

Emily R
-
Posts
591 -
Joined
Content Type
Profiles
Forums
Resource Library: Monster UI Apps for KAZOO
Events
Downloads
Posts posted by Emily R
-
-
User Stories
- An administrator wants to customize devices added to a KAZOO account.
- An administrator wants to ensure security settings are compliant with company protocol.
- An administrator wants to make sure configuration details and files are secure from scanners and malicious users.
Overview
Use SmartPBX or Callflows to create a new device. This will ensure SIP credentials are generated in Kazoo. While Advanced Provisioner does have the ability to create a device, it creates one without SIP credentials.
Once a device has been configured it generates a secure “config file” that is unique to that device and accessed by KAZOO during call events that include the device. Provisioner enables additional configuration options, and is used if
- An account or company to bootstrap hundreds of devices with minimal effort.
- Devices to be pre-set with KAZOO compatible settings and features.
NOTE: The config file is critical to correct usage of the devices and KAZOO. If it is corrupted or hacked it can cause considerable issues with your account. Please make sure you invest the time and resources for a point person to understand how this works.
Currently KAZOO supports eight brands and 200 models of devices. A full list of these devices can be found HERE.
Applications that can affect Device configurations
There are three applications in the Monster environment that access some or all Provisioner settings,
-
SmartPBX
This is the most accessible and user friendly access to customizing user specific devices. It is recommended all devices be initially added using SmartPBX. -
Provisioner
Once a device is provisioned, admins and managers may provide more advanced configuration settings using the Provisioner application. -
Callflows
Managers may use the callflows app to adjust settings for specific devices used in callflows. Access here is provided for convenience, but is not the most efficient interface for users.
A diagram showing the general flow of how devices can be provisioned is below:

This document focuses primarily on the Advanced Provisioner application, directed to administrators for advanced configurations. It assumes you will have already added your devices using SmartPBX. At the end of the document there is an overview of where to access provisioning tools Callflows.
Initial Device Configuration using SmartPBX
It is recommended you can single devices using the SmartPBX app by selecting the devices tab, then Add Device. This will launch the same user selection tools as the Provisioner Application.
Additionally, you can edit user preference settings for your personal device if you select the Edit wrench icon to the right of your device name. Any changes you save will be displayed in the Provisioner app and the Callflows app.
Customizing configurations using the Provisioner Application
Open the Provisioner application from your desktop environment. If you do not see it in your menu ask your administrator to enable it.
You will see one of the screens below with 4 tabs:
Devices | Account Settings | Contact List | IP Check.
Devices
The account will search for devices added to the URL assigned during your setup.
If you are working with a brand new account, the devices screen will show no results, as below:If any devices already added to this account, you will see the list displayed.
Add Device Button – Use SmartPBX or Callflows instead
NOTE: While you can add devices here, these devices will lack SIP credentials unless you manually add them from SmartPBX or Callflows. To minimize registration issues, add your devices in SmartPBX or Callflows before you work with the configuration settings below.
Configure Device
The configuration options provide advanced settings that are typically not accessible in SmartPBX. To further configure each device, select the gear icon at the far right.The options shown are available for each device, however the Configure option screen that will display will vary significantly as they often represent unique features.
The number of configuration screens vary depending on your device. Lines, Codecs, Time & Date, Settings, Network and Preferences will always show up for every model, but the rest (Combo Keys, Feature Keys, Sidecars, Handsets) all depend on the specific model.See for example the configuration screen below for a Yealink device. In this case there are 10 tabs to step through and review values in – it is critical whoever is configuring these devices understands what settings are most important and unique, and what settings are better left as default.
NOTE
- The circles at the top represent the number of available SIP accounts a device supports. It also appears for Feature/Combo keys and Sidecars which is for the number of keys supported per device.
Unlock Device
This is a provision to unlock a device that may have been locked by the system due to suspicious activity related to the device. Often this happens when a device is moved to a different WAN IP address (such as moving it from an office to a home office). The unlock setting allows provisioning to be accepted for 1 week. For more information on why and how phones can get locked, see our document HERE.Restart Device
Restarting a device may help as a reset when calls are stuck in the system. It is important to note however, that if you reset your device from another IP address your configuration will be lost.Device Log Files and Config Files
Administrators who are managing phones assigned with our provisioning service may access these log files to help in troubleshooting provisioning issues.To access the Device Logs or Device Config Files, click on the settings icon for a device and the dropdown will show options to view Log File of Config Files.
View Log File
"View Log File" opens up a screen showing activity Provisioner has logged for the device. It will show entries for when the device is created, updated or deleted through Smart PBX or Advanced Provisioner. It also shows when a phone is locked or unlocked for initial provisioning and device requests for config files.
Deleting is also included, but this doesn’t show up unless you deleted and then created the device again. You obviously can’t see a deleted log entry for a deleted device.
View Config File
This is a tool to help troubleshoot issues and/or conflicts with your configuration. "View Config Files" opens up a screen with a list of config files for a given device. Most brands only have a single config file, but some brands, like Polycom and Yealink, have multiple config files. Once you retrieve the file you can download it and send it your administrator or to a support team.Custom Config Files
Provisioner does not cover every feature available in the phones, but some vendors do support multiple config files. You can use custom config files to set features we do not cover with our Provisioner or to enable settings we don't expose.
If you are using this feature, we ask that you first test the device without any custom config file settings prior to filing a support ticket with us. It will make troubleshooting issues much easier.
Currently the vendors that have Custom Config File support on Provisioner:
- Yealink (using firmware v81+)
- Polycom
See details on configuring specific devices HERE
Delete
Use this if you want to completely remove your device from the system. Note in some cases when an account is deleted, devices in that account remain listed as "orphans." To assure deletion, use this delete.Account Settings
Account Settings are account defaults the admin for the account wishes to be applied on all devices in a given account.
Account settings aren’t global. There is a global default (which is the Inherits from Defaults value) which are static settings on the server. Account Settings are account defaults the admin for the account wishes to be applied on all devices in a given account.
Account administrators have access to Provider Settings, which is a level of defaults above Account Settings. All devices inherit settings in this order: Global → Provider/Reseller → Account → Device.
Settings set lower in the order will override the settings set higher in the order. For example device Settings will always overwrite any settings inherited from above. Account Settings will replace Provider/Reseller Settings.
Contact List
This feature is in its final stages of development and will be released shortly. It allows an account-wide contact list in your devices. The support will initially be for Poly devices but more to come in the future. See our separate user guide that specifically addresses this feature.IP Check
This tool checks to see if an IP address is blocked from provisioning due to abuse or other issues. It is available to Administrators who are managing phones hooked up to our provisioning service.Using IP Check
Enter the public IP address that the phone sits on in the IP Address textbox and then click the "Check Status" button.Note: 192.168.X.X or 10.X.X.X IPs are NOT public IPs, please enter only public IP addresses. Ask your IT administrator for help if you need it.
Understanding IP Status results
The results of a status check should look something like this:Banned
If this status is checked, then this IP is temporarily banned because someone tried to load a config file manually, or repeatedly tried to provision phones that weren’t yet in our system. This ban will automatically be removed at the start of the next hour, at which point you can try again.Failed
If this status is checked, then there were failed attempts to request config files from this IP. Please check your device logs to see if any of your devices are failing to pick up their config files.Blocklisted
If this status is checked, then this IP is permanently blocklisted (this has been renamed from "blacklist"). To be removed from the blocklist, please contact support. If you do not have a support contract, please use the forums to list your complaint.Whitelisted
IPs are added to the whitelist on the first successful provisioning attempt from an IP. If it's not on the whitelist, then phones on the IP either hasn't reached Provisioner, or is blocklisted. Accessing Provisioner Settings in Callflows
If you are an advanced administrator and are familiar with using the Callflows interface, you can also access the Provisioner settings using the Device selection. This is handy if you are in the middle of creating a callflow and need to change a device setting to support your updates.
When you start Callflows, click on the Device option.
You can then select “Add Device” and access the same configuration settings. Select the Advanced tab to access additional settings.
NOTE:
The Callflows application does not display visual versions of phone models. It also does not add/include some key fields used by Provisioner and SmartPBX. We strongly recommend you use SmartPBX for adding devices to start; if more granular settings are required, your system administrator may update these using Provisioner.Troubleshooting Provisioner Settings - Steps
If your device is not registering correctly, follow these steps to troubleshoot the source of the issue.
-
Reboot the device.
Sometimes it's just a matter of updating the config file.
-
Ensure that the base provisioning URL is correct.
By default it should be p3.zswitch.net for Hosted accounts. If you are using a white label instance, ensure that your URL resolves to our provisioner server; if the phone is not reaching our provisioner server, then it's not getting any updates on settings.
-
Reset the provisioning URL to the base provisioning URL.
Sometimes phones will end up looking in the wrong directory for their config file. This is caused by deleting the device and re-adding it back into Provisioner.
-
Factory Reset the phone and re-provision.
This is to clear all settings and use only the config file generated by Provisioner. If you have custom config files attached to the device, remove it before factory resetting.
After it re-provisions:- If the device still isn't working, let us know as it could be an issue with our settings.
-
If the device works, then apply the custom config file again and see if that works. If it doesn't then there's an issue with your custom settings.
Frequently Asked Questions
How do I know if the device I want to provision is supported by KAZOO?
We update our list of supported devices frequently; you can find it on our website, HERE.Alternatively, once you launch the software you will see a comprehensive list of devices supported in the configuration process. At times a newer device is introduced; contact the manufacturer to confirm if can use an older configuration file and is backward compatible. In some cases this may mean new features are not entirely supported, but the device will be recognized.
What is the difference between “registering a device" and “configuring a device”?
Registering a device means the phone validates its SIP credentials with Kazoo to permit the phone to make calls and use the phone features (BLF, voicemail, call parking, etc.)
Configuring a device means changing the settings on a device (editing keys, changing date/time, etc).
I followed the steps in Provisioner to set up my phone but it is showing “not registered” in SmartPBX?
First check the device log in Provisioner to see if “successfully provisioned” line exists.
- If it doesn’t, then there are issues with the phone connecting to the provisioner server (either the IP is banned or there are network settings preventing phones from reaching provisioner).
- If it does, then check the SIP credentials in SmartPBX to verify they match the credentials in AP. If they do, then there’s an issue with the SIP credentials in KAZOO.
Once the device is configured can I change/update some of the settings for my own personal use?
Many of the device settings initially configured in Provisioner can be adjusted and fine tuned using SmartPBX under the Device menu. This includes features such as call forwarding, caller ID, and call flow management. These can also be set in Callflows and even in Call Center Pro if it relates to behavior related to a call queue. When an adjustment is made from any of these other applications it is saved to a common database and reflected across all applications.
The Provisioner app provides access to even more settings options for some phones. Make sure to check in with a system administrator to see if these may help a specific use case for your account.
Where do I find default settings that are inherited, per notation “Inherits xxx from Defaults”?
Settings “inherited from Defaults” cannot be changed at this time. These are static defaults set on the provisioning server ton ensure successful installations; only accounts with their custom installations of Provisioner can have these defaults modified.
In the future there may be an option to replace the static defaults with Cluster defaults, this way different clusters can modify their defaults. Please request this on our Product Board if it is an important feature to you.
What does Save and Apply Mean?
Save and Apply saves the changes and then sends a check-sync for a reboot/update to the phone. It then sends a reboot to the phone.What happens if I initiate a “hard reset” on my device? Does this affect the Provisioner configuration files in KAZOO?
How your device is affected depends on whether the phone is re-started using the same IP address.- If the same IP address is used then the phone will reconnect with the initial config. file
- If a different IP address is mapped to the phone, then the initial config. file will no longer be valid.
Is it possible to provision a phone not listed in Provisioner?
In theory, any SIP phone can work as a very basic phone, however it is not recommended as it likely means you will have limited functionality and upgrades could cause issues.- If you have a specific phone model from a manufacturer (for example Poly) that is not listed but similar models are, you may be able to get it working.
- If however, an entire manufacturer's phone inventory is not listed it's likely that manufacturer has a proprietary setup and does not allow alternate platforms to recognize it.
Why didn't my device auto-update after changing a setting in SmartPBX (SPBX) or Advanced Provisioner (AP)?
Any change you do in SPBX or AP is not automatically transferred to the phone. It can take up to 24hrs. for updates to be generated in the config file and the Provisioner database.When you make a change in SPBX or AP then a config file for the device is generated on our Provisioner servers. The phone doesn't "see" these changes until it is either rebooted, or it completes the automatic update cycle, which occurs every 24 hours.
If you change something in SmartPBX or Advanced Provisioner and want it to be intermediately available in the phone, reboot the device or manually trigger a "Provision now" event from the phone web UI, otherwise wait up to 24h for the change to be picked by the phone.
What is the recommended method to configure a device with multiple extensions (user)?
We typically follow these steps:- Add the device via SmartPBX
- Create more users as needed in SmartPBX -> Devices -> SoftPhone
-
Copy the credentials of the new user(s) to the extra lines as required.
During this process it's helpful to come up with some sort of naming scheme on the additional SoftPhone "devices" to help manage and keep track that those are used as extra lines on physical phones, and not actual soft phones.
The BLF function isn’t working for my parked calls
If BLF is working to show presence but is not working for indicating parked calls, then this is most likely a setting conflict with KAZOO. Check the device's settings in SmartPBX.We are migrating from Private Cloud to Hosted. Is there a way of migrating the devices like we do for migrations from Hosted to Private Cloud?
There is currently no automated routine to migrate devices in that direction.Sometimes I remove an account and its device is still showing -- as an "orphan" it seems
"Orphaned" devices can appear when an account is deleted, but not the individual devices. To avoid orphaned devices, the best practice is to delete all the devices from an account first.
I added a SIP device in SmartPBX (Yealink t27p) and it appears to have gone through auto-provisioning (logs below), but I can't make any outgoing calls. The device’s screen says “no available handlers” when I try to dial out to my cell.
This type of error could indicate the SIP credentials associated with the device are not correct.
Click HERE for our Provisioning Guide for Supported Devices
Related Articles
SmartPBX User Guide Technical User Guides
API Reference Docs
#####
-
In case you missed it, Bret is looking for feedback on the Operator console Pro app. For those of you who have used it and/or might want to, please take a look here and give him your tips.
Thank you all! Your voice is important to us.
emily
-
User Story
- An account wants to manage incoming call routing based on open and closed office hours.
- An account wants to set different Virtual Receptionist prompts based on open and closed hours, including a “lunch hour” message, a “weekend” message and a “holiday” message.
Before you Begin
- Confirm your office hours, including any times you may be closed due to lunch or holidays.
- If your office hours vary by day and include different lunch hours, consider creating a .csv file that reflects these values. You can import that file to save time; see below.
Open SmartPBX
SmartPBX supports a new Office Hours Strategy process. The document below is part of the SmartPBX app. Select Main Number from the side menu.
Create Office Hours Strategy
Select the Main Number menu, then Office Hours Strategy. You will see the following screen.- If your message options stay constant 24/7, you can keep the default selection 24 hours Open Office.
-
If you have different Incoming Call routing options based on your office hours, select the Custom Office Hours button.
From this screen. you have 4 options for entering your personalized hours.
- Manually add hours using the “Add Hours” blue button (top left)
- “Select a template” from the drop down menu, which will populate a default set of hours
- Import CSV (top right) – where you can enter the data in a .csv file and upload it.
- Manually edit hours per day, by selecting each day tab. This is available as an edit option once initial hours are input.
Add Hours
If you want to add your hours manually, select all days that are the same, and enter your start and end times.NOTE: If you do have a separate message for lunch hours, save. your “open hours” first, then add your “Lunch Hours”.
- This can be any window of time your office is closed within the “open hours” window.
- When saved, “Lunch Hours” will use the Incoming Call Handling process as identified in the Incoming Call / Lunch Hours section below. Refer to the SmartPBX User Guide for details.
Select an existing template
Another way to populate your office hours is to use an existing template.NOTES:
- The initial template provided includes a traditional 9am to 5pm work week with a “closed” lunch hour window from 12pm to 1:00pm.
- You can assign this template and then make edits to it; for example if your lunch window is from 12:30-1:30 you can make these edits only.
- If a timeframe is not listed it is assumed the office is closed and will follow the closed path.
- We will be adding more templates as part of our update schedule.
Once the values have been entered you will be able to scroll through each day using the tabs at the top of the window.
Import a CSV file
Another way to populate your office hours is to import a .csv file from your computer. If you have selected Custom Hours, you will see this at the top of your dialog box.Below is a sample spreadsheet file showing the format to follow. Export this as a .csv file
NOTES:
- You will not see the “Download CSV” option until you have populated office hours values. You can then select download, edit the file, and re-upload it with changes.
- The .csv import system currently does not support any minute values other than :00 or :30. If you use other values the data will not be loaded.
- Make sure to use a 24 hour time indicator, there are no am and pm values.
You will see the following dialog box prompting you to identify your file.
That’s it!Assign your Incoming Call Handling Paths
Now that you have defined your office hours, you will want to assign how your incoming calls will respond during the different hours – while Open, at Lunch, After Hours and during holidays. This is accessed in the menu item under Main Number below the Holiday Hours setting. It looks like this:For a detailed overview of how to manage these settings, refer to the SmartPBX guide on How to set up a Virtual Receptionist (also called IVR).
Frequently Asked Questions
Is there any way to add other minute values besides :30 or :00? We like to use 8:45 as our start to the day.
This feature was available in earlier versions of SmartPBX and has been temporarily disabled. We will be updating the software shortly so you can manually add any minute value in the actual time field.How can I clear all the time values in the Office Hours and start over?
If you want to clear all the office hours, simply select “24 hours Open Office” as your choice. This will clear all office hour variables, and you can re-select “Custom Office Hours” to start over.If I have a holiday setting defined under Holidays, are those hours respected over the standard Office Hours?
Yes. If you have defined holidays, make sure to set your Incoming Call / Holidays tab to reflect how you want to your calls to be routed. Note this option will only be displayed if you have defined a holiday first. For details on that, refer to the SmartPBX User Guide here.When I try to choose lunch hours it only gives me a limited set of choices, how can I change this?
The lunch hours selection is based on the close hours in the morning and the open hour in the afternoon. This forces the system to have no unassigned hours. To change your lunch hour options, change the morning and evening hours first.######
-
Conferences Application User Guide
User Stories
- An account wants to create a series of conference call settings that can be saved and used multiple times by different users in the company account.
- A user wants to create his/her own conference call with personalized settings
- A user who has comm.io installed wants to set a conference call “meeting room” that displays on the comm.io Conferences screen.
- A user wants to set personalized conferences that are available for access using the comm.io app.
Overview
Conference manager is a tool used within KAZOO platform that provides a simple user interface for creating, monitoring, recording, and saving conference variables.Conference moderators can initiate and end conferences on demand, see all activity for live participants, and manage microphones.
In addition, you can use conferencing globally, without racking up high international fees, providing for the best business conferencing experience available.
Getting Started
NOTE: We have a short video showing the initial steps to setting up conferences HERE.
Make sure your admin has enabled the conferencing app from the app store and select it from your Apps page. If you do not find it, ask your administrator to provide access to it.Conferences Tab
The opening page for Conferences will show a list of any existing conferences already created and the general settings assigned to it.
NOTE: Any conferences highlighted in blue are active (live) calls.
Create a new conference
Select the blue Create Conference button.Enter Details
-
Conference Name
Use a name that your owner will recognize. Often this includes the owner name.
-
Conference Owner
Select from the list of users provided. If you do not find the name you want, you will need to add it as a user in the SmartPBX app.
-
Moderator PIN
This is a number that a moderator can enter from a call-in number to gain access to moderator functions.
-
Participant PIN
This is a number that a participants can enter to gain access to the call using a call-in phone number.
-
Max Participants
This field will only show if you choose to enable video conferencing. For now the maximum video participants is 20.
NOTE: If you want to use the video feature in comm.io you must select the enable video conferencing box also (see below).
Enter Options
-
Participants join the conference muted
This is a great option for large conferences. You can mute/unmute all participants at once from the “View Conference” page.
-
Participants join the conference deaf
This means the participants cannot hear you or any other participants as you set up your conference. Again this is useful for larger conference settings.
-
Play entry tone
This is a verification tone that a participant has joined the conference. This can get distracting if there are a lot of late participants!
-
Play exit tone
This will play when a participant exits a conference. This can get distracting if there are a lot of participants existing early!
-
Enable Video Conferencing
This must be checked in order to use the comm.io video conference and share video features. Note there is a maximum of 20 participants to join by video and you may experience lesser quality transmission with more people. Additionally, video support will incur additional charges. Please contact your administrator to review these variables.
NOTE: If you are using the comm.io app and wish to share screens, you MUST select the Use Video settings in that
-
Conference Server Number
The conference ID number is used for people who choose to join the conference by audio only. They will be asked an ID number as their entrance code.
View a conference
To the right of the conference name you will see an eye icon. Select this to “view” the status of a conference in session.
Your screen will show the list of attendees and moderators.If you have moderator status, at the top you will see this selection of controls that can be managed during the call:
The + symbol
Allows you to add additional users or a known device from your account to the conference. Using the dropdown, select a user or a device.Select as many as you want, and click on the Add button. Your added selections will be sent an invitation.
The lock
This locks and unlocks participant’s ability to mute and unmute calls from their local access point.Mute / Unmute
This is a global setting to mute or unmute all participants.
Hang Up
This is a master switch to end the call.NOTE: If for some reason the comm.io application does not end a conference call, this can be used to force end calls from comm.io.
Call-in Numbers Tab
The call-in numbers tab provides a list of numbers assigned as conference call call-in numbers. These will be used for users who wish to call in by phone, and also as the conference identifier.
Add Call-In Number
If you need to buy a number, you can access that process here, or add a number from your spare inventory. If you want the call in to be an extension, add it here.Editing Number Features
To the right of each number the following icons will be displayed. If these options are shown in gray, the number must be edited/accessed through the Smart PBX application.
If you can access these icons, they will prompt the following:
The megaphone allows you to add and customize a Greeting when the conference number is accessed.
You can use an existing media file you've uploaded, upload a new one, or type in a text that will be converted to speech.
And you can delete your conference call setup using the Trash icon.
Frequently Asked Questions
How do I mute or unmute people on the call?
As a moderator you launch the conference app and select the conference call when it’s in session. The you will be given the option to mute all participants or a specific participant.Can the moderator do this on the phone as well with a star code?
Each caller, whether a moderator or a participant may be able to use their local mute options (on a mobile phone, a headset, or a feature code on a desk phone) to mute themselves personally. To mute participants globally it’s best to use the moderator options in either the conferences app or the comm.io app.Related Articles
Video: How to Create and Manage Conferences
SmartPBX User Guide API Reference Docs
docs.2600hz.com
REST API Reference for Kazoo Crossbar APIdocs.2600hz.com
REST API Reference for Kazoo Crossbar API#######
-
Hi Jack:
Yes, you can mute a single caller or all callers using the conference app if you have "Moderator" status in the conference.
When you are logged into a conference using the conference manager app, you can "View" the live call (live conferences are shaded as active), by finding your conference call number, and then the Eye icon to it.The next screen shows the conference activity:
- The top mute option is to mute all participants.
- If you only want to mute the one hammering on a keyboard or whose dog is barking, then you can use the microphone within each participant's box
As far as using your own hardware to mute yourself, I have had luck using the mute on my headset and on my cell phone. I have not used the Feature Code on a desk phone but it likely will work.
I hope this helps?emily
-
User Story
-
A caller based in France does not use any prefixes and only places calls to local phone numbers. Typically, to use KAZOO the customer would have to get used to typing prefixes in order to place calls.
Overview
The Dialplan app enables you to support simplified dialing for outbound phone calls. Using a RegEx syntax, Dialplan can take a number a user has dialed and transform it into a number recognized by E.164 global formatting. Users who are used to dialing phone numbers in a way that only works in their specific country can now continue to dial numbers in that way.
Users can dial local numbers, just as they do with the PSTN, by providing Kazoo with DialPlan regular expressions. These regexps will be used on the dialed numbers to correct them to properly routable numbers.
It is possible to set these regexps on an account, user, or device basis. Kazoo will then apply the regexes in order, preferring the calling device's, then user's (if the calling device is assigned to a user), and finally the account's dialplan.Before you start
This application assumes you are familiar with using Regular Expression syntaxes, or RegEx, which is a sequence of characters that define a search pattern where the result can be then used for an additional task. It is often used for searching and replacing telephone number strings. There are several websites that provide help in creating and testing these expressions. For starters you can try the links below.- For more information on how to create or edit a RegEx Expression, see this page.
- To test your RegEx formula, go here.
Home Screen
On opening Dial Plan you will see three tabs: Account | User | Device, and a listing of any Dial Plan rules if any have been assigned.Account Tab
This shows any System Rules: rules that are applied to the entire account.
-
System Rules will display if they have been pre-configured based on your system install. These are typically related to international calling rules.
-
Custom Rules will be where you create custom rules for the entire account.
- Description: Enter a description that says what your RegEx will do
- Regex: Enter the actual regex calculation
- Prefix: Enter the digits before the regex
- Suffix: Enter the digits after the regex
You can test your Regex by typing a series of digits (likely a phone number) in the empty box. You should see a result something like this:
The example below shows capturing any digits and adding 502 as the areacode
User Tab
The user tab provides the same options to add RegEx rules, this time unique only to the user. Select the user from the dropdown, and add your RexEx.
Device Tab
The device tab provides the same options to add RegEx rules, this time unique only to a specific device. Select the user from the dropdown, and add your RegEx.Some Tips
Be careful your rules do not interfere with extension dialing within an account
It is possible that these dial_plan rules will interfere with extension dialing within an account. Please take common extension length into consideration when creating these dial_plan rules.
Determine if a number is "global"#
The first thing to configure is how to tell when a number is "globally rout able" versus an internal extension. This is managed in the system_config/number_manager configuration document, under the reconcile_regex key.
"reconcile_regex": "^\\+?1?\\d{10}$|^\\+[2-9]\\d{7,}$|^011\\d{5,}$|^00\\d{5,}$"
Here is the default, which if reading regex's isn't second nature, optionally matches a + and a 1 (the country code for the US), followed by any 10 digits, or matches 8-or-more digit numbers (prefixed by a +), or the international dialing codes for the US.
This regex must be able to match number formats your carrier(s) will send you. In the US, it is normal to see the 10-digit number (NPA-NXX-XXXX), optionally with a 1 prepended (NPANXXXXXX), or the full E.164 version (+1NPANXXXXXX). The default reconcile_regex matches all of those. Internal extensions, like 100, 2504, or *97, will obviously fail to be matched with the reconcile_regex and thus be rout-able only by authorized devices within an account.
Globally distributed users
Users within an account may be located anywhere in the world. An account-level dial_plan may not make sense for them. Instead, place dial_plan objects on the users' documents to ensure their local dialing preferences are honored.
Country samples#
Calls within France are 10-digit numbers with a leading 0; from outside of France, only the last 9 digits (omitting the 0) are dialed after the +33 country code. Armed with this knowledge, a regex might look like:
"reconcile_regex":"^(?:\\+33\\d{9})|(?:0\\d{9})$"
Note: (?:) is a non-capturing regex group
This should match calls dialed within France (using the 0 followed by a 9 digit number) as well as calls coming from outside of France (+33 followed by a 9 digit number).
One locale for all devices in an account
If all of the users/devices in an account are located in the same city, it would be most convenient to place a DialPlan at the account level, allowing them to dial as they are used to and converting it for Kazoo processing. For instance, we can use the following ^(\\d{7})$ regex for an account whose users are all in Louisville, KY. Then, when a user dials a 7-digit number, it is prepended with the 502 area code (as well as +1).
FAQs
Can I create RegEx rules for incoming calls?
No. The dialplan app is only designed for outgoing call management.API References
docs.2600hz.com
REST API Reference for Kazoo Crossbar API
-
-
User Story
- An account manager wants to review account balances for each account and sub account.
- An account manager wants to review the Service Plan charges.
- An account manager wants to track transactions during a specific time window
Overview
Account information is stored within the Control Center, which is accessible by clicking on your login name and account in the header of your window.
To the left, you will see the following options under the Billing section:
- Credit Card
- Usage Charges
- Service Plan
- Transactions
These tabs display information for both the Master account and any sub-accounts you may have created.
Credit Card
Credit Card on File
You MUST enter a credit card and maintain a balance for your main account.Once this is entered, it will be used to:
- Purchase new numbers
-
Add credit under the Usage Charges screen for discrete charges including
- Monthly charges
- Added billing for some applications
- Added billing for SMS texts, depending on your service plan
- Manual override charges for call restrictions as defined in the Accounts setup.
NOTES:
-
Only the top level account needs to have credit card information associated to it.
-
When an account is first created and set up. A service plan will be added. Billing starts at that date (proration). When the customer enters their card, there will be a charge then. They will also then be at the beginning of each month.
-
The credit card is charged at billing cycles. When an account is first set up, after the service plan has been added, the account will be charged for the remainder of the month (proration).
- Under the Usage Charges / Subscriptions tab you can set when and how you want to set up payments for your monthly bill -- as an automatic billing via this charge card, charged against your account credit, or by manually going to check your balances. The latter, called “Self Manage” is set as the default.
Billing Contact
Enter contact information for billing questions. This is used if there is someone specific that we need to speak with regarding billing.Usage Charges
This is where you can monitor your account usage, manage credits, enable threshold alerts, enable Auto Recharge, and if a Reseller, manage subscription payment. These will capture any charges outside the fixed monthly charges outlined in the Service Plan, and will draw off the available credit.Per minute charges
This tab will display any additional charges that accrue from an account, for example if its trunk limit is exceeded or if there is a 911 call. You can sort this based on your sub-account for billing purposes.
Asr Charges
This tab will display any Asr (Automatic Speech Recognition, or Speech-to-text) transcriptions that your account has used. These display each event that has been transcribed and sent as an email.Recurring Charges
This tab displays recurring charges similar to the Service Plan (below).Rollover Charges
This tab displays rollover charges or credits that may have incurred the previous month.Payments
Displays your payment history.Managing Credit for Main and Sub Accounts
At the top of the Usage Charges screen is the option to add credit to your account. Below is an overview of the options..
-
Available Credits
Make sure you check to see if you are in the Master Account or your sub-account when you add credit.-
The master account credit is the value that will be used to bill you.
- The sub-account credit is what we call “fake money.” This is a dollar value directed at the sub account, but will be billed through the main account. All charges appear on the master account. SO if they are using per minute only, it will deduct from the sub account, and from the master account.
-
The master account credit is the value that will be used to bill you.
The “fake money” from the sub account is used as a way to limit and prevent fraud while it passes the actual charges onto the master account. While it appears that there are two charges only one is being deducted actually money
NOTES:
-
It is critical you maintain a positive credit balance as there are functions that require accessing this in order to work. This includes:
-
Per-minute, inbound toll-free or international calls when using trunks or not.
- If no credit is available and they have no trunks, calls will fail.
- Only toll-free outbound would work.
- Depending on the amount of trunks and call volume it can be fairly quick to spot or it can take days to realize this.
-
When using trunks, if toll-free international per-minute calls, and inbound toll-free.
-
Per-minute, inbound toll-free or international calls when using trunks or not.
Add Credits
When you select Add Credits you will see a new dialog box with several tabs inside.
-
Manage Credits
This provides an option to manually add credits to your Current Balance (shown as “available credit” in your master account).
-
Threshold Alerts
This sets a minimum account balance threshold. When the Current Balance falls below this, you will receive an email alert.
Set this value based on how many customers you have and how many calls you anticipate will be billed per month. A common setting to start is $20-25.00.
-
Auto Recharge
Set this to ensure that your calls are not canceled due to a run-out balance. Enter the threshold amount and the amount of credit you want to add.
NOTE: It is important to set the recharge amount so it will cover at least a day, as the charge event occurs once a day only and it would require a manual update
Subscriptions
On the first of each month, your monthly subscription will renew and you’ll be charged for the upcoming month. Enter how you want to manage these charges.- Use Account Credit, with Credit Card Backup
- Use Credit Card, with Account Credit as Backup
- Self managed -- manual entry. This is the default setting.
Display Filters
Below your Credit Balance summary there are filters to view your charges.-
Per Minute
This tab displays the per minute charges incurred based on your settings in SmartPBX for call charges.
-
Mobile Data
If you have enabled SMS text messaging and/or mobile phone devices to your account, this tab will display the data (in Megabytes) that you’ve used for the month.
-
Rollovers
This reflects any credits or balances carried forward from the previous month. The value is calculated after monthly charges are applied.
-
Start and End fields
If you want to filter based on a time window, enter the start and end dates.
-
Filter
When you select the filter button you can sort the list by clicking on the field you want to sort. This is how to view different accounts’ billing summaries.
-
Download|
Select the download option to save a .csv file to your desktop. This can be imported into a 3rd party billing system or simply to a spreadsheet for your own reporting process.
Service Plan
This displays a breakdown of the Account’s service plan and amount due at the end of each month. It will stay fixed unless you add a device or a separate service or upgrade your monthly support plan. The download button allows you to download the data into a .csv file.Transactions
The transaction summary lists the charges that have been made to the card listed. This can be filtered by date.Related Articles
SmartPBX User Guide Accounts Manager Wizard User Guide API Reference Docs
docs.2600hz.com
REST API Reference for Kazoo Crossbar APIdocs.2600hz.com
REST API Reference for Kazoo Crossbar APIdocs.2600hz.com
REST API Reference for Kazoo Crossbar API####
-
User Story
An account wants to create an extension that when activated it forwards calls to multiple people in the account, such as a sales or support department.
What is a ring Group?
A ring group is an extension in your account that is mapped to multiple people. These are often used to ring a specific department in an office, for example a support team or sales team. Within each ring group, you can define a succession of rings, where one extension is tried first, then the call is moved elsewhere, to another extension or to voicemail.
Setting up a Ring Group in SmartPBX
From your SmartPBX dashboard, Select Groups
Select Add Group
Give your Group a name
Choose a name that helps remind you what the ring group is for.Enter an extension
If you don’t know available extensions, click on “Find One”. It will list extensions already added to your account. Choose one that is not already assigned.Drag User names from "Available Users" column to the "Selected Users" column
Select Create Group
You should now see your newly created group in the list.Ring Group Settings
There are a variety of settings you can apply to each ring group. To view them, click on the space under the column header to the right of your group.-
Members
Click on members to further define when a member in the ring group will start to receive the call, and for how long. Change the slider after each member to define this
Some considerations:
- Budget about 6 seconds for each Ring initially, then test. This can vary based on your account settings.
- The blue Distribute button will automatically sequence each member equally. In this case no ring will be set for more than one user.
- Big Boss may not want to be hearing the first call, and may be set as a last option.
- Overlapping sliders mean both extensions will ring for that call
- The far-right value is the longest a ring will last, past this value it will proceed as you define under the Group Features setting. To change the maximum time, select the value (defaults at 120 sec.) and enter a new value.
- You can Add a user to the group from this screen by selecting “Add User” at the bottom left.
- You can Remove a user by selecting the Remove button.
-
SAVE! your changes
-
Extension
You can add a second extension here, and/or unassign the existing one and change it.
-
Phone Numbers
You can assign a specific phone # to this ring group instead of an extension. You will be giving the option of assigning a spare number already in the system or of purchasing a new number. Make sure you understand your pricing model before you purchase!
-
Group Features
This option provides several options for the ring group extension.
-
Call Recording
This will set a localized call recording feature to on. You will assign a path to save it and indicate its format and a time limit.
NOTES:-
Call recording is subject to privacy and HIPAA laws. Please make sure you understand these issues before you enable this. Refer to our guidelines on HIPAA compliance HERE.
-
The newer call recording application is a more robust solution for this, and sets up a 3rd party hosting process that is more secure. We recommend you manage all call recordings through this instead. The user guide for Call Recording is HERE.
-
-
Ringback Settings
Enabling this option allows you to upload a media file to play back to the caller in lieu of rings. Hold music is a common to use here. -
Next Action
This is an important feature that sets a follow-up action for the call if no-one in the ring group can answer it, including sending the call to a voice mailbox.
-
Allow Call-Forward
When enabled, this will allow the group’s users to press their device’s “Forward” settings to forward an incoming call to a different extension outside the ring group. If this is disabled, the ring group settings will be the expected behavior. -
Caller ID Prepend
This allows you to add a prefix to the Caller ID, either a number or a Name. An example might be "Sales - xxxx" or "Spanish - xxx"
-
Managing a Ring Group in Callflows
We recommend you create your initial Ring Groups in SmartPBX as it has a newer user interface. Administrators with a programming background who use Callflows for advanced call routing can access the same settings within Callflows as shown below, and use the Ring Group as part of a more complex Callflow.
The screen below shows the same Ring Group that was created in SmartPBX.
You can add and delete users from this screen, however to define the Ring Strategy, Ringback, and number of times to ring members, you will need to add the Ring Group to a callflow and then edit it.
Drag the Ring Group Block to the flow area.
Additional Resources
SmartPBX Step Guide
Call Recording User Guide API References
docs.2600hz.com
REST API Reference for Kazoo Crossbar API
-
Members
-
User Story
- A user wants to add a device to his/her name in an existing account.
Steps
This can be achieved in the SmartPBX or Advanced Callflows app. It is recommended you us SmartPBX unlesss you are an administrator, as the Callflows setup may trigger additional reactions in the callflows application. Associate a device with its user in SmartPBX
- Open Smart PBX
- Select the User Tab to the left
-
Find the user you want to assign a device to
-
Under the devices column, select the area where devices will display - if there are no devices attached yet you will see the word None.
-
You will be given a choice to:
-
Add from Spare Devices.
This will display a list of devices your system admin has already added to the system. -
Add New Device
If you do not see your device listed, you can add it as a new device. Select New Device, and choose the type of device you have.
NOTE: each device type also will show “Advanced” Settings, unique to that device’s characteristics.characteristics. Make sure to review those settings in addition before you select the “Create Device” button.
Common settings include:- Allow use of the device’s voicemail
- Keep (or not) Original Caller ID
- Hide from Contact List
-
The screen shot below shows the Advanced settings for adding a Smartphone.
SAVE your new device!
Once it is added, you will see its icon in the devices area next to your name. Associate a device with its user in Callflows
We recommend you assign devices in SmartPBX as it has a newer user interface. Administrators with a programming background who use Callflows for advanced call routing can access the same settings within Callflows as shown below.
Select the user from your dropdown
Once you assign the correct user,
make sure to check the “enabled” checkbox!Review the additional settings tabs for both WiFi and Call Restrictions. Make sure an admin helps with these details.
Related Articles
SmartPBX Step Guide API Reference Docs
docs.2600hz.com
REST API Reference for Kazoo Crossbar API####
-
What is this?
While KAZOO does not yet support SMS messages directly to your account, there is a solution that coverts incoming SMS messages to a user’s email. This is available using zaps, an application connection tool developed by Zapier, and KAZOO’s Webhooks application.
NOTES:-
This process is using Zapier tools that were available in late 2020. The Zapier “zaps” and user interface steps may change without our knowledge.
-
This outlines steps to convert incoming texts only to an email in your account. Outgoing text to email is a more involved process with multiple Zap configurations.
Before you start
Make sure your numbers have SMS enabled.
- Go to SmartPBX and select the Numbers tab
- Find your number and look for the SMS icon.
- If not displaying select settings gear, drop down SMS and enable
NOTE: Enabling SMS will incur additional charges to your account.
Make sure you confirm with your administrator this is approved.Set up a Zapier Account
- Go to www.zapier.com and create a Zapier account
- Keep your credentials handy!
Add a Webhook for Zapier to connect with
Open the Webhooks Application from your KAZOO dashboard, .
If it is not displayed under your Apps, you may need to enable it from the App Exchange. Ask an adMinistrator to help with this.
If this is your first Webhook, your screen will look like this. Select New Webhook.
Assign a Name and a Trigger- Add a Hook name you will recognize.
- Select SMS as your Trigger Event.
- Enter GET as your request type.
The next step is to set up your zaplet in Zapier.- Log in to your Zapier account In a new window
- Select “Make a Zap”
-
Choose Webhooks by Zapier as your trigger.
-
Select “Catch Hook” as your Trigger Event
-
Click on Continue
This will generate a Custom Webhook URL to paste into the KAZOO Webhooks application. Select Copy to copy the URL
-
Return to the KAZOO Webhooks window and paste the URL into the field shown below.
-
Select the green Create Webhook button at the bottom of the page.
The Webhooks app should then display your webhook in its list, and should also show it toggled on.
NOTE: The icons to the right of the toggle allow you to- Edit the settings
-
View your webhook request log - a list of attempts on the webhook.
(this is useful for debugging). - Delete your webhook
-
Return to Zapier to Test your Webhook
Once you have your URL saved in the KAZOO webhooks side, return to the Zapier window and select Continue-
Send a text message to your newly configured KAZOO SMA number
-
-
Look for a confirmation in Zapier something like below
-
Next, define an ACTION that you want Zapier to take once it has found the hook. You can choose any of the actions Zapier provides; for this email example however, choose email, and select “Send an Outbound email.”
-
Here you can enter the email you want to send it to, and also a variety of other default fields.
In each field add a data source from the drop down menu that was captured during your test.
-
If you skipped that test, you will not see options
-
If your test worked properly you can add any field, or more than one field if you separate them by a colon.
-
Below is an example showing the from: , to: and subject: field applied
And an example showing fields filled in:
Once you have filled in all the fields you want, select Test & Continue at the bottom of the page.
You should see a sample email generated based on your entries.If all looks correct, select Turn on ZAP.
Make a final test from a phone to SMS phone number
NOTE: Make sure your JUNK mail filter will recognize your “From:” entry in your zaplet!
If you don’t see an email in your inbox, check your Junk mail filter.
-
-
LAST CHANCE !!! to vote for topics for TOMORROW.
-
Only a little more than week left to VOTE for your favorite feature request topic. Check out our poll in this forum above!
-
2600Hz does not endorse or support any specific networking hardware vendor or configurations. Most should work with little to no modifications over and above establishing internet service. Below are some general recommendations.
-
Make available at all times 64kpbs upload and download bandwidth per phone for HD audio (more may be needed for video). Bandwidth management and/or QoS can help you insure this at the router and switch levels. Alternately, some clients just purchase so much bandwidth that their client's can't reasonably consume it. And others simply buy a completely separate internet connection just for VOIP use.
-
Ensure the phones aren't affected by issues from the LAN such as ARP poisoning, broadcast storms, etc.
VLANs are highly effective for this and recommended whenever possible. Some clients also use fully separate switches for this. While others simply have good anti-virus/intrusion prevention/network monitoring on their network. -
Have some methodology for checking for packet loss and jitter over time.
Solarwinds NPM and Ping plotter can be a great tools for this, as well as routers such as Meraki and Ubiquity. Or just using simple trace route/continuous pings/MTR as needed. -
Ensure your router is sized correctly to handle the load from the network.
How exactly you choose to do this is completely up to you. There are many ways to do so, more even than are listed here. And even more vendors you could potentially use to do so. -
Specific recommendations
- Look for and ensure the router/firewall does not have any SIP Helpers / SIP ALG / SIP {anything} enabled, or VoIP {anything}.
- Avoid sonicwalls made prior to 2015.
- If you use open-sourced router software, ensure the hardware you are using is supported by the project.
- Do not use residential routers in businesses as they can easily be overwhelmed by the traffic.
One last note, community members have reported great success with Meraki, Ubiquity and Mikrotik hardware. You might consider these as there is community support around them. But to be clear even with these manufacturers we cannot support local networking equipment.
Please be aware, if your LAN or ISP configurations are in question, support may ask you to move the phone to another physical location to eliminate LAN/ISP issues as potential causes.
-
-
Hi Focus Group members ---
Thank you Thank you for all your input during our first Focus Group meeting.
We covered a LOT of territory, including:- Operator Console Pro
- Call Recording
- CallThru.us
- SMS Business chat
- Microsoft Teams requests
- User level permissions
- Native solutions v. integrations
- MUCH MUCH MORE!!
We're teeing up for our next meeting November 19, at 11 am - 12:30pm PST.
REGISTER HERE
and VOTE on this poll to show your preference on upcoming topics. 📣
Check the survey here and give us feedback on what you want to talk about.
If you're new, this meeting is led by our Product Managers -- it's an incredible opportunity to speak to those magical people who lead our new stuff!p.s. Time allowing we will have "Open Topics" for discussion also.
Please leave any additional product feature suggestions for our open topics discussion in the comments below. -
Steps to White Label CallThru.us
User Story
A reseller wants to include the 2600Hz CallThru.us application as part of a larger KAZOO-based communications package using personalized branding.What this is
A “white-label CallThru.us” is a duplicate copy of the 2600Hz CallThru.us application that supports re-branding with your company logo and contact information. The rebranded look becomes the primary presence on the application, both when downloaded at the app. store and when used on your clients’ phone.Once you have agreed to the terms for either a Hosted or a Private Cloud / Global Infrastructure branding strategy, you will submit configuration and branding details to Acrobits. They embed this into a copy of the KAZOO distribution and rebuild the app. This newly branded “KAZOO Bundle” is uploaded to the App Stores for Android and/or Apple and is now available to your clients. The steps to achieve this are outlined below.
Your reseller agreement with 2600Hz
To implement the white-label version of CallThru.us, contact your sales rep at 2600Hz. Sales will provide you with the pricing and distribution requirements, and give you a sense of what kind of timeframe is possible.In short, your reseller agreement includes the configuration and setup efforts by both 2600Hz and Acrobits and a monthly service fee.
Overview of Steps
In order to add your personally branded version of CallThru.us to App Stores, you will need to complete a series of steps. An illustration of these steps is below, these steps are described in the following pages.Details of Steps
-
Engage in a distribution agreement with 2600Hz
Pricing sheet is available from your sales team.
-
Create Apple and Google App Store Developer Accounts
NOTE: There is an annual fee associated with these accounts. Recently it has been $99/year for Apple and $25/initial setup fee for Google. -
Provide back end configuration credentials to 2600Hz.
You will be asked to provide the following information:- Application Name | example: example.us
- Domain suffix | example: s.example.us
- Domain | example: default.s.example.us
-
Legal Links
- The URL of customers EULA document if required
- URL to your company’s privacy policy
-
Provisioning URL from Kazoo cluster
- Enter the URL for your cluster; syntax should look like this: "https://portal.example.us:8443/v2/ctu"
-
Address Book Contact Name = name of service for calls -- can change to “business call” instead of callthru.us for example.
-
Engage with Acrobits as a 2600Hz customer.
2600Hz will provide you with an Acrobits contact to start the process of integrating your brand and design features.
Acrobits will provide you with a detailed list of image formats, resolution requirements. Some of the initial images and assets you will be asked to submit include below.
NOTE: Specifications on resolution and sizing and description requirements vary between Apple and Google-
For the app itself
- Logo / icon for splash screen
- Logo / icon for the app name
-
For the Store Listing
- App. Descriptions, short and full
- App. Screenshots
- Contact Information
-
Notes
-
For the app itself
-
2600Hz and Acrobits will build and test the final implementation.
There will be a window for resellers to review this before it is posted to each app. -
You will be notified when the apps are available and you can start selling.
Add your branded icon to the Monster UI menu
Once you have provided your updates to 2600Hz and Acrobits for building your custom app, you will want to enable the icon used to trigger the device activation application in Monster UI. Open your Branding application
- Upload the icon you wish to display in your customer application dashboard. Once this is uploaded it will replace the 2600Hz icon.
Frequently Asked Questions
How long does this white label process take?
Initial configuration can take 4-6 weeks after your initial commitment. Timing will depend on- The workload / backlog at 2600Hz and Acrobits when you commit
-
Your availability and response time to provide requested resources including
- Signing up for Developer Accounts
- Providing correct branding images and icons ready for Acrobits.
You should receive an estimate once you place your order.
Does Acrobits provide any services to help with the full white label branding process?
Yes. You will be working directly with Acrobits for the branding portion of the application, however, you are contracted with 2600Hz.What is the brand experience for users when they activate their phones?
Users will download your branded app from the iOS and Google Play stores and will see your company name, icon, brand colors and description.How are upgrades handled?
In the current implementation updates will be managed by 2600Hz and Acrobits. They will propagate to your branded version as part of your subscription.Appendices
iOS App Store implementation Notes
Below is an overview of the steps to take to set up an account with Apple so you can submit your branded version of CallThru.us to their store. NOTE: This can change!Create an Apple Developer Account
Go to the iOS Developer center and set up your
account.
Since you will be distributing this app publicly, you will use the iOS Developer Program tool (the iOS Enterprise Developer Program is for internal use only at large organizations).
To enroll, you will need an Apple ID with two-factor authentication turned on, and:
- A D-U-N-S number (Dun and Bradstreet)
- Be a Legal Entity and have binding authority
- A publicly available website with a DNS associated with your company.
Here is the link to Apple’s enrollment page.
NOTE: There is an annual subscription fee associated with this account, it is currently $99/year.Step Details, Android integration
A detailed explanation of the steps for signing up for the Google Play can be found hereRelated Articles
CallThru White Label - Customer Requirements Branding User Guide ####
-
Engage in a distribution agreement with 2600Hz
-
User Stories
- An administrator wants to establish global settings for account-wide call recording processes.
- An administrator wants to record all support calls in a Call Center queue
- A user wants to record calls only on his/her office phone but not on her cell phone, which is also connected to the office account
- A user wants to be able to initiate a call recording session after the call has started.
- A support team wants to record incoming calls to track content/effectiveness of calls
Overview
This app provides the tools to manage both global and personal settings that define how calls can be recorded. It allows the manager to assign initial settings for each user and device within the account.In some instances users can manage their personal recording settings from other end user apps such as SmartPBX, Callflows, comm.io and callthru.us. These settings are outlined at the end of this document.
NOTE:
The Callflows implementation of call recording uses an older set of APIs and features. We recommend using the Call Recording app instead as it- Is more accessible by both agents and managers
- Is more secure, as the recorded calls are saved using Amazon Web Services
Before you Start
Recording calls requires an initial policy guideline review and a corporate setup at the account level.-
Decide at what level and for whom you want to enable call recording for
You can configure call recording settings at the Account level, the User level, the Device level, and/or as a callflow action. Some of these are achieved through different applications, this is outlined below.
-
Know your privacy policies
Call recordings may be subject to privacy policies outlined by either a parent company or an industry standard. This is particularly true for calls that may have HIPAA connections. It is important you understand what kind of guidelines apply in order to implement a call recording plan.
-
Set up an external storage account with Amazon Web Services
All accounts must set up a storage account with a solution that is supported by your account setup. If your account is not yet configured, you will see this message when you launch the Call Recording app.
If on launching the Call Recording app you see this notice:You will need to exit the Call Recording app and launch your storage connector application. You can review the steps for this here. For Hosted clients, currently the only supported solution is Amazon S3.
NOTE:
Global Infrastructure and Private Cloud customers may be able to implement Google Drive; please note however this takes additional setup from our Operations team.Connecting an Amazon Storage Account
To establish these services, select the storage application from the KAZOO apps menu and follow its wizard process.You will first have to go to Amazon and create an account there so you can access your Secret Access Key and other codes to enter in the screen shot below. Check their documentation here:
http://docs.aws.amazon.com/AmazonS3/latest/dev/Introduction.htmlOnce you have your account in Amazon, you can continue the setup within your Account.
Launch the Amazon Connector application
Select the + sign to create an account, and complete the form and SAVE your changes.
Account-Level Call Recording Settings
Storage Settings
Once you have finished this process and saved your data the connector should appear in your Call Recording application.
- If you select the gear at the right, the path showing where the recordings are saved will display.
Configuring your Call Recording settings
There are 3 levels of settings to consider for your default configuration: Account, Users, and Devices.Account Tab
Force Record Settings
This allows an administrator to force-record types of calls.-
Force Record all Users
These settings will record any and all calls from any device associated with the use unless the device’s setting explicitly is set otherwise. You can indicate if you want to force inbound, outbound, and/or internal and external calls.
-
Force Record Entire Account
These settings will record every call on the account, including callflows, ring groups, conferences, etc. unless specific settings for the user and/or device indicate otherwise. You can indicate if you want to force inbound, outbound, and/or internal and external calls.
NOTES:
-
Account call recording settings are tracked separately from endpoint (user/device), so that a user/device may have turned it off while the account is set to on.
- Inbound vs Outbound is relative to the Account. If you set up recording on "Inbound" calls, the recording will be started on the originating leg (often called the a-leg) if the source network is matched. Conversely, outbound calls (from KAZOO) will be recorded when "Outbound" settings are used.
On-demand (in-Call) Recording
If enabled, this allows all objects under the account to press a defined feature code during a call and start the recording. Make sure you enter a code that does not conflict with preset codes.Users Tab
This section allows you to define per-user settings that override the default account settings.- By default, all users will inherit the initial Account Settings.
- To access the override functions, select the gear to the right of each user.
- Select the override options you want to apply to each user.
NOTE: The default setting is selected in this image, as the blue “Account Default”.
- To turn ON a recording option, select the ON
-
To disable recording entirely, select the OFF.
Devices Tab
This section allows you to define per-device settings that override the default user settings.- By default, all devices will inherit the User Settings. If the device is not associated with a User, the device will inherit from the Account Settings
- To access the override functions, select the gear to the right of each device.
NOTE: The default setting is selected in this image, as the blue “Account Default”.
- To turn ON a recording option, select the ON
- To disable recording entirely, select the OFF.
Stored Recordings
The stored recordings tab lists all stored recordings. These can be filtered by date or by direction (inbound or outbound). You can also search for a specific name or number.NOTE: “Inbound” and “Outbound” directions are labeled based on how KAZOO processes the call. For example, a customer’s outbound call is considered first an inbound leg from the device to KAZOO, and then an outbound leg from KAZOO to the carrier. While future releases will combine these legs into a single outbound classification, currently you may see two legs shown for a single call.
For each recording you can select:
Play Recording Download Recording
View Recording Details
Managing Call Recording settings in User applications
Below you will see where and how users can manage call recording options from within our other applications.NOTES:
-
If you change a call recording setting within SmartPBX for example, then that change will likely be reflected in Conferences and SmartPBX. This may affect some routines you have customized (such as callflows); you will want to re-test these.
Call Recording settings in SmartPBX
User Settings -- User Features
Click on User Features in the column next to your user name, and select Customized Call Recording.You will see the same options to control your call recordings as in the Call Recording app.
NOTE:
If no storage is configured or if the call recording app is not configured, the default action will be to use the original call recording configuration as accessed in SmartPBX under the User settings (see below).Once call recording is enabled, you will see the Microphone icon showing in your User Features column as below.
NOTES:
- internal call recording is not turned on and an external caller is transferred from one user to another, that transferred call will stop recording once transferred to the next extension.
- Updates to this setting in SmartPBX will also update the setting in the Call Recording application and vice-versa.
Group Settings -- User Features
There is also a setting for call recording within a Group.NOTE:
This is the original implementation for call recording. It is recommended you make these settings in the Call Recording app; that way you will have more visibility and access to your call recording data.
When enabled, it will provide settings for where to save your recordings, in what format, and a maximum time limit (in seconds) the recording will run.
Frequently Asked Questions, Call Recording
What settings take precedence for call recording? If my device says no and my user says yes, what happens?
If a user turns on call recording but a device has explicitly disabled it, the device will not be recorded when the user makes a call with it. If the device's settings are left undefined, the user's settings will be applied.The account's global settings are considered independently of the endpoint's. So a user who has disabled recording, within an account that has enabled recording, will still have calls recorded according to the account's settings.
For a complete set of charts displaying precedents, go HERE.
Where are call recordings saved?
Where they are saved depends on what application triggers the recording event.- Call Recording & Call Center Pro -- they are saved in your Amazon Web Services account. You can see, play, download, and view detailed call data for each call in the Call Recording app under the “Stored Recording” tab.
- Callflows app -- Calls recorded that are triggered by a callflow event are saved where the account has configured it within the callflows app.
How long are call recordings saved for?
This depends on the application you are using and the storage setup you have configured.Can I start recording a call once I’ve answered it, mid-call?
Yes. In the Call Recording app at the account level there is a setting to enable On-Demand (in-call) Call Recording that applies to the account as a whole. Once checked, the administrator can assign a feature code to trigger the recording on.
NOTE: If this is enabled make sure your user base is trained in legal requirements that may apply to announce you are recording the call.Can I pause a recording in the middle of a call?
Yes, you can stop a recording using the feature code you pressed to start the recording. If however you want to re-start recording during the same call, the first portion of your recording will be overwritten. An update is in progress to identify the restart as a separate recording.Is there a limit to how long a call will be recorded for?
It depends on where you’ve activated the call recording feature. If you’ve activated it from the Call Recording app and are saving the call using Amazon Web Services, there is no limit. If you are using the older implementation in Callflows, there is a field you set to limit the length of the recording when you turn on the feature.If a user’s call recording is turned off in the Call Recording app, will their calls still be recorded in Call Center Pro?
Currently the Call Center Pro setting will supercede the settings created at the account level. If in the Call Recording app Incoming call recording is disabled, and the Call Recording is enabled in Call Center Pro, the call will be recorded.Does the API call record_call callflow module accept ftp and ftps?
Yes, the API supports http, https, ftp, and ftps formats.Additional Call recording settings in KAZOO
Call Recording in Call Center Pro
When setting up a Call Center Queue, the administrator can elect to Record all calls in the queue. This can be defined as all calls in the entire queue (under General Settings, Basic queue), or all calls by agent (under the members setting)
Agent Level Call Recording Setting
Queue Level Call recording setting
Call Recording in Conferencing app
Currently Conferencing does not provide any unique settings related to Call Recording.Call Recording in CallThru.us
Currently CallThru.us does not provide any unique settings. The account will recognize your CallThru.us device that can be managed in SmartPBX.Call Recording in comm.io Currently comm.io does not provide any unique settings. The account will recognize your webphone as a device that is managed in SmartPBX.
Related Articles
SmartPBX: User Guide API Resources
Below are some links to our API documentation related to call recording settings. These are provided for experienced developers who wish to customize these features using JSON and other programming tools.docs.2600hz.com
Recording - Kazoo API Reference
REST API Reference for Kazoo Crossbar APIdocs.2600hz.com
Configuring Call Recording - Kazoo API Reference
REST API Reference for Kazoo Crossbar APIdocs.2600hz.com
Introduction to Storage Plans - Kazoo API Reference
REST API Reference for Kazoo Crossbar API
-
Download a .pdf
2600Hz and OneBill Announce Strategic Partnership to Offer Seamless Revenue Management.pdf
2600Hz and OneBill Announce Strategic Partnership to Offer Seamless Revenue Management
NEWS PROVIDED BY
2600hz, Inc.
Aug 12, 2020, 06:12 ETSAN FRANCISCO, Aug. 12, 2020 /PRNewswire/ -- 2600Hz, a leading provider of unified business communications and the world-renowned KAZOO platform, and OneBill, a leading Billing & Revenue Management platform provider, have created a strategic partnership to streamline and automate order provisioning, billing, invoicing, and taxation for 2600Hz customers. The companies are collaborating to create a seamless integration between KAZOO and OneBill's platform to automate ordering and billing operations, eliminating manual errors and reducing time, thereby enhancing customer experience.
"We understand the importance of simple, agile, and reliable billing for our partners so they can scale and automate their billing operations. Our partnership with OneBill gives them the tools they need as well as a competitive edge through dynamic billing," said 2600Hz Co-Founder and COO Patrick Sullivan.
"Our partnership with 2600Hz will enable businesses to automate the provisioning and activation of services through the entire Lead-to-Revenue generation process. With less manual intervention, businesses can reduce their operational costs associated with order management. At OneBill, we are all about empowering our customers to streamline their business workflows to maximize revenue," said OneBill Founder & CEO JK Chelladurai.
About 2600Hz
2600Hz's cloud communications platform modernizes how businesses provide services to their customers. KAZOO, the revolutionary, distributed multi-tenant platform, is a thoughtfully engineered mixture of tools built by leaders in the telecom industry and implemented to offer a feature-rich enterprise UCaaS/CPaaS solution. 2600Hz has expanded to offer a full enterprise-PBX as well as a hosted version. For developers building their own telephony apps, 2600Hz offers 300+ APIs that give access to the building blocks of the entire platform. For more information, visit http://www.2600Hz.com. Founded in 2010, 2600Hz is a privately-owned company based in San Francisco, California.About OneBill
OneBill product suite redefines the Lead to Revenue process for Unied Communication Service Providers (UCaaS) and their Channel Partners. OneBill platform offers wide variety of tools to automate end to end business processes for enterprises. OneBill enables the businesses to expand on their Channel and Agent Programs with ease. With extensive SOAP and REST based APIs, our partners have the ability to integrate third party applications building a complete solution. Founded in 2009, OneBill is a Santa Clara based company. For further information, please visit http://www.onebillsoftware.com2600Hz Contact:
Alisa Bartash
Head of Marketing
alisa@2600hz.comOneBill Contact:
Sunitha Shetty
Vice President – Customer Success
Sunitha.shetty@onebillsoftware.comSOURCE 2600hz, Inc.
Related Links http://www.2600hz.com
-
Download our .pdf
2600Hz Named Best Wholesale Cloud Communications Provider of the Year.pdf
2600Hz Named Best Wholesale Cloud Communications Provider of the Year
NEWS PROVIDED BY
2600hz, Inc.
Jul 31, 2020, 06:12 ETSAN FRANCISCO, July 31, 2020 /PRNewswire/ -- 2600Hz, a leading provider of unified business communications and the world-renowned KAZOO platform, has been named Best Wholesale Cloud Communications Provider of the Year by a panel of industry-leading analysts as part of the UC Today UC Awards 2020.
During the awards ceremony, UC Today publisher Rob Scott stated the category was open to providers demonstrating channel growth and success. After Blair Pleasant, President and Principal Analyst of COMMfusion, announced 2600Hz as the winner, Scott stated that 2600Hz won because "KAZOO by 2600Hz offers Service Providers a fully white labeled UCaaS, CPaaS, and CCaaS solution enabling partners to differentiate their offerings." Scott also applauded 2600Hz's accomplishment of launching six new products in the first five months of 2020, including a new call center solution, new mobile apps, and video conferencing and collaboration.
"We are very excited to have won the award for Best Wholesale Cloud Communications Providers. It is an honor to be recognized for our innovation and growth and we look forward to continued success throughout the remainder of 2020 and beyond. This award is a true testament to the hard work and dedication our team has put into KAZOO, and I am very proud of them," said 2600Hz COO and Co-Founder Patrick Sullivan.
About 2600Hz
2600Hz's cloud communications platform modernizes how businesses provide services to their customers. KAZOO, the revolutionary, distributed multi-tenant platform, is a thoughtfully engineered mixture of tools built by leaders in the telecom industry and implemented to offer a feature-rich enterprise UCaaS, CPaaS, CCaaS, mobile, and remote collaboration solution. 2600Hz has expanded to offer a full enterprise-PBX as well as a hosted version. For developers building their own telephony apps, 2600Hz offers 300+ APIs that give access to the building blocks of the entire platform. For more information, visit http://www.2600Hz.com. Founded in 2010, 2600Hz is a privately-owned company based in San Francisco, California.2600Hz Contact:
Alisa Bartash
Head of Marketing
alisa@2600hz.comSOURCE 2600Hz
Related Links https://www.2600hz.com
-
2600Hz and Xarios Announce Strategic Partnership ot Offer Next-Gen Call Center Technology and Analytics
NEWS PROVIDED BY
2600hz, Inc.
Mar 03, 2020, 11:11 ETSAN FRANCISCO, Aug. 12, 2020 /PRNewswire/ -- 2600Hz, a leading provider of UC and the world-renowned KAZOO platform, and Xarios Technologies, a developer of advanced telephony applications, have created a strategic partnership to bring the next generation of call center technology and real-time analytics to the telecom market. The companies are collaborating to offer a seamless integration between two of their most innovative products, 2600Hz's Call Center Pro (CCPro) and Xarios Dimensions, to bring to market a highly customizable yet easy to use call center solution built for an unparalleled customer experience, complete with insightful reporting and powerful analytics.
"2600Hz is passionate about building the best next-gen solutions for our customers and by leveraging KAZOO's UCaaS functionality and CPaaS integration capabilities," said 2600Hz COO Patrick Sullivan. Our partnership with Xarios Technologies elevates CCPro's functionality by offering intuitive, in-depth, and customizable analytics that take the call center experience to new levels."
The power of CCPro and Dimensions stems from the simplicity of integration and the
custom capabilities of the APIs. The companies are able to bring to the marketplace a very powerful and innovative feature set, by leveraging each other's strengths in a very short amount of time. Dimensions reports on the CCPro engine, by providing administrators and business owners with intuitive real-time call analytics, automated reporting and cost-effective wallboard displays."We are committed to helping our clients be their best, for them to deliver the highest level of customer service possible to their own customers." says Jimmy Lim, VP of Cloud Products at Xarios. "Our partnership with 2600Hz delivers a truly unique and powerful solution to the marketplace, with expert insight and highly visual displays."
About 2600Hz
2600Hz's cloud communications platform modernizes how businesses provide services to their customers. KAZOO, the revolutionary distributed multi-tenant platform, is a thoughtfully engineered mixture of tools built by leaders in telecom and implemented to offer a feature-rich UCaaS/CPaaS solution. Learn more at http://www.2600Hz.com.About Xarios Technologies
Xarios Technologies is a software vendor which specializes in communication applications for SME and mid-range enterprises. Established in 2007, Xarios Technologies design, develop and supply a range of innovative telephony applications that enhance the functionality and usability of communications platforms; delivering performance improvements and integration with other business applications. To learn more, please visit xarios.com.2600Hz Contact:
Alisa Bartash
Head of Marketing
alisa@2600hz.comSOURCE 2600Hz
Related Links https://www.2600hz.com
-
Download our .pdf
2600Hz Launches Next-Gen Call Center Solution Targeting Personalization of the Customer Experience
Cloud Communications Platform Offers Enhanced Call Center Functionality for CX Optimization
NEWS PROVIDED BY
2600hz, Inc.
Jan 14, 2020, 11:37 ETSAN FRANCISCO, Aug. 12, 2020 /PRNewswire/ -- 2600Hz, a leading provider of unified business communications and the world-renowned KAZOO platform, unveiled their next-gen call center solution, rivaling market leaders in the call center space. Call Center Pro (CCPro) offers an intuitive and seamless call center experience and helps SMBs transform basic call center experiences into opportunities to amplify the customer experience through scalable architecture, untapped integration capabilities, and the ability to transform how customers engage with your brand.
CCPro is a high-end yet affordable solution that allows SMBs to quickly modernize their call center capabilities and amplify collaboration across various business communication tools. Paired with KAZOO's advanced UCaaS/CPaaS APIs, call center optimization can be reached in each and every business, each creating an unparalleled experience for their customers. Not only does CCPro tackle everyday call center needs (Dashboards, Quality Monitoring/Management, Skill Based Routing, Eavesdrop/Whisper/Barge, etc.) but it can be easily personalized through BI to create a custom experience between the caller and your business.
A few highlights of CCPro include:
Optimized CX Through a Highly Customizable Platform
With 300+ APIs and multiple integrations such as Zapier, Slack, and various CRMs at your fingertips you can customize how the platform works for you. Anything from personalized greetings to immediate agent access to caller information allows for a valuable customer experience.Native Software Built into KAZOO
CCPro is fully integrated with KAZOO and offers resiliency that surpasses its competitors. Being truly geo-redundant, call centers using CCPro will always be up and running no matter what, and CCPro users never need to worry about dropped calls or outages.Ease of Use for All
CCPro was designed to be deployed rapidly and offer a seamless end user experience. Easy-to-use features and functionality save time, offer the highest quality service, and fast performance all within a simple yet modern interface.2600Hz's CEO, Darren Schreiber, stated, "Our focus since day one has been to create a communications platform that could increase business efficiency while simultaneously making the experience fun and engaging. Allowing customers to take boring, plain old call center technology and hook it into other business systems to automate and expedite the user experience creates unlimited possibilities. Making this technology accessible to SMBs takes things even further."
To elevate the experience even more, 2600Hz has partnered with Xarios Technologies to further amplify reporting and analytics ensuring the highest level of service possible. With Dimensions by Xarios, CCPro users will have powerful historical and real-time call data needed to ensure the highest level of call center productivity. More to come over the next few weeks.
About 2600Hz
2600Hz's cloud communications platform modernizes how businesses provide services to their customers. KAZOO, the revolutionary, distributed multi-tenant platform, is a thoughtfully engineered mixture of tools built by leaders in the telecom industry and implemented to offer a feature-rich enterprise UCaaS/CPaaS solution. 2600Hz has expanded to offer a full enterprise- PBX as well as a hosted version. For developers building their own telephony apps, 2600Hz offers 300+ APIs that give access to the building blocks of the entire platform. For more information, visit http://www.2600Hz.com. Founded in 2010, 2600Hz is a privately owned company based in San Francisco, California.2600Hz Contact:
Alisa Bartash
Head of Marketing
alisa@2600hz.comRelated Links
https://forums.2600hz.com/forums/monsteruiapps/call-center-pro/ -
Q3 2020 Quarterly Newsletter
From September 30, 2020Fall is here and we only have one more quarter of 2020 to go. The 2600Hz team took no breaks this summer, which means we have a ton of exciting updates for you. One of the many things we did in Q3 was create a Product Survey Forum in our Community. Since nobody knows this industry better than you, we would love your input in guiding our roadmap, testing out our prototypes, and providing valuable feedback. You don’t have to be a current customer to participate in the surveys, so check them out and make sure to join the Community and follow the topic so you’ll be notified when new surveys are available.Key Highlights From Q3
Back in July, 2600Hz was named 2020’s Best Wholesale Cloud Communications Provider of the Year by a panelist of industry-leading analysts as part of the annual UC Awards! We are thrilled to be recognized for our innovation and growth, and are grateful for all of our partners. We couldn’t have done it without all of you! Learn more about the UC Awards and see a list of all the winners here.
In August we announced a new and exciting partnership with OneBill, a leading billing and revenue management platform provider. Through this partnership, we’re bringing our customers a streamlined integration between KAZOO and OneBill’s platform. This integration enables our customers to streamline and automate order provisioning, billing, invoicing, and taxation to save time, reduce manual errors, and ultimately enhance their customer’s experience. Read more about it here.
September was a busy month for us also, as we sponsored and attended the annual Cloud Comms Summit. We are always proud to be a partner of the Cloud Communications Alliance, and never cease to enjoy attending their events. The CCA, along with The Cavell Group, did a fabulous job putting on the multi-day virtual event where we gained a ton of valuable insights about the state of the market (which we summarized for you here). Not only that, but our very own Alisa Bartash had the opportunity to represent 2600Hz in the event’s Shark Tank competition — and won!
Other New Product Releases & Updates
CSV Onboarding App — Fast SmartPBX onboarding is now possible on all of our platforms with the CSV Onboarding app. It enables you to perform bulk uploads to create new users and associate SIP devices in one job, replacing the process of entering this data manually. Simply upload your csv file, confirm the record mapping is correct and voila! The users will be added to SmartPBX. To make it even easier, there is a .csv template you can download here in the community, and you can learn how to use the app with our video, user guide and FAQs here
Dynamic Caller ID App — Also now available on all platforms, the Dynamic Caller ID app helps you and your customers ensure your outbound business calls are answered and reduce the likelihood of your calls being screened with Dynamic Caller ID. This application allows you to set unique rules that modify the caller ID display based on the outgoing phone in just three easy steps. You can set rules that match a feature code, area code(s), or a Regular Expression. Once set, each outgoing call that matches the pattern can display a modified phone number on the caller ID screen. Check out our video, user guide and FAQ here.
988 National Suicide Prevention Lifeline — The FCC has designated 988 as the new nationwide 3-digit phone number for Americans in crisis to connect with suicide prevention and mental health crisis counselors. All phone service providers are now mandated to direct 988 calls to the existing National Suicide Prevention Lifeline by July 16, 2022. 2600Hz has already implemented 988, so for customers using 2600Hz minutes, 988 will automatically route to the hotline. BYOC customers will need to implement it, and you can learn how to do so here.In Case You Missed It
It wouldn’t be a 2600Hz newsletter without some media and press updates. Here’s some news and a few marketing highlights from Q2:
- Our COO & Co-Founder Patrick Sullivan was interviewed by Telecom Reseller’s Doug Green for this CCA podcast, where they discussed the benefits of adding a second UC platform. Listen to it here.
- UC Today wrote two new articles featuring 2600Hz, WFH Requires Mobile Stability Powered by Cloud and The Benefits of Enterprise Communications White-Labeling.
- The Xarios team joined us on the Free UC w/ 2600Hz podcast to talk about how call center analytics can transform your business.
- We also had an in-depth discussion about how coronavirus has changed telecom over the past six months and areas that need to be addressed moving forward.
-
We wrote about the key industry insights from the Cloud Comms Summit and share how you can stand out and capture market.
A Few Friendly Reminders
2600Hz Community — Join in on timely discussions with your peers, get support for all things KAZOO, and find the latest 2600Hz resources. You don’t have to be a 2600Hz customer to be a member, but our customers do get access to additional resources and documentation. We’re constantly adding to the Community, and recently launched a Support page that features downloadable resources (including white-labelable docs!) and a series of videos explaining how to get started with KAZOO. To visit the community, click here.
Free UC w/ 2600Hz Podcast — Our podcast is still going strong and we’ve added a few episodes this quarter that you definitely don’t want to miss! To make listening even easier for you, we created a new podcast page that gives you access to all 21 episodes in one place. Check it out here, and don’t forget to bookmark the page since we’ll be adding to it! If there are any specific topics you would like us to cover or guests you would like us to talk to, let us know at marketing@2600hz.com!That’s our update for now! We’ve been working hard and will have a lot more exciting news and updates for you soon, so keep an eye on your inbox and don’t forget to follow us on Twitter, Facebook, and LinkedIn. -
Quarterly Newsletter June 2020We hope you, your loved ones, and your colleagues are doing well and staying safe. It’s been a busy quarter for 2600Hz and everyone on our team from Engineering to QA and Operations to Marketing have been working hard to bring you more tools that enable productive remote work. In case you missed it, we released a ton of new products, features, and functionality and we have a lot more great things planned for Q3.
Key Highlights From Q2
As part of our commitment to enabling remote work, we reprioritized our roadmap and brought our customers the comm.io desktop app. Video conferencing, a WebRTC-based softphone (we call it a web phone), virtual faxing, and more are built in, giving users all of their personalized communication information and tools in one place, right on their desktop or laptop. Check out the new comm.io site to see all that it can do!
What Do You Want In An Operator Console?
We are continually enhancing our product suite so we can provide you with the best reseller and end user tools that will help your business be successful. We are going to start sending out product surveys to get your input and to help us identify exactly what you and your customers need. We’re currently working on improving our Operator Console and have a few questions for you based on your customer’s requests and feedback when it comes to operator and attendant functionality. Please take our short 6 question survey that won’t take more than 2 minutes of your time. Your response will make a difference! You can take the survey here.
Other New Product Releases & Updates
In addition to releasing comm.io, we rolled a TON of new updates, features, and functionality in Q2 and already have more in the works that we’re planning to roll out in Q3. In case you missed it, here are some of the exciting releases and updates from Q2:
SMS — You can now send and receive SMS on most 2600Hz DIDs! Receiving inbound SMS is configurable via Webhooks and outbound SMS can be sent by utilizing our APIs or Zapier. If you have a Zapier account, you can connect SMS by Zapier with over 2,000 apps to create automations and custom notifications. Another great thing about SMS, you ask? You can send and receive SMS on softphones and any desk phone that supports message notifications! There truly are infinite useful and creative ways to utilize SMS...check out this blog for some interesting use cases and examples!
Voicemail Transcription — This feature helps users stay connected by converting voicemails to text. Transcriptions can be emailed or viewed in the Voicemails section of Comm.io. The feature is powered by Google’s ARS system, so it has phenomenal accuracy. There is a fee for using this feature ($0.05 per minute) so it is off by default for all existing voicemail boxes. New voicemail boxes currently have the feature enabled (although we're going to be changing it to be off by default in the next update) so if you don't want to use it, you'll need to disable it. It’s easy to enable or disable — watch how to do it here!
Announce-Only Voicemail Box — Perfect for closures and other informational messages, announce-only voicemail box enables a voicemail box to play a recorded message without allowing callers to leave a voicemail. This feature can be enabled and messages can be easily changed at any time in the Voicemail Boxes section of SmartPBX by going to Advanced, then Options.
Hold Music Resume — Hold music no longer restarts at the beginning every time you put a caller on hold! This is ideal for custom/sales messages because callers will now hear a continuation of the message, instead of it restarting at the beginning every time the caller is placed on hold.
We’re already planning our first release of Q3, so keep an eye on your email!
In Case You Missed It
It wouldn’t be a 2600Hz newsletter without some media and press updates. Here’s some news and a few marketing highlights from Q2:
- UC Today published not one but two exciting articles featuring the 2600Hz team — SMS is Key to COVID-Era Business Survival and 2600Hz Intros Beta Softphone & Video Conferencing.
- We rolled out a series of video tutorials about how to get started with KAZOO to help new partners get up and running in no time. Check them out here.
- 2600Hz was featured in UC Today’s UC Market Guide 2020 and our very own Patrick Sullivan contributed an article about the often-overlooked characteristic of UC providers & their solutions. Download it here.
- Patrick was also invited to do a video podcast with The UC Buyer, which you can check out here.
- We published new blogs about provisioning devices, business agility and SMS.
- We added a few new podcasts to our podcast page here.
A Few Friendly Reminders
2600Hz Community — Are you a member? It’s a forum where you can join in on timely discussions with your peers, get support for all things KAZOO, and find the latest 2600Hz resources. You don’t have to be a 2600Hz customer to be a member, but our customers do get access to additional resources and documentation. We’re making the forums even more user friendly, updating many of the documents, and adding even more support docs for our users and resellers. If you aren’t part of our community yet, join today and keep an eye out for exciting updates! Visit the community here.
Free UC w/ 2600Hz Podcast — Our podcast is still going strong and we’ve added a few episodes this quarter that you definitely don’t want to miss! To make listening even easier for you, we created a new podcast page that gives you access to all 20 episodes in one place. Check it out here, and don’t forget to bookmark the page since we’ll continue adding to it!
Monthly Business Partner Calls — If you’re a paid 2600Hz customer, these are for you! On the 3rd Wednesday of each month, we hold an interactive call with our CEO and Co-Founder Darren Schreiber. During each call, Darren shares need-to-know information that applies to your business and is available to answer any questions you may have. This is the ideal opportunity to engage with Darren on a regular basis while learning about important updates that can help your business thrive. Find more information about our next call here.
That’s our update for now! We’ve been working hard and will have a lot more exciting news and updates for you soon, so keep an eye on your inbox and don’t forget to follow us on Twitter, Facebook, and LinkedIn.
-
User Story
An account wants to filter out unwanted calls before they ring. Common call types include robo-calls, international calls, and calls labeled Anonymous.This application
Our blocklist configuration system was initially provided as a "blacklist" feature only within the Callflows app. As more customers requested this feature and did not need the other tools in Callflows, we separated it out and made it accessible to standard SmartPBX users. It has also been renamed from Blacklist to Blocklist.NOTES:
- The two applications do use the same back end data. If you have already created blocklists in Callflows they should appear in the Blocklist application listing for that account.
- The Blocklist app also allows you to enable or disable each list item from within the setup window; Callflows is a two-step process; you add numbers under Blocklist and enable each blocklist under Account Settings.
Getting Started
The Blocklist app should be displayed in your Monster UI menu of applications. If you do not see it, ask your administrator to enable it using the App Exchange.
Creating blocklists
Your first entry to the app will indicate if you have no blocklists saved to your account.
You will see this:
NOTE: If you had entered blocklists in Callflows, you will see a list of them here.
Select the New Blocklist button and enter a Name.
If you want the numbers to be deactivated immediately, you can toggle the “Enable on Creation” button. Otherwise, it will save the information and you can turn it on later.
Enter your list of what numbers you want to block
NOTES:
- The toggle to block Anonymous callers will block any CallerID that identifies as Anonymous. This is in addition to any list you add for blocking specific numbers.
- We recommend you create a unique blocklist just for Anonymous Callers as this is likely always on, and other lists may
- To block international numbers make sure to include the full country code.
- To block Canadian numbers, add +1 to the country code. The rest of the number will be tracked and recognized as Canadian.
Save your list!
Once your list is saved it will display on the home screen. You can review it by clicking the gear next to your named list. The new list will also appear in your Callflows app.List Details
The screen below shows the details of blocklist numbers once added. You can add more numbers, enable or disable the list, and/or block anonymous numbers.Frequently Asked Questions
Does this block outgoing calls to the same numbers also?
No, only inbound calls.Can I enter a wildcard to mask for example, ALL phone calls from a certain region?
Yes.If I update/add a blocklist entry to the blocklist app, will it display in my Callflows app, and vice-versa?
Yes.Why is there a separate blocklist app?
The blocklist app was developed to support SmartPBX users who do not have access to Callflows, and/or prefer a more simple approach to adding and editing a blocklist. Its user interface matches a more friendly approach similar to the SmartPBX UI.Do anonymous calls also include calls that show all 0's as the caller ID?
Yes.
#####
-
grrrr. So the web software is a bit grumpy when it comes to its definition of downloads -- it only wants a file. The workaround is to submit a screenshot as the "file" and then submit the training URL in the description area. I've done this for you this round, here. Please feel free to edit/update what I added!
https://forums.2600hz.com/forums/files/category/5-open-source-community-contributions/
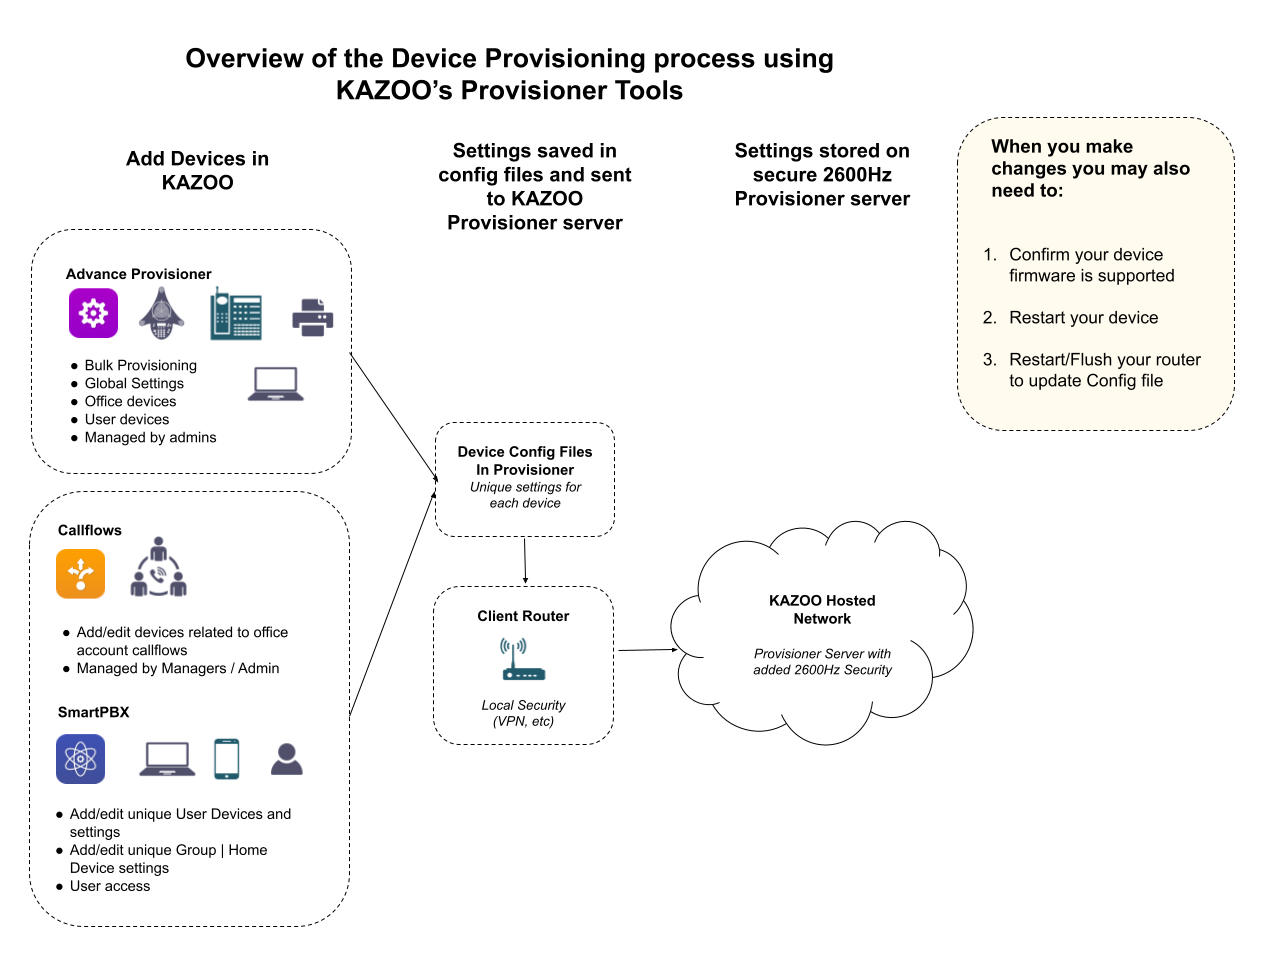

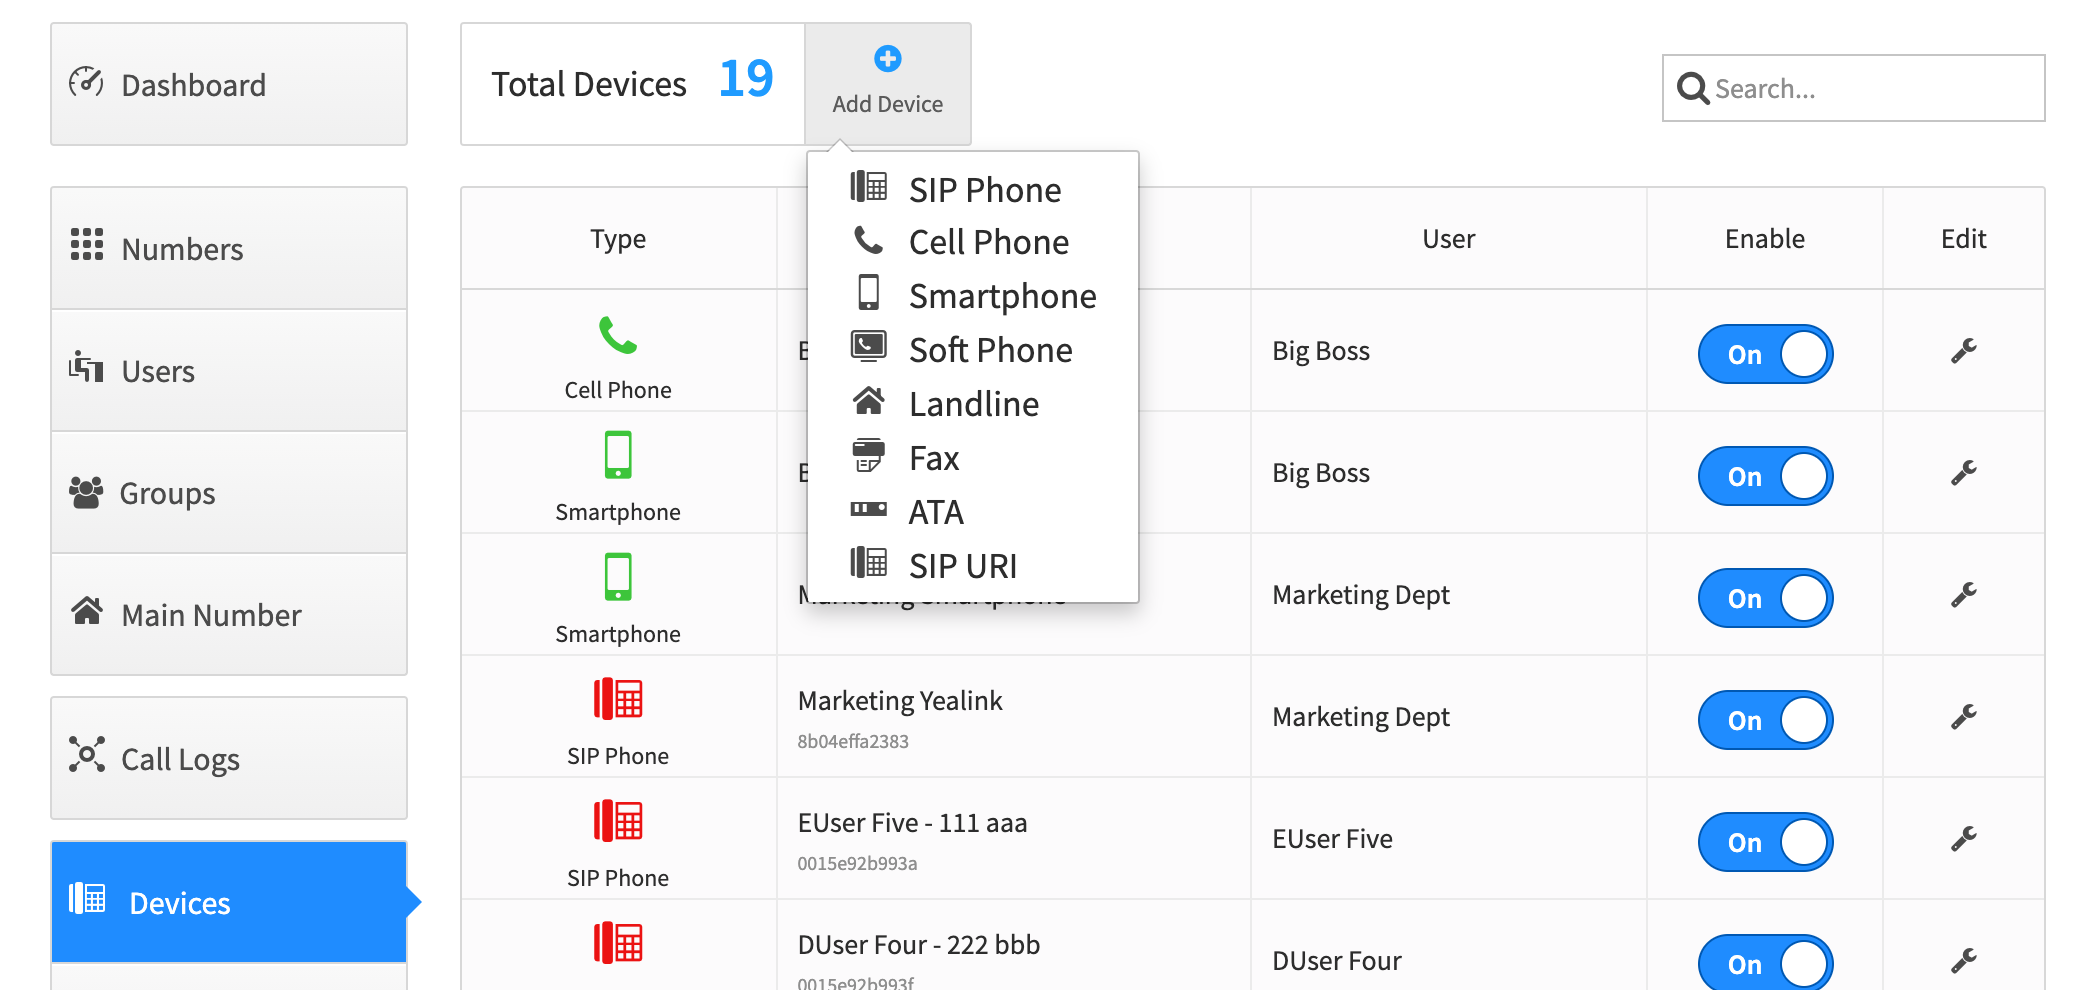
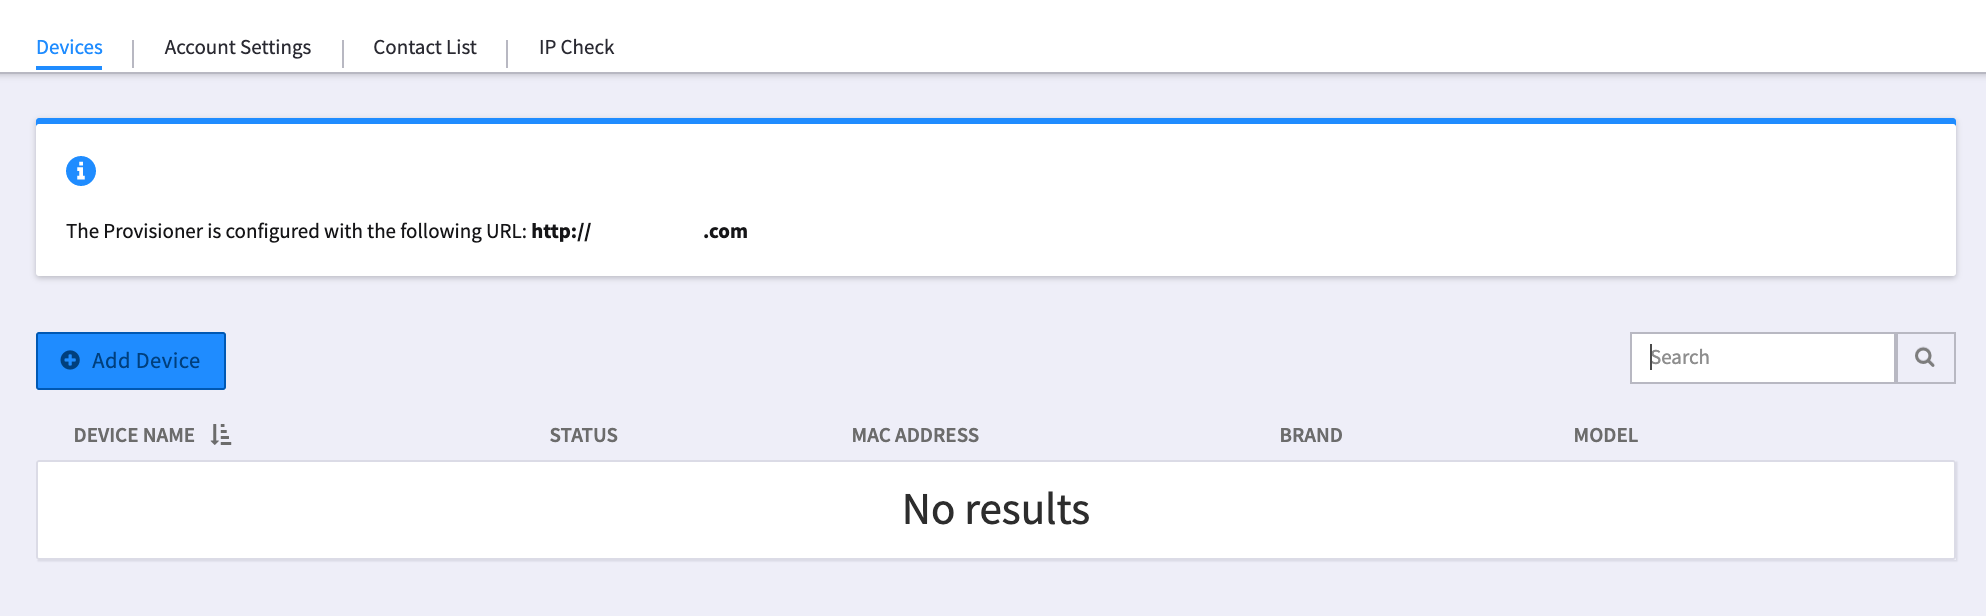
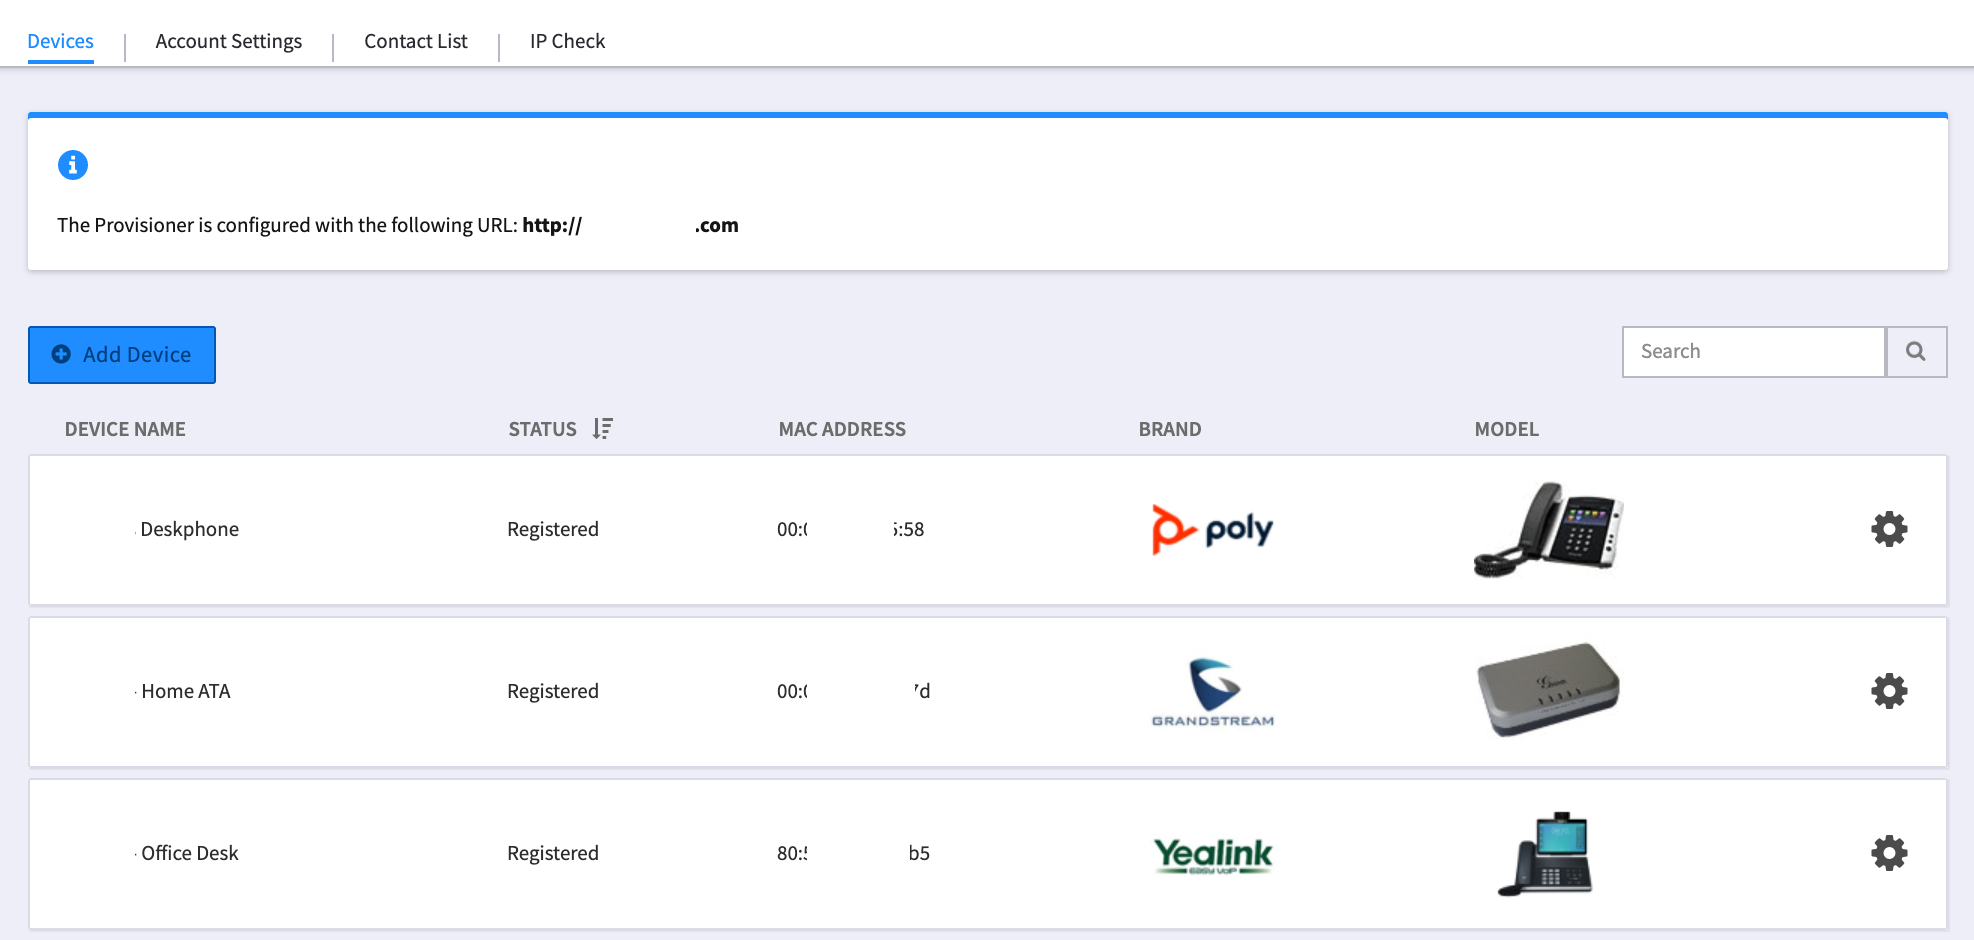
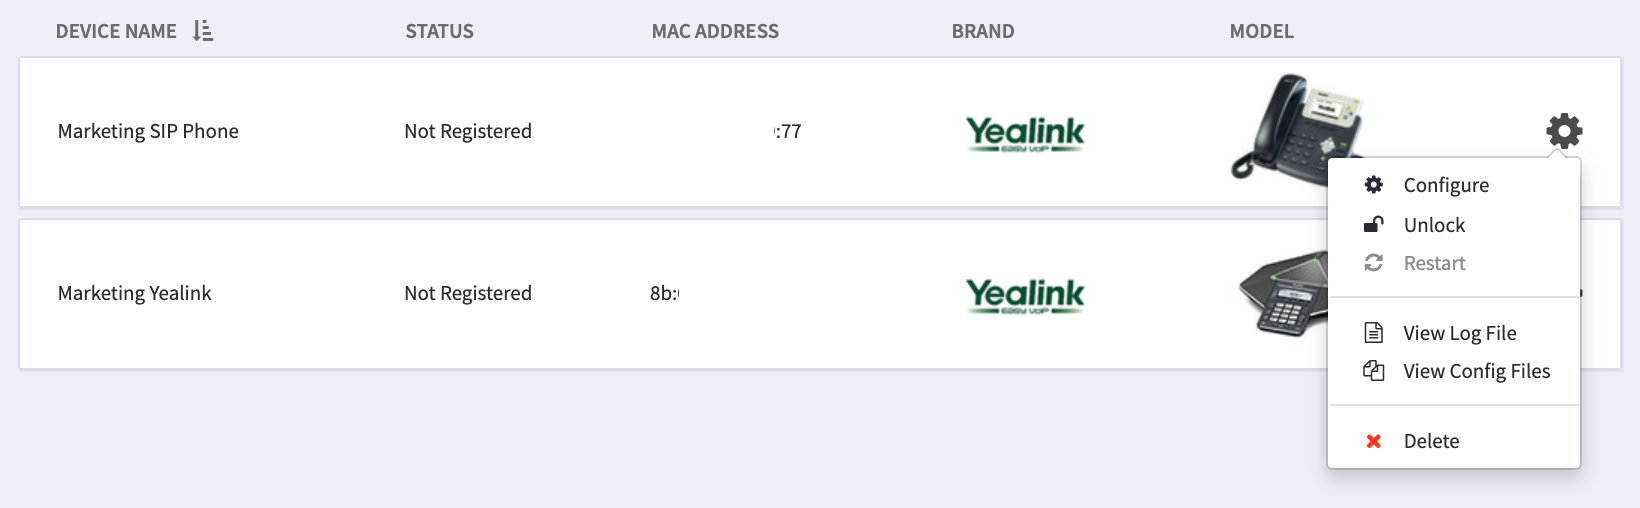
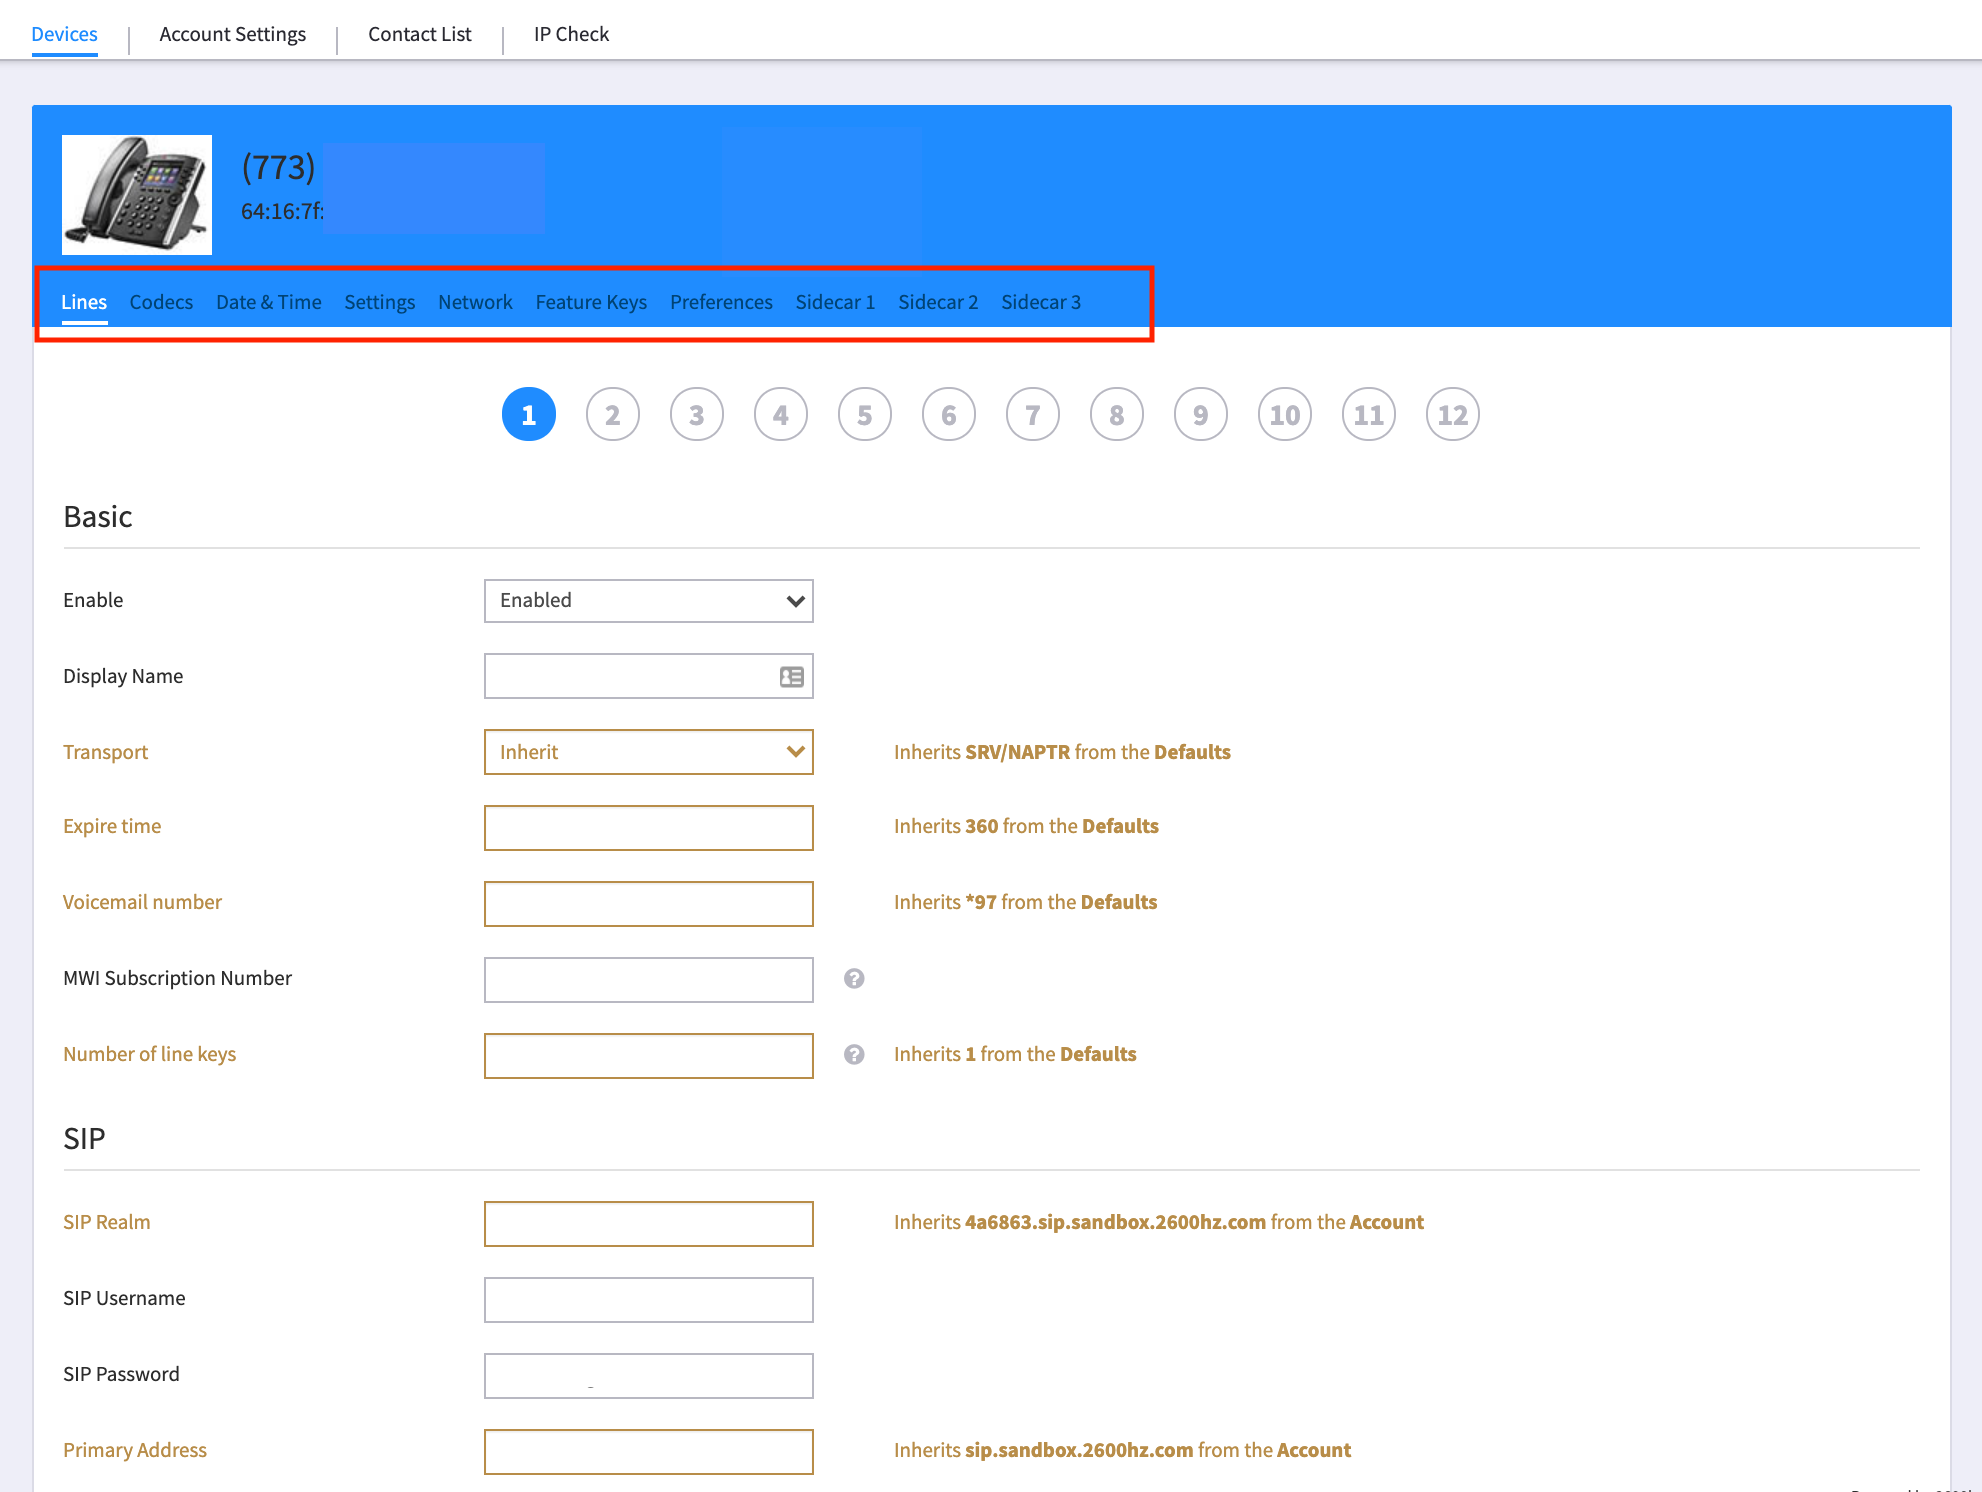
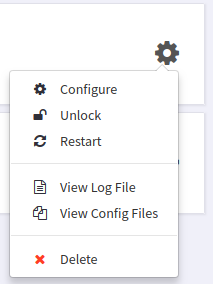
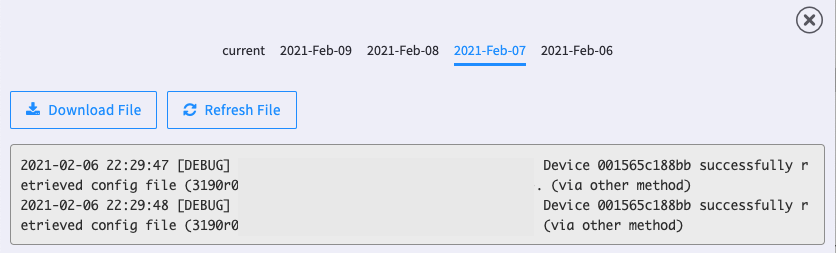
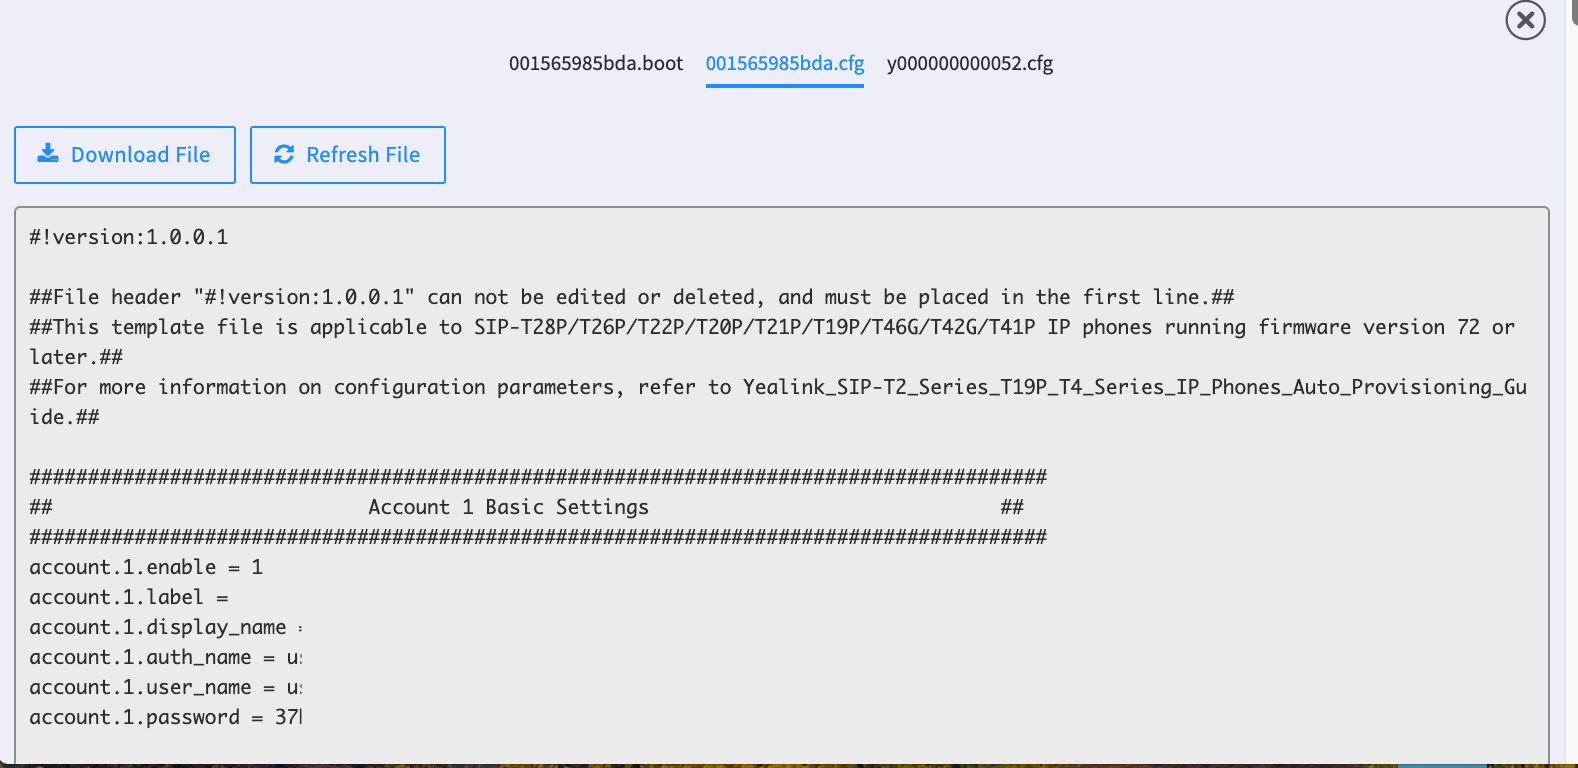
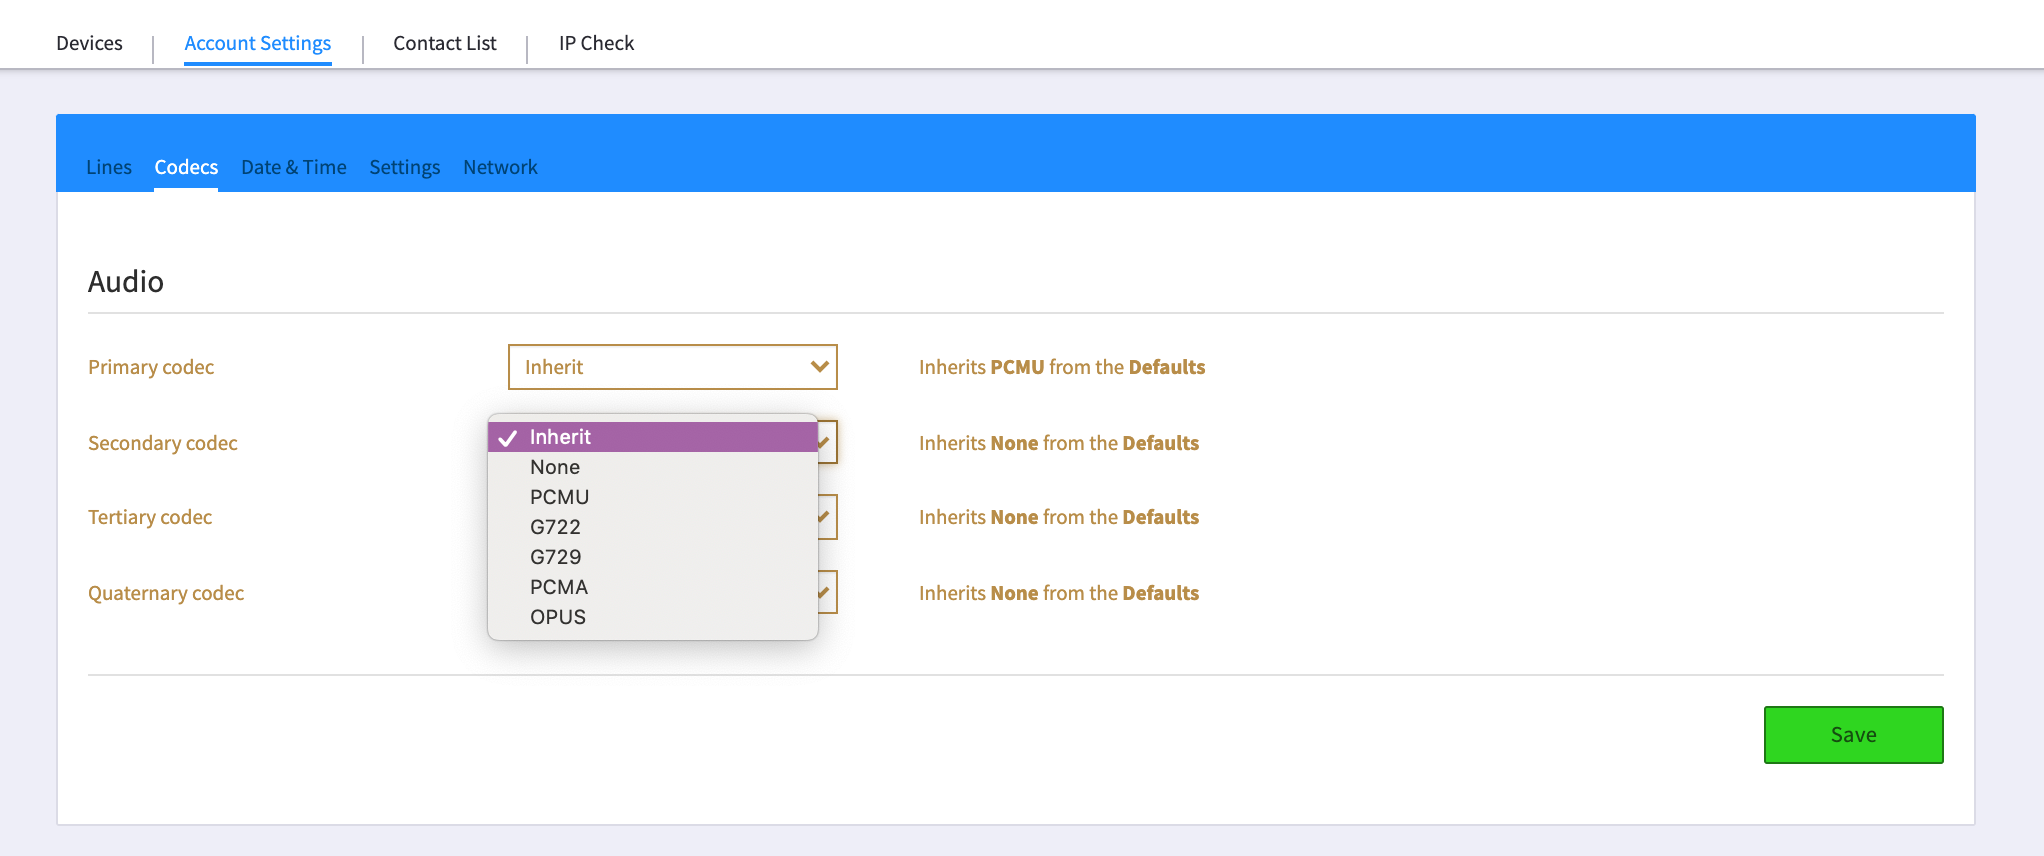
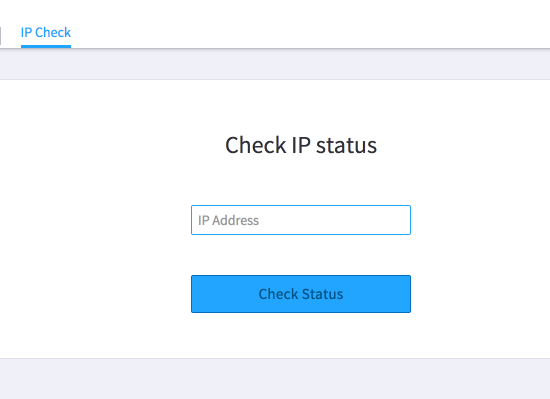
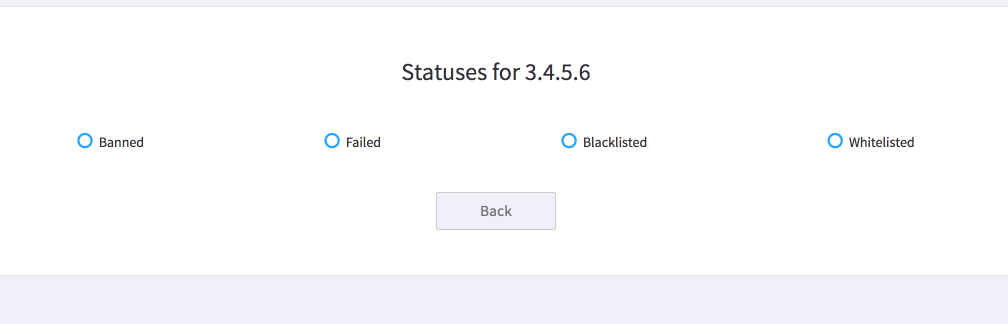

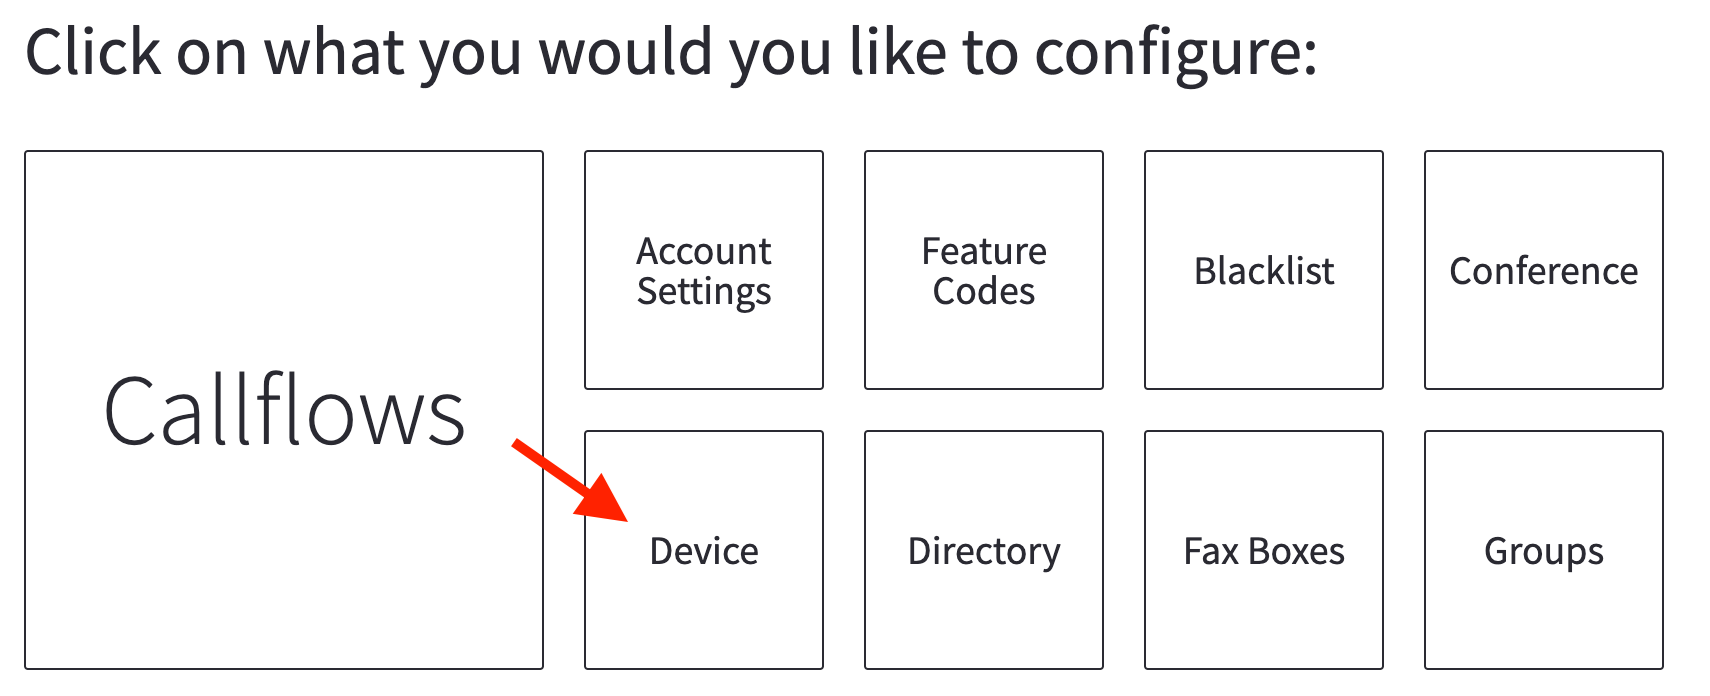
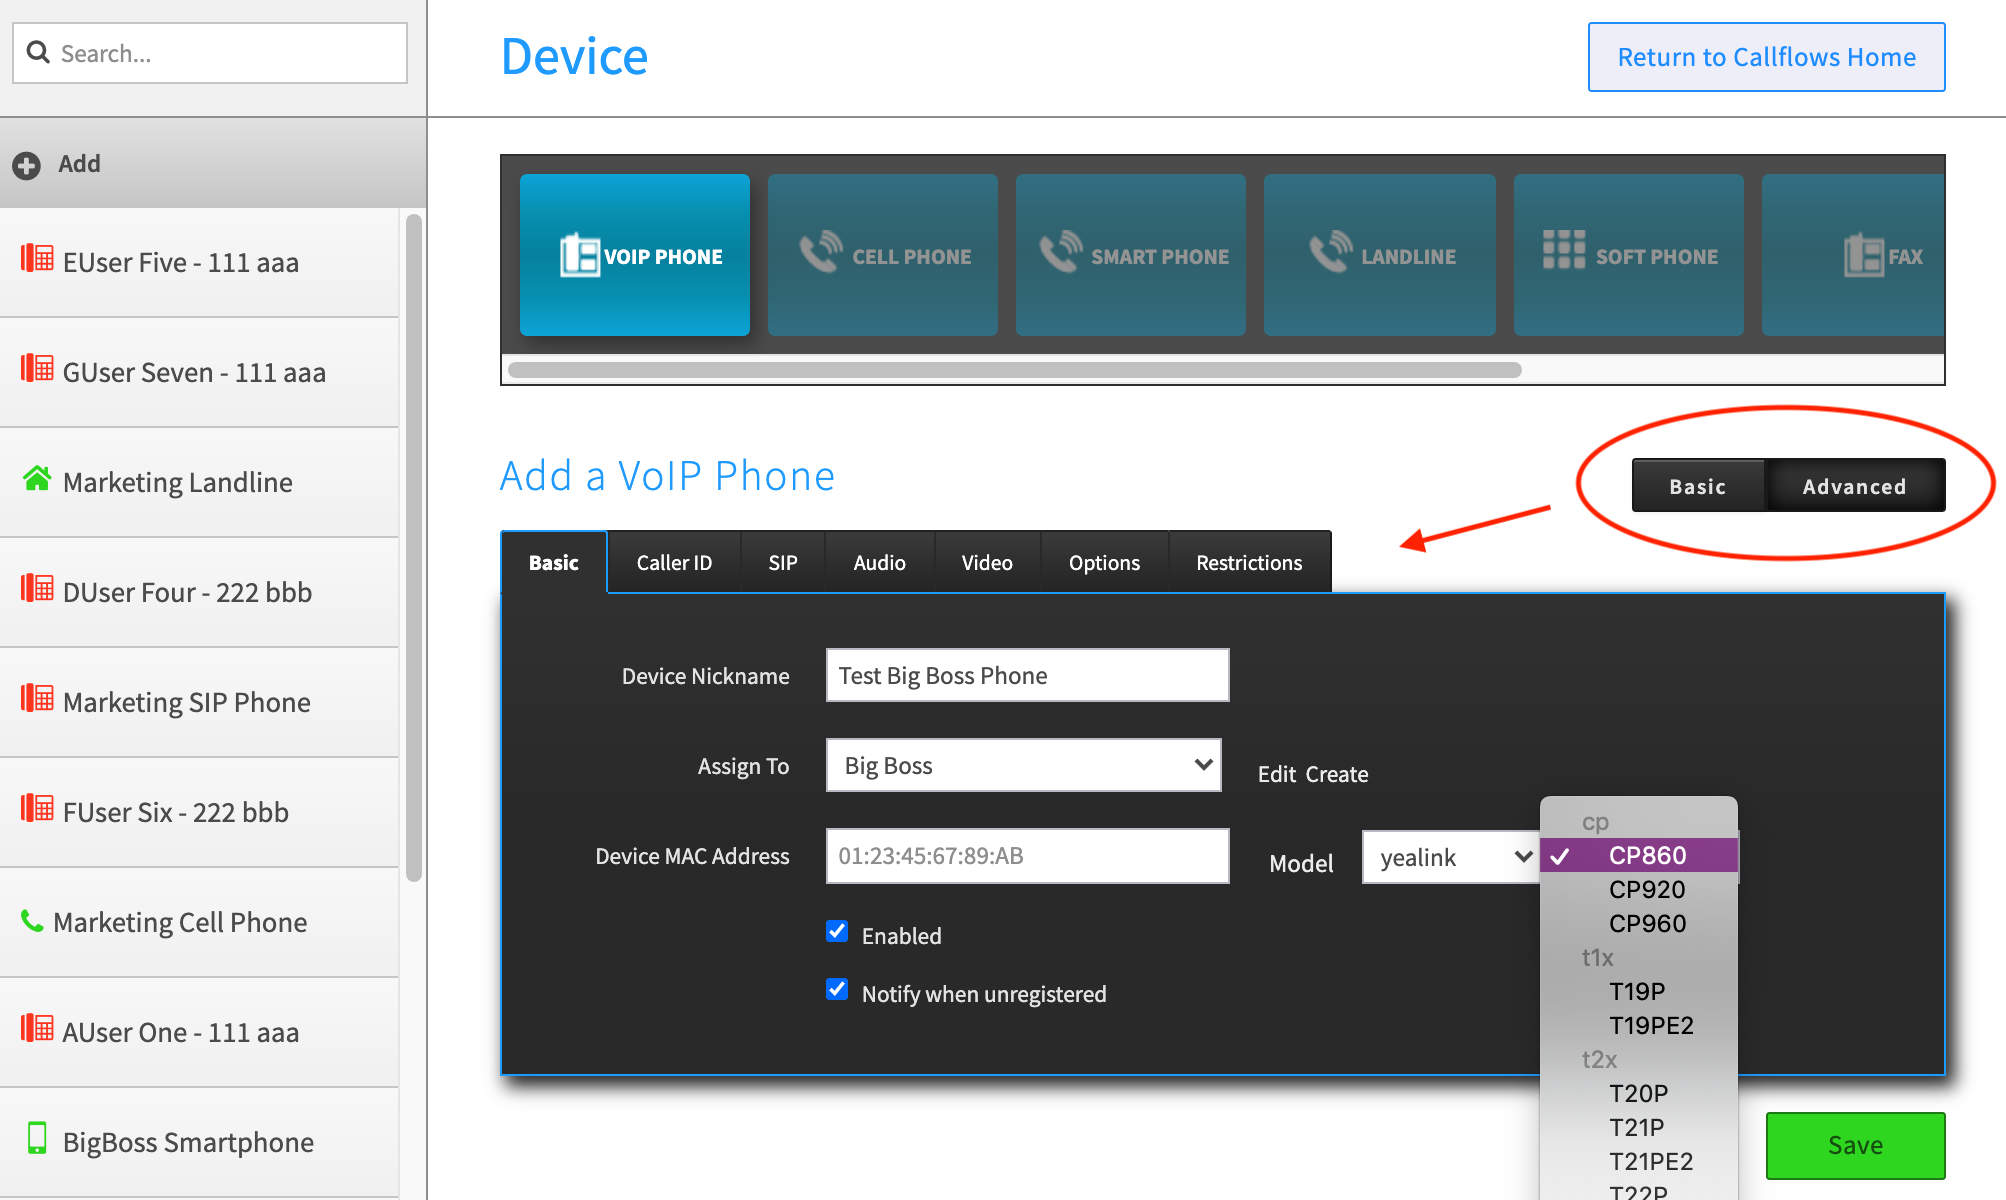
.png.a7c0edd096da0caf19ef2abd85a051ac.png)


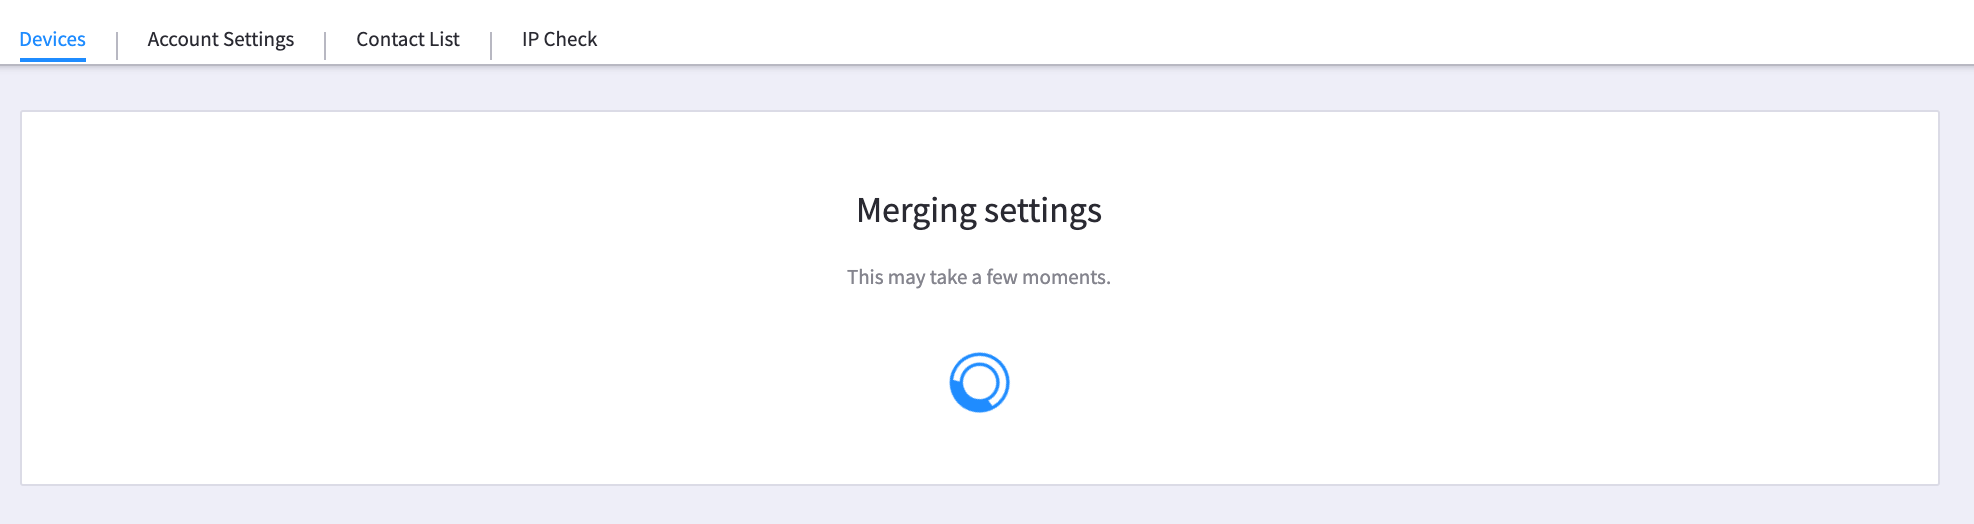
 SmartPBX supports a new Office Hours Strategy process. The document below is part of the SmartPBX app. Select Main Number from the side menu.


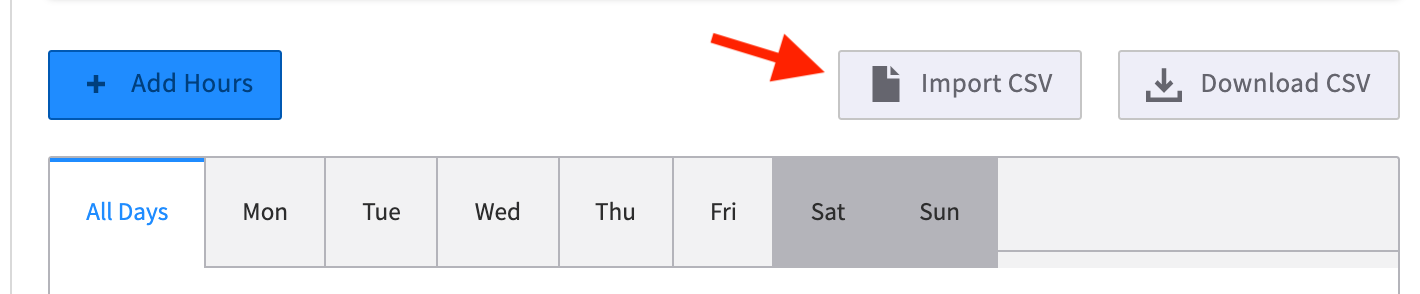

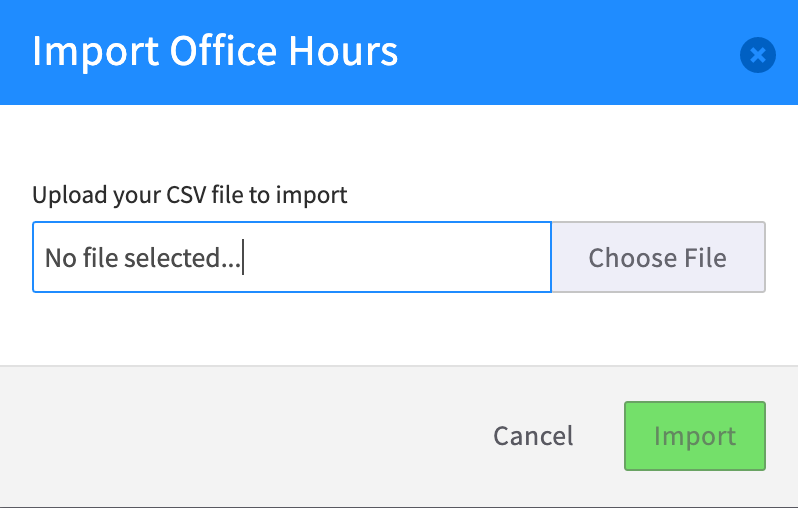
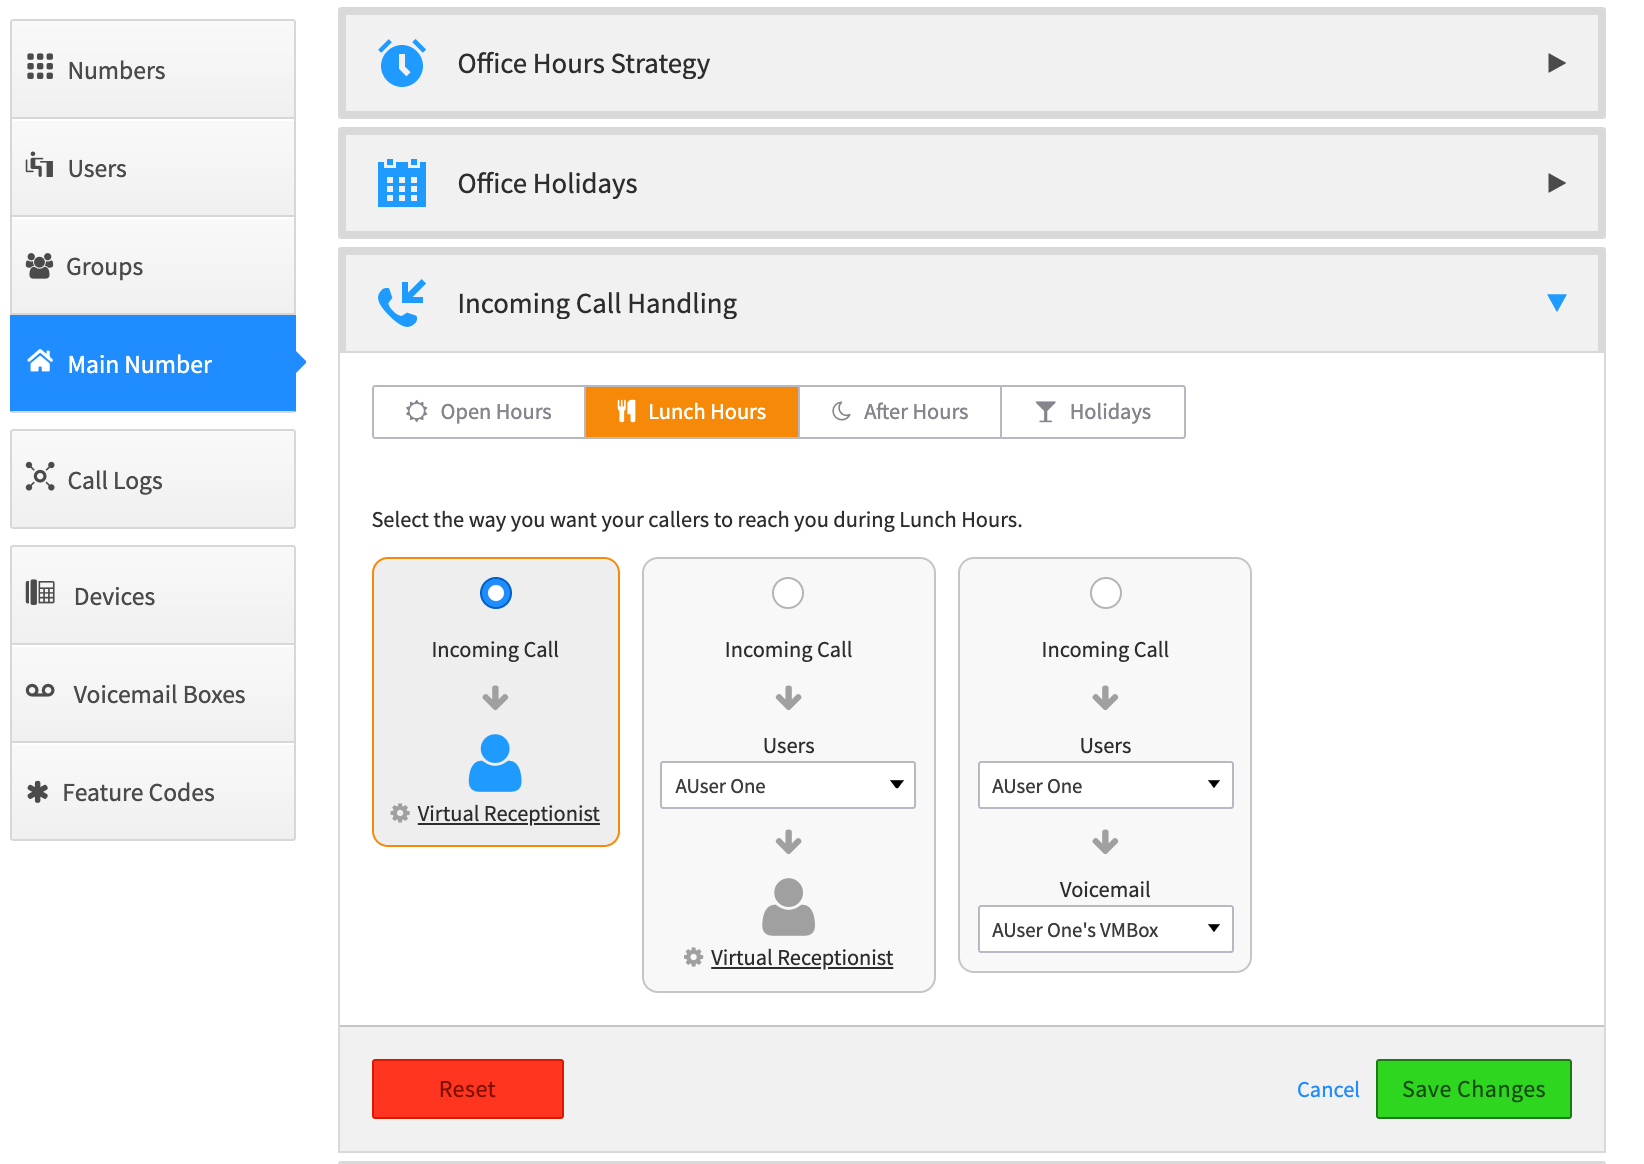
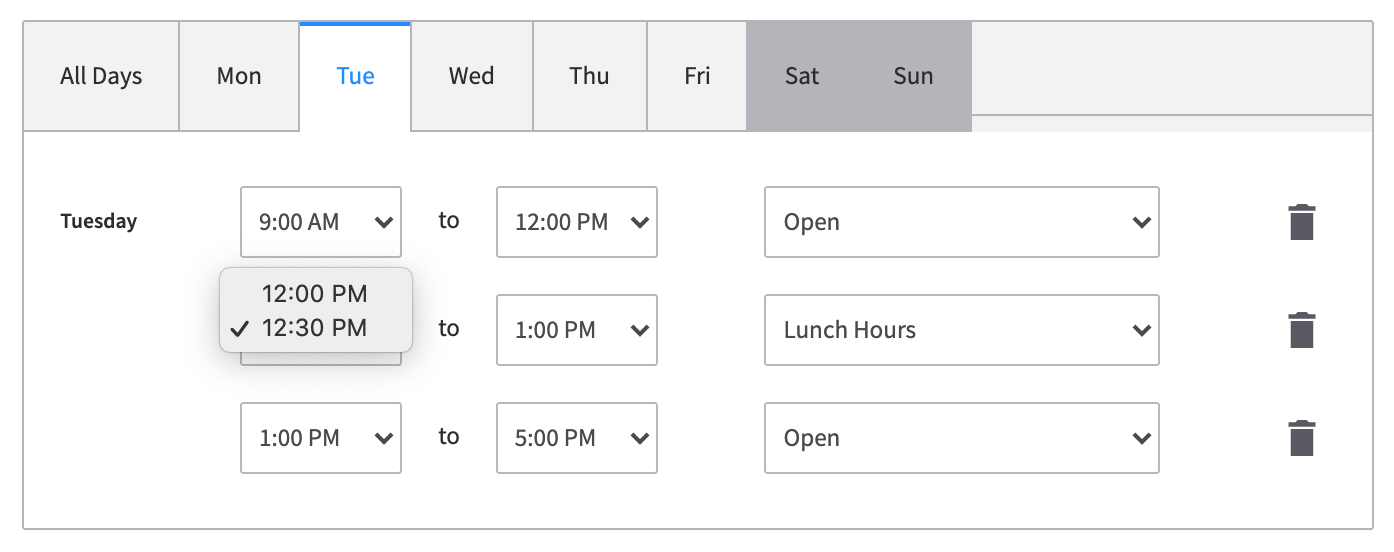

 NOTE: We have a short video showing the initial steps to setting up conferences


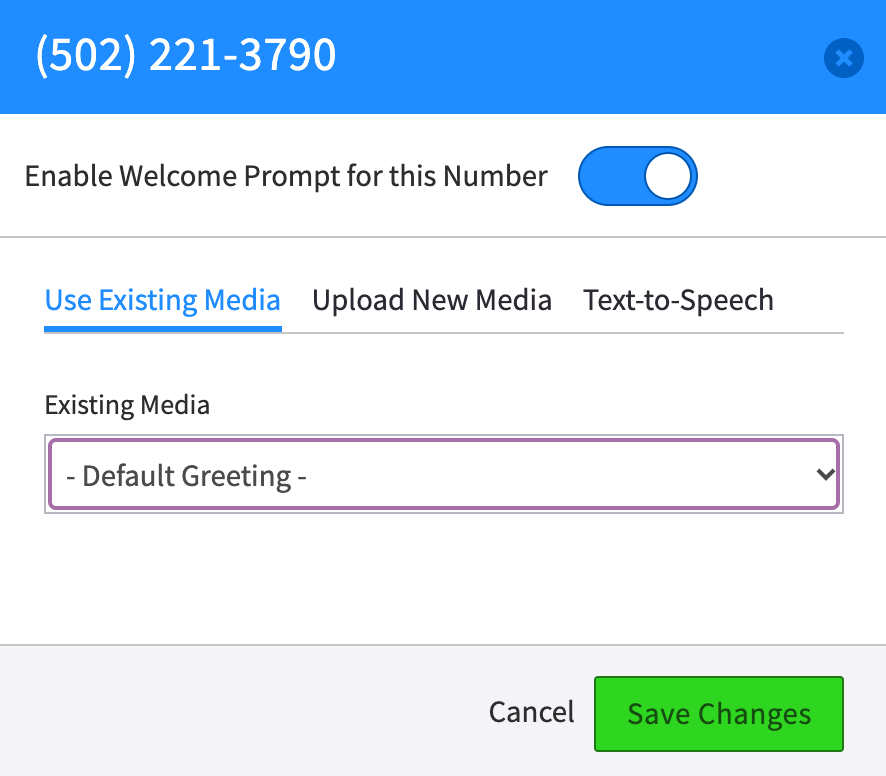
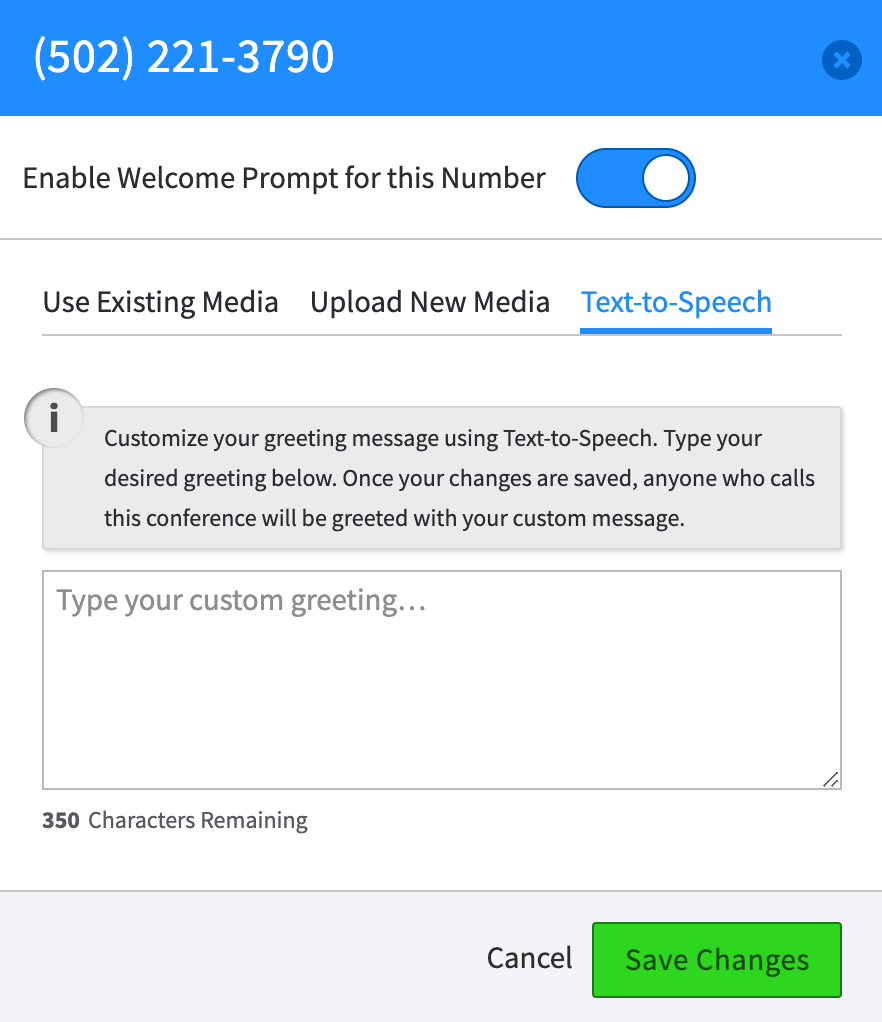


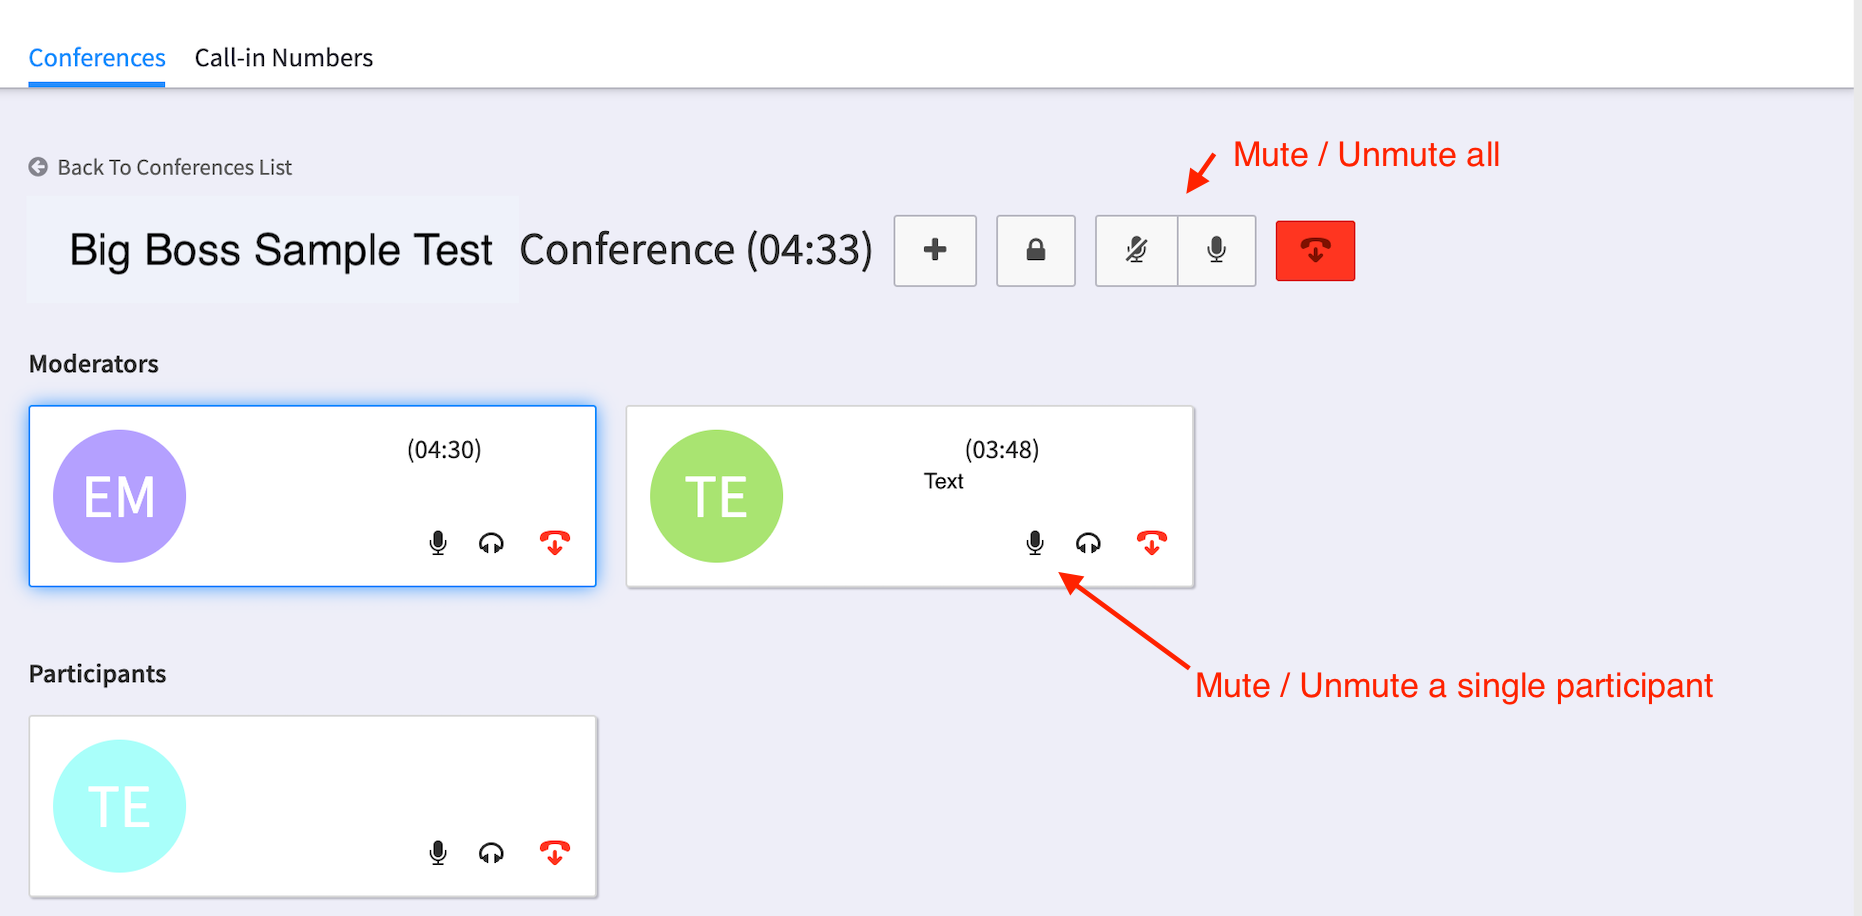
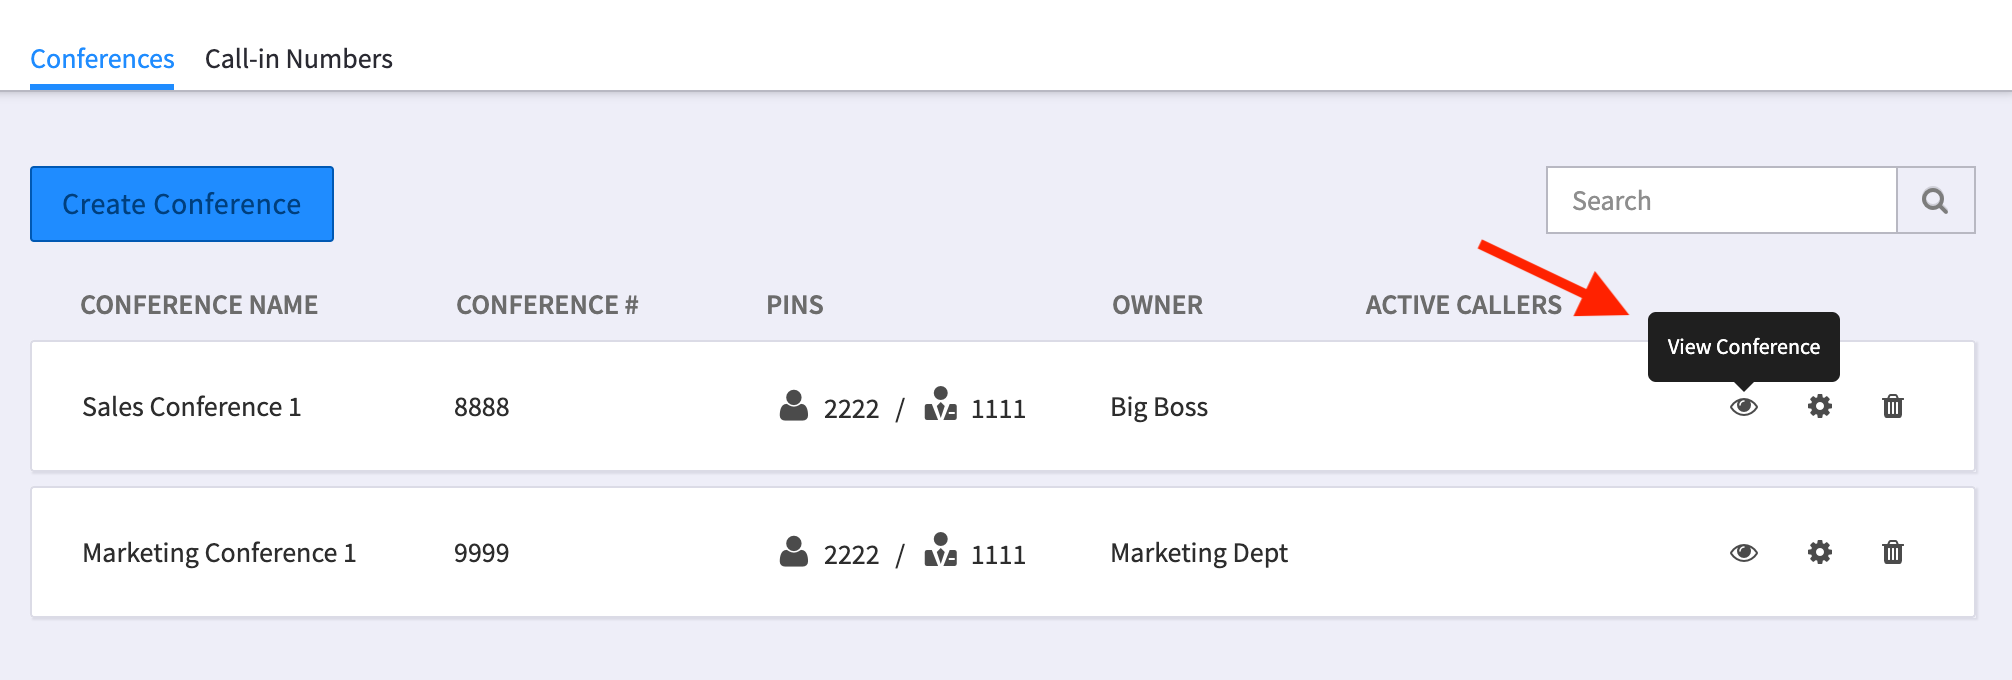

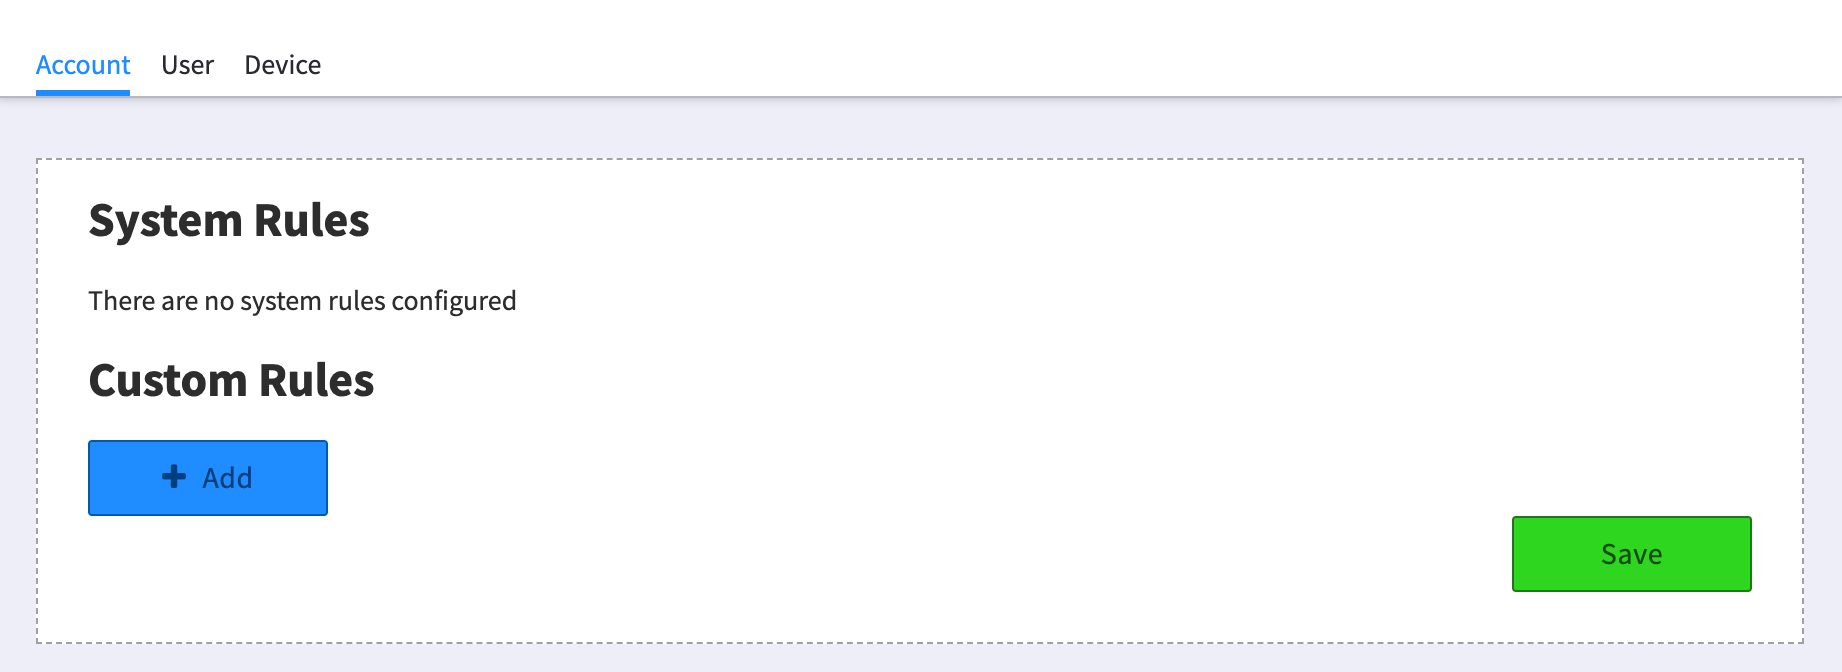
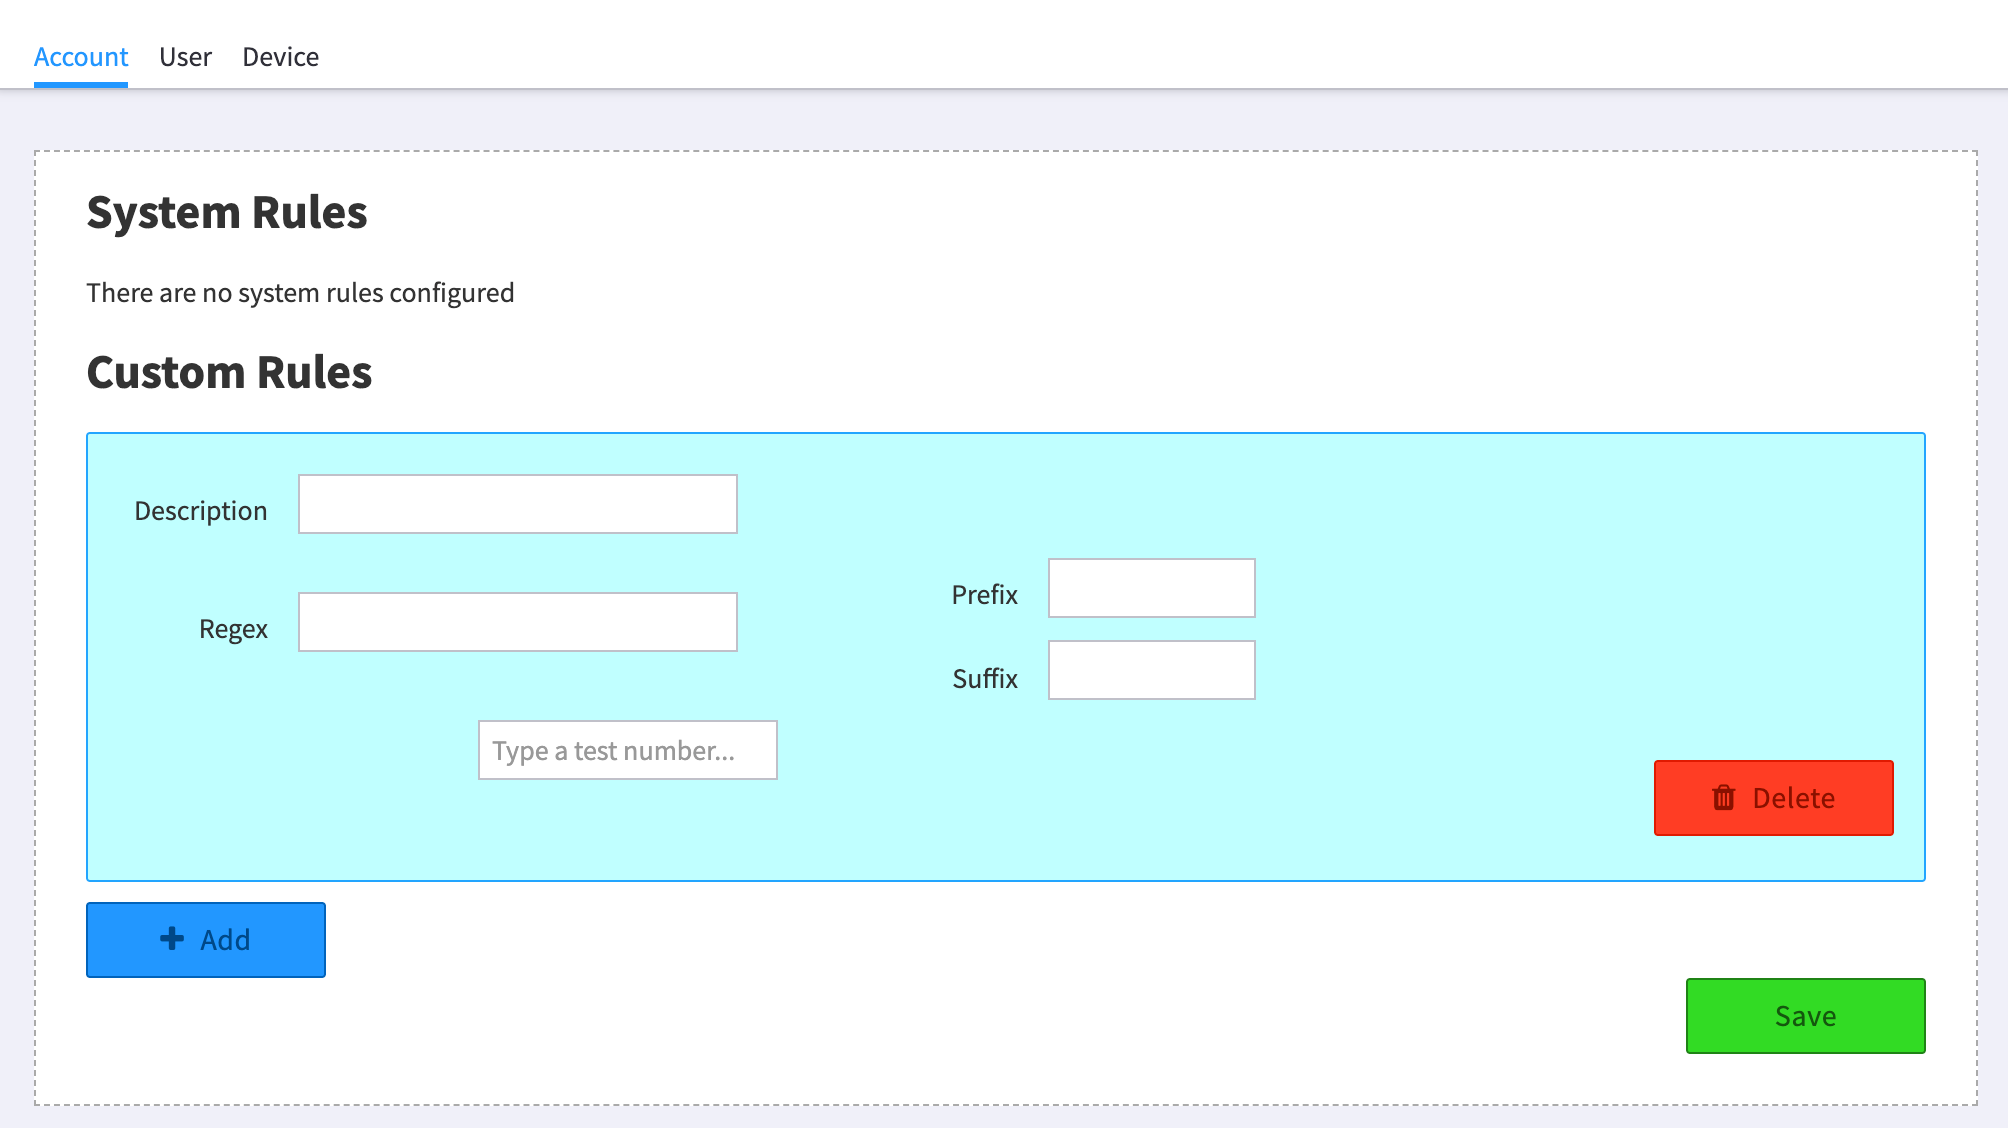
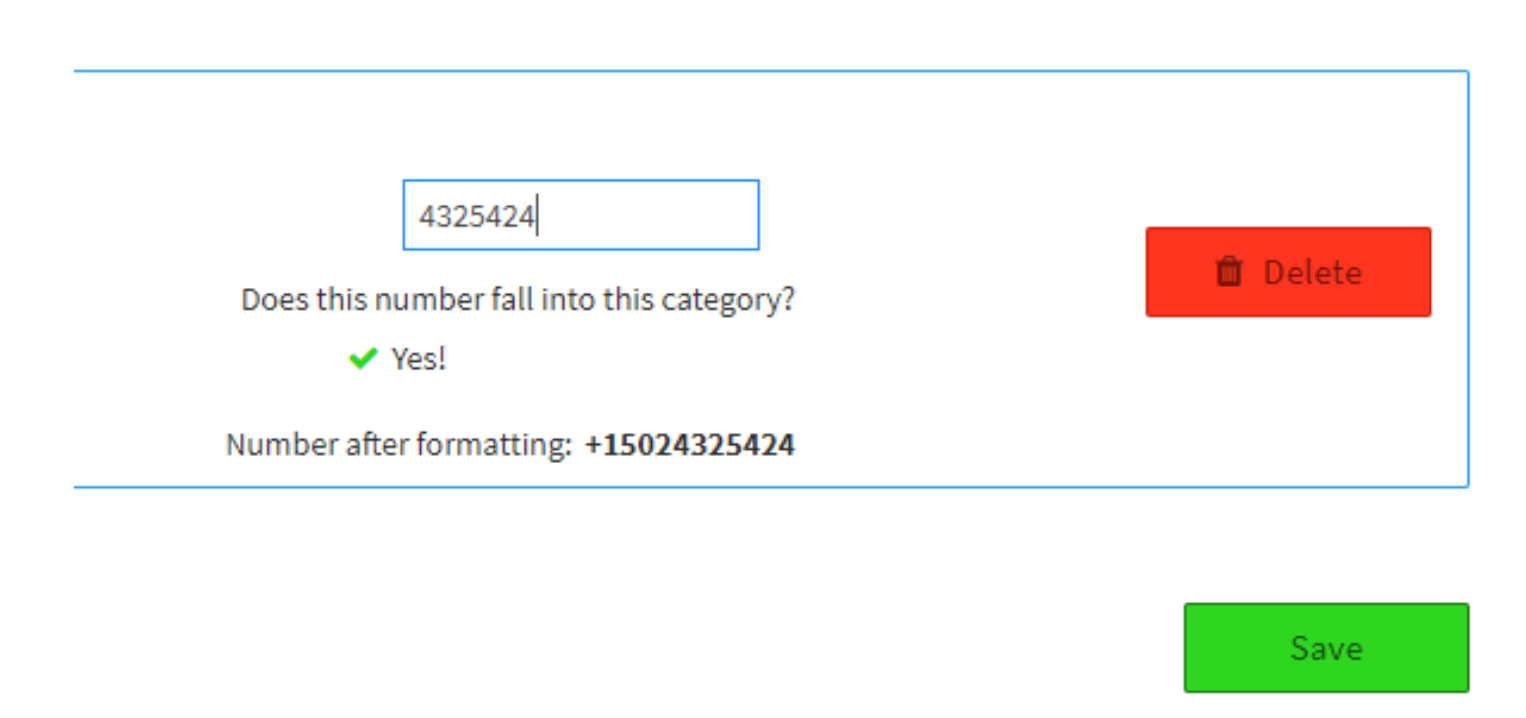
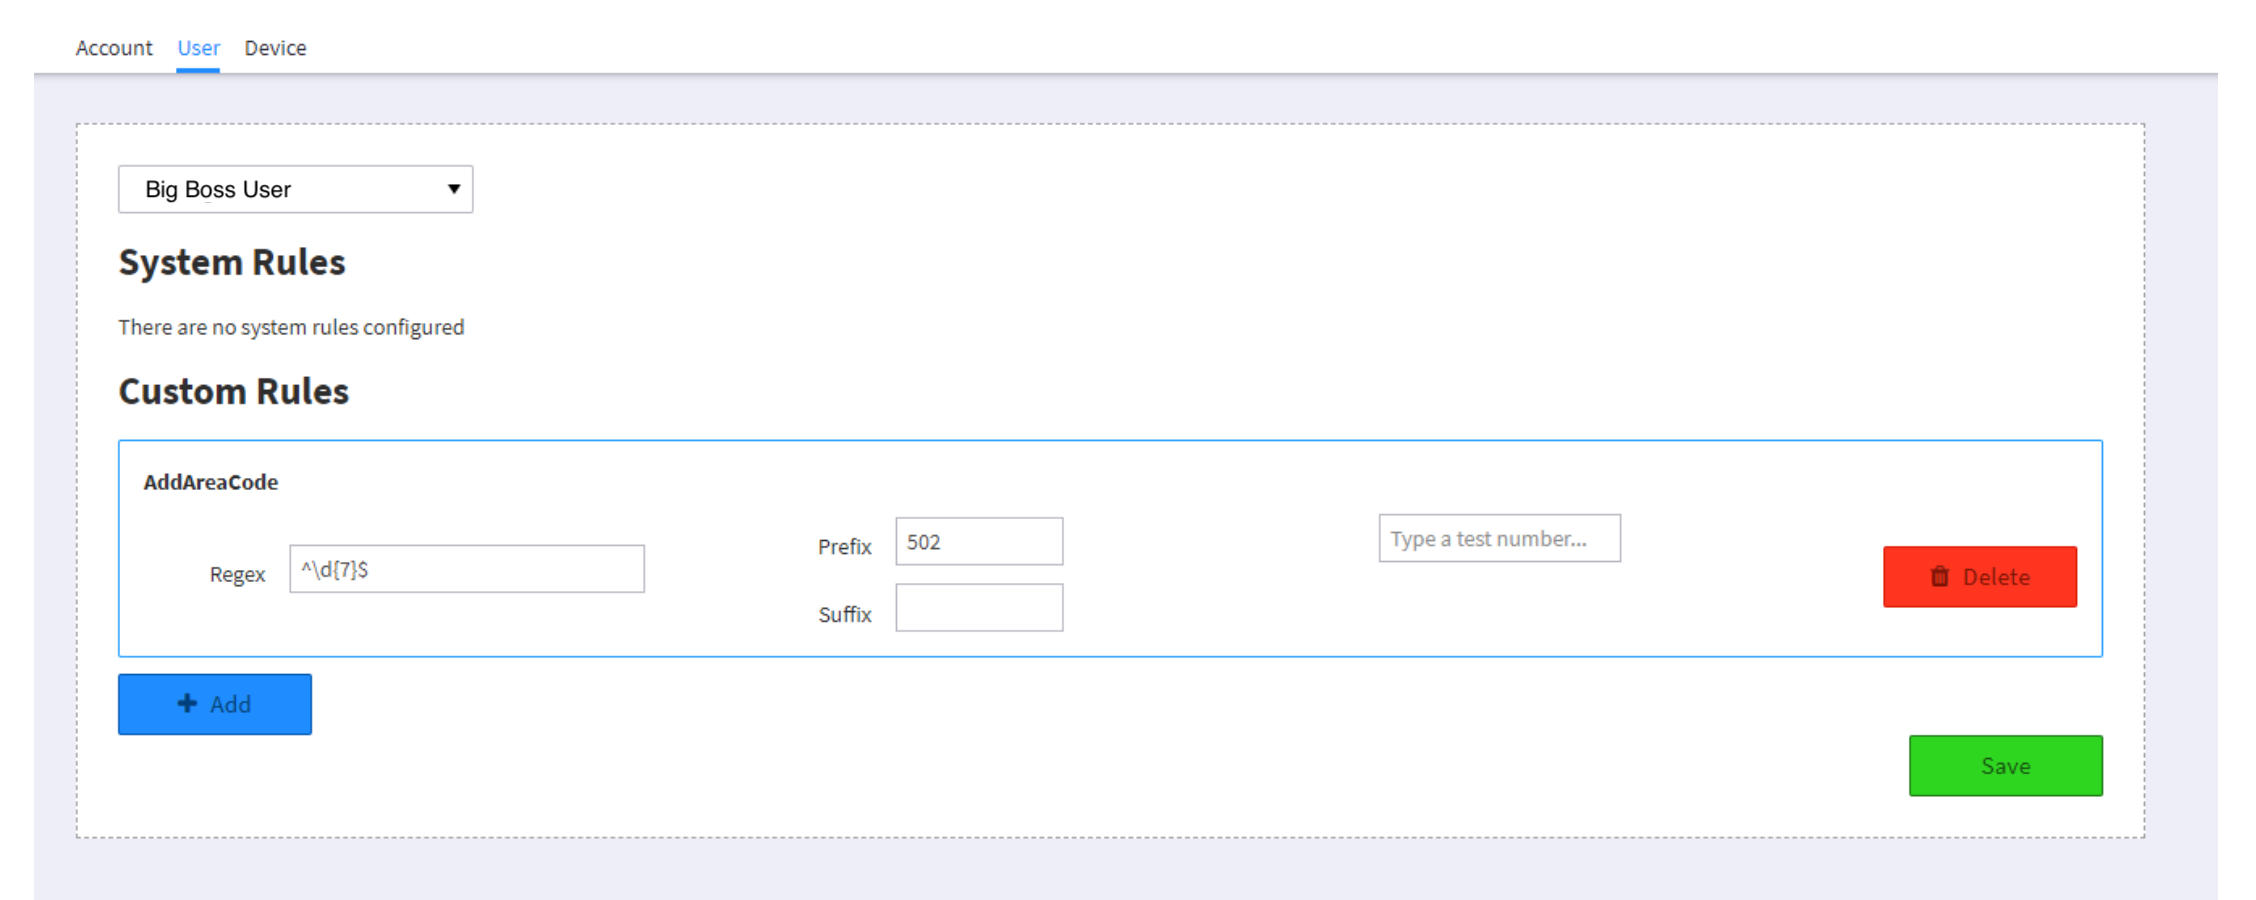
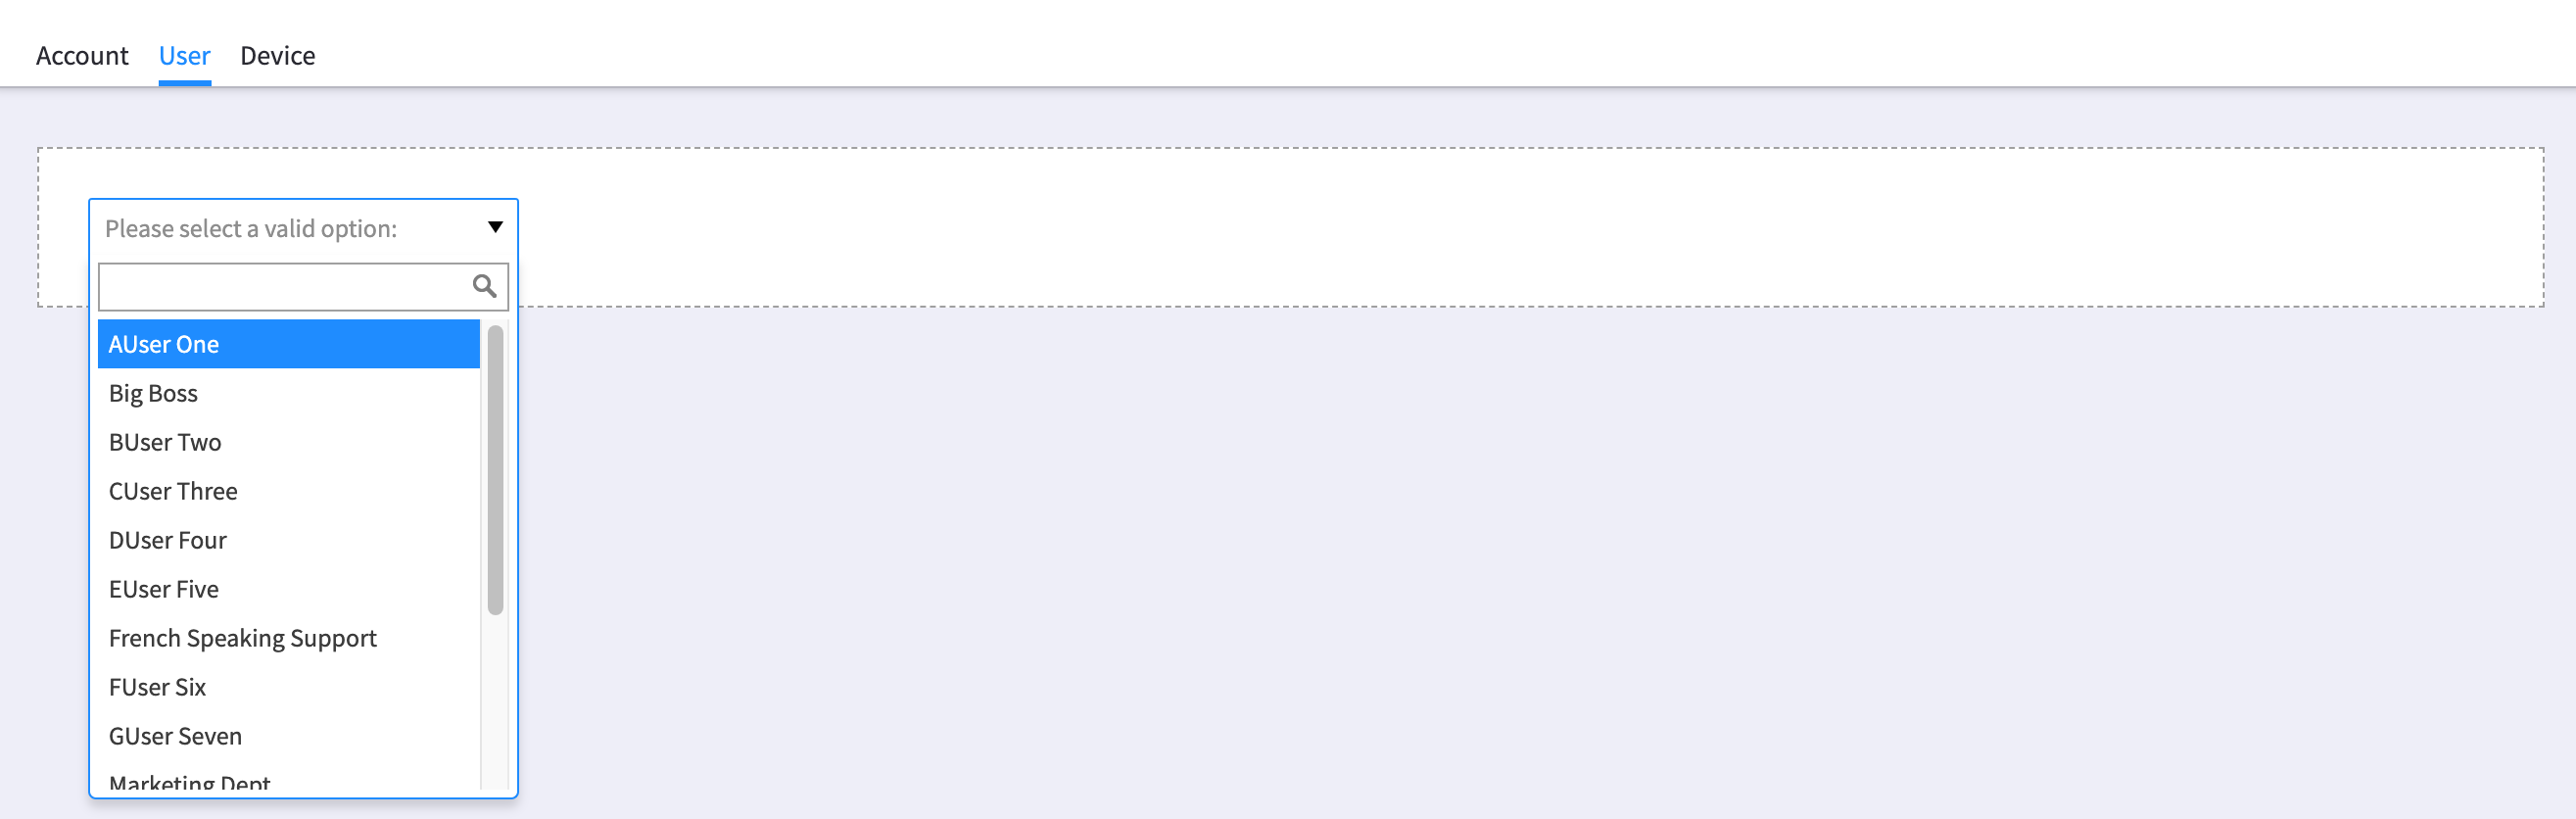
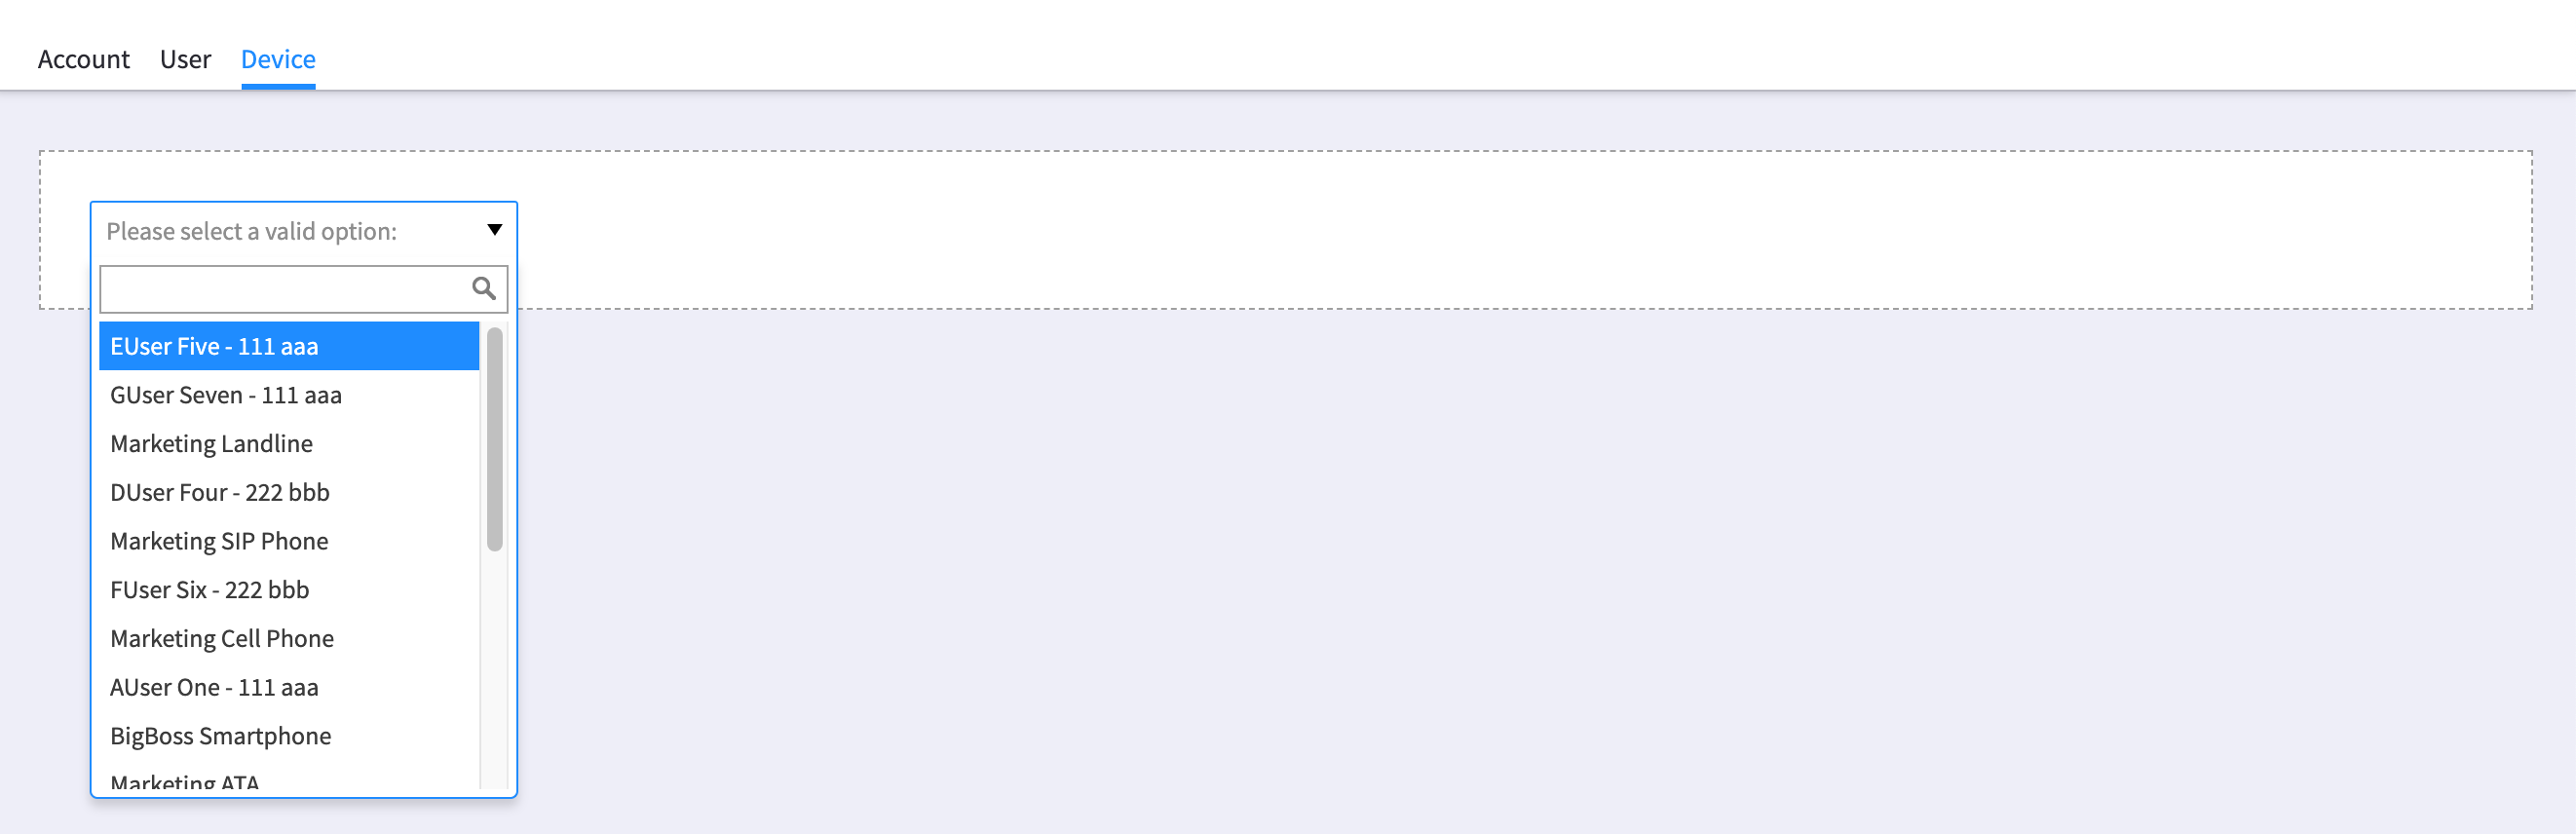
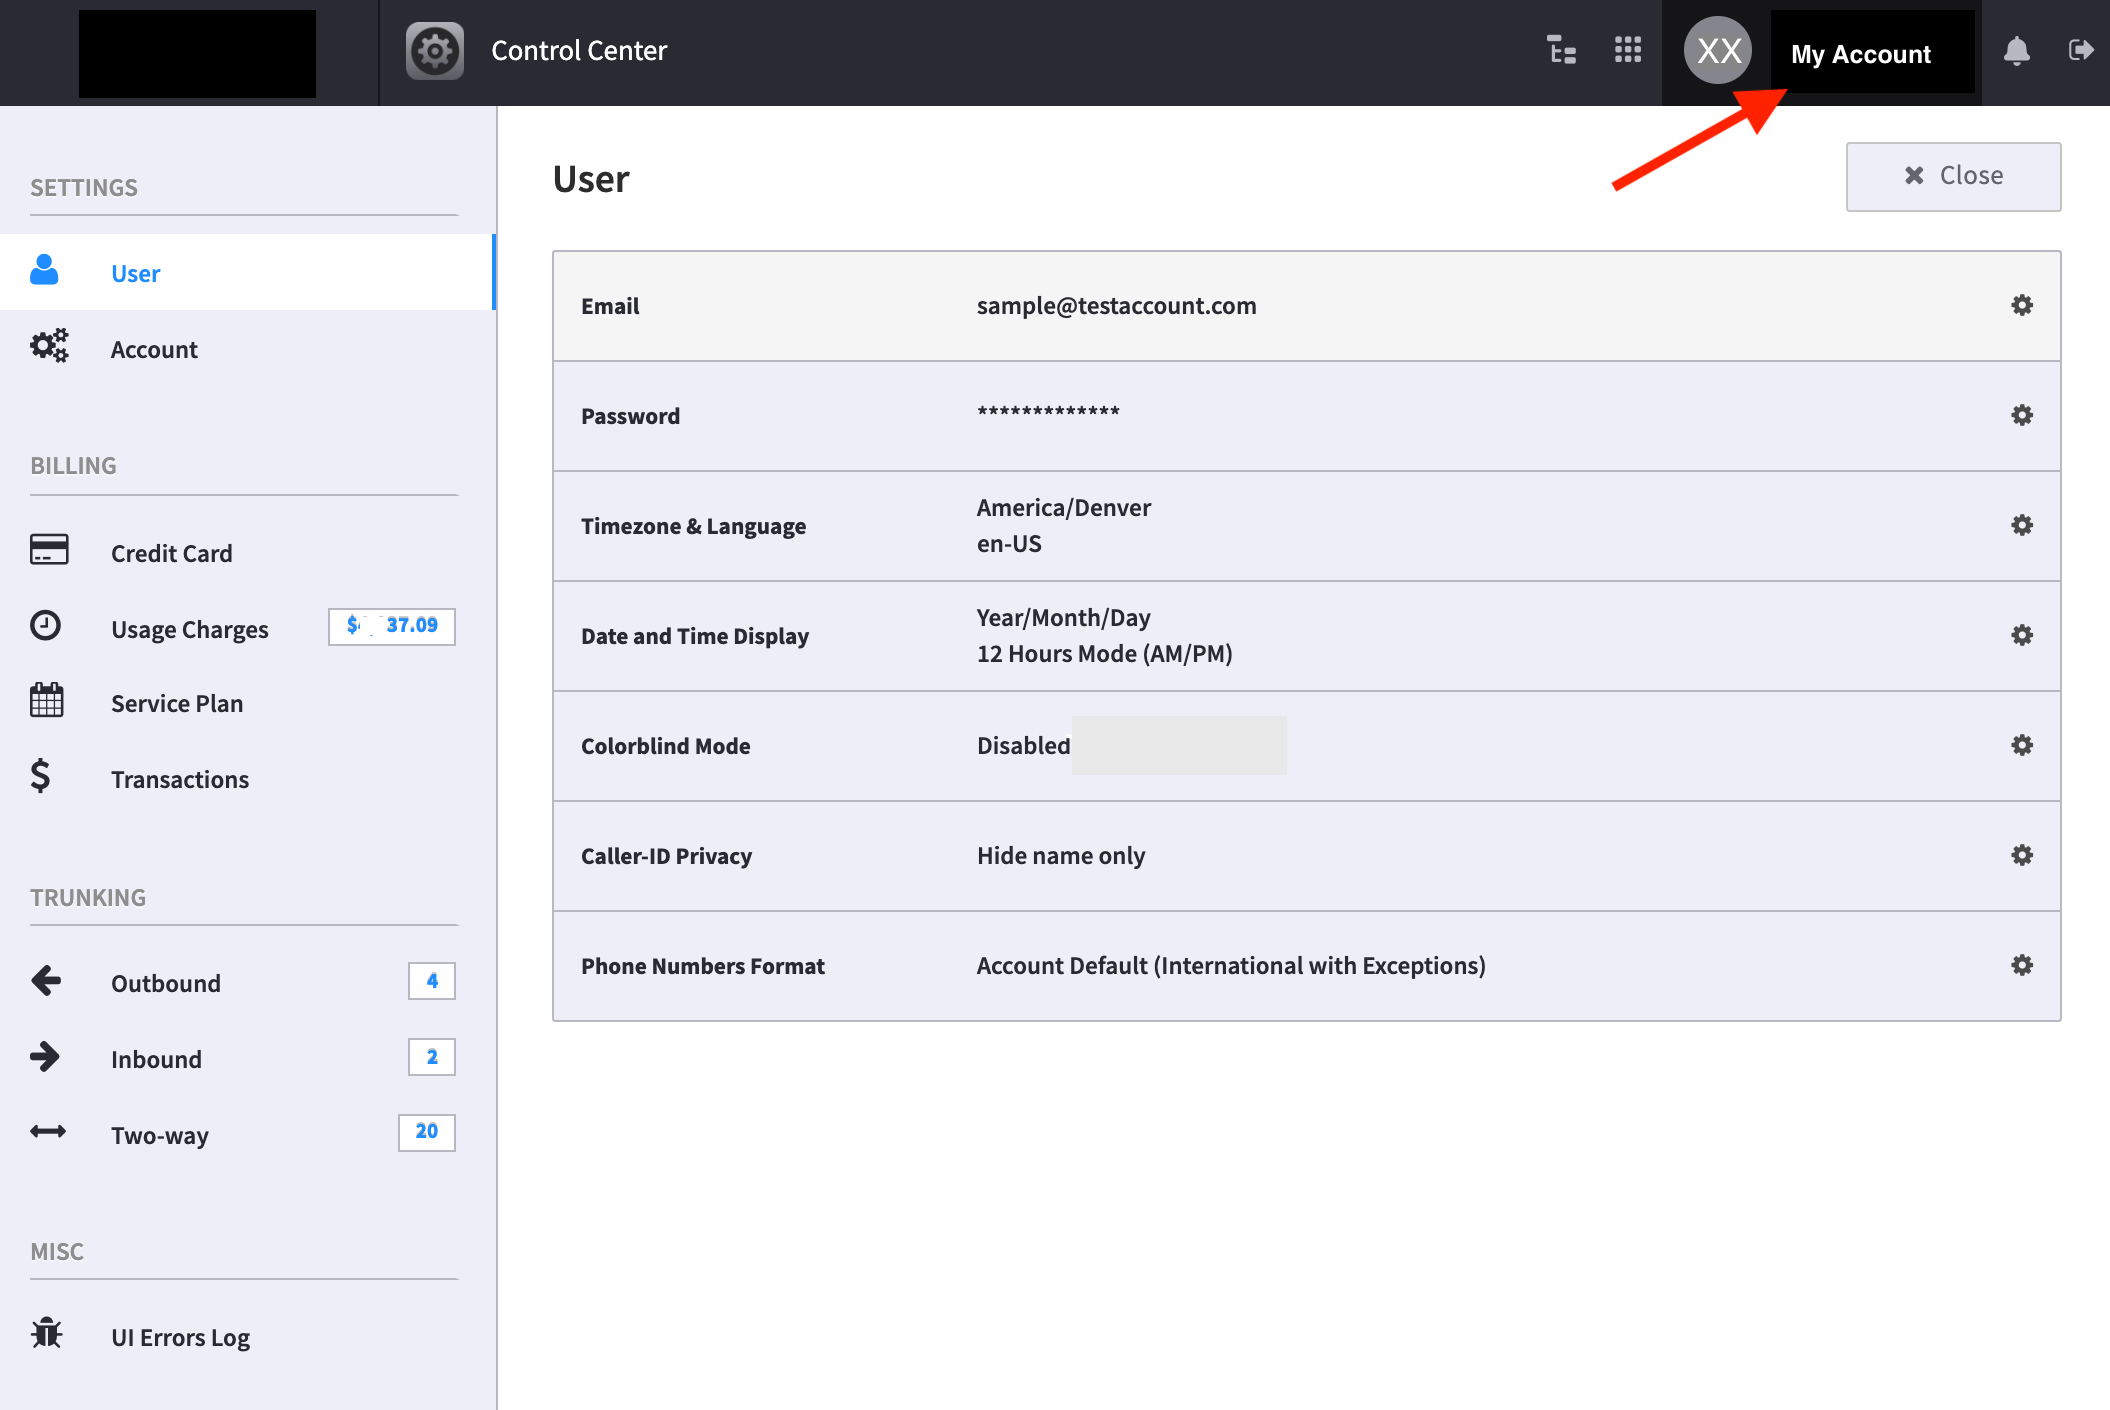
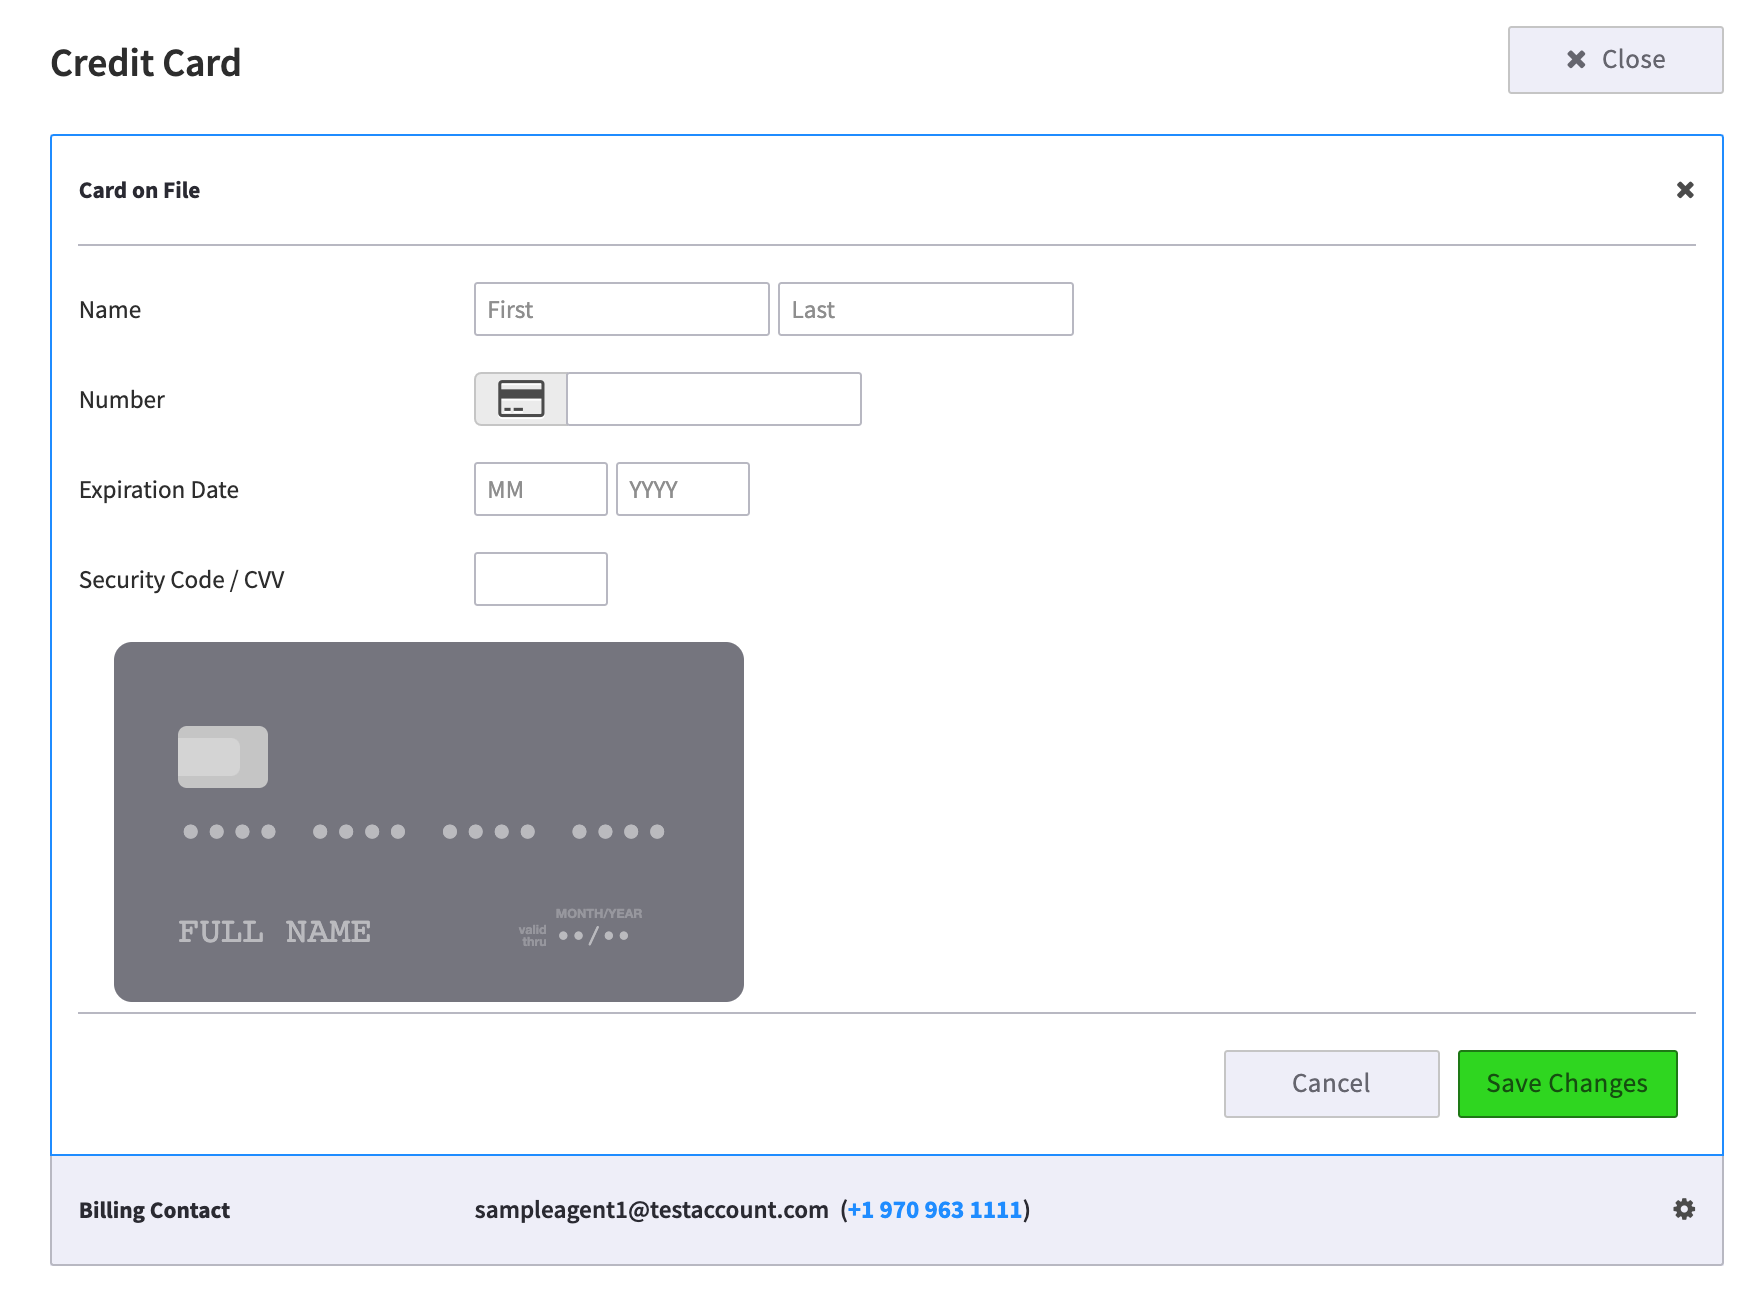
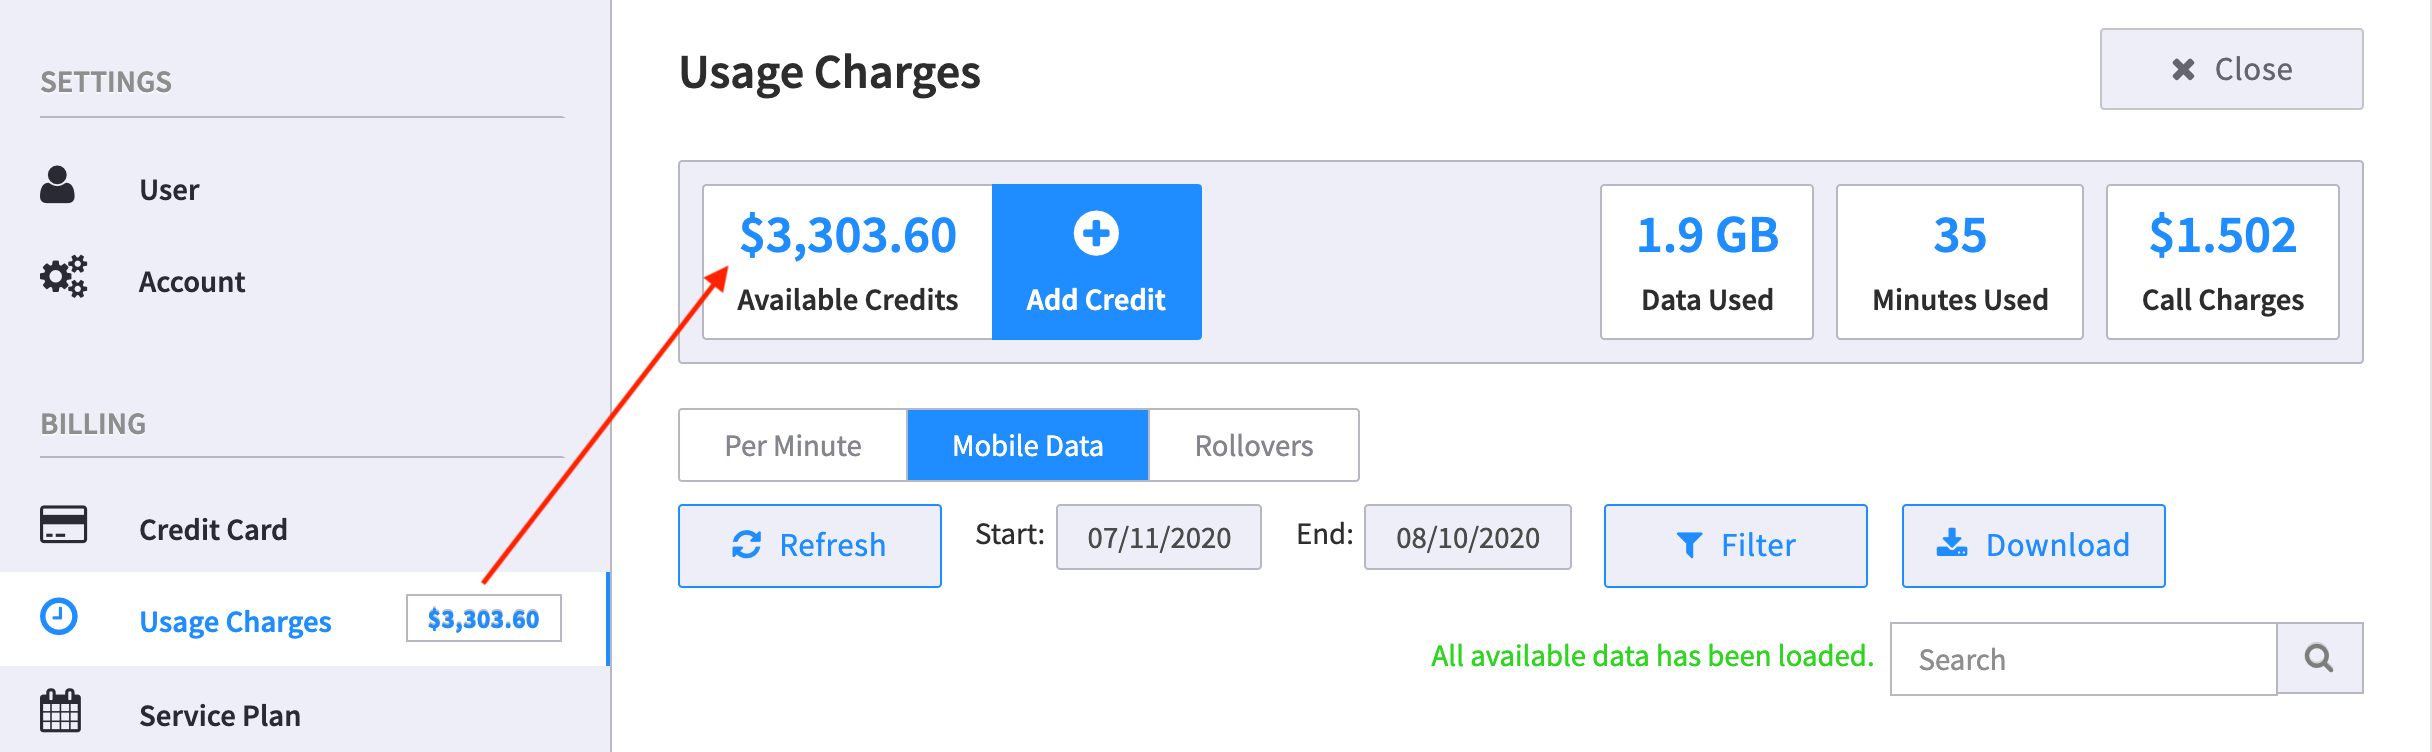
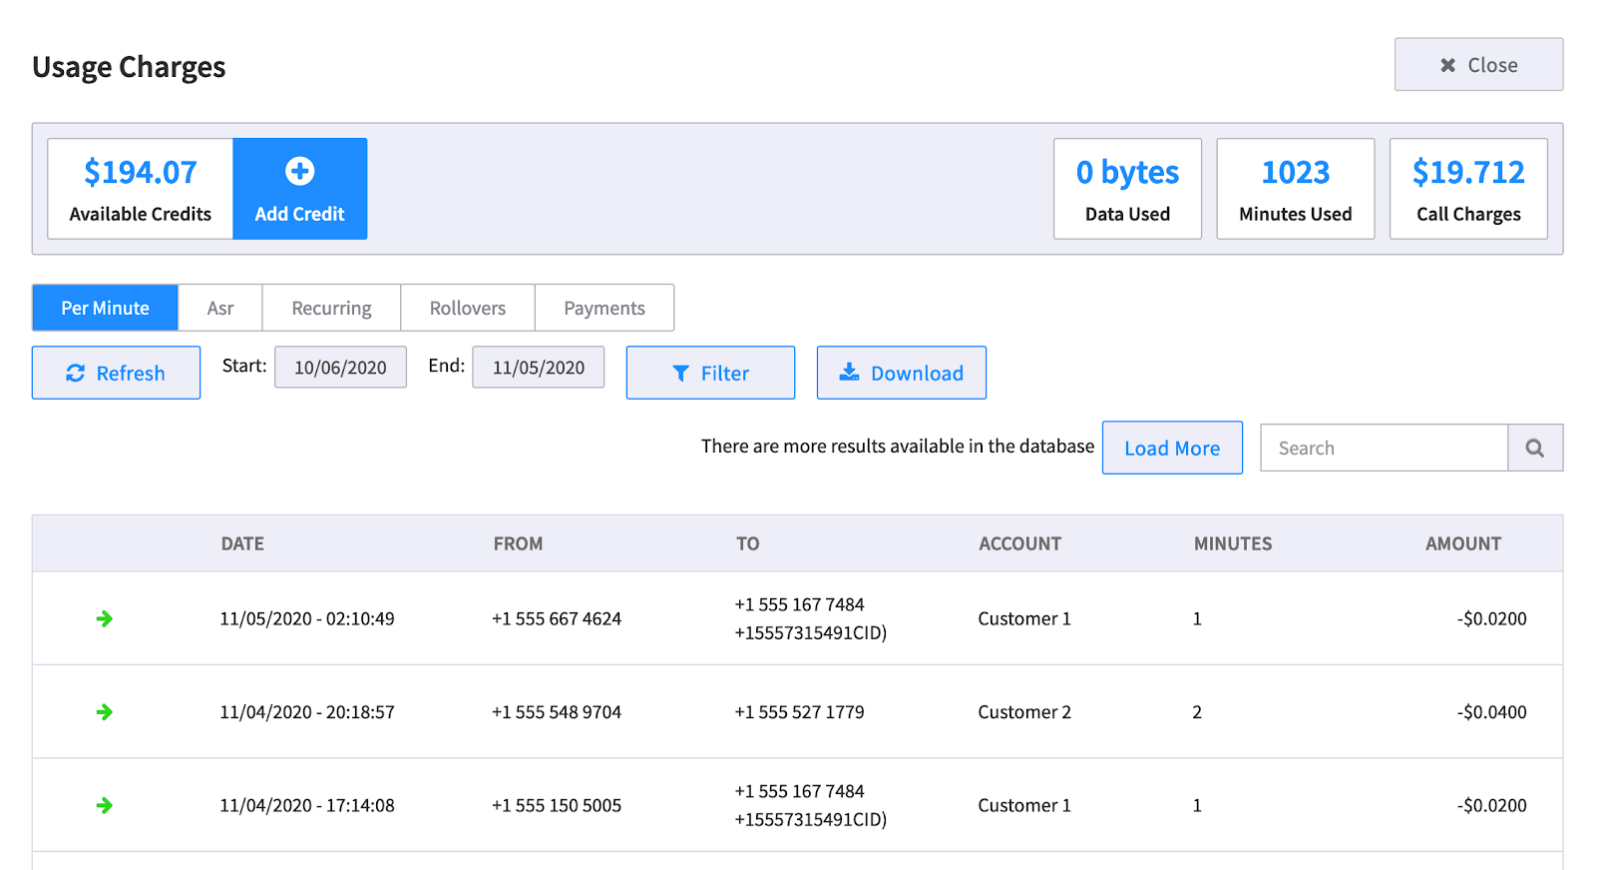
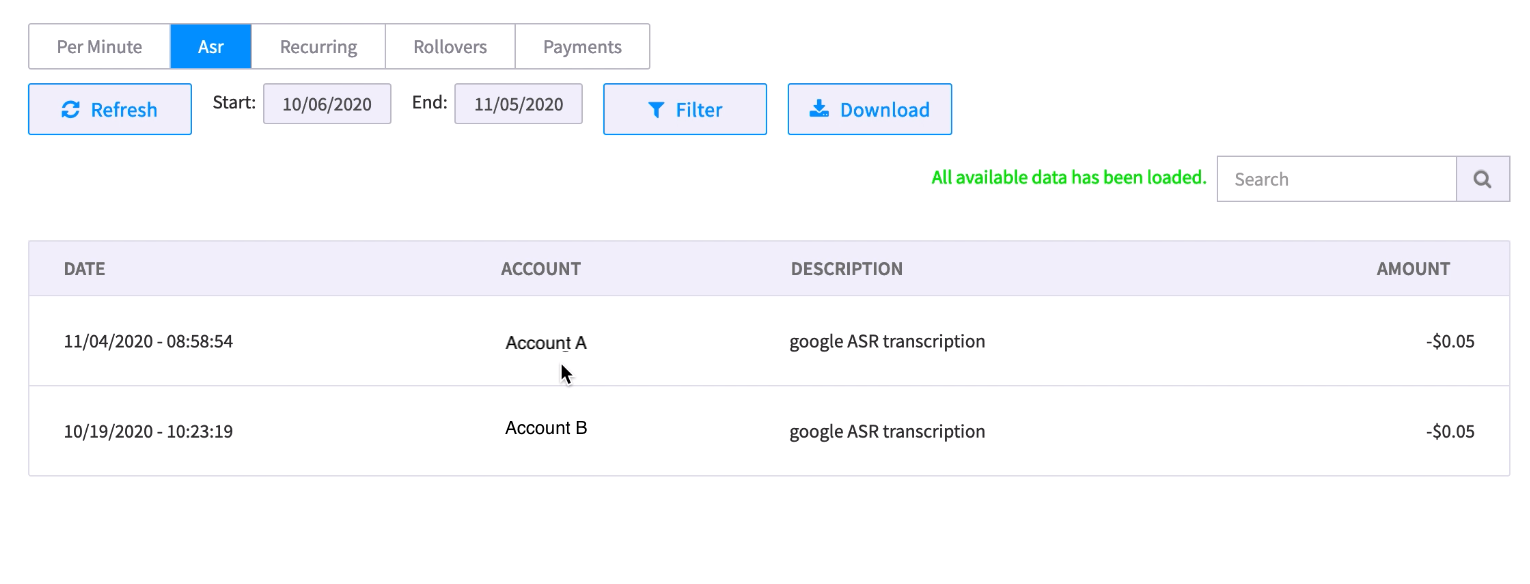
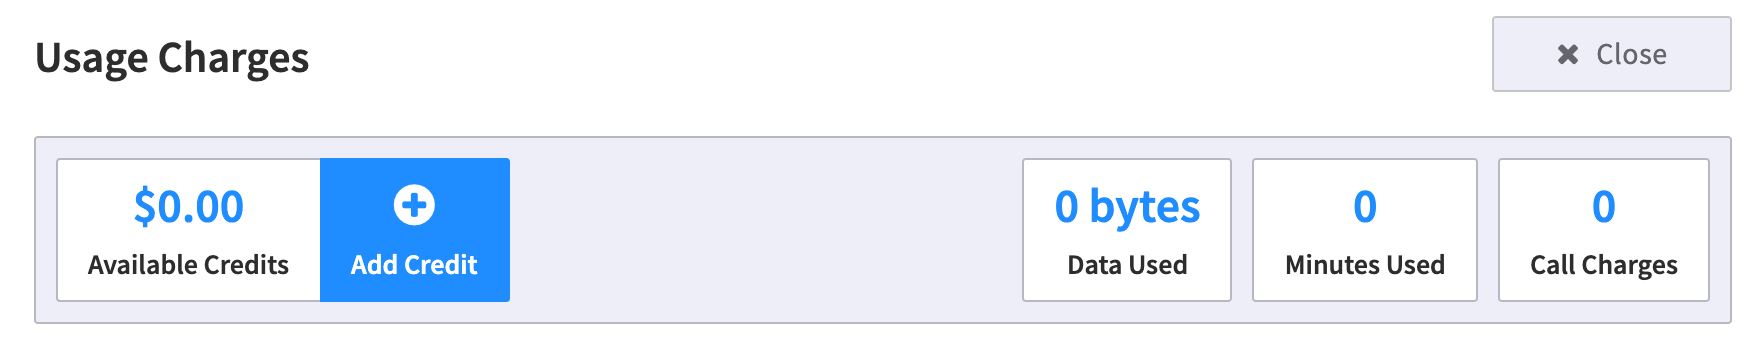

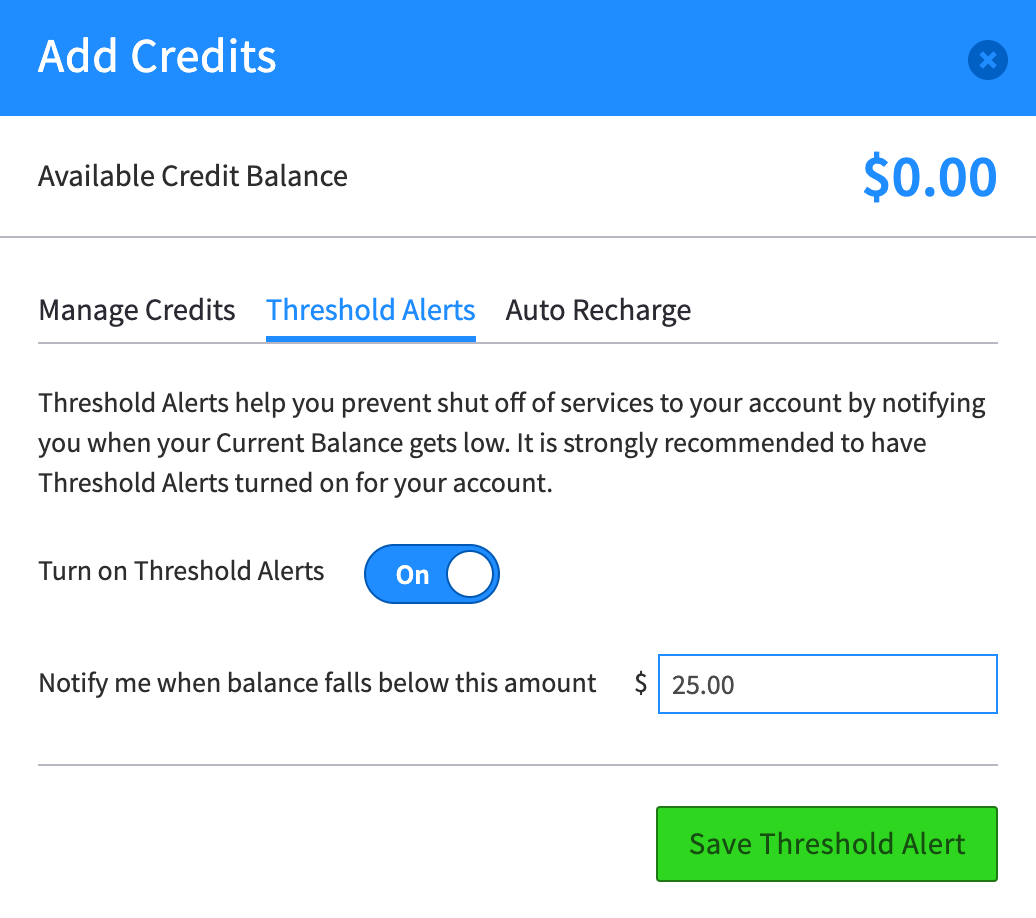

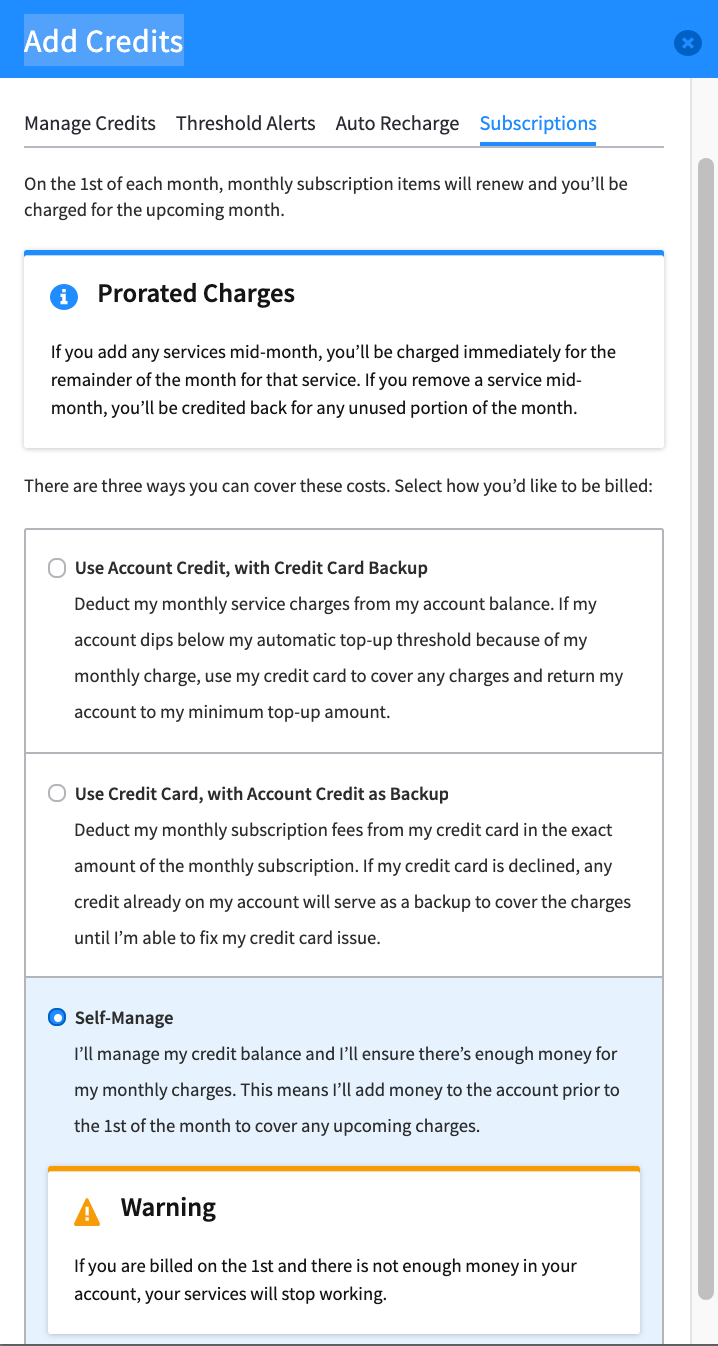
.png.96fd0bb0c5e4a4a87a25d9d476eb52d6.png)


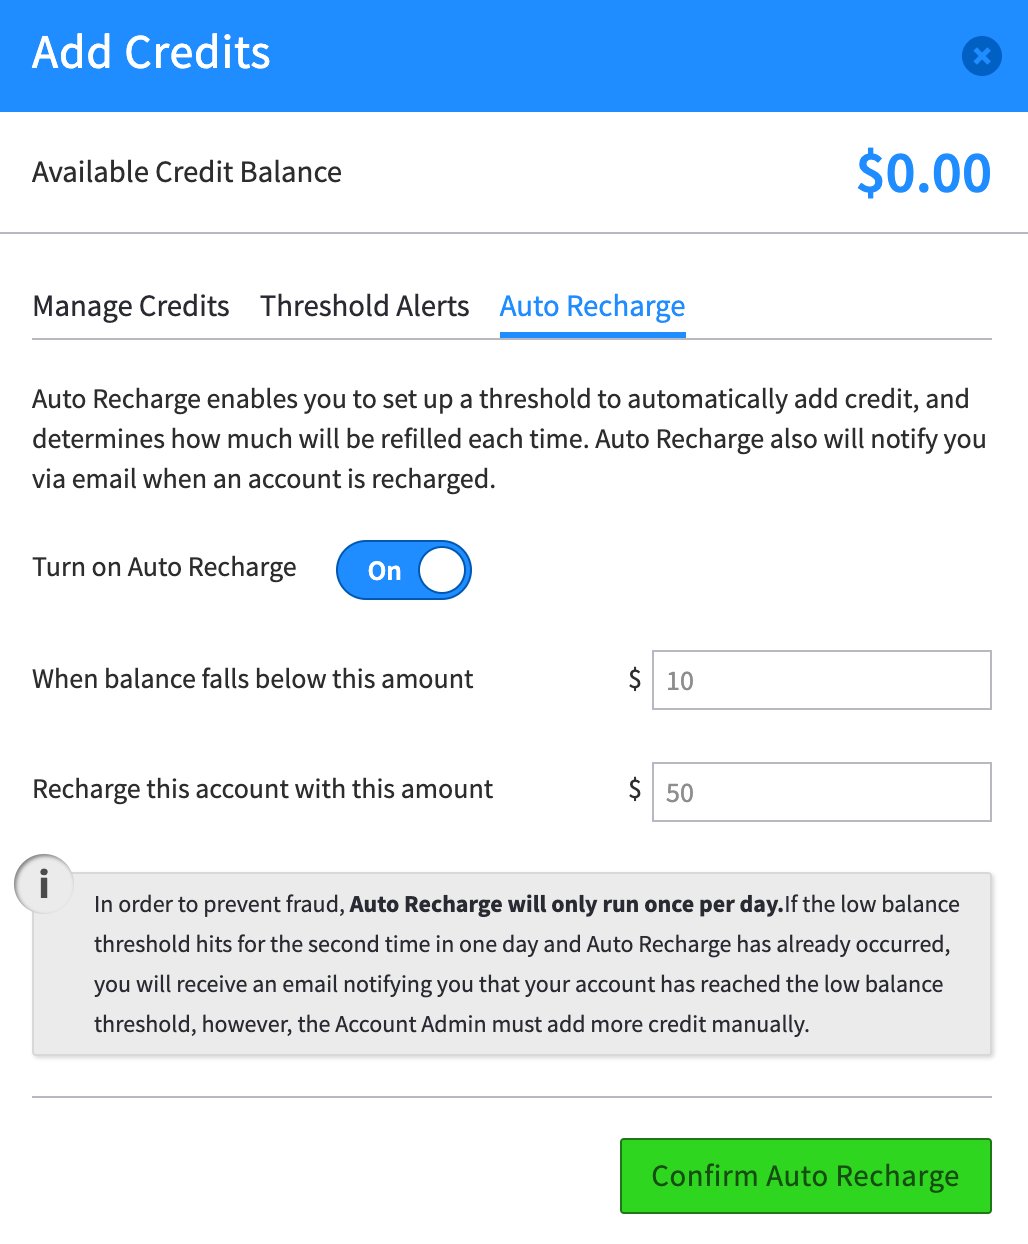
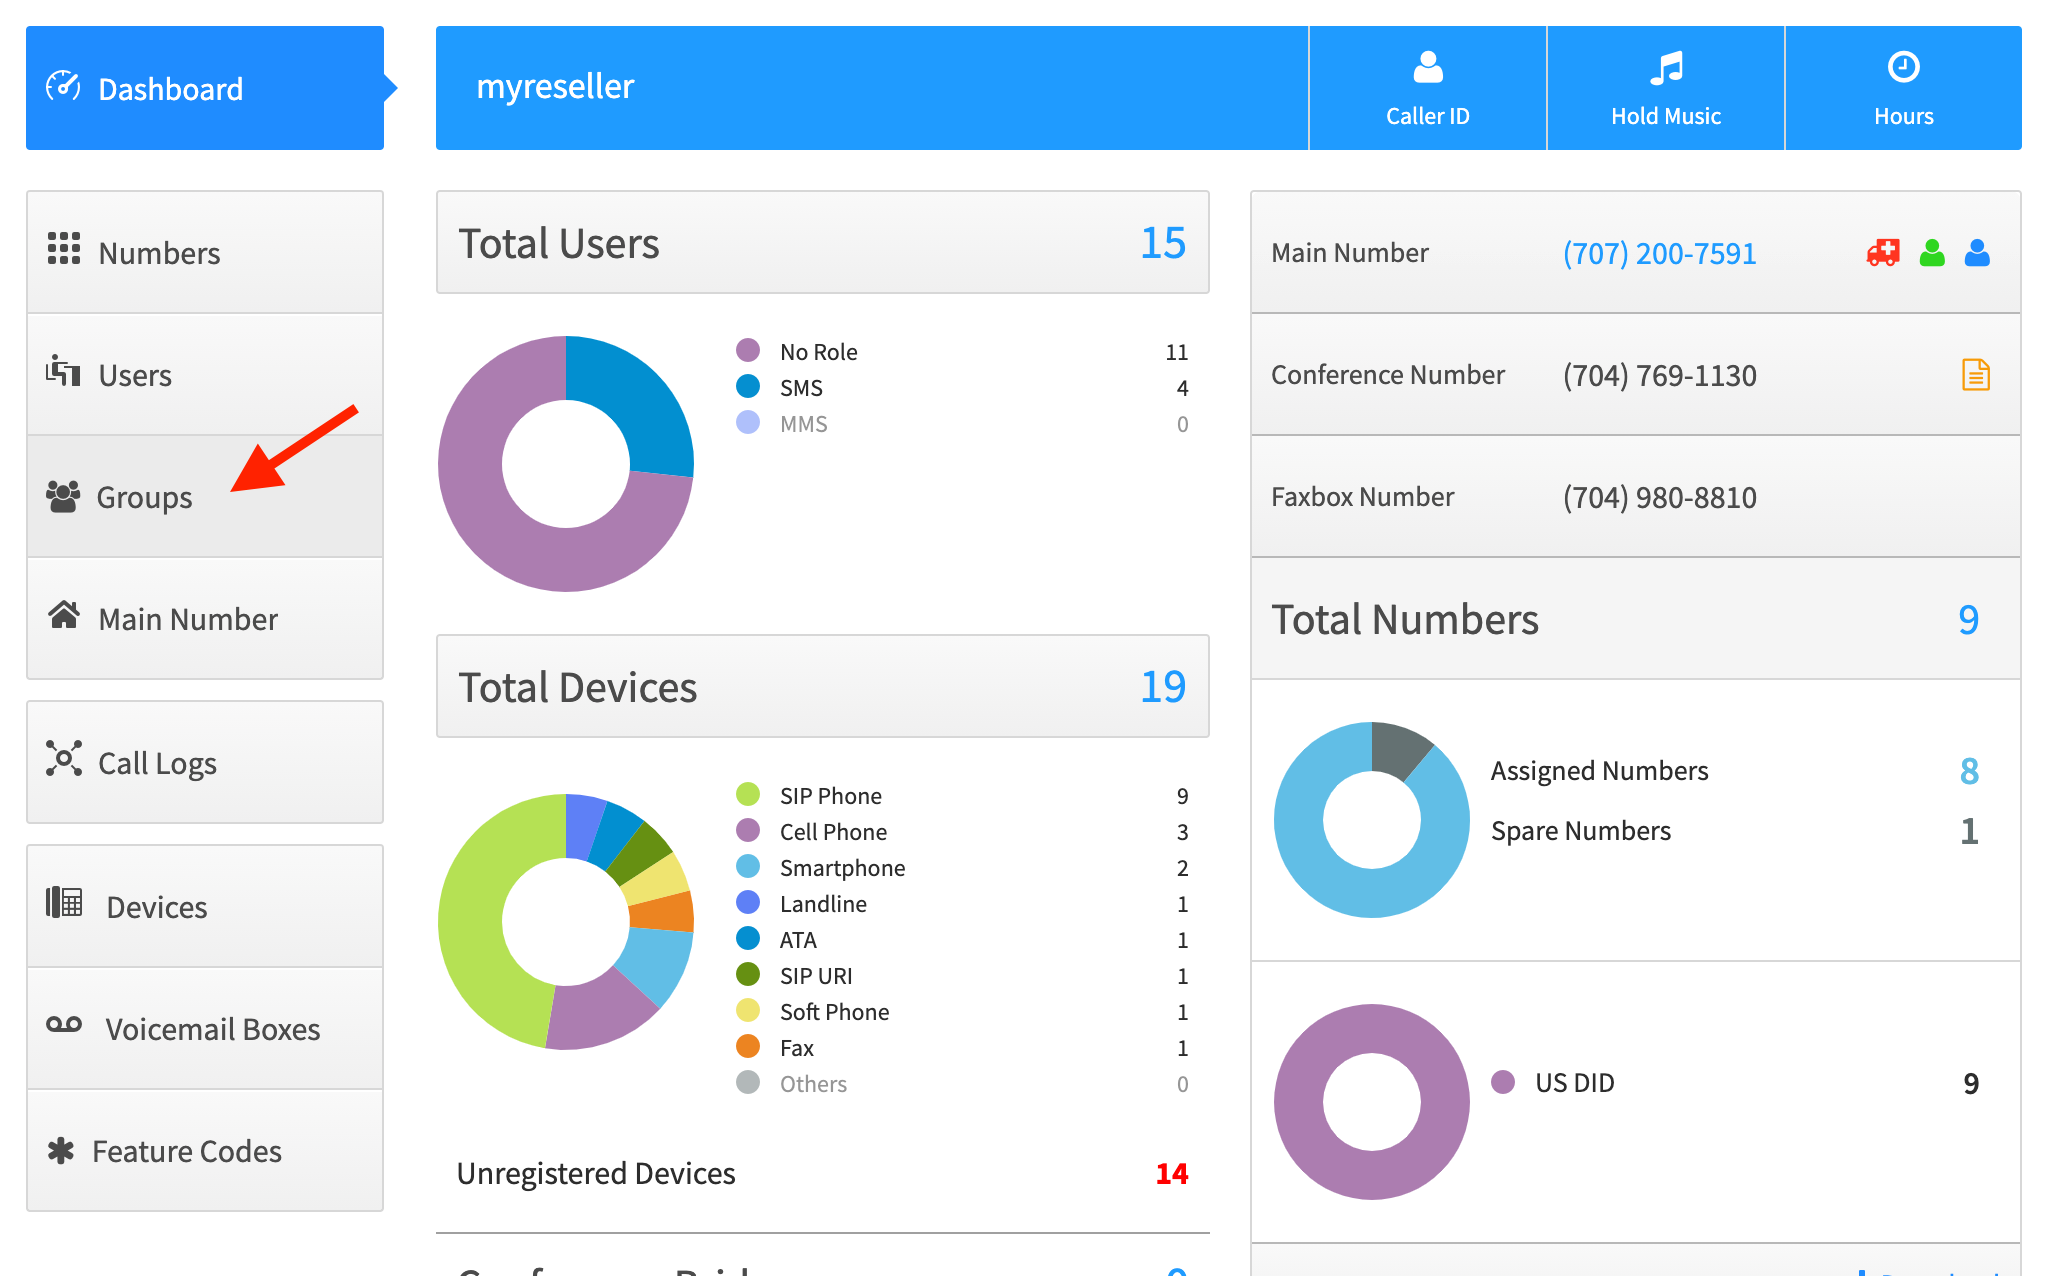
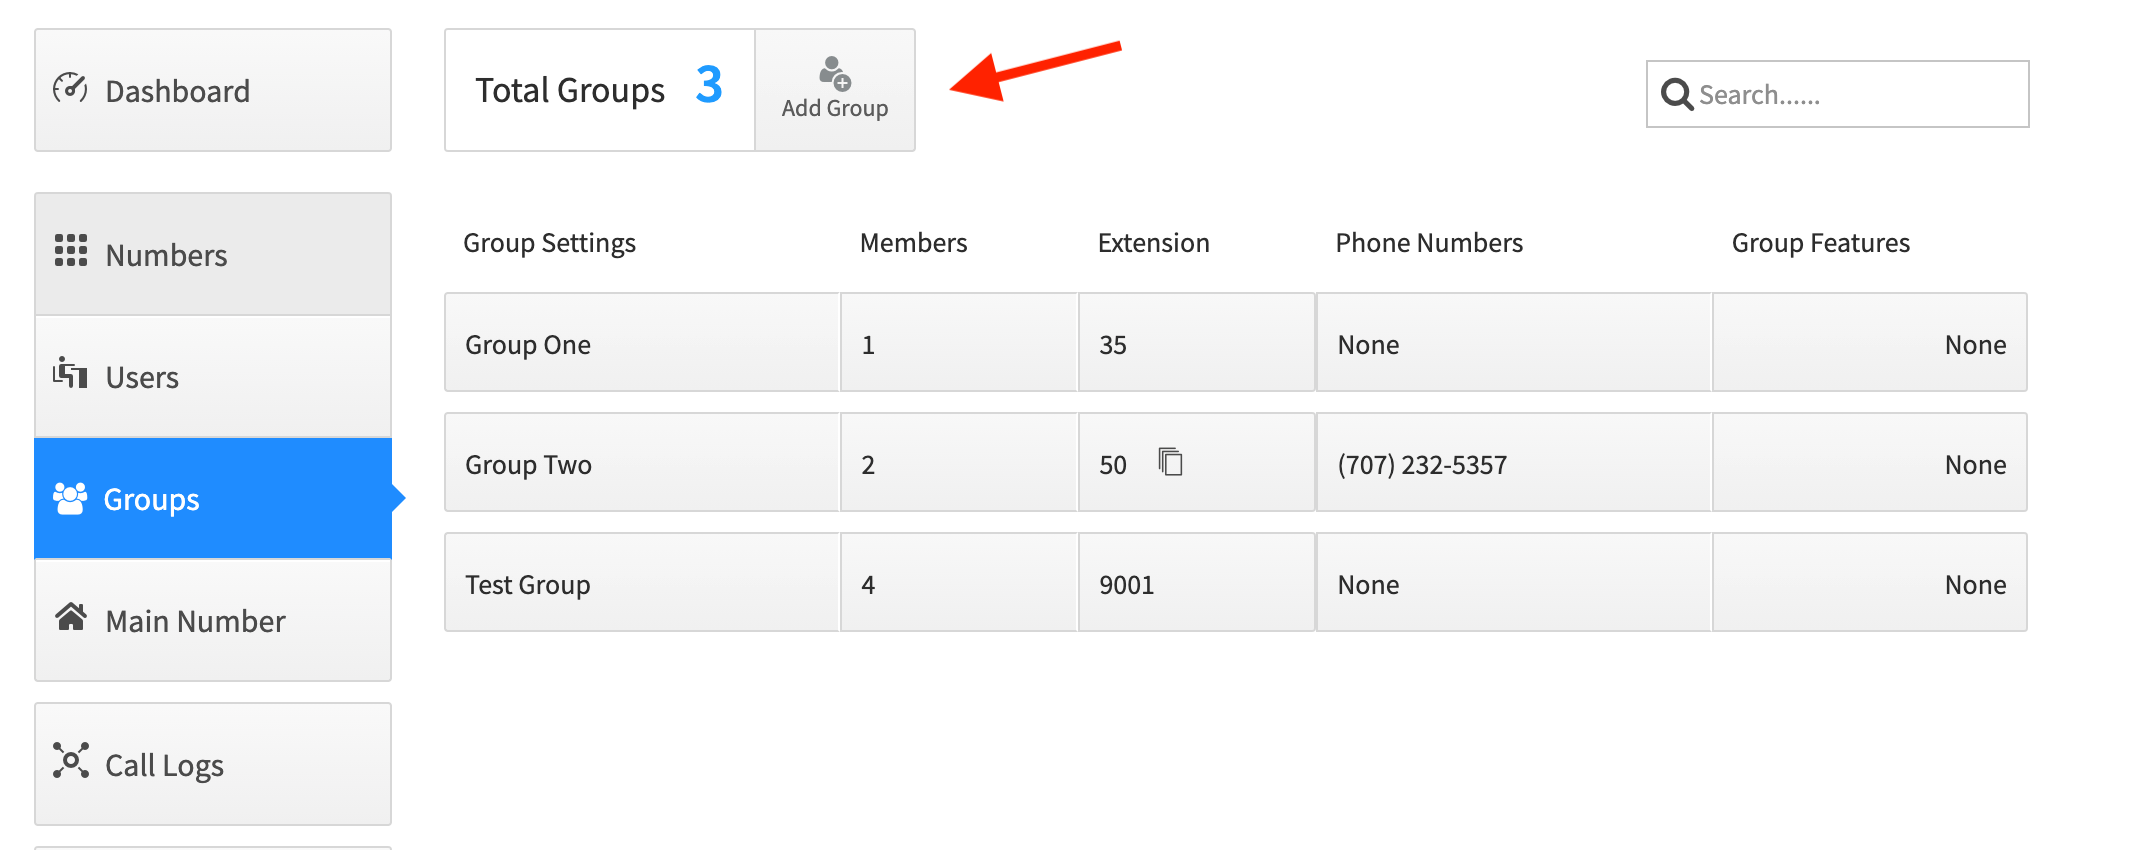
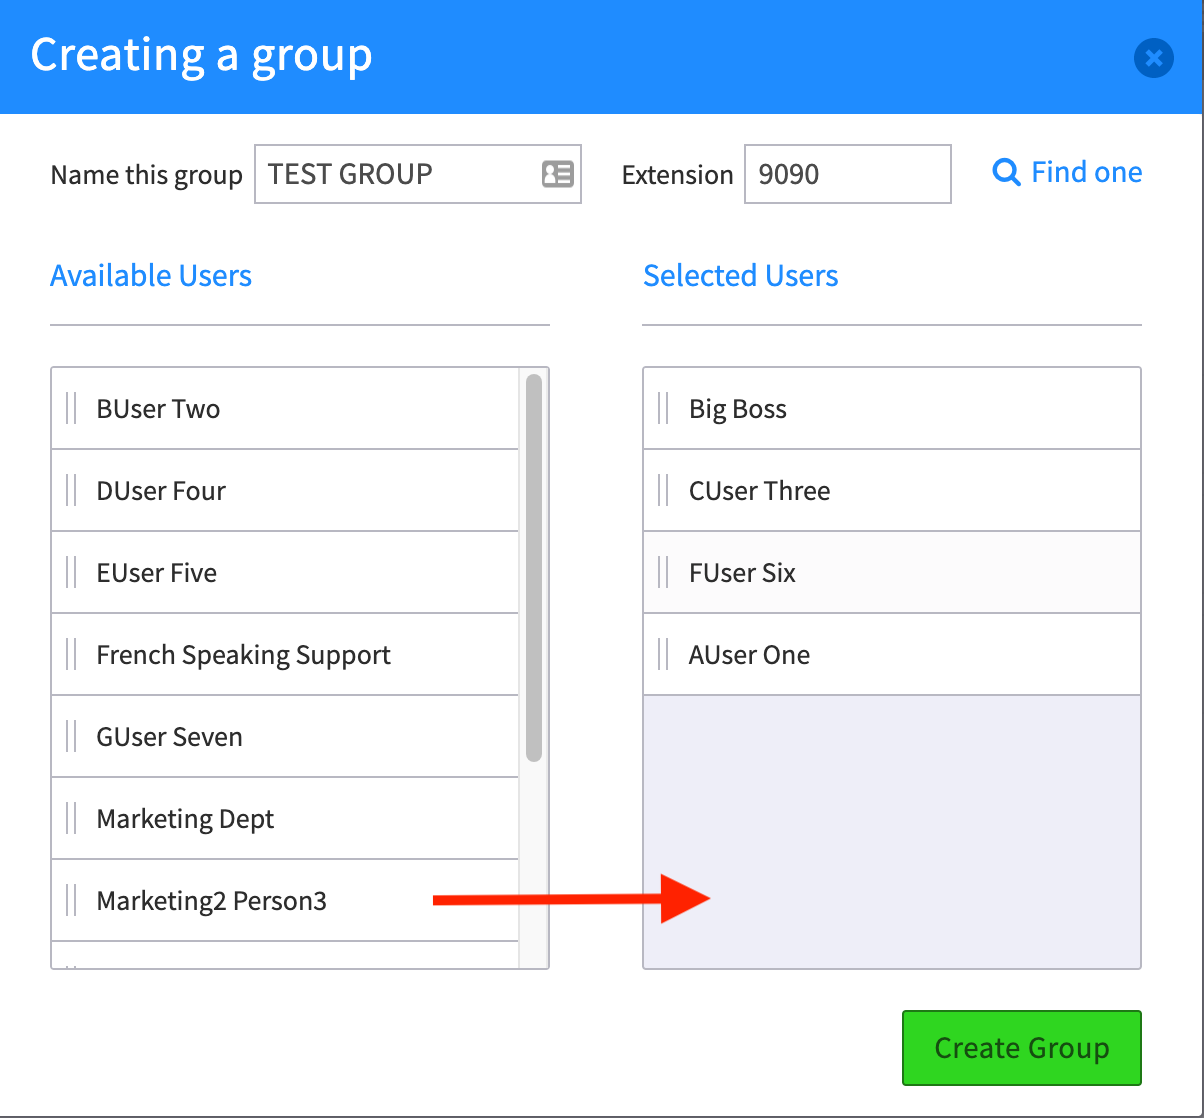
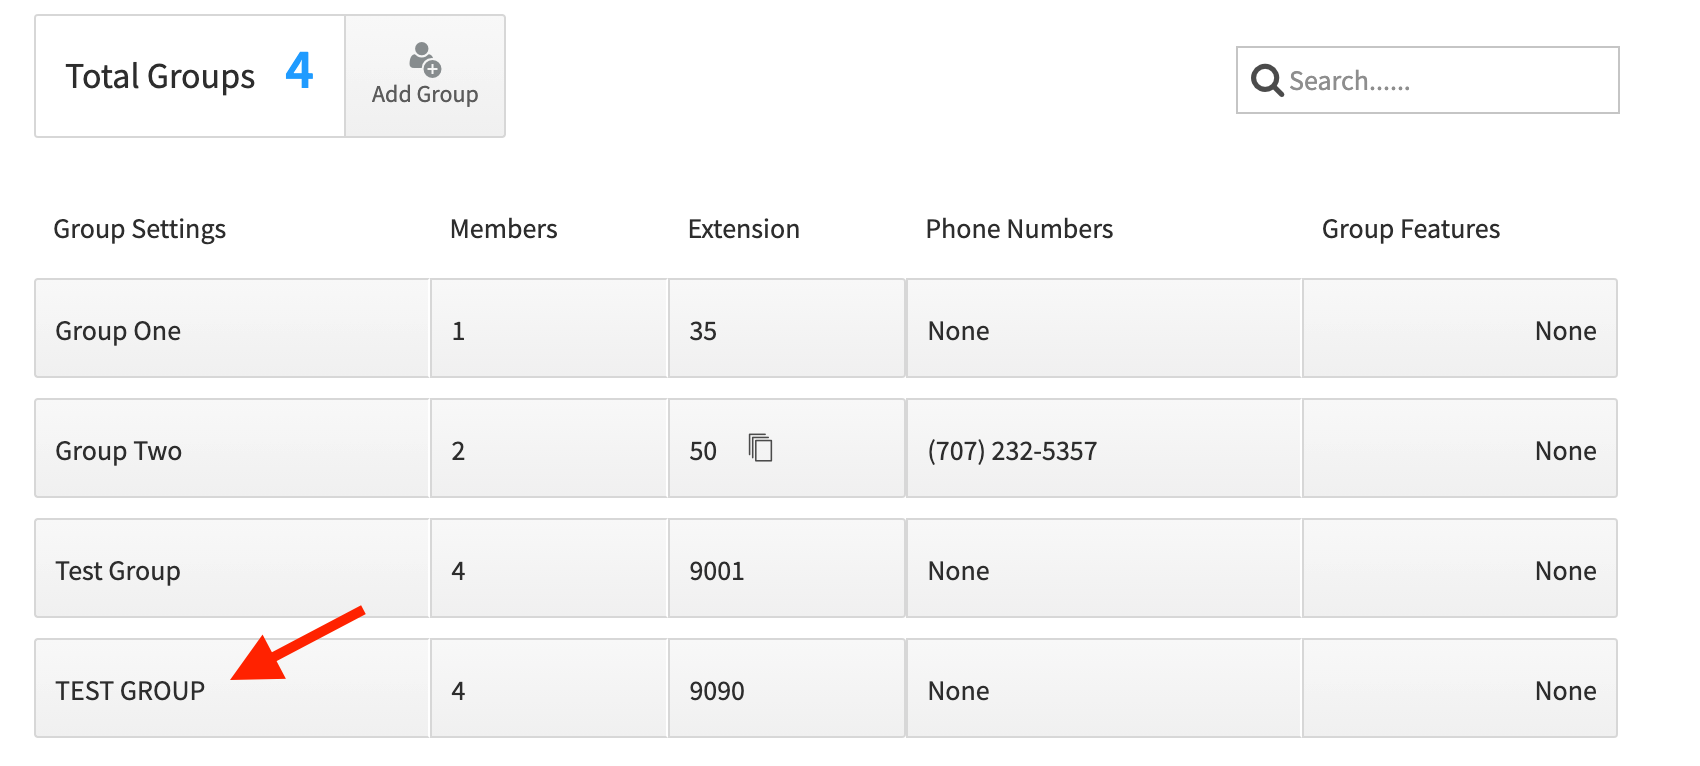
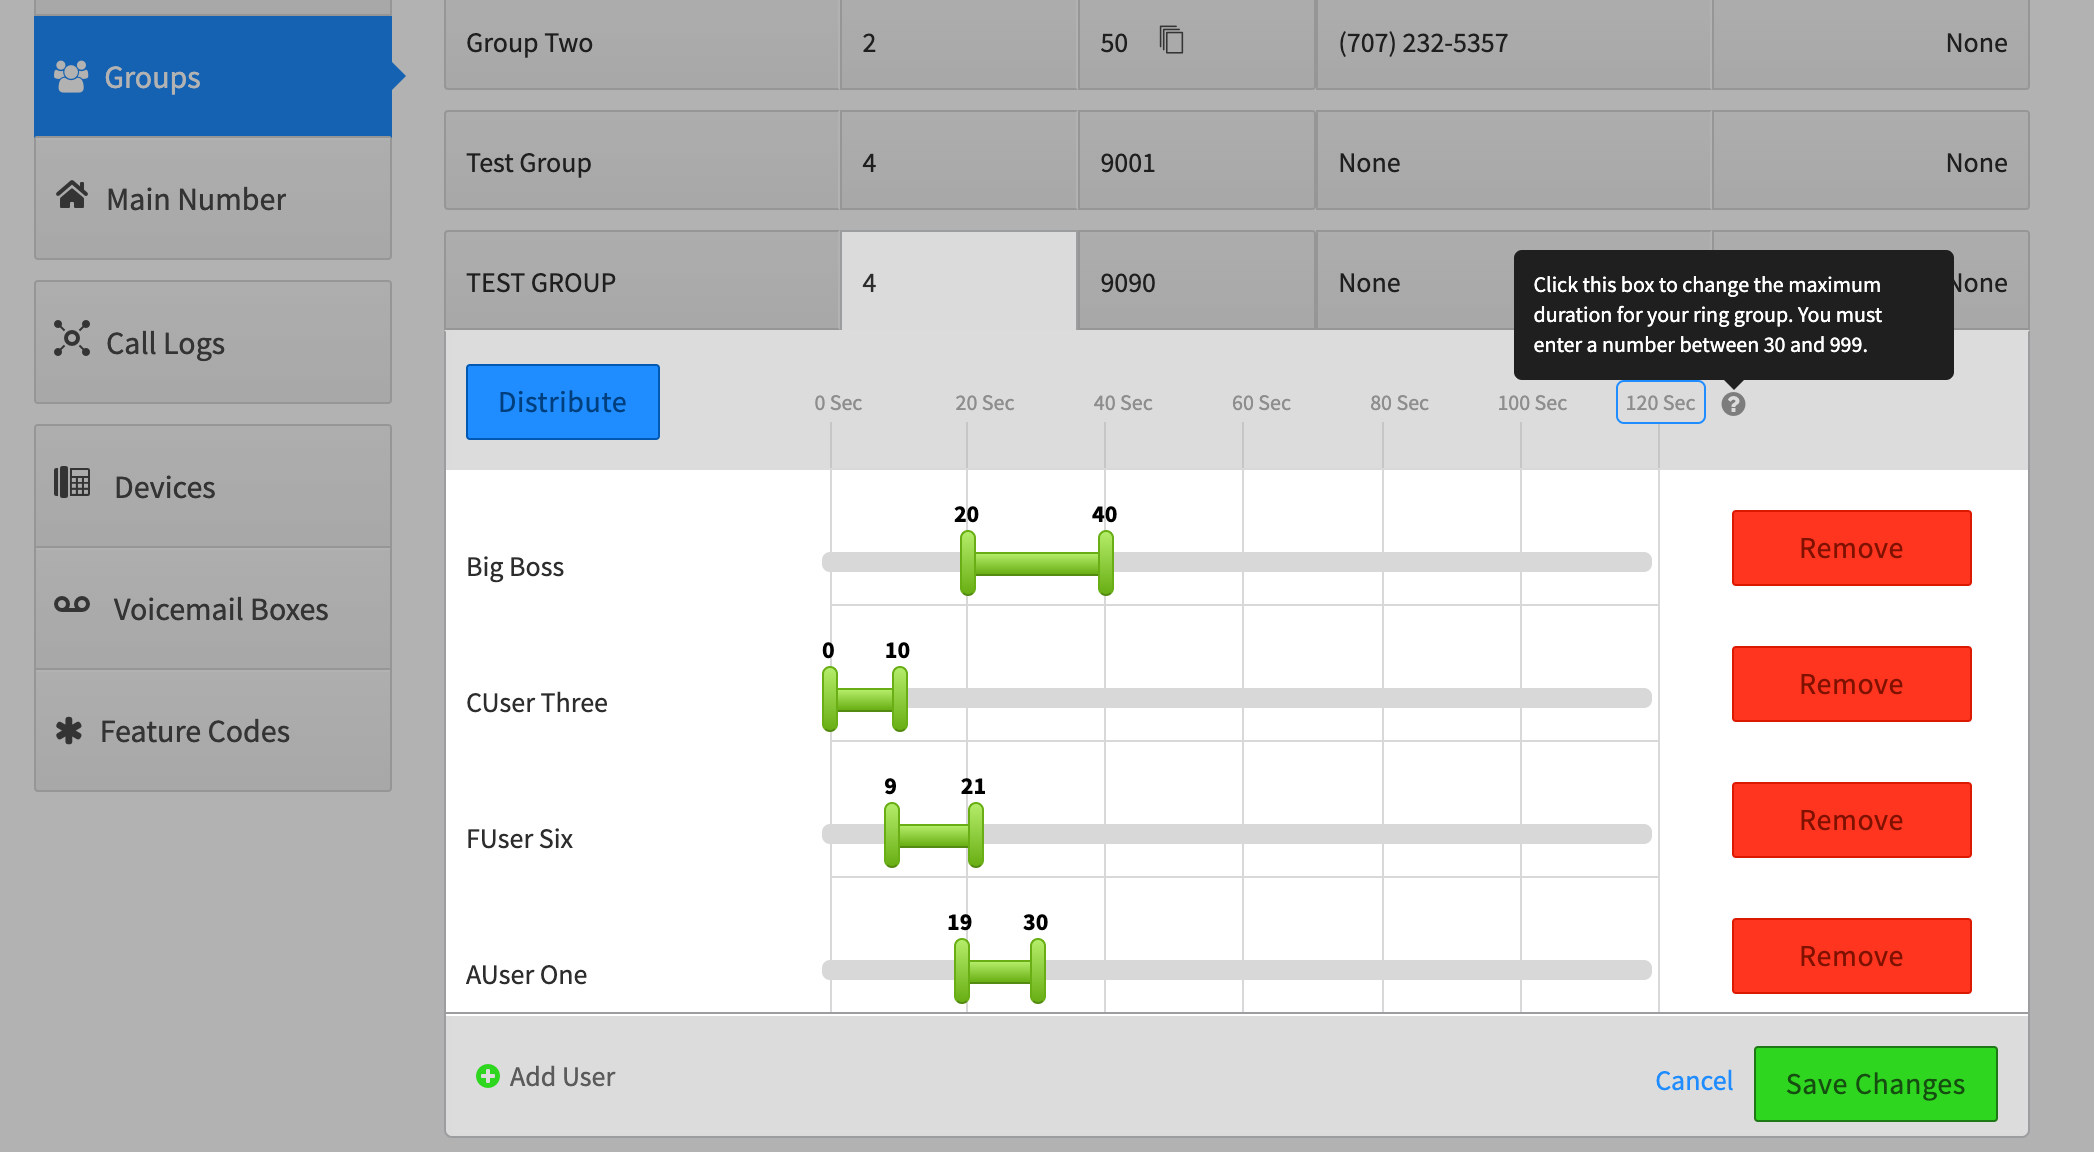
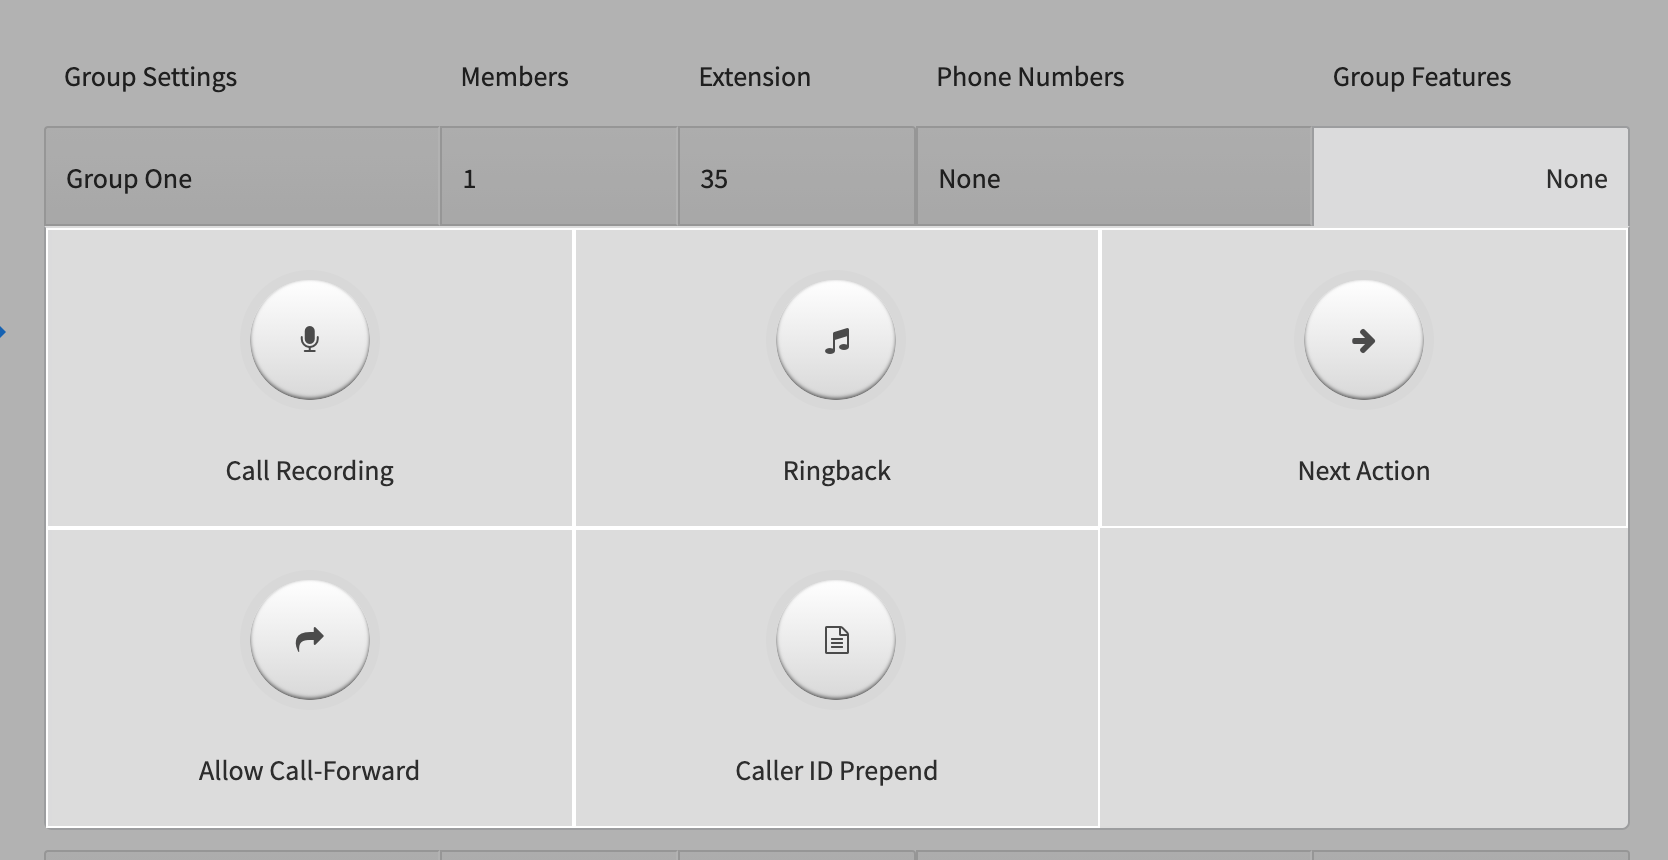
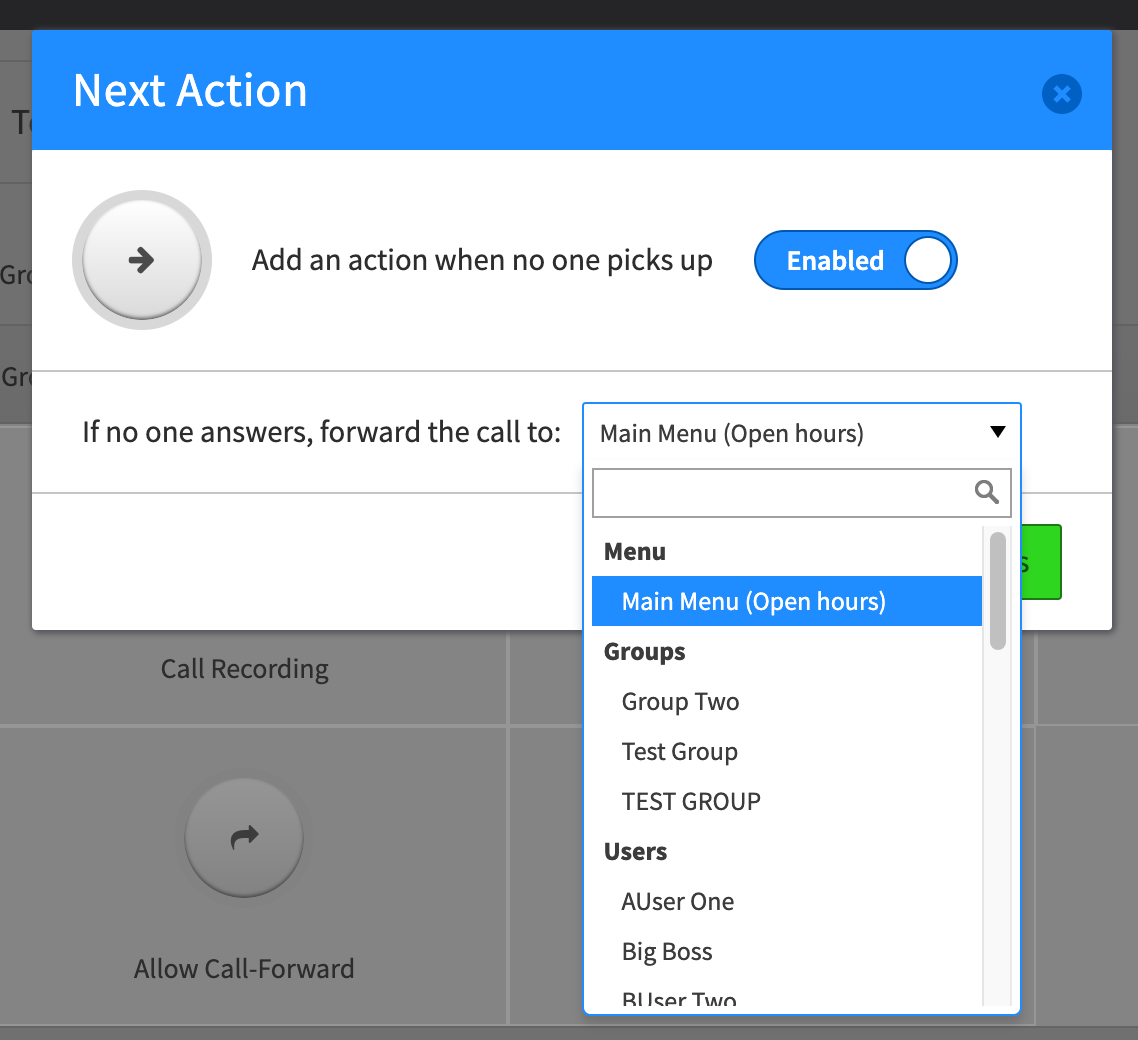

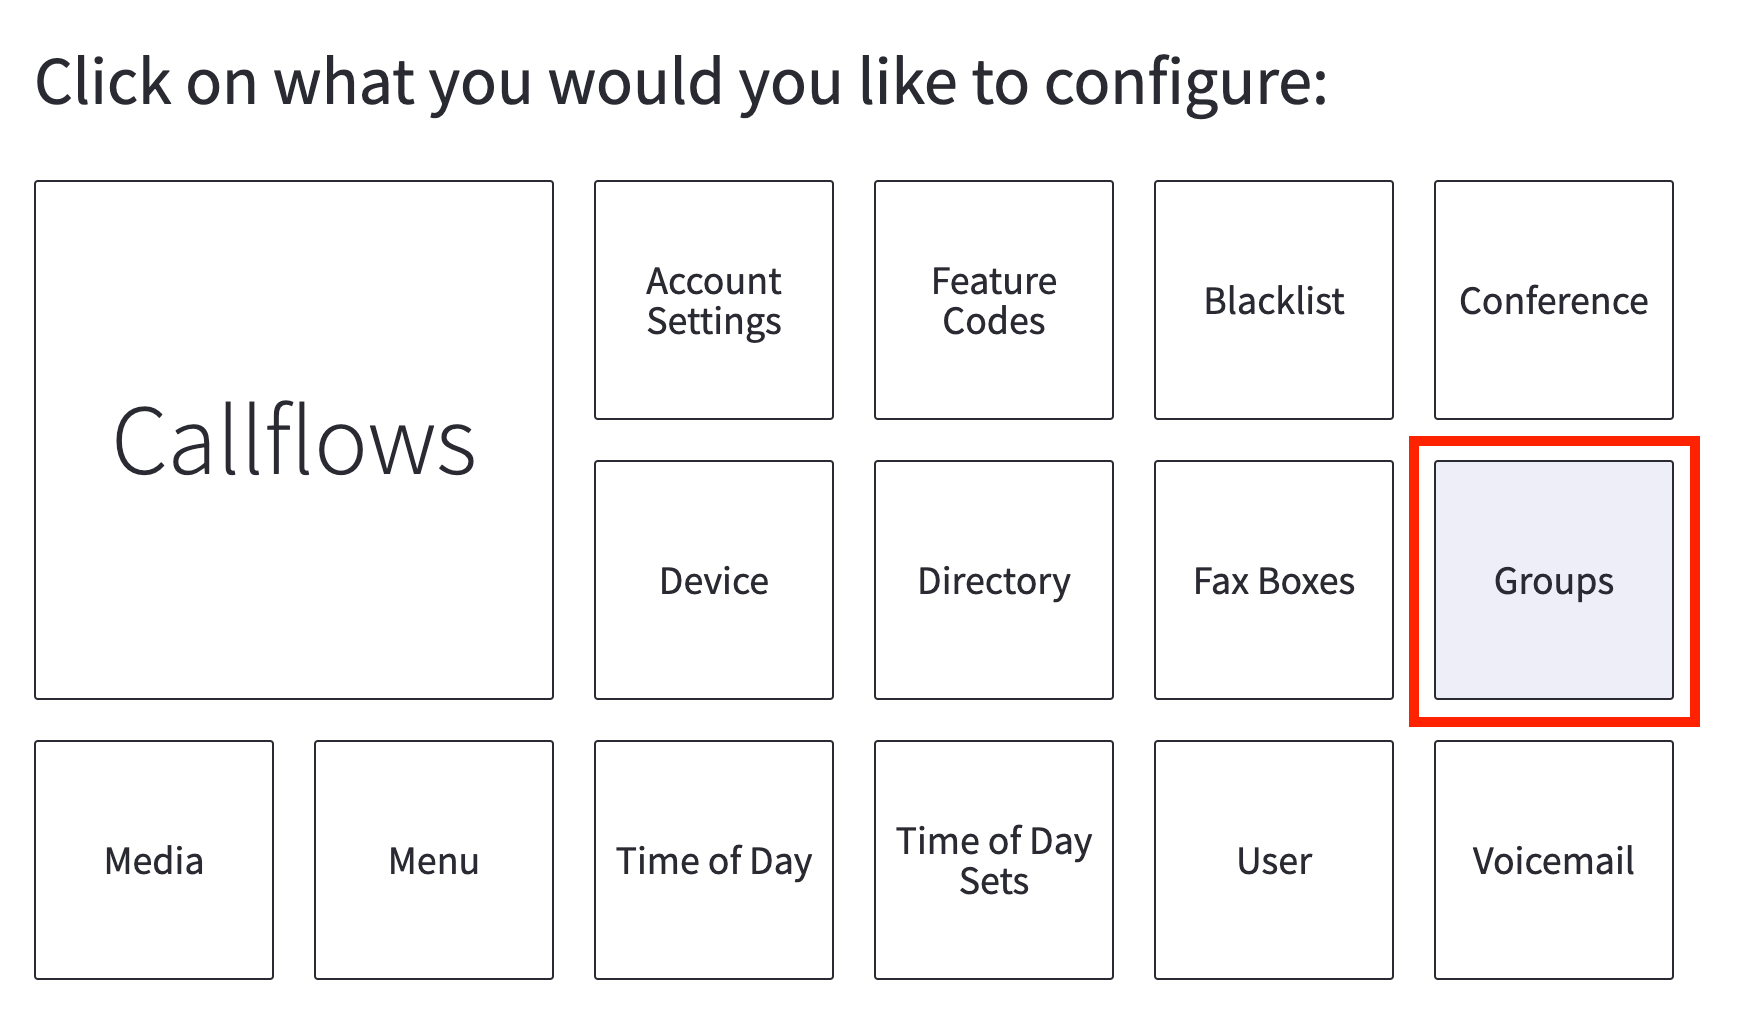
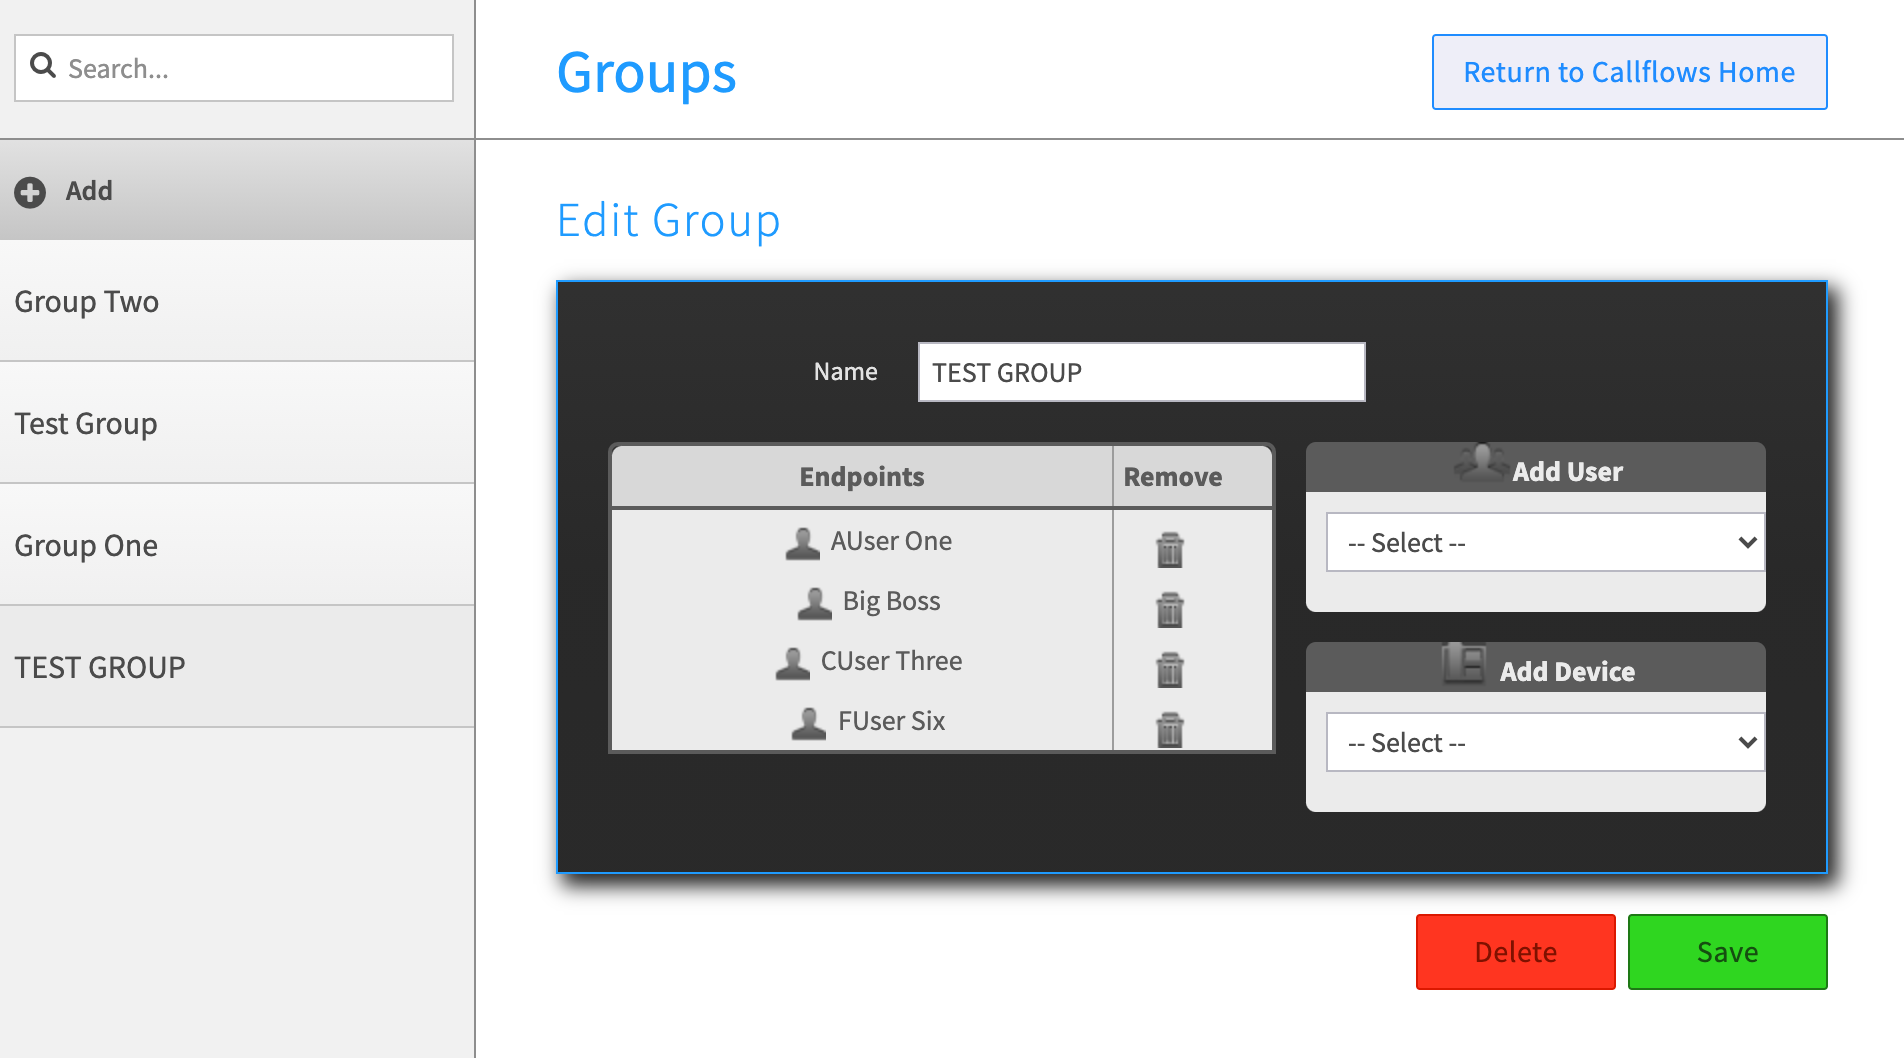
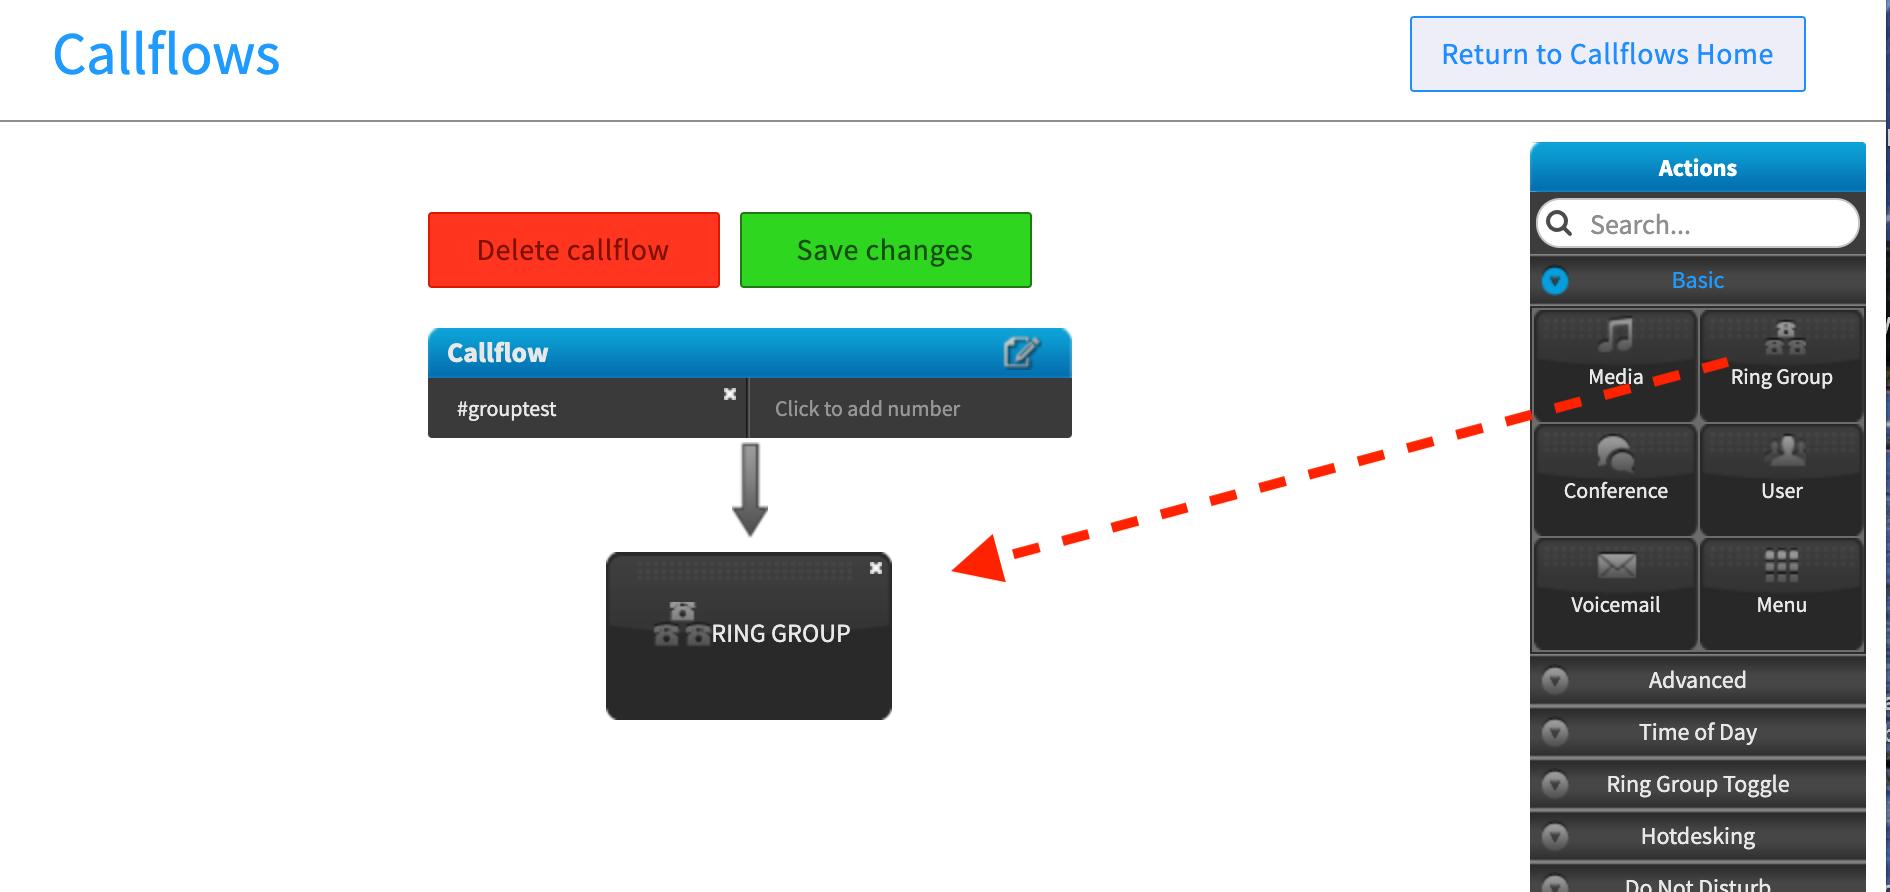
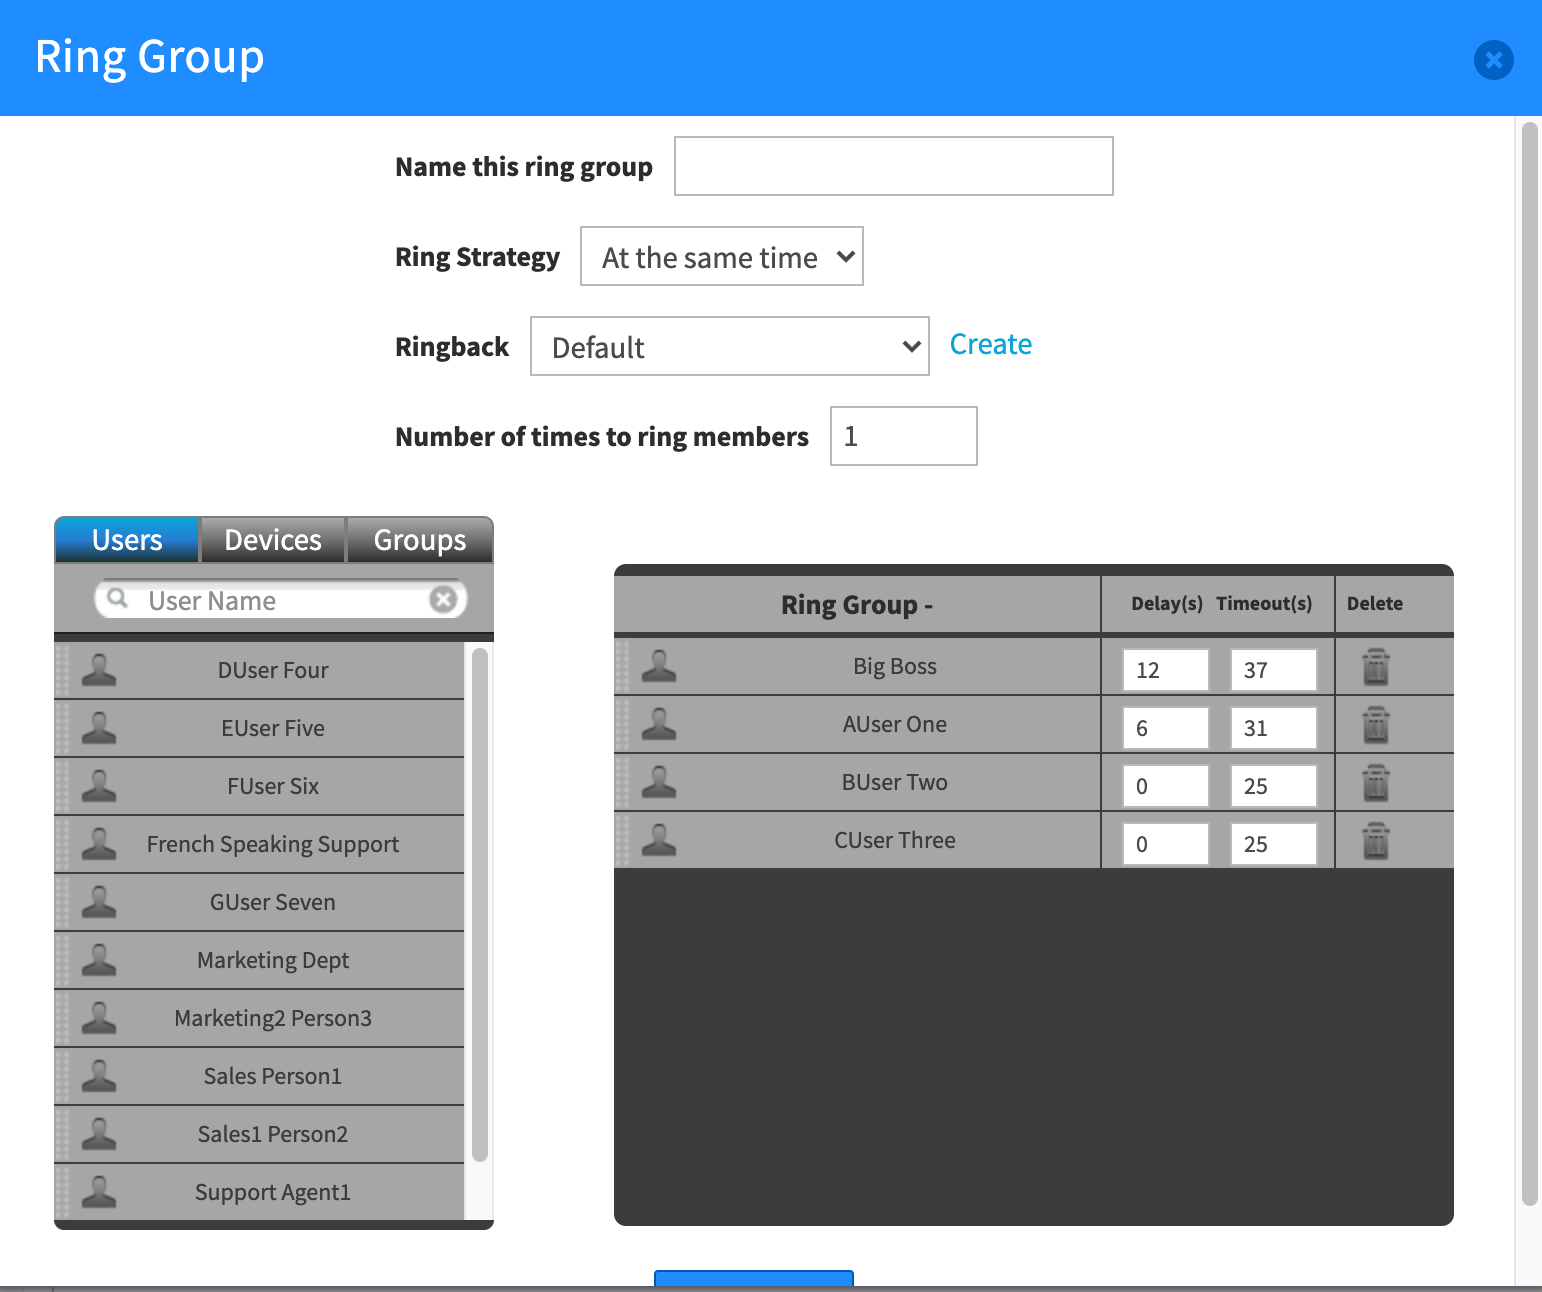


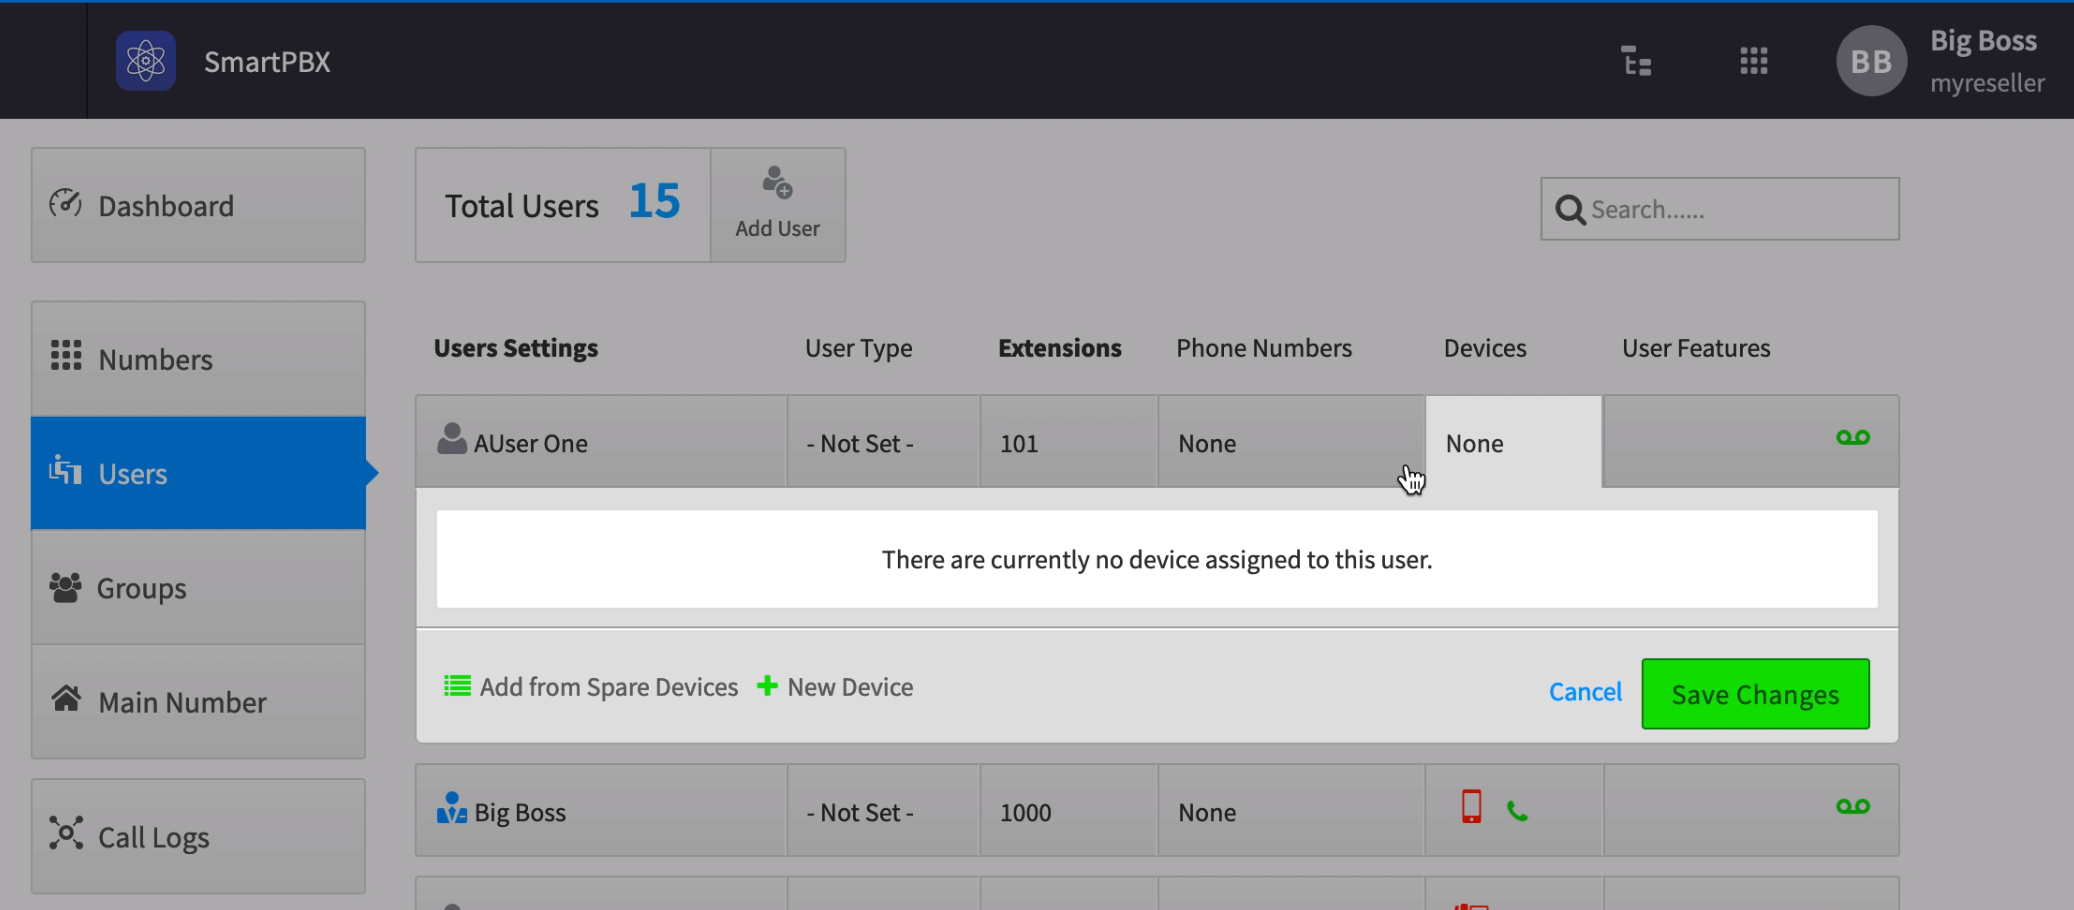
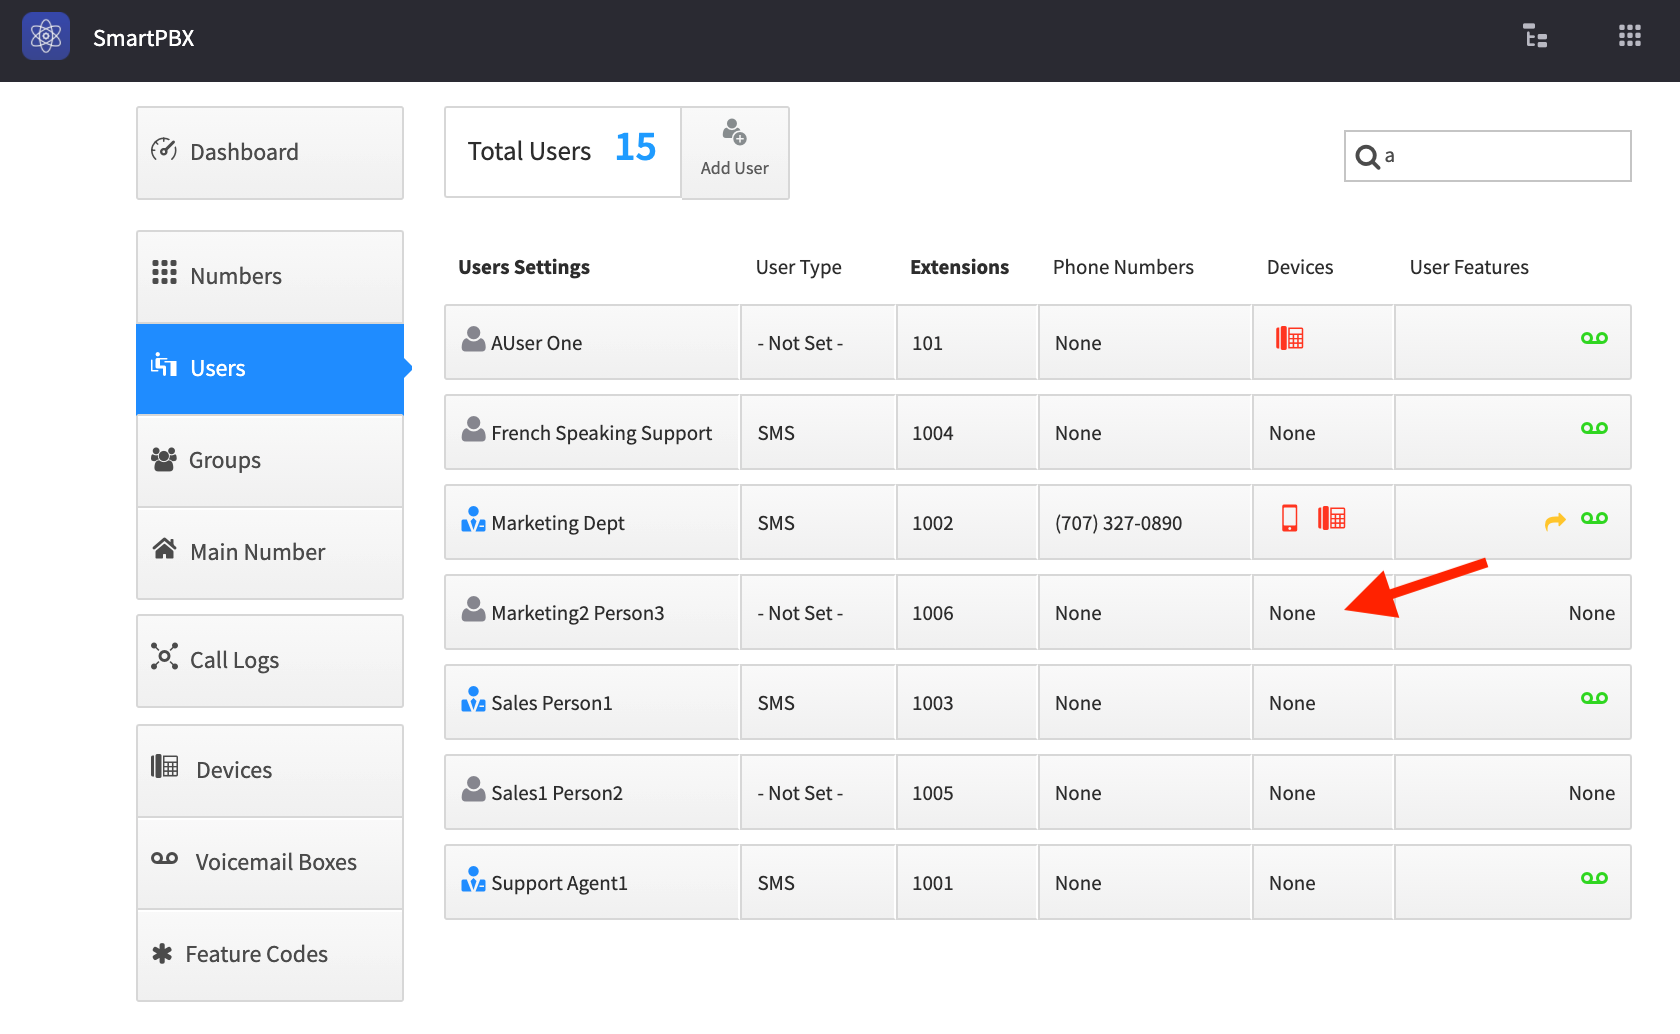
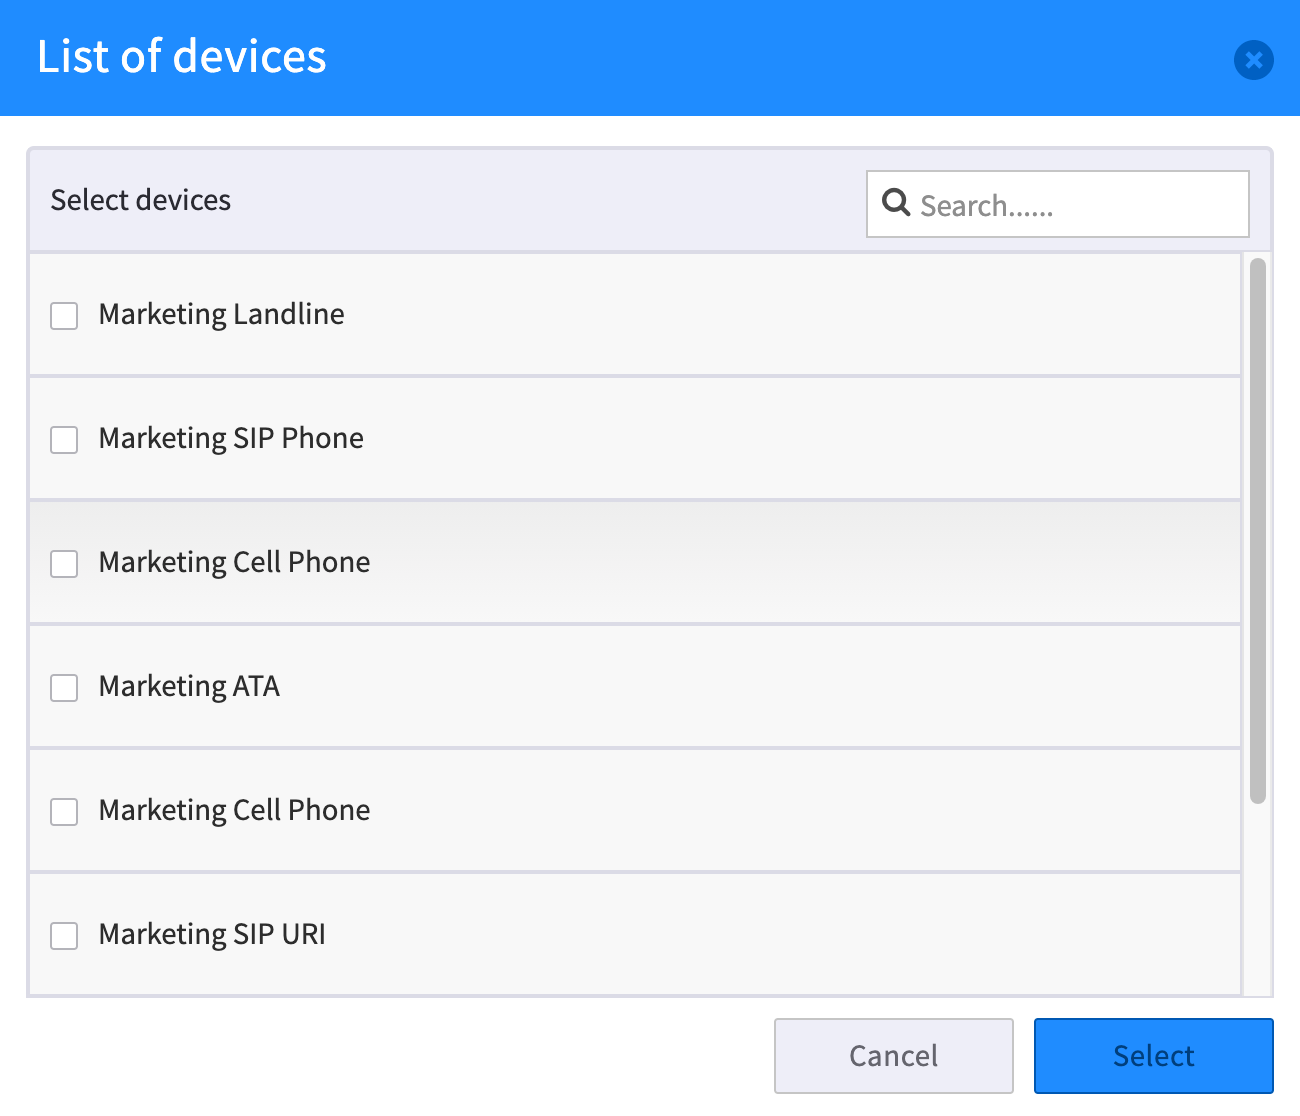
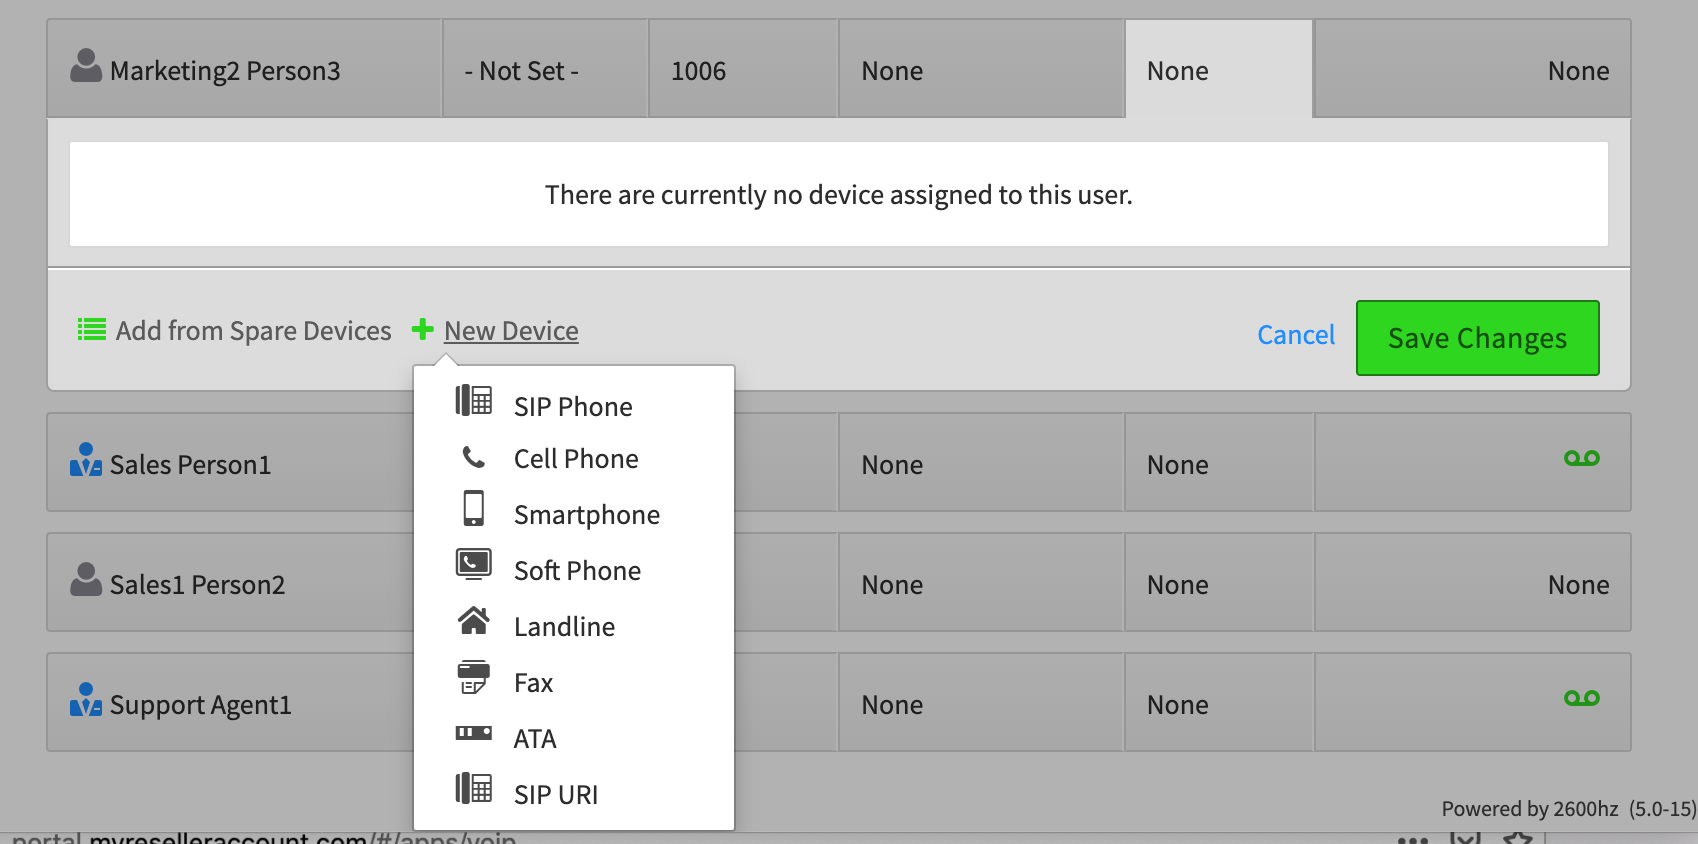
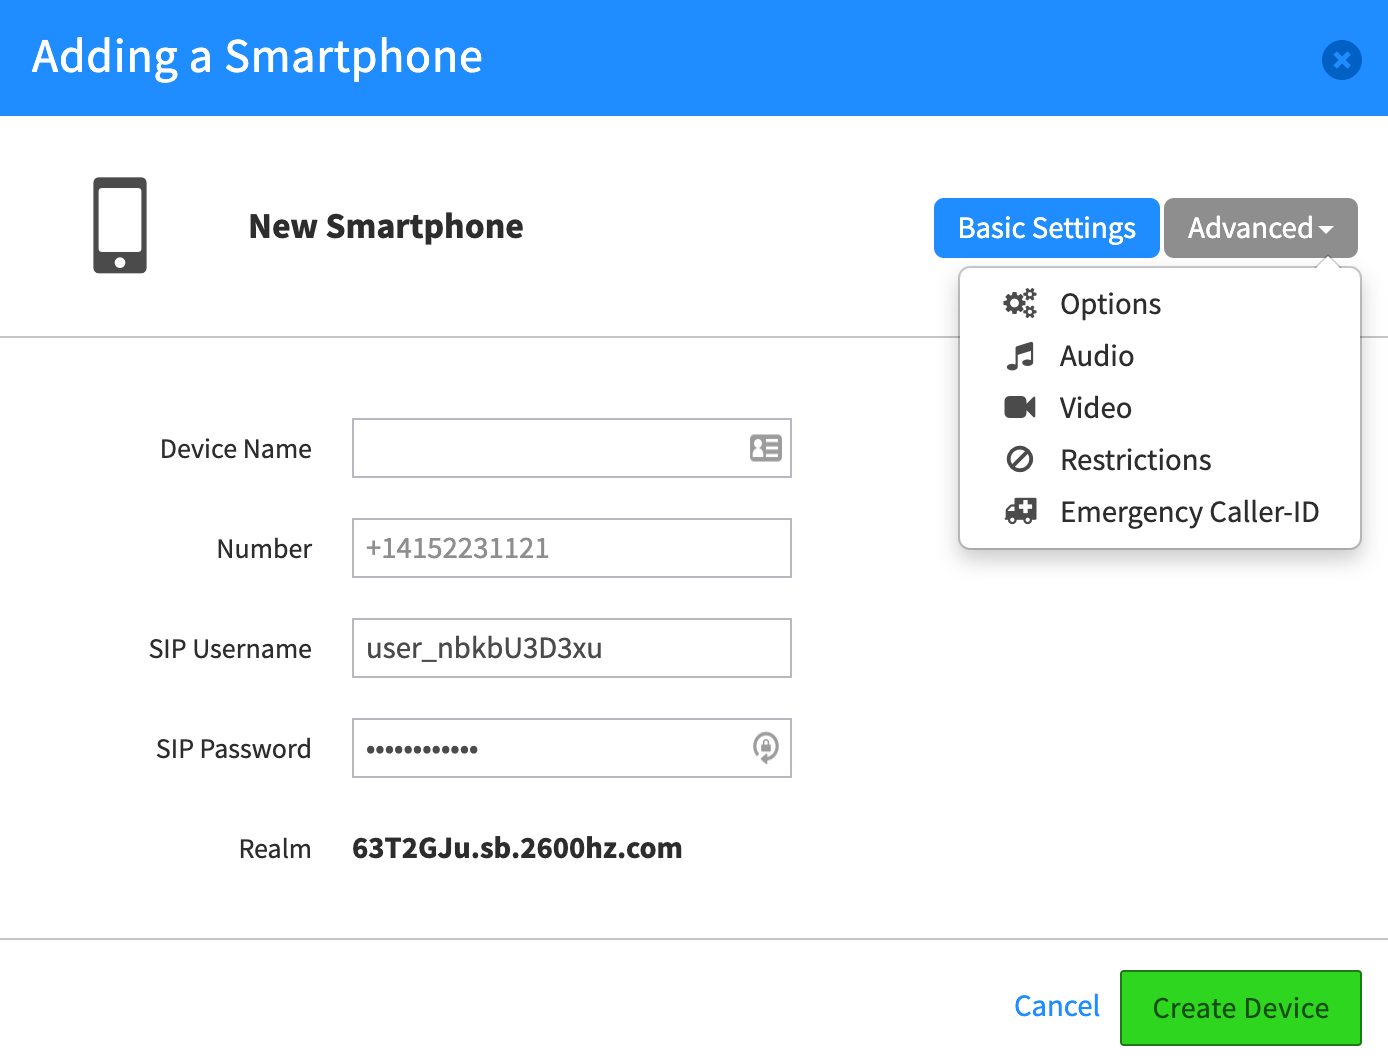
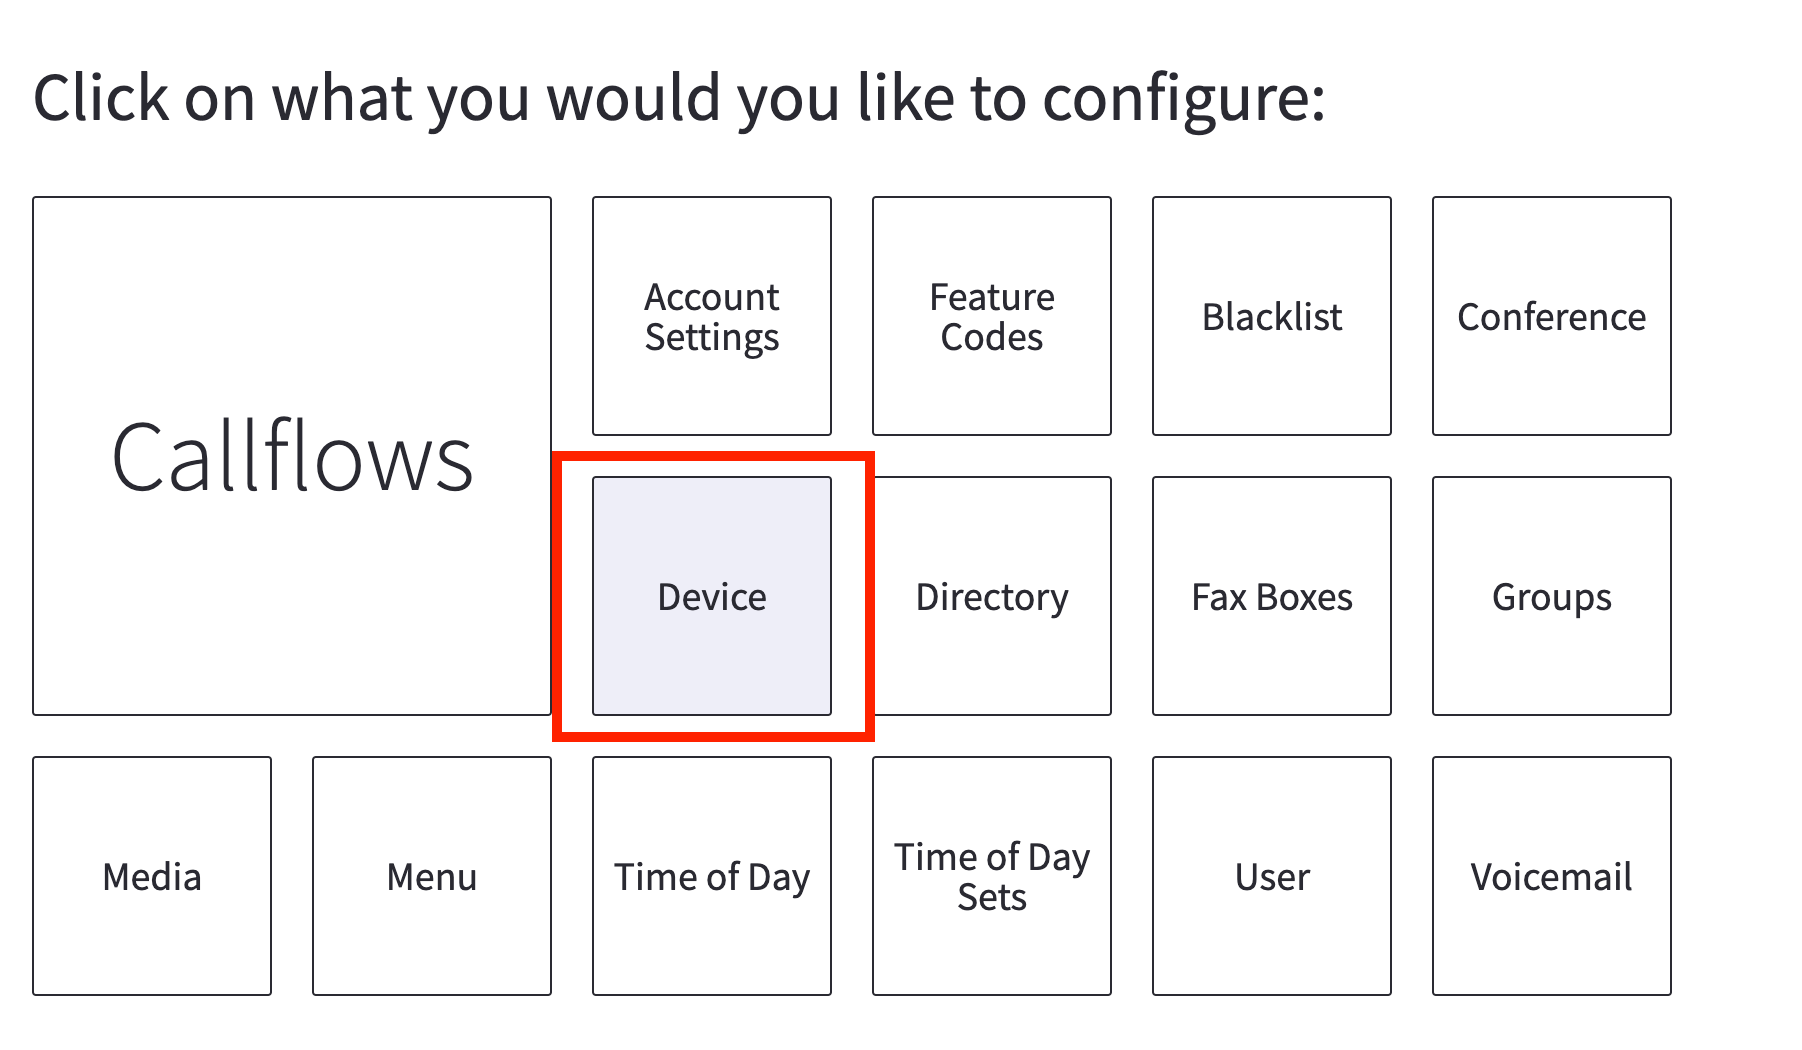
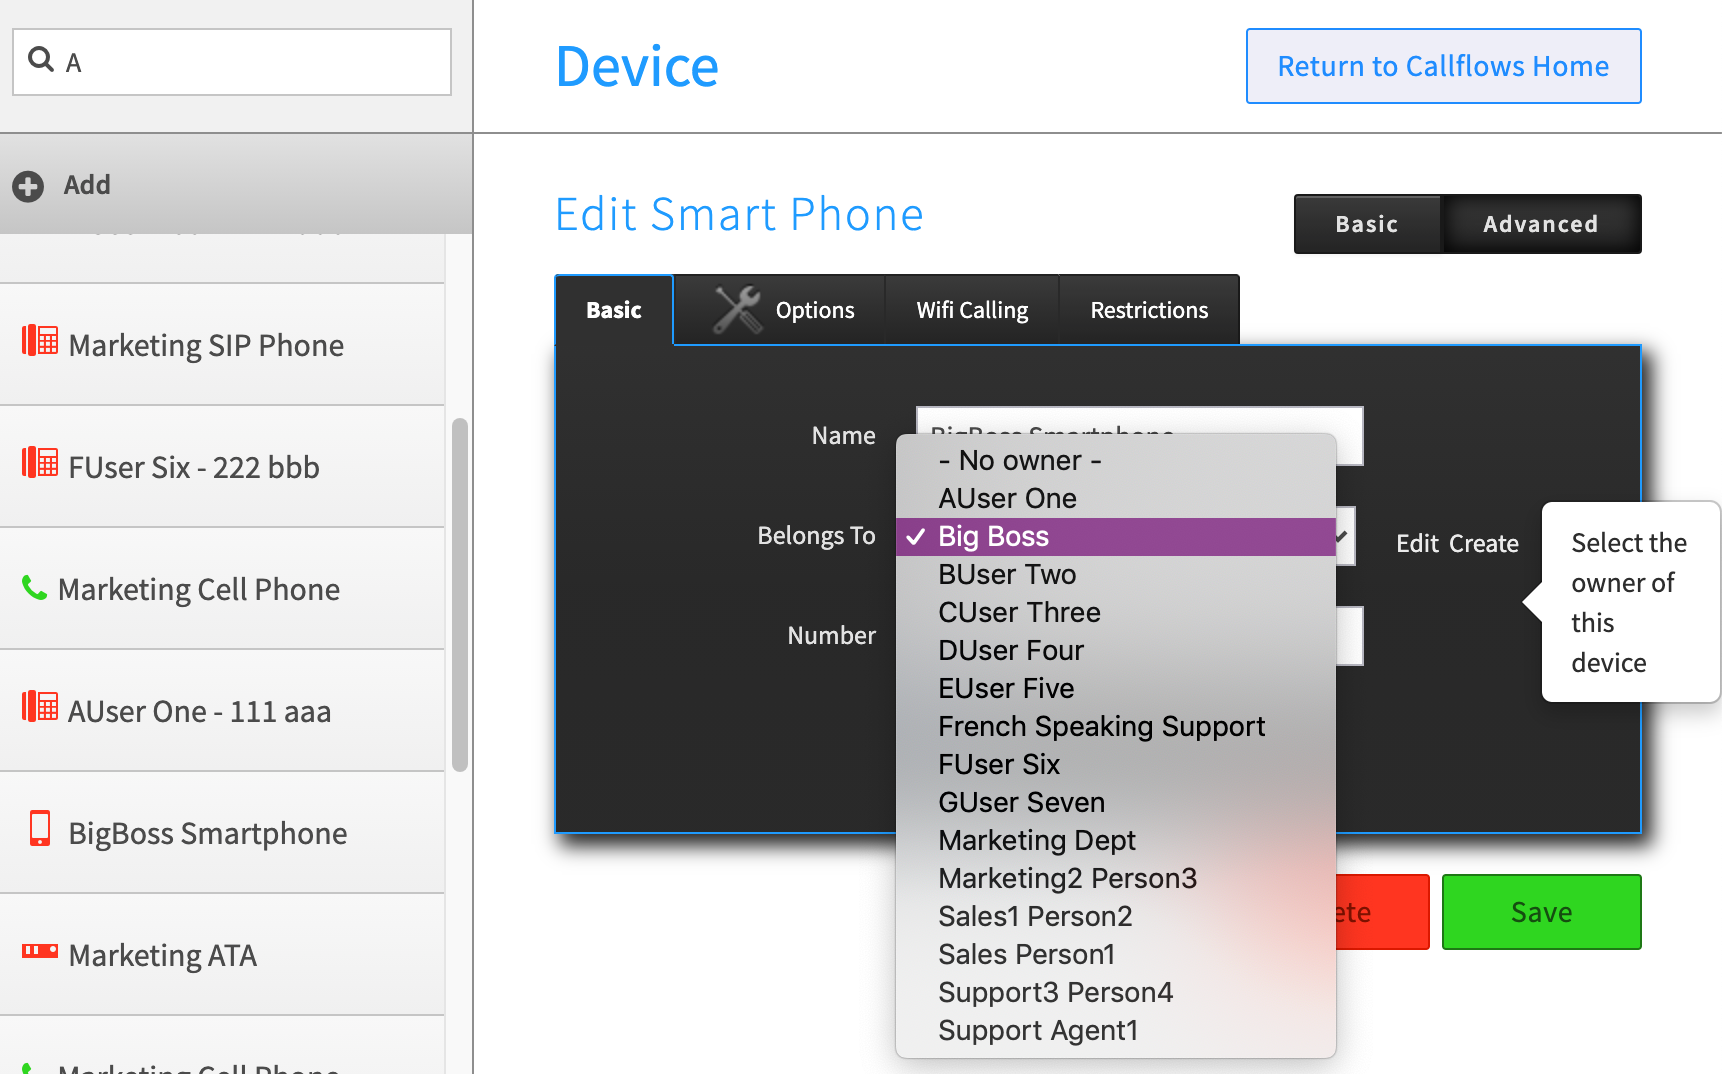
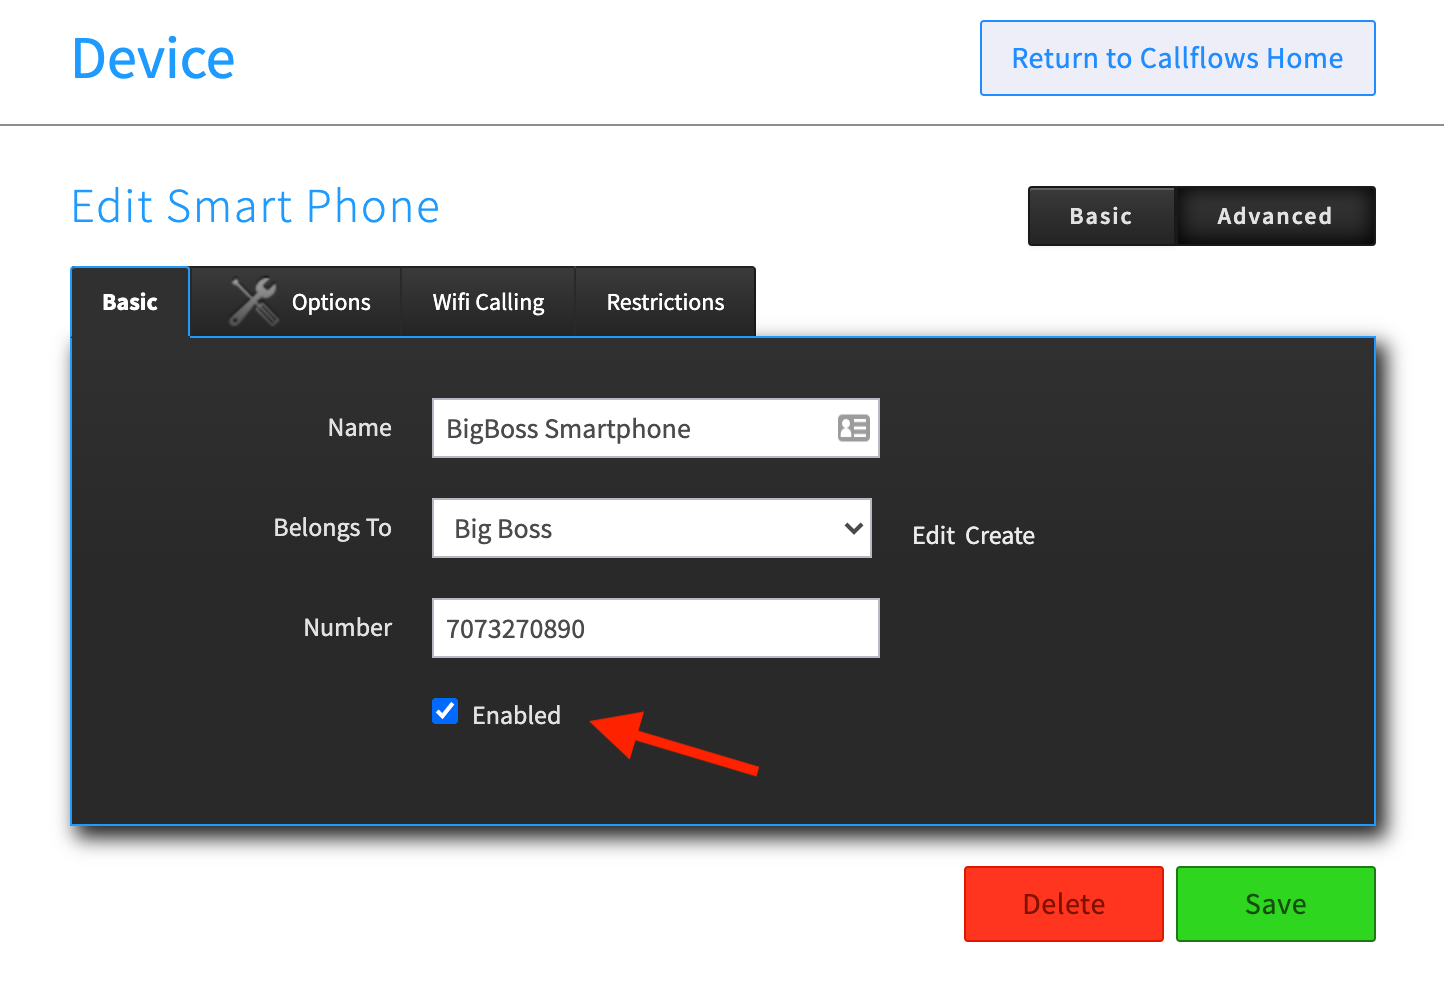
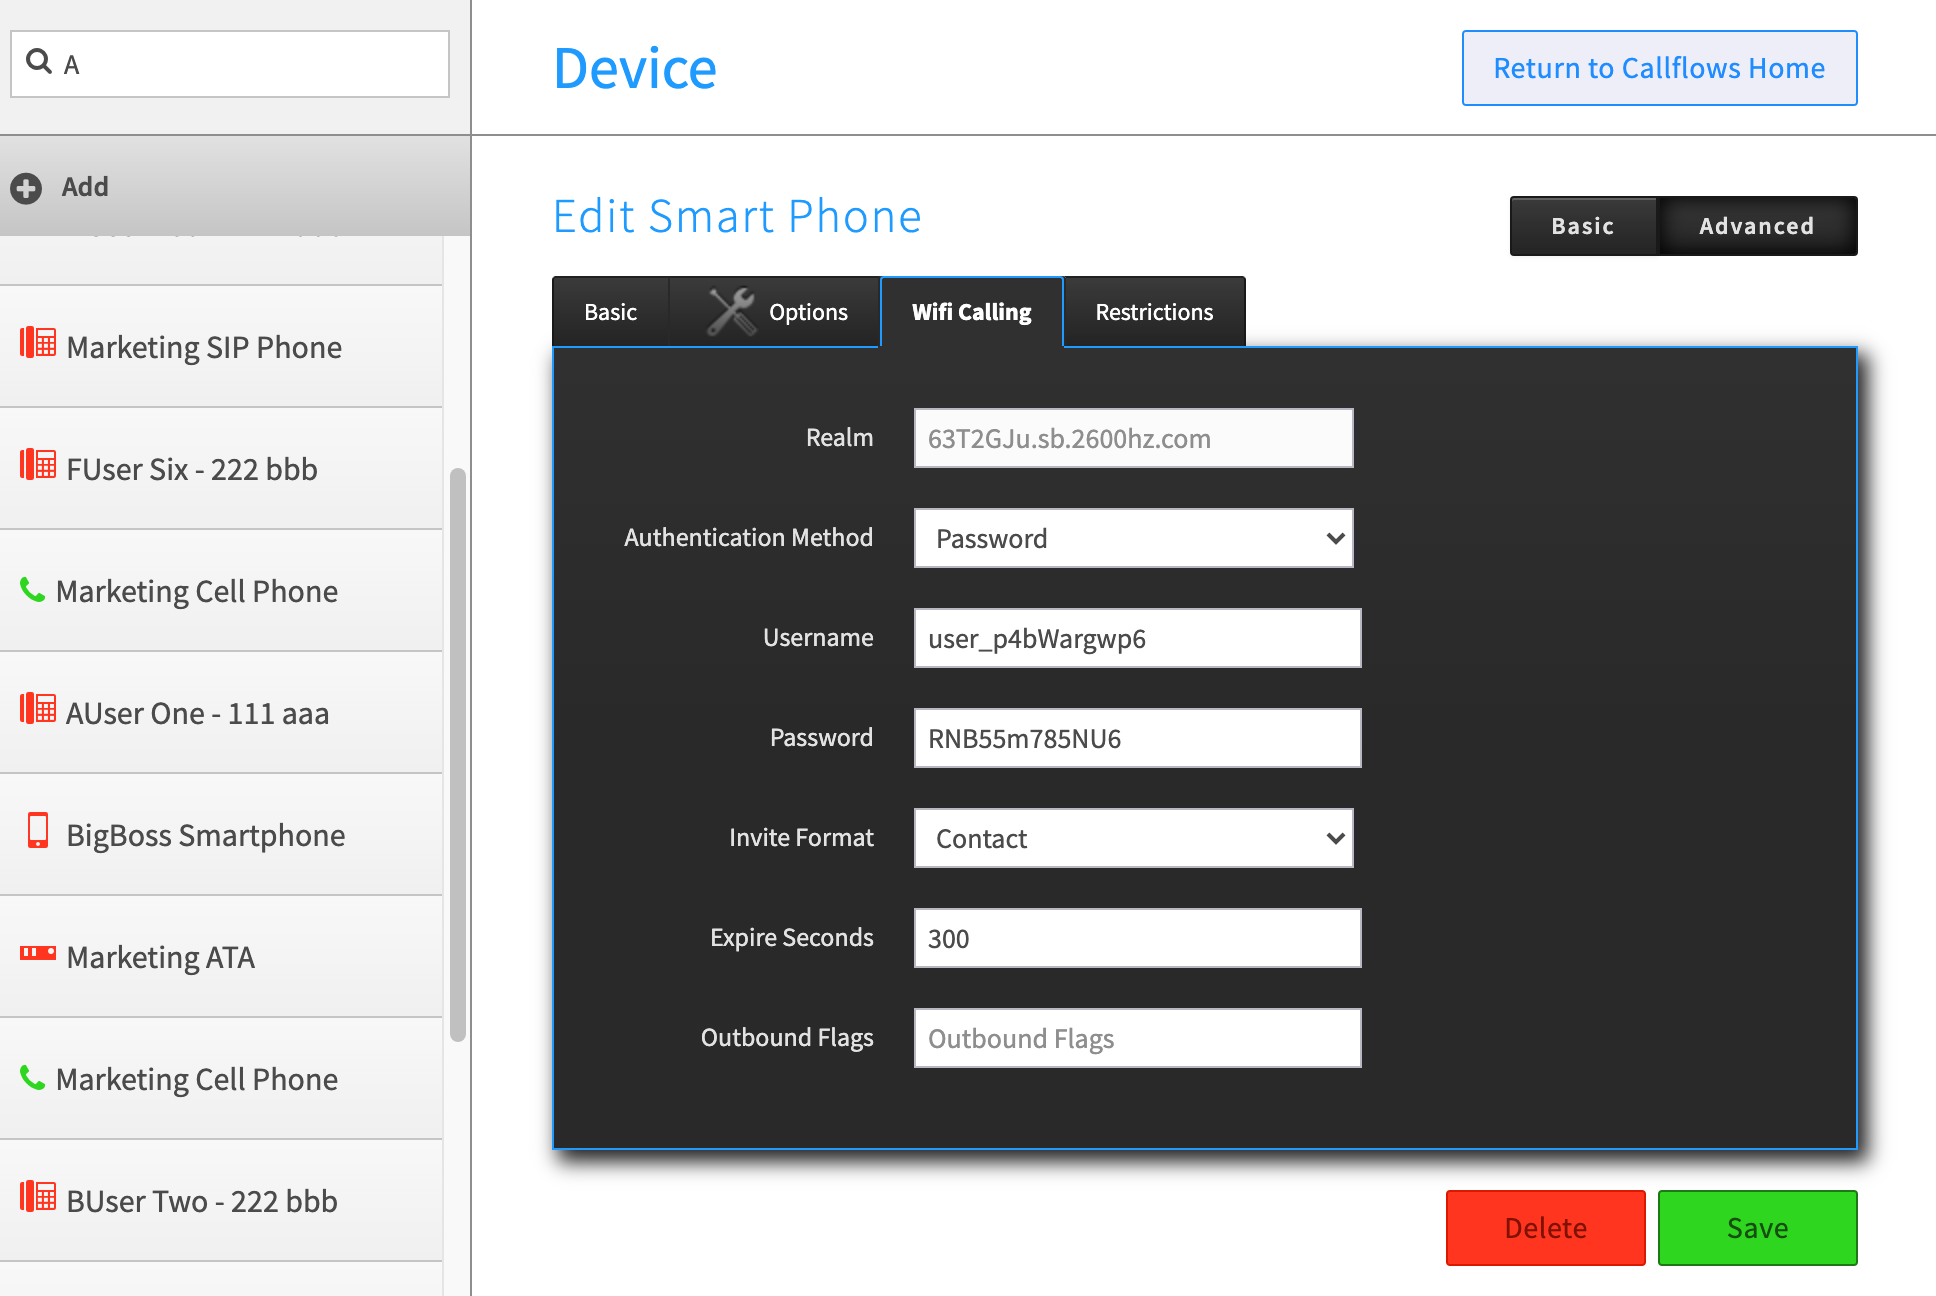


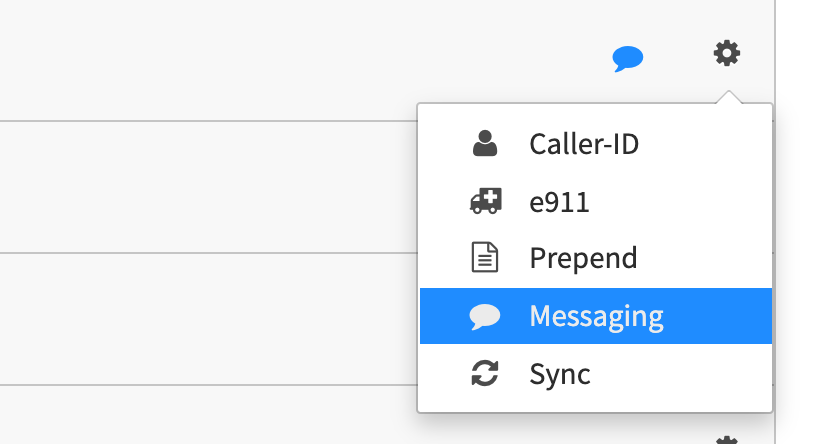
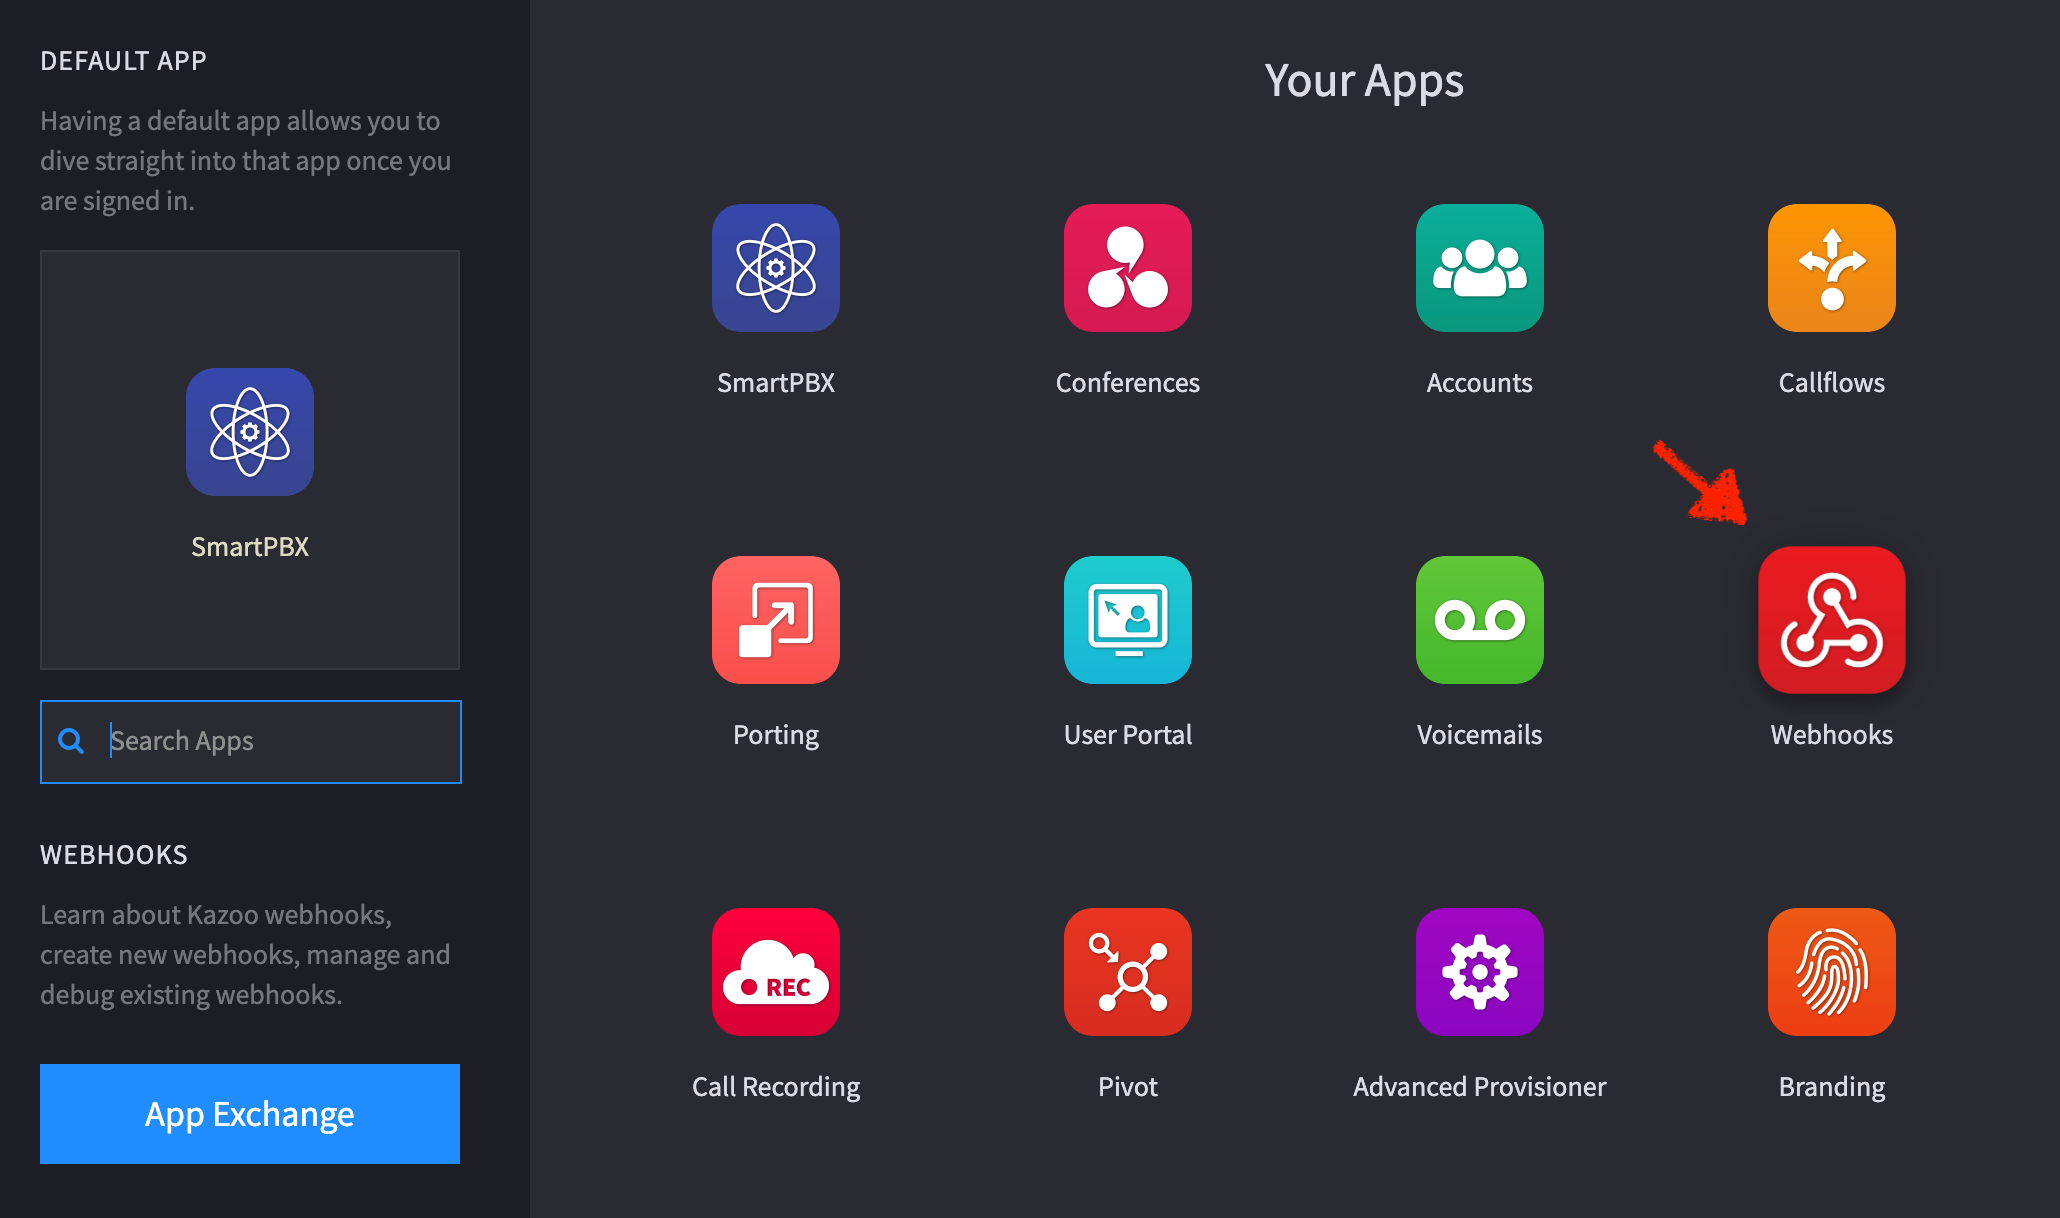
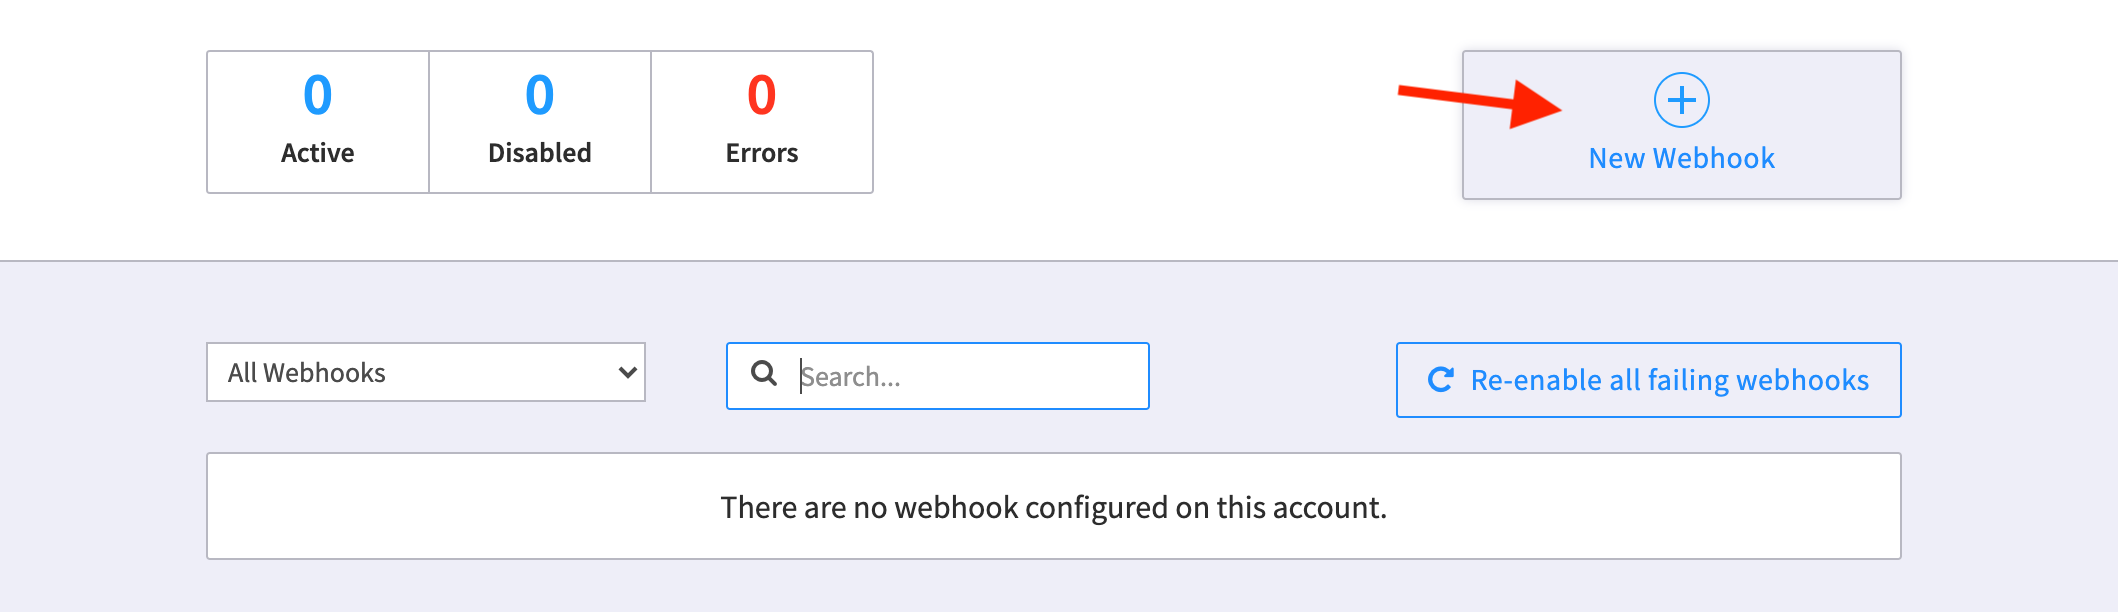
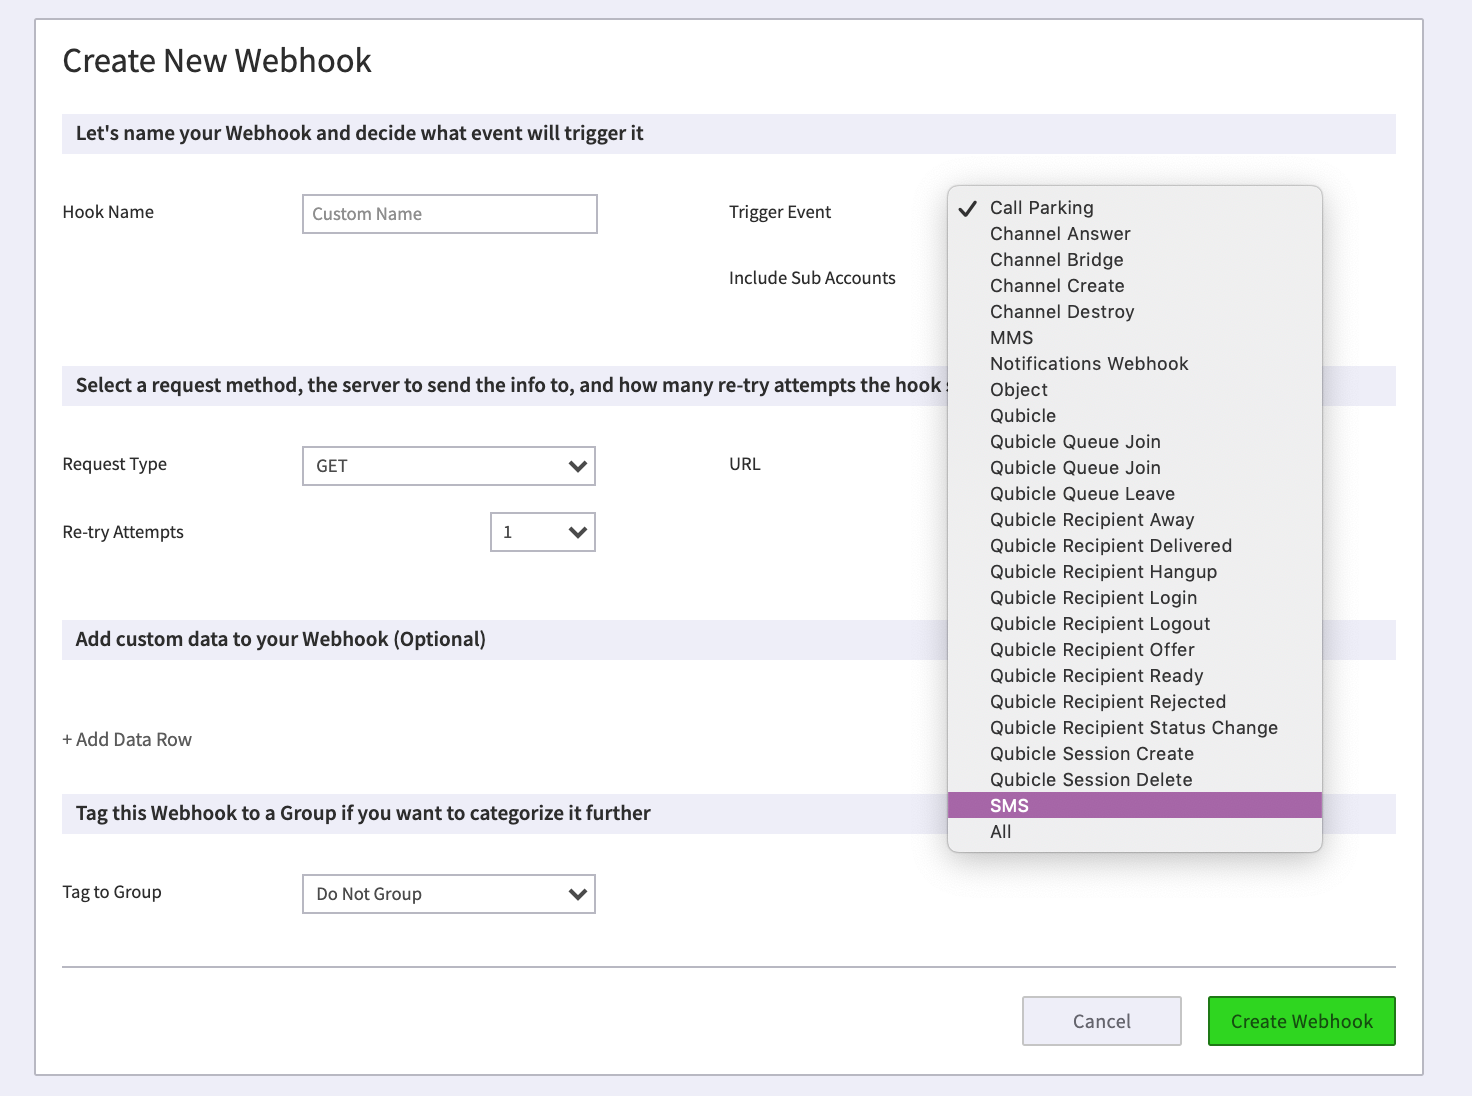
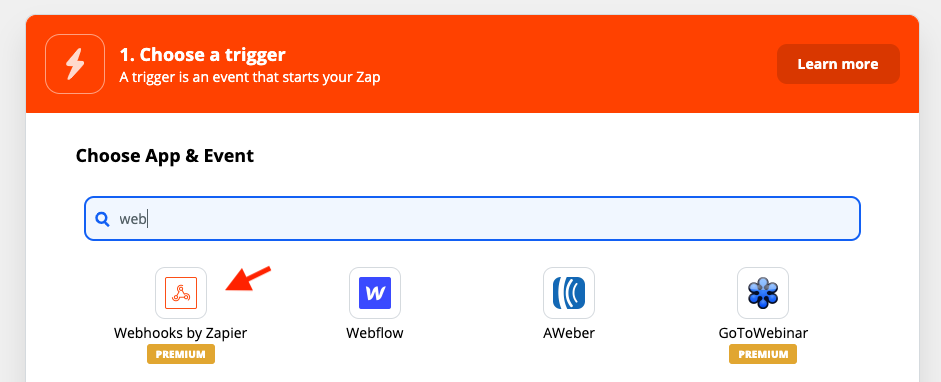
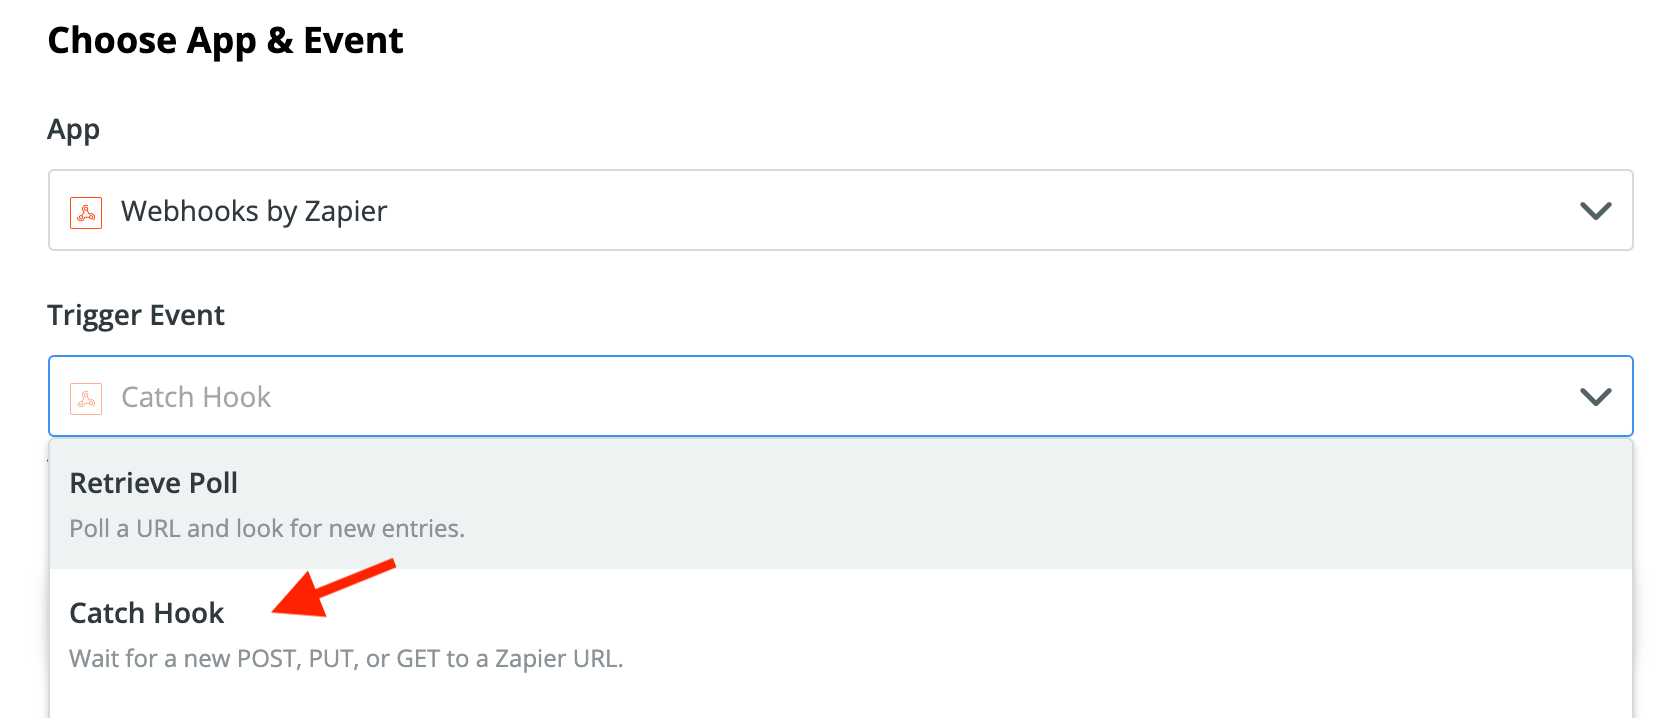
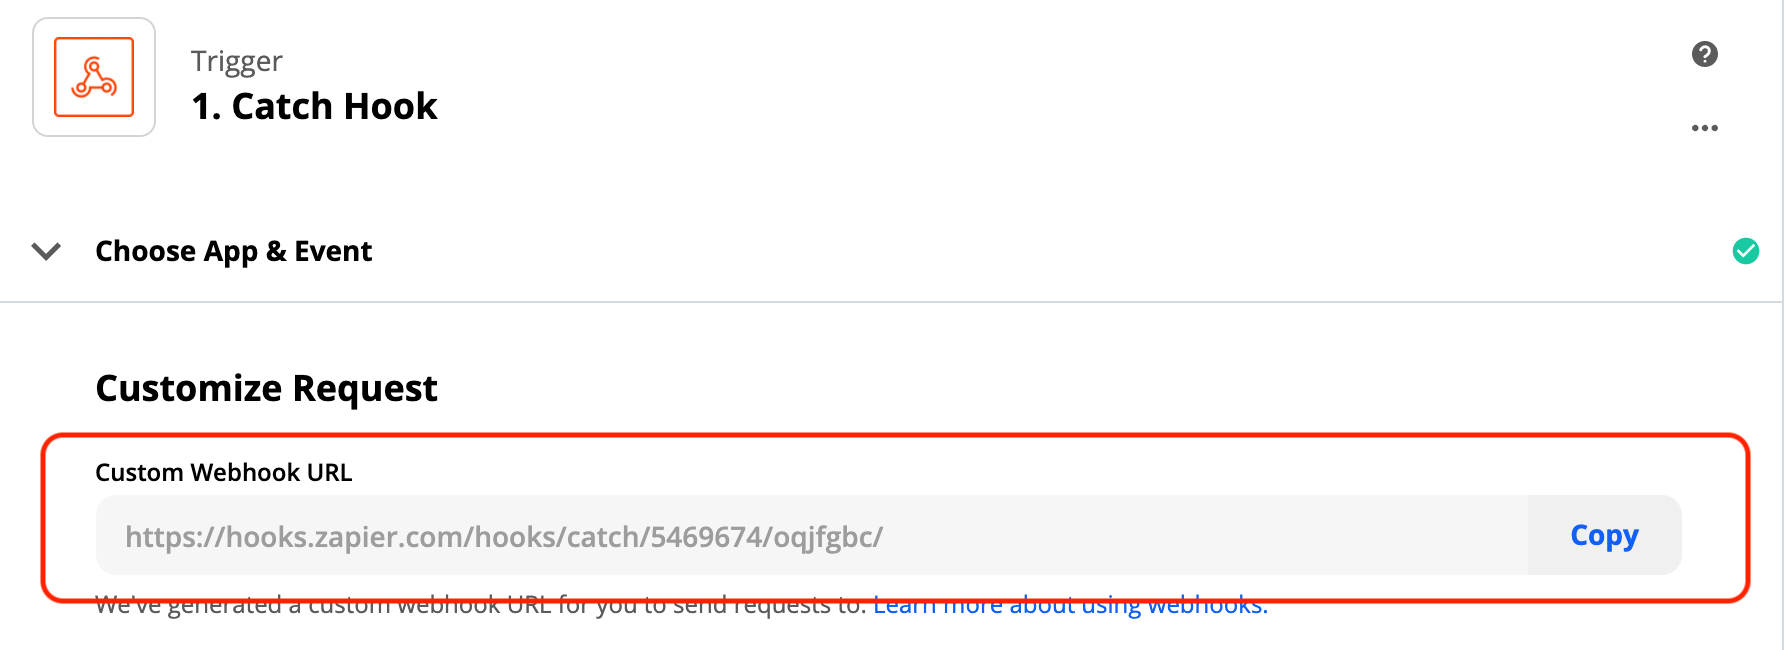
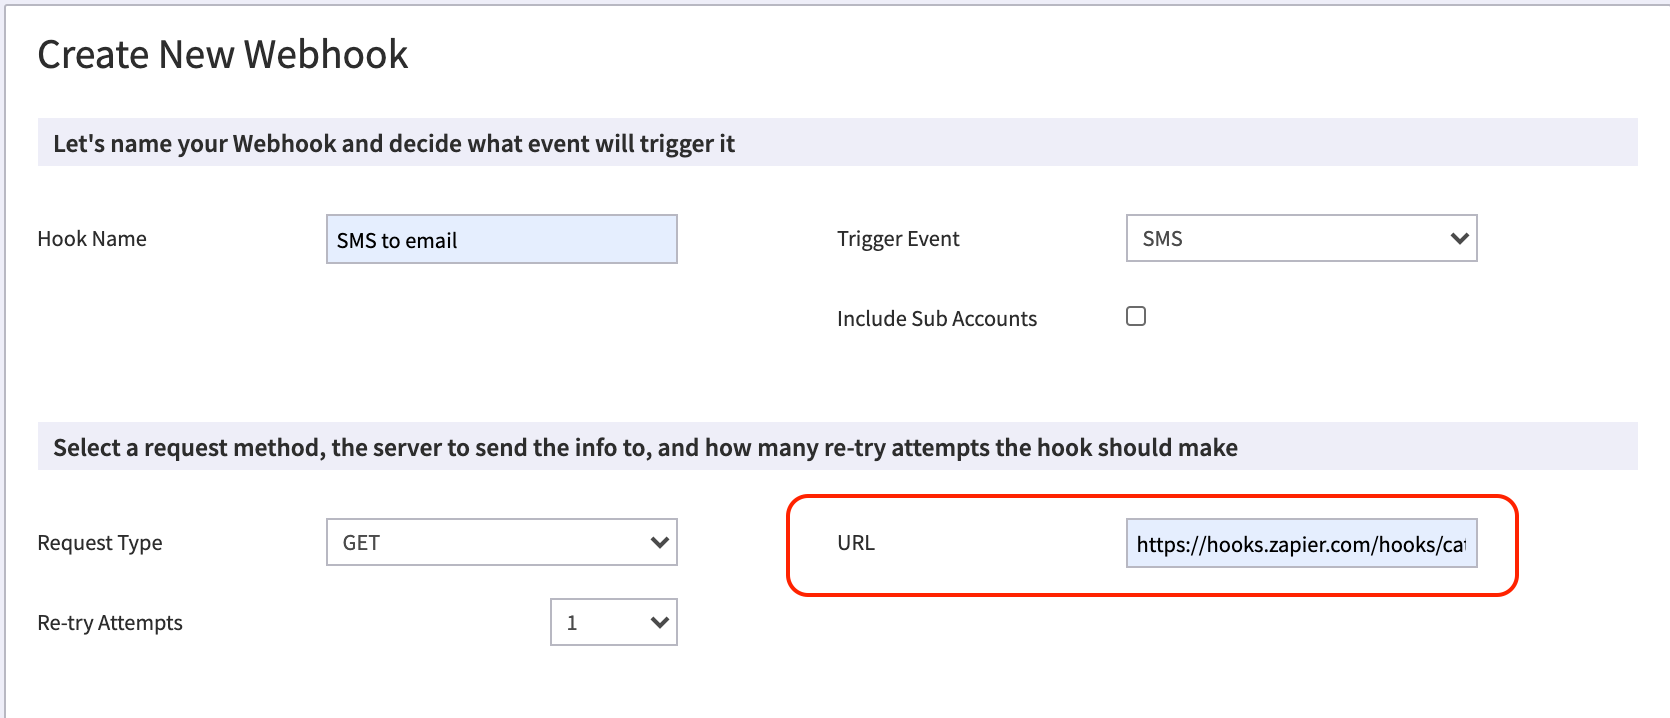
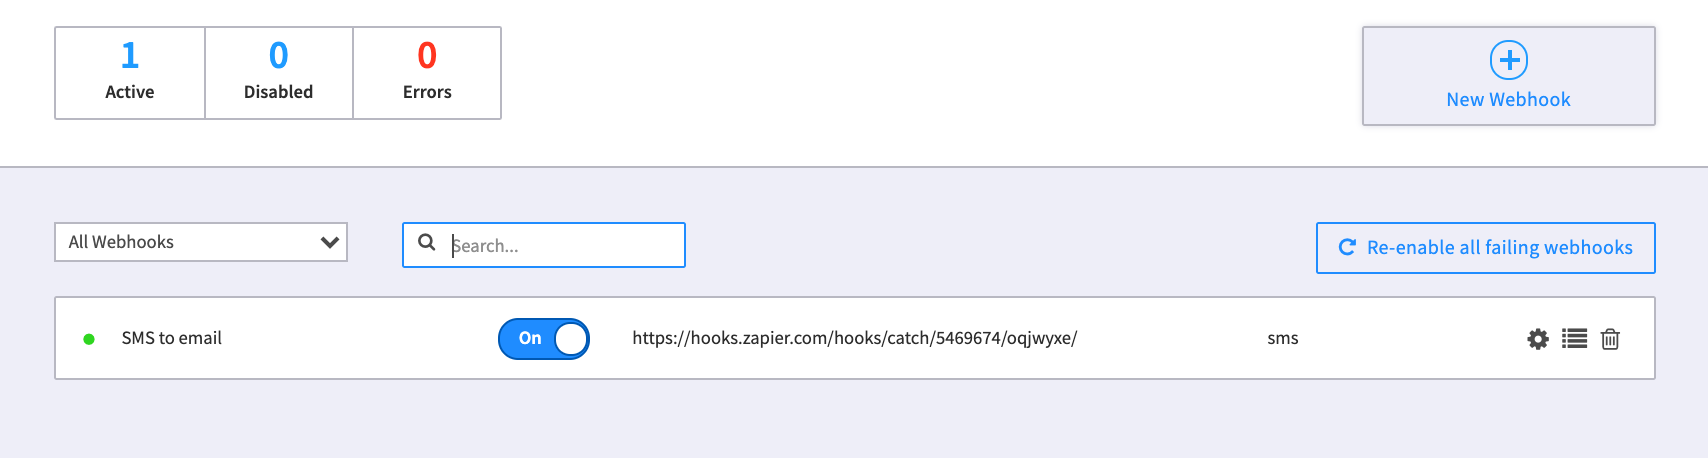
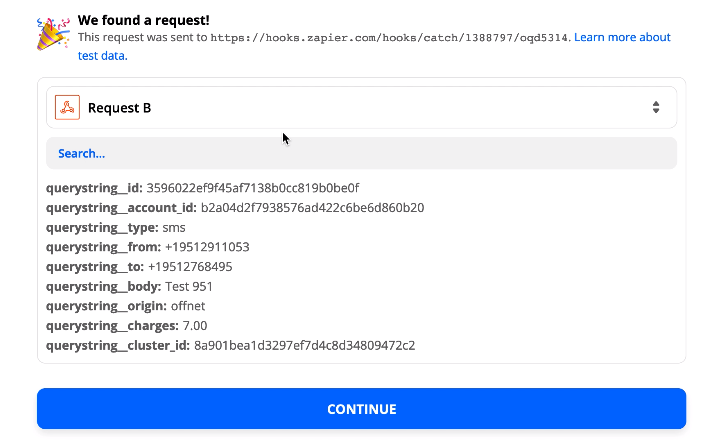
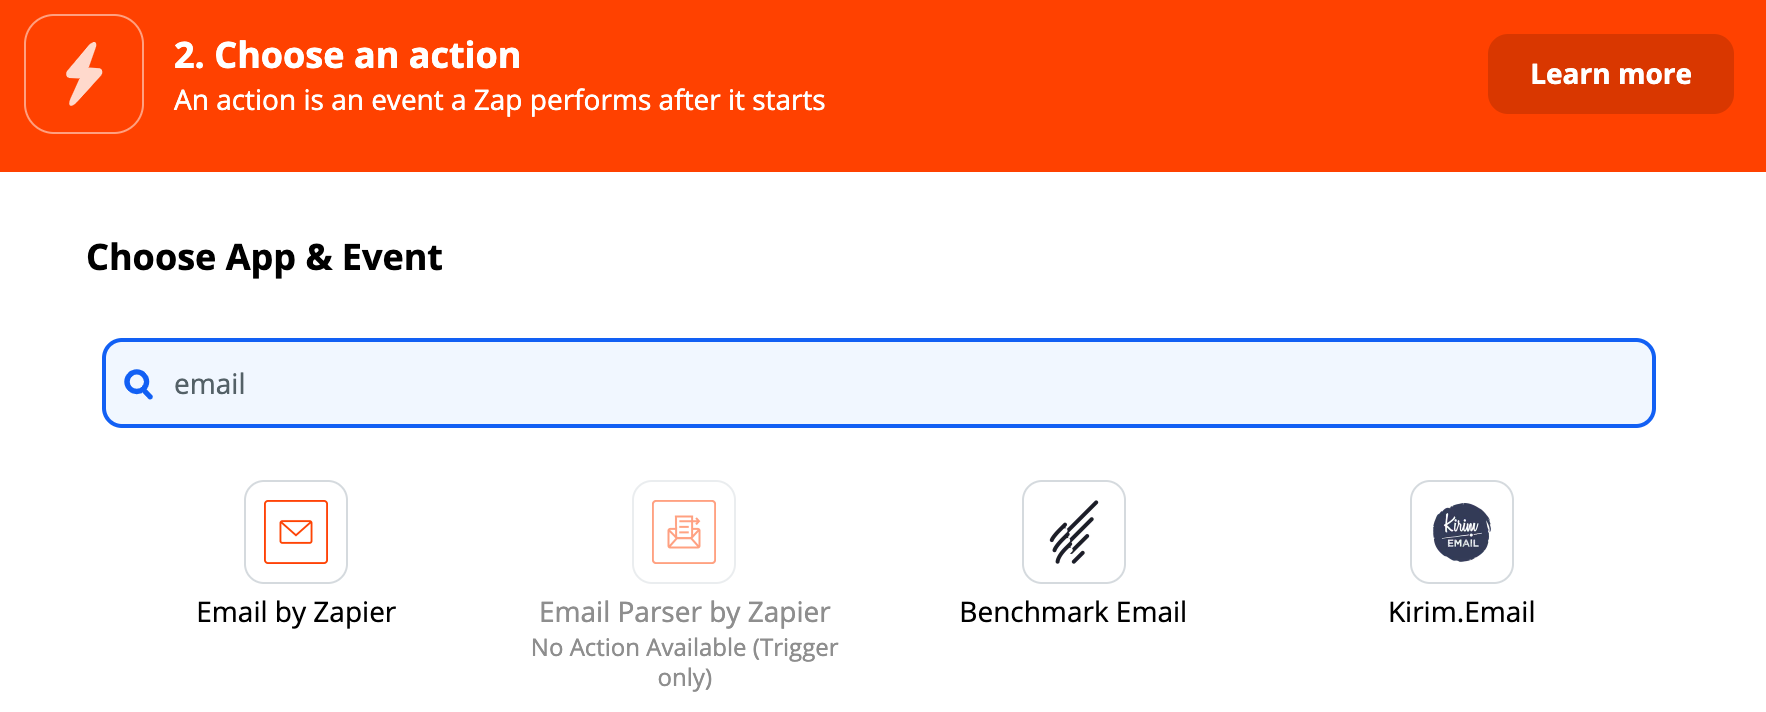
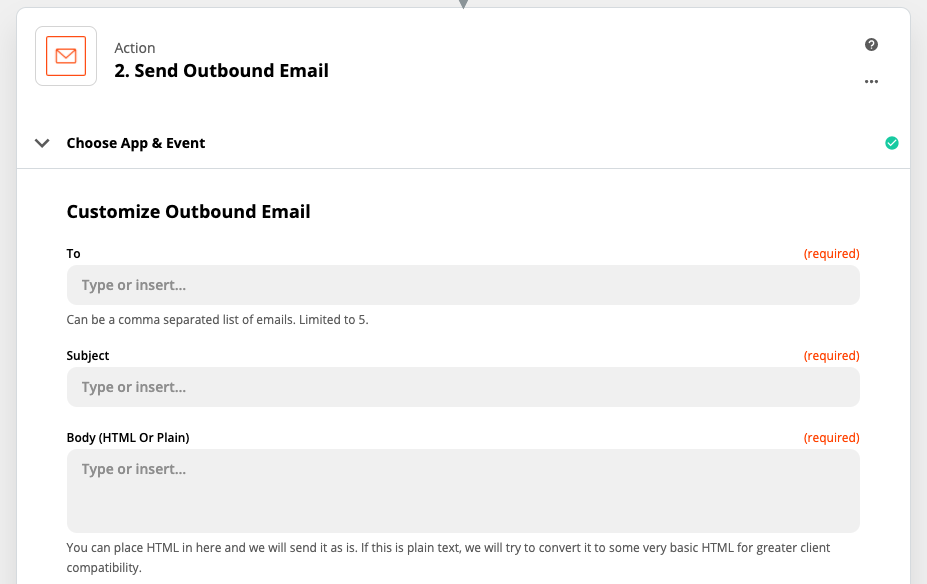
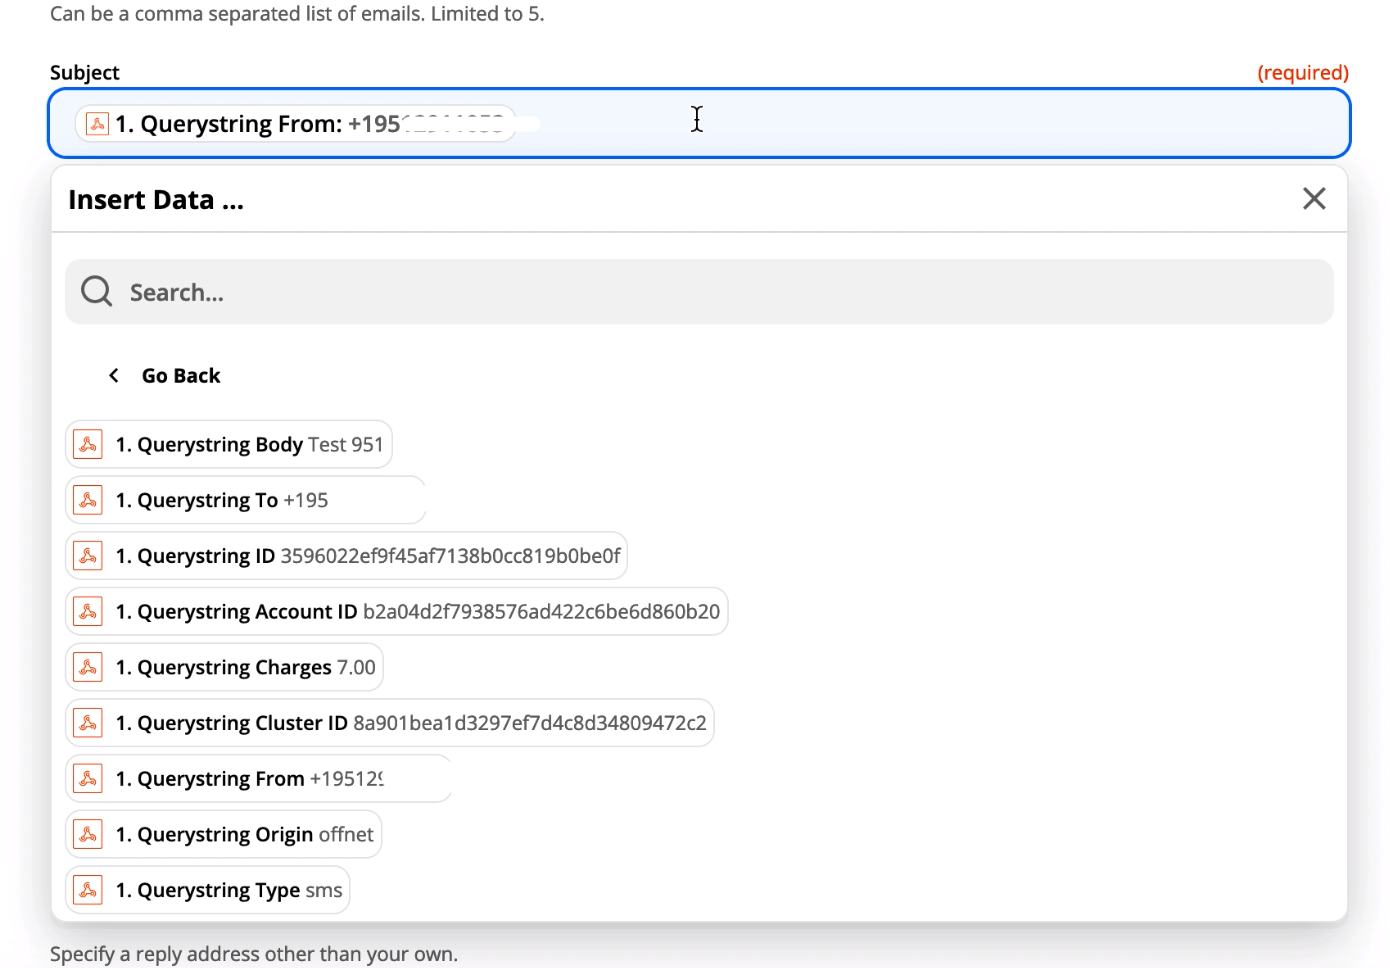

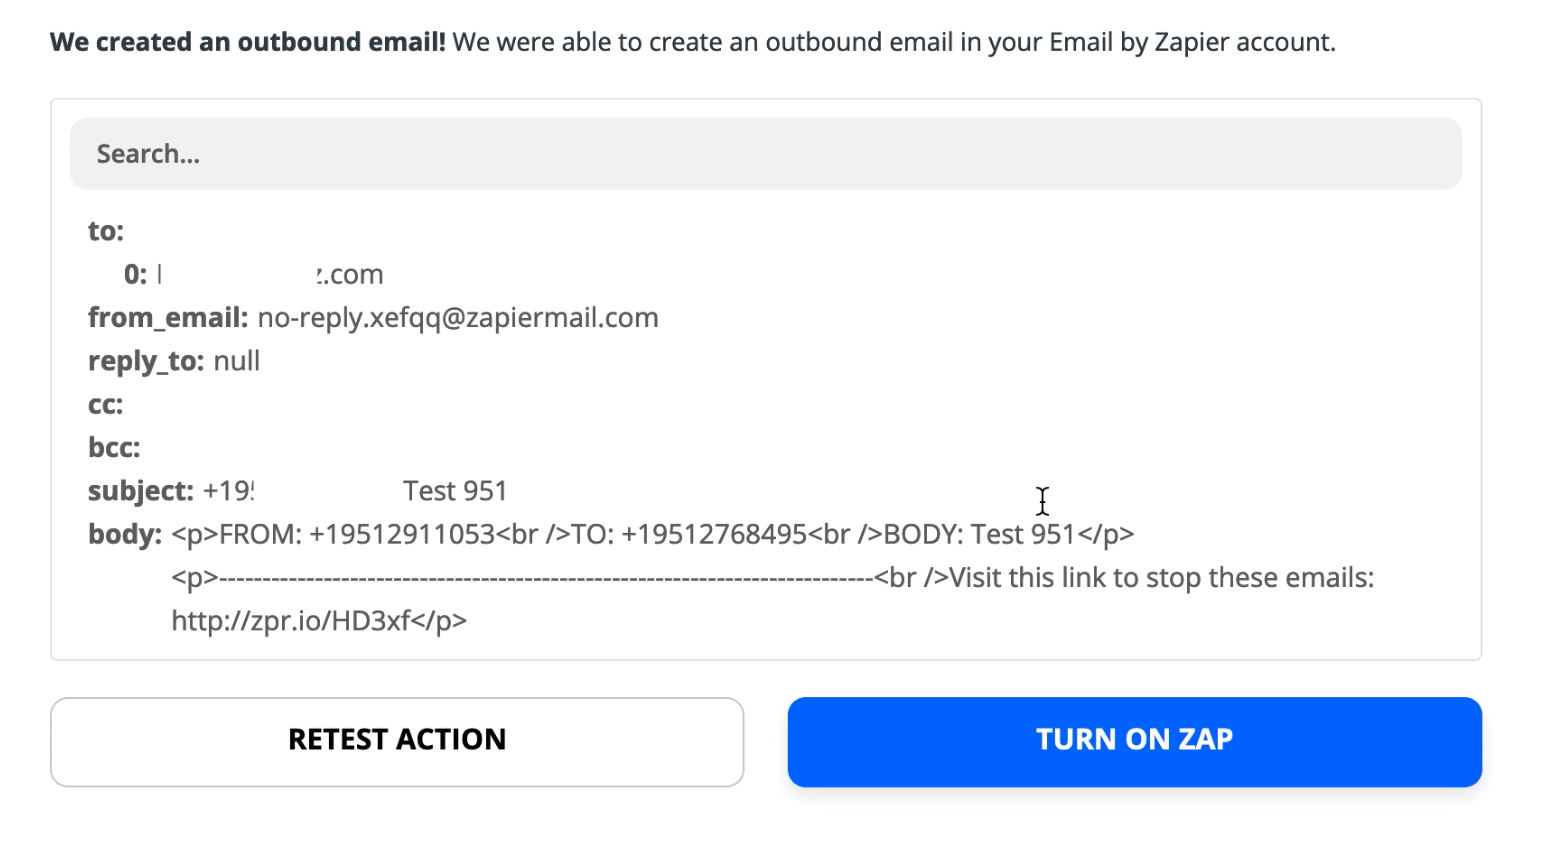
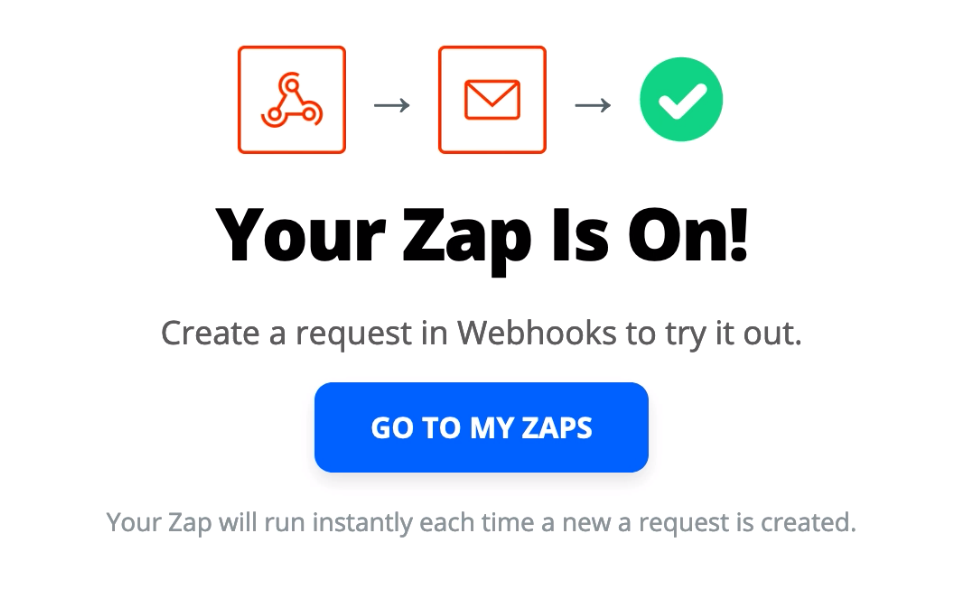

 Open your Branding application


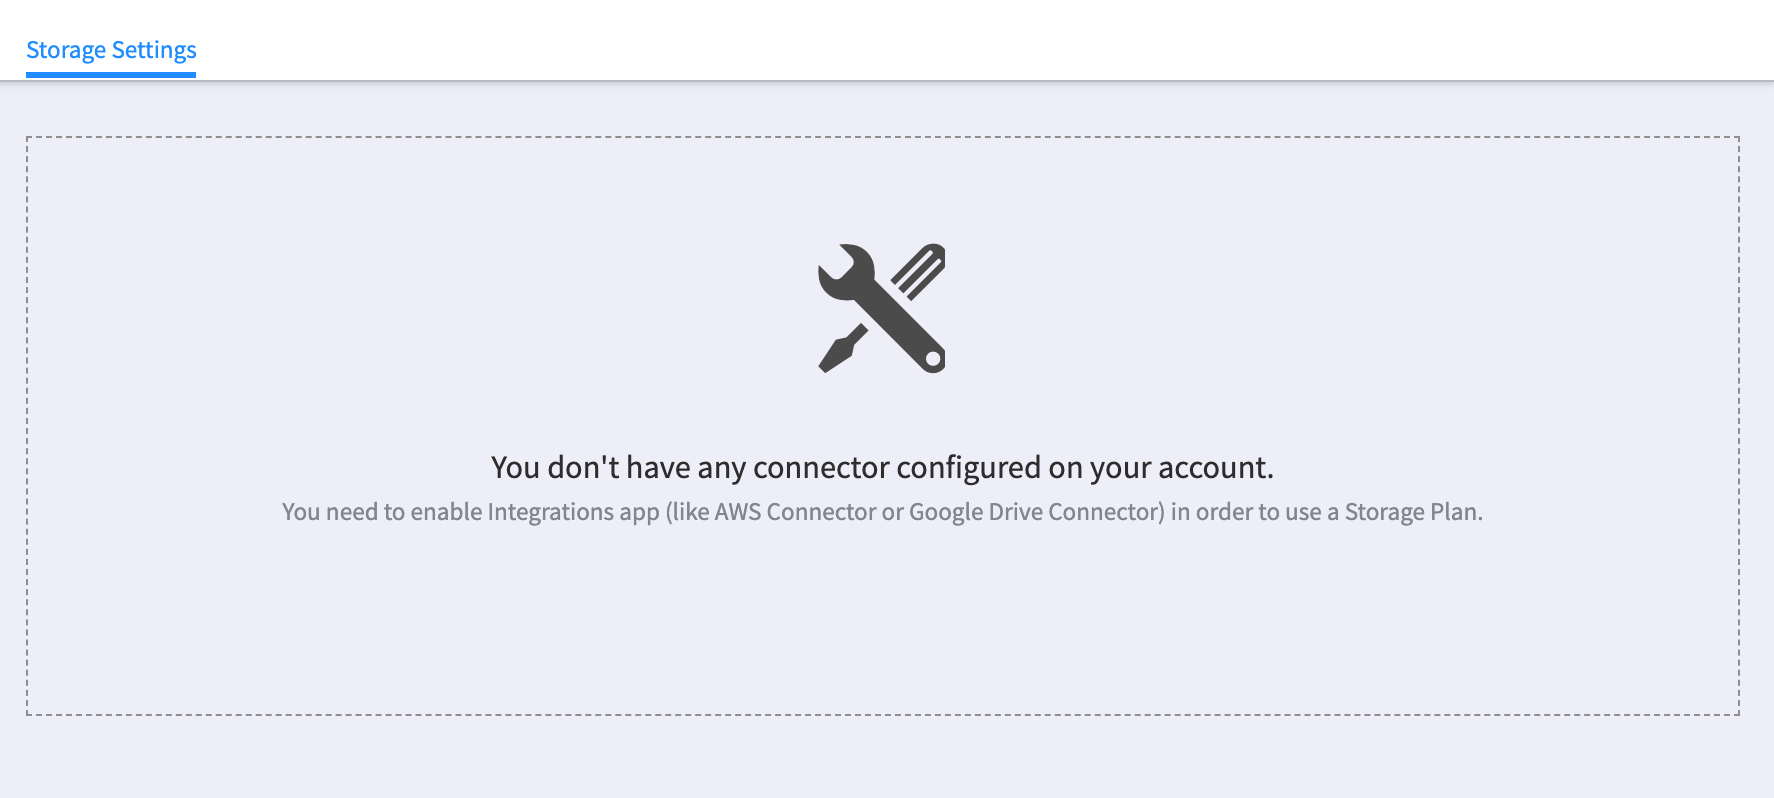
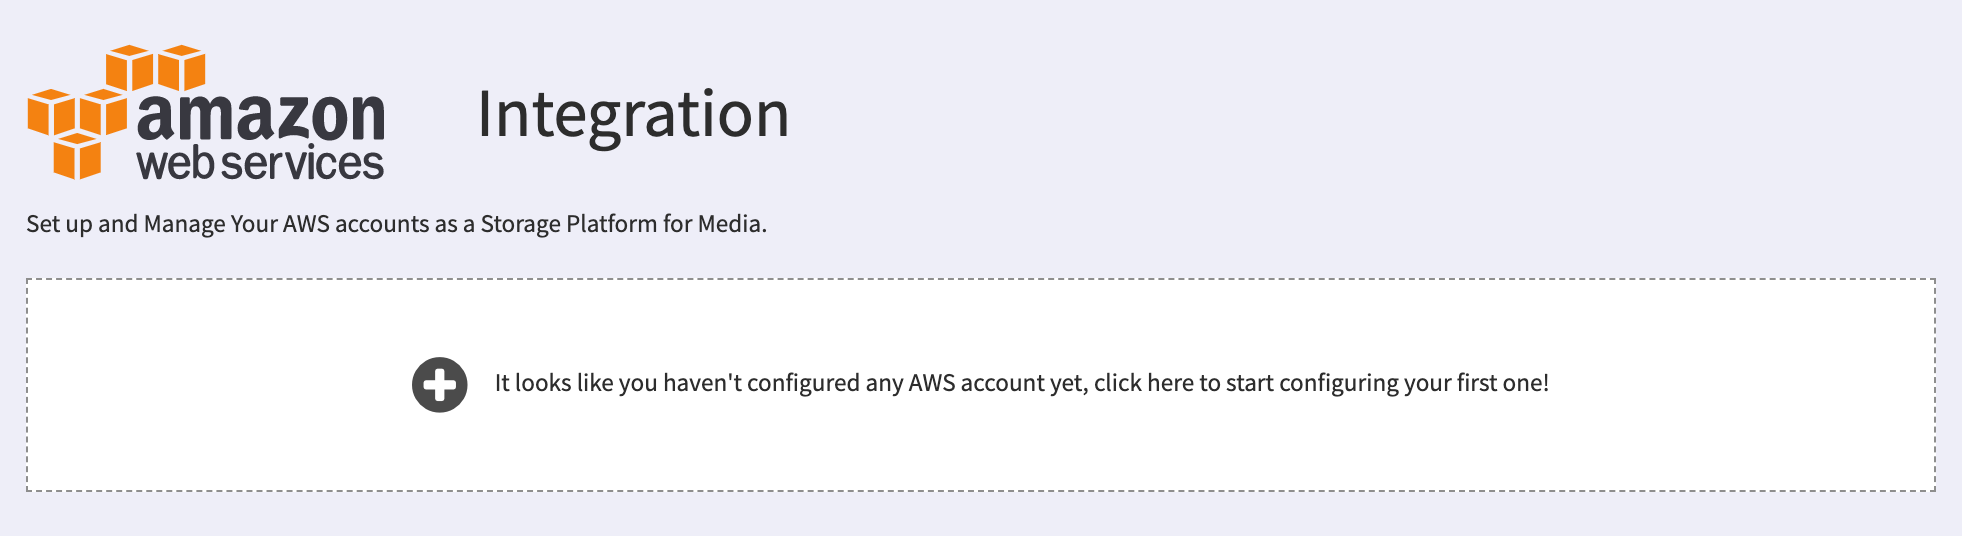
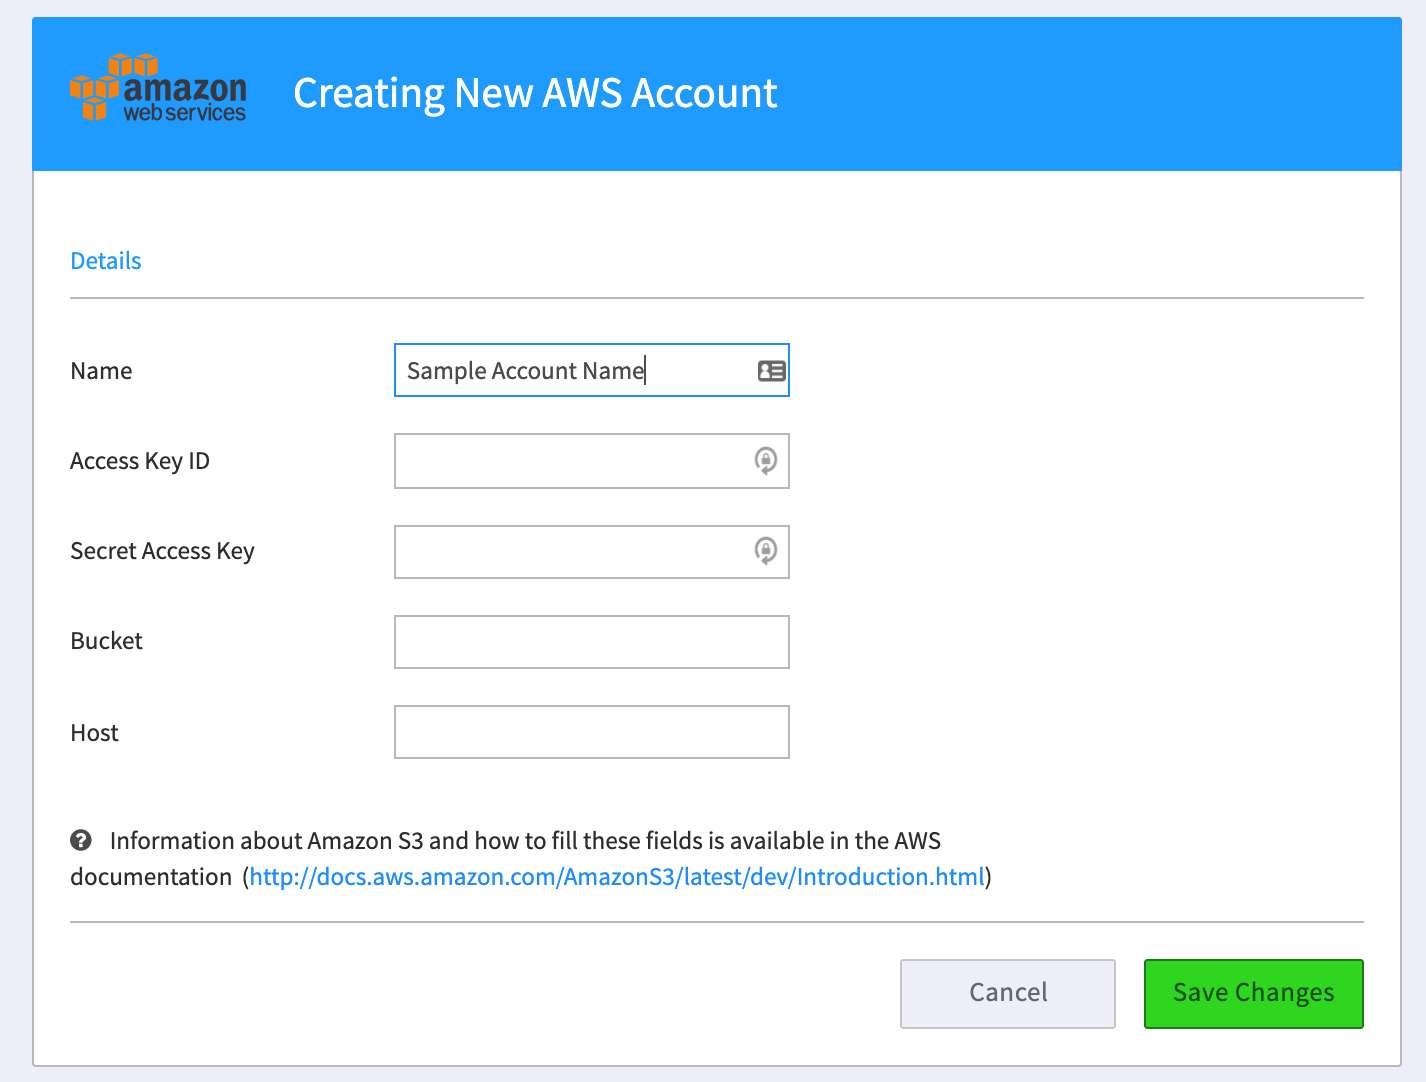
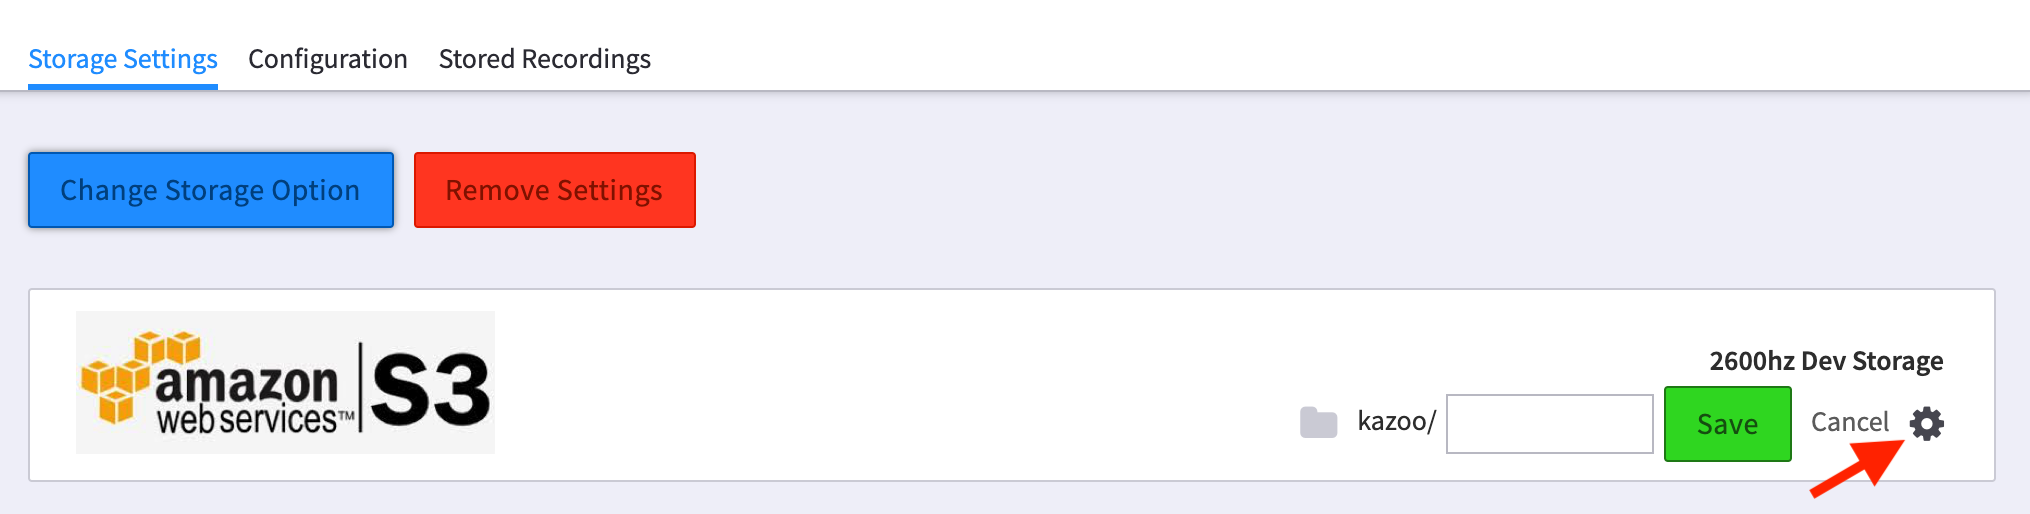
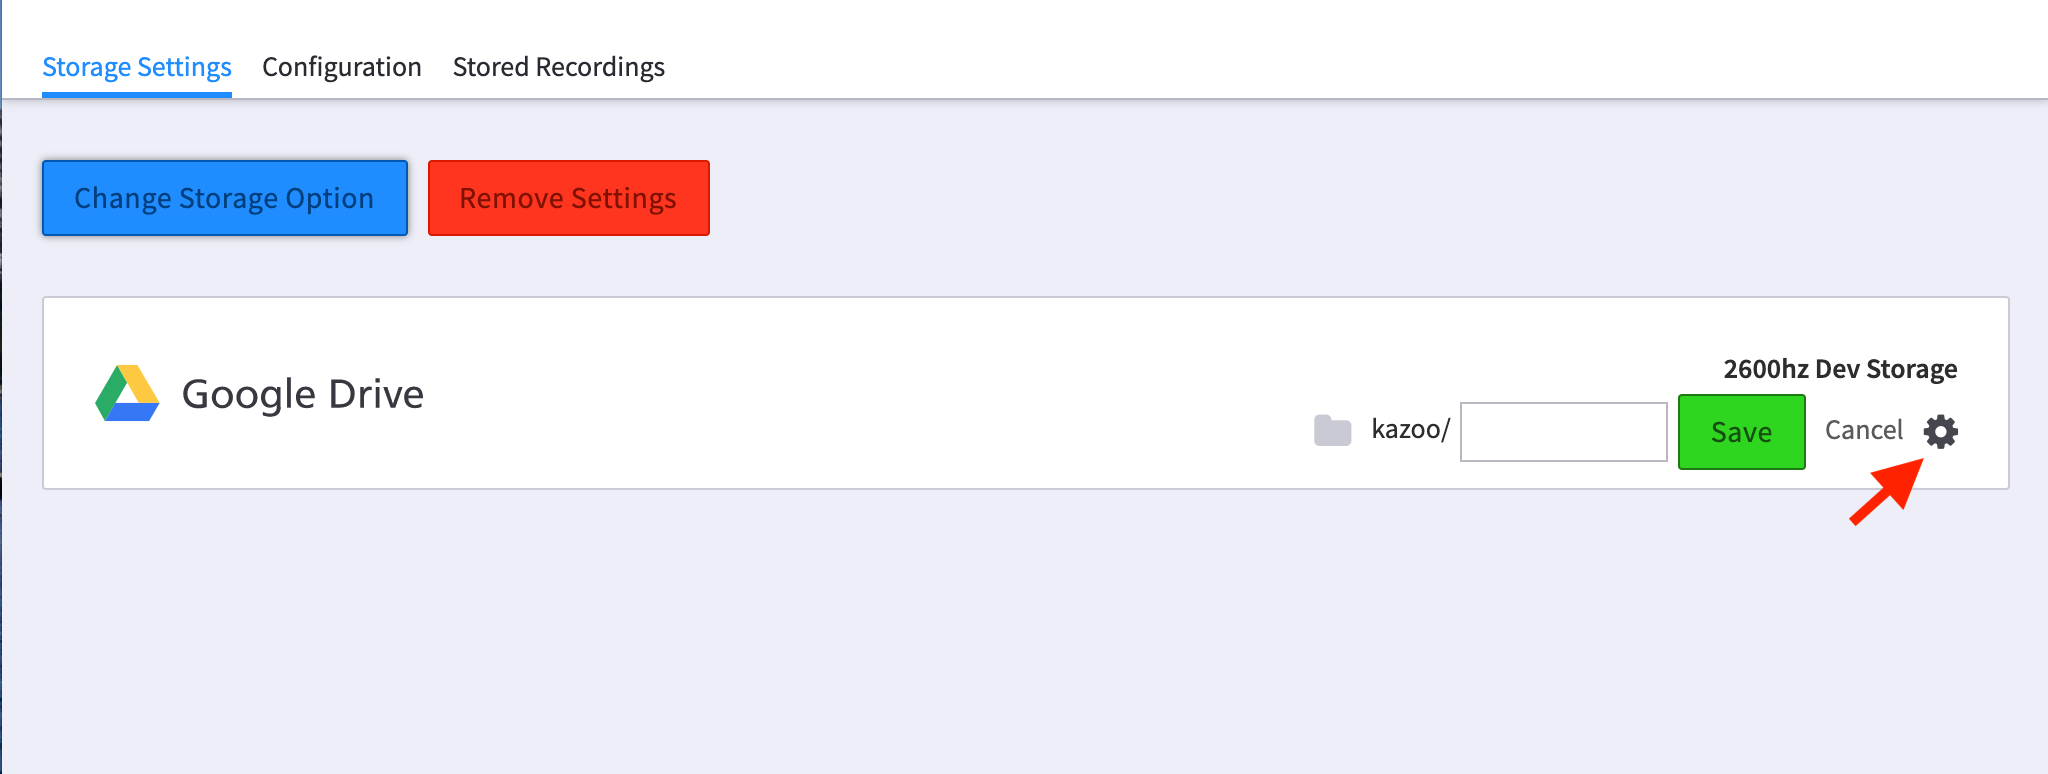
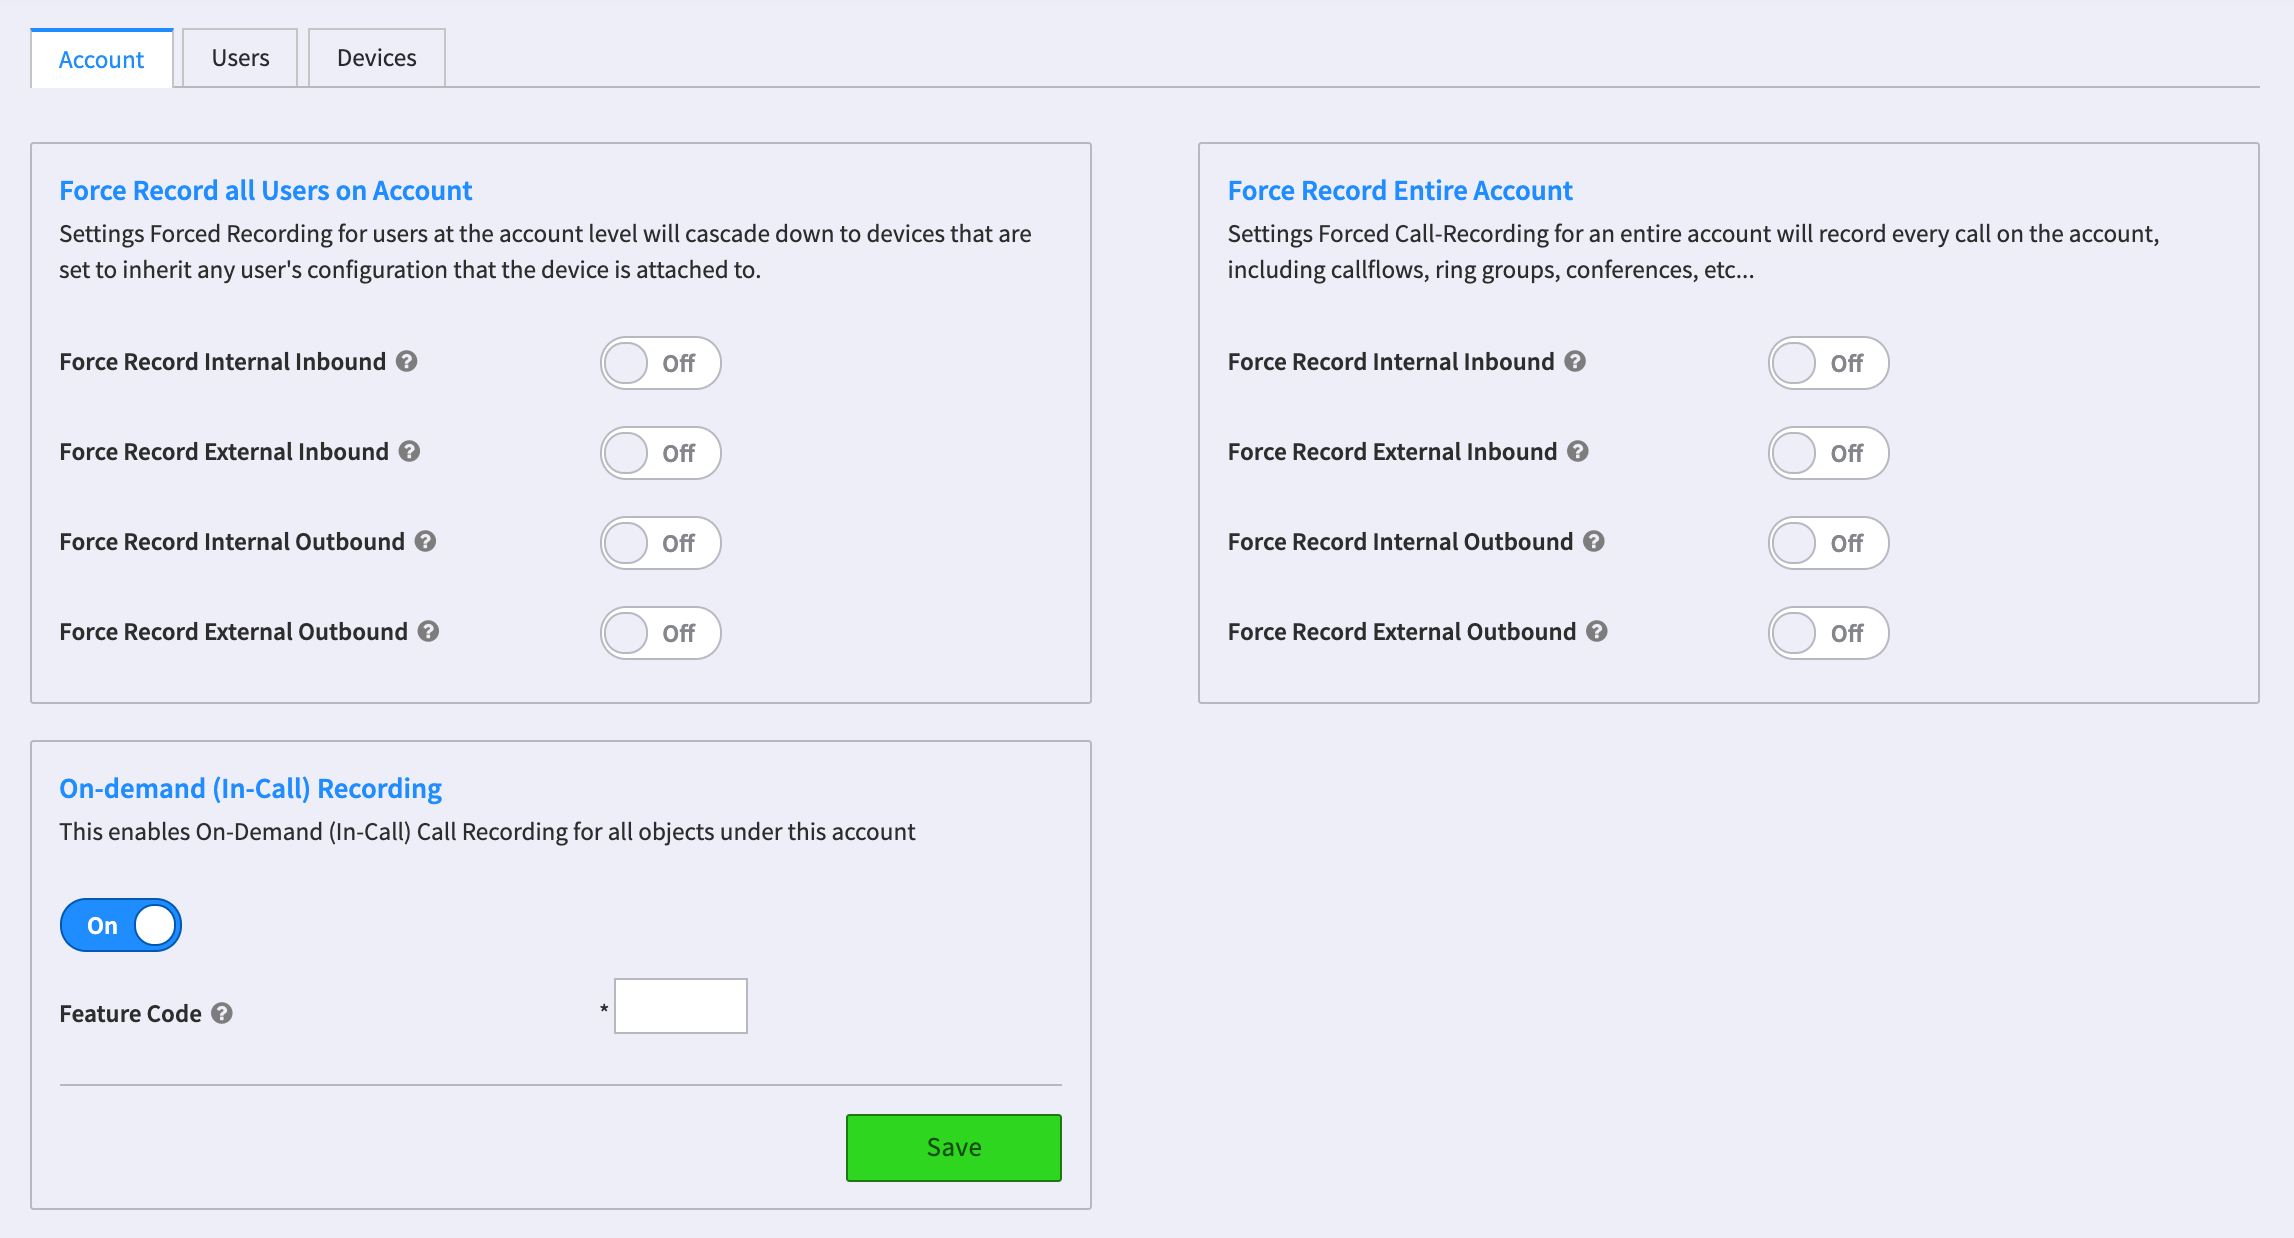
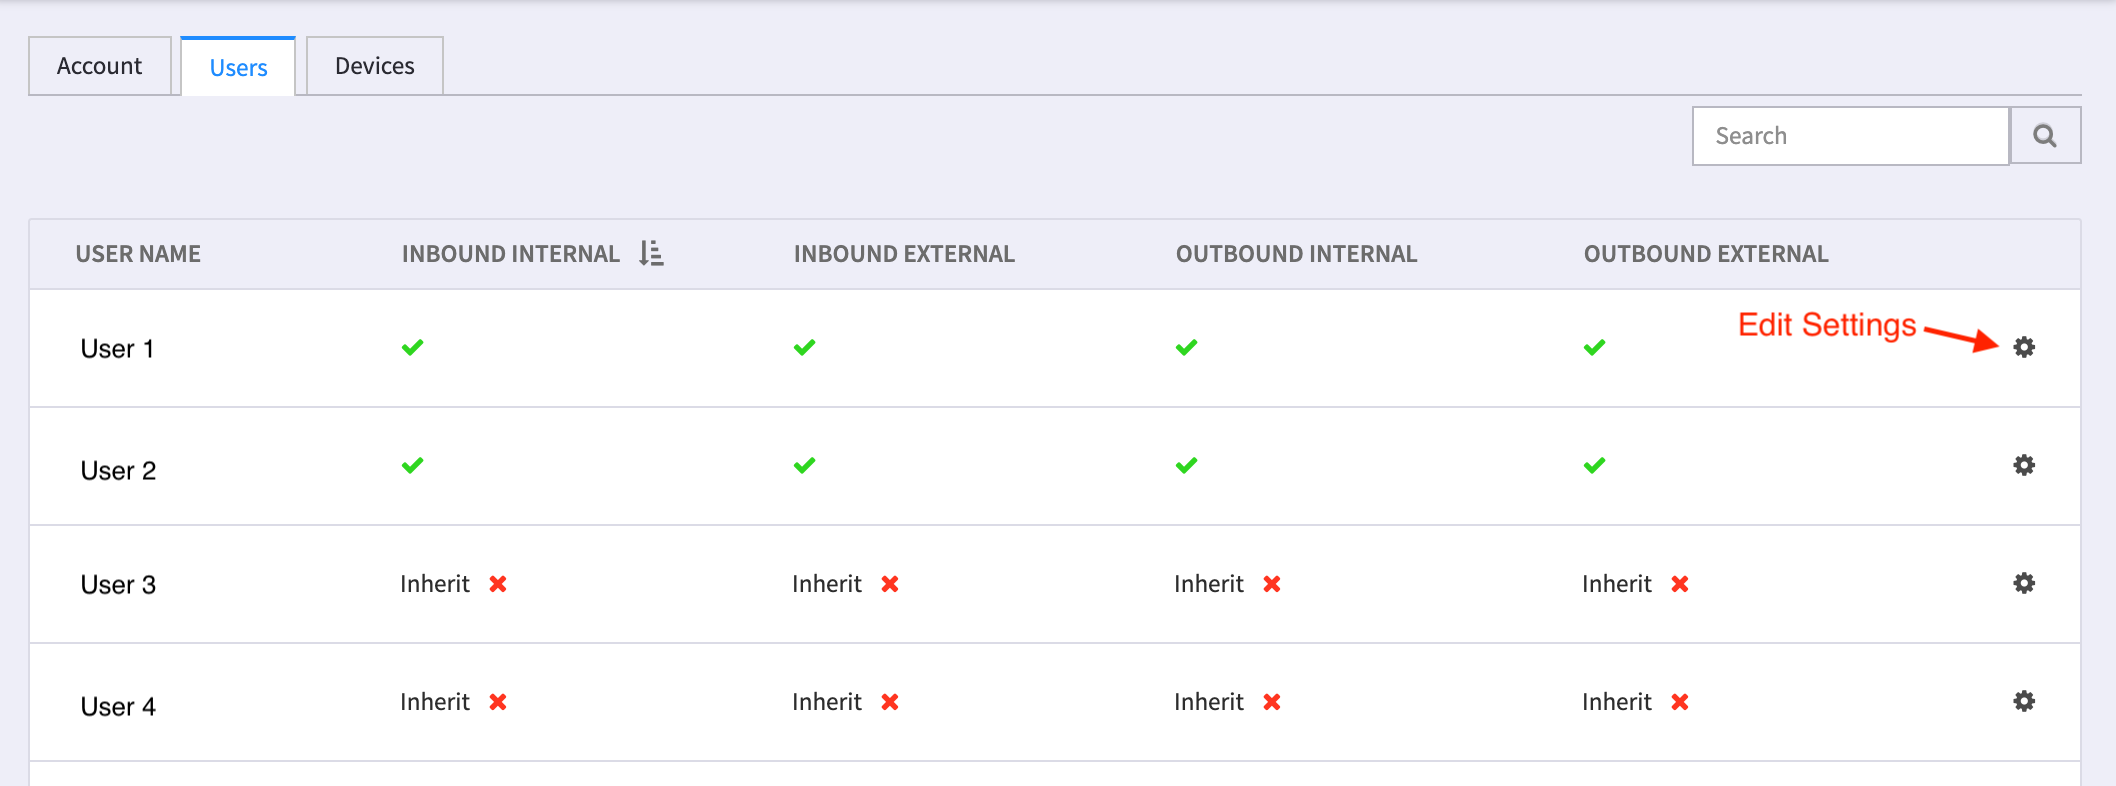
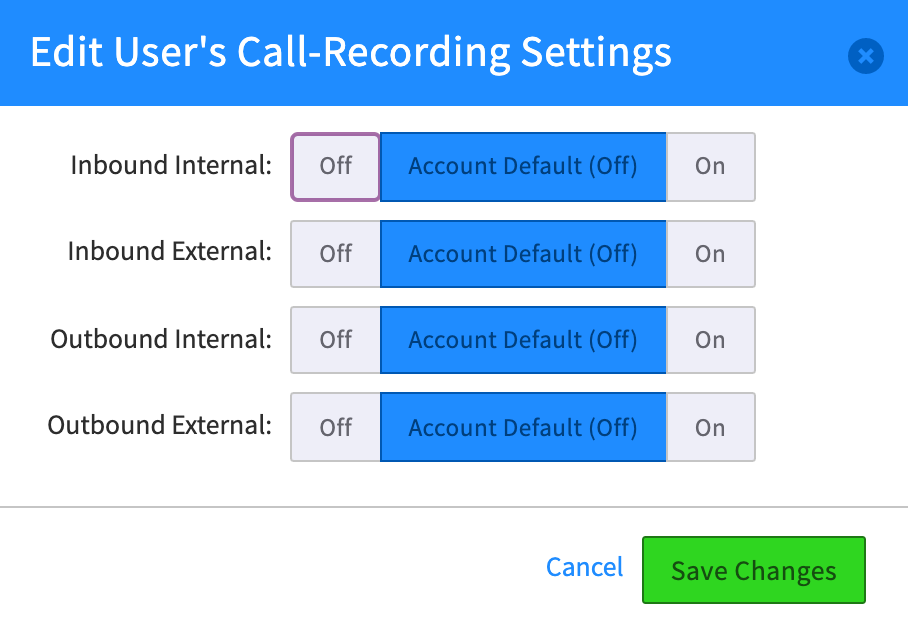
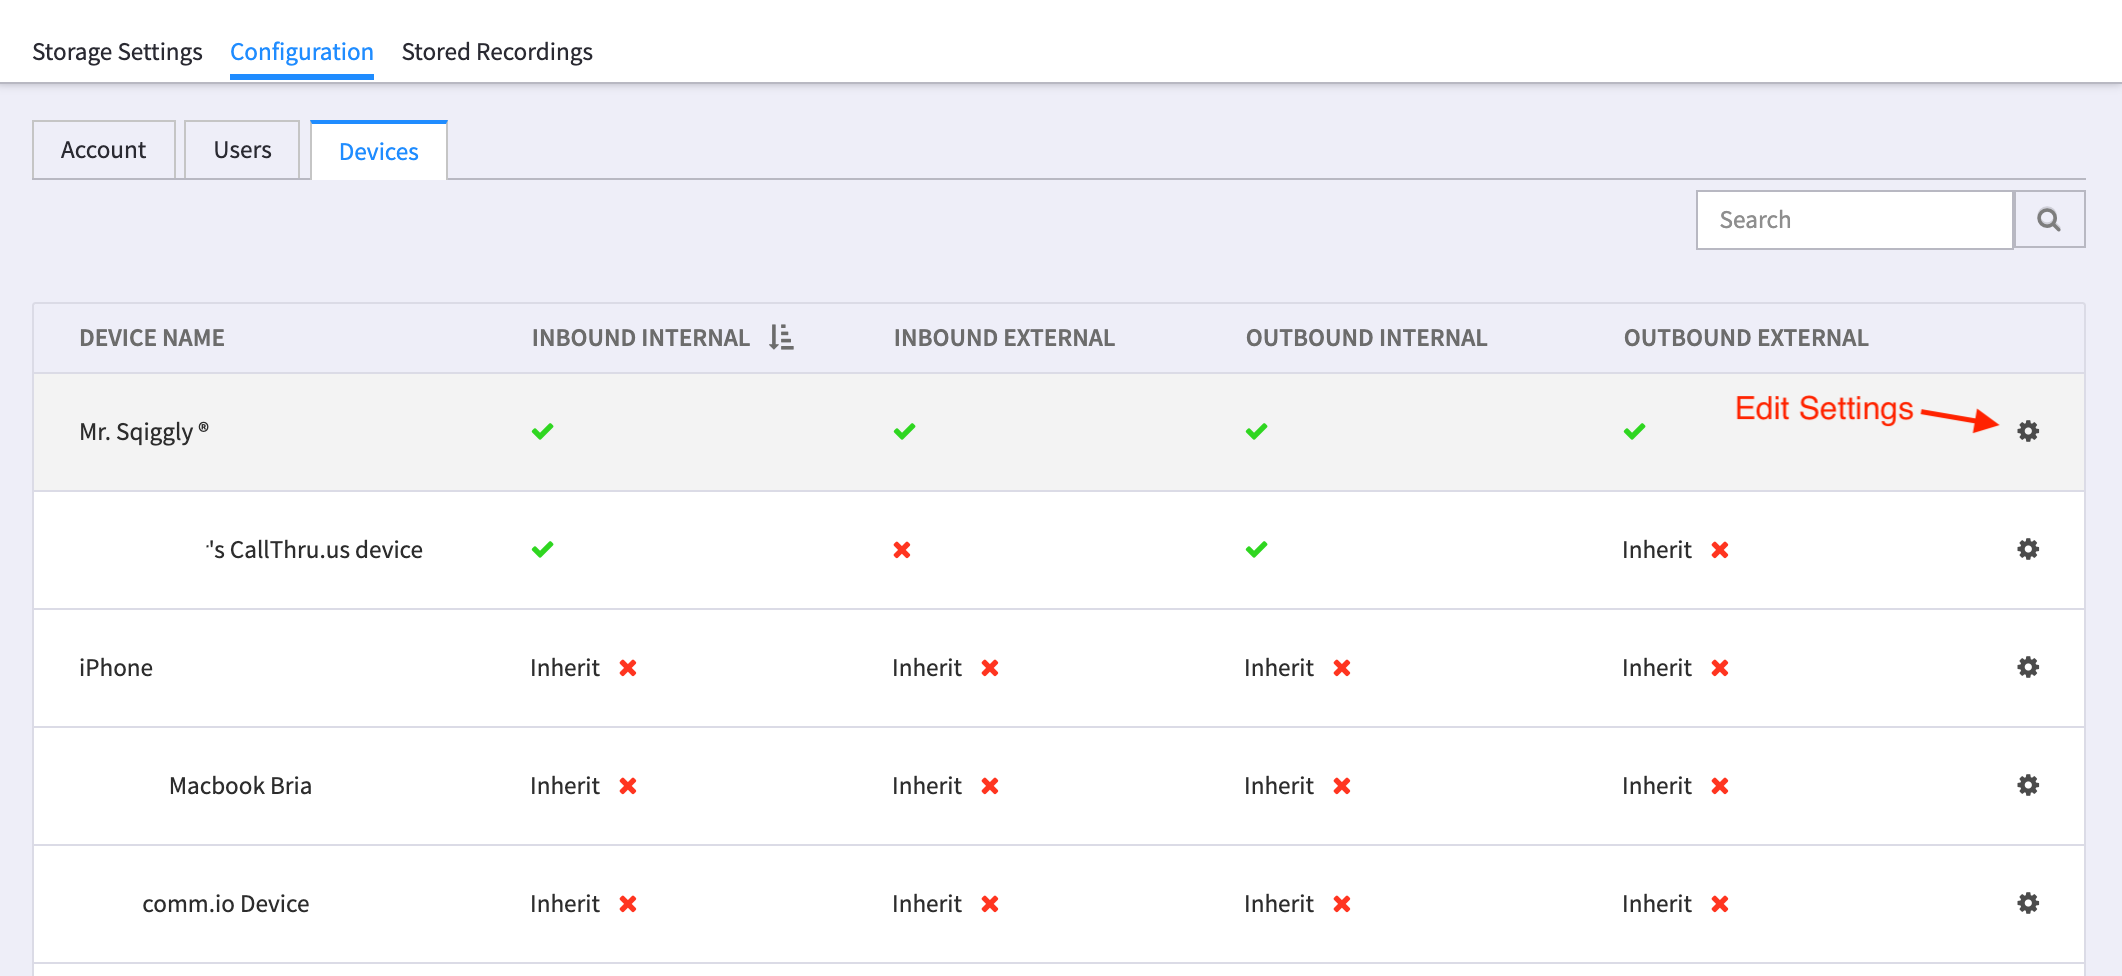
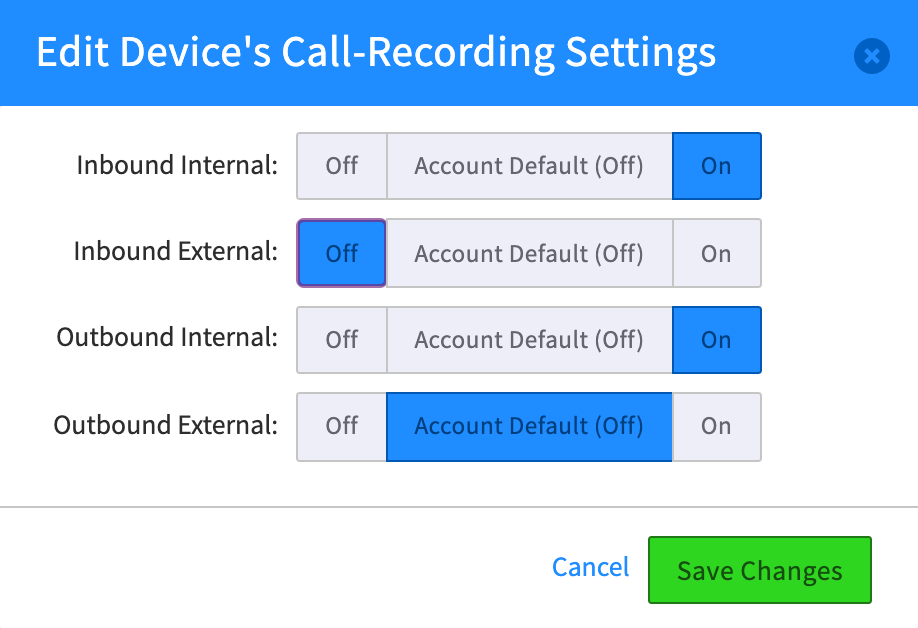
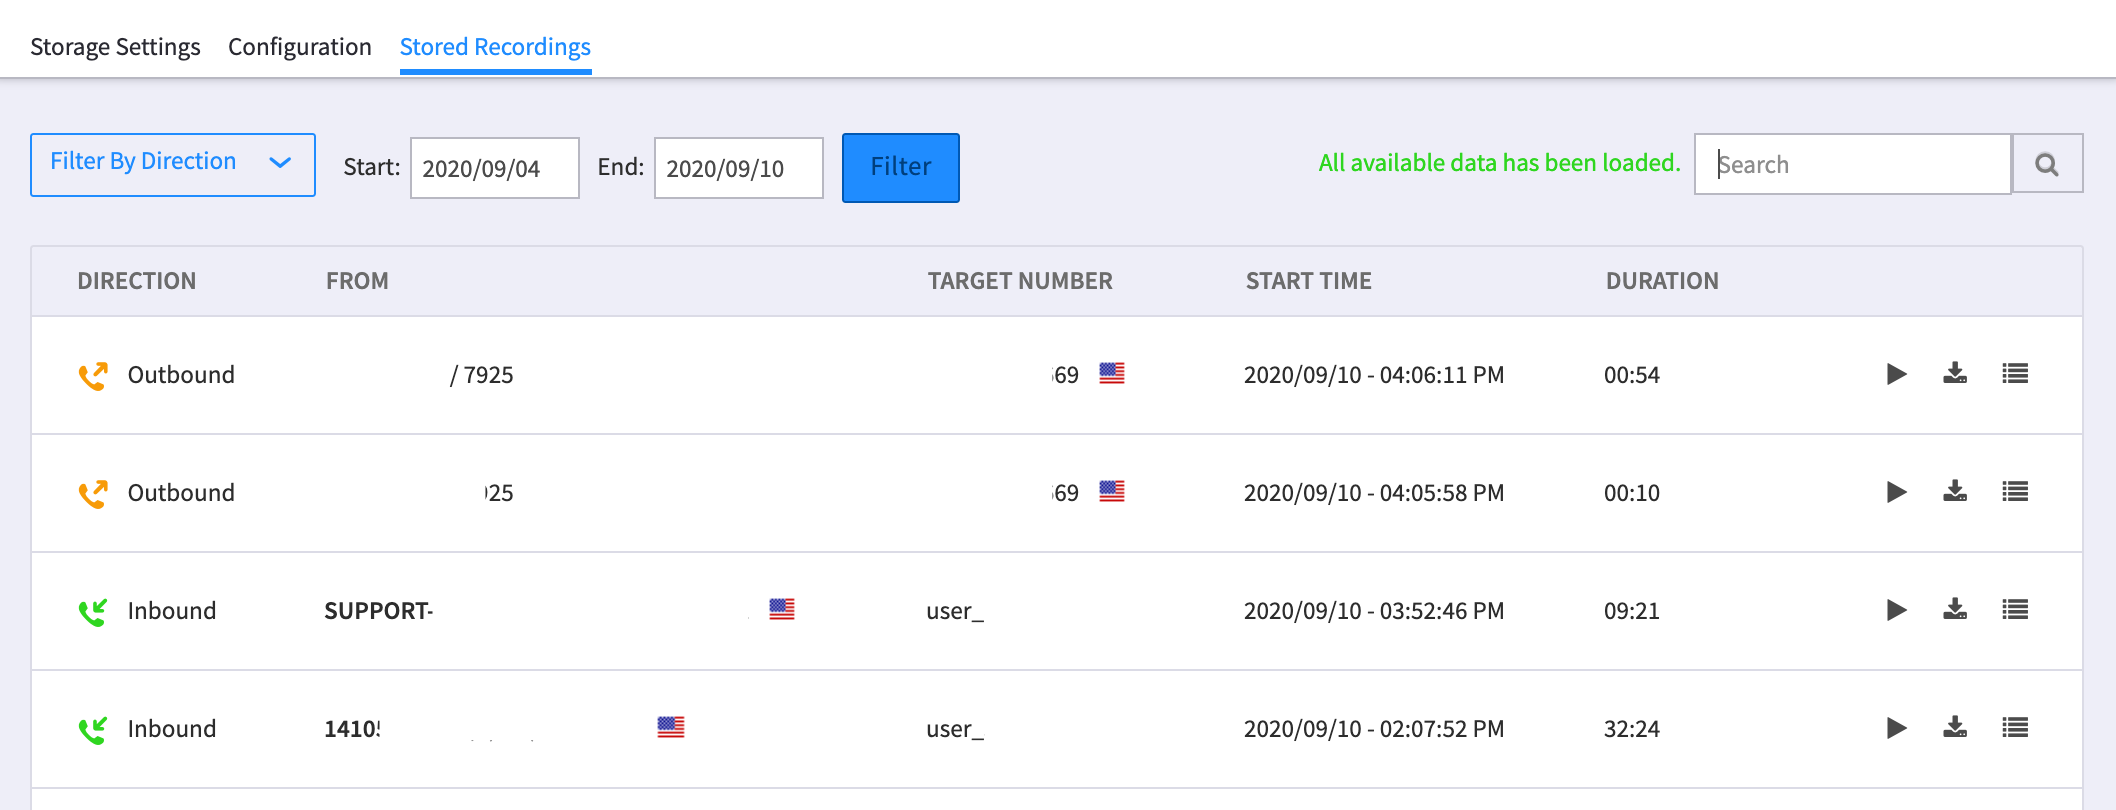
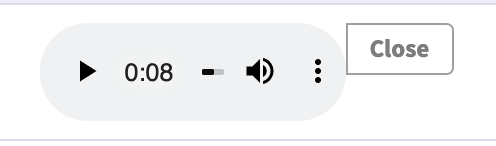

 Call Recording settings in SmartPBX
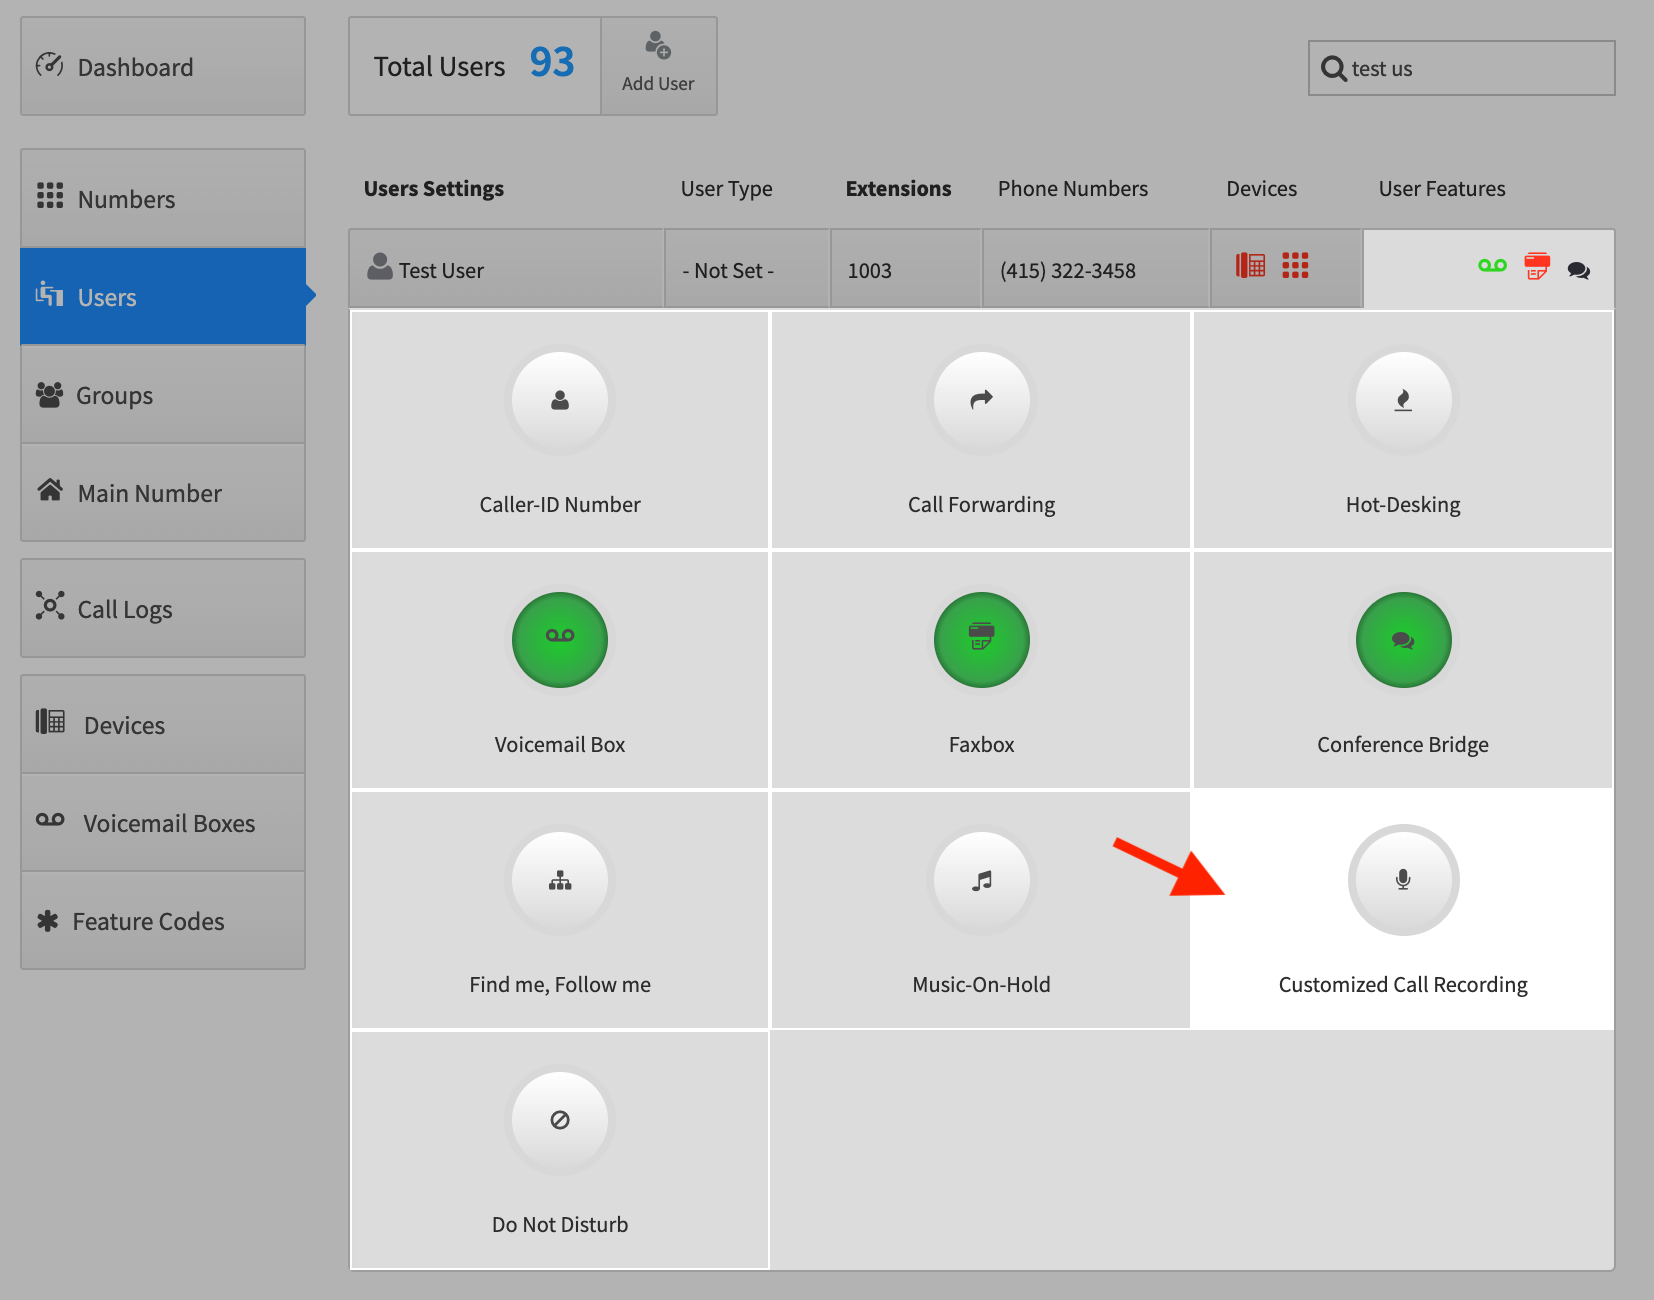
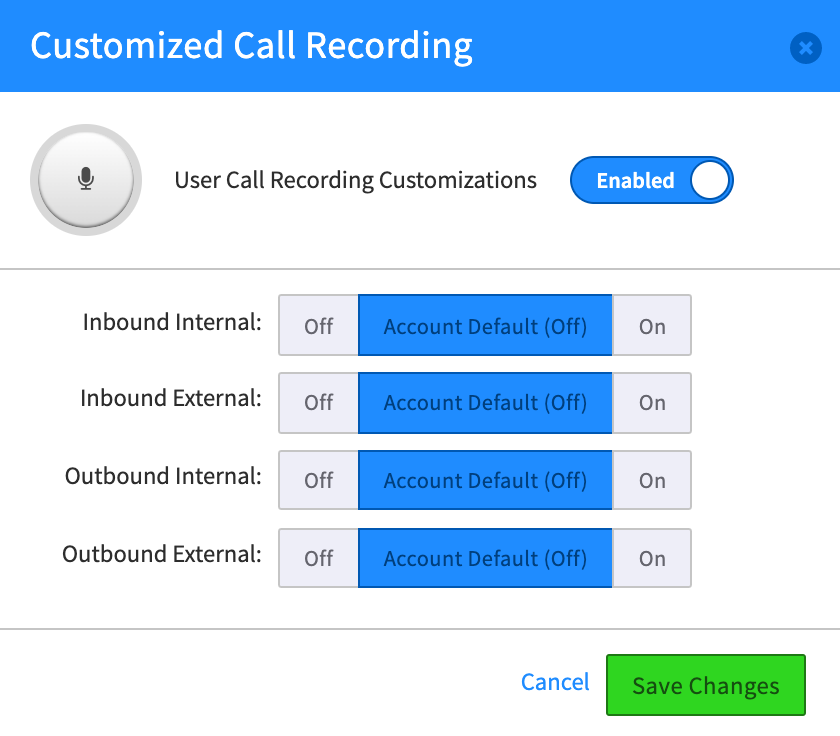

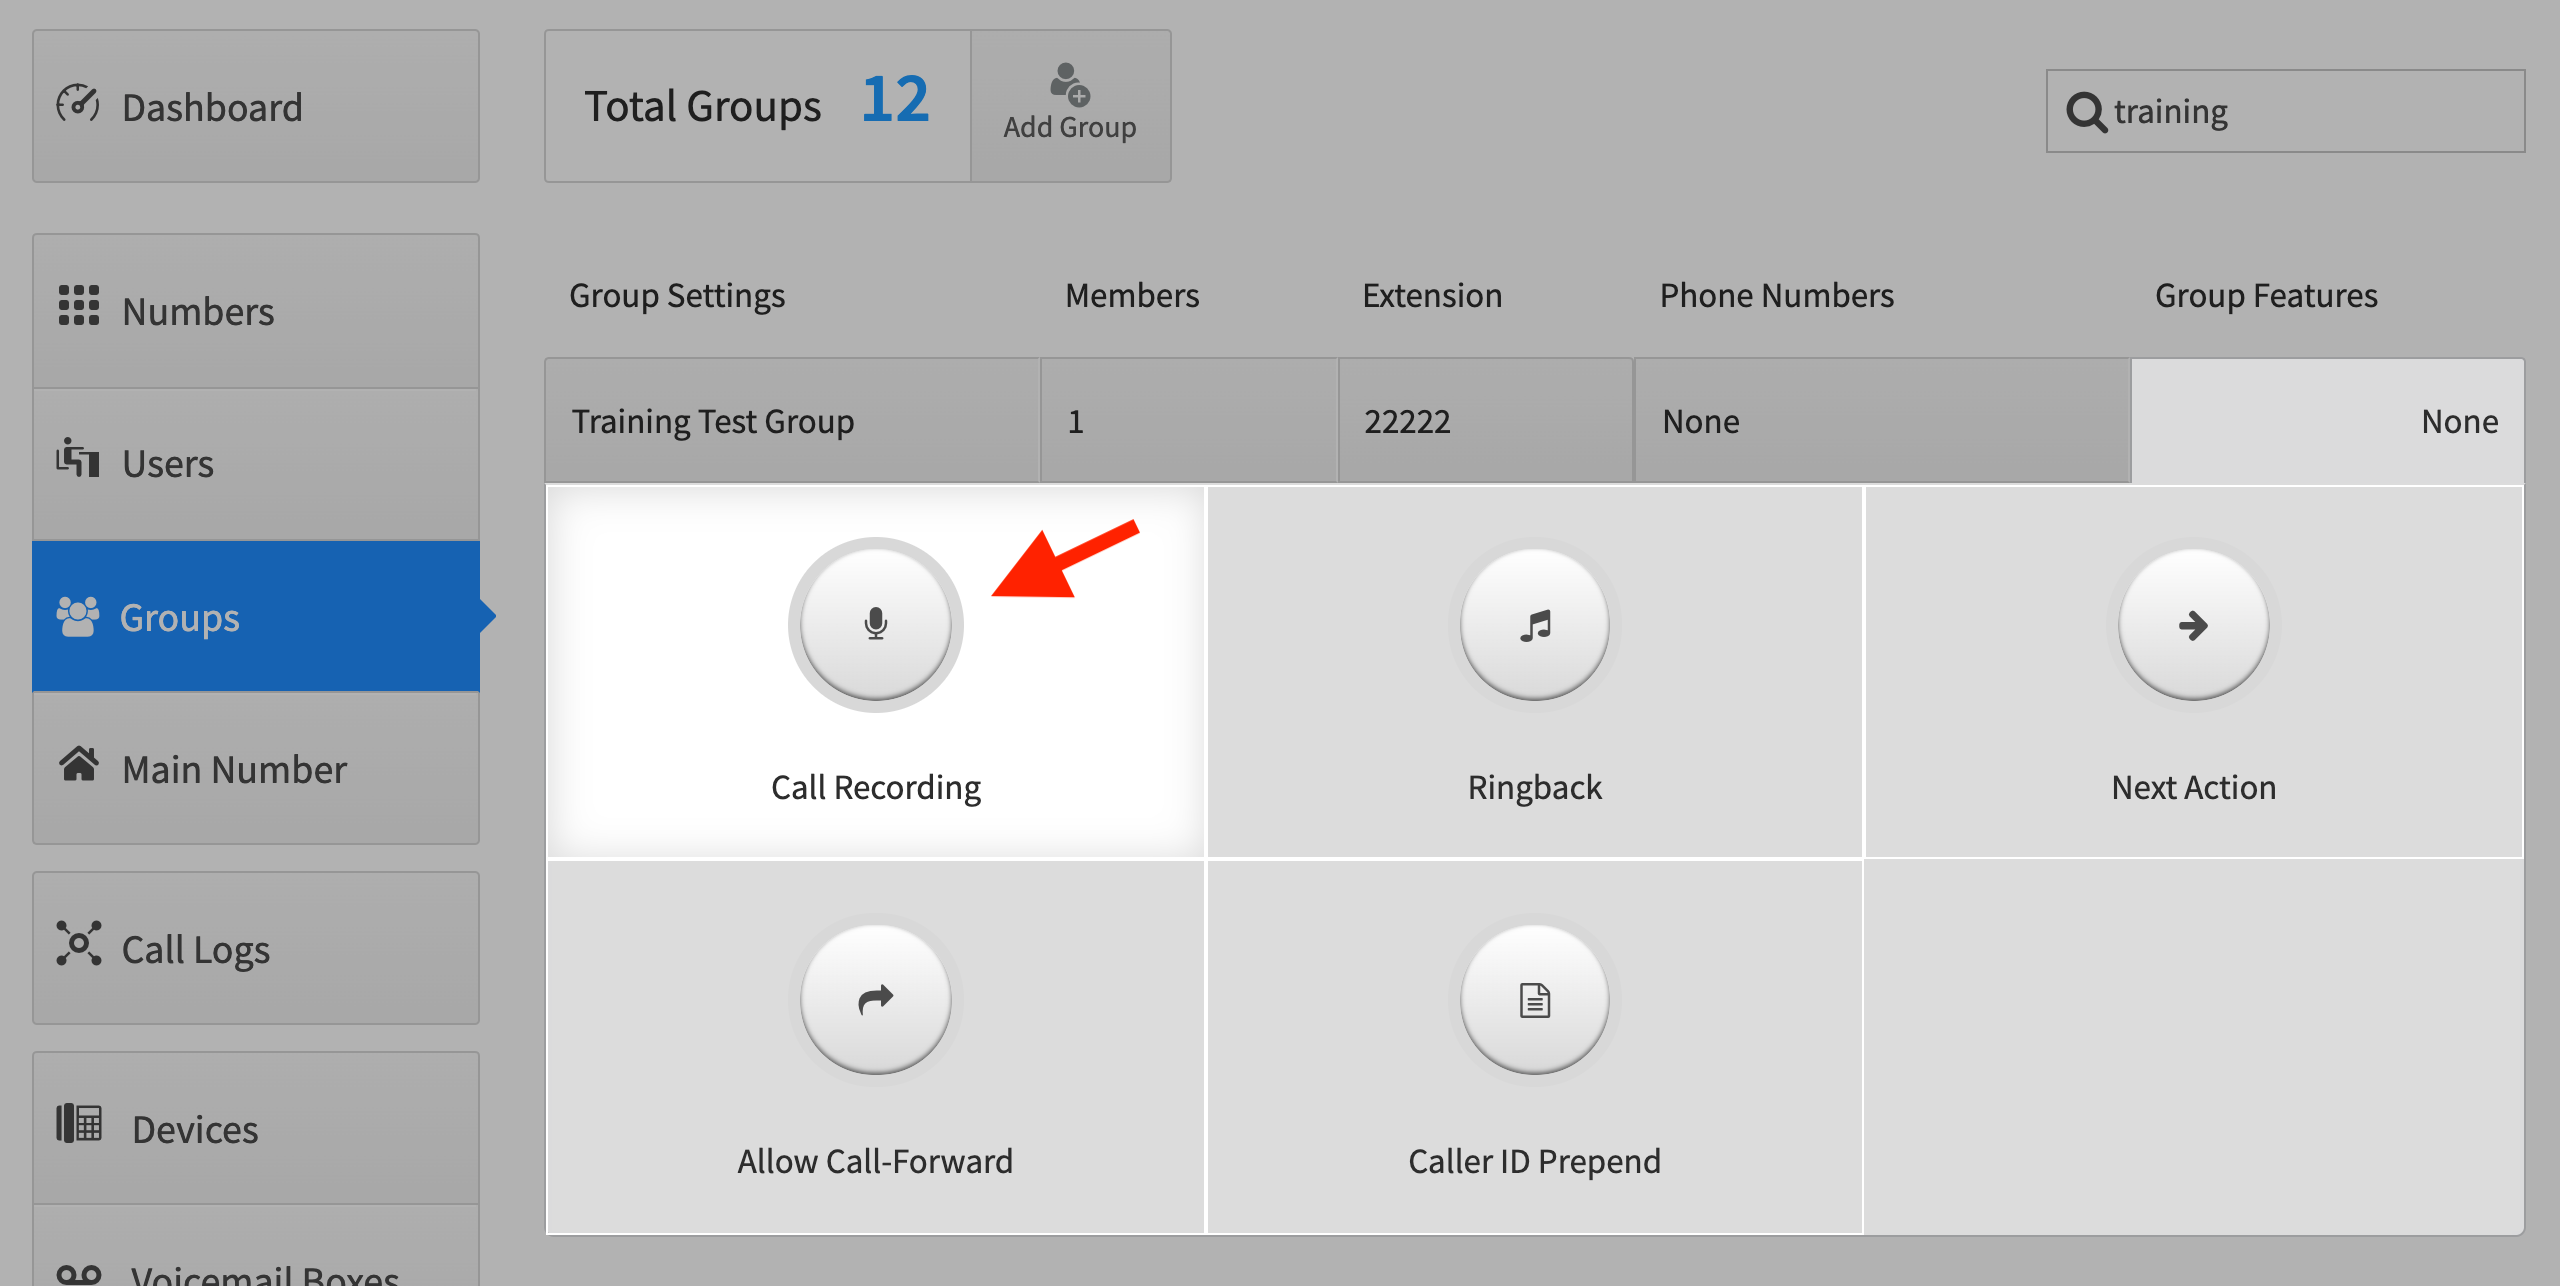
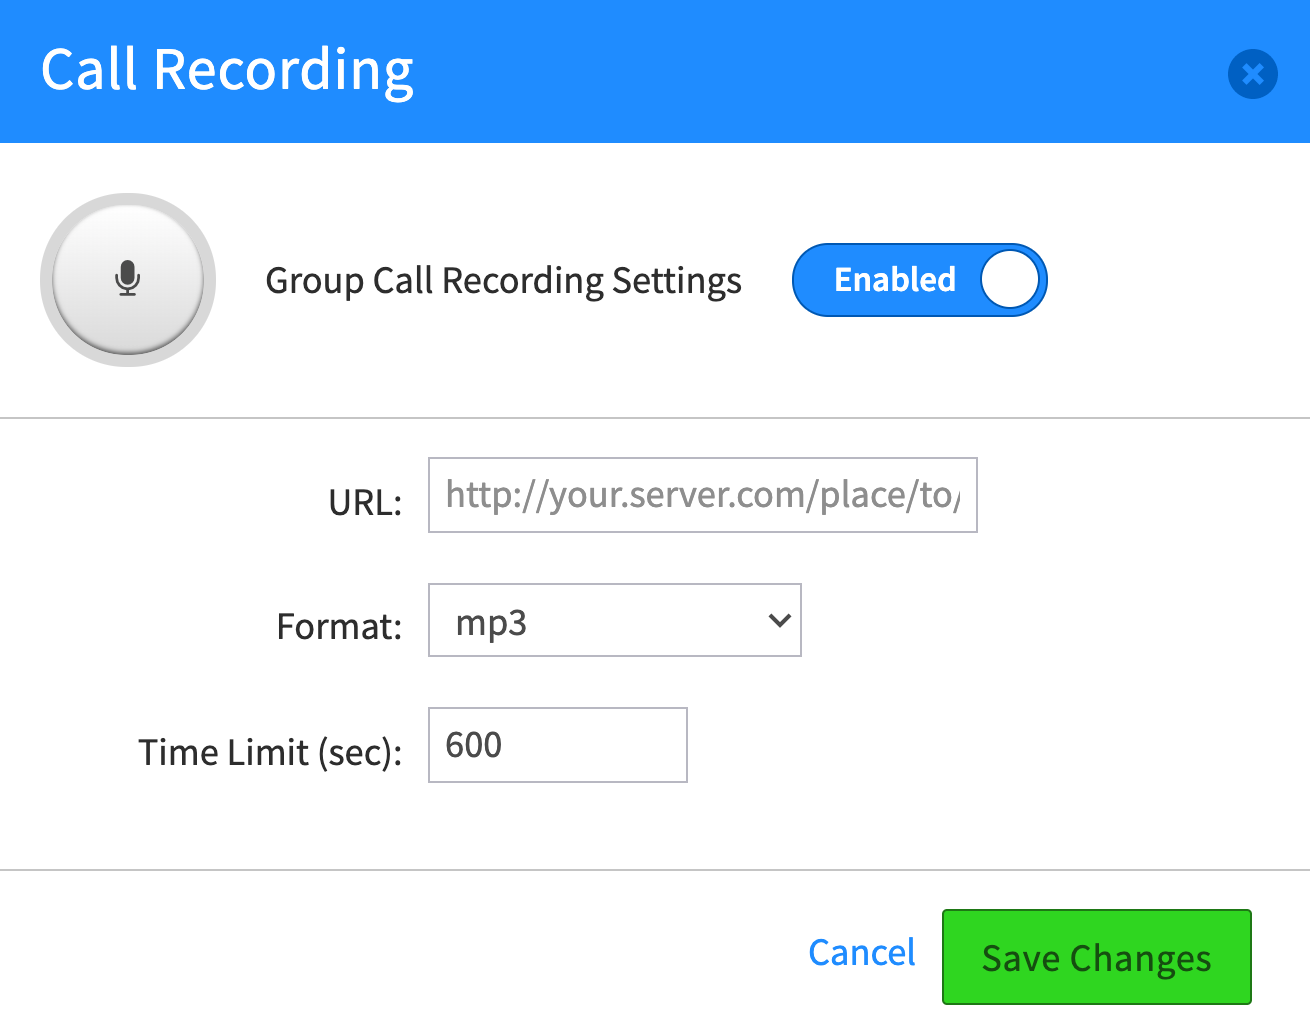

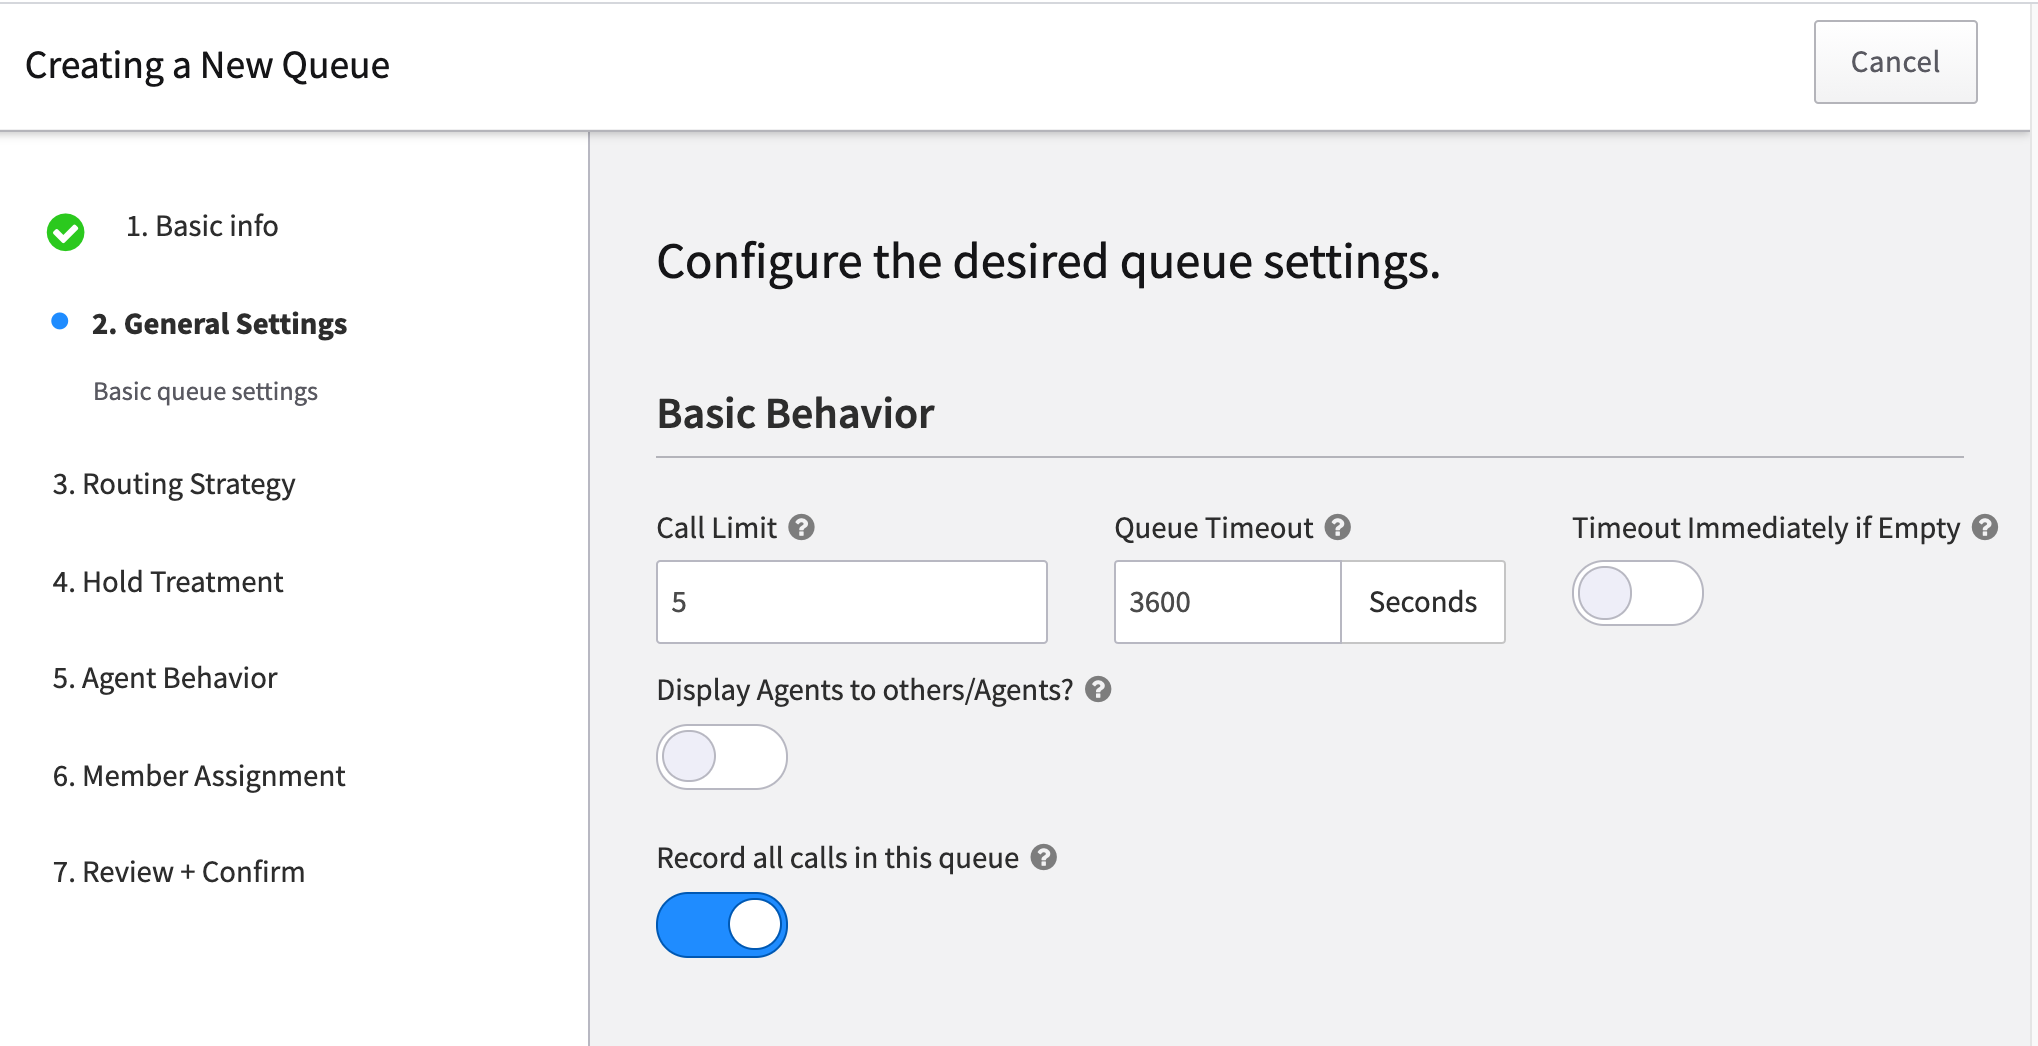


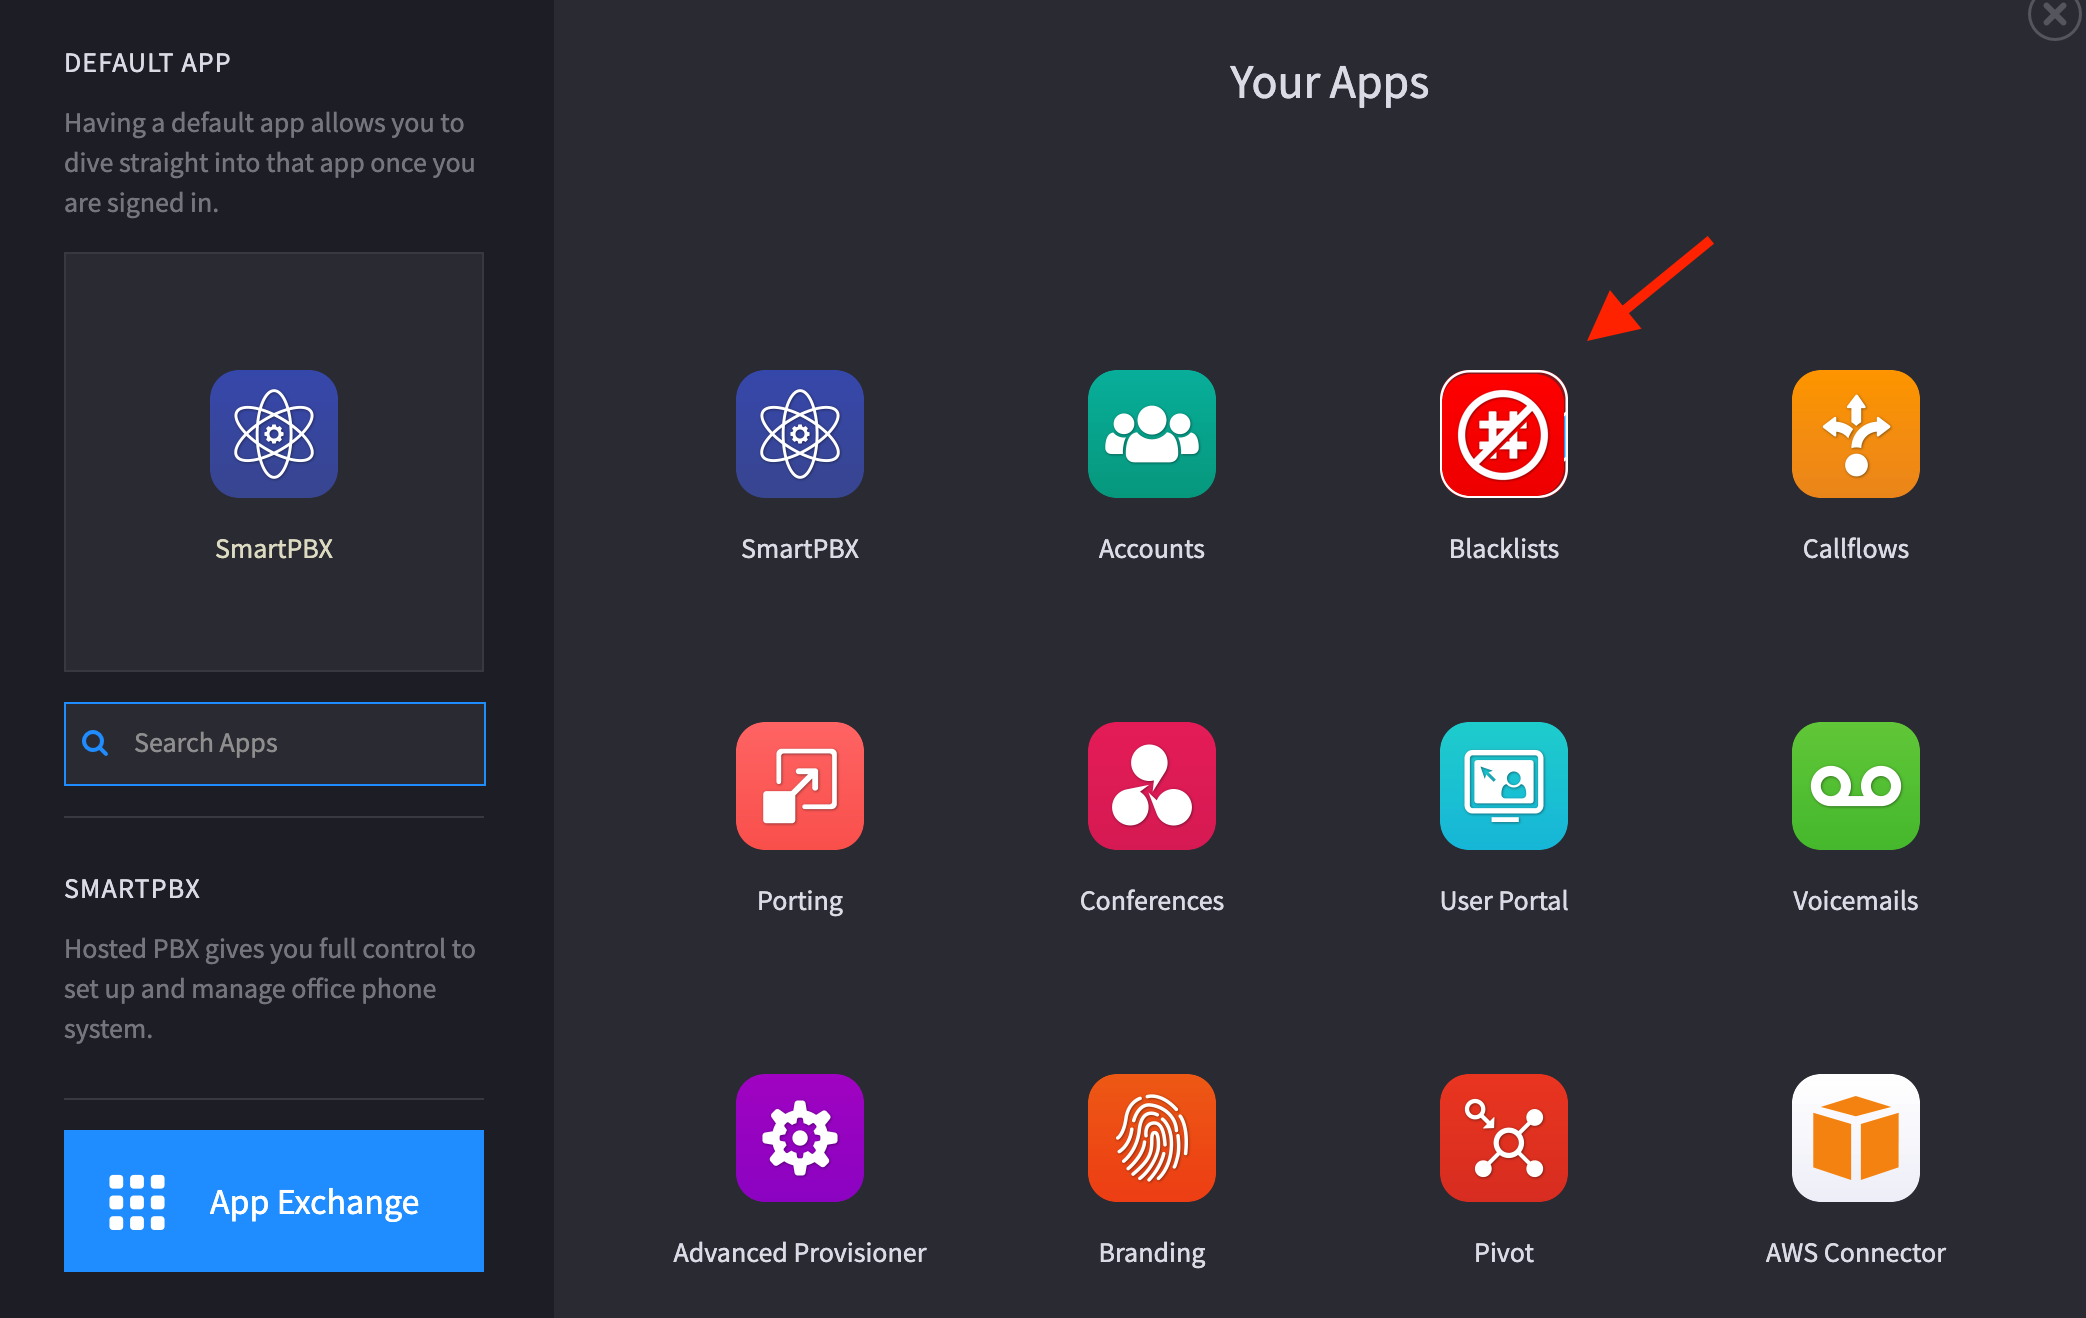
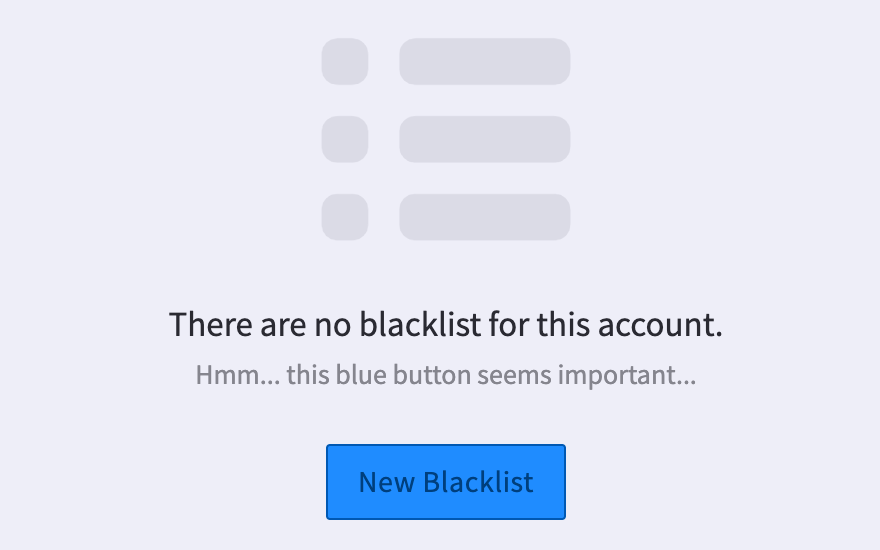
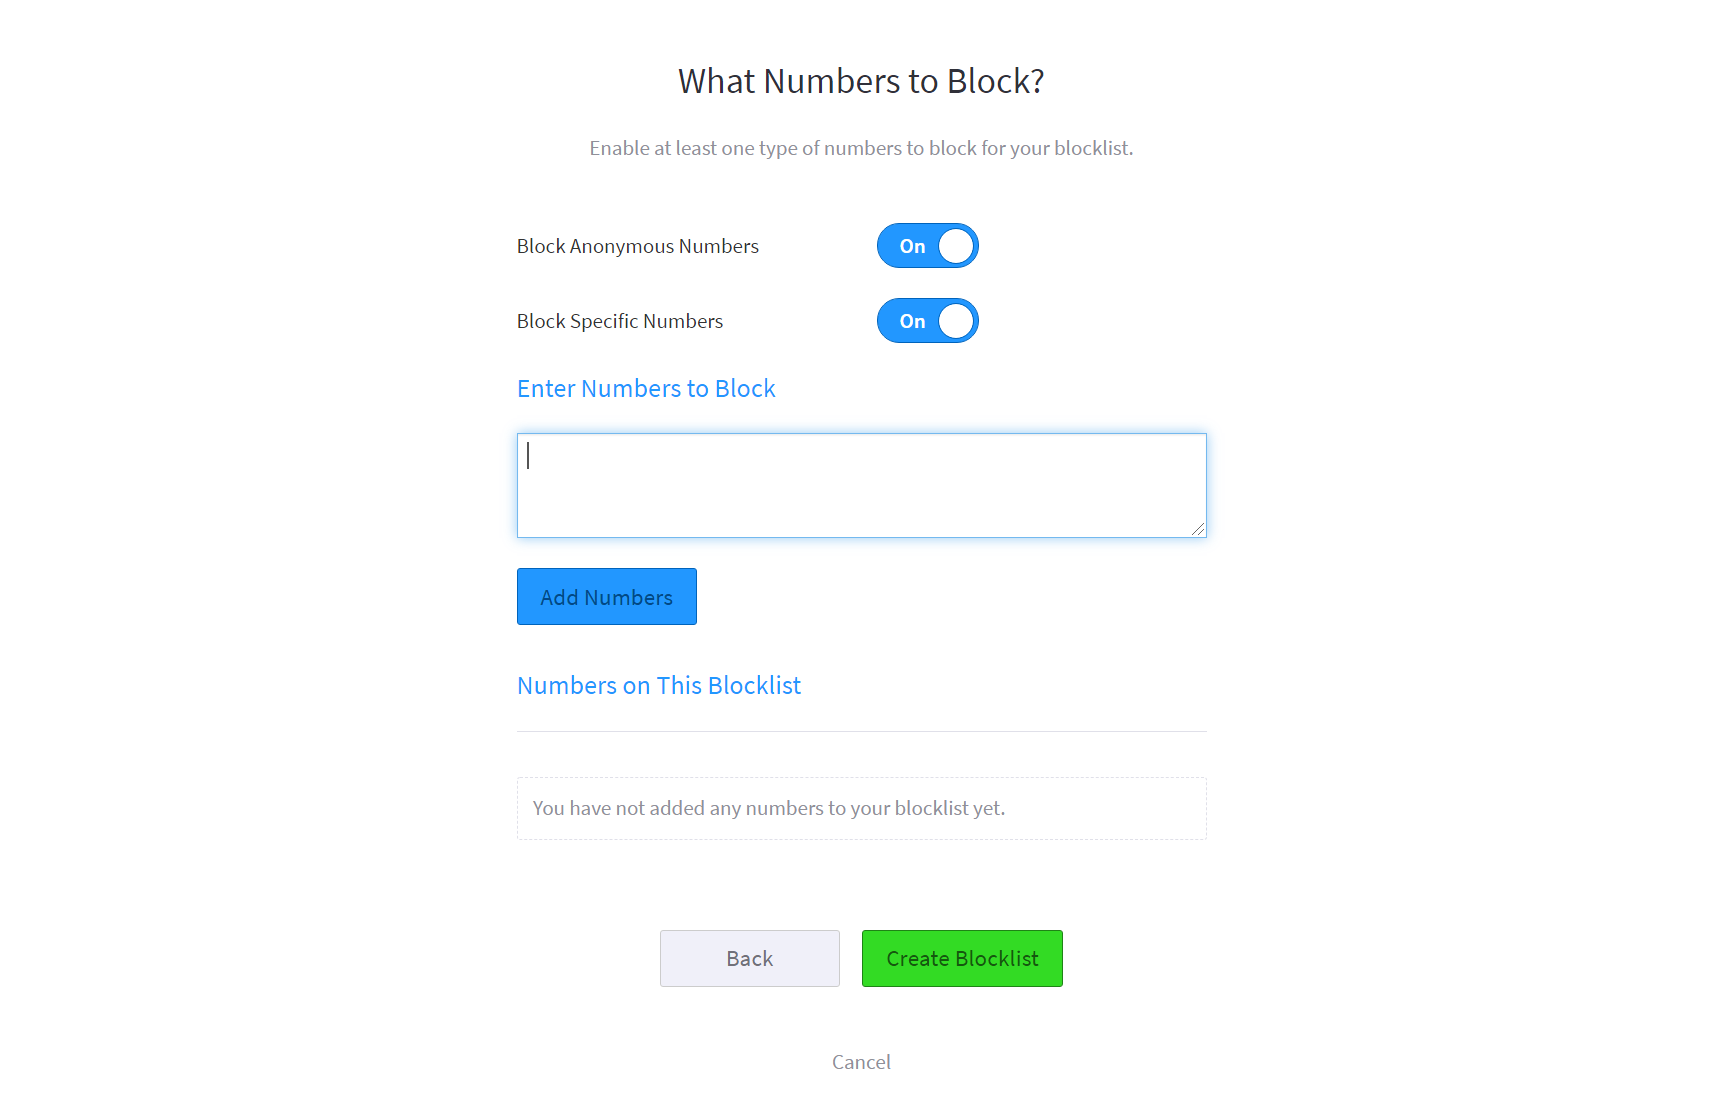
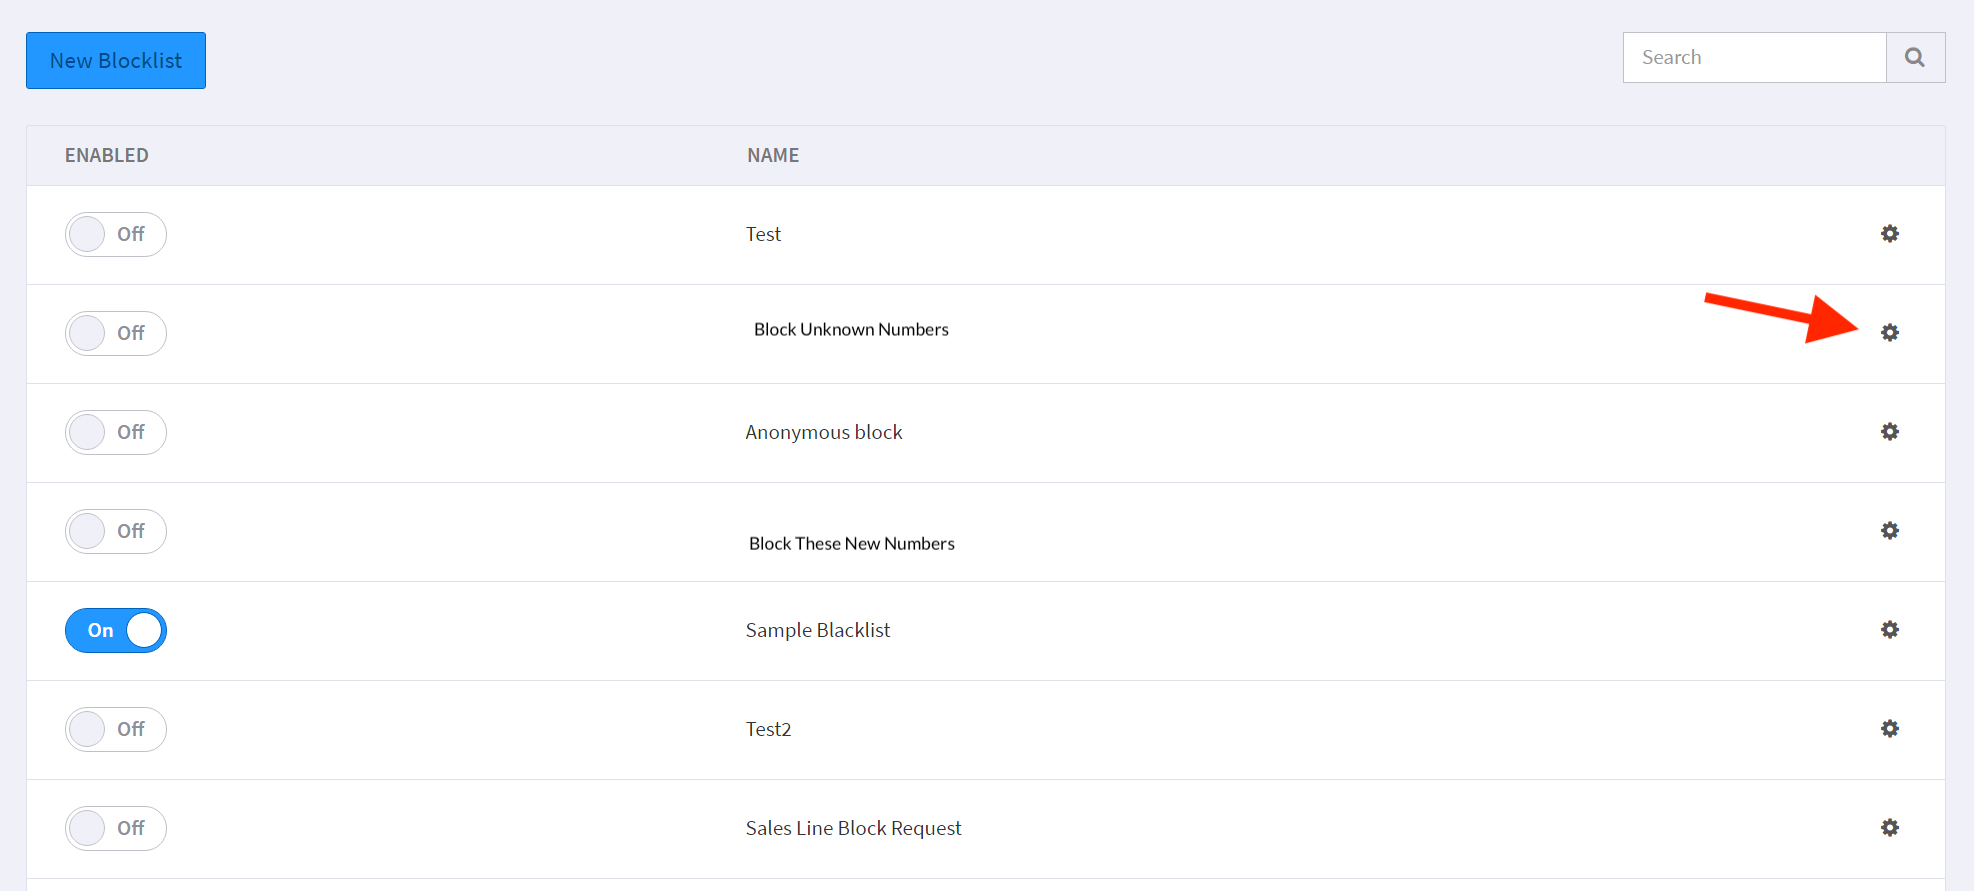
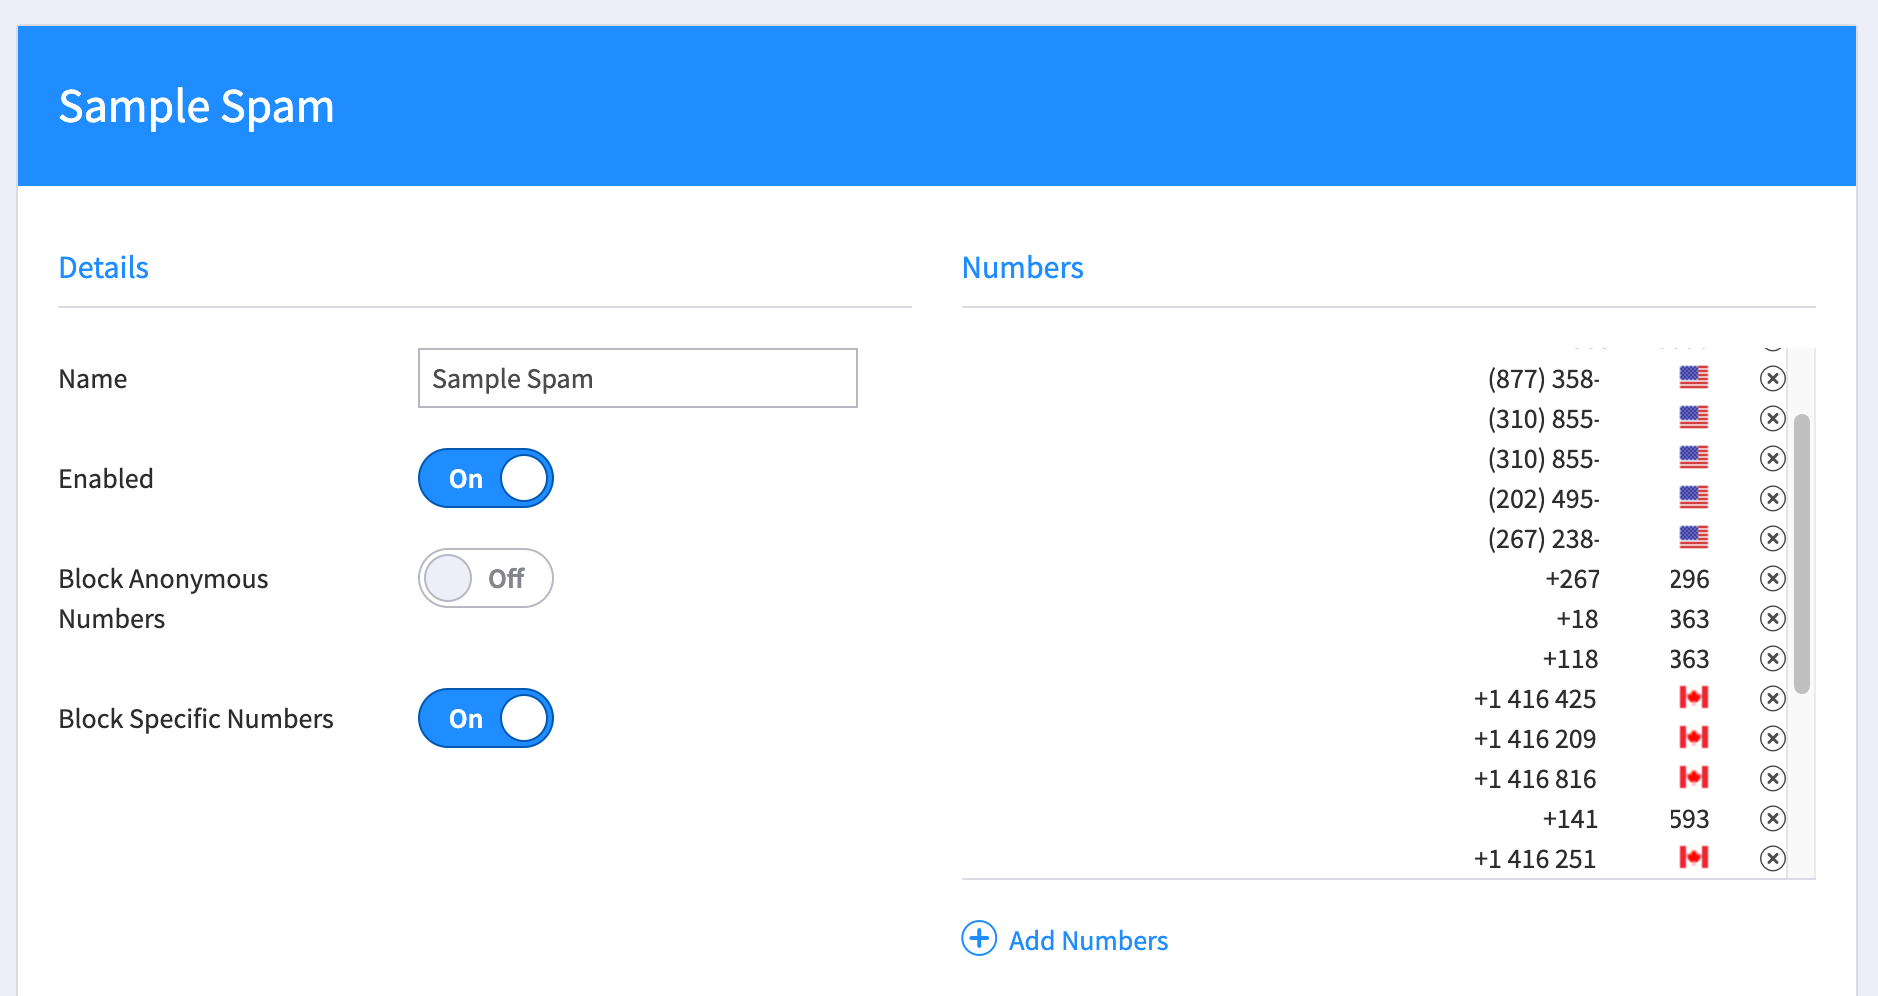
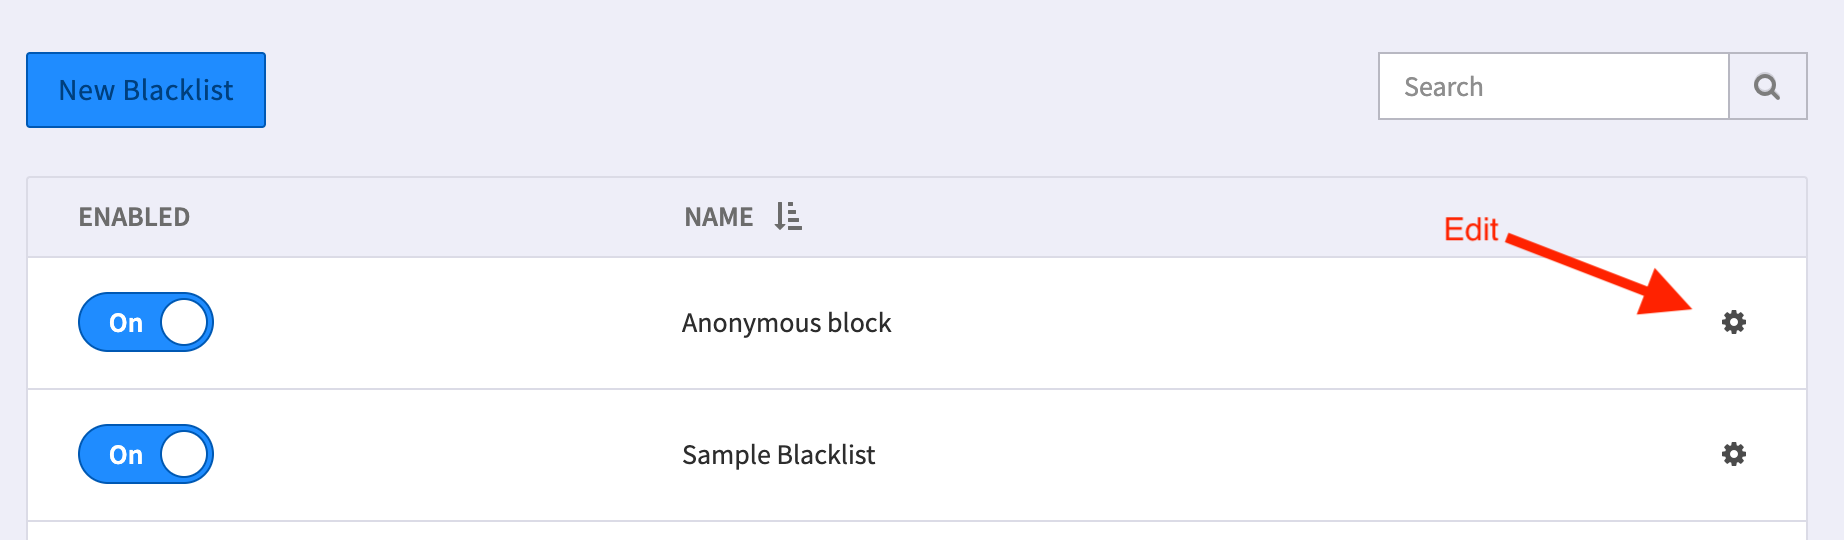

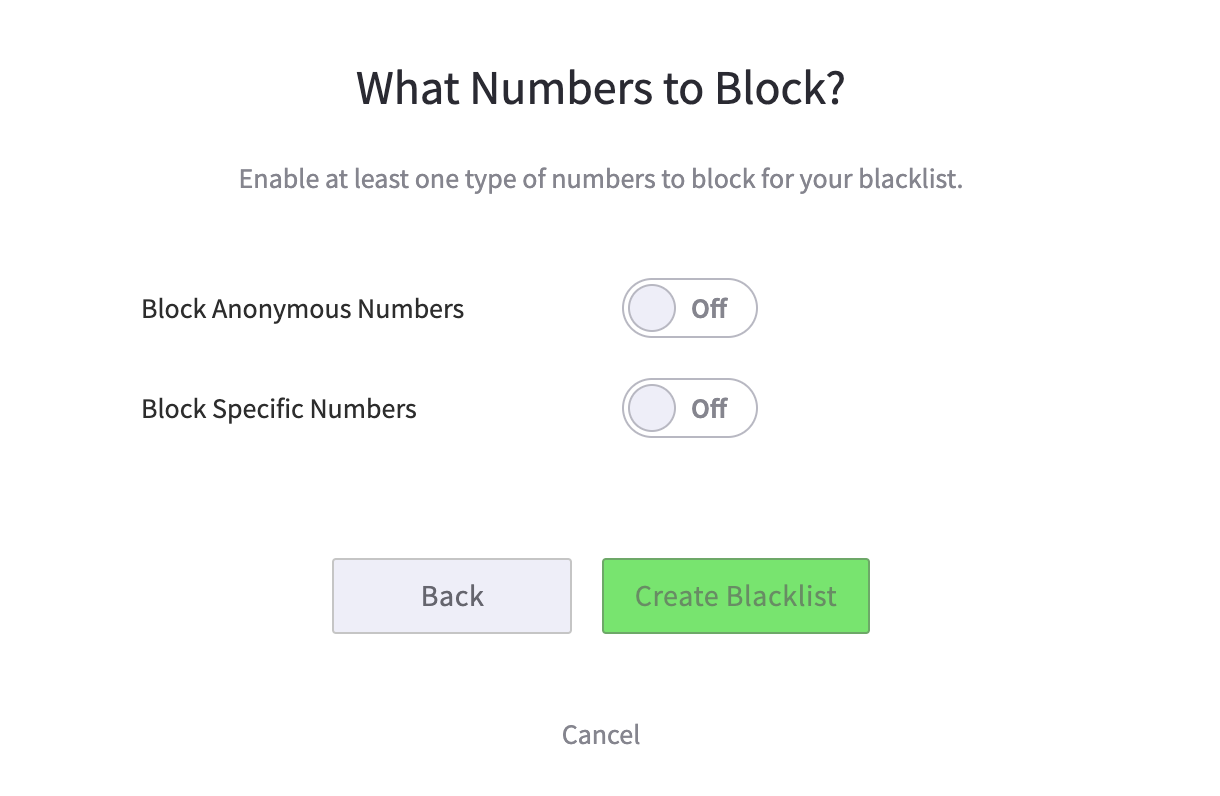
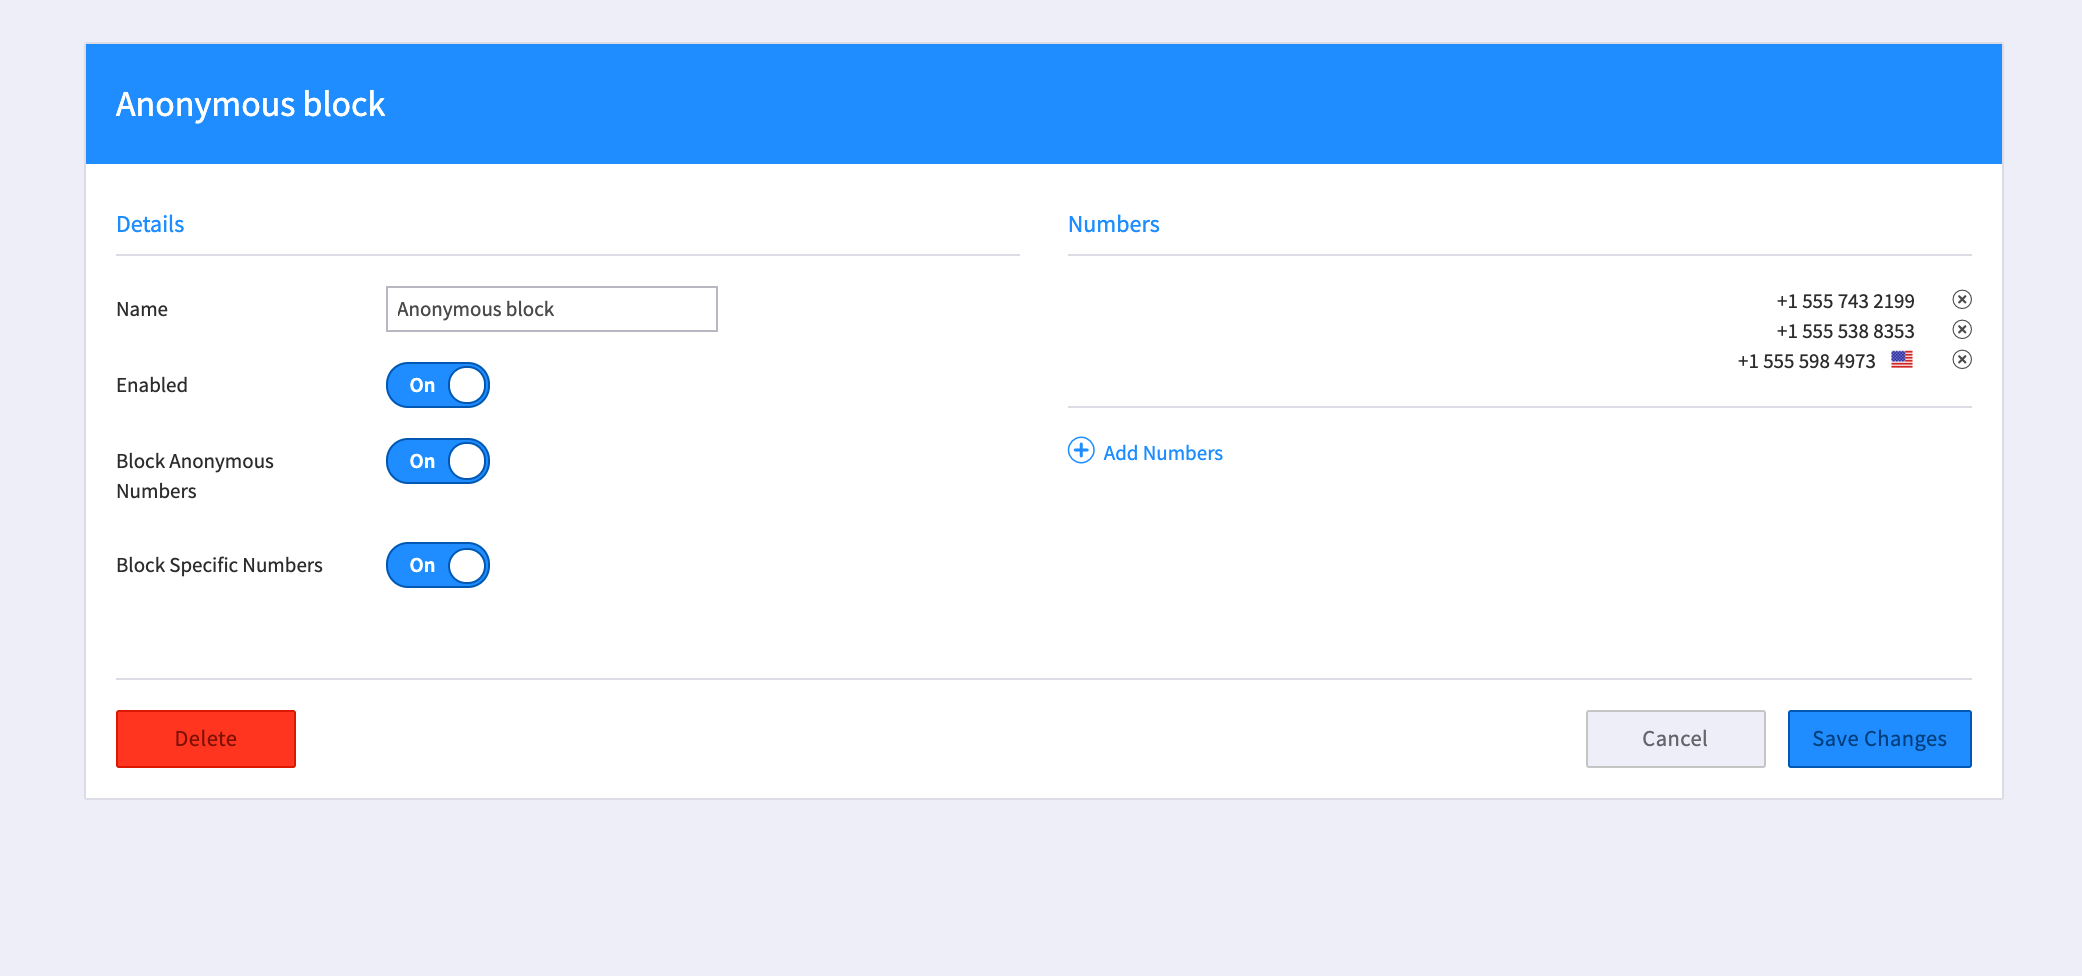
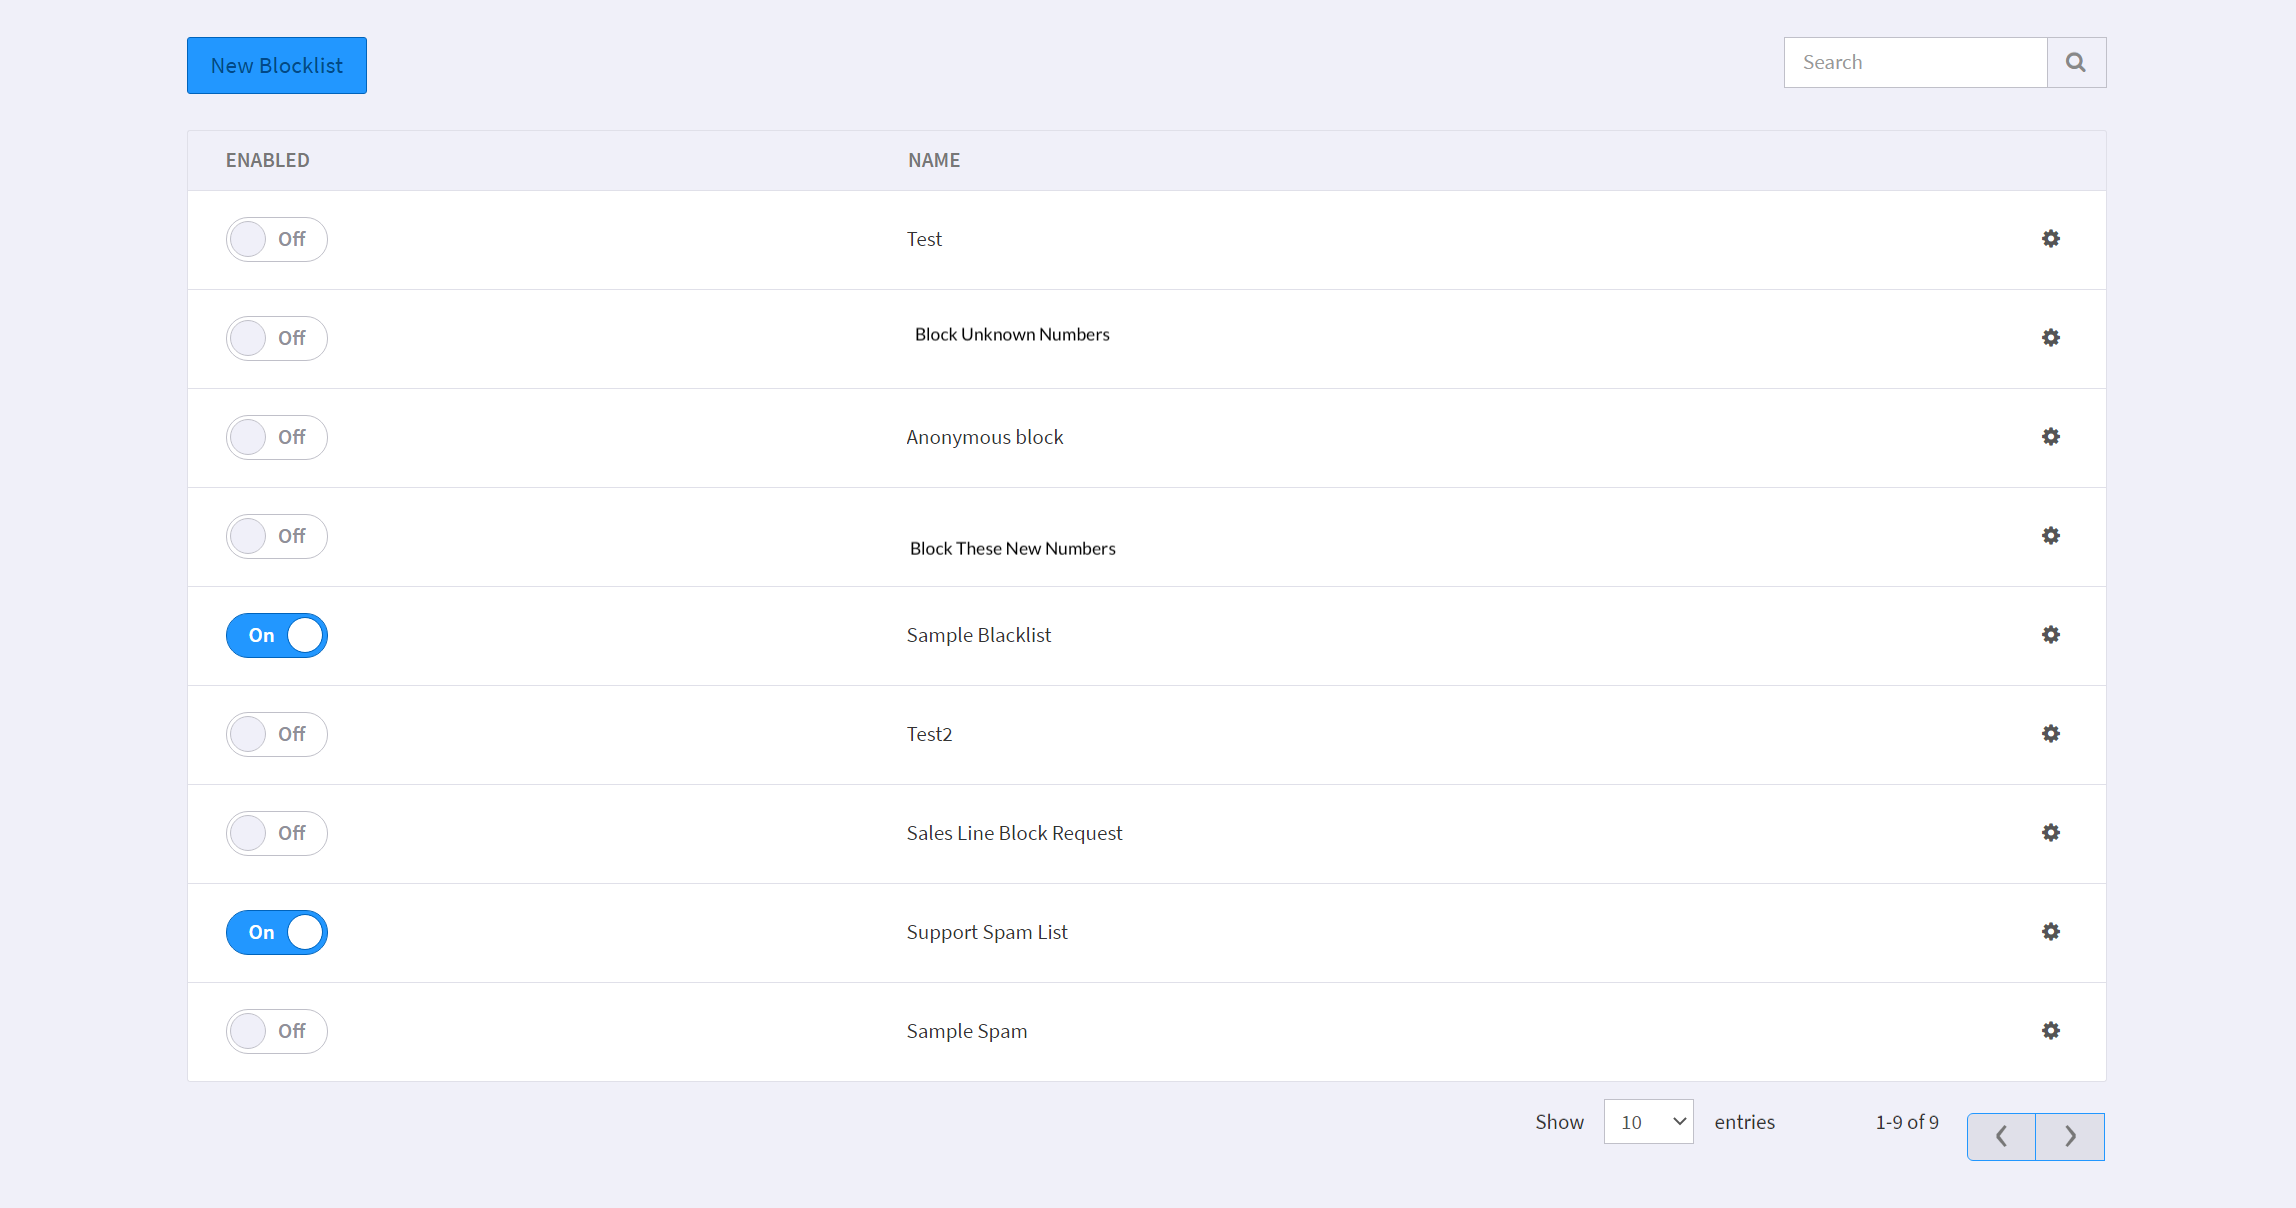

UC Today: 2600Hz Staying Close
in 2600Hz | Industry News
Posted
November 27, 2020
2600Hz Staying Close – Even Through Remote Holidays