


User Story
-
Reseller wants to store recordings onto Amazon Web Service while insuring as few permissions are given to the service account as is possible.
-
Reseller is looking for a solution that helps ensure strong encryption is implemented for call recording features and connect this account to a specific KAZOO account.
- Reseller plans to assign each account a unique “bucket” with its unique credentials.
Before you Start
- Sign up and Log in to your Amazon Web Services account. If you don’t have one already you can go to their website here to get started: https://aws.amazon.com/
Quick Overview of Steps
- Set up an account with Amazon Web Services
- Decide what clients and client names to use for each bucket
- Create bucket names for each client and define settings
- Create user names for each client
- Add JSON IAM policy and permissions
- Add JSON Bucket policy and permissions
- Capture your Access Key ID and Secret Access Key , Bucket Name
- Open the AWS app
- Create a new AWS account in KAZOO and enter that information.
Set up an S3 Bucket
An Amazon S3 (Simple Storage Service) bucket is Amazon’s term for a place you define to store your data and its metadata. It is the equivalent to a file folder with your company identifier on it.
- From your AWS portal, access the S3 application
- Select Create Bucket
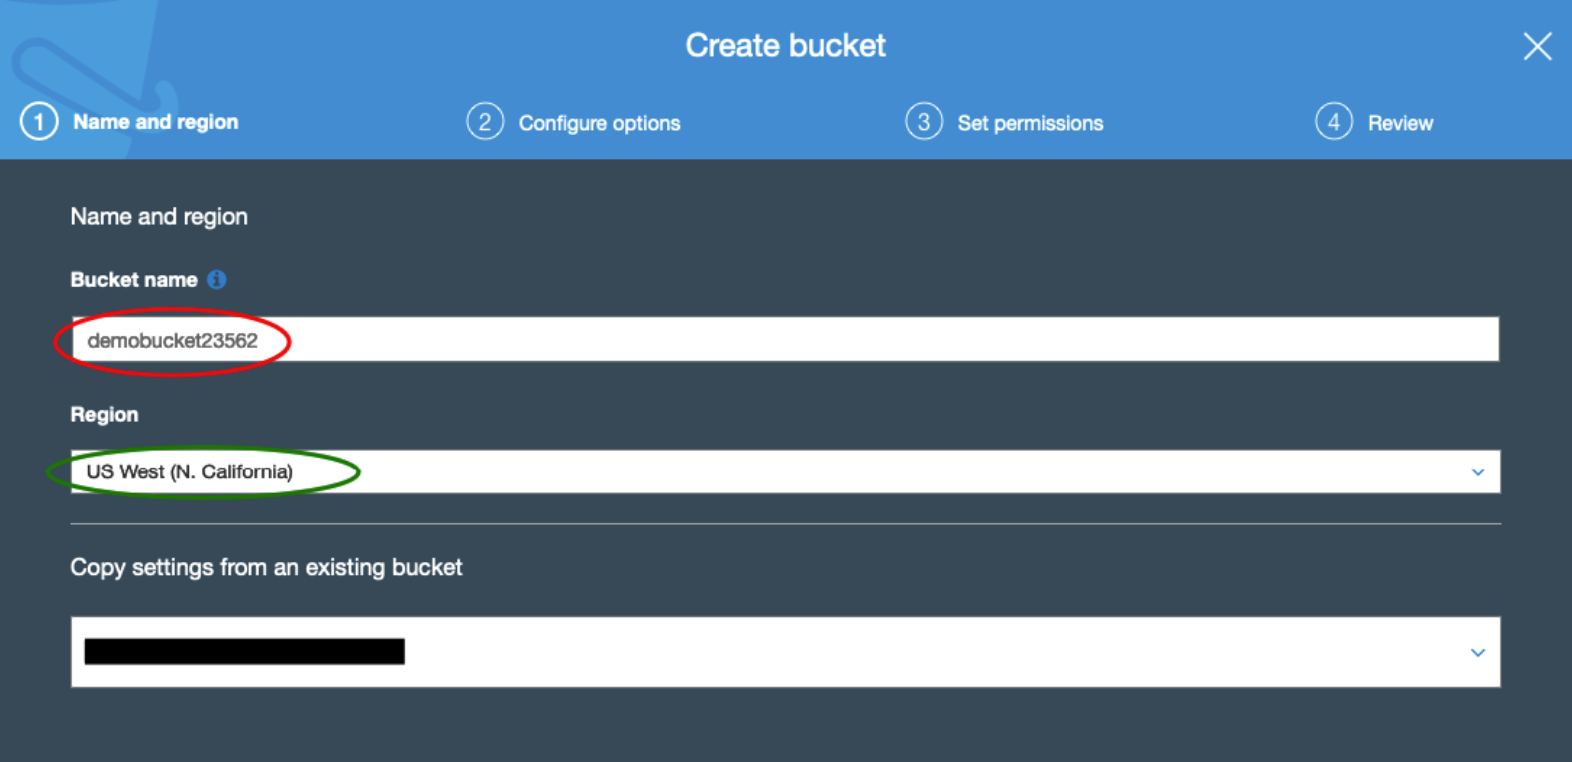
- Enter a new Bucket name. You will do this for every client?
-
The Region field can be left blank, AWS will read the account default.

- Click NEXT and page through the remaining settings options. We recommend enabling the “Block ALL public access” option to on.
Set up an IAM User
An IAM (Identity and Access Management) User is an entity name and credential that you create in AWS to represent the person or application that uses it to interact with AWS. An IAM user with administrator permissions is not the same thing as the AWS account root user.
- From your AWS portal, access the IAM application
-
Select Add User
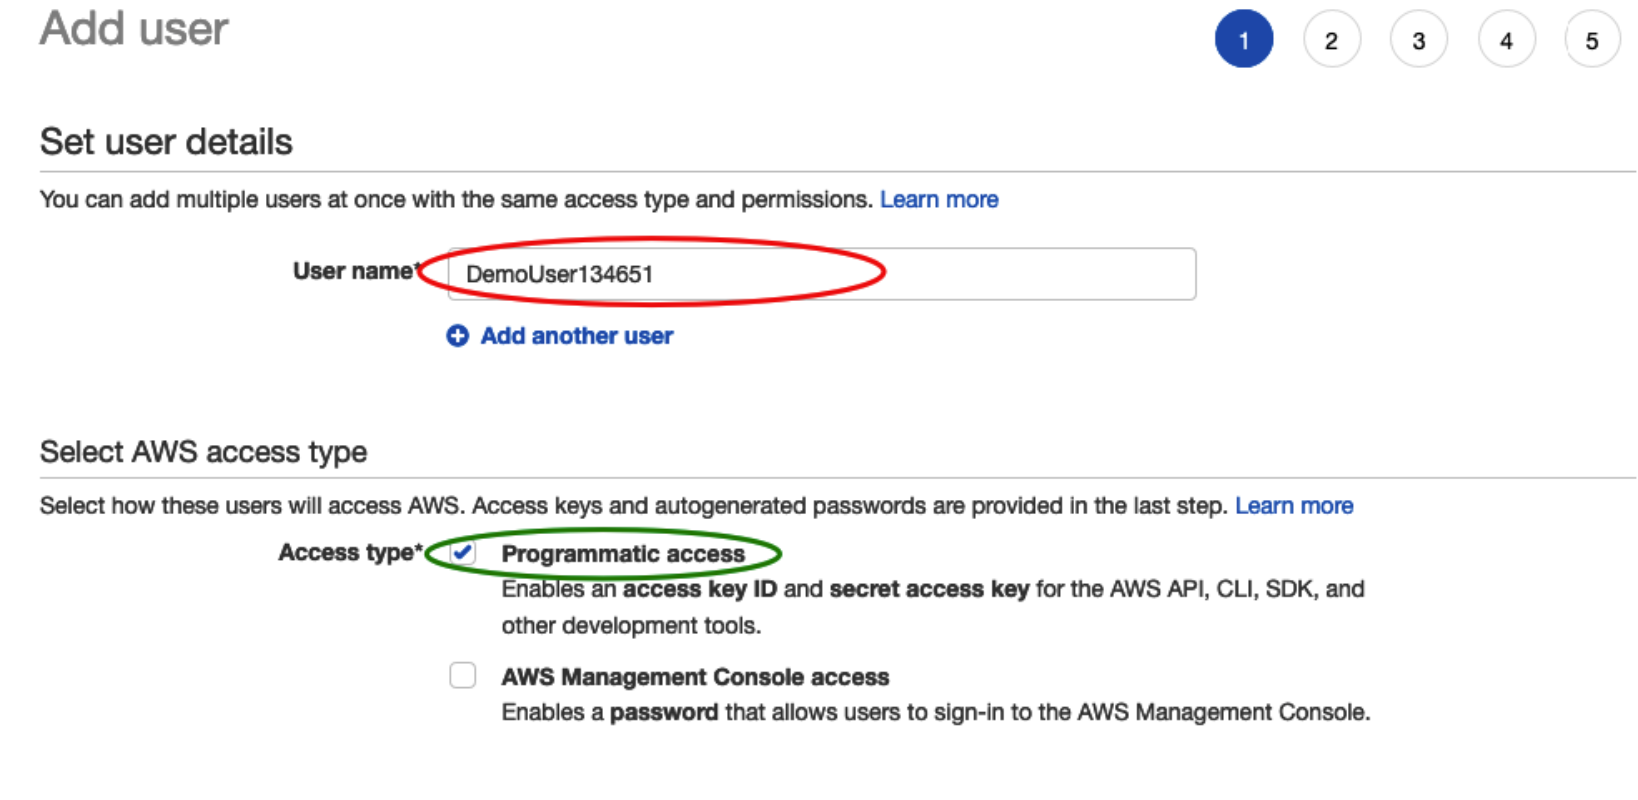
- Enter a new username. This will likely be your client name or client reference
- Check the Programmatic Access box under Access Type
- Select NEXT
-
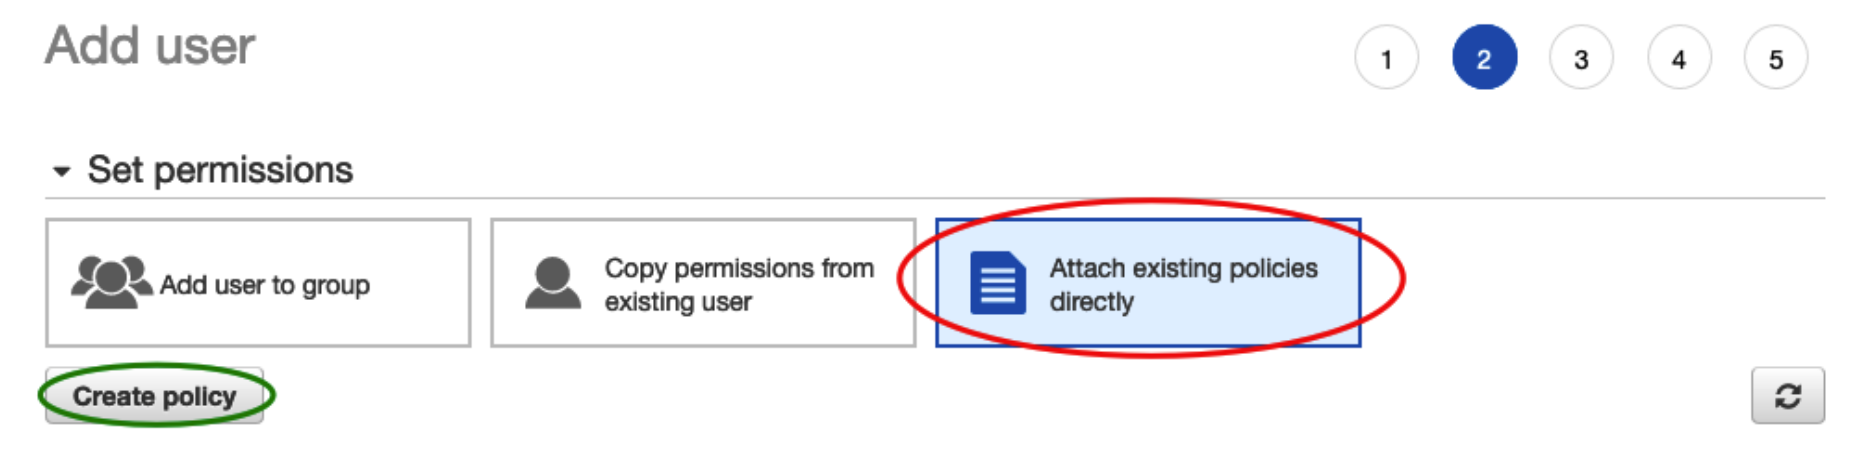
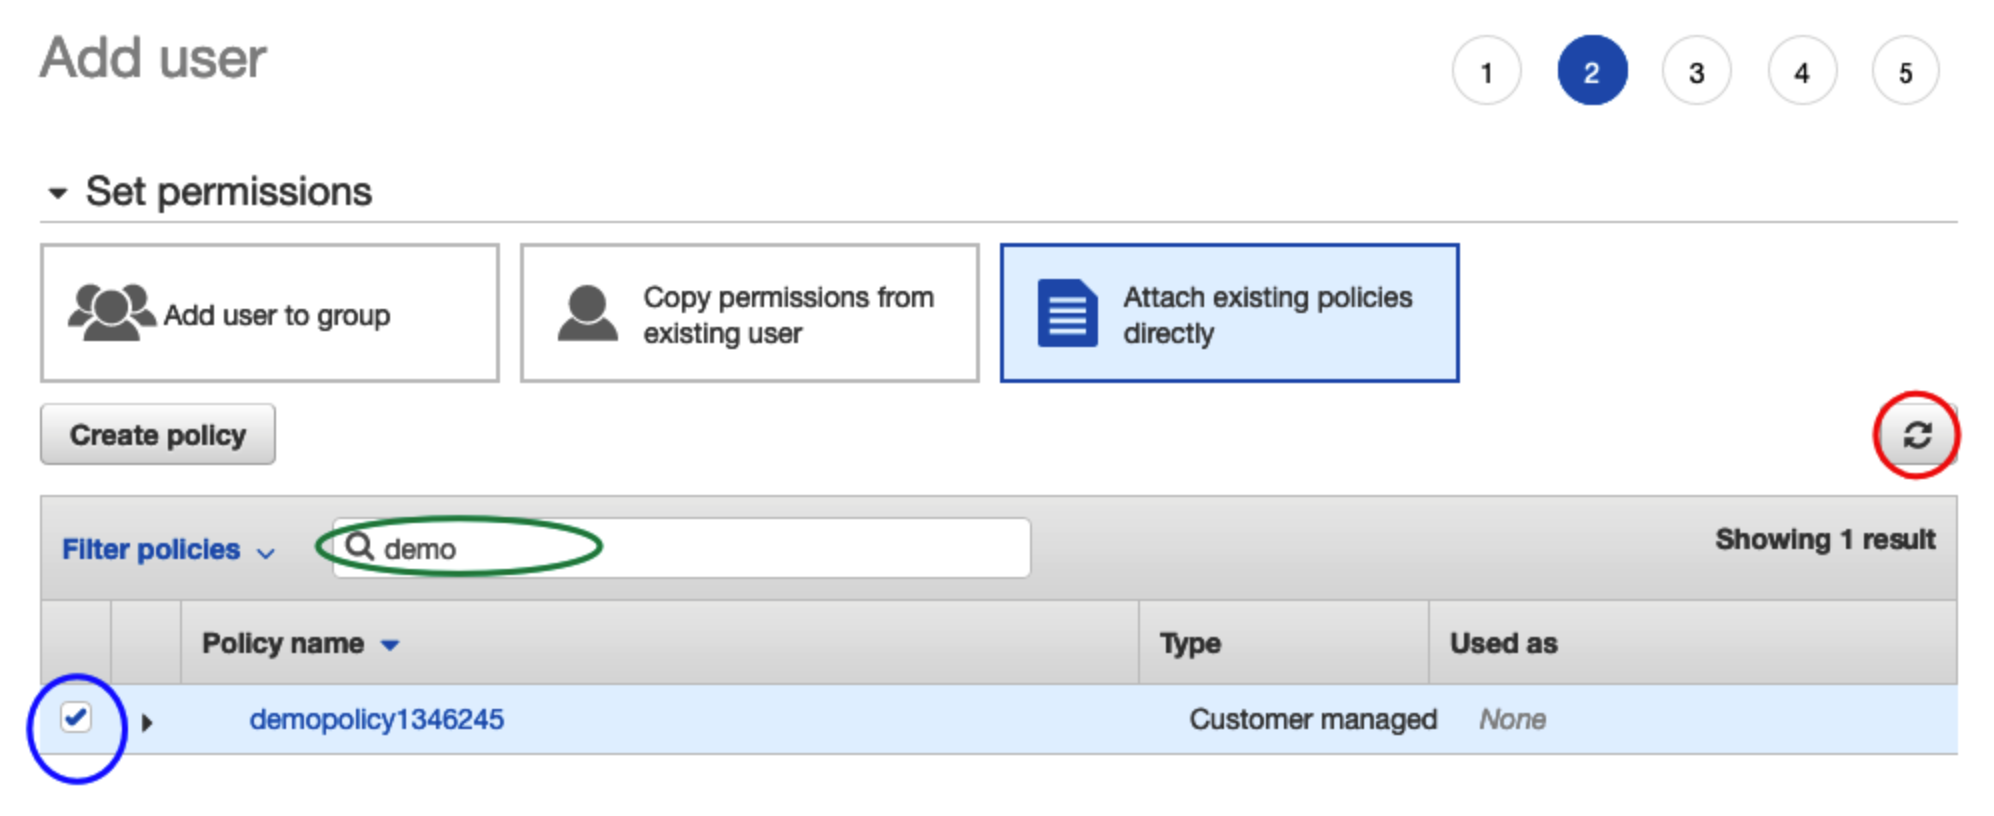
Under Set Permissions, select “Attach existing policies directly”
-
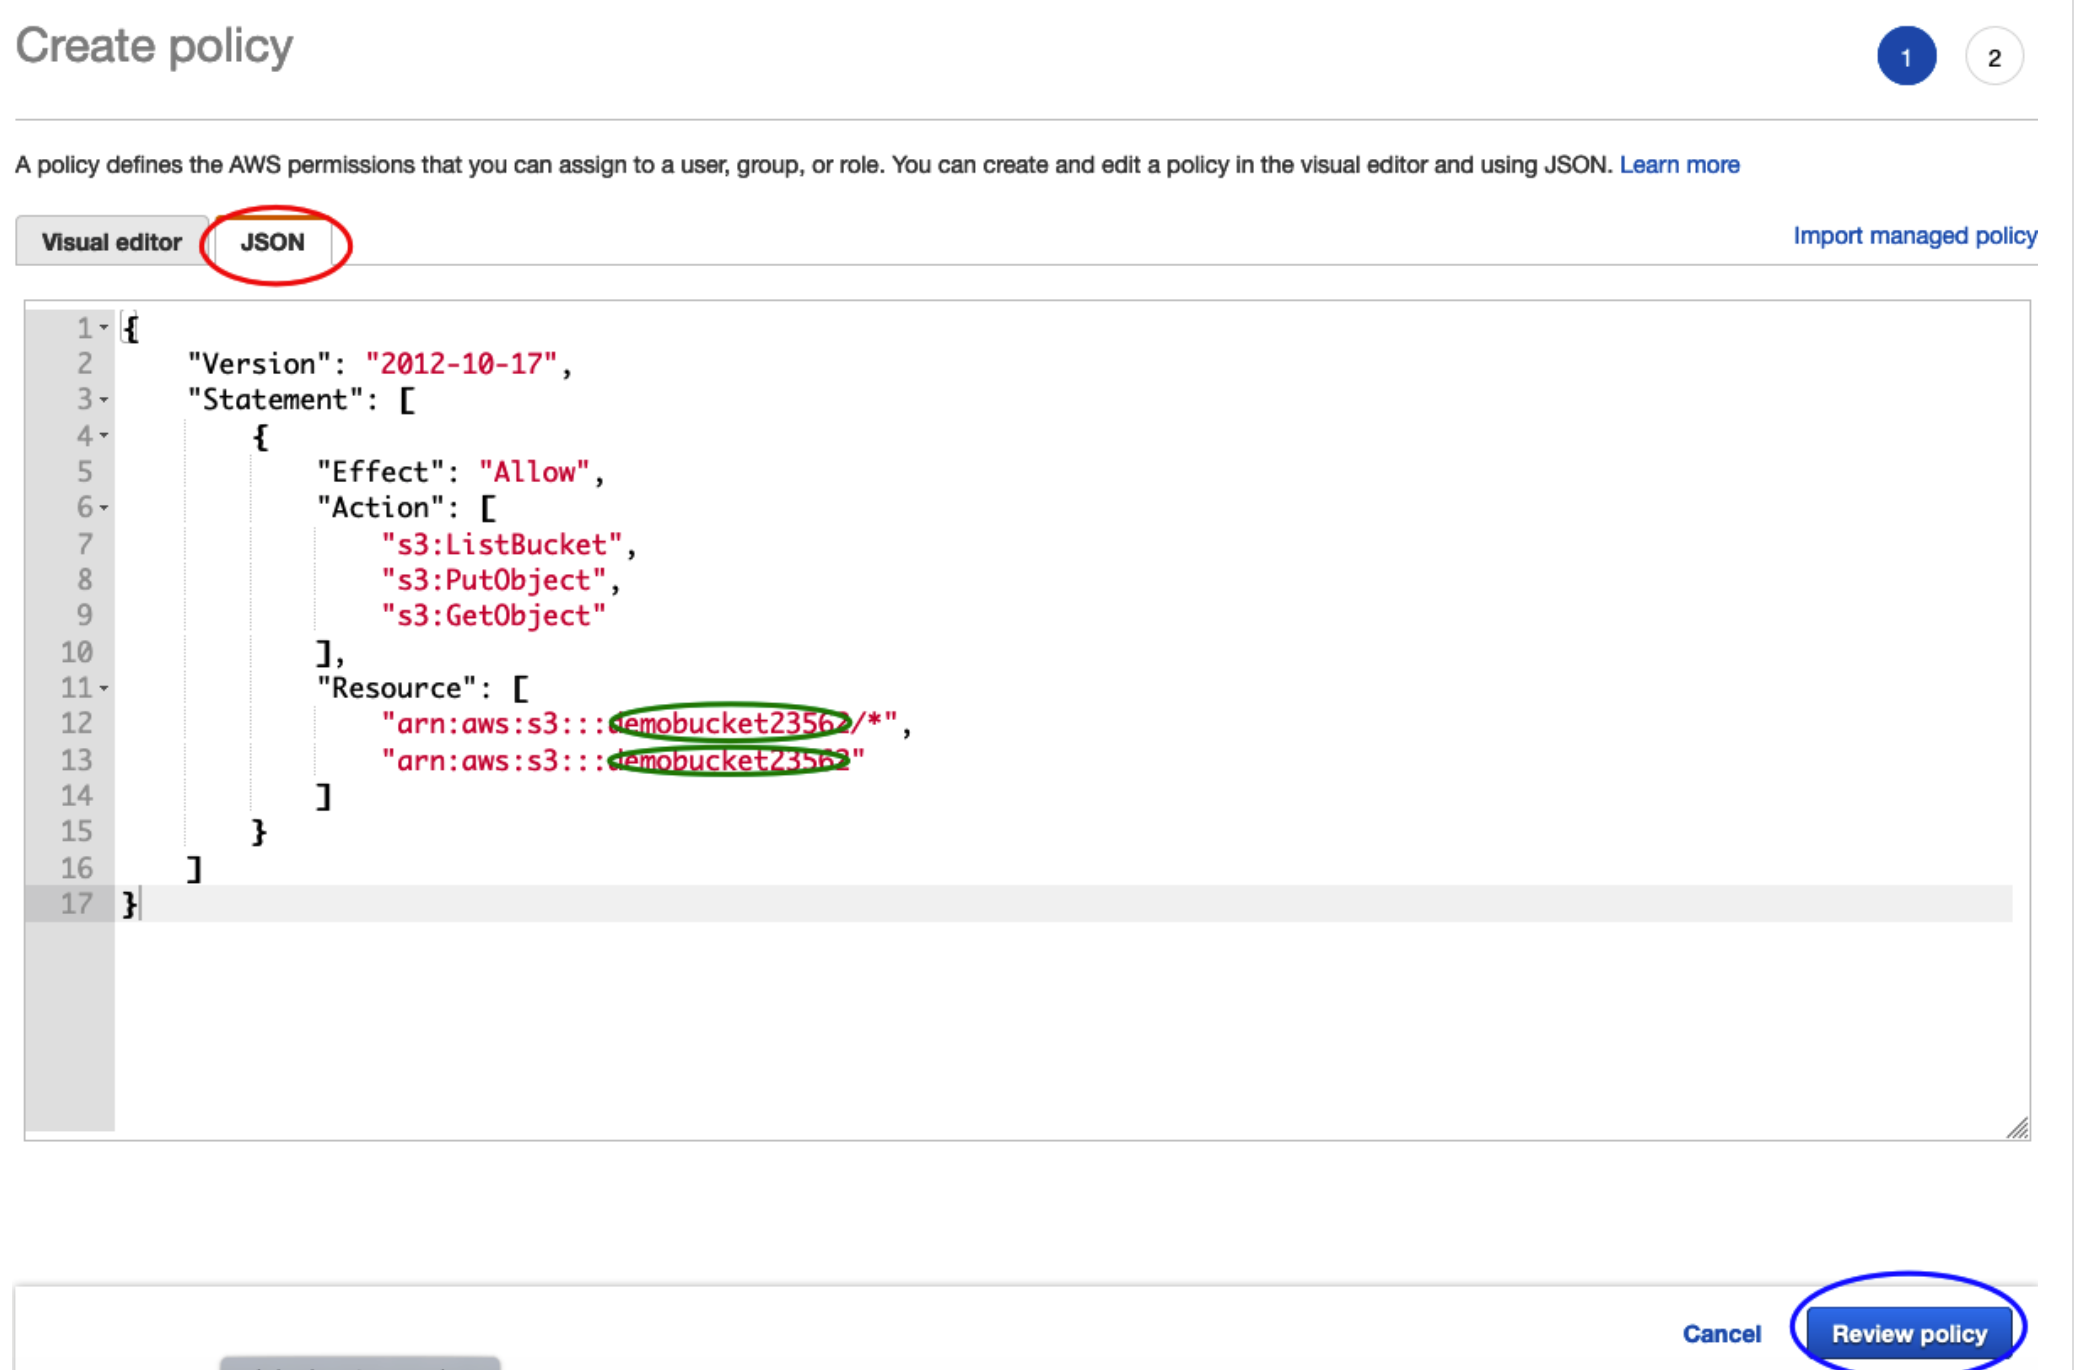
Select Create Policy
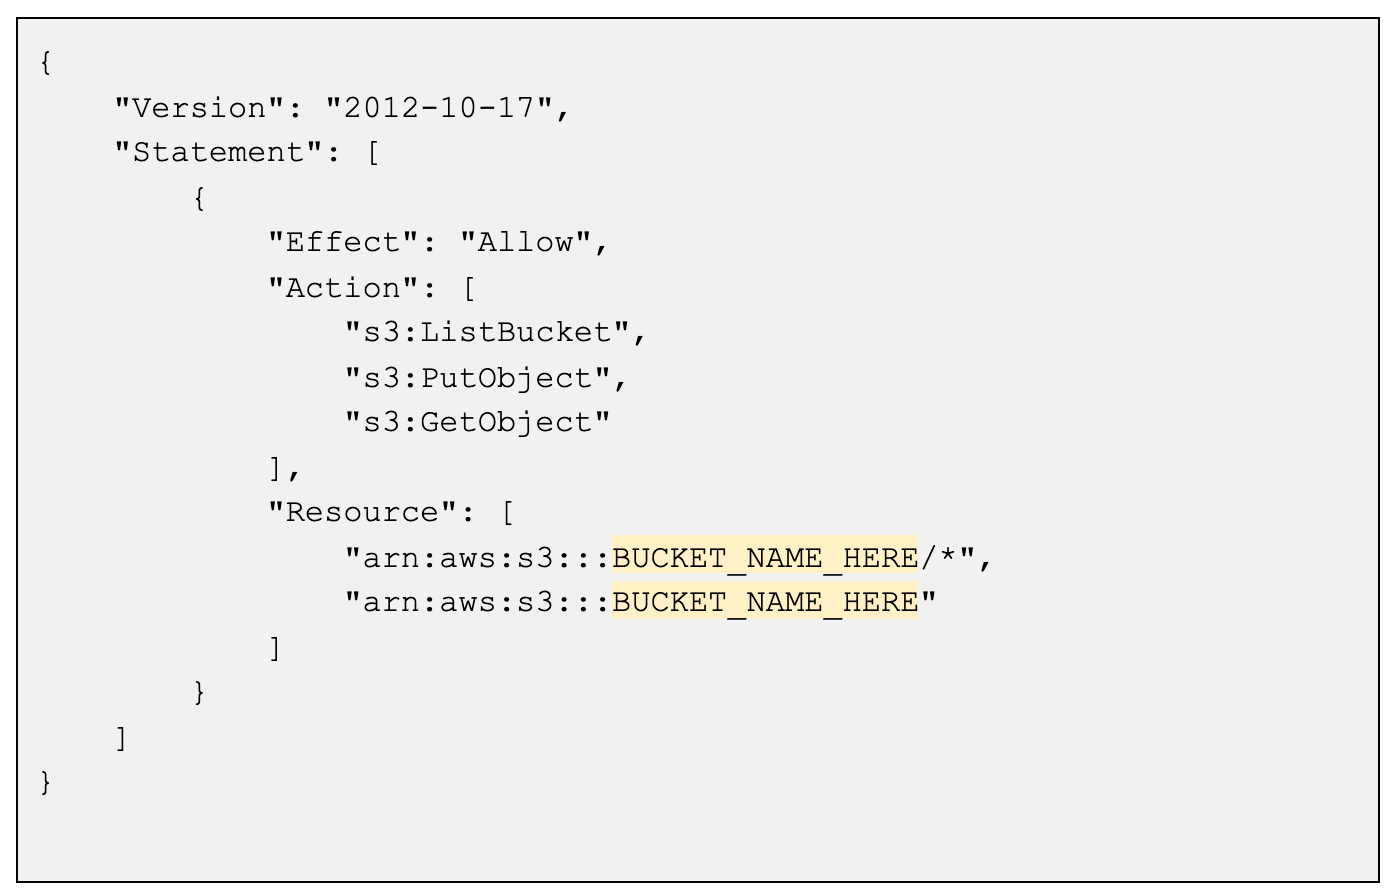
This will open a new tab for you to enter your policy details into. A policy defines the AWS permissions that you can assign to a user, group, or role. Yo can create and edit a policy in the visual editor and using JSON. For this example we will use the JSON.
-
Copy the text below. Replace the “BUCKET_NAME_HERE” text string with the bucket name you entered earlier.
{
"Version": "2012-10-17",
"Statement": [
{
"Effect": "Allow",
"Action": [
"s3:ListBucket",
"s3:PutObject",
"s3:GetObject"
],
"Resource": [
"arn:aws:s3:::BUCKET_NAME_HERE/*",
"arn:aws:s3:::BUCKET_NAME_HERE"
]
}
]
}It will display something like below:
-
Review Policy
Select Review Policy using the button at the bottom right.
-
Return to the IAM tab and refresh your screen using the refresh button to the right (circled in red).
- Enter the name of the policy in the search field and select the checkbox to the left of the Policy name it to be active.
- Select NEXT
-
Go to Set Permissions Boundary, Select NEXT: Tags
The next two pages are for tagging and review, you can just leave them blank and click create user.
-
Your access key and secret access key will be displayed.
SAVE these! You will need to add these to your connector app.
-
-
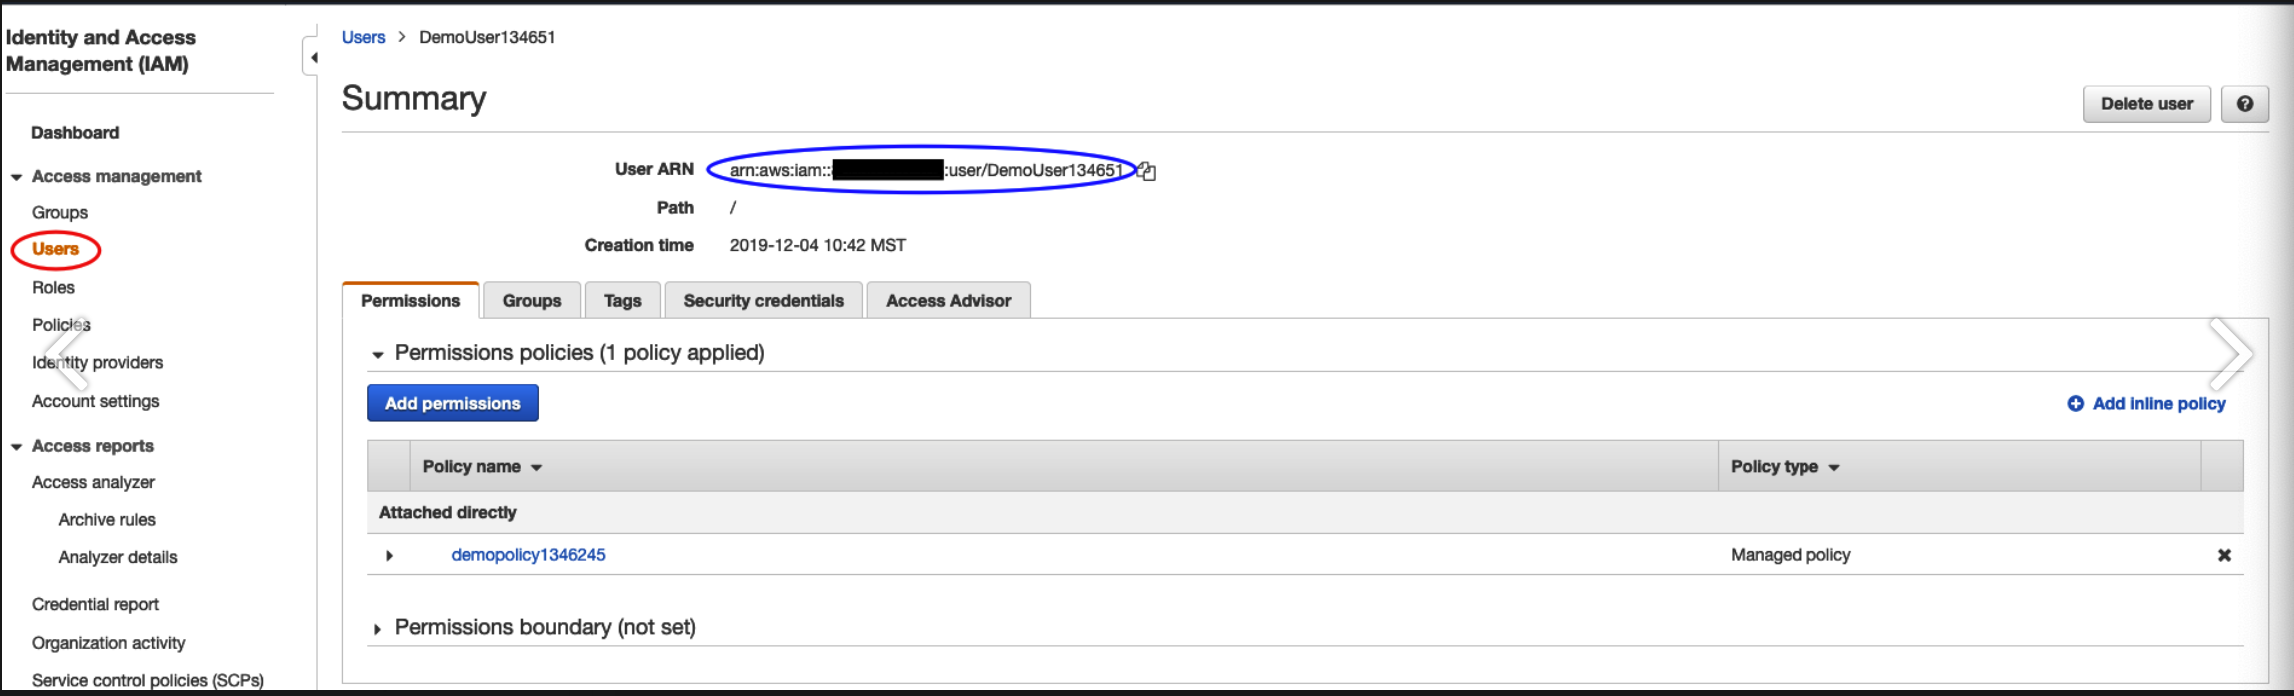
Return to the main page for IAM
-
Click Users, and click on your user account. Save the Amazon Resource Name (ARN) shown. This is your identifier Amazon recognizes. (for more info on these, see HERE.)
-
-
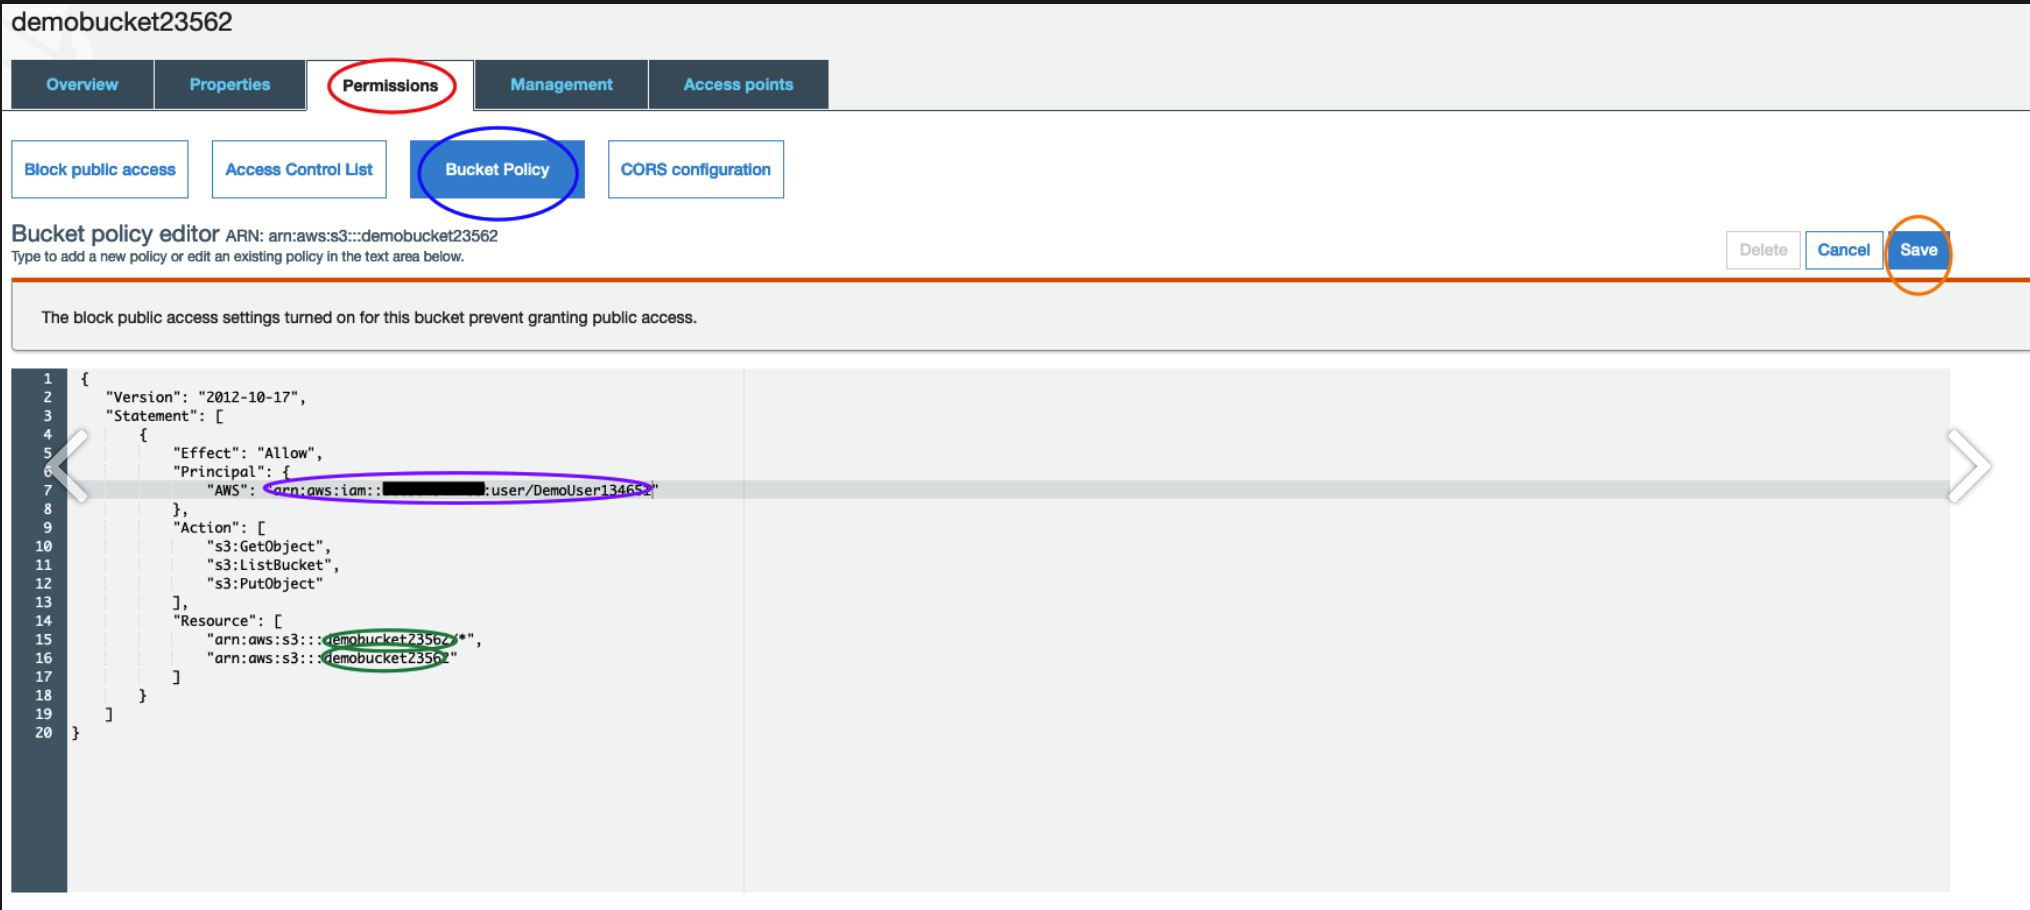
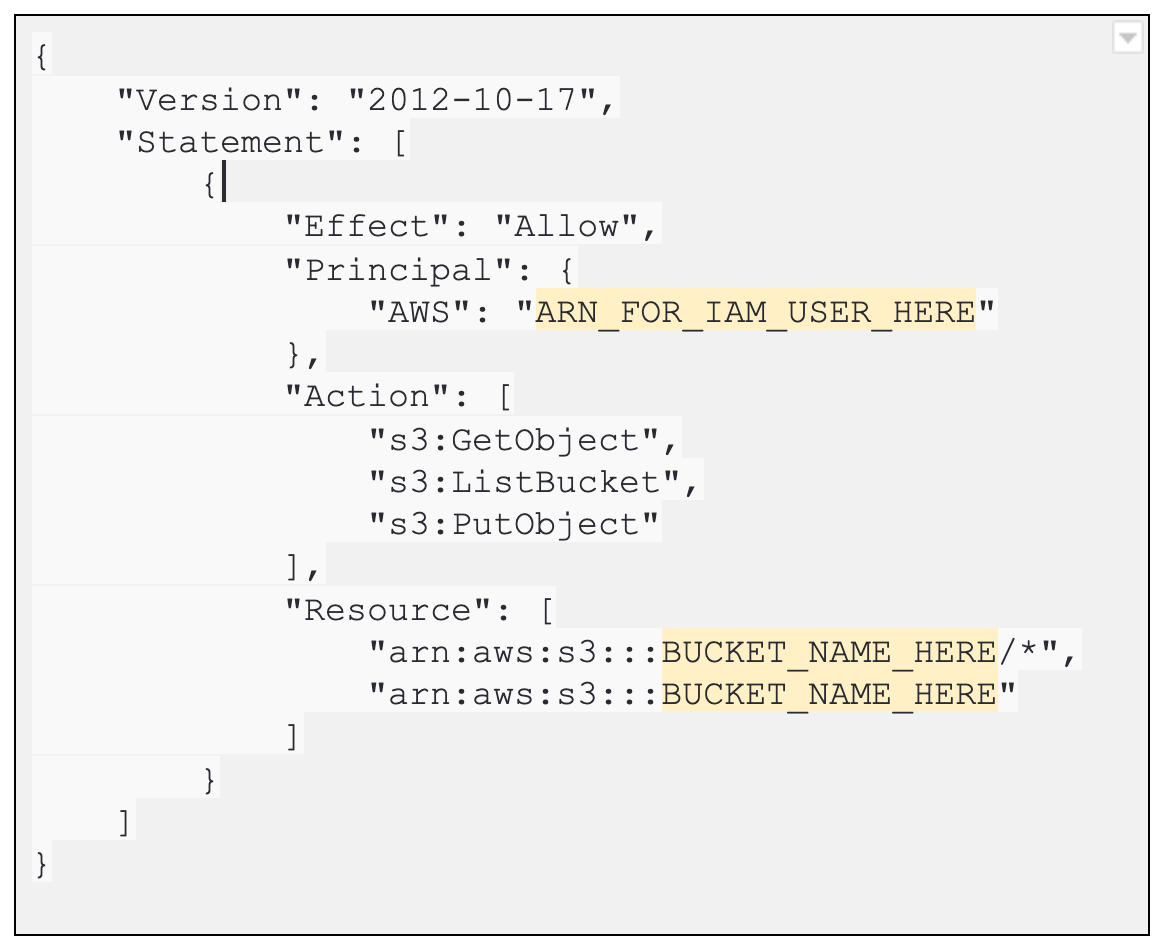
Enter your bucket policy
Return to the S3 app and select the bucket you want to add a policy to.

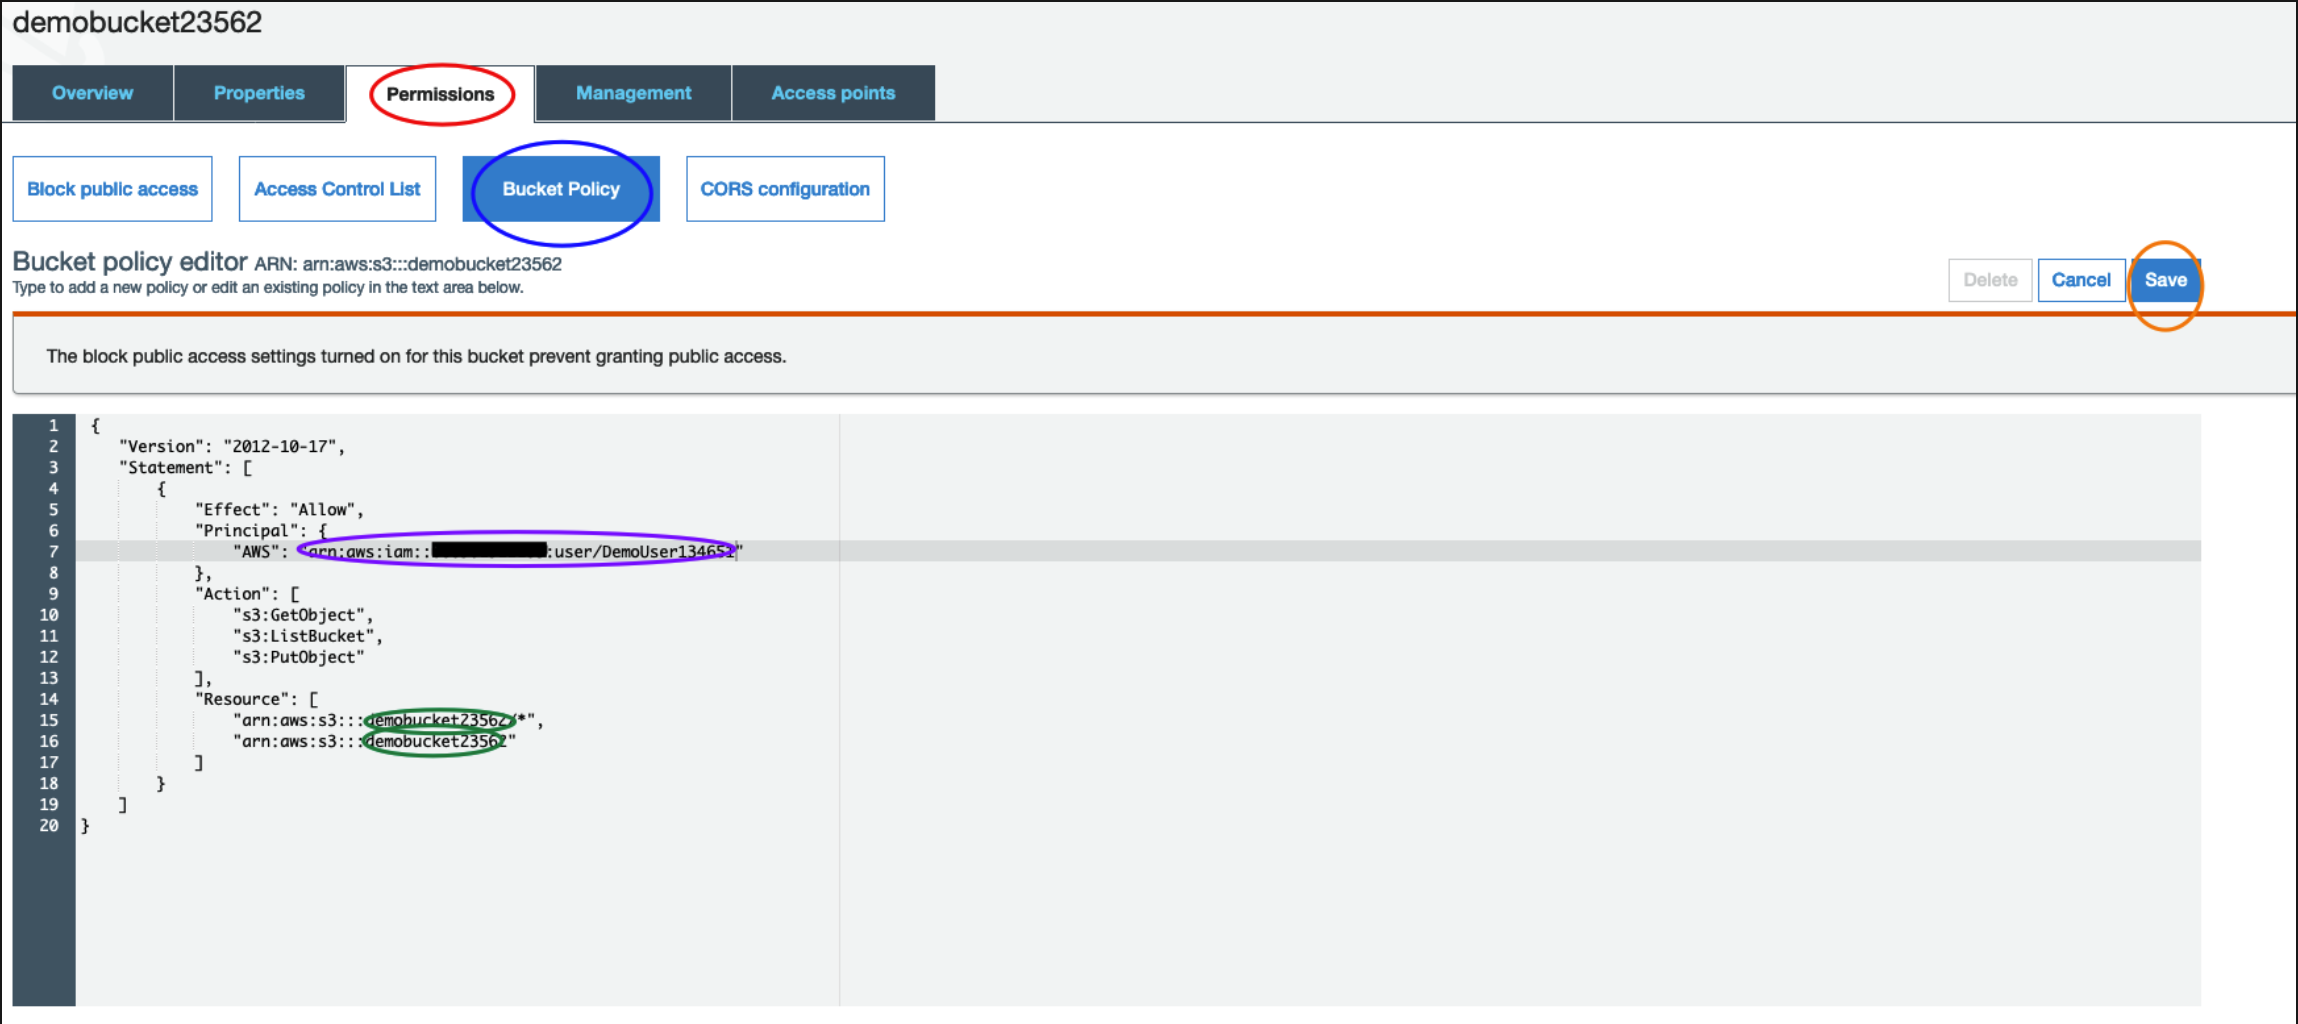
- Click on Permissions
- Click on Bucket Policy
- Copy / Paste the code below
- Update your bucket name and ARN (see highlighted area). SAVE !!!
You should see confirmation of your updates here.
|
{ |
Update your bucket name and ARN (See. highlighted areas). SAVE !
You should see confirmation of your updates here.
![]() Enter saved data into your AWS Connector App in KAZOO
Enter saved data into your AWS Connector App in KAZOO
- Click on AWS Connector from your Apps listing
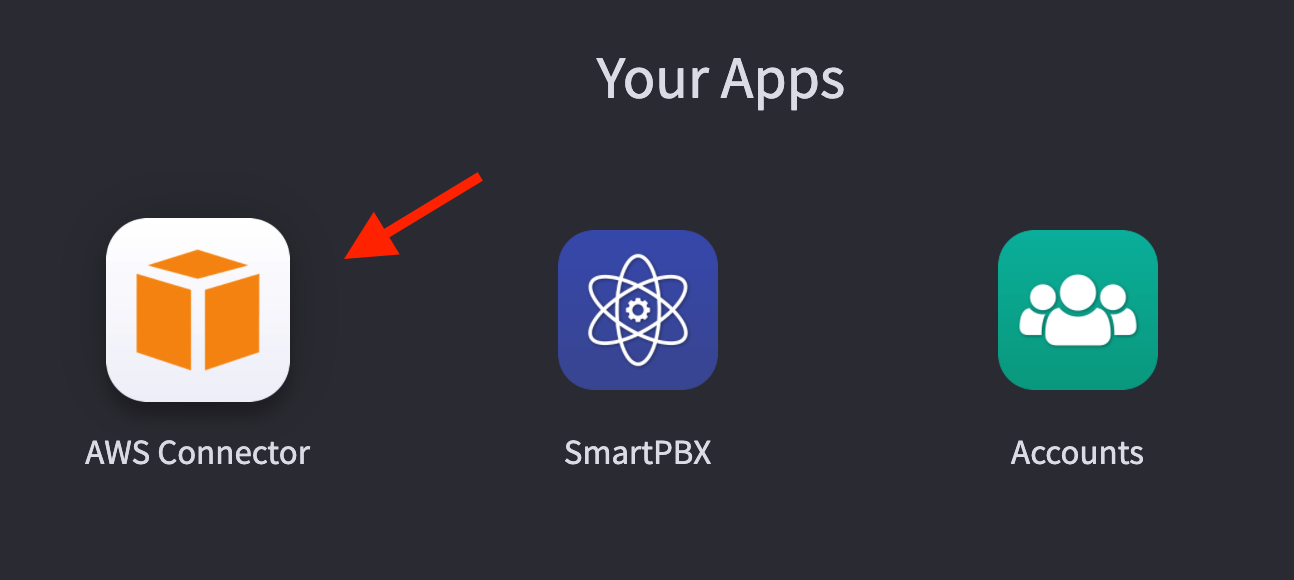
NOTE: If you can’t find it right away, use the Search Apps field at the left of the screen.
- Click Add AWS Account

Enter your saved account details
NOTE
-
Please input the host name for the zone you used for your S3 bucket. For example, s3.us-west-1.amazonaws.com. A full list of hostnames is available at https://docs.aws.amazon.com/general/latest/gr/s3.html"

Frequently Asked Questions
When is it important to assign an AWS account to a client?
AWS offers storage with enhanced privacy encryption, which is often required for HIPAA compliance and other clients who are concerned about privacy. It also provides automatic backup services to give your client files additional redundancy. If your client is concerned about tight encryption and security, this is an option to consider.
What are Bucket and IAM policies?
Below is an overview provided by Amazon, here:
IAM policies specify what actions are allowed or denied on what AWS resources (e.g. allow ec2:TerminateInstance on the EC2 instance with instance_id=i-8b3620ec). You attach IAM policies to IAM users, groups, or roles, which are then subject to the permissions you’ve defined. In other words, IAM policies define what a principal can do in your AWS environment.
S3 bucket policies, on the other hand, are attached only to S3 buckets. S3 bucket policies specify what actions are allowed or denied for which principals on the bucket that the bucket policy is attached to (e.g. allow user Alice to PUT but not DELETE objects in the bucket).
Note: You attach S3 bucket policies at the bucket level (i.e. you can’t attach a bucket policy to an S3 object), but the permissions specified in the bucket policy apply to all the objects in the bucket.
IAM policies and S3 bucket policies are both used for access control and they’re both written in JSON using the AWS access policy language, so they can be confused.
Related Articles
 |
Accounts Manager Wizard |
|
|
Notes on HIPAA Compliance Responsibilities |

API Reference
#### 
Edited by Emily R
Missing comma
(show revisions)
Recommended Comments
There are no comments to display.