


User Stories
- An administrator wants to customize devices added to a KAZOO account.
- An administrator wants to ensure security settings are compliant with company protocol.
- An administrator wants to make sure configuration details and files are secure from scanners and malicious users.
Overview
Use SmartPBX or Callflows to create a new device. This will ensure SIP credentials are generated in Kazoo. While Advanced Provisioner does have the ability to create a device, it creates one without SIP credentials.
Once a device has been configured it generates a secure “config file” that is unique to that device and accessed by KAZOO during call events that include the device. Provisioner enables additional configuration options, and is used if
- An account or company to bootstrap hundreds of devices with minimal effort.
- Devices to be pre-set with KAZOO compatible settings and features.
NOTE: The config file is critical to correct usage of the devices and KAZOO. If it is corrupted or hacked it can cause considerable issues with your account. Please make sure you invest the time and resources for a point person to understand how this works.
Currently KAZOO supports eight brands and 200 models of devices. A full list of these devices can be found HERE.
Applications that can affect Device configurations
There are three applications in the Monster environment that access some or all Provisioner settings,
-
SmartPBX
This is the most accessible and user friendly access to customizing user specific devices. It is recommended all devices be initially added using SmartPBX. -
Provisioner
Once a device is provisioned, admins and managers may provide more advanced configuration settings using the Provisioner application. -
Callflows
Managers may use the callflows app to adjust settings for specific devices used in callflows. Access here is provided for convenience, but is not the most efficient interface for users.
A diagram showing the general flow of how devices can be provisioned is below: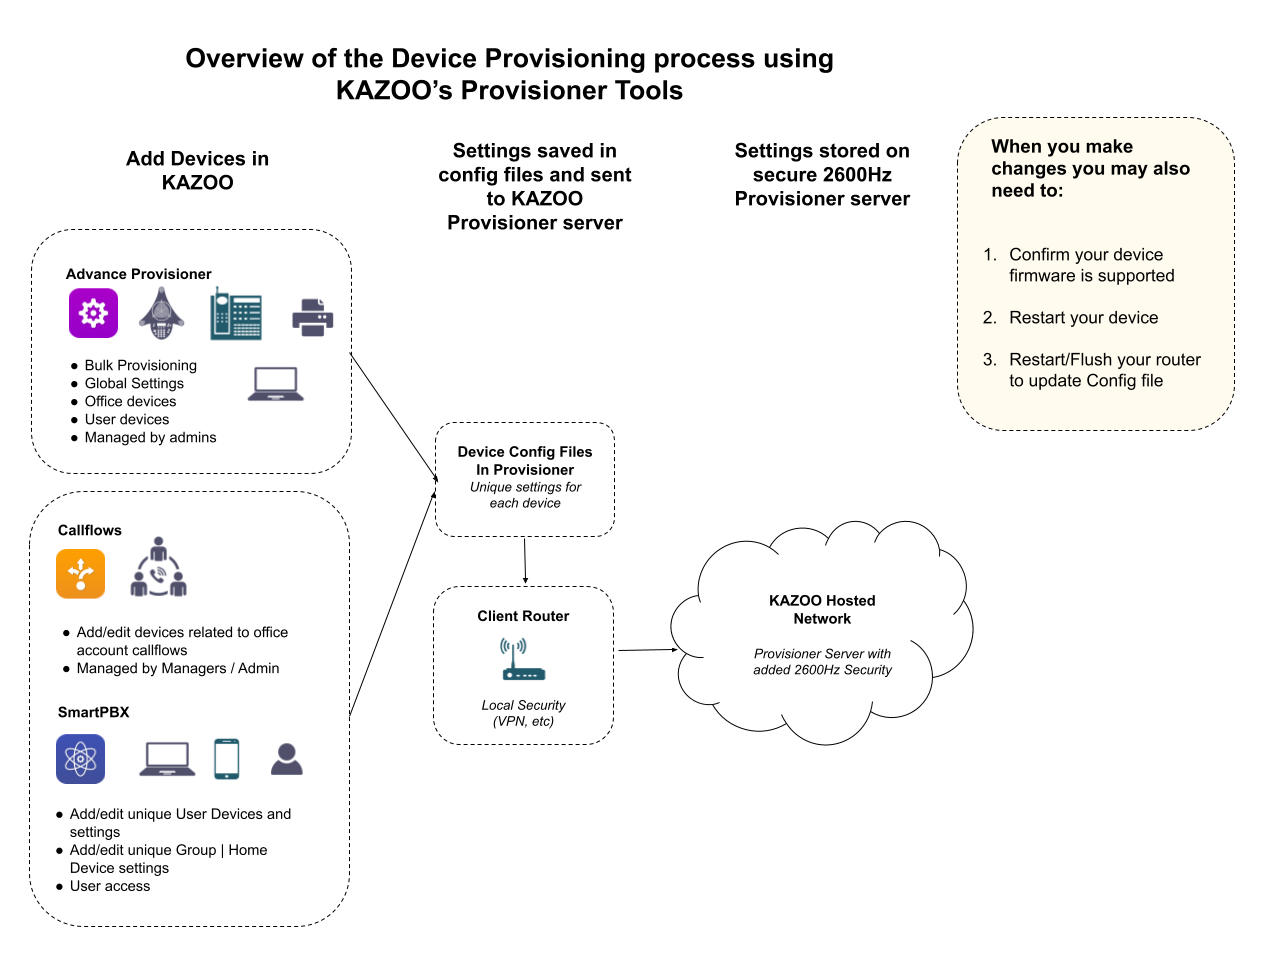
This document focuses primarily on the Advanced Provisioner application, directed to administrators for advanced configurations. It assumes you will have already added your devices using SmartPBX. At the end of the document there is an overview of where to access provisioning tools Callflows.
 Initial Device Configuration using SmartPBX
It is recommended you can single devices using the SmartPBX app by selecting the devices tab, then Add Device. This will launch the same user selection tools as the Provisioner Application.
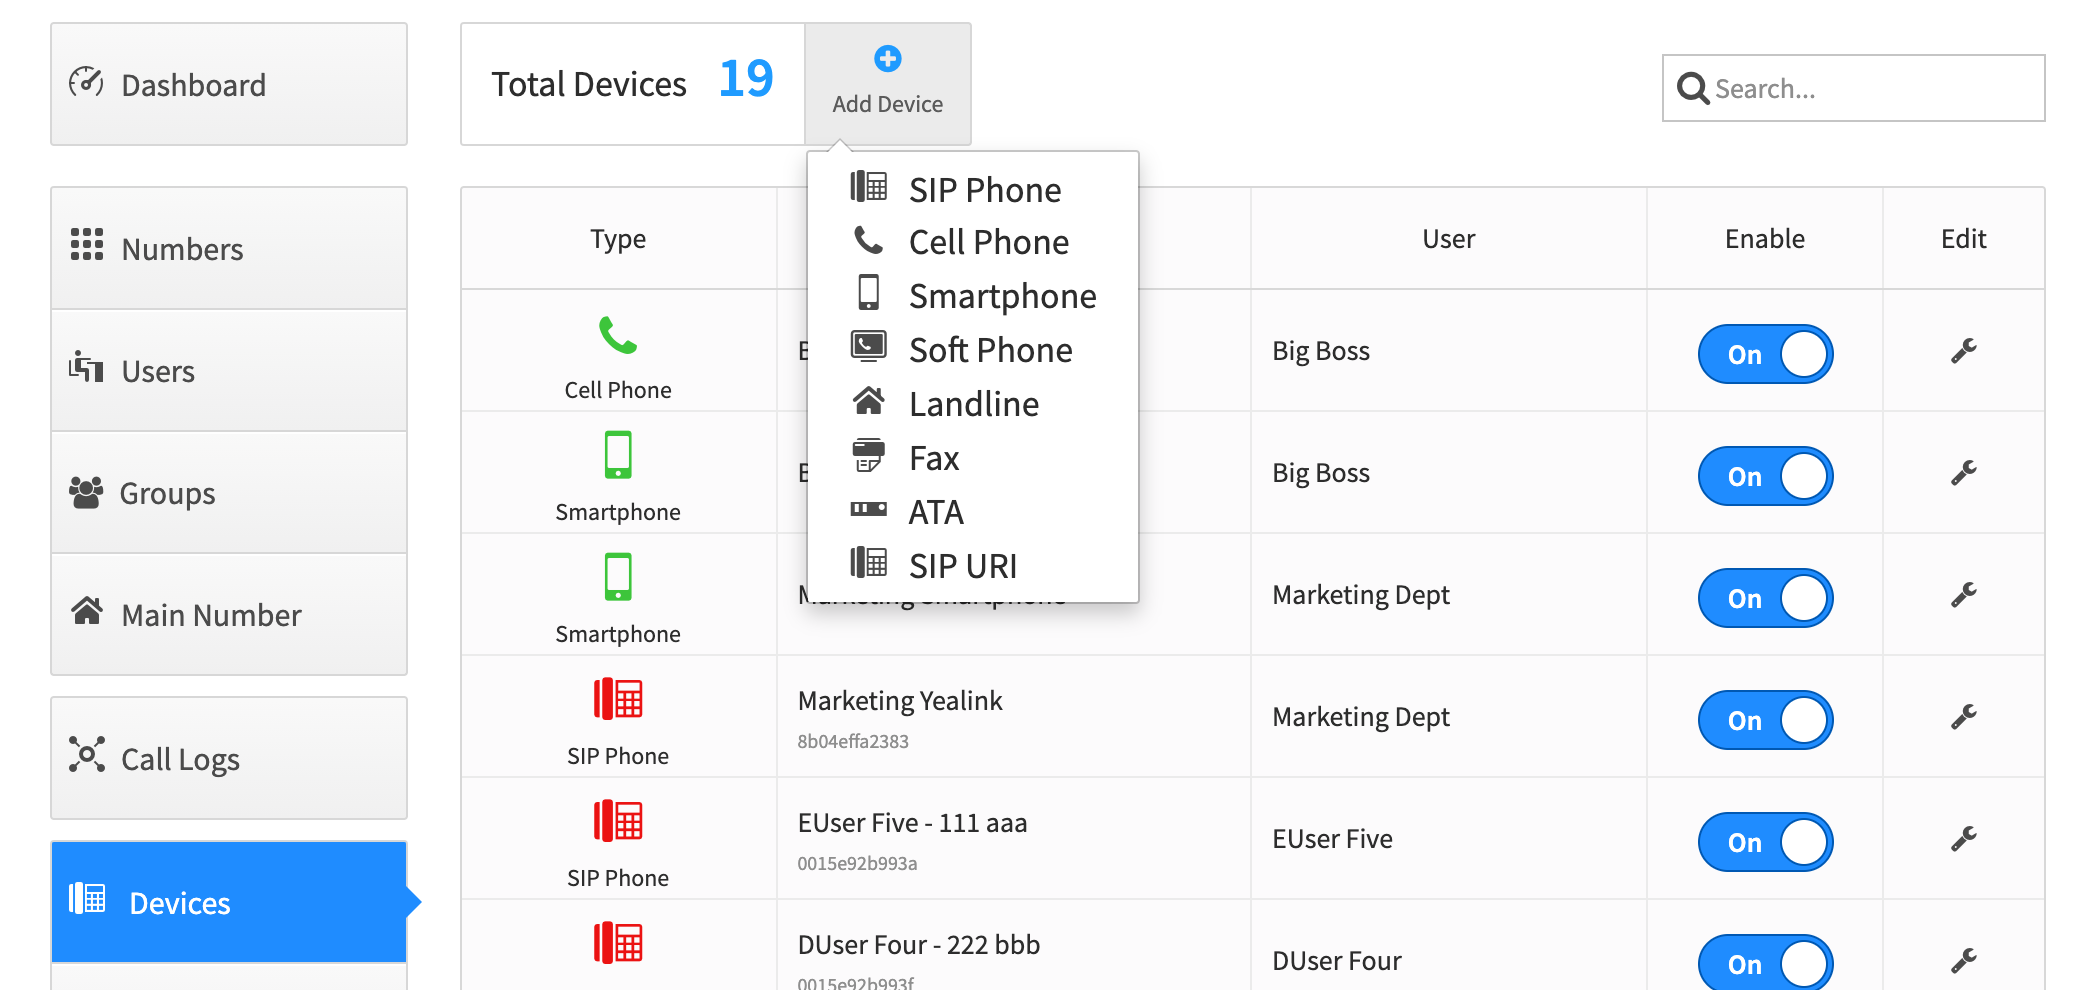
Additionally, you can edit user preference settings for your personal device if you select the Edit wrench icon to the right of your device name. Any changes you save will be displayed in the Provisioner app and the Callflows app.
 Customizing configurations using the Provisioner Application
Open the Provisioner application from your desktop environment. If you do not see it in your menu ask your administrator to enable it.
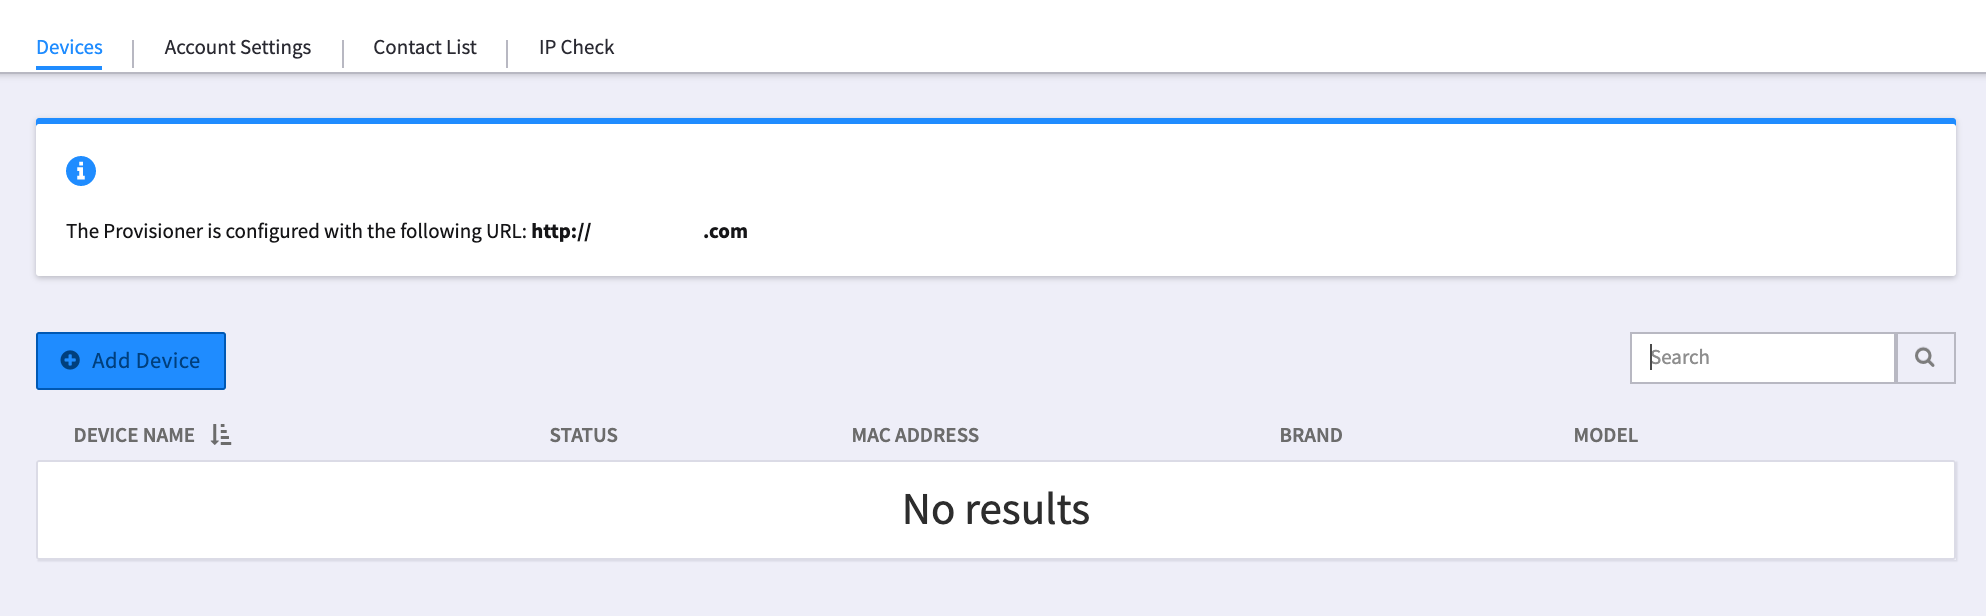
You will see one of the screens below with 4 tabs:
Devices | Account Settings | Contact List | IP Check.
Devices
The account will search for devices added to the URL assigned during your setup.
If you are working with a brand new account, the devices screen will show no results, as below:
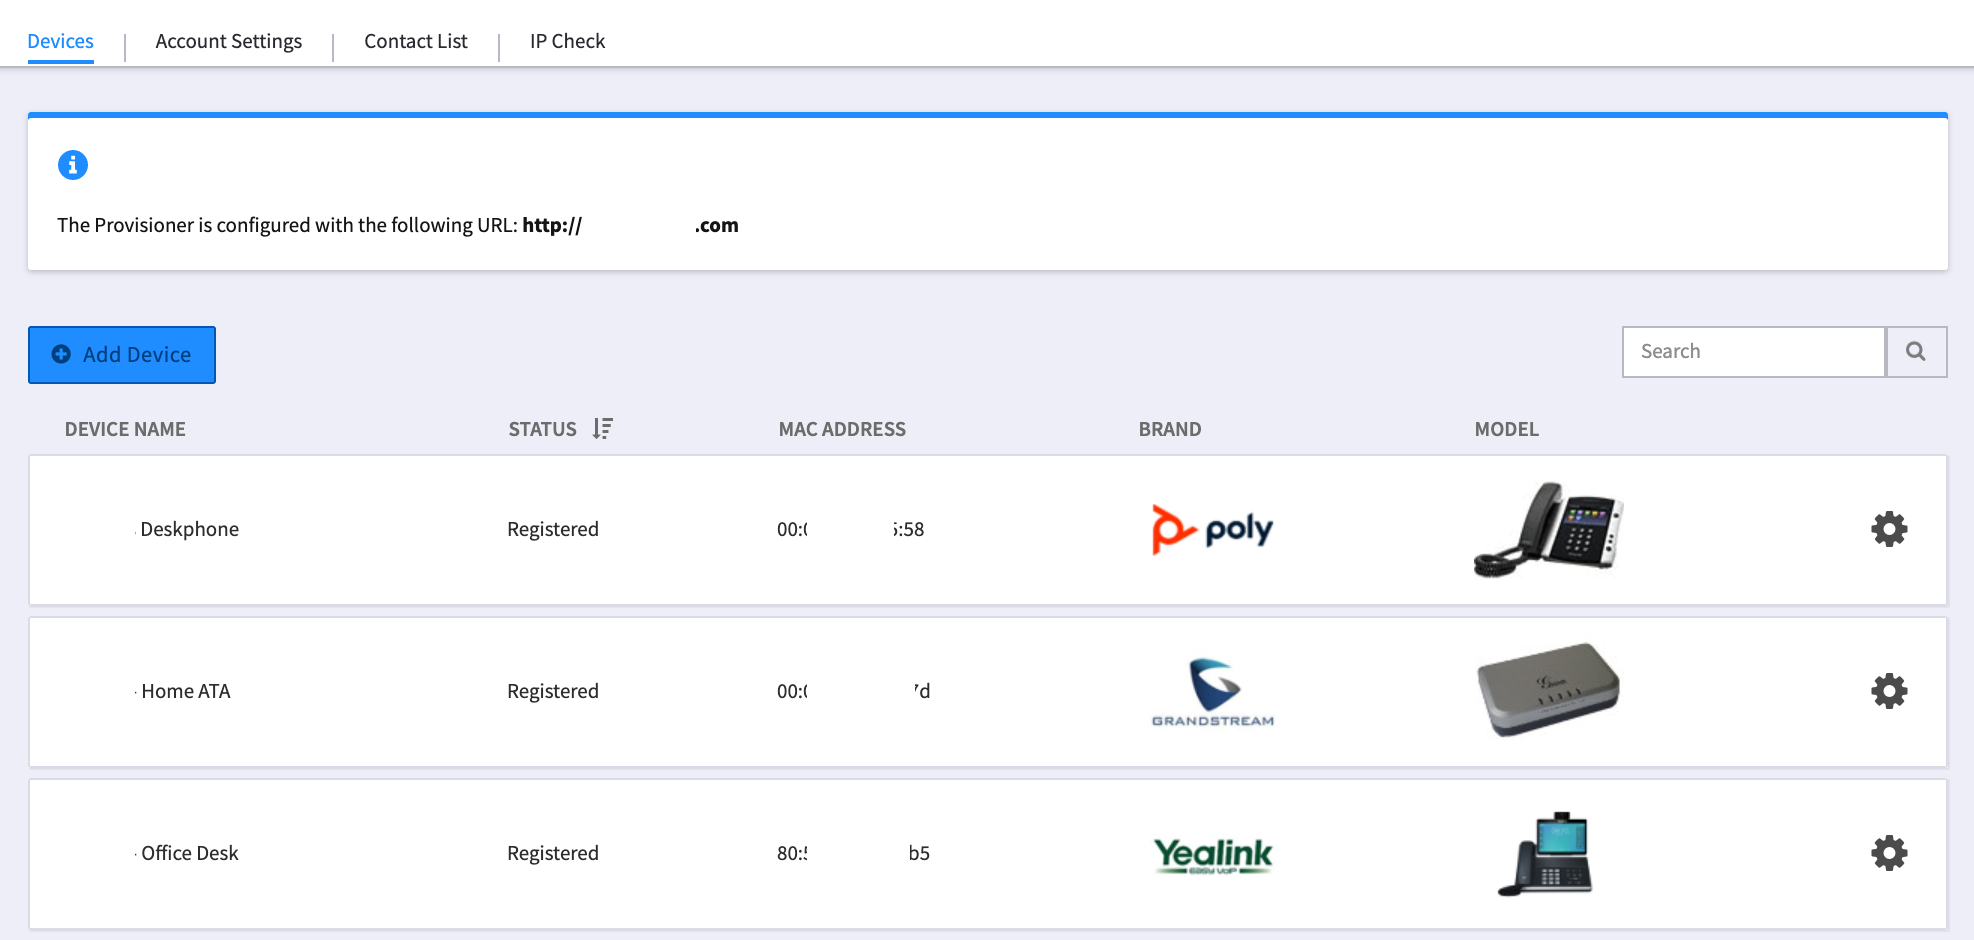
If any devices already added to this account, you will see the list displayed.
Add Device Button – Use SmartPBX or Callflows instead
NOTE: While you can add devices here, these devices will lack SIP credentials unless you manually add them from SmartPBX or Callflows. To minimize registration issues, add your devices in SmartPBX or Callflows before you work with the configuration settings below.
Configure Device
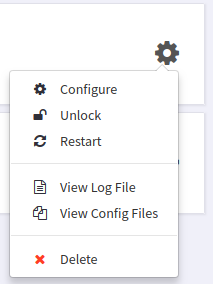
The configuration options provide advanced settings that are typically not accessible in SmartPBX. To further configure each device, select the gear icon at the far right.
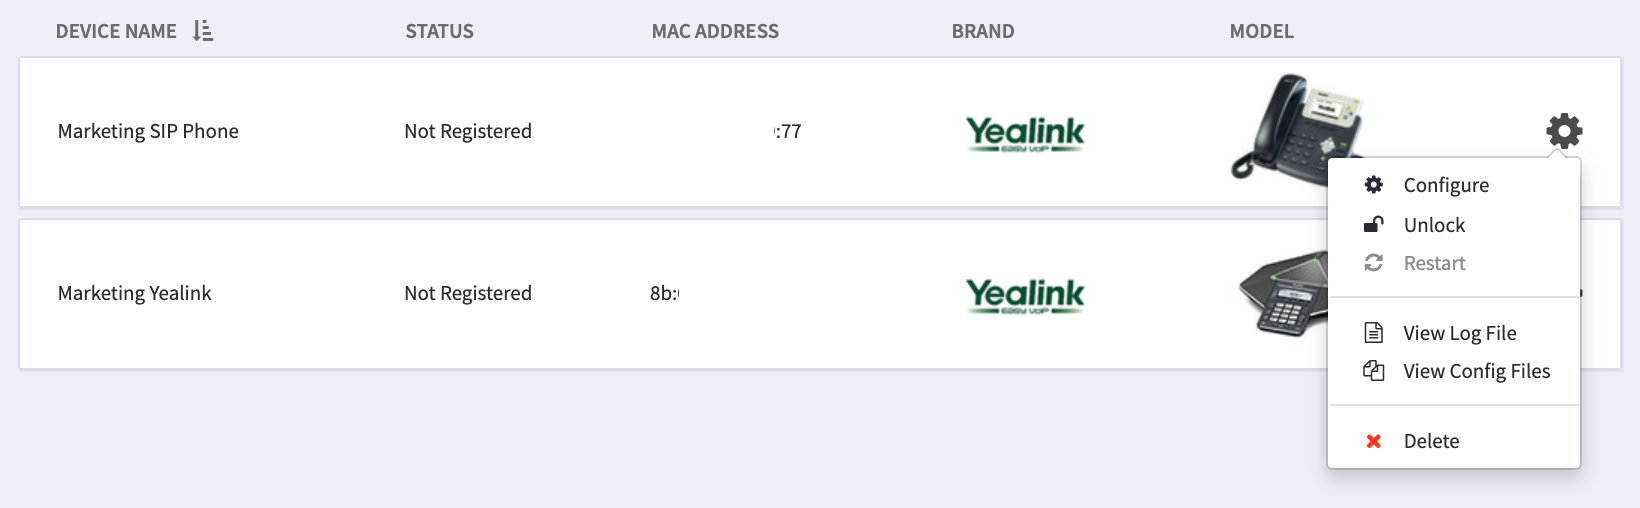
The options shown are available for each device, however the Configure option screen that will display will vary significantly as they often represent unique features.
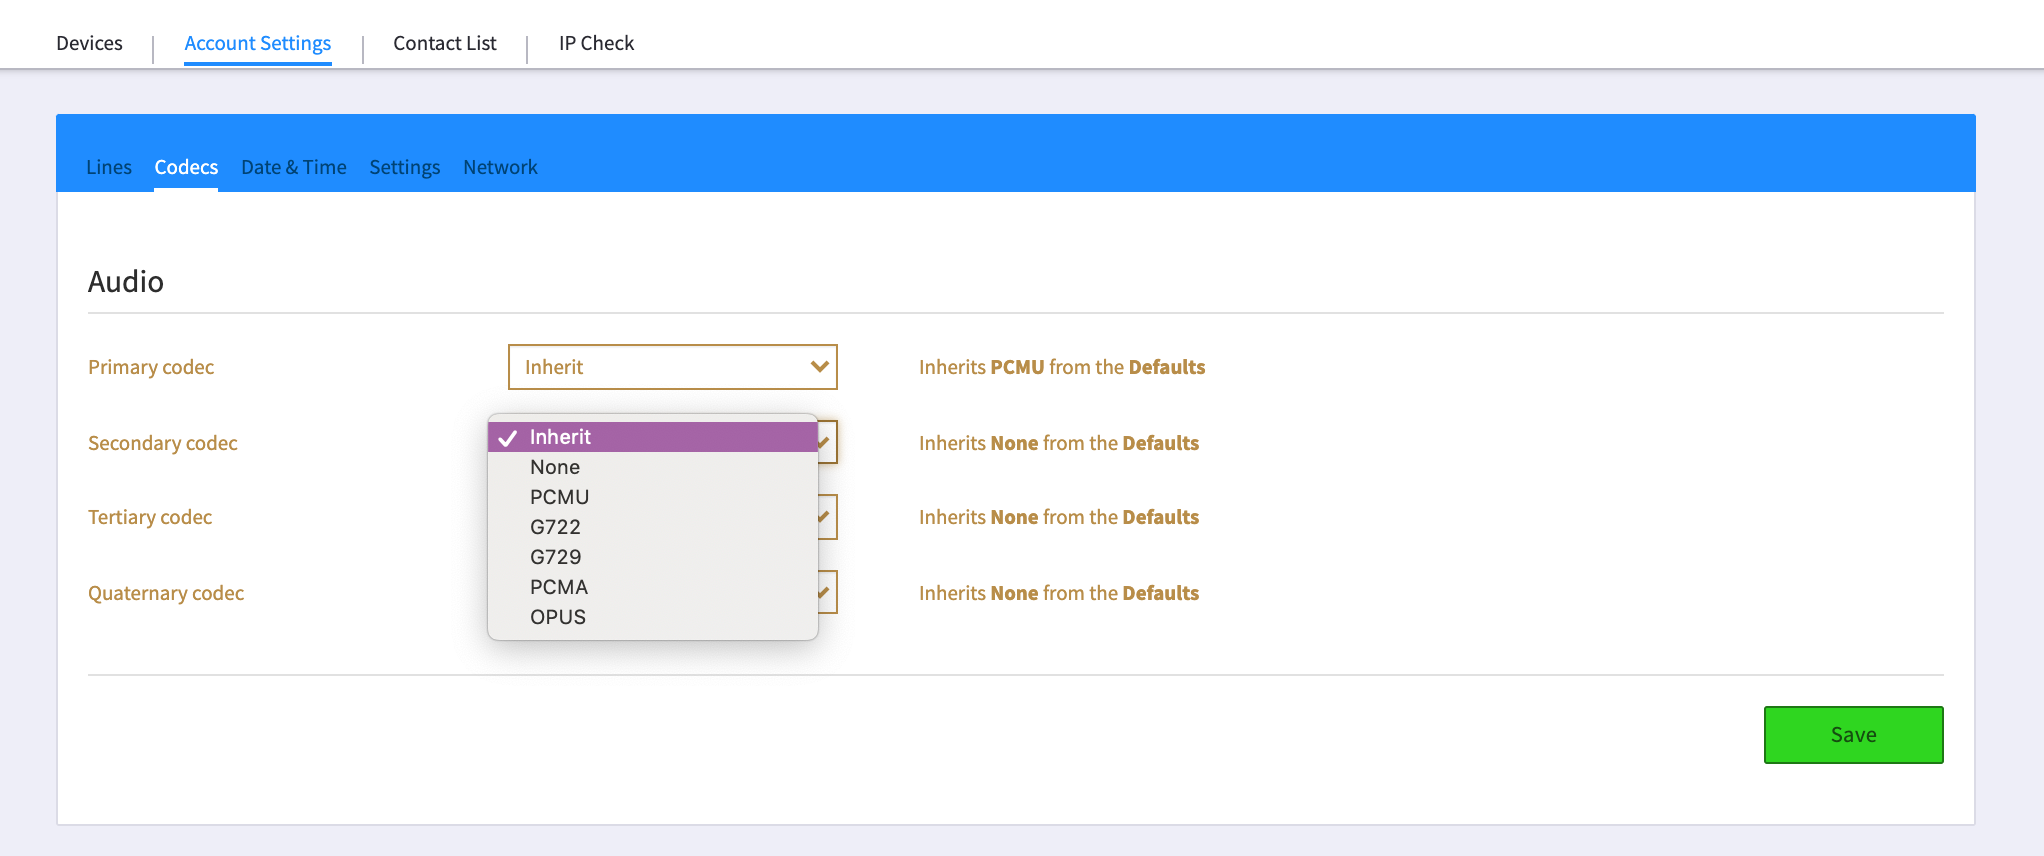
The number of configuration screens vary depending on your device. Lines, Codecs, Time & Date, Settings, Network and Preferences will always show up for every model, but the rest (Combo Keys, Feature Keys, Sidecars, Handsets) all depend on the specific model.
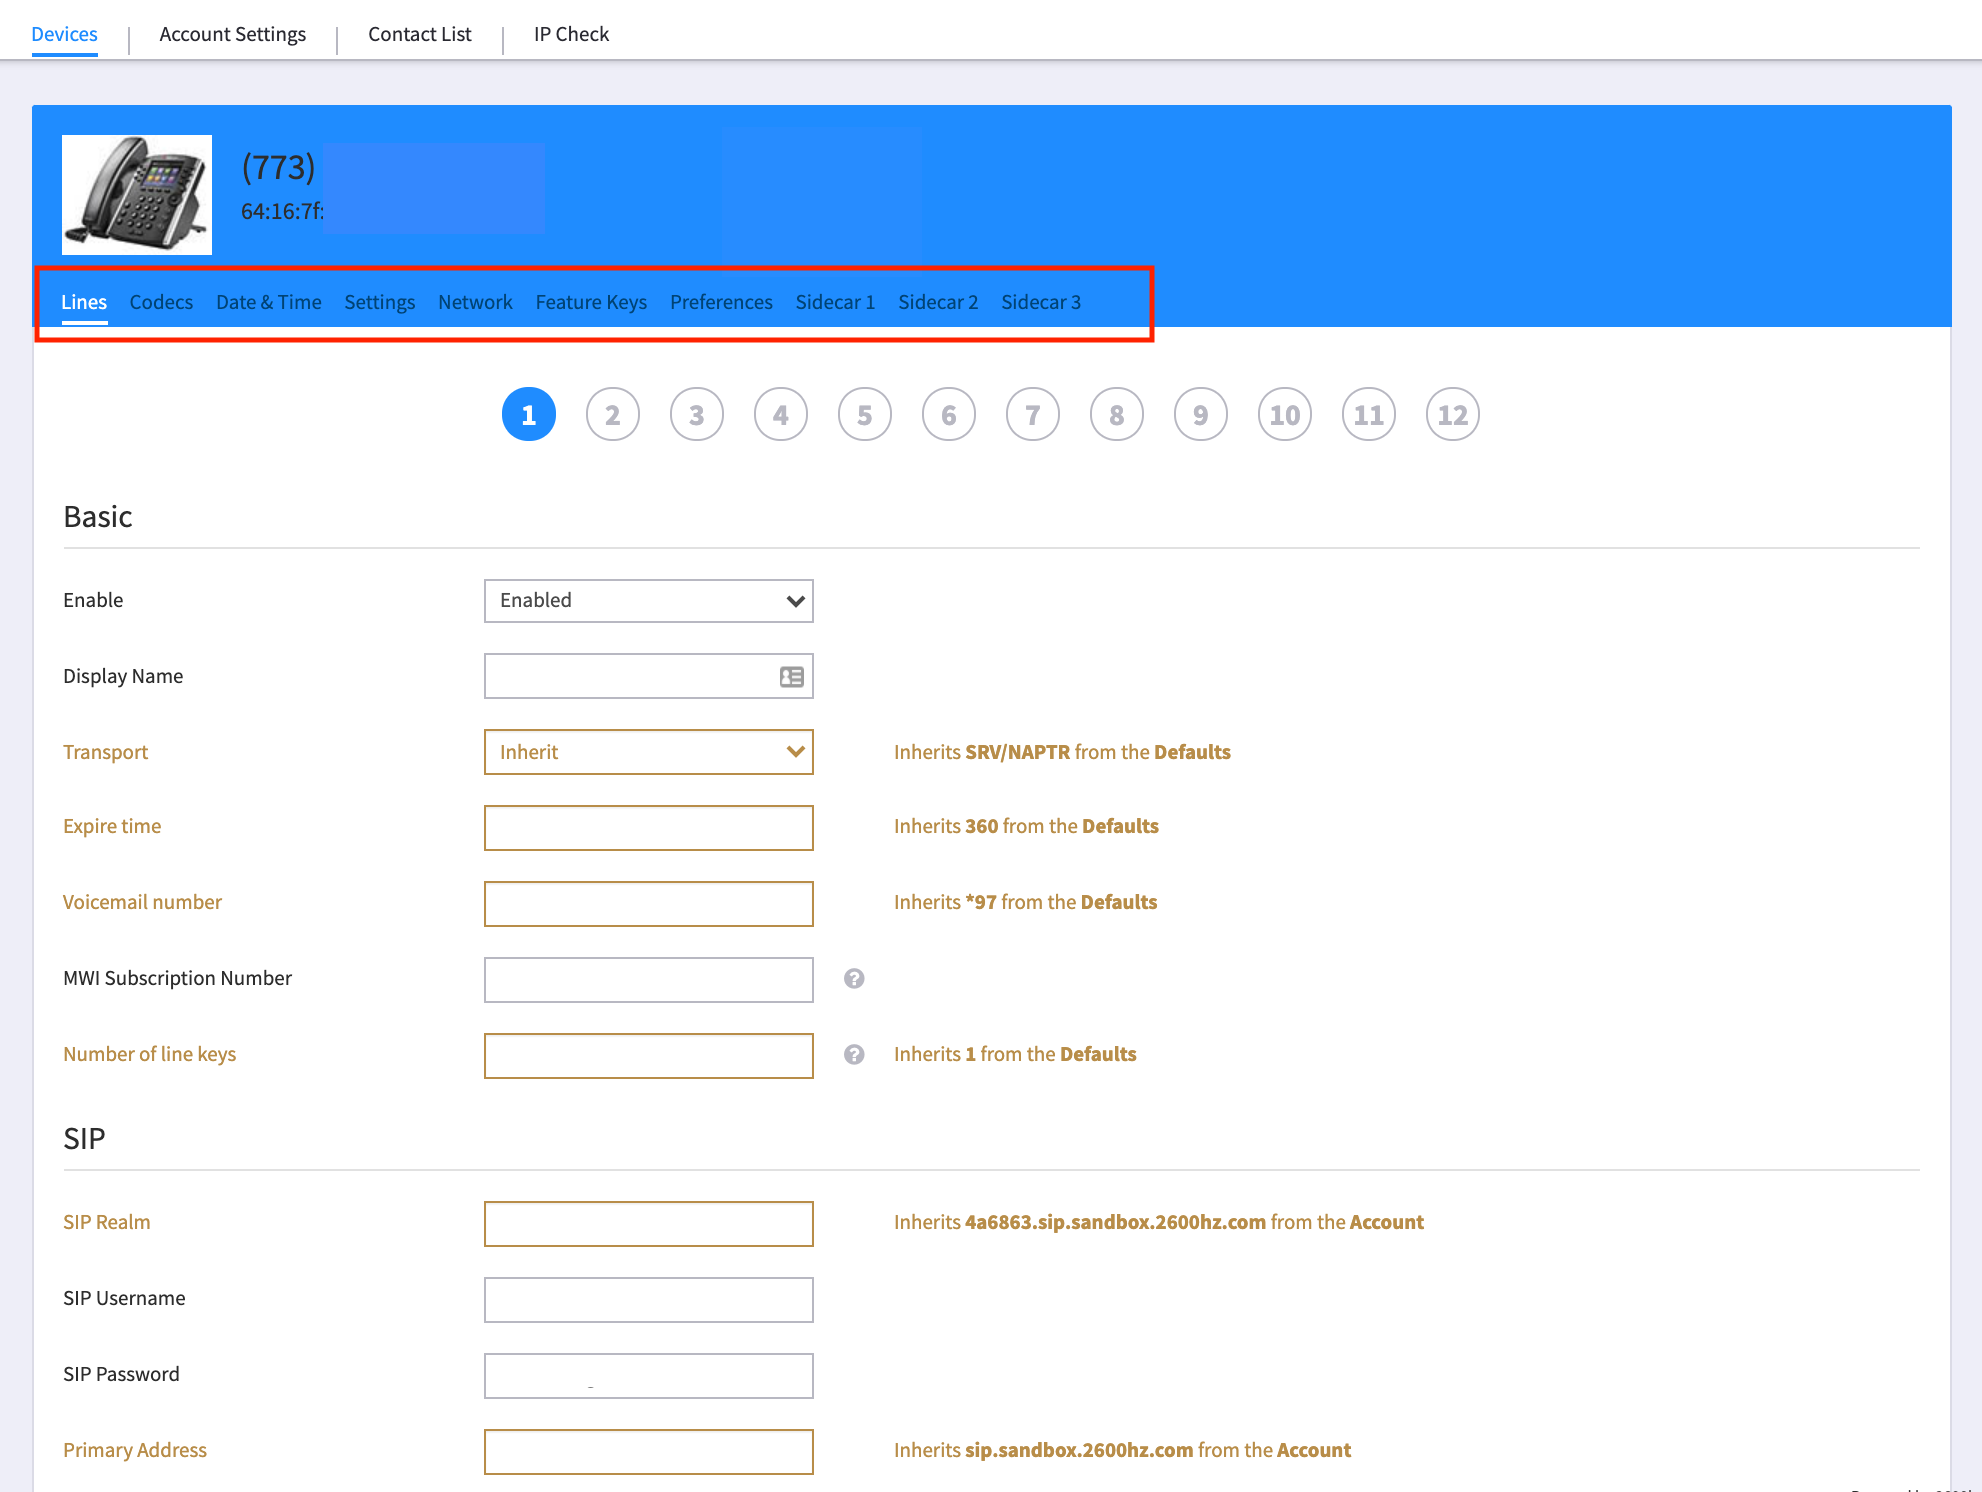
See for example the configuration screen below for a Yealink device. In this case there are 10 tabs to step through and review values in – it is critical whoever is configuring these devices understands what settings are most important and unique, and what settings are better left as default.
NOTE
- The circles at the top represent the number of available SIP accounts a device supports. It also appears for Feature/Combo keys and Sidecars which is for the number of keys supported per device.
Unlock Device
This is a provision to unlock a device that may have been locked by the system due to suspicious activity related to the device. Often this happens when a device is moved to a different WAN IP address (such as moving it from an office to a home office). The unlock setting allows provisioning to be accepted for 1 week. For more information on why and how phones can get locked, see our document HERE.
Restart Device
Restarting a device may help as a reset when calls are stuck in the system. It is important to note however, that if you reset your device from another IP address your configuration will be lost.
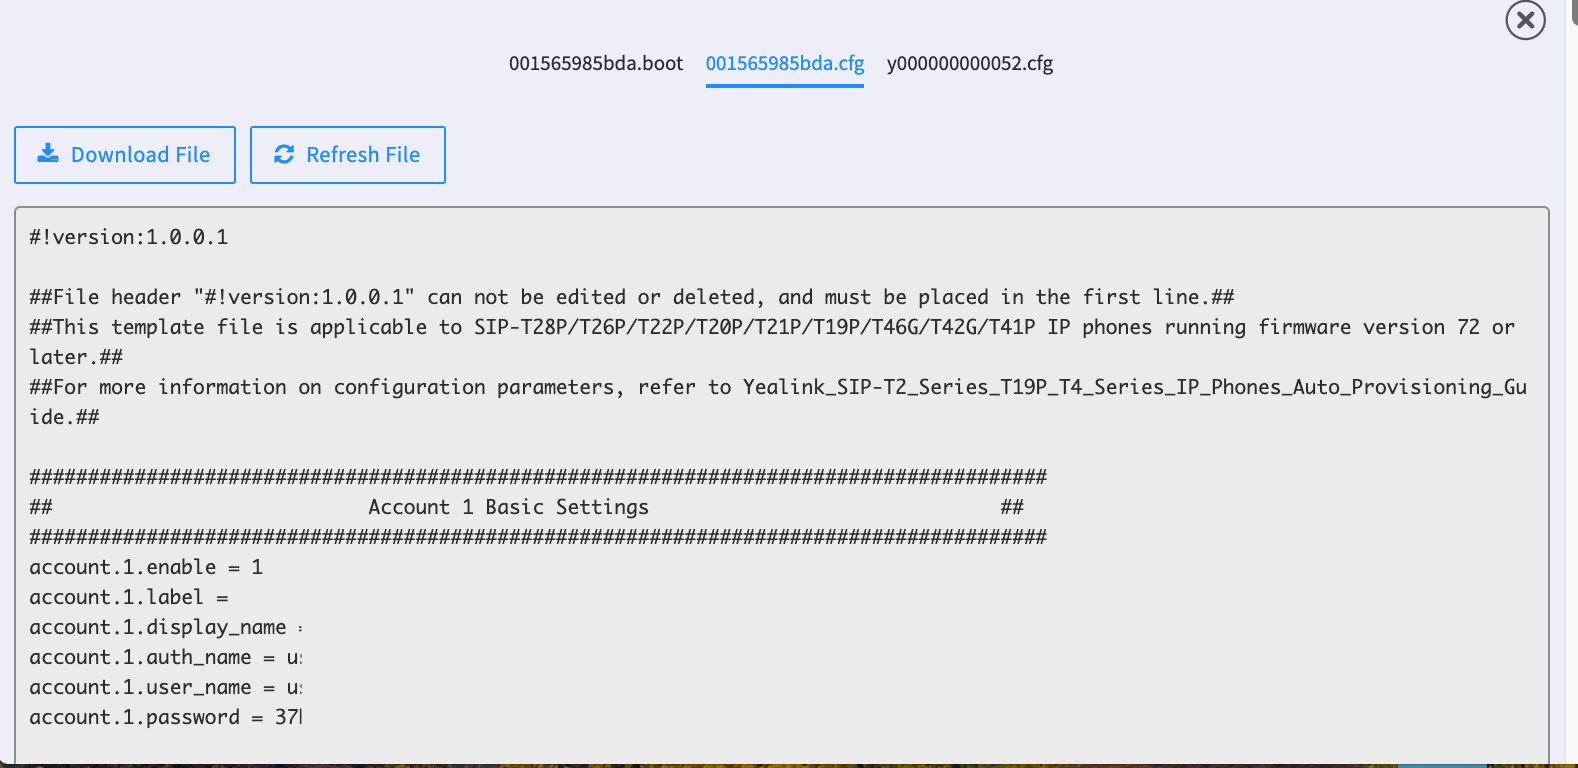
Device Log Files and Config Files
Administrators who are managing phones assigned with our provisioning service may access these log files to help in troubleshooting provisioning issues.
To access the Device Logs or Device Config Files, click on the settings icon for a device and the dropdown will show options to view Log File of Config Files.
View Log File
"View Log File" opens up a screen showing activity Provisioner has logged for the device. It will show entries for when the device is created, updated or deleted through Smart PBX or Advanced Provisioner. It also shows when a phone is locked or unlocked for initial provisioning and device requests for config files.
Deleting is also included, but this doesn’t show up unless you deleted and then created the device again. You obviously can’t see a deleted log entry for a deleted device.
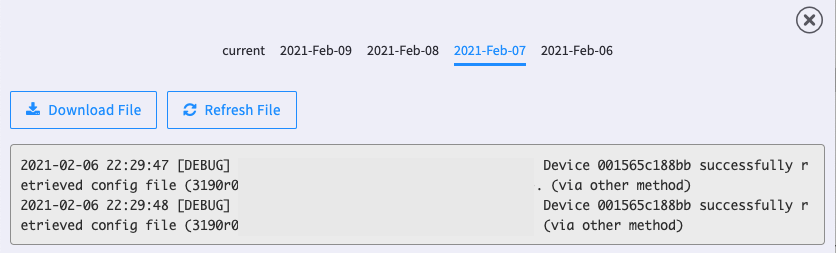
View Config File
This is a tool to help troubleshoot issues and/or conflicts with your configuration. "View Config Files" opens up a screen with a list of config files for a given device. Most brands only have a single config file, but some brands, like Polycom and Yealink, have multiple config files. Once you retrieve the file you can download it and send it your administrator or to a support team.
Custom Config Files
Provisioner does not cover every feature available in the phones, but some vendors do support multiple config files. You can use custom config files to set features we do not cover with our Provisioner or to enable settings we don't expose.
If you are using this feature, we ask that you first test the device without any custom config file settings prior to filing a support ticket with us. It will make troubleshooting issues much easier.
Currently the vendors that have Custom Config File support on Provisioner:
- Yealink (using firmware v81+)
- Polycom
See details on configuring specific devices HERE
Delete
Use this if you want to completely remove your device from the system. Note in some cases when an account is deleted, devices in that account remain listed as "orphans." To assure deletion, use this delete.
Account Settings
Account Settings are account defaults the admin for the account wishes to be applied on all devices in a given account.
Account settings aren’t global. There is a global default (which is the Inherits from Defaults value) which are static settings on the server. Account Settings are account defaults the admin for the account wishes to be applied on all devices in a given account.
Account administrators have access to Provider Settings, which is a level of defaults above Account Settings. All devices inherit settings in this order: Global → Provider/Reseller → Account → Device.
Settings set lower in the order will override the settings set higher in the order. For example device Settings will always overwrite any settings inherited from above. Account Settings will replace Provider/Reseller Settings.
Contact List
This feature is in its final stages of development and will be released shortly. It allows an account-wide contact list in your devices. The support will initially be for Poly devices but more to come in the future. See our separate user guide that specifically addresses this feature.
IP Check
This tool checks to see if an IP address is blocked from provisioning due to abuse or other issues. It is available to Administrators who are managing phones hooked up to our provisioning service.
Using IP Check
Enter the public IP address that the phone sits on in the IP Address textbox and then click the "Check Status" button.
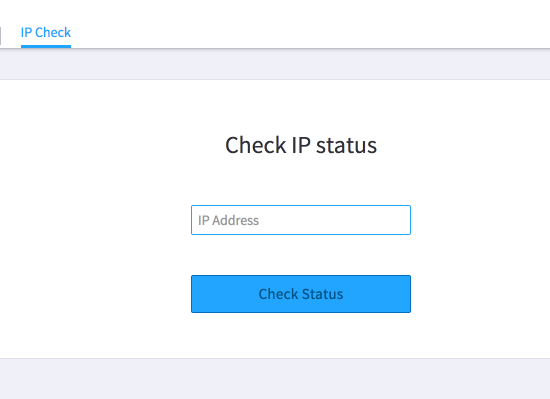
Note: 192.168.X.X or 10.X.X.X IPs are NOT public IPs, please enter only public IP addresses. Ask your IT administrator for help if you need it.
Understanding IP Status results
The results of a status check should look something like this:
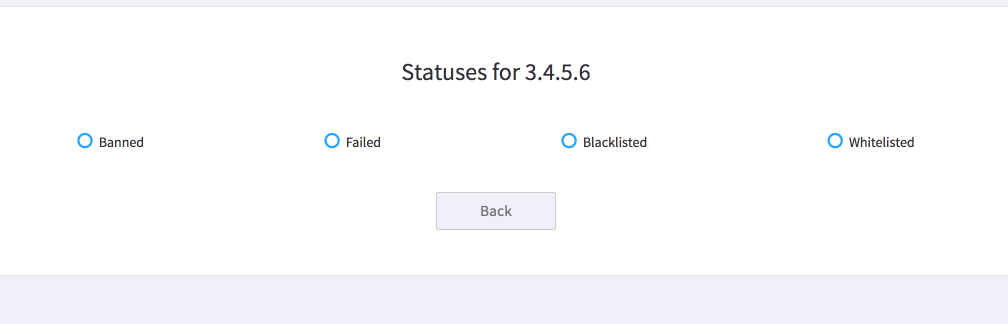
Banned
If this status is checked, then this IP is temporarily banned because someone tried to load a config file manually, or repeatedly tried to provision phones that weren’t yet in our system. This ban will automatically be removed at the start of the next hour, at which point you can try again.
Failed
If this status is checked, then there were failed attempts to request config files from this IP. Please check your device logs to see if any of your devices are failing to pick up their config files.
Blocklisted
If this status is checked, then this IP is permanently blocklisted (this has been renamed from "blacklist"). To be removed from the blocklist, please contact support. If you do not have a support contract, please use the forums to list your complaint.
Whitelisted
IPs are added to the whitelist on the first successful provisioning attempt from an IP. If it's not on the whitelist, then phones on the IP either hasn't reached Provisioner, or is blocklisted.
 Accessing Provisioner Settings in Callflows
If you are an advanced administrator and are familiar with using the Callflows interface, you can also access the Provisioner settings using the Device selection. This is handy if you are in the middle of creating a callflow and need to change a device setting to support your updates.
When you start Callflows, click on the Device option.
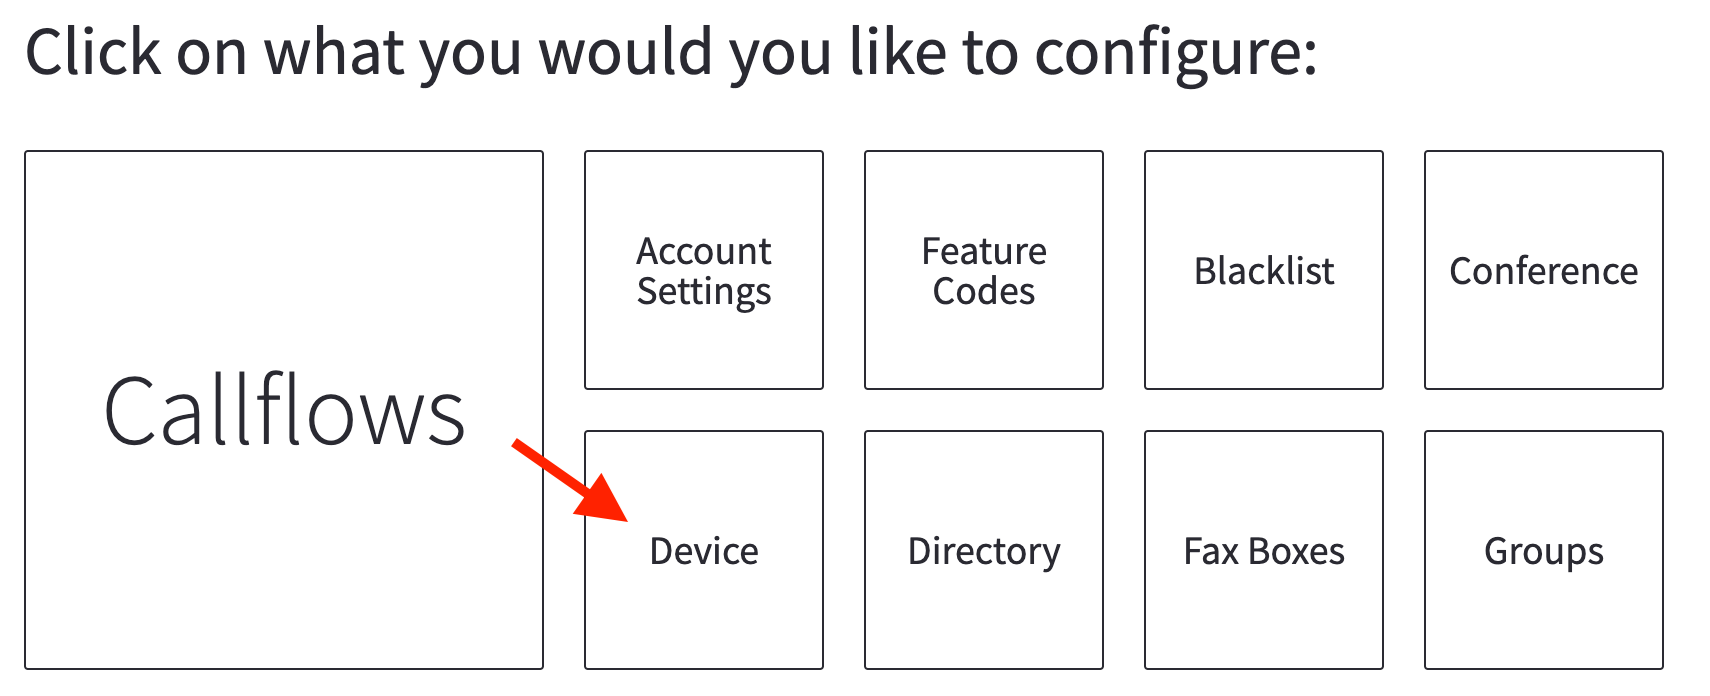
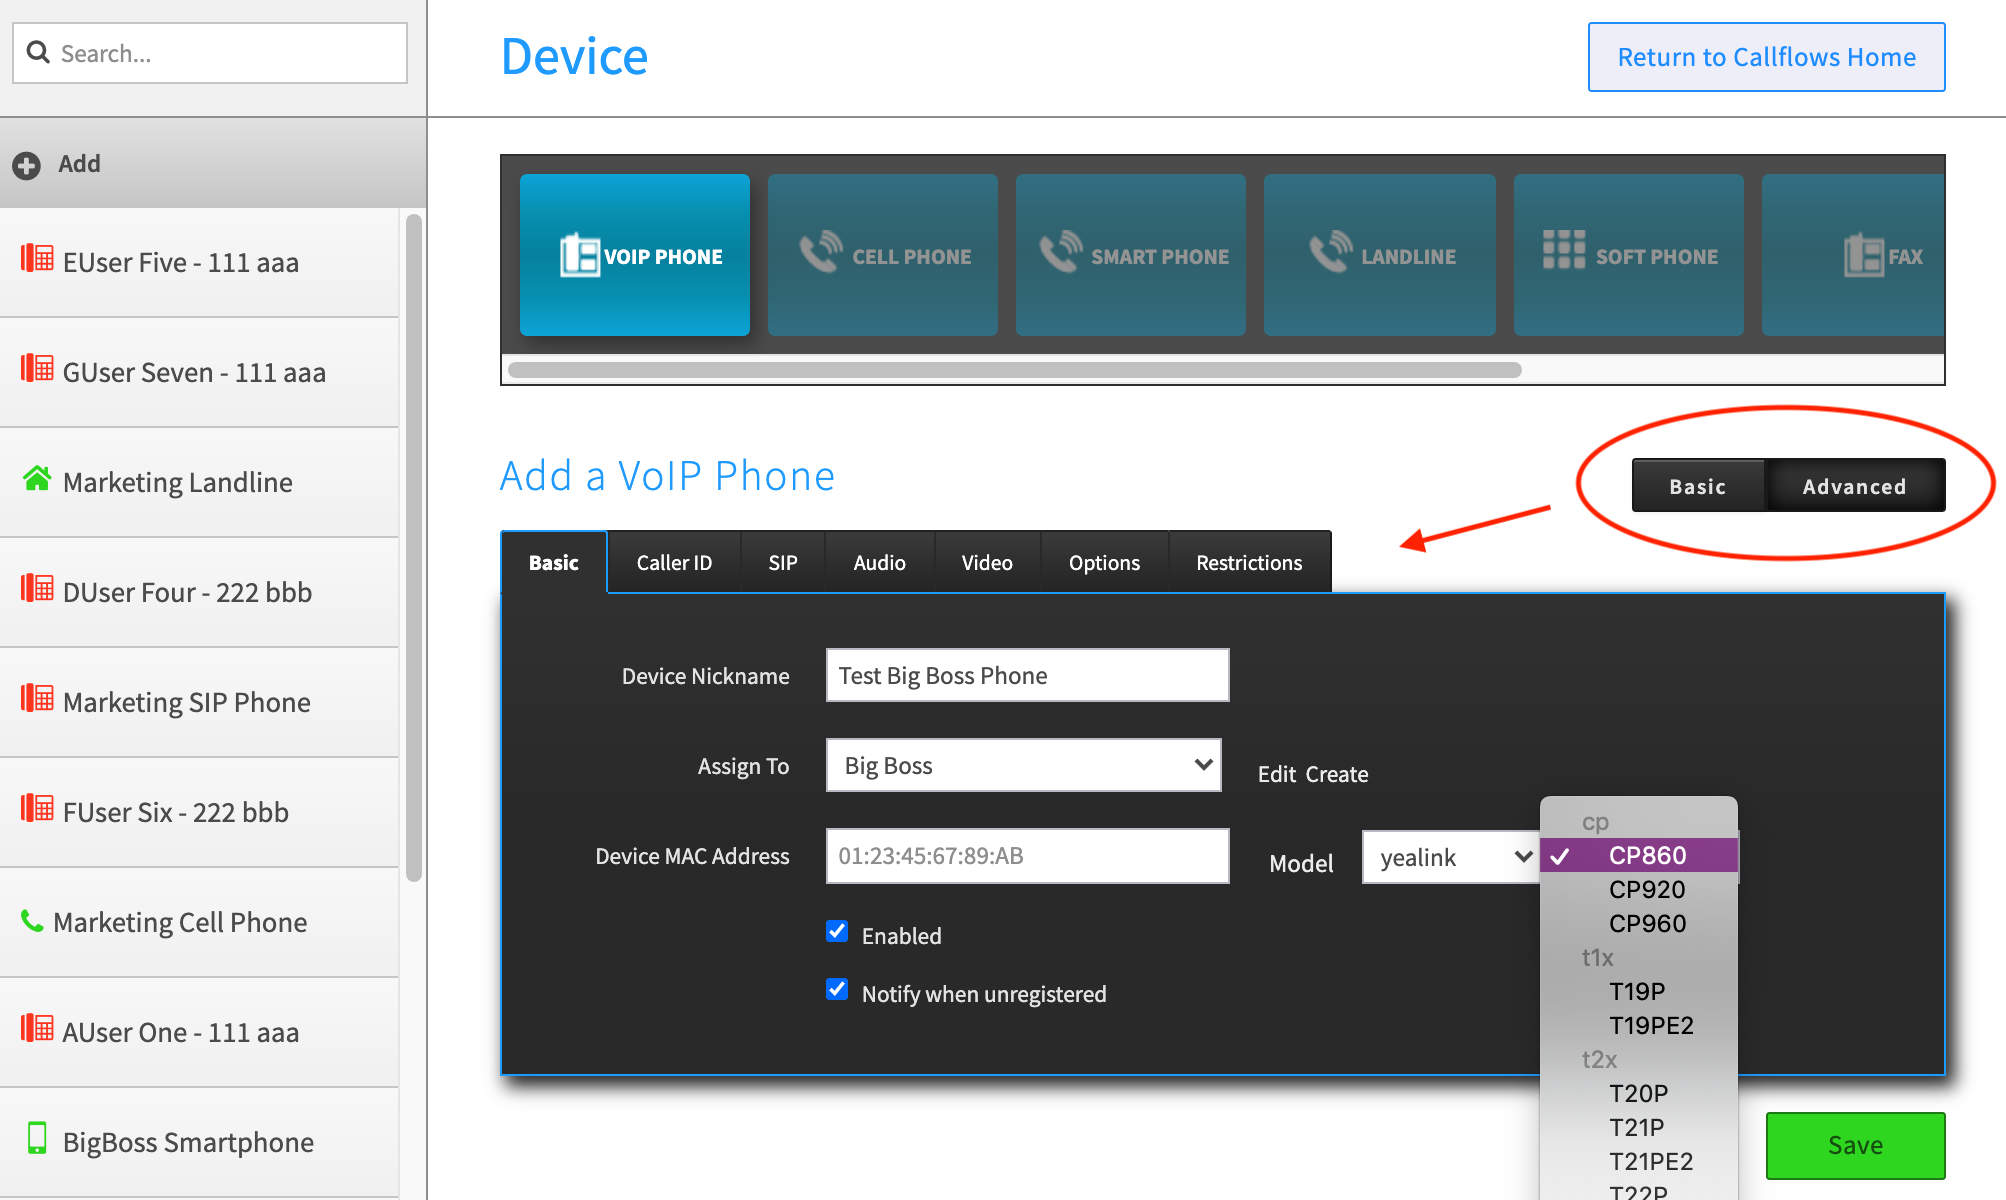
You can then select “Add Device” and access the same configuration settings. Select the Advanced tab to access additional settings.
NOTE:
The Callflows application does not display visual versions of phone models. It also does not add/include some key fields used by Provisioner and SmartPBX. We strongly recommend you use SmartPBX for adding devices to start; if more granular settings are required, your system administrator may update these using Provisioner.
Troubleshooting Provisioner Settings - Steps
If your device is not registering correctly, follow these steps to troubleshoot the source of the issue.
-
Reboot the device.
Sometimes it's just a matter of updating the config file.
-
Ensure that the base provisioning URL is correct.
By default it should be p3.zswitch.net for Hosted accounts. If you are using a white label instance, ensure that your URL resolves to our provisioner server; if the phone is not reaching our provisioner server, then it's not getting any updates on settings.
-
Reset the provisioning URL to the base provisioning URL.
Sometimes phones will end up looking in the wrong directory for their config file. This is caused by deleting the device and re-adding it back into Provisioner.
-
Factory Reset the phone and re-provision.
This is to clear all settings and use only the config file generated by Provisioner. If you have custom config files attached to the device, remove it before factory resetting.
After it re-provisions:- If the device still isn't working, let us know as it could be an issue with our settings.
-
If the device works, then apply the custom config file again and see if that works. If it doesn't then there's an issue with your custom settings.
Frequently Asked Questions
How do I know if the device I want to provision is supported by KAZOO?
We update our list of supported devices frequently; you can find it on our website, HERE.
Alternatively, once you launch the software you will see a comprehensive list of devices supported in the configuration process. At times a newer device is introduced; contact the manufacturer to confirm if can use an older configuration file and is backward compatible. In some cases this may mean new features are not entirely supported, but the device will be recognized.
What is the difference between “registering a device" and “configuring a device”?
Registering a device means the phone validates its SIP credentials with Kazoo to permit the phone to make calls and use the phone features (BLF, voicemail, call parking, etc.)
Configuring a device means changing the settings on a device (editing keys, changing date/time, etc).
I followed the steps in Provisioner to set up my phone but it is showing “not registered” in SmartPBX?
First check the device log in Provisioner to see if “successfully provisioned” line exists.
- If it doesn’t, then there are issues with the phone connecting to the provisioner server (either the IP is banned or there are network settings preventing phones from reaching provisioner).
- If it does, then check the SIP credentials in SmartPBX to verify they match the credentials in AP. If they do, then there’s an issue with the SIP credentials in KAZOO.
Once the device is configured can I change/update some of the settings for my own personal use?
Many of the device settings initially configured in Provisioner can be adjusted and fine tuned using SmartPBX under the Device menu. This includes features such as call forwarding, caller ID, and call flow management. These can also be set in Callflows and even in Call Center Pro if it relates to behavior related to a call queue. When an adjustment is made from any of these other applications it is saved to a common database and reflected across all applications.
The Provisioner app provides access to even more settings options for some phones. Make sure to check in with a system administrator to see if these may help a specific use case for your account.
Where do I find default settings that are inherited, per notation “Inherits xxx from Defaults”?
Settings “inherited from Defaults” cannot be changed at this time. These are static defaults set on the provisioning server ton ensure successful installations; only accounts with their custom installations of Provisioner can have these defaults modified.
In the future there may be an option to replace the static defaults with Cluster defaults, this way different clusters can modify their defaults. Please request this on our Product Board if it is an important feature to you.
What does Save and Apply Mean?
Save and Apply saves the changes and then sends a check-sync for a reboot/update to the phone. It then sends a reboot to the phone.
What happens if I initiate a “hard reset” on my device? Does this affect the Provisioner configuration files in KAZOO?
How your device is affected depends on whether the phone is re-started using the same IP address.
- If the same IP address is used then the phone will reconnect with the initial config. file
- If a different IP address is mapped to the phone, then the initial config. file will no longer be valid.
Is it possible to provision a phone not listed in Provisioner?
In theory, any SIP phone can work as a very basic phone, however it is not recommended as it likely means you will have limited functionality and upgrades could cause issues.
- If you have a specific phone model from a manufacturer (for example Poly) that is not listed but similar models are, you may be able to get it working.
- If however, an entire manufacturer's phone inventory is not listed it's likely that manufacturer has a proprietary setup and does not allow alternate platforms to recognize it.
Why didn't my device auto-update after changing a setting in SmartPBX (SPBX) or Advanced Provisioner (AP)?
Any change you do in SPBX or AP is not automatically transferred to the phone. It can take up to 24hrs. for updates to be generated in the config file and the Provisioner database.
When you make a change in SPBX or AP then a config file for the device is generated on our Provisioner servers. The phone doesn't "see" these changes until it is either rebooted, or it completes the automatic update cycle, which occurs every 24 hours.
If you change something in SmartPBX or Advanced Provisioner and want it to be intermediately available in the phone, reboot the device or manually trigger a "Provision now" event from the phone web UI, otherwise wait up to 24h for the change to be picked by the phone.
What is the recommended method to configure a device with multiple extensions (user)?
We typically follow these steps:
- Add the device via SmartPBX
- Create more users as needed in SmartPBX -> Devices -> SoftPhone
-
Copy the credentials of the new user(s) to the extra lines as required.
During this process it's helpful to come up with some sort of naming scheme on the additional SoftPhone "devices" to help manage and keep track that those are used as extra lines on physical phones, and not actual soft phones.
The BLF function isn’t working for my parked calls
If BLF is working to show presence but is not working for indicating parked calls, then this is most likely a setting conflict with KAZOO. Check the device's settings in SmartPBX.
We are migrating from Private Cloud to Hosted. Is there a way of migrating the devices like we do for migrations from Hosted to Private Cloud?
There is currently no automated routine to migrate devices in that direction.
Sometimes I remove an account and its device is still showing -- as an "orphan" it seems
"Orphaned" devices can appear when an account is deleted, but not the individual devices. To avoid orphaned devices, the best practice is to delete all the devices from an account first.
I added a SIP device in SmartPBX (Yealink t27p) and it appears to have gone through auto-provisioning (logs below), but I can't make any outgoing calls. The device’s screen says “no available handlers” when I try to dial out to my cell.
This type of error could indicate the SIP credentials associated with the device are not correct.
Click HERE for our Provisioning Guide for Supported Devices
Related Articles
|
|
SmartPBX User Guide |
|
|
Technical User Guides
API Reference Docs
#####
.png.a7c0edd096da0caf19ef2abd85a051ac.png)


Recommended Comments
There are no comments to display.