-
Posts
22 -
Joined
-
@fmateo05 Hi there! Just a quick update — we’ve officially moved all of our documentation to our new site: docs.2600hz.com. You’ll find all the legacy Monster UI documentation there, along with a bunch of other helpful resources. As for open source, we’re still planning on it! That being said, we don’t have a formal timeline just yet. When it does happen, it’ll be based on version 5.4.
-
Currently, we are in the process of adding these guides to our new docs site, for now here are the exported PDFs of the guides until that is complete. We have now placed on this on the new doc site: https://preview.docs.2600hz.com/commland/guides/ Note: comm.land 2.6 requires Kazoo 5.3 Release Notes: COMM.LAND 2.6.96.pdf COMM.LAND 2.6.75.pdf Guides: comm land installation guide (Kazoo 5 3 and above).pdf comm land 2 6 User Guide .pdf Account Settings (Admin Only).pdf MS Teams.pdf Branding.pdf Conferences Admin.pdf Screen Pops Admin.pdf Chat Workspace.pdf
-
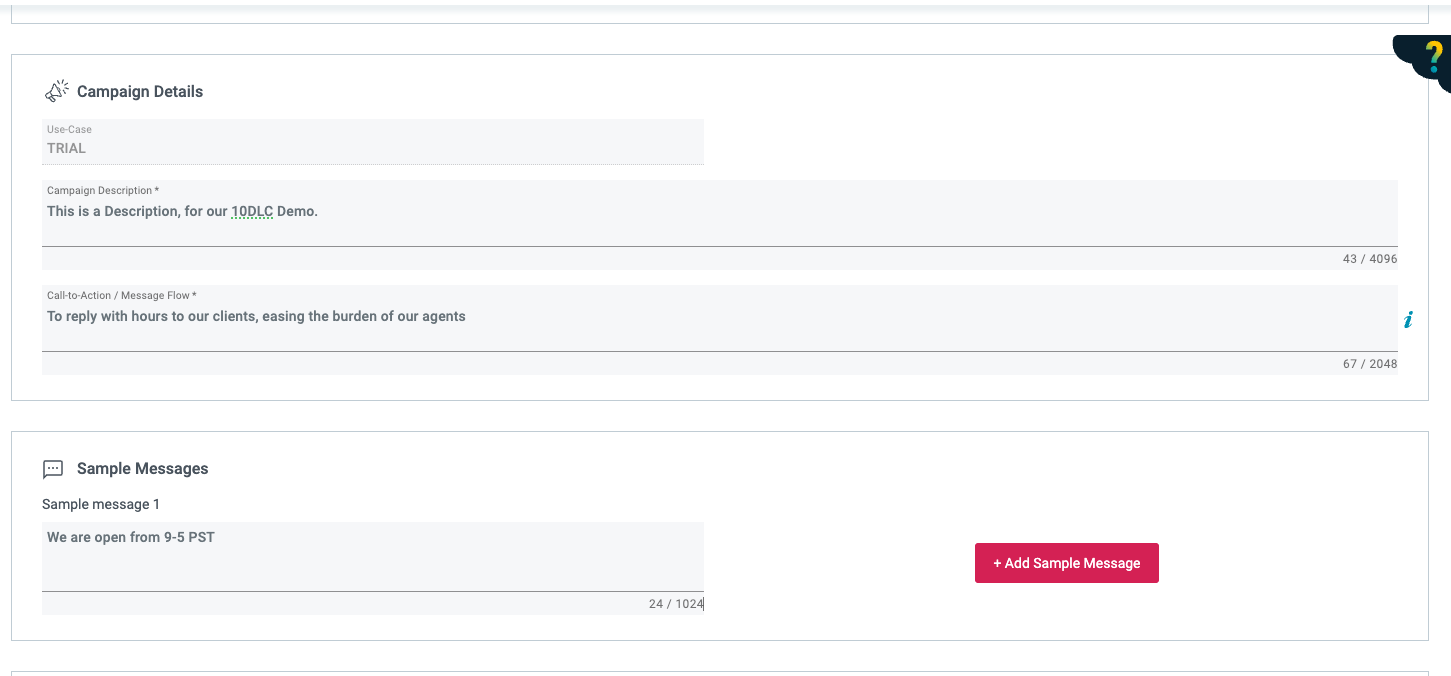
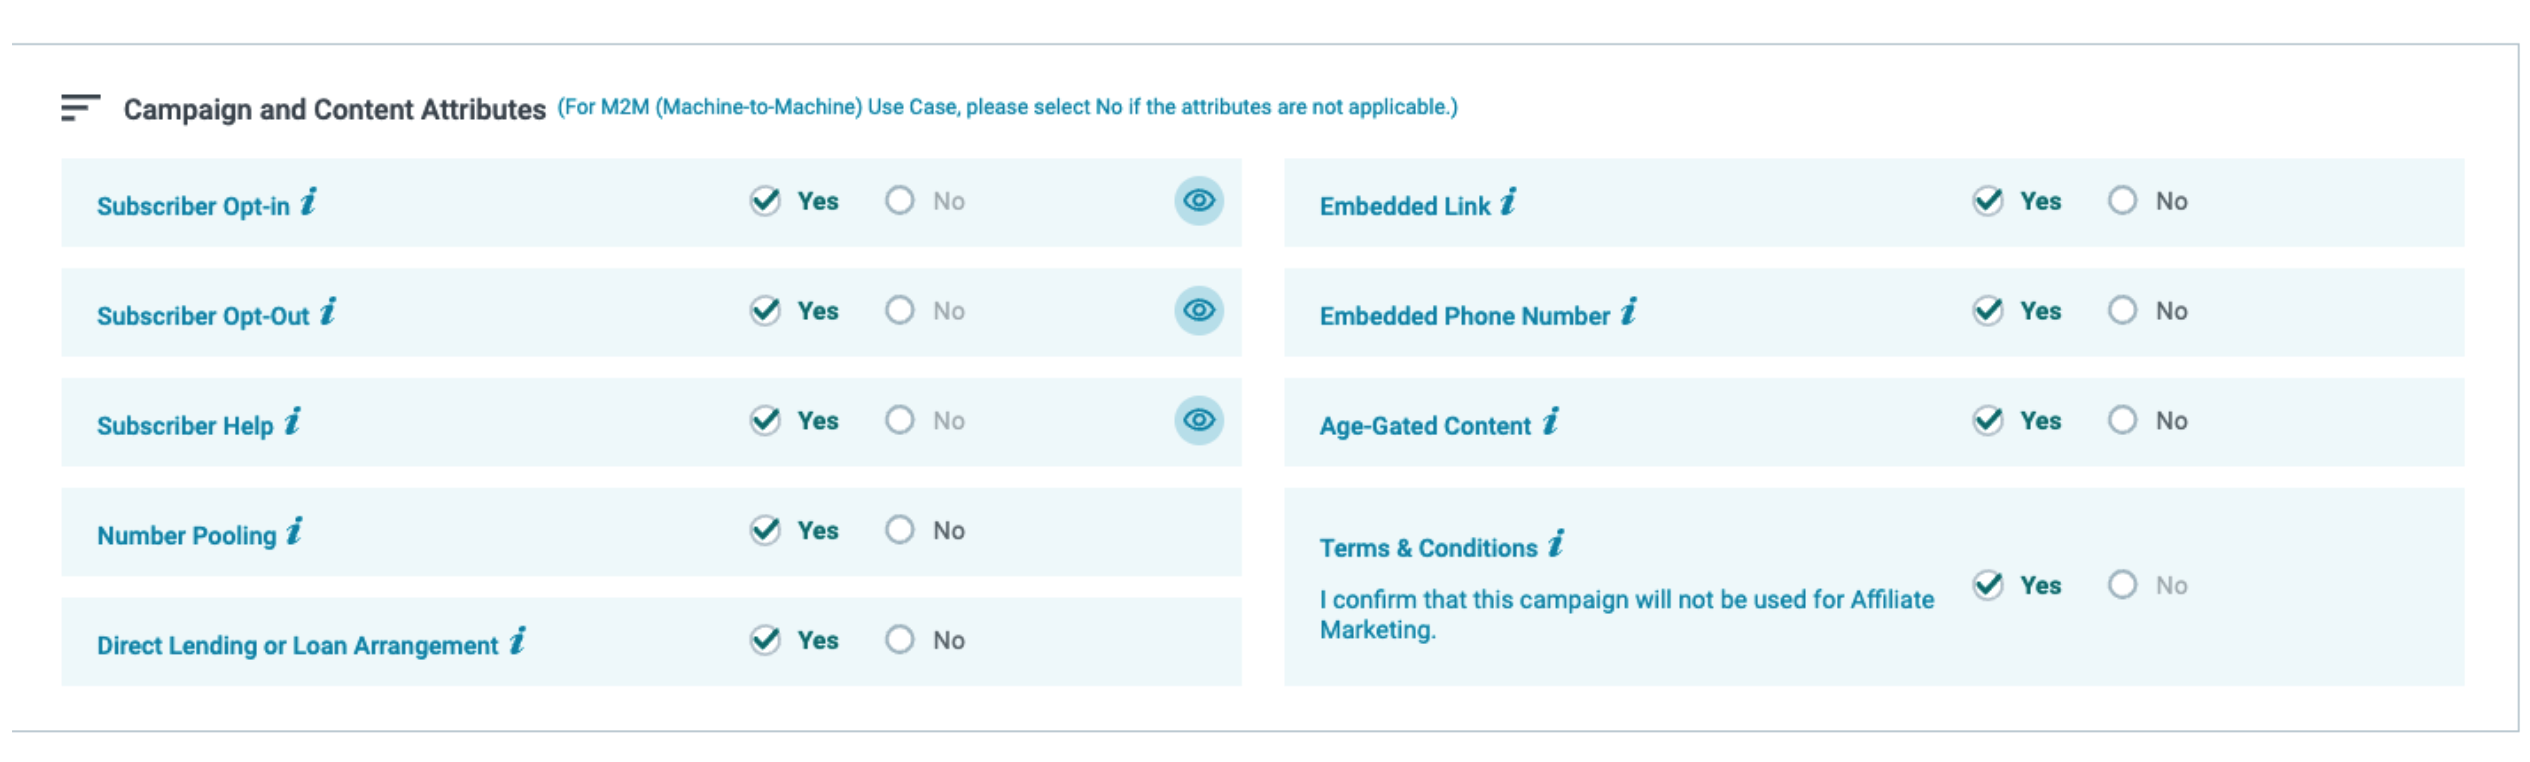
Effective November 6, 2024, there will be updated requirements for several fields when submitting 10DLC campaigns. In order to ensure the most success for vetting, please make sure your campaigns follow these new requirements. What do I need to do? Ensure that your campaigns have the following new elements: Campaign and Content Attributes Subscriber Opt-in: Provide the opt-in keywords if applicable. The Opt-in Message is required and must contain the following details: Brand name, message frequency disclosure, "message and data rates may apply" disclosure, HELP information, STOP information. Subscriber Opt-Out: Provide the opt-out keywords. The Opt-out Message is required to contain the following details: Brand name and confirmation the consumer will receive no further messages. Subscriber Help: Provide the Help keywords. The Help Message must contain the following details: Brand name and an email address, phone number, or website link the consumer can use for assistance. Campaign Description Messaging frequency needs to be disclosed. If donations are collected, it must be clearly stated. Message Flow/Call to Action (CTA) (Opt-In) Provide the specific link, written form, or screenshot of the opt-in form. Use the “CTA (Call-to-Action), Privacy Policy and/or Terms and Conditions Multimedia Upload” field to attach the screenshot, if applicable. If Verbal Opt-in is collected, please add the script that describes the opt-in flow. The script must contain the following disclosures: “Brand name, types of messages being sent, message frequency disclosure, “message and data rates may apply” disclosure, HELP information, STOP/opt-out information, and a link to the Privacy Policy and Terms & Conditions” Phone Numbers cannot be a required field on the website where opt-in is collected. The only way it can be required if text messaging opt-in is the only use of the form. Please note the campaign vetting review will be on the Call to Action/Message Flow field AND the Call-to-Action disclosure provided at the actual opt-in collection. Privacy Policy and Terms and Conditions Provide the Privacy Policy URL in the Privacy Policy Link field. Provide the Terms and Conditions URL in the Terms and Conditions Link field. If you do not have your Privacy Policy and Terms and Conditions accessible via a public URL, please upload a PDF or document version of these files in the CTA (Call-to-Action), Privacy Policy and/or Terms and Conditions Multimedia Upload. Privacy Policy must include a disclaimer that no mobile opt-in will be shared with third parties for marketing purposes. Terms of Service must have an SMS disclosure that includes the brand name, types of messages consumers can expect to receive, message frequency disclosure, “message and data may apply” disclosure, privacy policy links, and opt-out instructions. Sample Messages Sample Messages must correspond to the registered use case. If a campaign is registered under multiple use cases (mixed), a sample message for each use case should be provided. For example, if you register under the marketing use case, state in the description the use of texts for promotional purposes and the sample message should reflect a typical marketing message you would send. Hey all! With 10DLC being new for us all, I thought I would share a little 10DLC registration best practices. Fields that will be reviewed (at a minimum): Legal company name Brand support email address Brand support phone number Brand Website Universal Employer Identification Number (EIN) Campaign description Content Attributes Content/Prohibited SHAFT-C Content Sample message Opt-Out Message Call to Action (CTA) field when required by The Campaign Registry (TCR) Do... Don't... Comply with the guidelines outlined in this article. Non-compliance will result in a declined campaign. Provide complete information and verify that content attributes are accurate prior to sharing the campaign with your DCA. Include opt-in and opt-out language (when applicable). When a phone number is collected via a website, the brand should also disclose the privacy policy/terms of use. Include a non-working website. Provide content attributes that don’t match the other fields entered in TCR (embedded phone number or link, debt reduction program) Use sample messages, campaign description, or website/brand information that are inconsistent with each other. Sample message entries match and make sense for the website and/or brand. Register Charity or Sole Proprietor use cases for political messaging. Brand registration best practices Standard use case requirements Remember the brand is the message sender - the EIN and company information should reflect the message sender, not necessarily you as the reseller. Website - some online presence is necessary here, social media presence is acceptable. Opt-in and opt-out information should be displayed clearly and conspicuously on the website. Phone number and email - these should use the brand's domain and the phone number should be found on the company website/social media page. Must meet the other requirements set forth by TCR to be at least a Verified Brand. Sole Proprietor use case requirements True Sole Proprietors (SPs) must go through TCR's provisioning process. Please make sure you first evaluate whether you're a fit for the SP use case or the low-volume campaign type! Campaign registration best practices The following recommendations can be applied to all campaigns. Content Attributes Please make sure your content attributes are correct while setting up your campaign. These fields can not be changed, so a brand-new campaign will have to be submitted. Example: If a customer selects "no" for the embedded link, but the sample content provided clearly shows links. They will need to resubmit their campaign with "yes" selected for the embedded link. Prohibited SHAFT-C content The following types of content are not allowed on 10DLC: Sex, Hate, Alcohol, Firearms, Tobacco (cannabis, CBD, etc.) Please note: This content is not allowed to be on the customer's website at all. Example: If a chiropractor's office has CDB Oils on its website, this is prohibited, and the campaign will be denied, even if not directly related to CBD marketing. Description Must be able to tell the intended purpose of the overall messages. Your description should answer the questions: Who you are Who do you want to reach Why you are sending out messages to Good Example: Messages aimed at customers of a car dealership service center. Appointment reminders, repair updates, satisfaction follow-up, online bill payment, and 2-way conversations. Bad Example: Text messages are used for our team members to communicate with our customers and partners. Why is it bad? It doesn’t say who you are or what you want to communicate. Call to action/message flow As of November 17, 2022, you're required to provide a clear, concise, and conspicuous description of how an end user signs up to receive messages. Opt-in must be 1 to 1, can't be shared with third parties, and can't be implied. It also can't be obscured within the Terms & Conditions and/or other agreement(s). Examples of how to get users to opt in: Entering a phone number through a website Example: Customers opt-in by visiting www.examplewebsite.com and adding their phone number. They then check a box agreeing to receive text messages from the example brand. Clicking a button on a mobile webpage Sending a message from the consumer’s mobile device that contains an advertising keyword. Example: Consumers opt-in by texting START to (111) 222-3333. Important: If consumers can opt in by texting a keyword, the response should include the brand name, confirmation of opt-in enrollment to a recurring message campaign, how to get help, and a clear description of how to opt out. Initiating the text message exchange in which the message sender replies to the consumer only with responsive information. Signing up at a point-of-sale (POS) or another message sender on-site location. Opting in over the phone using interactive voice response (IVR) technology. Example: "2600Hz: You are now opted-in to our platform notifications. For help, reply HELP. To opt out, reply STOP" Sample messages You must display messages that are unique and provide examples of content you may send so we can tell what the interaction may look like. The sample messages should align with the overall campaign description. We would ideally want to see the identification of who is sending the message (a brand name or sender name), meaning it shouldn’t be a generic description along with generic sample messages where the use case can’t be determined without additional research. Please make sure at least one sample message has Opt-Out language. Good examples: Hello John Doe, this is a reminder about your appointment with John’s Car Dealership on April 2nd, 2021 at 10:00 AM. Please reply YES to confirm your attendance or NO if you are not able to make it. Let us know when you would like to reschedule your appointment. Thank you! Good evening Church family, we are having an in-person worship service tomorrow at 10:30 am. We will also be streaming the service over Facebook Live for those unable to attend. Reminder: tomorrow is the day to bring the donation boxes. Hi %FirstName%! This is Ramiro with 2600Hz. We’d love to invite you to visit our booth at the upcoming Conference, which is taking place virtually and in person from Nov 9-13! Tickets are available now. There will be panels relating to voice, messaging, and 911! Register at http://www.2600hz.com . Will we see you at the conference this year? Reminder from Dr. Smiles, DDS, Hi Jim, we look forward to seeing you at 3:00 pm tomorrow for your cleaning. Reply OPTIONS for Notification Options, or STOP to disable SMS notifications. Visit https://brandedurl.com/optout/ for options or reply with STOP to disable SMS notifications. Bad examples: Thanks for leaving a rating on Google Business. We would like to learn more about your experience. I will contact you soon. I received your question. I will get back to you as soon as possible. There’s a little favor I would like you to help me with, please. Opt-out message Acceptable opt-out language is: End, stop, unsubscribe, and Arret (French) must be separated by spaces. Example: "[Insert Business Name:] You have an appointment for Tuesday at 3:00 PM, reply YES to confirm, NO to reschedule. Reply STOP to unsubscribe." Unacceptable opt-out language: Stop2End Example: Luke's Pizza: Use discount code CHEESE for 10% off of your online order. Stop2End Why is it bad? There must be spaces separating each word
-
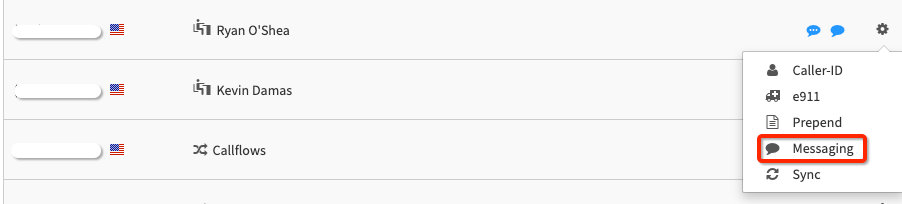
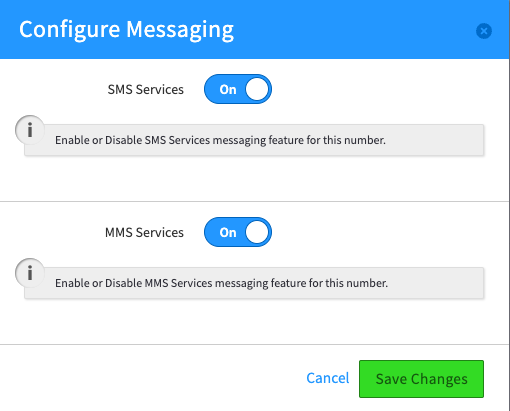
pricing for SMS/MMS for shared hosted can be found here under additional pricing. We strongly recommend registering a campaign with The Campaign Registry first. Unregistered SMS/MMS messages will not be supported and in many cases will not be delivered. 10DLC - The Campaign Registry - Instructions Verify the DID you are wanting to use SMS/MMS is on Bandwidth for the carrier. freecarrierlookup.com Go to the Number Manager app, find the number you are wanting to enable messaging on, select the gear icon, then select messaging. Toggle on or off SMS or MMS Now, you can use SMS/MMS with an app of your choice, or via manual webhook setup to your own app. Example webhook below (follow your specific apps guide) Note: if using textable, follow the guide for “trunking.io”

-
2.4 = Kazoo version 5.1 2.5 = Kazoo version 5.2 NEW FEATURES ON comm.land 2.4 / 2/5 New User Preferences Dark Mode The following is a User Guide for comm.land 2.4 / 2.5 and its workspaces. Installation Guide can be found here The Dock, Workspaces and Apps With comm.land you will have the power of Workspaces and Apps right at your fingertips. What is a workspace? - Our workspaces are a set of core features that always stay updated in the background, regardless of where you are working in comm.land. Current workspaces are as follows: Phone Contacts (Alpha) Conferences (Beta) Faxes What is an app? - This is everything else! The apps that you know and love already can live right in comm.land. Note: Currently only 3 Applications can be used in comm.land - More will be coming, along with App Marketplace Current Apps Available are as follows: Call Center (Basic and Pro - unified) Conferences Admin (Beta) Screenpops Admin (Alpha) Accessing all your Apps and Workspaces - Simply hit the Dock Menu Button in the bottom left corner, and you will see 2 tabs – one for your Workspaces and another for your Apps. Customizing your dock - You can customize your dock by pinning different Apps and Workspaces. You can pin up to 4 Workspaces and 4 Apps to your dock. There is also space for a 5th Workspace and App, which will be the last used Workspace/App that is not pinned. Phone Workspace (with Webphone) By default the Phone Workspace will open with the Call History tab selected, you can select to view Call History, Voicemail, or Parked Calls to the right of the webphone in your Phone Workspace. If enabled, the webphone sits to the left of your chosen call data. Within the webphone, you can “pop-out” the phone to move around your screen or take out of your Phone Workspace. When you have your webphone as a new window, you will have the option to pin your phone back to the Workspace. This is helpful should you lose that new window. The webphone is always available in all App and Workspace pages via the “Phone” icon in the top right. Using the Webphone Simply enter a name (internal), number, or extension. If you enter at least 3 Characters, you will see a search for a user within your office! Click on the user, their information will auto-fill, then you can hit the dial pad to call. Selecting the gear icon, you will see your microphone, speaker and camera settings. You can leave it set as “Default” and it will auto-select your computer's default speaker and microphone. You can also select away from the default, which will stay present until device is disconnected. While in a call, you can open the dialpad, mute yourself, place the call on hold, park the call, transfer, start video or start a screenshare. User Preferences - NEW FOR 2.4! To access the preferences page, click on your user name at the top right corner. Then select “Preferences” Note: The Call Forward toggle will only appear after you’ve enabled this feature in your User Preferences New to 2.4 - Enjoy Light or Dark modes. When entering the User Preferences page, you will be presented with various preferences on the left side that you can set as a user. Personal Information In the Personal Information area you can update your name and email address for your user. Username & Password The Username & Password page you will be able to change your password for your user. NOTE: After resetting your password, you will be logged out and required to log back in with the new password Set your preferred date/time preferences - along with how phone numbers are displayed within comm.land Privacy Set your personal caller ID settings via the Privacy page. Call Forwarding Set your call forwarding settings - ability to ring your other devices or retain initial caller id on forward. Do Not Disturb Set your Do Not Disturb settings for your various devices. Voicemail to Email Enable your voicemail to email and set your email address. Contacts Workspace (Alpha) Easily look through your internal directory, call or email directly from the contacts workspace. Conferences Workspace (Beta) Upon entering the Conferences Workspace, you will see an overview of all the conferences on your account. Your personal conference will be up top. To join a conference, simply hover over the conference row and select “Join.” After selecting join, you will be presented with a set of options to either join by phone or computer Selecting Use My Computer will present you with options to select a microphone, speaker and, if video is enabled on the conference, Video/Camera. Selecting Use My Phone will provide you with the Call-in Numbers along with all the conference ID and Participant PIN that will be needed to call-in. In video conferences you will have the following options: For your personal conferences or conferences you are an admin of, you have extra options. You can force a layout on the screen, including locking it to 1 single user if needed for presenting. You also have the ability to lock or unlock the conference. Locked conferences will block all new users from joining, until an admin has unlocked the conference again. The ability to “Mute all” participants or “Deafen all” is also an extra feature available to conference admins. Faxes Workspace Sending a fax - You can send a fax easily by hitting the send fax button, it will then allow you to choose a phone number to send to and, if you have multiple faxboxes, it will allow you to pick which one to send from. Then simply upload a file you wish to fax. Application Updates Once you have downloaded comm.land to your desktop, you will receive automatic application updates. When this happens you will see a notification asking if you want to restart comm.land and launch the update immediately or later. You can force check for an update via the Preferences > System Information Page
-
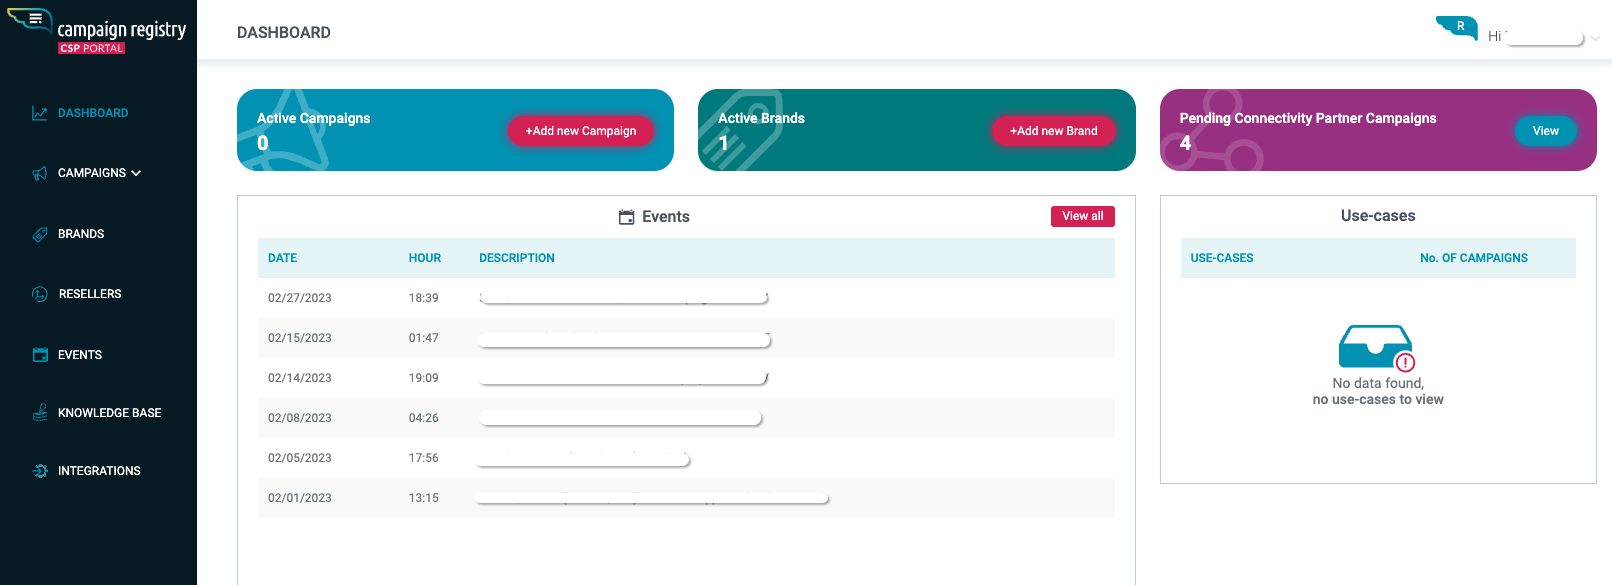
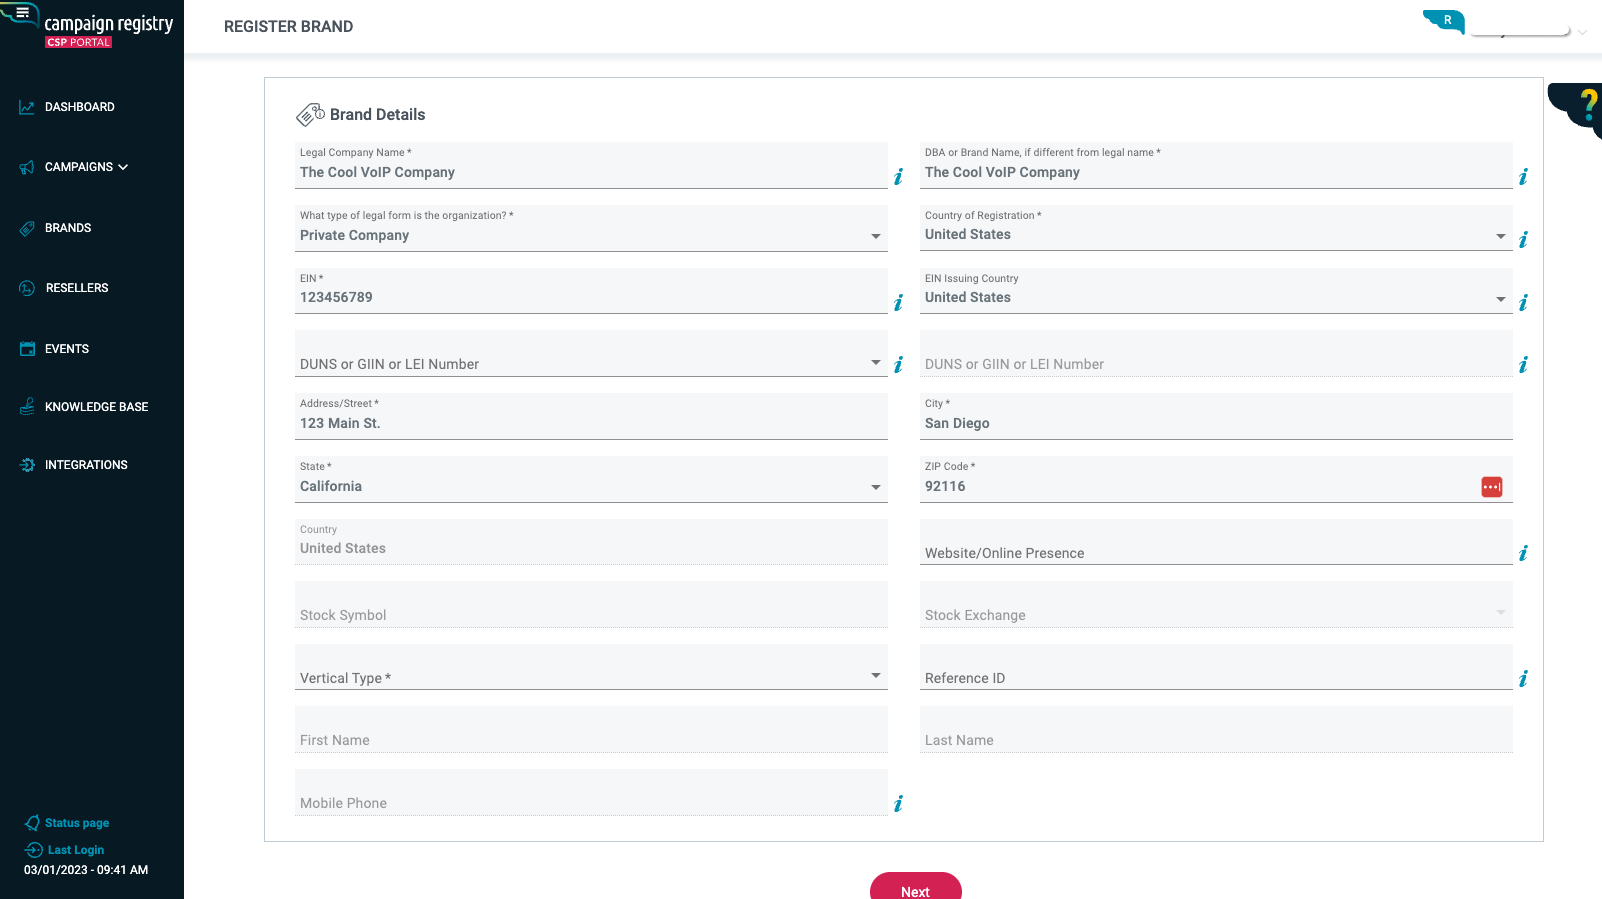
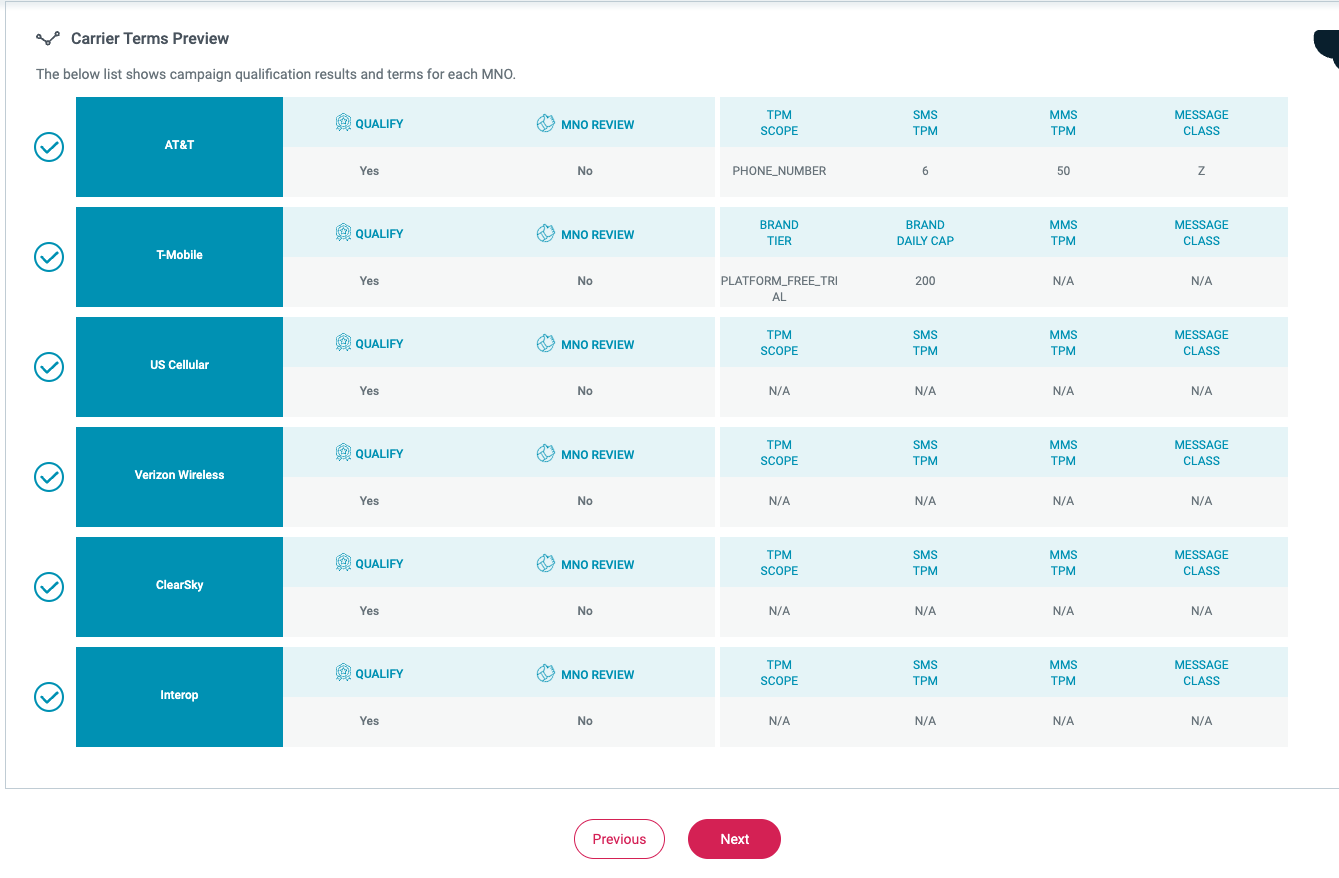
 Please refer to: Campaign Registry - Knowledge Base for more information and how-tos. Verify the DID you are using for SMS is with Bandwidth, can check that here: FreeCarrierLookup Instructions for enabling SMS/MMS The following guide is meant as a basic brand setup and campaign setups to start campaigns. First you will sign up for The Campaign Registry. Once the account is made, you will sign into a Dashboard. Next, you will establish a brand. After establishing a brand, you can then start creating a Campaign Select your use case after selecting your verified Brand. You will then see the terms regarding your campaign type with the various carriers Next, you will need to enter your Campaign information. The information needed will vary based on the type of campaign selected. Next, and most importantly, select 2600Hz, Inc as the Connectivity Partner Next, Simply open a ticket with Support, providing your new Campaign ID, along with the DID(s) you wish to use the Campaign ID with. support@2600hz.com Note: a $15 Campaign Vetting Fee per Campaign will be applied, this is a (DCA) carrier fee separate from The Campaign Registry fees that we have to pass on. All newly created 10DLC campaigns will be subject to manual review and will be placed in a “pending” status until this review is completed. (3-5 business days) $15 fee per vetting event. a telephone number (TN) won’t be able to be associated with a campaign until it's fully approved. Instructions for enabling SMS/MMS
-
2.4.39COMM.LAND-2.4.39.pdf 2.5.6COMM.LAND-2.5.6.pdf
-
Welcome!
-
With the Conferences Admin app, you can customize your conferences, assign conferences admins, and create new conferences. How to modify existing conferences? Simply go to the Conferences Bridges tab, locate the conference of your choice, and click the gear icon. You will then have be able to edit the conference name, ID, and Owner. Selecting the Access tab on the side, you can edit the participant and moderator pins. In the Features area, you can set various options like playing entry and exit tones, along with enabled video conferencing. In the Participant Experience, you can customize how many participants are allowed in, along with audio settings for the meeting. How to make a new conference? Simply go to Conference Bridges, then select the “+ Conference” icon in the top right corner. You will then be presented a wizard walkthrough to set up your new conference. Once complete, you will be able to access your new conference!
-
Screenpops Admin - configure screenpops for your comm.land users. How to Set Up Screenpops NOTE: Screenpops are OFF by default on comm.land. An Admin must login to comm.land and setup Screenpops in order for them to work account-wide. Per user configuration will be coming, but is not present in this first release. First, slide the toggle to enable, then to customize, select the gear icon. You will then be presented with options on how you wish to set up Screenpops. Select the option preferred by account, then select Next. You will then have the ability to select the way in which the Screenpop is displayed. Various built-in system data points are available. You also will have the ability to to add custom parameters to tie in with various other systems. After tweaking how you wish Screenpops to be displayed, you will be able to review it all, before confirmation. Once you confirm, screenpops will be configured and working across the account for comm.land users.
-
The following is a User Guide for comm.land 2.3 and its workspaces. Installation guide can be found here. The Dock, Workspaces, and Apps With 2.3, you will have the power of Workspaces and Apps right at your fingertips. What is a Workspace? Our Workspaces are a set of core features that always stay updated in the background, regardless of moving to other spaces within comm.land. Current workspaces are as follows: Phone Contacts (Alpha) Conferences (Beta) Faxes What is an App? This is everything else! The Apps that you know and love already can live right in comm.land. Note: Currently only 3 Apps can be used in comm.land. More will be coming, along with the 2600Hz Marketplace Current Apps Available are as follows: Call Center (Basic and Pro - unified) Conferences Admin (Beta) Screenpops Admin (Alpha) Accessing all your Apps and Workspaces - Simply hit the Dock Menu Button in the bottom left corner, and you will see 2 tabs – one for your Workspaces and another for your Apps. Customizing your dock - You can customize your dock by pinning different Apps and Workspaces. You can pin up to 4 Workspaces and 4 Apps to your dock. There is also space for a 5th Workspace and App, which will be the last used Workspace/App that is not pinned. Phone Workspace (with Webphone) By default the Phone Workspace will open with the Call History tab selected, you can select to view Call History, Voicemail, or parked calls to the right of the webphone in your Phone Workspace. If enabled, the webphone sits to the left of your chosen call data. Within the webphone, you can “pop-out” the phone to move around your screen or take out of your Phone Workspace. When you have your webphone as a new window, you will have the option to pin your phone back to the Workspace. This is helpful should you lose that new window. The webphone is always available in all App and Workspace pages via the “Phone” icon in the top right. Using the Webphone Simply enter a name (internal), number, or extension. If you enter at least 3 Characters, you will see a search for a user within your office! Simply click on the user, their information will auto-fill, then you can hit the dial pad to call. Selecting the gear icon, you will see your microphone, speaker and camera settings. You can leave it set as “Default” and it will auto-select your computer's default speaker and microphone. You can also select away from the default, which will stay present until device is disconnected. While in a call, you can open the dialpad, mute yourself, place the call on hold, park the call, transfer, start video or start a screenshare. Settings Page To access the Settings page, click on your username at the top right corner. Then select “Settings.” Note: Call Forward toggle will only become present after setting a forward for the first time from the Settings page. Once in the Settings page, you will be able to enable call forwarding (setting a number), setup your Voicemail to email, and the option to select your different devices to set “Do Not Disturb.” Basic Information Page You access your Basic Information by clicking your name in the top right then selecting “Basic Information.” From the Basic Information area, you can set/update things such as your name, email, username and password. You can also set any date/time format preferences and caller ID privacy preference. Contacts Workspace (Alpha) Easily look through your internal directory, call or email directly from the Contacts Workspace. Conferences Workspace (Beta) Upon entering the Conferences @orkspace, you will see an overview of all the conferences on your account. Your personal conference will be up top. To join a conference, simply hover over the conference row and select “Join.” After selecting join, you will be presented with a set of options to join either by phone or computer. Selecting Use My Computer will present you with options to select a microphone, speaker, and, if video is enabled on the conference, Video/Camera. Selecting Use My Phone will provide you with the Call-in Numbers along with all the Conference ID and Participant PIN that will be needed to call-in. In video conferences you will have the following options. For your personal conferences or conferences you are an admin of, you have extra options. You can force a layout on the screen, including locking it to 1 single user if needed for presenting. You also have the ability to lock or unlock the conference. Locked conferences will block all new users from joining, until an admin has unlocked the conference again. The ability to “Mute all” participants or “Deafen all” is also an extra feature available to conference admins. Faxes Workspace Sending a fax - You can send a fax easily by hitting the send fax button, it will then allow you to choose a phone number to send to and, if you have multiple faxboxes, it will allow you to pick which one to send from. Then simply upload a file you wish to fax. (15mb max) comm.land Application Updates Once you have downloaded comm.land to your desktop, you will receive automatic application updates. When this happens you will see a notification asking if you want to restart comm.land and launch the update immediately or later.
-
Hello! and welcome!
-
I do like that idea @Rick! @SkunkbeardWe will talk about this topic a bit here in this weeks T(w)IL.
-
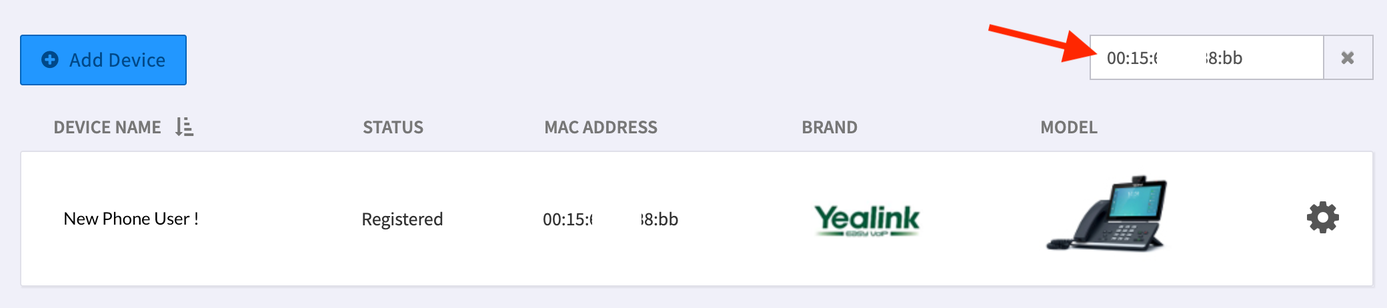
Find a Device using its MAC Address Trying to track down who stole that phone out of the storage room, or off your desk? Here’s how to search for it, using its MAC address: Open the Provisioner Doc Use the Search field and enter the known MAC address there. NOTE: Advanced Provisioner will only find these phones if they were provisioned originally through its application. If a phone was provisioned through SmartPBX or Callflows, it will not find the MAC address.
-
ryan. changed their profile photo
-
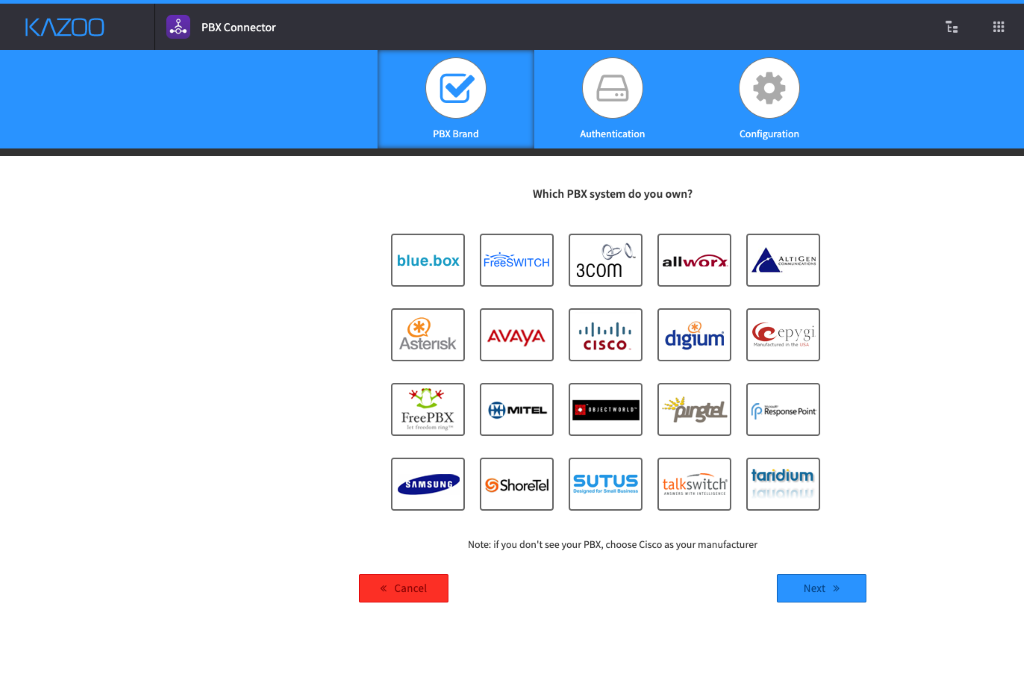
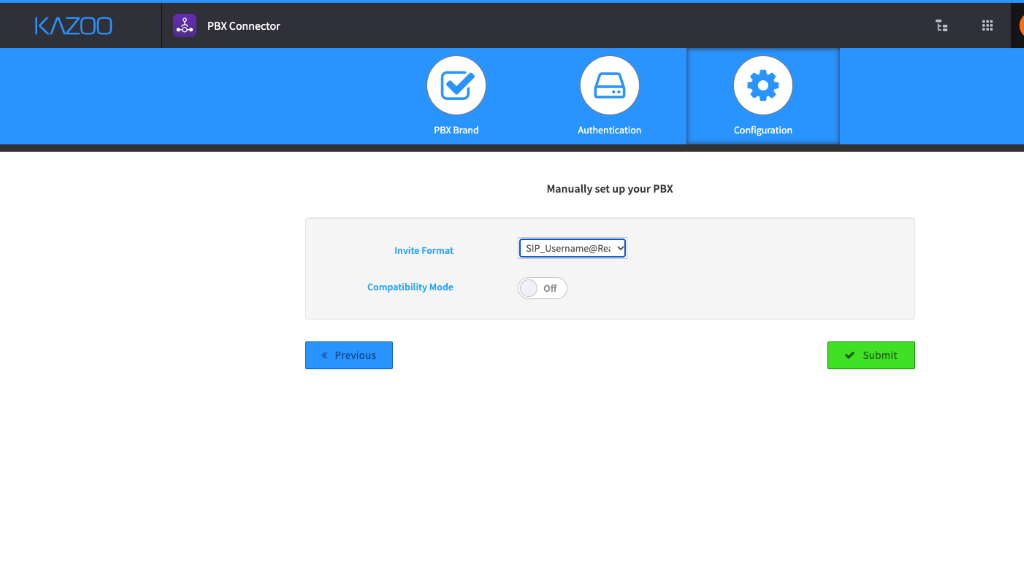
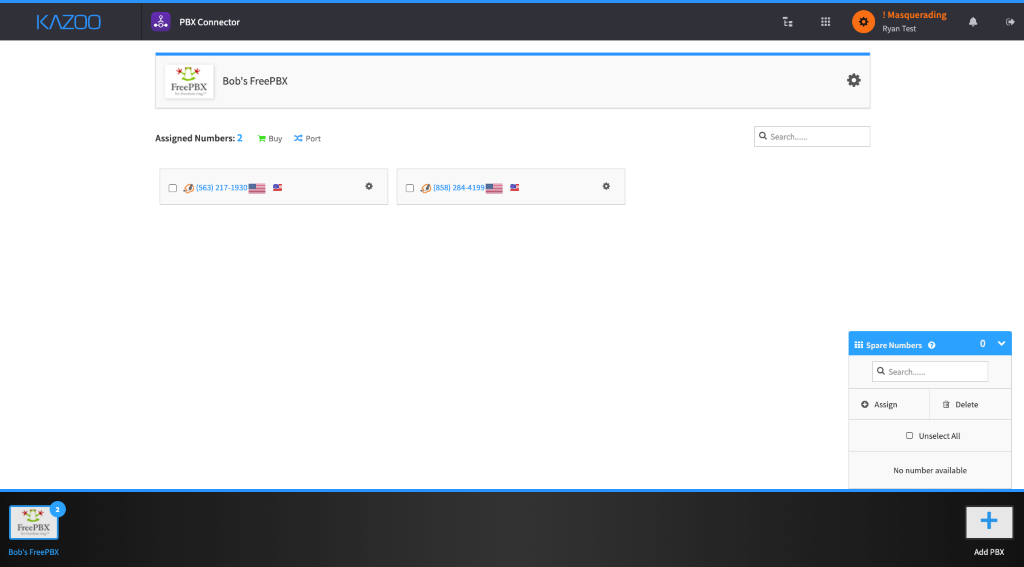
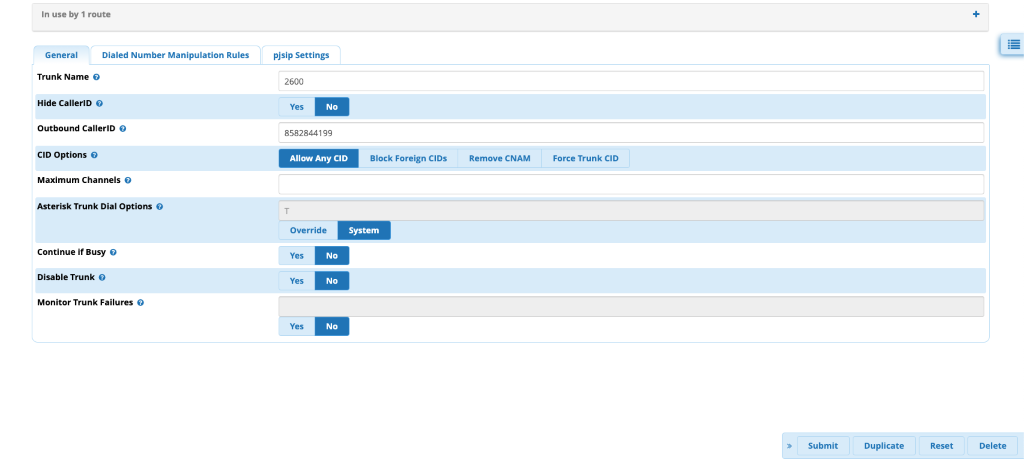
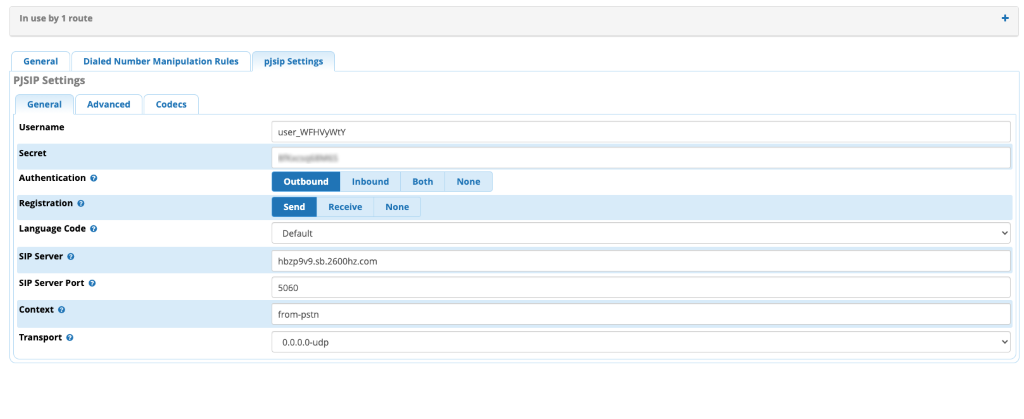
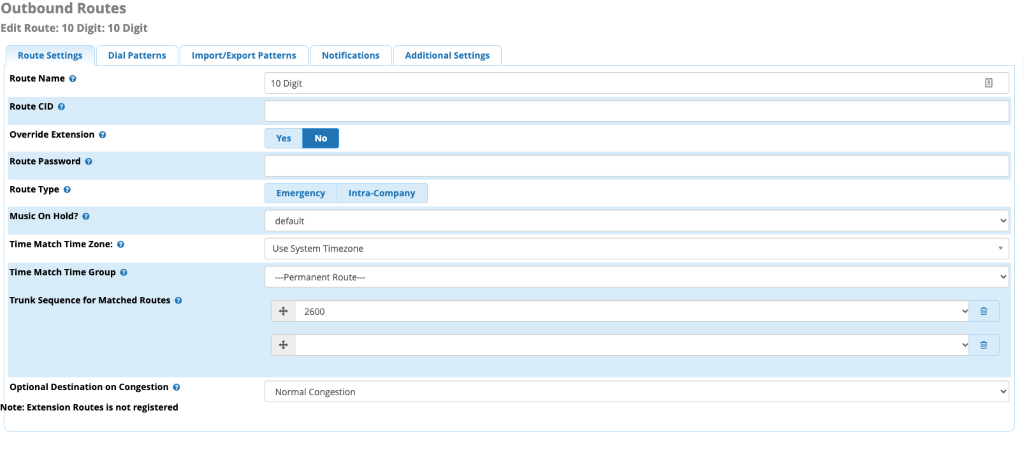
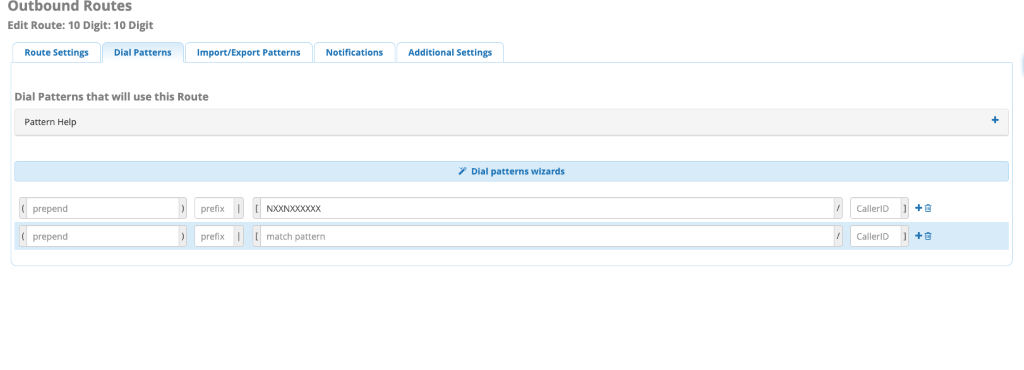
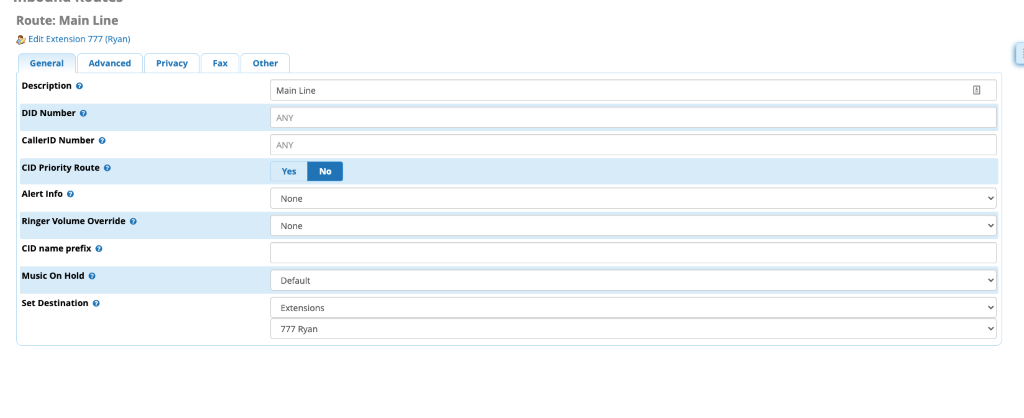
PBX Connector – Free PBX Hello! This is a little step by step guide for using the PBX Connector to connect to a legacy FreePBX Box. This is just a little for "fun" guide I cobbled together, thought I would share with the community. If you have an old FreePBX box with a bunch of FXS cards that you do not want to part with you can use this to create a SIP Trunk between your new KAZOO services and your legacy gear, making the move to newer cloud services easier. First open PBX Connector and Select FreePBX Do you want to authenticate this PBX with a Static IP or Domain, select NO –Copy the username, password and realm. That information will be needed for the FreePBX configuration. Change the invite format to SIP_Username@Realm - Then hit submit Simply add the numbers you wish to use on the other PBX and you are now done with this side of the configuration. Once logged into your legacy FreePBX system, go to Connectivity>Trunks Add new chan_pjsip trunk - Name it whatever you would like. Set the caller ID if you would like as well. Go to PJSIP Settings put in the username, secret (password) SIP server (realm) and SIP server port (5060) - Submit and apply settings, the trunk is now added but not functional until inbound and outbound routes are set. --------- Below are examples of routes you could do in FreePBX that you will need in order to make and receive calls via PBX Connector on FreePBX, these obviously will change based on your specific needs but the example should work in most use cases. Connectivity>Outbound Routes>Add new route Name the route (example 10 Digits) , select your new trunk to tie this outbound rule to your trunk. Add your dial pattern from the Dial Pattern tab – Submit and apply (repeat for various other outbound rules – examples, 911, Long Distance, Toll Free, International) Connectivity>Inbound Routes>New Route You can simply set this to ANY and ANY to route any number you assign to the system to a specific spot, or you can set each DID one at a time to go to specific spots. Submit and Apply Now, you should be able to make and receive calls to your legacy FreePBX box.