Search the Community
Showing results for tags 'smartpbx'.
Found 21 results
-
 Monster App Choices SmartPBX vs Advanced Callflows vs APIs User Story A new user wants to understand what application to use for getting started with and managing and maintaining their account. They are confused about whether to use SmartPBX, Advanced Callflows or system APIs. A new user is looking to understand how these applications interact with each other. Overview It’s important to understand both SmartPBX and Callflows access the same back end database and use the same APIs to transfer data. Edits from one app will reflect in the others the next time you load it. Some apps however, do not provide access to certain settings, either because it is considered more complex and requires admin level understanding, or the setting was added as a new feature not yet updated in an older app. This document will share recommendations on when to use each configuration method. In addition it will review some 2600Hz history to give context to the applications and how they evolved. In short Your administrator will likely use Account Manager for your initial account setup. Once your account is accessible, Smart PBX is often set as the default application you see when logging in. Use SmartPBX for account maintenance and management whenever possible. It is the most current and most user friendly app for your initial setup. Use Callflows if you are an administrator and want to set up some more advanced, complex features for your client. Use KAZOO’s powerful API library if none of the options above provide a feature you require, if your process is a back-end calculation or for automation needs that do not need user input. Note: API use requires a developer who is comfortable using JSON APIs in their preferred programming language, is familiar with Kazoo configurations and reading Kazoo docs. A summary chart of what functionality can be managed in each app is available at the end of this document. For a detailed overview comparing access to each setting in Callflows v. SmartPBX, go HERE. Set up your Initial Account with Account Manager This will be accomplished with your Account administrator. Once your initial account has been set up, you will want to personalize it according to your office requirements. Get Started with your personalizations with SmartPBX Once your account has been set up by an administrator it’s best for as much configuration to be exposed in SmartPBX as possible for End Users to see. Spend some time stepping through the application and working with the features available for you. We have a series of User Guides available also, HERE NOTE: Make sure you associate a “Main Extension” to your user name in SmartPBX. This is required for the comm.io app, and is not available to add in Callflows. (This is an example of the newer app supporting newer features). If you have set up your user in Callflows already and want to use the comm.io softphone, refer to the comm.io installation and setup document, HERE. Advanced Functions using Callflows If it’s not possible to complete your objectives using SmartPBX, use Advanced Callflows. Some common advanced functions callflows excels at include: Creating sub-menus for incoming calls (e.g. Spanish speaking and English speaking). We have a document HERE that outlines this setup. Creating secondary, tertiary, etc. callflows. For example for multiple locations/companies in a single account. Creating custom feature codes Using APIs to develop further customizations Both SmartPBX and Advanced Callflows ultimately use the same APIs, they are just viewed in different ways. If there’s some function in the Kazoo GUI that you need to do very often, often enough that it’s not efficient to use the GUI, this is an occasion where you use APIs. Some common uses for accessing the API directly include: Processes not supported by SmartPBX or Callflows Integrations with other programs that also use APIs. Examples include billing programs, integration with Salesforce or web pages, etc. Repetitive processes that can run in the background and do not need user input (for example, some billing functions). To start learning the API syntax, watch the network tab and see what APIs are being called while you complete your task in the GUI. Then check the documentation to be sure you fully understand what the API call is actually doing. And write your code to replicate it. All the documentation for our APIs is available HERE. Anything that can be done in our GUI can be done via API as well. Simply open your browser’s development tools feature, watch the network tab and see what APIs are being called while you complete your task in the GUI. Reconcile this with the API the documentation to be sure you fully understand what the API call is actually doing. And write your code to replicate it. Notes: Not all APIs are considered stable and available for end user use. Please be sure your API is supported before using them. Please take special care and do extensive testing if you want your application to work with SmartPBX. When developing using the API always develop against a sandbox environment. Never code against a production cluster. An example configuration using multiple KAZOO applications Below are some example configurations where more than one application is accessed. These include helpful tips on the most efficient ways to achieve this. Build a sub-menu into your main number incoming call routing If you want to build a sub-menu into your main number config (for example to support multiple languages or departments), this is not possible to do in SmartPBX. Here’s a trick we use to streamline this process: First, in SmartPBX. build all your ring groups for the sub-menu Second, in Callflows, build the callflow for the sub-menu. Instead of building the menu options all from scratch, use the SmartPBX ring groups you just made. Third, while still in Callflows, name the callflow and enable the “List this callflow in Main Number” check box. This will allow you to use the advanced callflow as an option back in SmartPBX’s main number section. With this example, your end users will be able to change the members and order of the sub-menu’s options via the SmartPBX groups section. This keeps the complexity of Advanced Callflows abstracted away from user, and allows them to manage the details of the process using a familiar interface, SmartPBX. Sample of application best uses Account Mgr SmartPBX Callflows APIs Initial Setup ✔ Add/Edit Users and Devices Global Setup User Edits Basic Settings: Office / Holiday Hrs Hold music Incoming call routing Default language interface Billing settings Global Setup User Edits Ring Groups Create Here Trunking Controls Admin Setup Admin Edits Sub menus for incoming calls Create Ring Group First Attach sub menus to Ring Group Background of KAZOO’s development and updates When the KAZOO project first started over 10 years ago, everything was done via json APIs -- there was no GUI (Graphic User Interface). The expectation was the KAZOO platform would serve as a robust engine for companies to use as their back-end and that those companies would build their own GUI to best fit their customer’s needs. KAZOO is extremely robust and with this comes complexity however, and many of our clients didn’t want to spend time diving into API docs before they even knew if a project would work for them. They wanted a quick and easy way to set up an account to test our wares. To support these developers 2600Hz made a very basic GUI for the APIs to enable a quick and easy setup for a testing environment. This original GUI didn’t expose all of the APIs or even all the features of the APIs but it gave developers a head start. Once they felt confident in the platform, developers used it to enable them to build custom GUIs. This served our clients who are sophisticated programmers in their own right well, and they created unique applications as we imagined, and still do. Their solutions are elegant overlays to the KAZOO engine. As we grew however, resellers started using the original tool to set up and maintain end user accounts; they requested we provide a more friendly way to enable their end users to personalize and change their account details without constant support. This was the driving force behind our Monster-UI framework and SmartPBX application. SmartPBX was built as a general use GUI for Kazoo, one that resellers could hand off to end users. In making the system more friendly to non-programmers however, we reduced the configuration offerings to a core that most accounts need. To continue to keep some more complex features accessible for advanced administrator use we ported in the old UI as the Callflows app. Some challenges remain with this multi-tiered approach. Because SmartPBX and Advanced Callflows share the same APIs, you could see callflows created by SmartPBX in the Callflows app, setting an expectation that users could also edit them. We needed a way to track where the input came from and how to edit it. To solve this, 2600Hz added metadata to the json API indicating what app that created the callflow. And elements made in SmartPBX were hidden from Advanced Callflows. This is the state the system exists in today. While most now use Monster UI and SmartPBX, some companies still use Kazoo strictly as a back-end system and use their own GUIs. Developers are still welcome to use the APIs to build their own GUIs. For those developers wanting to use the APIs, but also wanting to use Advanced Callflows, SmartPBX and other Monster UI apps. This is possible as well. When doing this, however, please take great care in your code to match the formatting that Monster UI apps use as closely as possible. Remember not every single feature of the APIs is available in SmartPBX or even in Advanced Callflows, and SmartPBX expects very particular formatting to work correctly. In all scenarios, thoroughly test your code against a sandbox environment before deploying to production systems. Additional Resources SmartPBX User Guide Account Settings Access: Callflows v. SmartPBX Advanced Callflow configurations and setup API References docs.2600hz.com Callflows - Kazoo API Reference REST API Reference for Kazoo Crossbar API
 -
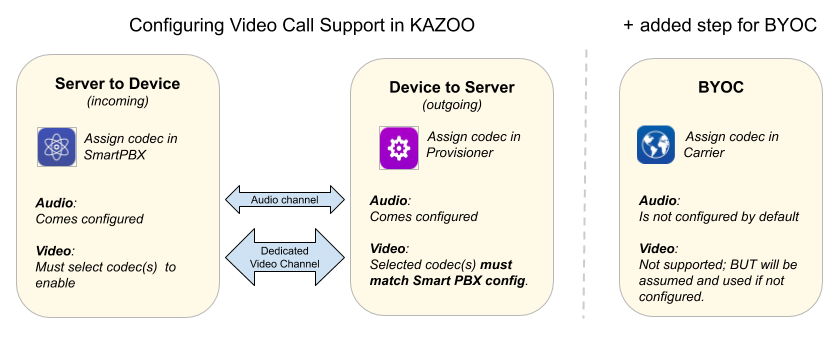
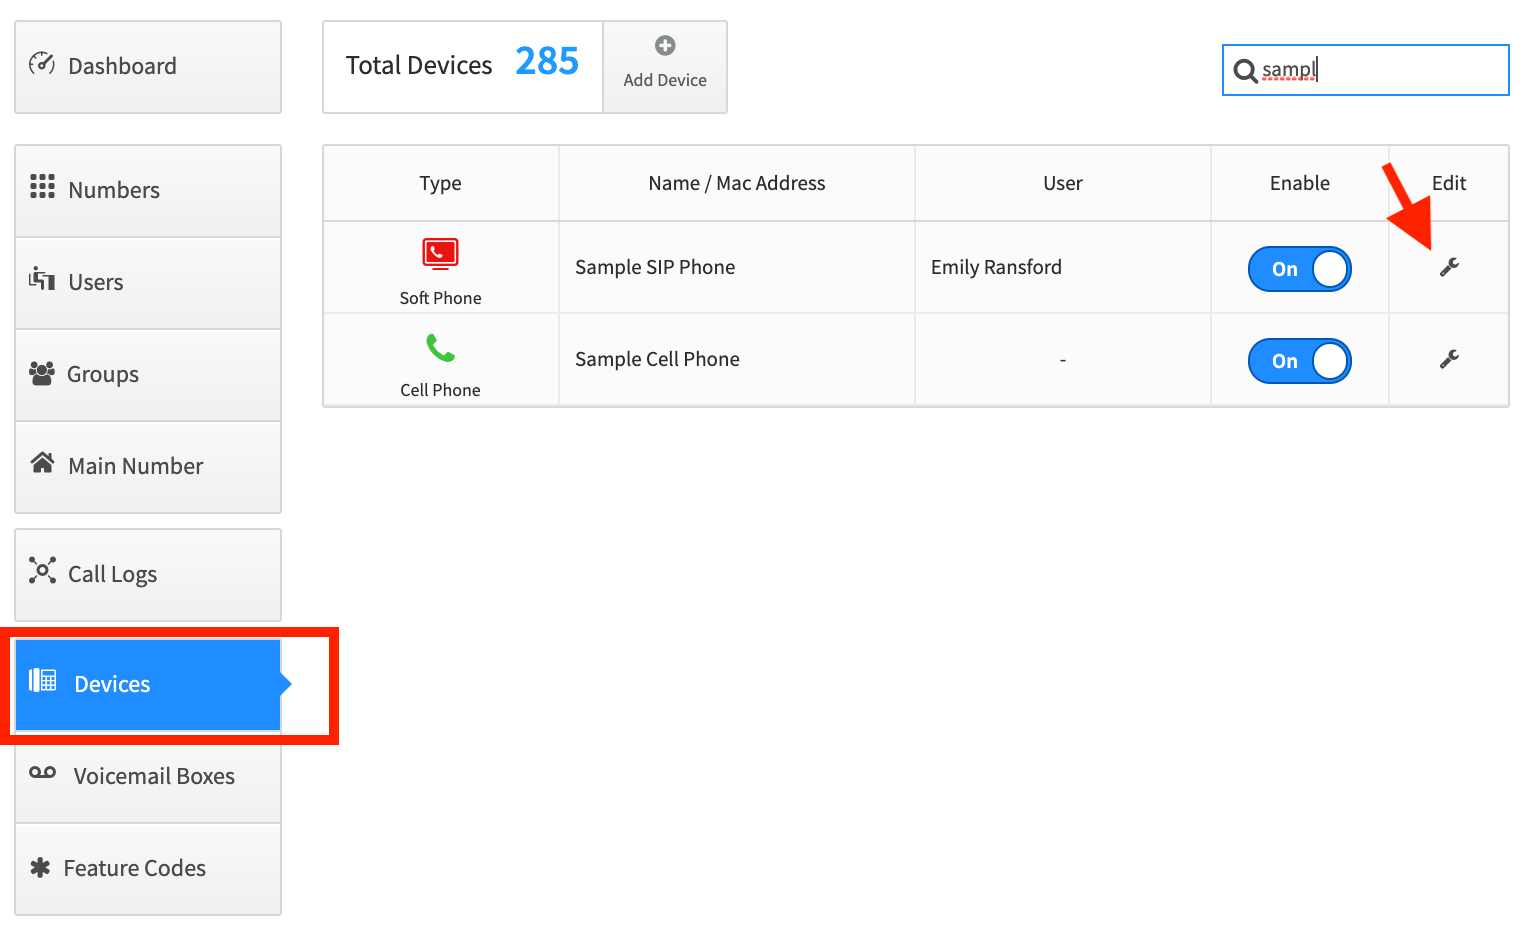
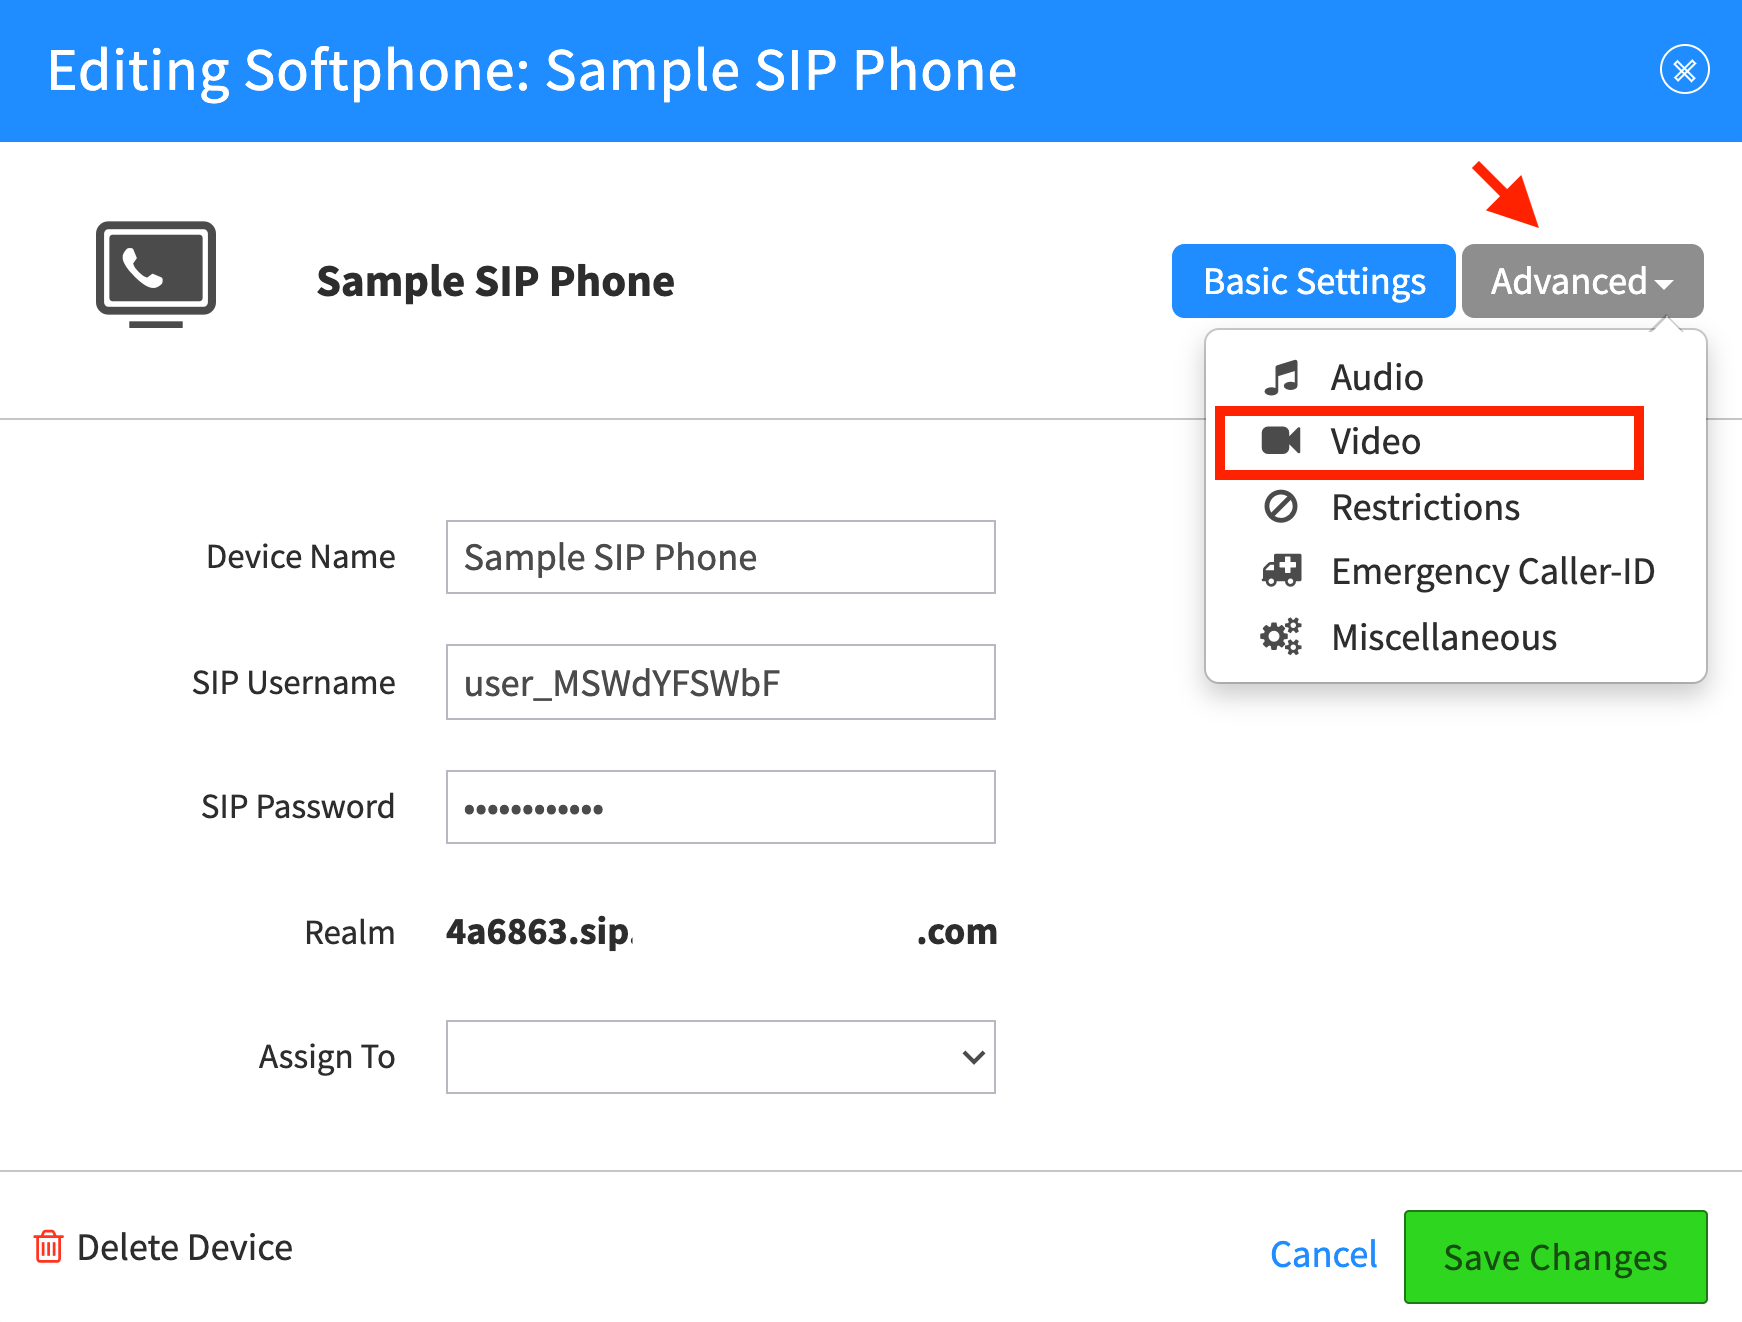
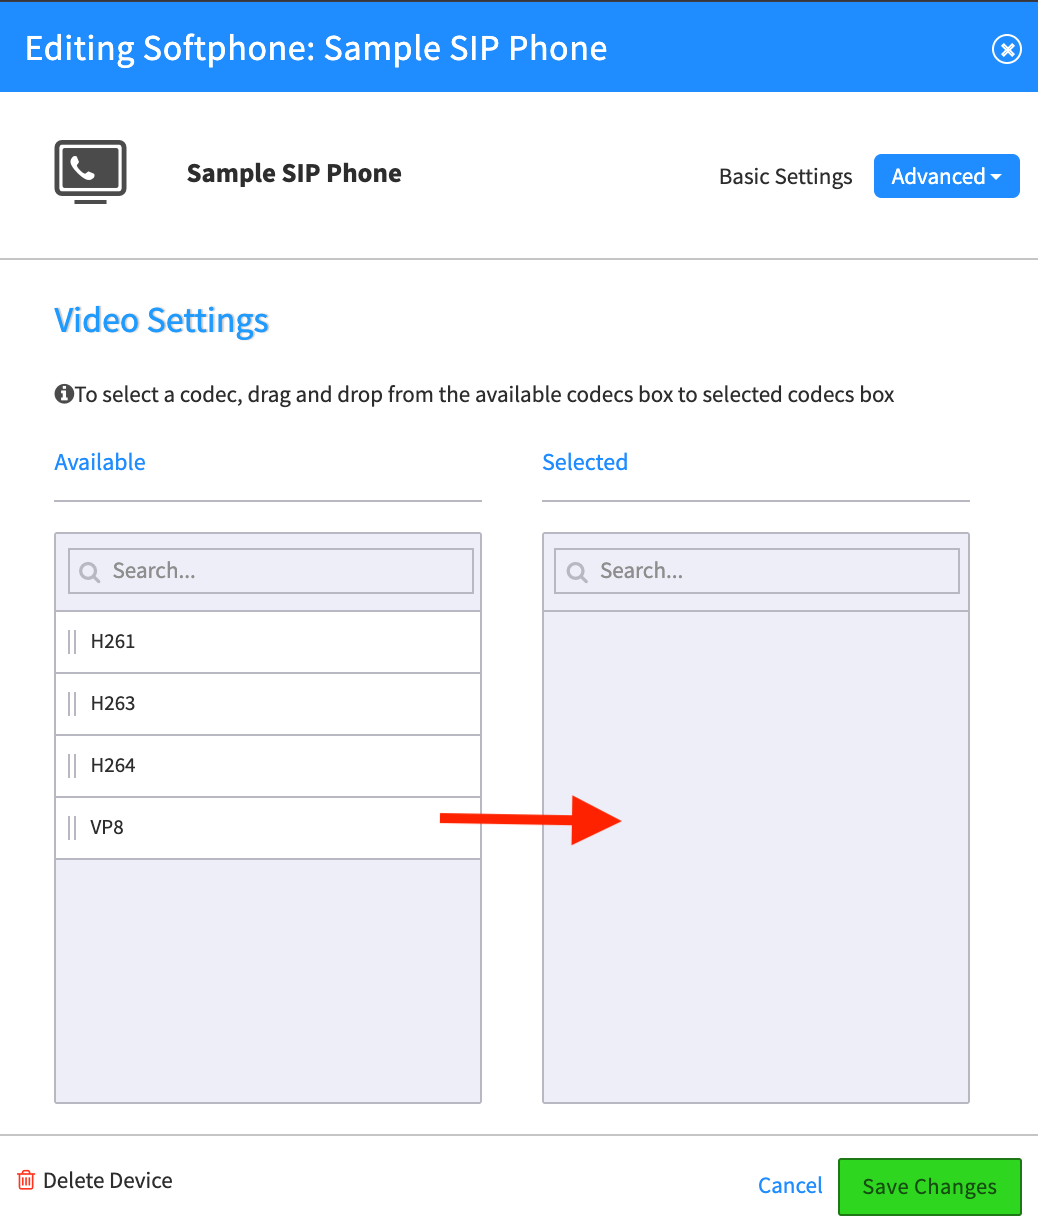
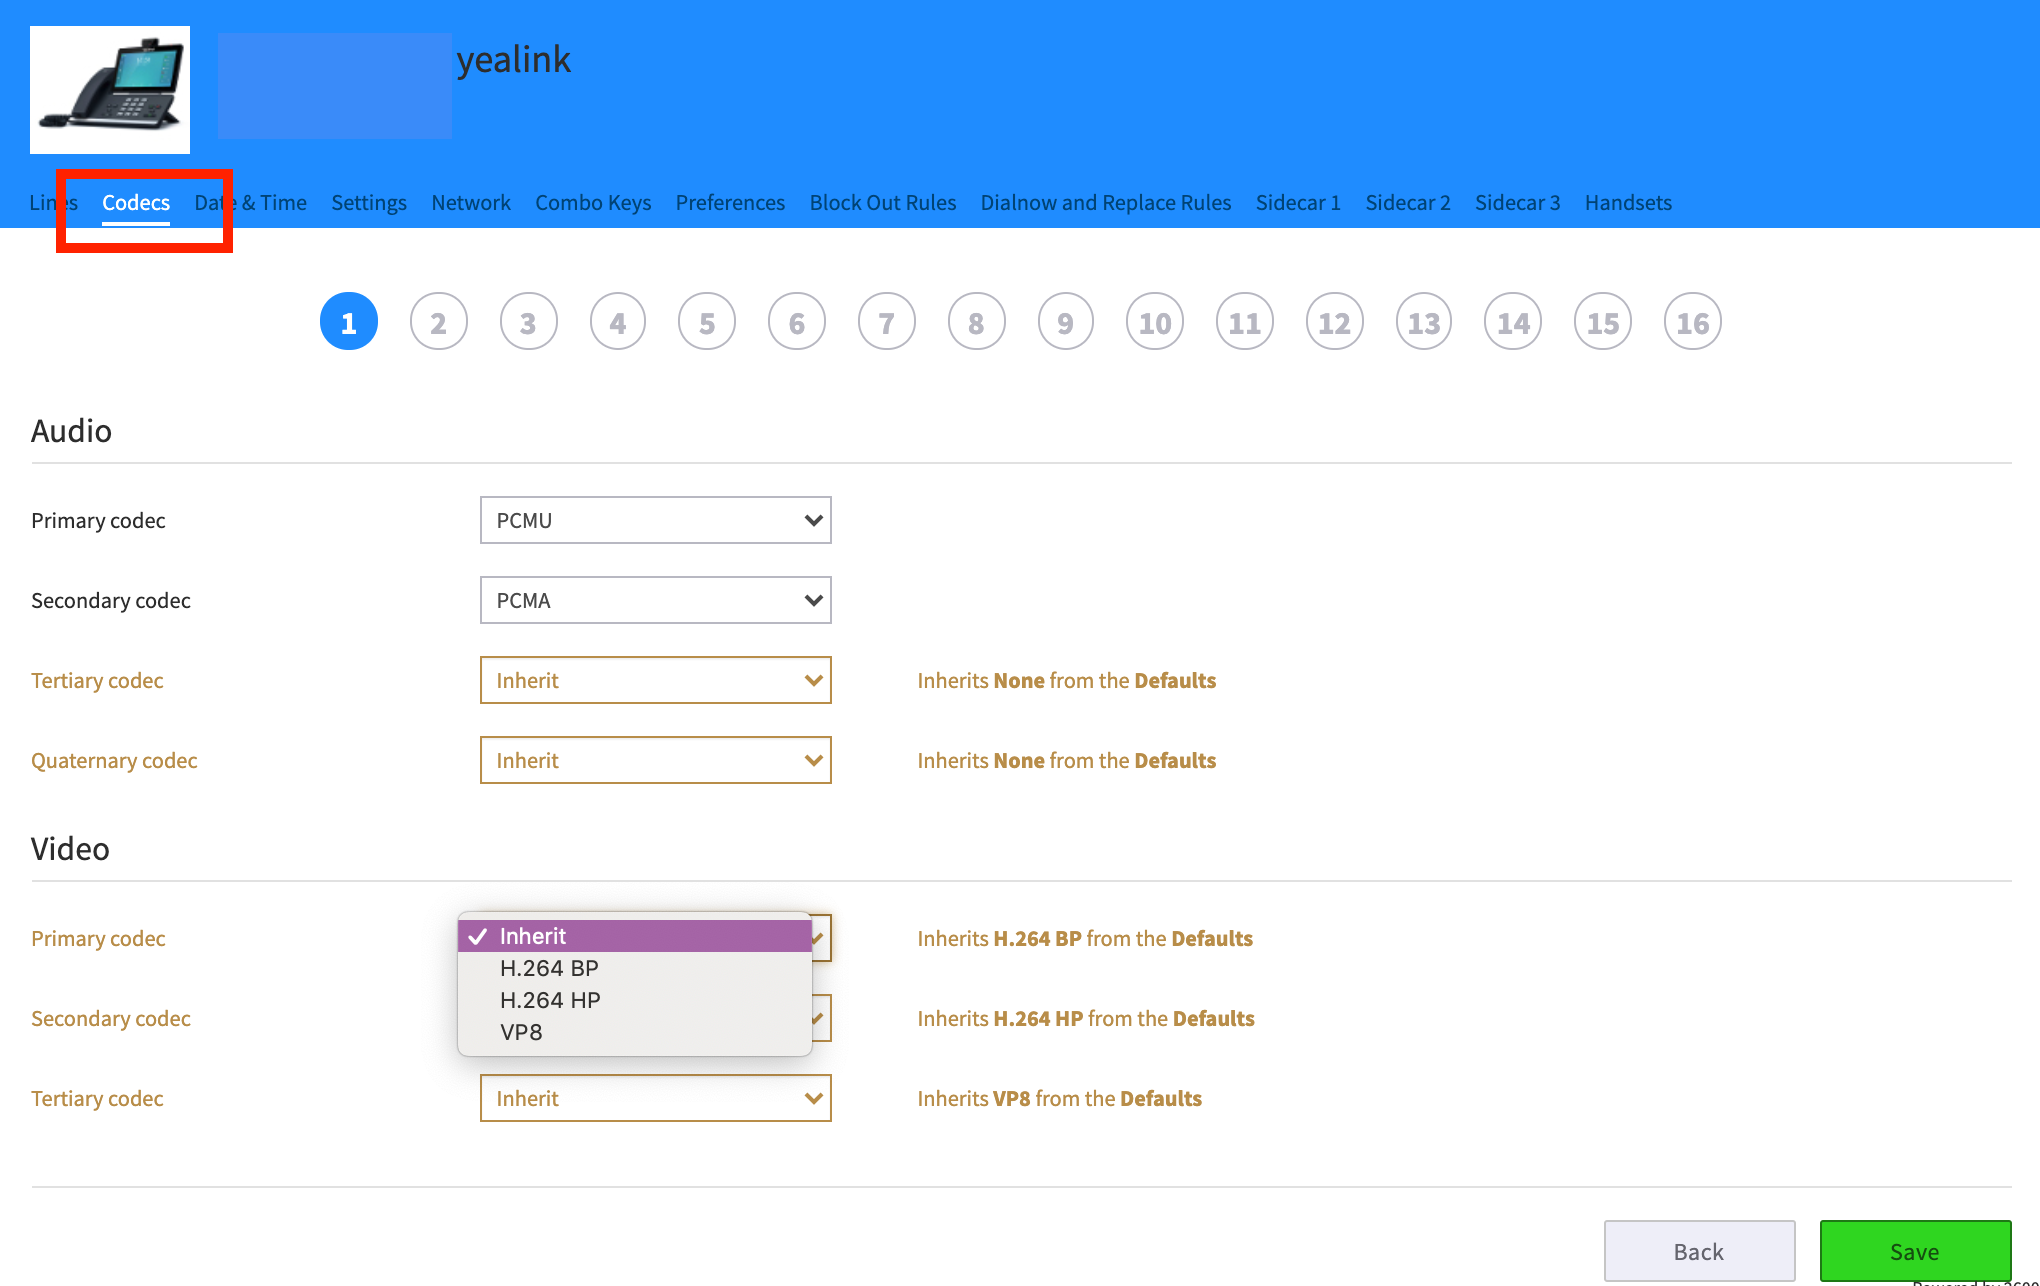
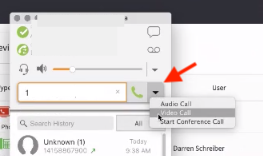
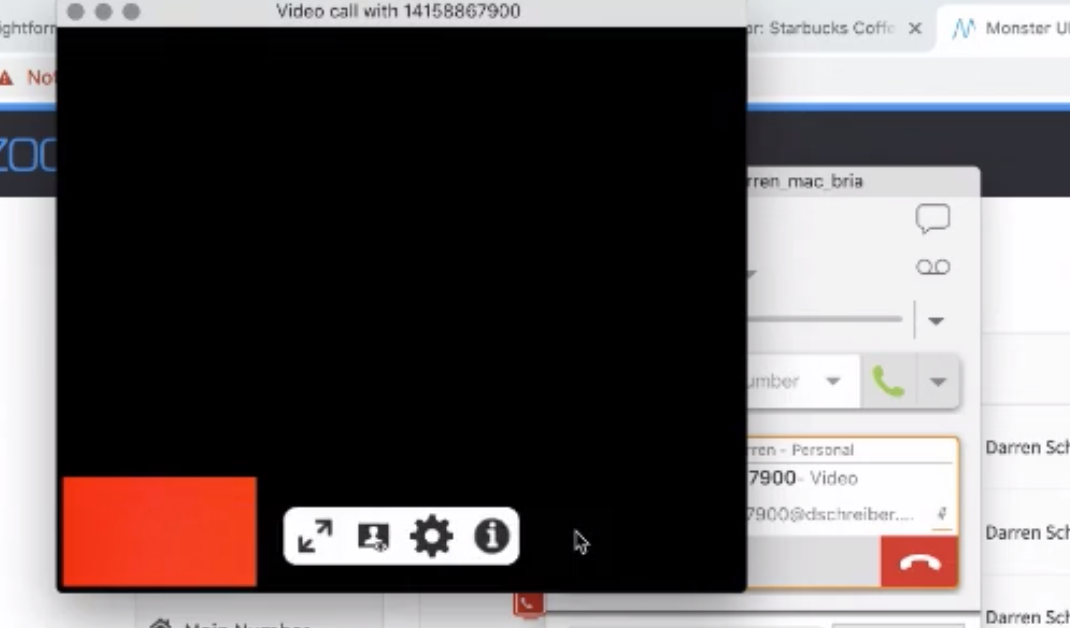
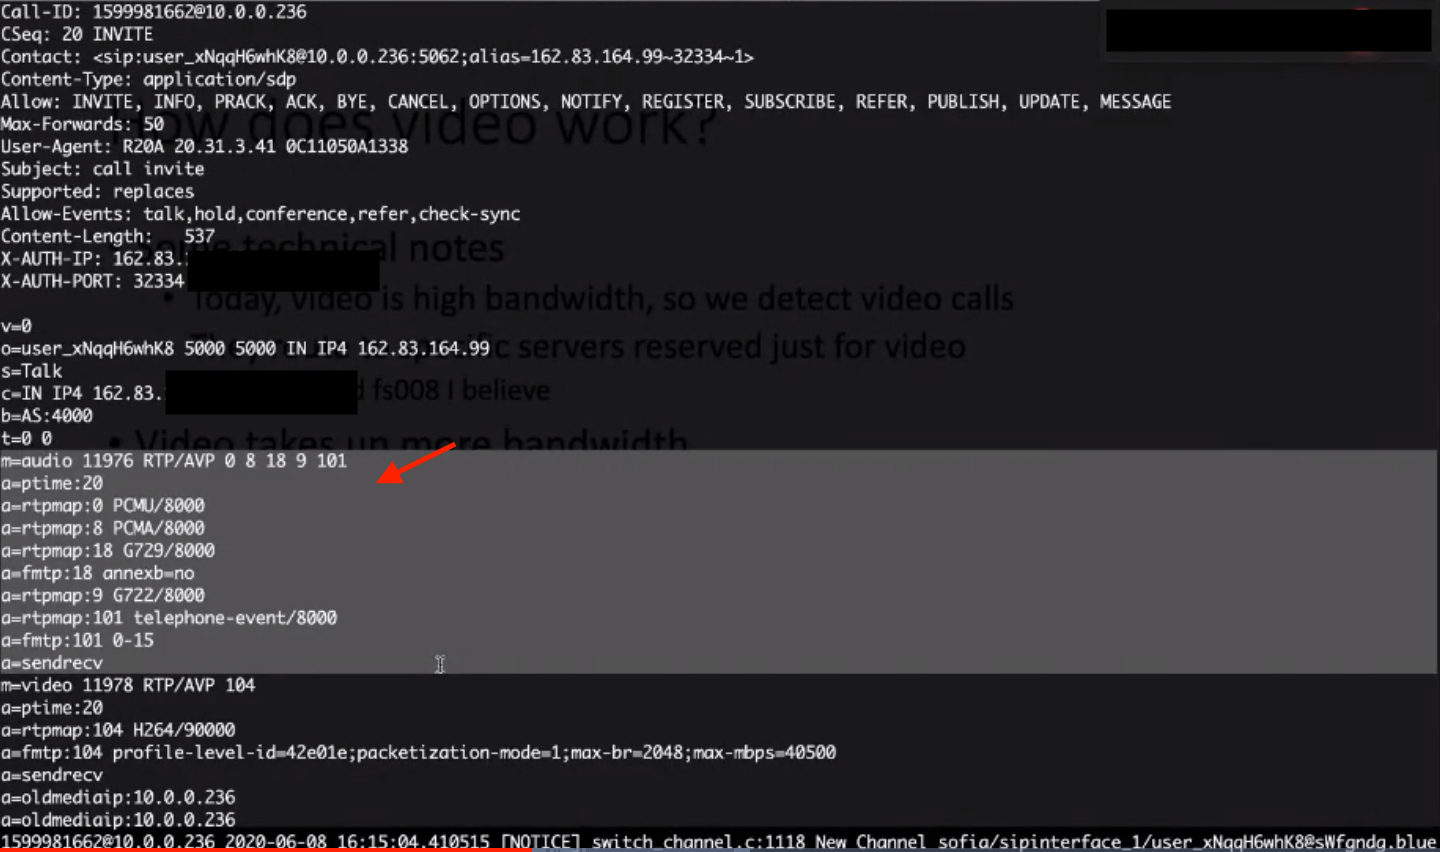
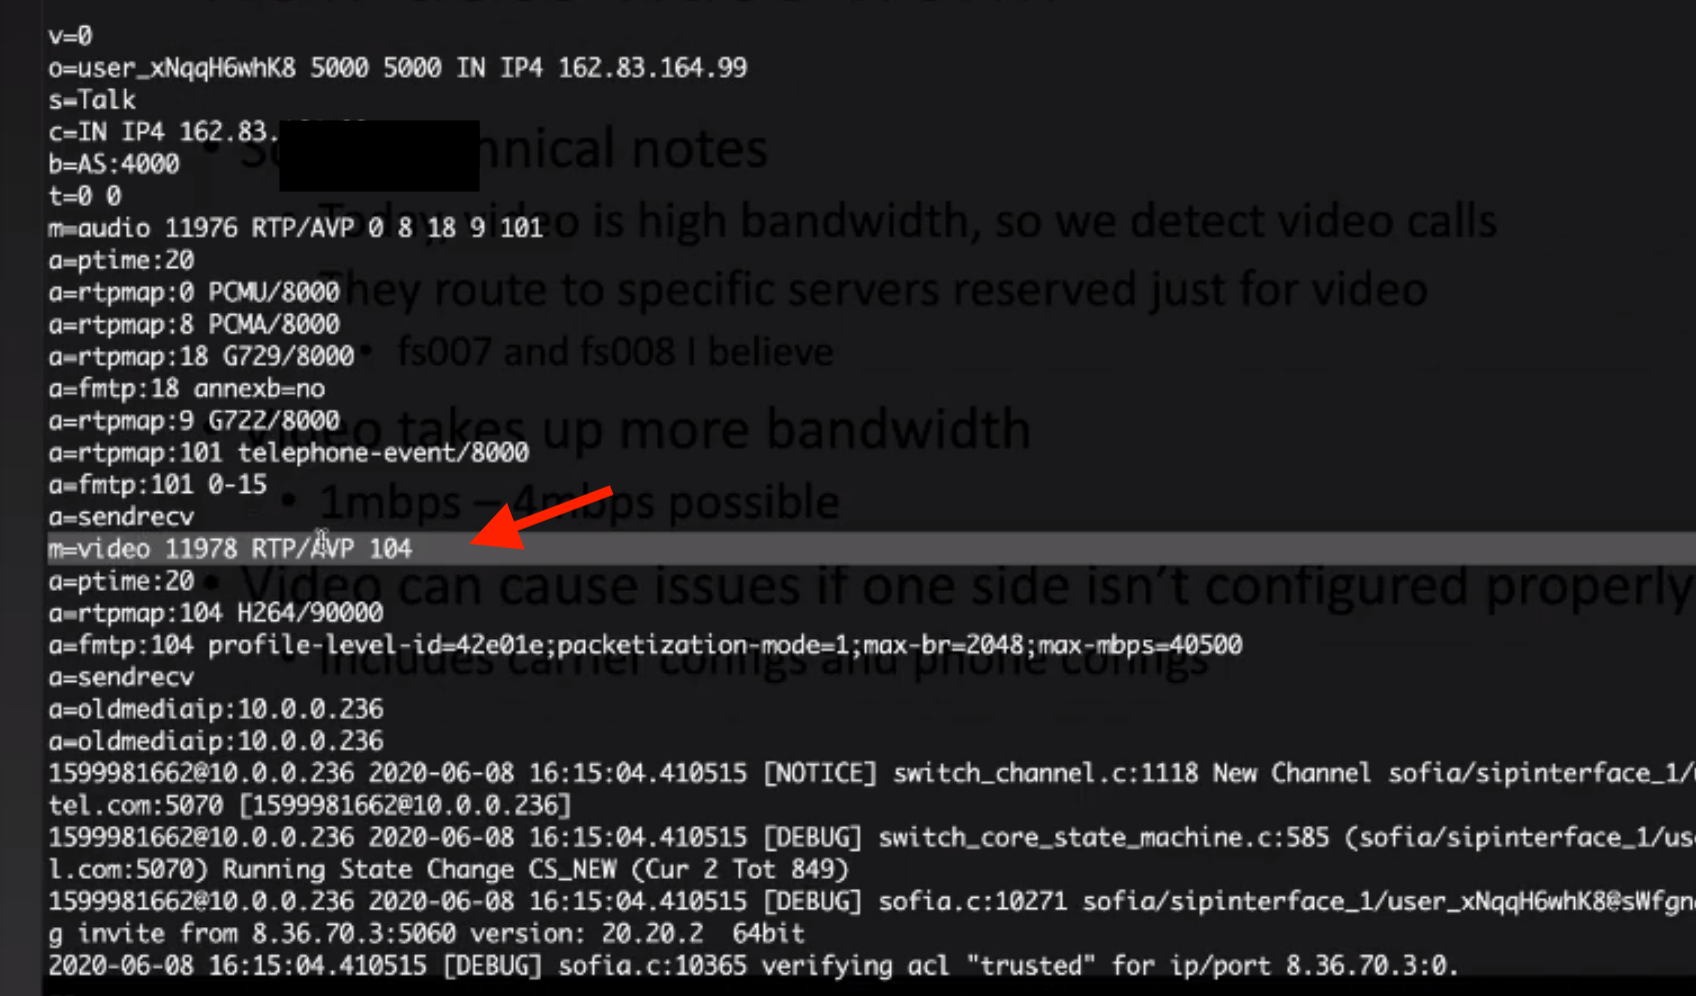
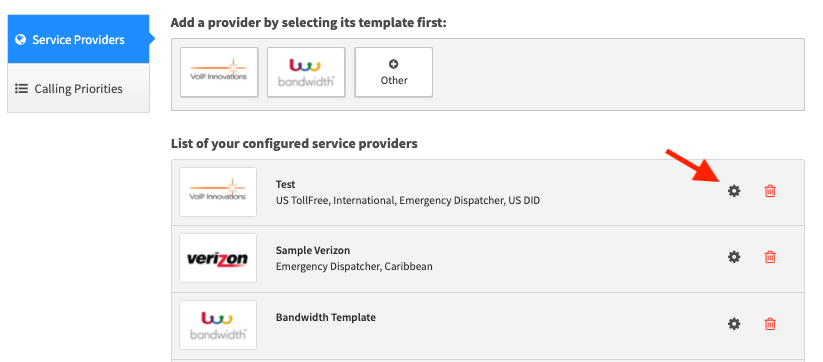
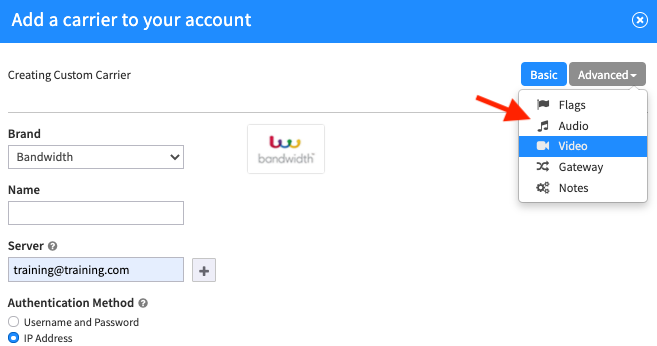
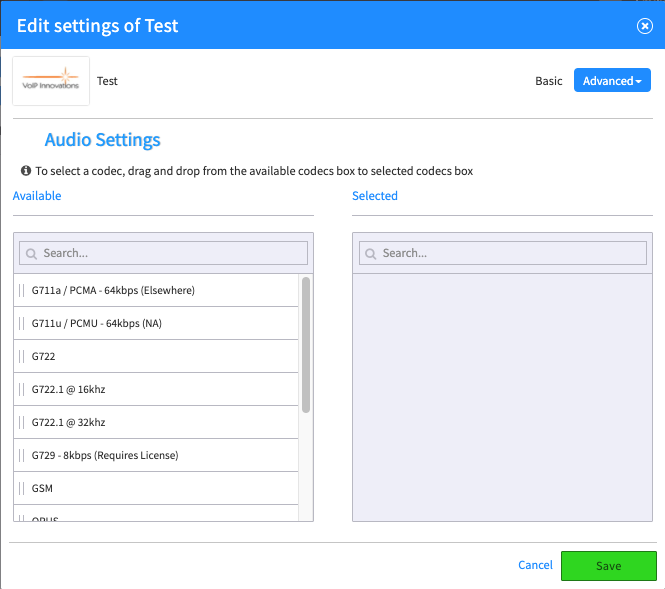
 Configuring Video for use on the KAZOO Platform User Stories A user wants to enable a device so it supports video calling between two office desk phones A user wants to call into a KAZOO video conference using a video-enabled desk phone instead of a laptop. A user wants to allow video replay and/or online streaming on an office phone (to replay a saved video call for example) using the KAZOO platform. Overview Video Calling Video is an image capture process that takes a rapid amount of still pictures at a source, compresses the data, and transmits the packet across phone lines. The recipient unpacks them and replays the sequence to show movement, or “video.” Some notes about the transmission: “Frames” are single images, transmission is described in “frames per second”, or FPS. Typical compression is 20-30 frames per second. Lower rates and lower resolution means you will see a stuttered, jagged result. The resulting “video” is a stream of these captures. As with any images, video takes up significant data bandwidth to transmit. To help mitigate this video uses one of several compression algorithms which collectively are referred to as “CODECS” (short for “COder-DECoder”). CODECS Compression CODECS refers to the format for compressed data transmitted across devices (including WebRTC, Softphones, mobile devices, comm.io). Some formats compress audio only, others compress audio and video. There are several different compression types available today. To successfully transmit these files, both the originating device and the receiving device must be equipped with the same codec compression interpreter. If a device transmits H264 video, then the receiver must be able to “read” that. Your office desk phone and your laptop application for example, must be able to talk in the same language. Common audio formats used by telco devices include .mp3 and Opus. Popular compression formats for video are H263, H264, and the newer Google-developed VP8. Audio and the KAZOO Platform All KAZOO Platform calls assume (and require) audio CODECS. Audio is typically set by default, and users can fine tune those settings in either our Provisioner setup or the SmartPBX app. KAZOO includes support for the most common audio formats. This audio information will be sent to the corresponding phone hardware so the two are synchronized. Video and the KAZOO Platform Video is optional as its transmission takes considerably more bandwidth and can lead to an additional charge to your account. To support independent control over video, the KAZOO platform transmits audio and video on separate ports for each call. In order for the sending and receiving devices to share video, they must both recognize the same CODECS data. This requires an intentional setup in both SmartPBX and the Provisioner app. Enabling Video Calls To use video, you will need to enable it for your devices in your user account. This is a two step process. Since the call origination device (whoever starts the call) is what picks the algorithm, or the “rules.” As your system will do both, you will need to provide available compression settings for both sending and receiving instances: Server to Phone (using SmartPBX) and Phone to Server (using Provisioner) Below is an illustration summarizing the process. Before you start Confirm the video format(s) that are supported by your devices. The most common include H261, H263, H264 and VP8. CONFIGURE VIDEO SETTINGS FOR SERVER → PHONE TRANSMISSION This setting is defined in SmartPBX. Here you will define Server to Phone connections. NOTE: If the two settings do not match you will get “incompatible destination” errors. To set these preferences, go into SmartPBX Select the Device tab to the left. Search for your device, and select the Edit icon to its right From that dialog, select the Advanced Tab, and then Video from the drop-down menu. You will see a screen that shows a list of video compression options. Drag the compression types you want to recognize to the Selected column. NOTES: By default, there will be no options in the Selected column. This effectively means video is not enabled. To enable a video type, drag the compression style your devices support to the Selected column. VP8 is currently the most popular, as its compression has the best results and there is no license fee related to it. Most newer devices prefer it for these reasons, so if your devices support it, it’s recommended you use it as your primary selection. You can move more than one codec to the Selected column, and drag them into a preferred priority. SUCCESS !!! You are now ready to move to the Provisioner app and configure the settings there. CONFIGURE VIDEO SETTINGS FOR PHONE → SERVER TRANSMISSION Define the settings for a Phone to Server video transmission in the Provisioner app. This setting defines the transmission codec from the phone to the server. Under the Devices tab, find your phone and select the Settings gear; Choose Configure. Select the Codecs tab from the Blue Menu and review the video preferences. If Video selection isn’t visible, you’ll need to go back to SmartPBX and verify you saved your settings to turn it on. Even if the video is turned on, by default the selection here will be None. If you see a value for “Inherits”, this means the setting will carry down from your parent account. Your selection here MUST MATCH your selection in SmartPBX as you configured above. You can only select Primary, Secondary, and Tertiary types if you have moved each into the Selected column in SmartPBX. SAVE your settings! SELECTING A TYPE OF CALL WHEN YOU DIAL Some phones and web phones allow you to choose whether to make your call an audio-only or a video call. If you do not intend to share video this is a great way to save bandwidth and unnecessary usage fees. On the Bria softphone To the right of the phone # field, you will see a drop-down menu arrow. Select that to choose your phone call mode. If you choose video, a video “screen” will appear. Yealink phones Yealink will ask for audio/video on your screen once you dial the number. NOTE: It’s best to define your type of call at the beginning of your call. While some phones may provide a way to switch mid-call, this may interrupt the call integrity and cause reduced quality and/or a disconnect. HOW KAZOO MANAGES VIDEO CALLS Because video takes significant bandwidth and processing power to compress and decompress, KAZOO has set up dedicated servers to process video calls. ADDITIONAL NOTES Once video is enabled, it typically is used as the default for every call. Newer devices may give you the option as the call is made (see above), so you can choose audio if you do not want to incur extra costs. Older models have a configuration setting that can be set to “optional.” You will need to make sure this is set correctly in the back end configuration. Usually this can be found in the Provisioner app. If you turn on video on as a default in your device, all calls will include the video codec even if the receiver has no video capabilities. This is clearly a waste of bandwidth so it is recommended you find and enable an “optional” setting to trigger the setting for each call. FREQUENTLY ASKED QUESTIONS : VIDEO SETUP What devices does KAZOO support for video? KAZOO supports any device that supports the CODEC options listed in the SmartPBX and Provisioner settings. Currently this includes H261, H263, H264, and VP8. This is typically provided as part of the device specifications. Do I have to configure my comm.io video to use the conferencing there? No. comm.io has automatically configured the video codec in its software. It should work without any added configuration. When I try to use my video I get an error message that says “incompatible destination”. This error is indicating that the CODEC algorithms on the sending and receiving devices do not match. You will need to review the settings for each device and add a matching CODEC in the configuration. If I have vp8 set as primary and H263 set as tertiary on my sending device, and my receiving device only has H263 set, will the call connect? Yes. As long as the codec has been moved to Selected in SmartPBX under your device, it won’t matter which is primary, secondary or tertiary. Those priorities will kick in only if multiple options exist. Typically it makes sense to select VP8 as the primary as it has the most efficient compression and therefore will likely incur less charges. My device settings in Provisioner say “inherited”. Where from? This references a parent account setting. If you have a hierarchy of accounts, it comes from the account, or reseller, or system defaults – whichever one is found first (in that order). Does the order (primary, secondary, etc) of the video selection(s) I add in Smart PBX have to match the order I enter in Provisioner or do they just need to be enabled in both places? As long as the codec has been moved to Selected in SmartPBX under your device, it won’t matter which is primary, secondary or tertiary. Those priorities will kick in only if multiple options exist. Do I need to configure these settings for mobile phones? Mobile phones are pre-configured for both audio and video. Phone browsers often choose a codec and then optimize it for best use of battery life and resolution for their device. If you cannot see a video transmitted from a mobile phone on your desktop phone (or vice-versa, and you get a “Can’t play video - video codec not supported) it may be you need to configure the desktop so it supports the mobile phone video codec. Below is what is currently supported: Apple iPhones: H. 264 and their new format for Apple only, HEVC Apple Safari: H. 264 and now also vp8 starting with Safari 12.1 Android Phones: H. 263 / H.264 There are apps available for each operating system that will convert and/or display files using other formats such as VLC Media Player; you can search for these in their app stores. Why do some of my calls cause video errors and others don’t? There are several reasons this could happen. Consider the following as a way to troubleshoot this: Are the calls that are working internal calls within your office? This may be related to your carrier configuration if you have a BYOC account. Refer to the Carrier section above. Is the difference related to incoming v. outgoing calls? Check your configuration and codec assignments in SmartPBX (server to device or incoming) and in Provisioner (device to server, or outgoing). Is it specific to a device type? In some cases a device does not support the video codecs you have configured and/or it may not support video at all, and your calls are sending video requests. Often these issues will provide an error saying “video not supported” or “incompatible destination.” Does the KAZOO CallThru.us mobile app support this video process? Not at this time. Configuring Video for use on the KAZOO Platform Reseller Notes Billing Structure for Video Calls Currently video is currently enabled for all accounts at no additional charge for our introductory beta rollout; once the product is officially released you will be charged $20/video channel. Once we have video call features (such as inviting external participants to video conferences) that significantly increase the video load we will add a setting to the Control Center to manage maximum channels -- similar to the trunking setting. This will mean account managers will be able to distribute charges in a similar manner. How KAZOO detects video calls (back end SIP code) Audio call request is shown in the gray section Additional Video call request is shown below the added gray line BYOC Carrier Configuration If you are using your own carrier it is critical you also assign audio settings. If you do not, the system will assume your devices support both audio and video and will by default try to make video calls. As no 3rd party carriers are supporting video at this time this will cause Outbound calls made from a video phone to a carrier to fail. Calls within an office will work correctly. To configure the carrier settings, go to the Carrier app. And select an account you have created or create a new account. Then select Audio and add specific codecs. Continue with video, even though they are likely not supported. #####
 -
 USER GUIDE – BUILD A VIRTUAL RECEPTIONIST IN SMART PBX (also called an IVR) User Story An office wants to set up a system on their PBX where the caller selects different extensions/options for: Receptionist Directory / List of Extensions Sales group Voicemails for Users and Groups Answering Service or 3rd party number Spanish language menu This is often called a “Virtual Receptionist” or an “IVR” (for "Interactive Voice Response") setting. You will be able to guide your callers to different extensions depending on their purpose. Overview This guide is set up in two parts. Part 1 steps through an initial setup for a main menu using SmartPBX. Part 2 steps through how to add sub-menus and additional features to the standard virtual receptionist process. This addresses our initial user story item for adding a Spanish language menu. To achieve this we will leverage our powerful Callflows application and create a “submenu” there, and then reference it in SmartPBX. The process looks something like this: Before you start Part 1 will take you through setting up a basic Virtual Receptionist, or call directing menu. This guide assumes you have gone through basic SmartPBX setup steps (add link for setup reference) and have: Configured a Company main number and emergency / 911 address Added users to a directory and assigned their extensions Added/enabled devices and phone numbers to the device tab. NOTE: If you use an external answering service, you will want to add their phone # and landline as a device. Added/enabled a group of users (such as sales, billing, appointments, etc) if that will be an option for your Virtual Receptionist List of your office hours and holidays Part 1: Create an initial Virtual Receptionist Menu in SmartPBX Open SmartPBX Quick steps include as follows: Go to the Main Number / Incoming Call Handling menu Enter office hours, and vacation and holiday times that may affect your Virtual Receptionist response For each “setting” -- Open Hours, Lunch Hours, After Hours, and Holidays, choose an initial Callflow and click on its Virtual Receptionist link. Add menu number item and attach its destination Add Greetings for each extension if desired Save Save as part of the Company Directory for future access Detailed Steps STEP GUIDE – BUILD A VIRTUAL RECEPTIONIST IN SMART PBX (also called an IVR) 1. Select Main Number tab from the left menu. You will see this screen: 2. Enter Office Hours Strategy This is important as you will likely have different call routing options when your office is closed, either for lunch, after hours or a holiday. NOTES: Verify your time zone Enter your “lunch hour” if you send calls to a different number during that time SAVE your edits! 3. Enter Office Holidays Again, these notes will trigger different call routing procedures. NOTES: Once you add holidays, you will need to make sure you create an Incoming Call Handling scenario for holiday routing. SAVE your changes! 4. Configure your Virtual Receptionist routing for each time setting There are four different settings to configure for incoming calls: Open Hours, Lunch Hours (if you define this separately), After Hours, and Holidays. With each tab, you will see the menu choices shown below. The first box will send calls directly to the Virtual receptionist. The second box will provide a single option, and then forward to the Virtual Receptionist. For this session we'll work with option 1. Check to see that Open Hours is selected in green. Note: if you don't see the "Lunch Hours" or other options to the right, it is because you have not defined these in the dialog boxes above - they are optional. Select the first box, and click on the Virtual Receptionist link. You will see a dialog box like below: 5. For each menu item number, assign an extension or a device. NOTES: You should see all the users, devices and messages assigned to this account in your drop down. If you do not, return to the main SmartPBX menu and add the connections you need. If you do not see your “Account Directory” as a top level choice in the drop down, you will need to go back to your Users tab, select each user and check the box “Include User in the Company Directory". (See dialog box below) SAVE! your settings so far. Return to your Main Menu / Incoming Call Handling / Virtual Receptionist - Open Hours menu and 6. Add a Greeting If you want to add a greeting before you offer menu choices, choose from one of the options for creating that greeting shown on the right. You can: Type a text that converts to speech Upload a pre-recorded .mp3 file Choose from existing recordings 7. Step through the same process for Lunch Hours, After Hours, and Holidays. This is important! If you do not add your preferences for the different hours and holidays, your callers will only hear your first setup option. 8. AND SAVE! Part 2: Advanced Virtual Receptionist Setup using Callflows This section is optional. It demonstrates how to use Callflows to add more complex steps to the Virtual Receptionist process. This includes: Adding sub-menus for different languages Adding call routing options to groups Add a Spanish Speaking menu option If you want to add a second menu option, for example in a different language, you will need to set up a Callflow that directs the caller to a separate menu. Quick Steps Open Callflows Create and build a new Callflow SAVE your Callflow EDIT your Callfllow and make sure to select “List Callflow in Main Number” option so it is displayed in SmartPBX. Open SmartPBX and assign your new Callflow to an extension in the Incoming Call menu. Detailed Steps Open the Callflow Application 1. To access this application, select the Apps icon at the top right of your screen. 2. Click on Callflows If you do not see it, enter it under “search apps”. If it is still not visible, ask your administrator to enable it for you. 3. Select Callflows from the Main menu 4. Then select Add Callflow And add the phone number or extension associated with this flow, or routine. You can choose a spare number in your inventory or define an extension to be used. NOTE This extension is what you will use as the beginning of your Spanish Speaking Callflow. 5. Add a new menu to your Callflow Find the Menu button in the Actions bar to the right, and drag it dynamically to below the Callflow block. The menu dialog box will pop up. 6. Add a greeting message using the bottom selection options. You can Type in a message that will be converted to speech (TTS) and define the “profile” of the speaker (e.g. female/male, etc.) Upload a pre-recorded .mp3 file NOTES: A “Not set” option will mean no greeting is played and the menu options begin. “TTS” is short for Text to Speech. Enter text and it will be spoken for you. You can edit your media file using the edit option; this includes defining the “speaker” profile. 7. Add extensions to the Spanish Menu Callflow Once you have the Spanish menu set up, you will want to attach the extensions that you had defined in SmartPBX, basically copying the same navigation from the main menu to the Spanish menu. To do this, drag the user, ring group, directory, and device buttons from the Actions menu to the Callflow diagram. TIP: A quick way to find the device button: enter the word device in the search box at the top. NOTES When you save this callflow, it will re-arrange the blocks in the correct extension order, 1,2,3,4, etc. When assigning a remote call forwarding device, it's recommended you increase the time setting for "Ring this device for ... " It defaults at 20 seconds, you may want to increase to as much as 120 seconds to allow enough time to reach the forwarding/destination phone number. See image below. Once you drag an action to its place, it will prompt you to assign a user, a phone extension or voicemail box, depending on the action you’ve selected. . 8. SAVE your Callflow 9. List your Callflow in Main Number Confirm it is set to “List this Callflow in Main Number.” This will flag the Callflow and enable it to display as an option in SmartPBX. To verify this is checked, select Edit at the Callflow name level, and check the “List …” box 10. Return to SmartPBX to assign your new Callflow! Go back to your SmartPBX Main Number menu / Incoming Call Handling, and re-select Virtual Receptionist. Note you will now see a 4th option in your configuration screen that is pulled in from the Advanced Callflows application. Unless you want to only use a callflow you have set up that includes multiple menus, etc., you can ignore this. We will add the menu we created in our original Virtual Receptionist navigation. Here, you are now able to select your newly created Spanish Menu options under the Advanced Callflows category. 11. Step through the same process for Lunch Hours, After Hours, and Holidays. This is important! If you do not add your preferences for the different hours and holidays, your callers will only hear your first setup option. NOTE: If you do not see these options, it means you have not defined settings for these options. Use the Main Menu drop-down options and fill out the details. 12. Test your Magic! #####
 -
 SmartPBX FAQ General Information What is Smart PBX? Standard Text Answer. Copy these lines and then paste into a new file and overwrite them with your words. Add bullets if it helps keep things clean How do Smart PBX settings work with and/or override Callflows settings? The data settings for your office can be managed from either Smart PBX or Callflows, and so the last setting you change will be the "current". We strongly recommend you use SmartPBX for your initial setup and engage with callflows app only if SmartPBX does not support your needs. Here's why: Smart PBX has been more recently updated; its User Interface is more friendly for use by your agents, and it makes sense to be familiar with how they will interact with the settings. SmartPBX's setup includes fields and settings not required in Callflows. This can cause issues later on. An example of this is the main extension field assigned to each user. This is required for comm.io to load properly and not required in callflows. SmartPBX is the primary app. our support team will use and interact with while working with you. If an issue can be managed from SmartPBX they will use that first. Greeting Setting I uploaded a greeting in the SmartPBX for the the virtual receptionist, and it seems to be just dead air. Can you dial an extension during the "dead air?" If so, this suggests there is something amiss with the actual music file. Sometimes an .mp3 recording format is not recognized by SmartPBX's Linux server. Please try using a website like https://online-audio-converter.com/ to convert from mp3 to mp3 and retry uploading the converted file. I am trying to record a greeting during lunch hours, but it does not ask me for my PIN so I can change the recording (first answered in our forum by TJ Forsman, Thank You!) Do you have time of day conditions set? The system has to be in the mode that you want to record for that method to work. For example the system would need to be in lunch mode and then calling the main number and using the pin should work. This is also true if you want to set up two separate auto attendants setup for day and after hours. You will want to be in day mode to record day and night to record night. We ended up just setting up a vm box a user could call into and leave the greeting in and have it email is the wav file and upload to the auto attendant in the GUI to make it easier for changes. Ring Groups Settings Can I prepend incoming calls with a tag to identify its source, for example with a caller ID name? Yes. You can add a prepend to a ring group you define. Here's the steps: Open SmartPBX Click on the Groups Tab on the left menu bar Select the Features box (tab to the far right) Select Caller ID Prepend Toggle the enable switch and type in a Name and Number prefix to identify the call. Voicemail Settings Can my voicemails be transcribed to an email for me? Yes! There are two ways to update this setting and turn it on (note there is an added charge of $0.05/minute for this feature as it requires significant storage and a transcription service) From your user settings, under User / User Features / Voicemail box / Transcribe From your voicemail boxes menu, select Advanced and check "Transcribe Messages". You can view these steps with screen shots in our SmartPBX STEP Guide, here Can I enable / disable Voicemail Transcription globally / system wide for an account? If you want to set a default setting for your accounts, send a support request 2600Hz. They can run a script to globally change the default setting. What voice transcription engine do you use? Our initial implementation for voice transcription uses the Google API. Our system is designed to allow support for multiple services however, and we are considering adding Watson and others if demand justifies the investment to add it and QA its addition. I can't seem to retrieve my voicemail messages; it is hanging up after the announcement. This behavior can happen if your voicemailbox is set to "Announcement Only." This setting can be found in SmartPBX under the Voicemail Boxes menu: Select Voicemail boxes, Select your voicemail box, then click on the wrench icon Click on the Advanced button at the top right, and select Options Make sure the "Announce only-mode" is unchecked, both for your mailbox and the main mailbox. NOTE: This can also be accessed in the Advanced Callflows menu. [callflows → voicemail → select voicemail box → advanced options]
 -
 Monster App Choices SmartPBX vs Advanced Callflows vs APIs User Story A new user wants to understand what application to use for getting started with and managing and maintaining their account. They are confused about whether to use SmartPBX, Advanced Callflows or system APIs. A new user is looking to understand how these applications interact with each other. Overview It’s important to understand both SmartPBX and Callflows access the same back end database and use the same APIs to transfer data. Edits from one app will reflect in the others the next time you load it. Some apps however, do not provide access to certain settings, either because it is considered more complex and requires admin level understanding, or the setting was added as a new feature not yet updated in an older app. This document will share recommendations on when to use each configuration method. In addition it will review some 2600Hz history to give context to the applications and how they evolved. In short Your administrator will likely use Account Manager for your initial account setup. Once your account is accessible, Smart PBX is often set as the default application you see when logging in. Use SmartPBX for account maintenance and management whenever possible. It is the most current and most user friendly app for your initial setup. Use Callflows if you are an administrator and want to set up some more advanced, complex features for your client. Use KAZOO’s powerful API library if none of the options above provide a feature you require, if your process is a back-end calculation or for automation needs that do not need user input. Note: API use requires a developer who is comfortable using JSON APIs in their preferred programming language, is familiar with Kazoo configurations and reading Kazoo docs. A summary chart of what functionality can be managed in each app is available at the end of this document. For a detailed overview comparing access to each setting in Callflows v. SmartPBX, go HERE. Set up your Initial Account with Account Manager This will be accomplished with your Account administrator. Once your initial account has been set up, you will want to personalize it according to your office requirements. Get Started with your personalizations with SmartPBX Once your account has been set up by an administrator it’s best for as much configuration to be exposed in SmartPBX as possible for End Users to see. Spend some time stepping through the application and working with the features available for you. We have a series of User Guides available also, HERE NOTE: Make sure you associate a “Main Extension” to your user name in SmartPBX. This is required for the comm.io app, and is not available to add in Callflows. (This is an example of the newer app supporting newer features). If you have set up your user in Callflows already and want to use the comm.io softphone, refer to the comm.io installation and setup document, HERE. Advanced Functions using Callflows If it’s not possible to complete your objectives using SmartPBX, use Advanced Callflows. Some common advanced functions callflows excels at include: Creating sub-menus for incoming calls (e.g. Spanish speaking and English speaking). We have a document HERE that outlines this setup. Creating secondary, tertiary, etc. callflows. For example for multiple locations/companies in a single account. Creating custom feature codes Using APIs to develop further customizations Both SmartPBX and Advanced Callflows ultimately use the same APIs, they are just viewed in different ways. If there’s some function in the Kazoo GUI that you need to do very often, often enough that it’s not efficient to use the GUI, this is an occasion where you use APIs. Some common uses for accessing the API directly include: Processes not supported by SmartPBX or Callflows Integrations with other programs that also use APIs. Examples include billing programs, integration with Salesforce or web pages, etc. Repetitive processes that can run in the background and do not need user input (for example, some billing functions). To start learning the API syntax, watch the network tab and see what APIs are being called while you complete your task in the GUI. Then check the documentation to be sure you fully understand what the API call is actually doing. And write your code to replicate it. All the documentation for our APIs is available HERE. Anything that can be done in our GUI can be done via API as well. Simply open your browser’s development tools feature, watch the network tab and see what APIs are being called while you complete your task in the GUI. Reconcile this with the API the documentation to be sure you fully understand what the API call is actually doing. And write your code to replicate it. Notes: Not all APIs are considered stable and available for end user use. Please be sure your API is supported before using them. Please take special care and do extensive testing if you want your application to work with SmartPBX. When developing using the API always develop against a sandbox environment. Never code against a production cluster. An example configuration using multiple KAZOO applications Below are some example configurations where more than one application is accessed. These include helpful tips on the most efficient ways to achieve this. Build a sub-menu into your main number incoming call routing If you want to build a sub-menu into your main number config (for example to support multiple languages or departments), this is not possible to do in SmartPBX. Here’s a trick we use to streamline this process: First, in SmartPBX. build all your ring groups for the sub-menu Second, in Callflows, build the callflow for the sub-menu. Instead of building the menu options all from scratch, use the SmartPBX ring groups you just made. Third, while still in Callflows, name the callflow and enable the “List this callflow in Main Number” check box. This will allow you to use the advanced callflow as an option back in SmartPBX’s main number section. With this example, your end users will be able to change the members and order of the sub-menu’s options via the SmartPBX groups section. This keeps the complexity of Advanced Callflows abstracted away from user, and allows them to manage the details of the process using a familiar interface, SmartPBX. Sample of application best uses Account Mgr SmartPBX Callflows APIs Initial Setup ✔ Add/Edit Users and Devices Global Setup User Edits Basic Settings: Office / Holiday Hrs Hold music Incoming call routing Default language interface Billing settings Global Setup User Edits Ring Groups Create Here Trunking Controls Admin Setup Admin Edits Sub menus for incoming calls Create Ring Group First Attach sub menus to Ring Group Background of KAZOO’s development and updates When the KAZOO project first started over 10 years ago, everything was done via json APIs -- there was no GUI (Graphic User Interface). The expectation was the KAZOO platform would serve as a robust engine for companies to use as their back-end and that those companies would build their own GUI to best fit their customer’s needs. KAZOO is extremely robust and with this comes complexity however, and many of our clients didn’t want to spend time diving into API docs before they even knew if a project would work for them. They wanted a quick and easy way to set up an account to test our wares. To support these developers 2600Hz made a very basic GUI for the APIs to enable a quick and easy setup for a testing environment. This original GUI didn’t expose all of the APIs or even all the features of the APIs but it gave developers a head start. Once they felt confident in the platform, developers used it to enable them to build custom GUIs. This served our clients who are sophisticated programmers in their own right well, and they created unique applications as we imagined, and still do. Their solutions are elegant overlays to the KAZOO engine. As we grew however, resellers started using the original tool to set up and maintain end user accounts; they requested we provide a more friendly way to enable their end users to personalize and change their account details without constant support. This was the driving force behind our Monster-UI framework and SmartPBX application. SmartPBX was built as a general use GUI for Kazoo, one that resellers could hand off to end users. In making the system more friendly to non-programmers however, we reduced the configuration offerings to a core that most accounts need. To continue to keep some more complex features accessible for advanced administrator use we ported in the old UI as the Callflows app. Some challenges remain with this multi-tiered approach. Because SmartPBX and Advanced Callflows share the same APIs, you could see callflows created by SmartPBX in the Callflows app, setting an expectation that users could also edit them. We needed a way to track where the input came from and how to edit it. To solve this, 2600Hz added metadata to the json API indicating what app that created the callflow. And elements made in SmartPBX were hidden from Advanced Callflows. This is the state the system exists in today. While most now use Monster UI and SmartPBX, some companies still use Kazoo strictly as a back-end system and use their own GUIs. Developers are still welcome to use the APIs to build their own GUIs. For those developers wanting to use the APIs, but also wanting to use Advanced Callflows, SmartPBX and other Monster UI apps. This is possible as well. When doing this, however, please take great care in your code to match the formatting that Monster UI apps use as closely as possible. Remember not every single feature of the APIs is available in SmartPBX or even in Advanced Callflows, and SmartPBX expects very particular formatting to work correctly. In all scenarios, thoroughly test your code against a sandbox environment before deploying to production systems. Additional Resources SmartPBX User Guide Account Settings Access: Callflows v. SmartPBX Advanced Callflow configurations and setup API References docs.2600hz.com Callflows - Kazoo API Reference REST API Reference for Kazoo Crossbar API View full File
 -
View full File
-
-
-
Configuring Video for use on the KAZOO Platform User Stories A user wants to enable a device so it supports video calling between two office desk phones A user wants to call into a KAZOO video conference using a video-enabled desk phone instead of a laptop. A user wants to allow video replay and/or online streaming on an office phone (to replay a saved video call for example) using the KAZOO platform. Overview Video Calling Video is an image capture process that takes a rapid amount of still pictures at a source, compresses the data, and transmits the packet across phone lines. The recipient unpacks them and replays the sequence to show movement, or “video.” Some notes about the transmission: “Frames” are single images, transmission is described in “frames per second”, or FPS. Typical compression is 20-30 frames per second. Lower rates and lower resolution means you will see a stuttered, jagged result. The resulting “video” is a stream of these captures. As with any images, video takes up significant data bandwidth to transmit. To help mitigate this video uses one of several compression algorithms which collectively are referred to as “CODECS” (short for “COder-DECoder”). CODECS Compression CODECS refers to the format for compressed data transmitted across devices (including WebRTC, Softphones, mobile devices, comm.io). Some formats compress audio only, others compress audio and video. There are several different compression types available today. To successfully transmit these files, both the originating device and the receiving device must be equipped with the same codec compression interpreter. If a device transmits H264 video, then the receiver must be able to “read” that. Your office desk phone and your laptop application for example, must be able to talk in the same language. Common audio formats used by telco devices include .mp3 and Opus. Popular compression formats for video are H263, H264, and the newer Google-developed VP8. Audio and the KAZOO Platform All KAZOO Platform calls assume (and require) audio CODECS. Audio is typically set by default, and users can fine tune those settings in either our Provisioner setup or the SmartPBX app. KAZOO includes support for the most common audio formats. This audio information will be sent to the corresponding phone hardware so the two are synchronized. Video and the KAZOO Platform Video is optional as its transmission takes considerably more bandwidth and can lead to an additional charge to your account. To support independent control over video, the KAZOO platform transmits audio and video on separate ports for each call. In order for the sending and receiving devices to share video, they must both recognize the same CODECS data. This requires an intentional setup in both SmartPBX and the Provisioner app. Enabling Video Calls To use video, you will need to enable it for your devices in your user account. This is a two step process. Since the call origination device (whoever starts the call) is what picks the algorithm, or the “rules.” As your system will do both, you will need to provide available compression settings for both sending and receiving instances: Server to Phone (using SmartPBX) and Phone to Server (using Provisioner) Below is an illustration summarizing the process. Before you start Confirm the video format(s) that are supported by your devices. The most common include H261, H263, H264 and VP8. CONFIGURE VIDEO SETTINGS FOR SERVER → PHONE TRANSMISSION This setting is defined in SmartPBX. Here you will define Server to Phone connections. NOTE: If the two settings do not match you will get “incompatible destination” errors. To set these preferences, go into SmartPBX Select the Device tab to the left. Search for your device, and select the Edit icon to its right From that dialog, select the Advanced Tab, and then Video from the drop-down menu. You will see a screen that shows a list of video compression options. Drag the compression types you want to recognize to the Selected column. NOTES: By default, there will be no options in the Selected column. This effectively means video is not enabled. To enable a video type, drag the compression style your devices support to the Selected column. VP8 is currently the most popular, as its compression has the best results and there is no license fee related to it. Most newer devices prefer it for these reasons, so if your devices support it, it’s recommended you use it as your primary selection. You can move more than one codec to the Selected column, and drag them into a preferred priority. SUCCESS !!! You are now ready to move to the Provisioner app and configure the settings there. CONFIGURE VIDEO SETTINGS FOR PHONE → SERVER TRANSMISSION Define the settings for a Phone to Server video transmission in the Provisioner app. This setting defines the transmission codec from the phone to the server. Under the Devices tab, find your phone and select the Settings gear; Choose Configure. Select the Codecs tab from the Blue Menu and review the video preferences. If Video selection isn’t visible, you’ll need to go back to SmartPBX and verify you saved your settings to turn it on. Even if the video is turned on, by default the selection here will be None. If you see a value for “Inherits”, this means the setting will carry down from your parent account. Your selection here MUST MATCH your selection in SmartPBX as you configured above. You can only select Primary, Secondary, and Tertiary types if you have moved each into the Selected column in SmartPBX. SAVE your settings! SELECTING A TYPE OF CALL WHEN YOU DIAL Some phones and web phones allow you to choose whether to make your call an audio-only or a video call. If you do not intend to share video this is a great way to save bandwidth and unnecessary usage fees. On the Bria softphone To the right of the phone # field, you will see a drop-down menu arrow. Select that to choose your phone call mode. If you choose video, a video “screen” will appear. Yealink phones Yealink will ask for audio/video on your screen once you dial the number. NOTE: It’s best to define your type of call at the beginning of your call. While some phones may provide a way to switch mid-call, this may interrupt the call integrity and cause reduced quality and/or a disconnect. HOW KAZOO MANAGES VIDEO CALLS Because video takes significant bandwidth and processing power to compress and decompress, KAZOO has set up dedicated servers to process video calls. ADDITIONAL NOTES Once video is enabled, it typically is used as the default for every call. Newer devices may give you the option as the call is made (see above), so you can choose audio if you do not want to incur extra costs. Older models have a configuration setting that can be set to “optional.” You will need to make sure this is set correctly in the back end configuration. Usually this can be found in the Provisioner app. If you turn on video on as a default in your device, all calls will include the video codec even if the receiver has no video capabilities. This is clearly a waste of bandwidth so it is recommended you find and enable an “optional” setting to trigger the setting for each call. FREQUENTLY ASKED QUESTIONS : VIDEO SETUP What devices does KAZOO support for video? KAZOO supports any device that supports the CODEC options listed in the SmartPBX and Provisioner settings. Currently this includes H261, H263, H264, and VP8. This is typically provided as part of the device specifications. Do I have to configure my comm.io video to use the conferencing there? No. comm.io has automatically configured the video codec in its software. It should work without any added configuration. When I try to use my video I get an error message that says “incompatible destination”. This error is indicating that the CODEC algorithms on the sending and receiving devices do not match. You will need to review the settings for each device and add a matching CODEC in the configuration. If I have vp8 set as primary and H263 set as tertiary on my sending device, and my receiving device only has H263 set, will the call connect? Yes. As long as the codec has been moved to Selected in SmartPBX under your device, it won’t matter which is primary, secondary or tertiary. Those priorities will kick in only if multiple options exist. Typically it makes sense to select VP8 as the primary as it has the most efficient compression and therefore will likely incur less charges. My device settings in Provisioner say “inherited”. Where from? This references a parent account setting. If you have a hierarchy of accounts, it comes from the account, or reseller, or system defaults – whichever one is found first (in that order). Does the order (primary, secondary, etc) of the video selection(s) I add in Smart PBX have to match the order I enter in Provisioner or do they just need to be enabled in both places? As long as the codec has been moved to Selected in SmartPBX under your device, it won’t matter which is primary, secondary or tertiary. Those priorities will kick in only if multiple options exist. Do I need to configure these settings for mobile phones? Mobile phones are pre-configured for both audio and video. Phone browsers often choose a codec and then optimize it for best use of battery life and resolution for their device. If you cannot see a video transmitted from a mobile phone on your desktop phone (or vice-versa, and you get a “Can’t play video - video codec not supported) it may be you need to configure the desktop so it supports the mobile phone video codec. Below is what is currently supported: Apple iPhones: H. 264 and their new format for Apple only, HEVC Apple Safari: H. 264 and now also vp8 starting with Safari 12.1 Android Phones: H. 263 / H.264 There are apps available for each operating system that will convert and/or display files using other formats such as VLC Media Player; you can search for these in their app stores. Why do some of my calls cause video errors and others don’t? There are several reasons this could happen. Consider the following as a way to troubleshoot this: Are the calls that are working internal calls within your office? This may be related to your carrier configuration if you have a BYOC account. Refer to the Carrier section above. Is the difference related to incoming v. outgoing calls? Check your configuration and codec assignments in SmartPBX (server to device or incoming) and in Provisioner (device to server, or outgoing). Is it specific to a device type? In some cases a device does not support the video codecs you have configured and/or it may not support video at all, and your calls are sending video requests. Often these issues will provide an error saying “video not supported” or “incompatible destination.” Does the KAZOO CallThru.us mobile app support this video process? Not at this time. Configuring Video for use on the KAZOO Platform Reseller Notes Billing Structure for Video Calls Currently video is currently enabled for all accounts at no additional charge for our introductory beta rollout; once the product is officially released you will be charged $20/video channel. Once we have video call features (such as inviting external participants to video conferences) that significantly increase the video load we will add a setting to the Control Center to manage maximum channels -- similar to the trunking setting. This will mean account managers will be able to distribute charges in a similar manner. How KAZOO detects video calls (back end SIP code) Audio call request is shown in the gray section Additional Video call request is shown below the added gray line BYOC Carrier Configuration If you are using your own carrier it is critical you also assign audio settings. If you do not, the system will assume your devices support both audio and video and will by default try to make video calls. As no 3rd party carriers are supporting video at this time this will cause Outbound calls made from a video phone to a carrier to fail. Calls within an office will work correctly. To configure the carrier settings, go to the Carrier app. And select an account you have created or create a new account. Then select Audio and add specific codecs. Continue with video, even though they are likely not supported. ##### View full File

-
View full File
-
 Below is an overview of what the SmartPBX dashboard is showing about your account configuration. NOTE: For details on each setting and strategies for how to define them, refer to our companion User Guide that walks through the setup process, HERE. Dashboard Header Information This information provides quick access to some of the main features of your account. The top left displays the account name you are viewing and is read-only. The tabs to the right are clickable and provide access to the following settings: Account Default Caller ID Number Here you can set what number is used as the default Caller ID for outbound calls from the account. You can also set the CNAM and E911 info associated with the number. For more info on CNAM and E911 see the Main Number section below. 911 VERY IMPORTANT: Calls to 911 will not be allowed if one of the DIDs belonging to the account is not configured with proper E911 address information. If the account has multiple physical locations, each location must have its own DID with E911 address information specific to that location. Devices that are not at the location matching the E911 address of the account’s default E911 configured number must specify the correct DID to be used for emergency calls placed from that device so that the 911 call can be handled by the correct 911 call center and so they can if needed send emergency responders to the correct address. If a call to 911 is placed and it is determined that the address is not configured or incorrect there are significant penalty fees charged. If you bring your own carrier (BYOC) then E911 is not managed through Kazoo’s Monster UI and no check can be made to ensure you have E911 address information properly configured for the emergency Caller ID that you have configured. Account Default Hold music (MOH) Set what the account’s default hold music is. It will play when someone is on hold, in a conference room when there is only one person there, if you get Call Center the hold music there. NOTE: This can be over-ruled by add-on applications. For example, the Call Center Pro application provides added choices for uploading music and a sequence of "on hold" interactions, including "approximate waiting time" and "number in queue ahead of you." Hours This allows you to revise the office hours you previously set up. Total Users The total users graph shows the total number of users assigned to this account, and how many, if any have been given access to SMS/MMS messaging. There is an added charge for this so it is helpful to see what the summary here. Total Devices This summarizes the number of devices (not users, remember many users will have more than 1 device) configured for the account. A desk phone is one type of device that is called a “SIP Phone” device type. Not all devices are necessarily themselves a “Phone”. Some can be a static forward to a phone number off net like a Cell Phone or might be an ATA that an old analog phone is connected to. A circle graph representing the percentages of types of devices with a legend showing the actual count of each device type. Unregistered Devices The total number of device that are not currently registered. It will include SIP phones/devices that are not registered and will include device types that by nature do not register like Landline, cell phones, and RTC webphones used in the comm.io app. Conference Bridge count Summarizes the total number of conference bridges set up for this account. Main Number This displays the main numbers and the features active for each number. If you bring your own carrier E911 and Caller ID Name will not be available for you to manage with Kazoo. When you first set up the account there will be a special message here to assign a Main Number. Once you have one assigned, there will be a message to configure E911 for a Main Number. See the Numbers section below for the meaning of the icons like that may appear with a number. Conference Number The account’s conference number if assigned. One of the available user features is to have their own conference room, and/or a video conference room as part of the comm.io app. The user would give out the main conference number and the user’s conference room number along with an optional PIN access code. Main Faxbox Number The account’s Main Faxbox number if assigned. This faxbox only handles inbound faxes and will send inbound faxes to the email address configured when a number is assigned to the Main Faxbox. Total Numbers Summarizes the total Numbers owned by the account and indicates any and spare numbers you may have purchased in a group but not yet assigned. It also identifies 800 numbers you manage. A Graph showing the classification of the Numbers owned by the account. The available classification names can be seen in the Restrictions portion of a device. US DID includes United States and Canadian numbers. Company Directory Shows how many users there are in the company directory. You can configure a user not to be listed in the company directory. But by default, users will be added to the company directory. You can download this information as a .csv file also, and import it into a document for distribution. Account ID This number will be used if you need a support person to help track down call routing issues or any other support questions. Account Realm The realm of the account. This is used as part of SIP authentication and for faxboxes so the account users can send an email to the system that will then be sent as a fax to the destination number. See the Creating Accounts and Branding articles in the Getting Started resources for more info on the significance of the realm and the implications of changing it later. Numbers & Users Below is a quick overview of the pages displayed when you click on the icons in the dashboard. NOTE: A more detailed discussion of these settings can be found in the SmartPBX User guide, HERE. Numbers in use shows the phone numbers, the users assigned to the numbers, and some of the attributes assigned to that number. When a number is selected there are actions displayed above the list of numbers that can be performed on that number. Here the actions for selected numbers are and . In Number Manager App there is also the action which allows you to move a spare number to another account. Be aware, if you move a number to another account and later Delete it from that account the number will go back as a spare number to the account it was previously moved from. If you believe a number is in the wrong place (Spare/In Use) you can use the to try to correct it. Charges for DIDs apply to spare numbers as well as Numbers in use. Meaning of Number Icons like indicates the number was added manually or imported to the system and features like inbound and outbound Caller ID and E911 are not available for it. Generally, this is the case because it is from a BYOC carrier and those features need to be managed through the carrier that the number was bought from. icon when clicked displays a menu that allows you to manage features of the number like Caller ID, CNAM, and E911. E911 is configured on the number. Caller ID name will be looked up for the number the call came from, AKA Inbound CNAM lookup. number has set a name in the national CNAM database that can be looked up by OTHER systems that do Caller ID lookup. This is not to be confused with the External Caller ID Name. The External Caller ID Name is only effective for calls between accounts. The PSTN network does not support transmitting Caller ID information so when a call goes out a carrier across PSTN the Caller ID name is lost. But the destination number’s service provider, like we offer with the “Inbound CNAM lookup” described above, can do a lookup in the national CNAM database and provide that to their users. . indicates the number is in the process of porting. Indicates that the number has been enabled for SMS text messaging Indicates the number has Prepended value to it that will display on caller ID. Spare Numbers Users Here is where you can view and manage the account’s users and the features they have set up. Each Column for the user reflects primary info of that column’s category for that user and you can click it to access the settings for that category for that user. For a detailed description of what the icons represent and how to assign them, refer to the SmartPBX User guide.
 -
Below is an overview of what the SmartPBX dashboard is showing about your account configuration. NOTE: For details on each setting and strategies for how to define them, refer to our companion User Guide that walks through the setup process, HERE. Dashboard Header Information This information provides quick access to some of the main features of your account. The top left displays the account name you are viewing and is read-only. The tabs to the right are clickable and provide access to the following settings: Account Default Caller ID Number Here you can set what number is used as the default Caller ID for outbound calls from the account. You can also set the CNAM and E911 info associated with the number. For more info on CNAM and E911 see the Main Number section below. 911 VERY IMPORTANT: Calls to 911 will not be allowed if one of the DIDs belonging to the account is not configured with proper E911 address information. If the account has multiple physical locations, each location must have its own DID with E911 address information specific to that location. Devices that are not at the location matching the E911 address of the account’s default E911 configured number must specify the correct DID to be used for emergency calls placed from that device so that the 911 call can be handled by the correct 911 call center and so they can if needed send emergency responders to the correct address. If a call to 911 is placed and it is determined that the address is not configured or incorrect there are significant penalty fees charged. If you bring your own carrier (BYOC) then E911 is not managed through Kazoo’s Monster UI and no check can be made to ensure you have E911 address information properly configured for the emergency Caller ID that you have configured. Account Default Hold music (MOH) Set what the account’s default hold music is. It will play when someone is on hold, in a conference room when there is only one person there, if you get Call Center the hold music there. NOTE: This can be over-ruled by add-on applications. For example, the Call Center Pro application provides added choices for uploading music and a sequence of "on hold" interactions, including "approximate waiting time" and "number in queue ahead of you." Hours This allows you to revise the office hours you previously set up. Total Users The total users graph shows the total number of users assigned to this account, and how many, if any have been given access to SMS/MMS messaging. There is an added charge for this so it is helpful to see what the summary here. Total Devices This summarizes the number of devices (not users, remember many users will have more than 1 device) configured for the account. A desk phone is one type of device that is called a “SIP Phone” device type. Not all devices are necessarily themselves a “Phone”. Some can be a static forward to a phone number off net like a Cell Phone or might be an ATA that an old analog phone is connected to. A circle graph representing the percentages of types of devices with a legend showing the actual count of each device type. Unregistered Devices The total number of device that are not currently registered. It will include SIP phones/devices that are not registered and will include device types that by nature do not register like Landline, cell phones, and RTC webphones used in the comm.io app. Conference Bridge count Summarizes the total number of conference bridges set up for this account. Main Number This displays the main numbers and the features active for each number. If you bring your own carrier E911 and Caller ID Name will not be available for you to manage with Kazoo. When you first set up the account there will be a special message here to assign a Main Number. Once you have one assigned, there will be a message to configure E911 for a Main Number. See the Numbers section below for the meaning of the icons like that may appear with a number. Conference Number The account’s conference number if assigned. One of the available user features is to have their own conference room, and/or a video conference room as part of the comm.io app. The user would give out the main conference number and the user’s conference room number along with an optional PIN access code. Main Faxbox Number The account’s Main Faxbox number if assigned. This faxbox only handles inbound faxes and will send inbound faxes to the email address configured when a number is assigned to the Main Faxbox. Total Numbers Summarizes the total Numbers owned by the account and indicates any and spare numbers you may have purchased in a group but not yet assigned. It also identifies 800 numbers you manage. A Graph showing the classification of the Numbers owned by the account. The available classification names can be seen in the Restrictions portion of a device. US DID includes United States and Canadian numbers. Company Directory Shows how many users there are in the company directory. You can configure a user not to be listed in the company directory. But by default, users will be added to the company directory. You can download this information as a .csv file also, and import it into a document for distribution. Account ID This number will be used if you need a support person to help track down call routing issues or any other support questions. Account Realm The realm of the account. This is used as part of SIP authentication and for faxboxes so the account users can send an email to the system that will then be sent as a fax to the destination number. See the Creating Accounts and Branding articles in the Getting Started resources for more info on the significance of the realm and the implications of changing it later. Numbers & Users Below is a quick overview of the pages displayed when you click on the icons in the dashboard. NOTE: A more detailed discussion of these settings can be found in the SmartPBX User guide, HERE. Numbers in use shows the phone numbers, the users assigned to the numbers, and some of the attributes assigned to that number. When a number is selected there are actions displayed above the list of numbers that can be performed on that number. Here the actions for selected numbers are and . In Number Manager App there is also the action which allows you to move a spare number to another account. Be aware, if you move a number to another account and later Delete it from that account the number will go back as a spare number to the account it was previously moved from. If you believe a number is in the wrong place (Spare/In Use) you can use the to try to correct it. Charges for DIDs apply to spare numbers as well as Numbers in use. Meaning of Number Icons like indicates the number was added manually or imported to the system and features like inbound and outbound Caller ID and E911 are not available for it. Generally, this is the case because it is from a BYOC carrier and those features need to be managed through the carrier that the number was bought from. icon when clicked displays a menu that allows you to manage features of the number like Caller ID, CNAM, and E911. E911 is configured on the number. Caller ID name will be looked up for the number the call came from, AKA Inbound CNAM lookup. number has set a name in the national CNAM database that can be looked up by OTHER systems that do Caller ID lookup. This is not to be confused with the External Caller ID Name. The External Caller ID Name is only effective for calls between accounts. The PSTN network does not support transmitting Caller ID information so when a call goes out a carrier across PSTN the Caller ID name is lost. But the destination number’s service provider, like we offer with the “Inbound CNAM lookup” described above, can do a lookup in the national CNAM database and provide that to their users. . indicates the number is in the process of porting. Indicates that the number has been enabled for SMS text messaging Indicates the number has Prepended value to it that will display on caller ID. Spare Numbers Users Here is where you can view and manage the account’s users and the features they have set up. Each Column for the user reflects primary info of that column’s category for that user and you can click it to access the settings for that category for that user. For a detailed description of what the icons represent and how to assign them, refer to the SmartPBX User guide. View full File
-
-
View full File
-
-
View full File
-
-
USER GUIDE – BUILD A VIRTUAL RECEPTIONIST IN SMART PBX (also called an IVR) User Story An office wants to set up a system on their PBX where the caller selects different extensions/options for: Receptionist Directory / List of Extensions Sales group Voicemails for Users and Groups Answering Service or 3rd party number Spanish language menu This is often called a “Virtual Receptionist” or an “IVR” (for "Interactive Voice Response") setting. You will be able to guide your callers to different extensions depending on their purpose. Overview This guide is set up in two parts. Part 1 steps through an initial setup for a main menu using SmartPBX. Part 2 steps through how to add sub-menus and additional features to the standard virtual receptionist process. This addresses our initial user story item for adding a Spanish language menu. To achieve this we will leverage our powerful Callflows application and create a “submenu” there, and then reference it in SmartPBX. The process looks something like this: Before you start Part 1 will take you through setting up a basic Virtual Receptionist, or call directing menu. This guide assumes you have gone through basic SmartPBX setup steps (add link for setup reference) and have: Configured a Company main number and emergency / 911 address Added users to a directory and assigned their extensions Added/enabled devices and phone numbers to the device tab. NOTE: If you use an external answering service, you will want to add their phone # and landline as a device. Added/enabled a group of users (such as sales, billing, appointments, etc) if that will be an option for your Virtual Receptionist List of your office hours and holidays Part 1: Create an initial Virtual Receptionist Menu in SmartPBX Open SmartPBX Quick steps include as follows: Go to the Main Number / Incoming Call Handling menu Enter office hours, and vacation and holiday times that may affect your Virtual Receptionist response For each “setting” -- Open Hours, Lunch Hours, After Hours, and Holidays, choose an initial Callflow and click on its Virtual Receptionist link. Add menu number item and attach its destination Add Greetings for each extension if desired Save Save as part of the Company Directory for future access Detailed Steps STEP GUIDE – BUILD A VIRTUAL RECEPTIONIST IN SMART PBX (also called an IVR) 1. Select Main Number tab from the left menu. You will see this screen: 2. Enter Office Hours Strategy This is important as you will likely have different call routing options when your office is closed, either for lunch, after hours or a holiday. NOTES: Verify your time zone Enter your “lunch hour” if you send calls to a different number during that time SAVE your edits! 3. Enter Office Holidays Again, these notes will trigger different call routing procedures. NOTES: Once you add holidays, you will need to make sure you create an Incoming Call Handling scenario for holiday routing. SAVE your changes! 4. Configure your Virtual Receptionist routing for each time setting There are four different settings to configure for incoming calls: Open Hours, Lunch Hours (if you define this separately), After Hours, and Holidays. With each tab, you will see the menu choices shown below. The first box will send calls directly to the Virtual receptionist. The second box will provide a single option, and then forward to the Virtual Receptionist. For this session we'll work with option 1. Check to see that Open Hours is selected in green. Note: if you don't see the "Lunch Hours" or other options to the right, it is because you have not defined these in the dialog boxes above - they are optional. Select the first box, and click on the Virtual Receptionist link. You will see a dialog box like below: 5. For each menu item number, assign an extension or a device. NOTES: You should see all the users, devices and messages assigned to this account in your drop down. If you do not, return to the main SmartPBX menu and add the connections you need. If you do not see your “Account Directory” as a top level choice in the drop down, you will need to go back to your Users tab, select each user and check the box “Include User in the Company Directory". (See dialog box below) SAVE! your settings so far. Return to your Main Menu / Incoming Call Handling / Virtual Receptionist - Open Hours menu and 6. Add a Greeting If you want to add a greeting before you offer menu choices, choose from one of the options for creating that greeting shown on the right. You can: Type a text that converts to speech Upload a pre-recorded .mp3 file Choose from existing recordings 7. Step through the same process for Lunch Hours, After Hours, and Holidays. This is important! If you do not add your preferences for the different hours and holidays, your callers will only hear your first setup option. 8. AND SAVE! Part 2: Advanced Virtual Receptionist Setup using Callflows This section is optional. It demonstrates how to use Callflows to add more complex steps to the Virtual Receptionist process. This includes: Adding sub-menus for different languages Adding call routing options to groups Add a Spanish Speaking menu option If you want to add a second menu option, for example in a different language, you will need to set up a Callflow that directs the caller to a separate menu. Quick Steps Open Callflows Create and build a new Callflow SAVE your Callflow EDIT your Callfllow and make sure to select “List Callflow in Main Number” option so it is displayed in SmartPBX. Open SmartPBX and assign your new Callflow to an extension in the Incoming Call menu. Detailed Steps Open the Callflow Application 1. To access this application, select the Apps icon at the top right of your screen. 2. Click on Callflows If you do not see it, enter it under “search apps”. If it is still not visible, ask your administrator to enable it for you. 3. Select Callflows from the Main menu 4. Then select Add Callflow And add the phone number or extension associated with this flow, or routine. You can choose a spare number in your inventory or define an extension to be used. NOTE This extension is what you will use as the beginning of your Spanish Speaking Callflow. 5. Add a new menu to your Callflow Find the Menu button in the Actions bar to the right, and drag it dynamically to below the Callflow block. The menu dialog box will pop up. 6. Add a greeting message using the bottom selection options. You can Type in a message that will be converted to speech (TTS) and define the “profile” of the speaker (e.g. female/male, etc.) Upload a pre-recorded .mp3 file NOTES: A “Not set” option will mean no greeting is played and the menu options begin. “TTS” is short for Text to Speech. Enter text and it will be spoken for you. You can edit your media file using the edit option; this includes defining the “speaker” profile. 7. Add extensions to the Spanish Menu Callflow Once you have the Spanish menu set up, you will want to attach the extensions that you had defined in SmartPBX, basically copying the same navigation from the main menu to the Spanish menu. To do this, drag the user, ring group, directory, and device buttons from the Actions menu to the Callflow diagram. TIP: A quick way to find the device button: enter the word device in the search box at the top. NOTES When you save this callflow, it will re-arrange the blocks in the correct extension order, 1,2,3,4, etc. When assigning a remote call forwarding device, it's recommended you increase the time setting for "Ring this device for ... " It defaults at 20 seconds, you may want to increase to as much as 120 seconds to allow enough time to reach the forwarding/destination phone number. See image below. Once you drag an action to its place, it will prompt you to assign a user, a phone extension or voicemail box, depending on the action you’ve selected. . 8. SAVE your Callflow 9. List your Callflow in Main Number Confirm it is set to “List this Callflow in Main Number.” This will flag the Callflow and enable it to display as an option in SmartPBX. To verify this is checked, select Edit at the Callflow name level, and check the “List …” box 10. Return to SmartPBX to assign your new Callflow! Go back to your SmartPBX Main Number menu / Incoming Call Handling, and re-select Virtual Receptionist. Note you will now see a 4th option in your configuration screen that is pulled in from the Advanced Callflows application. Unless you want to only use a callflow you have set up that includes multiple menus, etc., you can ignore this. We will add the menu we created in our original Virtual Receptionist navigation. Here, you are now able to select your newly created Spanish Menu options under the Advanced Callflows category. 11. Step through the same process for Lunch Hours, After Hours, and Holidays. This is important! If you do not add your preferences for the different hours and holidays, your callers will only hear your first setup option. NOTE: If you do not see these options, it means you have not defined settings for these options. Use the Main Menu drop-down options and fill out the details. 12. Test your Magic! ##### View full File
-

-
SmartPBX FAQ General Information What is Smart PBX? Standard Text Answer. Copy these lines and then paste into a new file and overwrite them with your words. Add bullets if it helps keep things clean How do Smart PBX settings work with and/or override Callflows settings? The data settings for your office can be managed from either Smart PBX or Callflows, and so the last setting you change will be the "current". We strongly recommend you use SmartPBX for your initial setup and engage with callflows app only if SmartPBX does not support your needs. Here's why: Smart PBX has been more recently updated; its User Interface is more friendly for use by your agents, and it makes sense to be familiar with how they will interact with the settings. SmartPBX's setup includes fields and settings not required in Callflows. This can cause issues later on. An example of this is the main extension field assigned to each user. This is required for comm.io to load properly and not required in callflows. SmartPBX is the primary app. our support team will use and interact with while working with you. If an issue can be managed from SmartPBX they will use that first. Greeting Setting I uploaded a greeting in the SmartPBX for the the virtual receptionist, and it seems to be just dead air. Can you dial an extension during the "dead air?" If so, this suggests there is something amiss with the actual music file. Sometimes an .mp3 recording format is not recognized by SmartPBX's Linux server. Please try using a website like https://online-audio-converter.com/ to convert from mp3 to mp3 and retry uploading the converted file. I am trying to record a greeting during lunch hours, but it does not ask me for my PIN so I can change the recording (first answered in our forum by TJ Forsman, Thank You!) Do you have time of day conditions set? The system has to be in the mode that you want to record for that method to work. For example the system would need to be in lunch mode and then calling the main number and using the pin should work. This is also true if you want to set up two separate auto attendants setup for day and after hours. You will want to be in day mode to record day and night to record night. We ended up just setting up a vm box a user could call into and leave the greeting in and have it email is the wav file and upload to the auto attendant in the GUI to make it easier for changes. Ring Groups Settings Can I prepend incoming calls with a tag to identify its source, for example with a caller ID name? Yes. You can add a prepend to a ring group you define. Here's the steps: Open SmartPBX Click on the Groups Tab on the left menu bar Select the Features box (tab to the far right) Select Caller ID Prepend Toggle the enable switch and type in a Name and Number prefix to identify the call. Voicemail Settings Can my voicemails be transcribed to an email for me? Yes! There are two ways to update this setting and turn it on (note there is an added charge of $0.05/minute for this feature as it requires significant storage and a transcription service) From your user settings, under User / User Features / Voicemail box / Transcribe From your voicemail boxes menu, select Advanced and check "Transcribe Messages". You can view these steps with screen shots in our SmartPBX STEP Guide, here Can I enable / disable Voicemail Transcription globally / system wide for an account? If you want to set a default setting for your accounts, send a support request 2600Hz. They can run a script to globally change the default setting. What voice transcription engine do you use? Our initial implementation for voice transcription uses the Google API. Our system is designed to allow support for multiple services however, and we are considering adding Watson and others if demand justifies the investment to add it and QA its addition. I can't seem to retrieve my voicemail messages; it is hanging up after the announcement. This behavior can happen if your voicemailbox is set to "Announcement Only." This setting can be found in SmartPBX under the Voicemail Boxes menu: Select Voicemail boxes, Select your voicemail box, then click on the wrench icon Click on the Advanced button at the top right, and select Options Make sure the "Announce only-mode" is unchecked, both for your mailbox and the main mailbox. NOTE: This can also be accessed in the Advanced Callflows menu. [callflows → voicemail → select voicemail box → advanced options] View full File
-
I recently got a client who wants to give customers access to the Smart PBX but would like to remove the ability to purchase phone numbers. I thought taking the Number Manager away was enough but the Buy button still appears within the UI. Any one have an idea how to remove this feature and I just can't find it?