

Rick Guyton
-
Posts
628 -
Joined
-
Days Won
41
Content Type
Profiles
Forums
Resource Library: Monster UI Apps for KAZOO
Events
Downloads
Posts posted by Rick Guyton
-
-
Awesome, thanks for that info @mc_! We have a media file we need to use with our sub-accounts frequently. This will be a great help. We've been uploading and uploading...
-
16 hours ago, Tuly said:
@Rick Guyton thank you for that!! why cant you do this with a simple static caller ID callflow?
Hi Tuly, I'm not sure I understand your question. But I think you are asking me why you have to use a pattern (feature code) instead in the call flow instead of a static number. If so, you don't have to actually. Consider this:
Problem: When I call my my mom at 9095555507, I want to spoof my cellphone's caller ID (4805555516)
Solution: Create a callflow in my account for the static number 9095555507 and point it to a pivot script https://api.telkit.tk/scid/4805555516.
Now, when I call my mom, at 9095555507, my outbound call will hit my pivot script and my caller ID will change to my cell phone number 4805555516. But this is really limited. What if I want all of my family in so cal to see my cellphone caller ID when I call them? Not just my mom? If I stick to this method, I now have a few dozen call flows to make.
New Problem: When I call anyone in the 909 area code, I want to spoof my cellphone's caller ID (4805555516)
Solution: Create a callflow in my account for the pattern ^909 and point it to a pivot script https://api.telkit.tk/scid/4805555516.
Now, any time I call a number in the 909 area code, it will use my cell phone CID 4805555516. This is super powerful and some sales may love a tool that calls out using matching area codes. But, I'm using this for my family and my little sister, wife and daughter all live in AZ with me and have 480 area code numbers.
New Problem: When I call anyone from my family, I want to spoof my cellphone's caller ID (4805555516)
Solution: Well, I can't use area code based call flow anymore.. So I've either got to create callflows for each of my family's numbers. So, just make a feature code for calling out under my cellphone caller ID. Since I might want to call friends, ect with my cellphone number, I'll just make a feature code using the direction in the tutorial.
You could do any of this and more... I'll share a really cool config I did for a client in just a minute that's totally out of the box in a minute. But, as you read through the scenarios, I think you'll see why the best practice is to simply setup a feature code. As people use features, their use cases for that feature grow and it'd suck to accommodate each problem as it grows if you were servicing a client.
Ok, you didn't ask but I have to share this config just because I was astounded just how powerful the 2600hz platform can be.
Problem: An enterprise client purchased a single building for two of their entities to use. On Mondays and Fridays, CompanyA will use the building and all at all other times, CompanyB will use it. Both companies need the phone system to operate using their numbers on their days. This is easy enough for inbound. But outbound calling is a tough nut to crack...
Solution: Create a feature code (*80*) and point it to a time of day. On Monday and Friday, go to the pivot https://api.telkit.tk/scid/CompanyANum. And set all other times to go to https://api.telkit.tk/CompanyBNum. Then, I configure all phones in the building to prepend *80* to all 11 and 10 digit numbers. BOOM, time based dynamic caller ID and it is SOLID.
-
Hi all, I just created a feature for this. Check it out!
-
Wrap Up
Why AWS API Gateway?
Well, API gateway is incredibly reliable and has nearly infinite horizontal scalability. It's also stupidly cheap. Just $4 per MILLION transactions when using Mock integrations. But, equally important to me was the Lambda functions you can trigger. With Lambda, you can execute C#, Java, Node.js or Python scripts in response to API calls. No servers, no maintenance, nearly infinite scalability and you only pay for your AWS GW fee and the time (to the second) that your code snipit takes to run. It's awesome.
Why the mock integration?
As far as I can tell, mock is free to use. As opposed to running a lambda script. Sure, the lambda script is super cheap. But, why do that when you can have free? For these API functions, all the data we need is given to us by Kazoo. It's just a minor reformatting of the data that we need. And this is a perfect use case for mock.
Testing your APIs
If you click on the GET method of either of these API functions I've provided you with, you will see a blue lightning bolt icon. Click that, can you will be able to provide your API functions with test data to see how they behave. This works with any AWS API query, not just mock ones. Very useful when developing new functions!
Custom Domain
If you want to use your own custom domain like I did with telkit.tk, follow these instructions: http://docs.aws.amazon.com/apigateway/latest/developerguide/how-to-custom-domains.html. Otherwise, you can just use the URI provided by AWS. It will work equally well either way.
Last Note
The real intention behind this post is to cut the FUD behind using pivots in general and in using AWS GW. I'm very much hoping this tutorial makes it easier for you all to develop your own AWS API GW functions. Maybe even share them! Pivots are an insanely powerful tool that I think don't get enough attention. Have fun!!
-
Creating The SCID AWS API Gateway Service
-
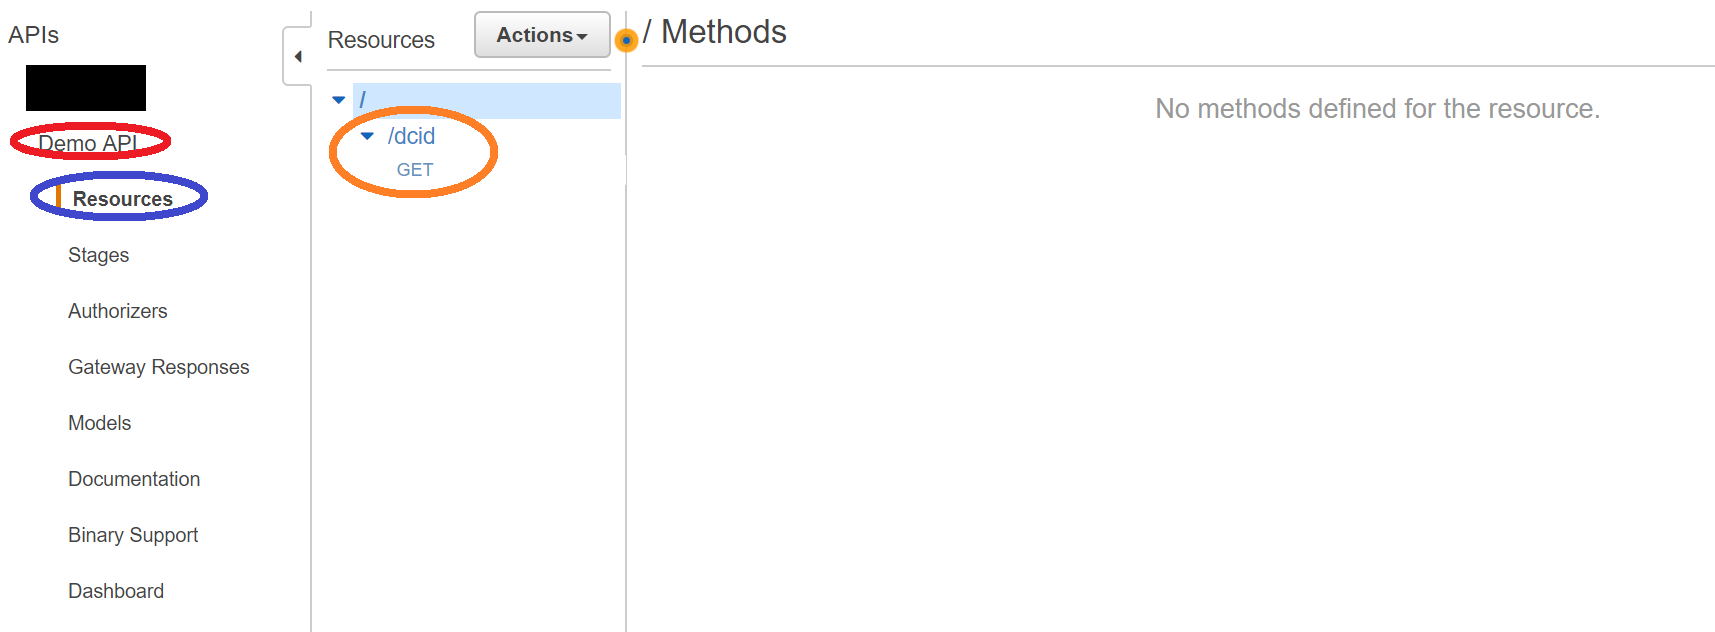
We will be using the same API as before, so go into your Demo API (or whatever you called it) and click on resources. We'll start there. You should see your dcid resource from the previous section. We won't be doing anything more with dcid, but I just want to be sure you are in the right place.
-
-
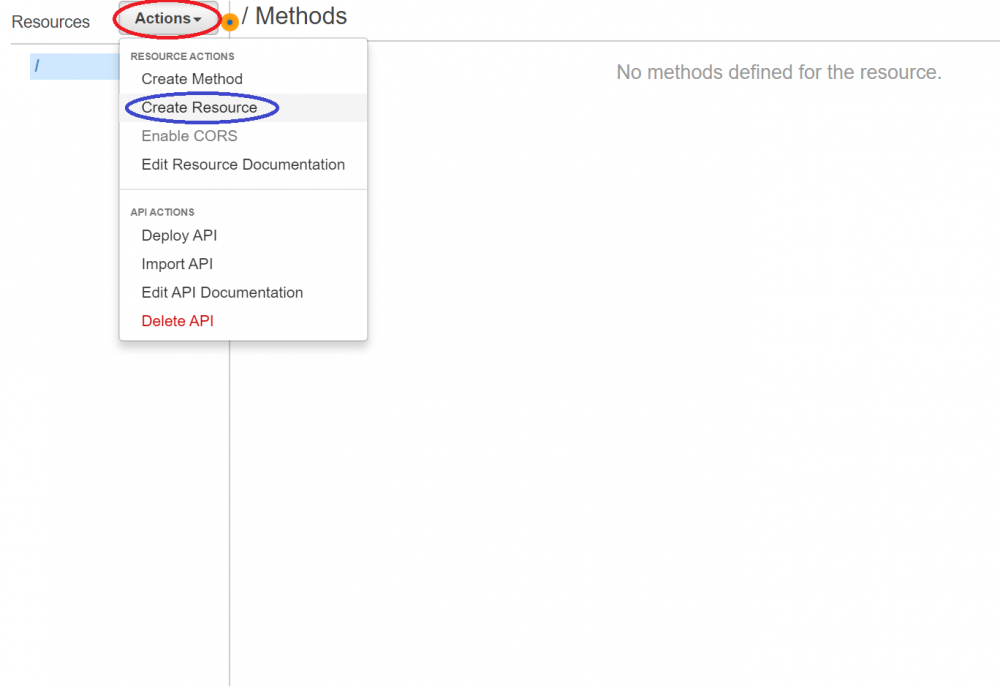
Create your second resource
- Click Actions
- Then Click Resource
-

-
Name Your Resource
- Enter your Resource name as dcid
- Same for Resource Path
- Click Create Resource
-
-
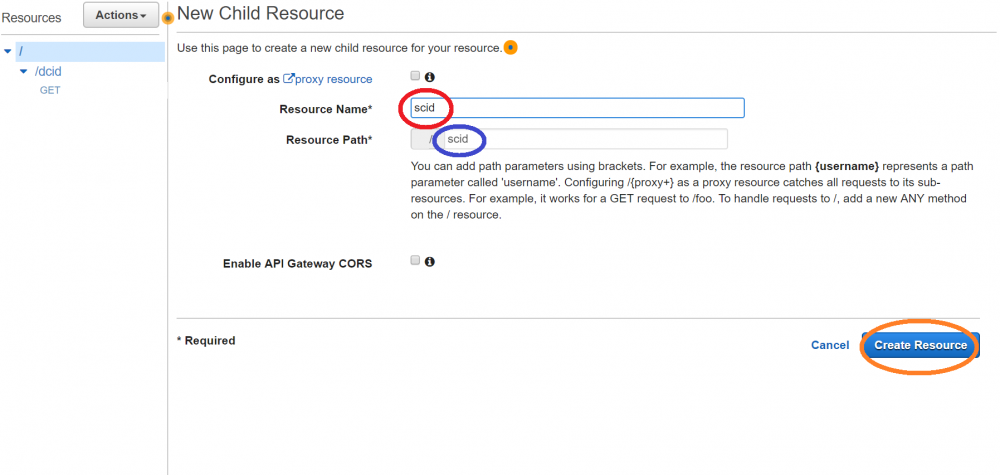
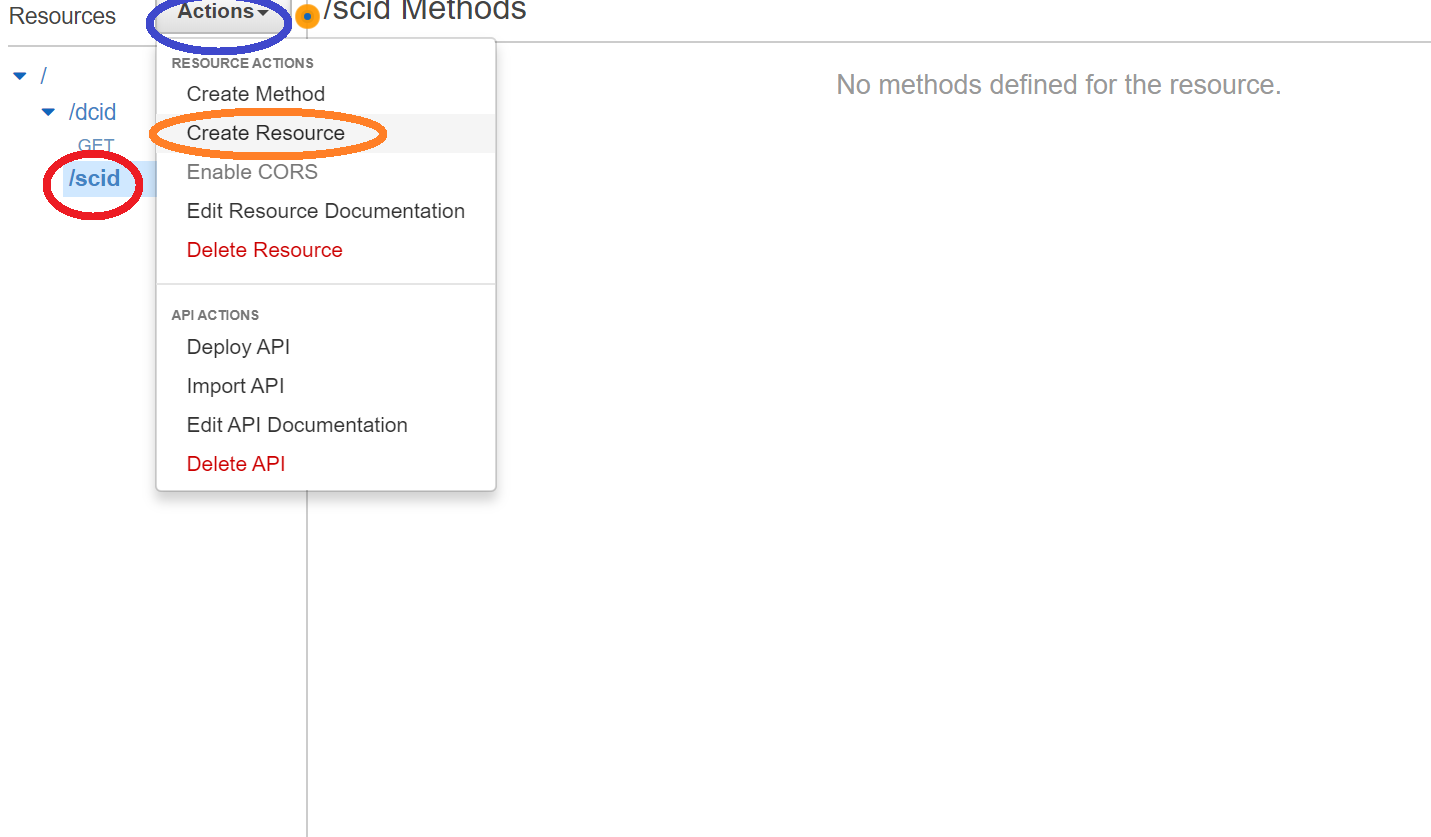
Create a child resource under the scid resource
- Make sure scid is highlighted
- Click actions
- Then click create resource
-

-
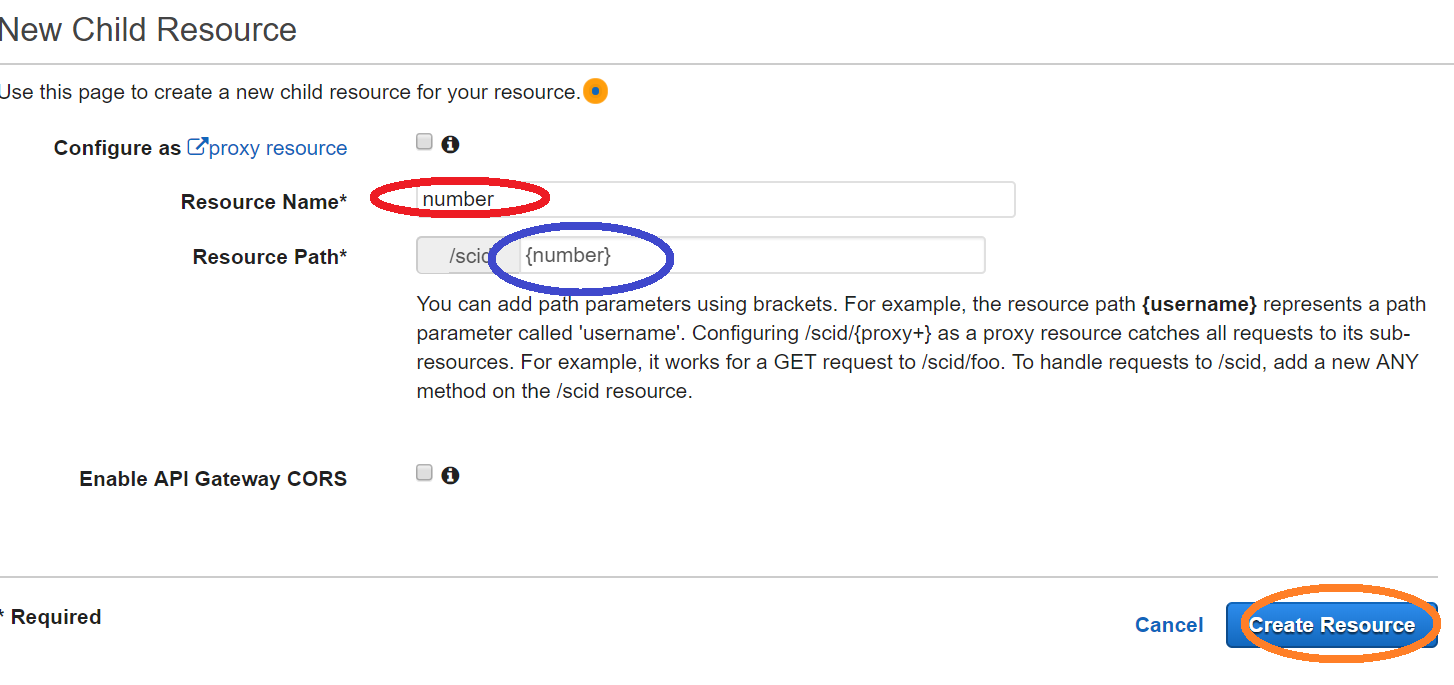
Name Your Child Resource
- Enter your Resource name as number
- VERY IMPORTANT!! Enter your Resource Path as {number}. EXACTLY!
- Click Create Resource
-

-
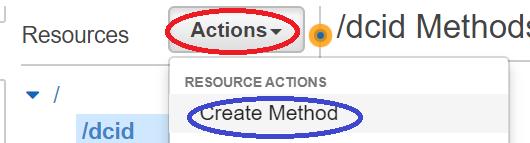
Make a new Method
- Click Actions
- Then, Create Method
-
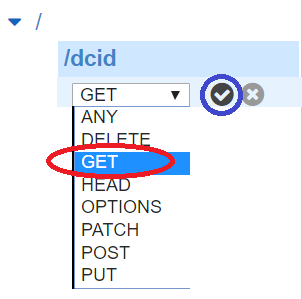
- Then Select GET from the drop down
- Click the check mark
-
-
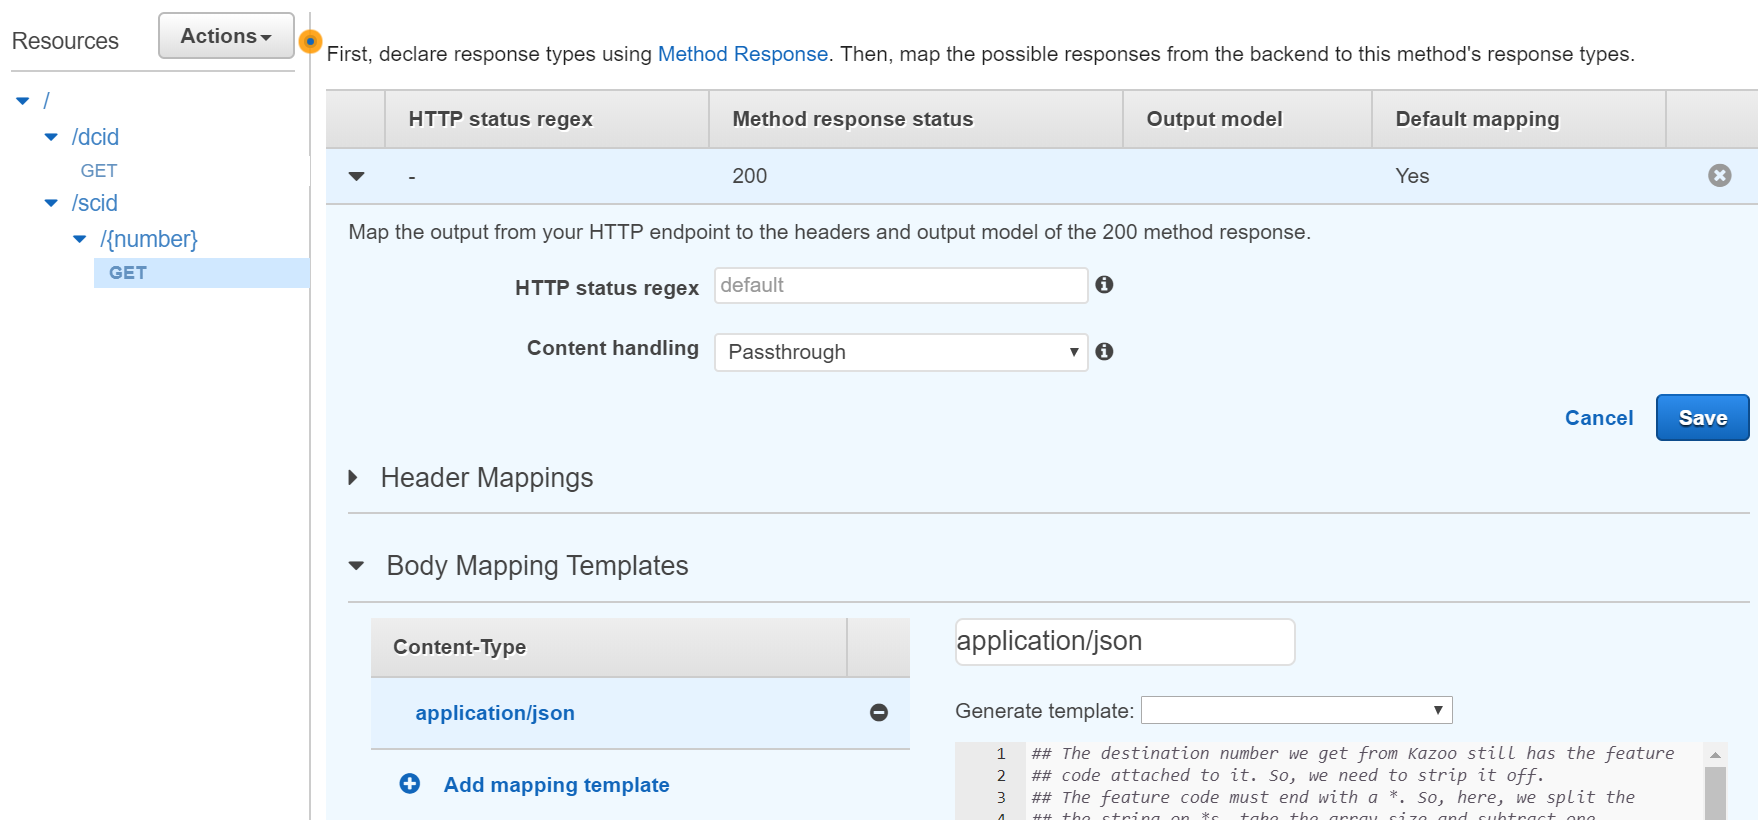
Next, follow steps 4-8 in the above post on dcid. Obviously use the code block from this post when you get to step 8. You should end up with something that looks like this:
-
-
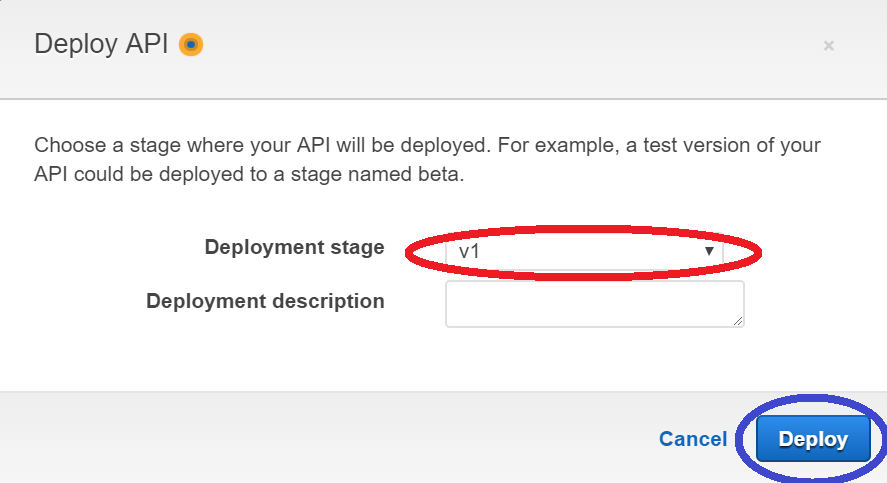
Re-deploy your API!
- Click Actions
- Then click Deploy API
-

- Select your existing stage you created in the previous post
- And hit deploy!
-
SCID Template:
## The destination number we get from Kazoo still has the feature
## code attached to it. So, we need to strip it off.
## The feature code must end with a *. So, here, we split the
## the string on *s, take the array size and subtract one.
## this will give us the vaule after the final * sign, our number
## to dial.
#set($SplitNum = $input.params('To').split("\*"))
#set($DestNumIndex = $SplitNum.size() - 1)
#set($NumToCall = $SplitNum[$DestNumIndex])
## After we have that, it gets pretty easy.
## Now we just present it back to Kazoo in a way it expects.
{
  "children": {
    "_": {
      "data": {
        "to_did": "$NumToCall",
        "use_local_resources": false
      },
      "module": "resources"
    }
  },
  "data": {
    "caller_id_number": "$input.params('number')"
  },
  "module": "set_cid"
}
Thats it! There's a few things you might still want to do, like test your APIs and change the URL. I'll touch on those in my last post.
-
We will be using the same API as before, so go into your Demo API (or whatever you called it) and click on resources. We'll start there. You should see your dcid resource from the previous section. We won't be doing anything more with dcid, but I just want to be sure you are in the right place.
-
Creating The DCID AWS API Gateway Service
-
Create the new API inside the Amazon API Gateway Service.
- Select New API
- Name Your API
- Click Create API
-

-
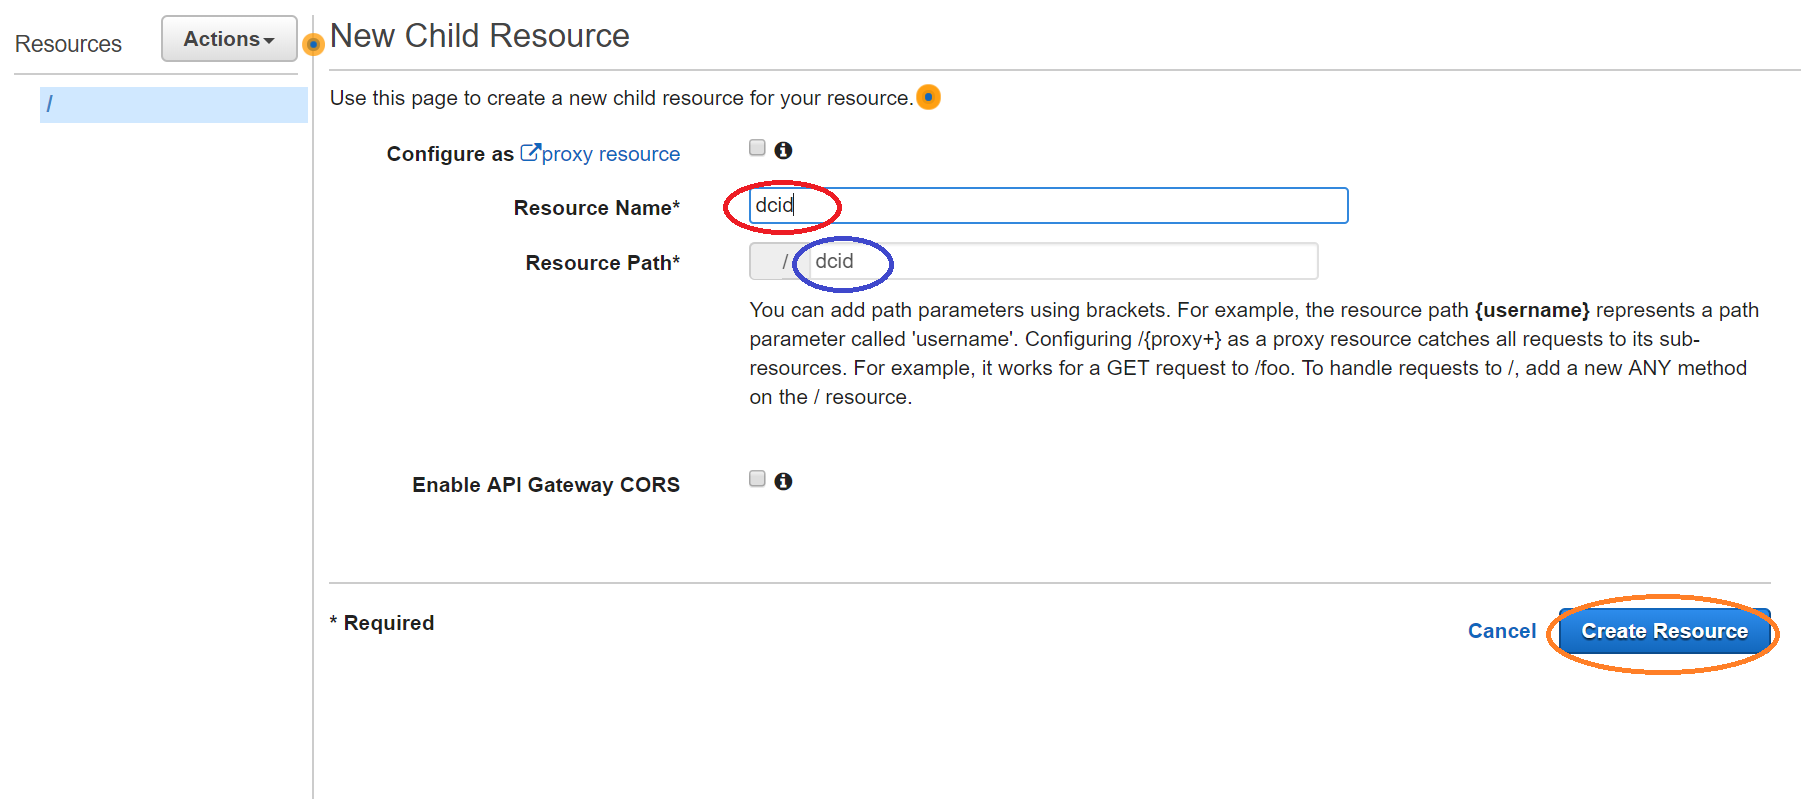
Create your first resource in your fresh new API
- Click Actions
- Then Click Resource
-
-
Name Your Resource
- Enter your Resource name as dcid
- Same for Resource Path
- Click Create Resource
-

-
Make a new Method
- Click Actions
- Then, Create Method
-
- Then Select GET from the drop down
- Click the check mark
-
-
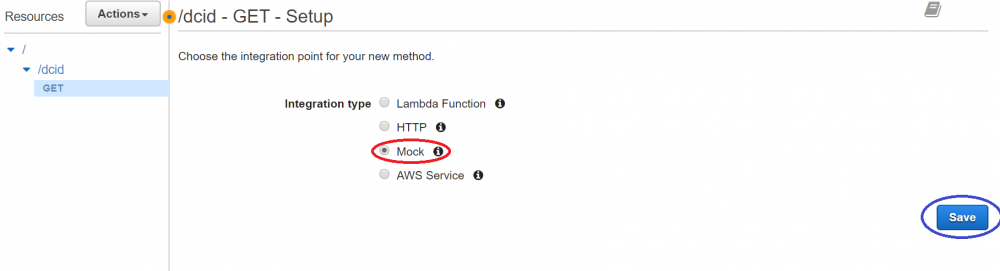
Setup your new method
- Next, you will see options to setup your new method, select mock as your integration type
- Then click save
-
-
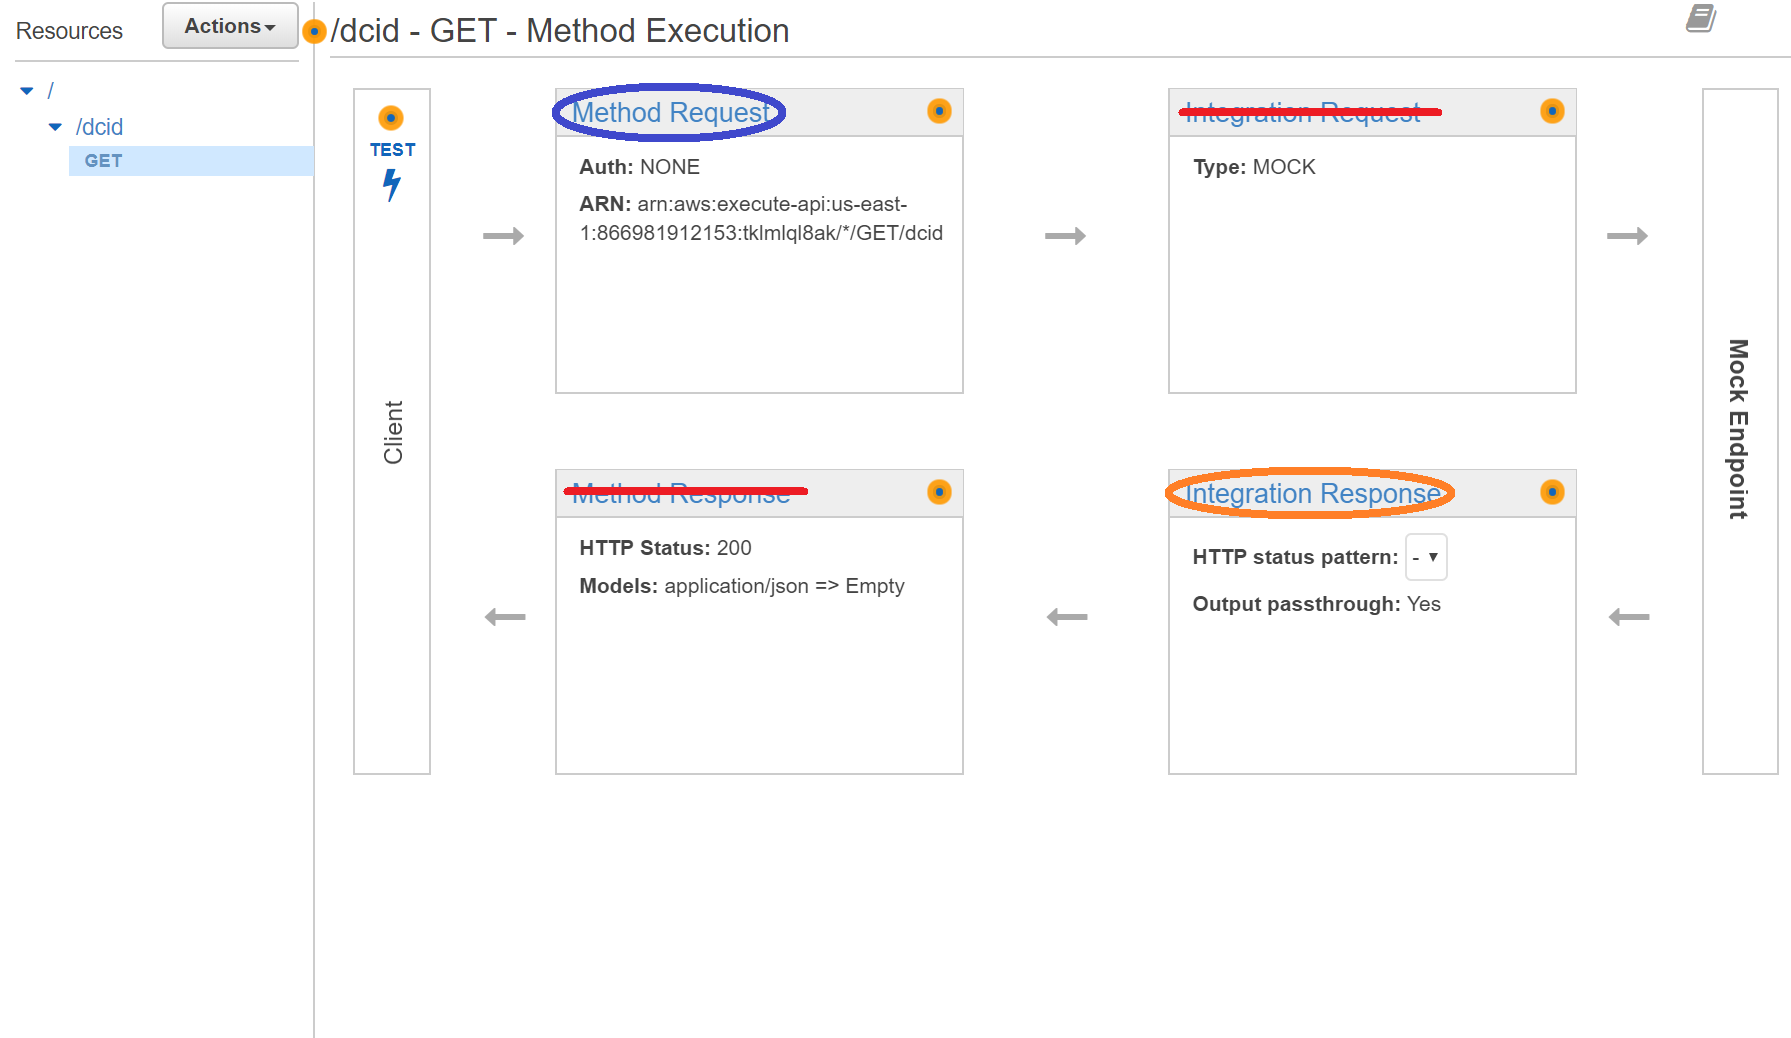
Setup your method's execution
- Fortunately, Kazoo submits and accepts JSON and these are the default formats in AWS API GW. So, there's no need to mess with the Integration Request OR Method Response. The default are good for us.
- But, we do have work to do in Method Request and Integration Response. I'll break these into separate sections though.
-
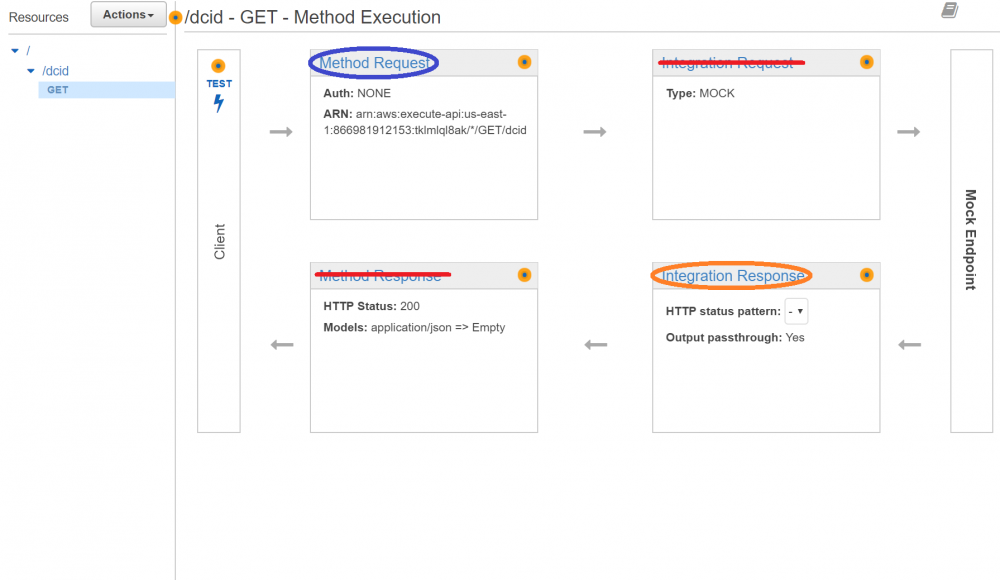
-
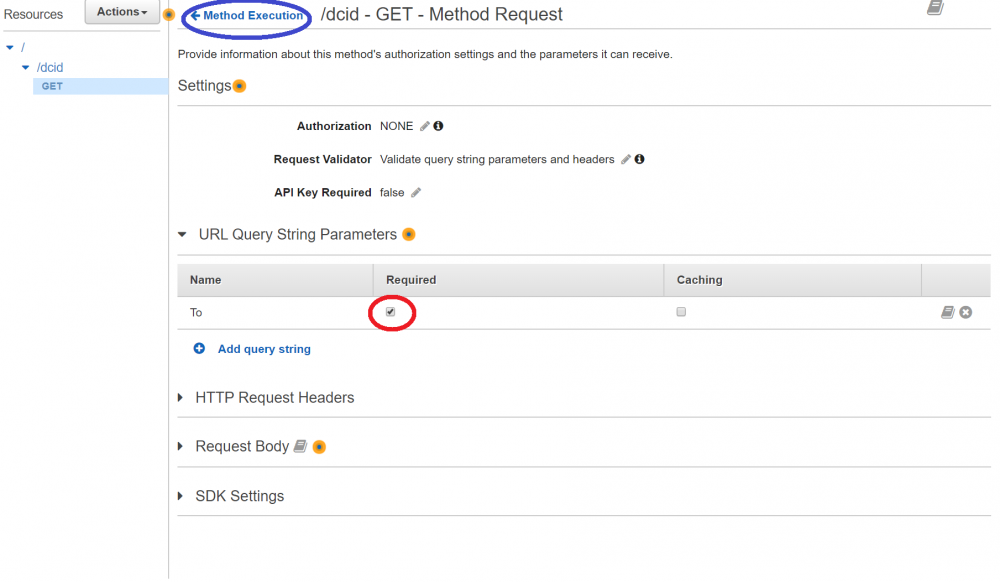
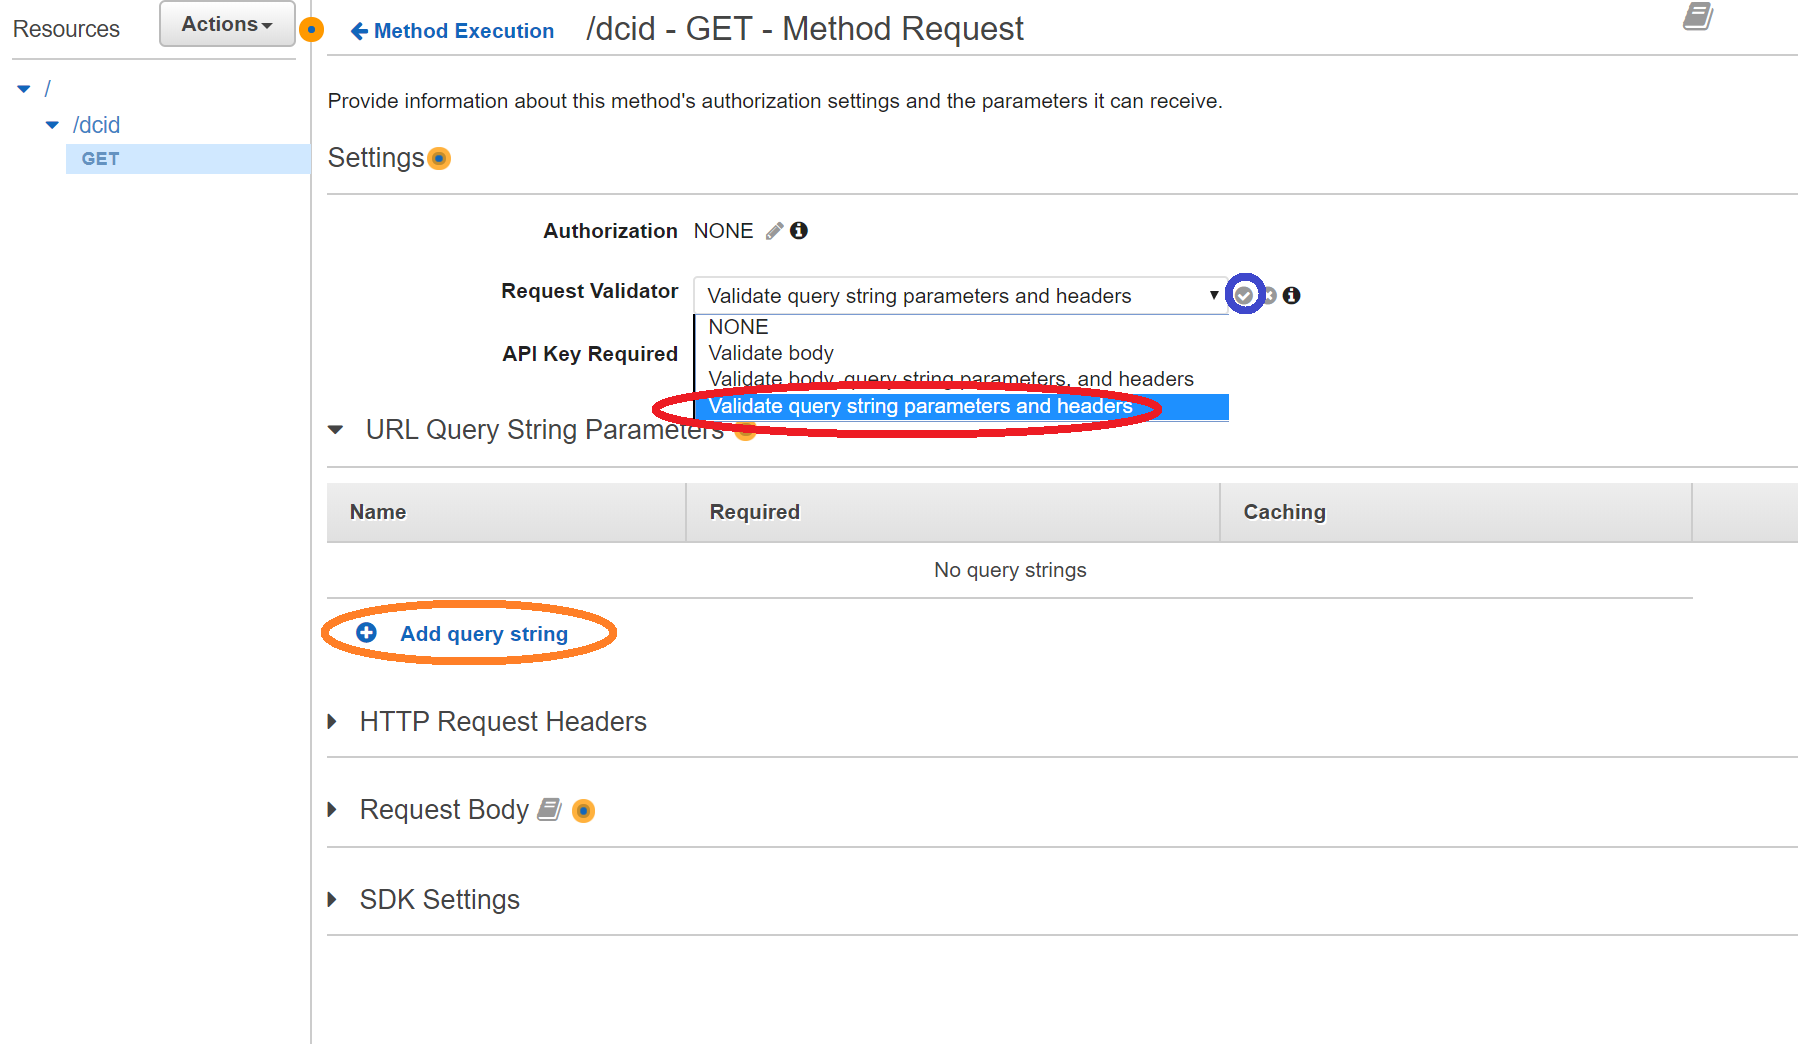
Setting up the Method Request
- Click the method request (reference Step 6)
- Under Request Validator, select Validate query string parameters and headers.
- Then, click the check mark.
- Next, click Add Query String
-
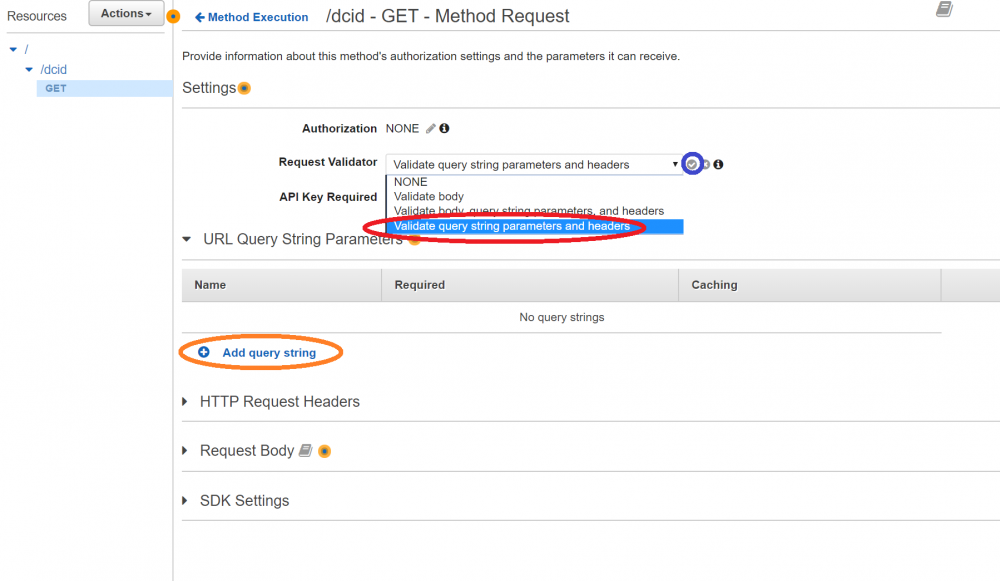
- Enter "To" as your query string name
- Click the check mark
-
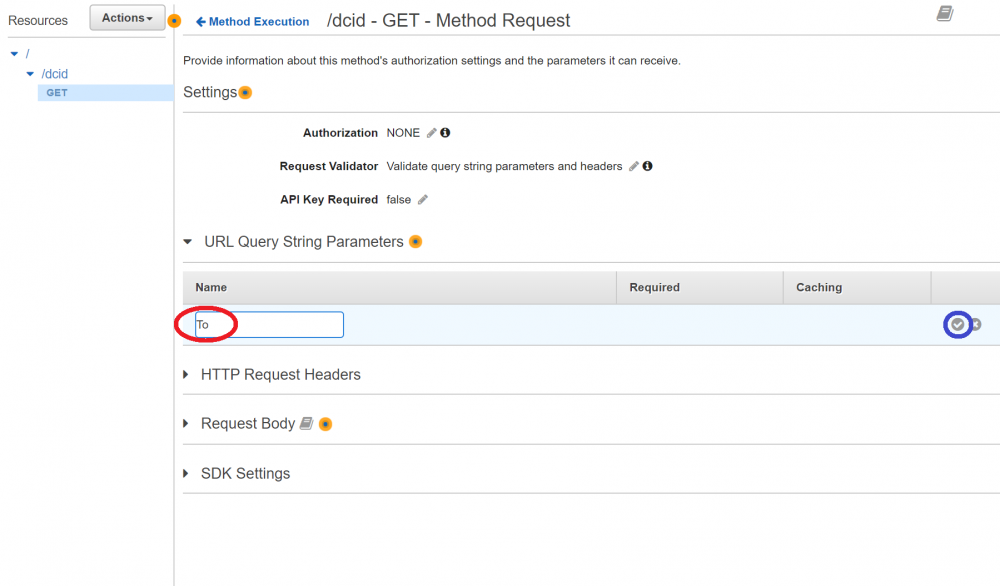
- Next, click the required check box on your TO query string
- This wraps up your Method Request, Click the <- Method Execution link to go back to the screen in step 6
-
-
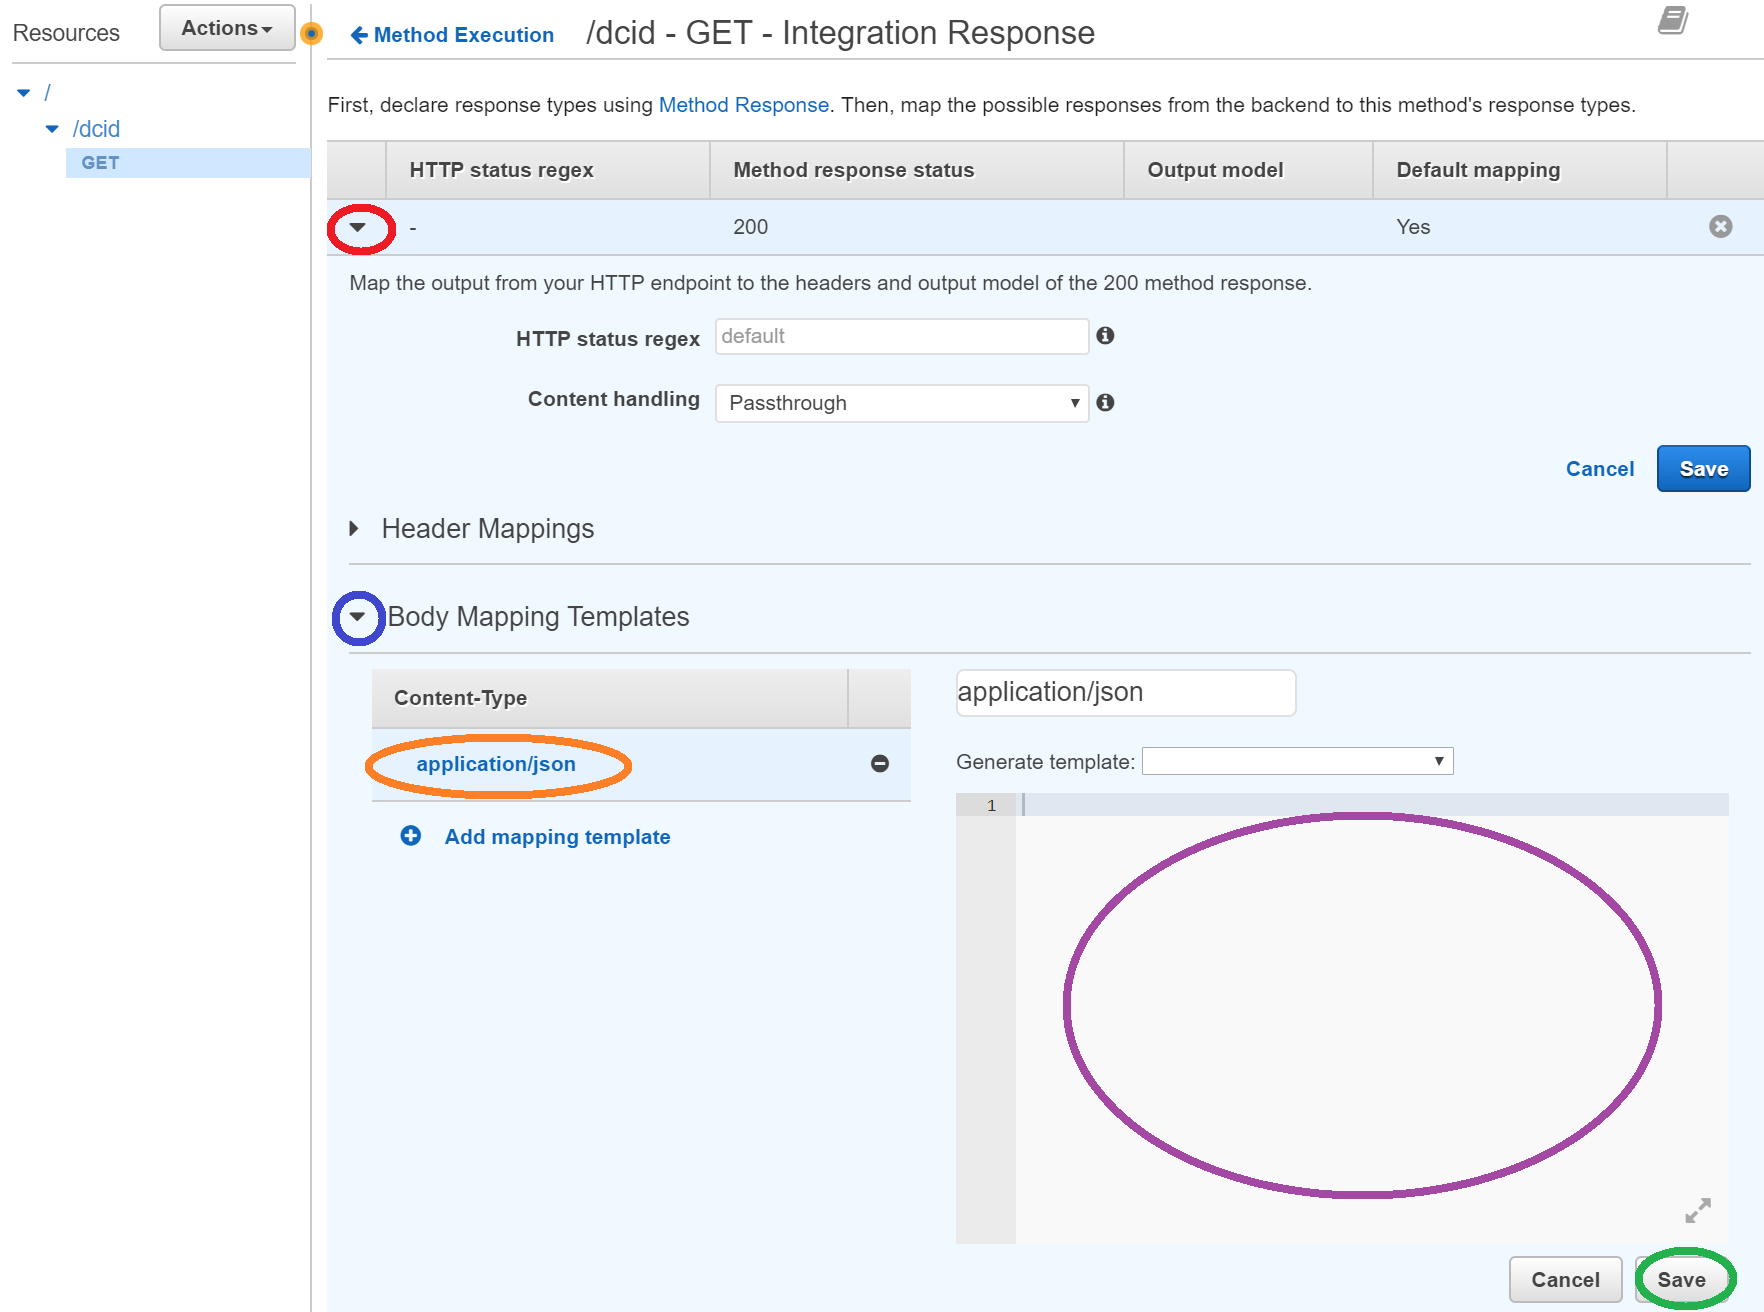
Setting Up The Integration Response
- Expand the 200 HTTP status
- Expand Body Mapping Templates
- Select The application/json Content Type
- Paste The Script at the bottom of this post here
- Click Save
-

-
DEPLOY!!!
- Click Actions
- Then click Deploy API
-
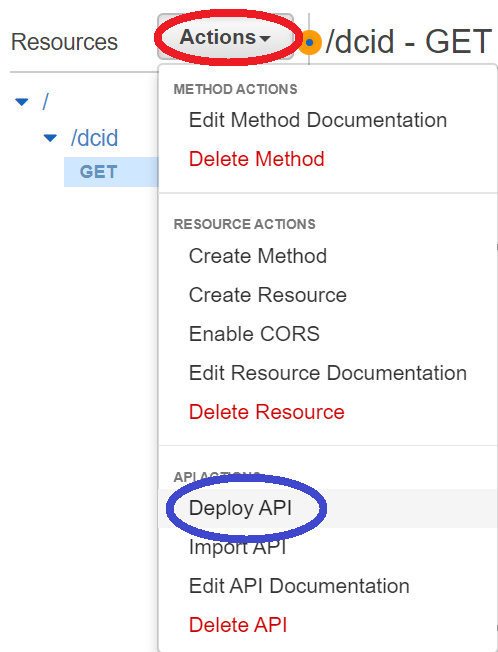
- Select New Stage for deployment stage
- Name your stage (I picked v1, but it could be anything)
- Finally Click Save
-

- Finally, you will be re-directed to your stage editor. You can now use your invoke URL for your very own pivot DCID!
DCID Template:
## This API assumes a format of *SOMEFEATURECODE*SpoofedCID*DestNum ## Here we split out the CID to spoof and the destination number #set($SplitCIDString = $input.params('To').split("\*")) ## And, now we return it to Kazoo in a format it knows how to use { "children": { "_": { "data": { "to_did": "$SplitCIDString[3]", "use_local_resources": false }, "module": "resources" } }, "data": { "caller_id_number": "$SplitCIDString[2]" }, "module": "set_cid" } -
Create the new API inside the Amazon API Gateway Service.
-
One thing we've been sorely missing for quite some time is the ability to quickly and easily create dynamic caller IDs for our clients. In this post I will give you a solution for how you can now do this and how to roll it out on your own! It gets a little technically dense. So I'm going to start as light as possible and then delve into the more complex parts as I go.
WARNING!!! These URLs are strictly for demo only! I don't recommend you use these URLs in production at all. I say this not because I foresee any stability or scale-ability issues. Quite the opposite, this can scale to the moon and back...then back again and it bills to me. So, you have been forewarned. This costs $4 per million requests, so if you guys get too crazy with it, I may shut it down without notice. I mean it'd have to get pretty crazy, but still, at your own risk here.
So, here's the two functions I've implemented and how you can add them to your accounts.
.
Static Caller ID
https://api.telkit.tk/scid/NUMNUMBER
This feature will allow you to create callflows that calls out using alternate pre-defined numbers.
What you will need:
- Account ID to activate
- An auth token
- An available feature code number (check for conflicts! 80-89 seem to be safe)
- The number you'd like to "spoof"
Then, run this command from a *nix device:
Quotecurl -X PUT http://ui.zswitch.net/v2/accounts/ACCOUNTID/callflows/ -H "Content-Type:application/json" -H "X-Auth-Token:AUTHTOKEN" -d '{"data":{"flow":{"data":{"method":"GET","req_timeout":"5","req_format":"kazoo","voice_url":"https://api.telkit.tk/scid/NUMBERTOSPOOF","debug":false},"module":"pivot","children":{}},"numbers":[],"patterns":["^\\*FEATURECODE"],"contact_list":{"exclude":true}}}'
Takes a dial string like *80*OUTBOUNDNUMBER and calls the outbound number from the predefined spoofed number from above.
Fully Dynamic Caller ID
This feature will allow you to setup a feature that lets them call out under LITTERALLY any number, not just numbers that you pre-define for them.
What you will need:
- Account ID to activate
- An auth token
- An available feature code number (check for conflicts! 80-89 seem to be safe)
Then, run this command from a *nix device:
Quotecurl -X PUT http://ui.zswitch.net/v2/accounts/ACCOUNTID/callflows/ -H "Content-Type:application/json" -H "X-Auth-Token:AUTHTOKEN" -d '{"data":{"flow":{"data":{"method":"GET","req_timeout":"5","req_format":"kazoo","voice_url":"https://api.telkit.tk/dcid/","debug":false},"module":"pivot","children":{}},"numbers":[],"patterns":["^\\*FEATURECODE"],"contact_list":{"exclude":true}}}'
This takes a dial string like *80*SPOOFEDNUMBER*OUTBOUNDNUMBER and calls the outbound number as the spoofed number..
Getting your auth token
If you don't know how to get an auth token, here's some instructions for that...
Run this command from a *nix box:
echo -n 'YOURUSERNAME:YOURPASSWORD' | md5sumThis will give you an MD5 for the next command...
curl -X PUT http://ui.zswitch.net/v2/user_auth -H "Content-Type:application/json" -d '{ "data" : { "credentials" : "MD5HASH", "account_name" : "ACCOUNTNAME" } }' 2> /dev/null | egrep -o '"auth_token":"([^"]|\\")*"'This will give you an auth token.
Try this out, if you like it read my next three posts on how to roll each function for yourself and a few last thoughts at the end.
-
FYI the call center does not know when you are on non-queued calls. So if the client is on an outbound call, or if the client receives a direct call, qubical will still try to deliver calls from the queue. To deal with this we disable call waiting. This basically causes the queue to continuously try and fail to deliver calls to the client until they are off the unrelated call. It’s a little less than optimal, but it works
-
5 minutes ago, Tuly said:
you think there Is any noticeable difference with PCMU vs G722? ill update to 82.0.20 and PCMU.....
H U G E!!!
There's no HD symbol.
")
Otherwise, not really. I mean you can hear it if you are calling between two HD phones. But that rarely happens.
-
Yea, I get that. But I needz the HDz.
so 82.0.20 & G722 I go...
-
18 hours ago, Karl Stallknecht said:
Bump? :-) Any ideas @FASTDEVICE or @Rick Guyton?
I mean, my solutions does exactly what you describe. Except that the BLF keys do not that will illuminate when the after hours or holiday TODs are active. They only illuminate when you are overriding the system schedule. Personally, that's what I want. A BIG RED BUTTON when action needs to be taken. I understand the preference for it to work the other way. But good god the unholy hacks you'd have to do to make it even kind of work as an external service would be nasty. Even if you did manage to do it... when 2600hz does maintenance and wipes the BLF status cache... your clients would be calling you all the time.
-
15 minutes ago, Tuly said:
@Rick Guyton i can also say we have more quality issues on Yealink T27 then all other phones, what codec is the phone using? G722 or PCMU?
Tully T27Gs or T27Ps? T27Ps are flawless for us. The only issue I've ever had with them is that the very first revision of the firmware didn't light BLFs. T27Gs are were we have problems. G722 is what we use.
-
20 hours ago, Tuly said:
@Rick Guyton Have you tested 82.0.20 with success? (We have quite a few T27G with no quality issues)
Yea, 82.0.20 works great for us. Still confused as hell why we are seeing this so regularly and others aren't. I'll dig some more...
-
3 minutes ago, Mark Magnusson said:
We are already testing this on our sandbox system, I am unsure of the 4.2 rollout time frame unfortunately. And yes, the data resolution will be much improved, allowing you to drill down per day, week, and month.
I'm excited. My existing clients have been begging for this. And we've lost a couple potential accounts to ring central because we couldn't do this.
-
48 minutes ago, Mark Magnusson said:
I will take this opportunity to chime in here to say that as of 4.2 Qubicle has reporting capabilities that include:
Per Queue
- Average wait time
- Call Count
- Timeout Count
- Abandon Count
Per Agent
- Call Count
- Missed Call Count
- Rejected Call Count
- Average Call Duration
- Average Ring Duration
These will all be available via a new qubicle_reports API (as well as in a nice new graphical dashboard).
This will likely make it much easier to get the data you are interested in for call center calls without having to process the WebSocket events that Dave listed above.
Awesome news Mark! Very excited. Any idea when that'll drop? Also, will we be able to see time frames better? In the current app, all the statistics are from when queue last started. And that could be this morning, or 3 weeks ago. Would be awesome to see stats for a particular day.
-
48 minutes ago, SPC-Tim said:
I have a few clients who run T27g's. and yes we are using SRV/NAPTR.
No issues to report and we are also on the us-west server.
...wow...mind blown. Thought for sure this was a firmware deal dead to rights... Would you mind sharing what codec you are using? Are you using advanced provisioner? Would you mind checking your debugging to see what firmware the phones are running?
-
1 minute ago, SPC-Tim said:
Thank you for the info!
I have not personally had users with this issue, but the info is helpful to troubleshoot
Do you have clients running T27Gs? (not T27Ps, those are fine)
If so are you using SRV/NAPTR?
-
2 minutes ago, Logicwrath said:
Are the media servers the same throughout all your tests?
Yea, all us-west.
-
Just FYI, I've seen lots of call quality reports on the T27G phones. I've personally identified a frequent "gap" in inbound audio on these phones. However, after upgrading it to 82.0.20, the problem went away. This has happened on two seperate accounts now.
-
On 10/31/2017 at 9:46 AM, esoare said:
FYI.
Need to Login to the phone first.
Go to "Features"
Go to "Remote Control"
In Box "Action URI allow IP List "
put in that box " any " (or whatever IP you want access for this function/other)
the address for this also is different " http://phoneiphere/screencapture ".
the address can also be "https://phoneiphere/screencapture".
The phone gets a popup box, asking if it is OK to do this. You have to hit that OK, and refresh the webpage.
esoare
This can also be done with the provisioner with this command:
features.show_action_uri_option = 0
You'd just need to add it in a supplementary config in the provisioner.
-
Hi Anir, try http://URL/{MAC}.xml (no obi)
-
8 minutes ago, FASTDEVICE said:
@Rick Guyton Didn't realize the routing could fail if the user hangs up before confirmation.
Yea, we've had issues where the user will press a menu option and then immediately hang up. And sometimes the system doesn't route it in time. So it fails. With our config this is slightly more pronounced because we have a process BLF callflow item and then a TOD item. And there was a time that we put the TOD first in the callflow and the BLF second. Man, that was a bad idea.. So, now we just advise clients to walk away and let the system hang up on them.
To be clear, I'm not sure if this is a practical issue for your config because you go straight to the TOD toggle from your menu. I was just highlighting a couple of potential issues with my solution so people go in eyes wide open.
-
On 10/13/2017 at 12:53 PM, FASTDEVICE said:
The only issue to consider with Rick's suggestion is that using "enable" will result in the persistent appearance of the office phones working, but potentially disabling your normal business hours and holiday schedule. In both Rick's and my case, the end-user has to manually use the "reset" option regardless, but in Rick's they rely on BLF for indication.
This is totally valid. And we were bitten once when BLF states were lost on the 2600hz side during an upgrade that coincided with a holiday. Fortunately, most of our clients knew they needed to push the button to reset anyway. And at the end of the day all but one of the reports were more of a "why did this weird thing happen?" and not a "OMGZ everything's down". We haven't had issues with BLF being on the fritz for quite some time, so I'm really hoping that's behind us...
Also, it's important to know that if the user hang up at EXACTLY the right time, it's possible for them to hit the BLF update in the callflow without hitting the office hours update callflow item. That's why we tell the client not to hang up the call in the TTS for the menu. The TTS is usually enough to prevent this though. Also, during training I'll stress the importance of letting the phone system hang up. I usually throw a joke about the system being like my wife in that way for fun, but that's totally optional.
Thanks for the info on the preflow @FASTDEVICE! I didn't know about that. I'll probably personally stick to our way of doing out of office. But, I'm sure that info will come in handy eventually.
-
If anyone stumbled onto this, we've updated our best practice on this.


Dynamic Caller ID AND How To Make A Highly Available Pivot Script With AWS API GW
in PSTN, Software, and Services
Posted
Stay tuned, I was going to put it into the main post. But it took a lot longer to write that then expected. I’ll update with that next week.