

Emily R
-
Posts
591 -
Joined
Content Type
Profiles
Forums
Resource Library: Monster UI Apps for KAZOO
Events
Downloads
Posts posted by Emily R
-
-
wow o wow. This is fantastic and shows a LOT of work. Thank you! Checking with my team to credit you with Bits rewards back at you (see here).

Have you seen this Downloads page also we created for contributions from the Community (see the Community Contributions category top right)? It would be awesome if you're willing to post your training there too, by adding it as a link. Let me know if you have questions! -
User Story
- Once an account has been set up, an administrator wants to make some edits to the global account settings.
- Once an account has been set up, users want to personalize their experience with local time, date, language, and other settings.
Before You Start
The first step to setting up your account is to use the Account Manager Wizard application. This is often done by your administrator. A user guide for that process is HERE.
Before reviewing and making edits, confirm with your administrator these global settings have been set to match the account strategy. This includes strategies for:
- Custom branding and DNS paths if desired.
- Settings for localizing the UI and system prompts to an alternate language if desired.
Your Control Center Dashboard
Once your account is created and you are given a green flag to review and edit your own settings, log in and select the Account Name at the top right of your window.
You will see the screen below:
Settings
If you are an administrator you will have access to editing both the User settings and the Account settings from this screen.
User Settings:
Are your user preferences for your personal interface with applications such as SmartPBX and Callflows, etc. By default you will inherit the Account (Global) settings; here you can customize it to match your location and personal preferences. This is helpful if you are in a different timezone from your home account, and/or your native language is different than the home account language.’Account Settings:
These settings define some of the defaults for your global account.
NOTE: If you are an administrator and “masquerading” in an account you will not see the User Settings option in your menu.The User preferences allows each account user to customize the interface for their personal dashboard. To edit/update these values, select the gear to the right of the setting.
email
This is the email you will use to log in.NOTE:
Making a change to the email address in this section, will also modify the users section in SmartPBX. It will enable the "Send emails to an alternate address" option. It will not change the email address since that is their login name.Password
This is where to manage your password for logging in.Timezone & Language
Here you can enter the timezone and language you wish to use for this user. This is helpful if your native language is different from your home office native language.Notes:
- If you update the Timezone setting, it will stamp your voicemails and incoming call data using your new value.
- If you update the Language here, it will display your new language as the UI in SmartPBX and a few other applications. It will not affect the system prompts and voicemail messaging system.
- If you change your language setting, you may need to log out and back in to see the results.
- Some settings can be changed here, and also in the SmartPBX app (for example your CallerID setting). As the database is the same, the last change you make will be the one that is used.
Date and Time Display
This setting will update your date and time display in the SmartPBX application. You can also elect to display hours in 12 or 24 (system default) mode.NOTE: A known limitation of this that is scheduled to be resolved is that the voicemail time stamp does not yet consider this setting, and defaults to the Month/Day/Year format.
Colorblind Mode
Setting this on will update the color palette to colors more friendly for most colorblind users. For example, the arrows representing inbound and outbound calls in the call history page are changed from orange and blue to black and white.
Caller-ID Privacy
This setting defines how you want your outgoing calls to be identified in Caller ID.NOTE:
- If you select “Hide name and Number” your calls may be rejected by a receiving PBX or caller filtration software system.
Phone Numbers Format
This setting identifies the format you want to see phone numbers in. By default, all phone numbers are displayed in their international standard (+1 415 222 1234 for a US number for instance), but you can also choose to display numbers in their national format (e.g. 415 888-2222 for a US number).Finally you can choose to display all numbers in their international format, and then select countries that you wish to display in their national formats. This would mean for example, a US number could display without the country code, and all other international numbers would keep their country codes.
National mode will show only the local format. If you anticipate international calls this is not recommended.NOTE
-
If your host account is transitioning to a localized language system wide, it’s recommended you keep this setting at the Account Default.
The account settings are available only if you are an account administrator. These settings are interpreted by additional components of the system including blacklisting numbers, office hours messaging in callflows, and localizing the software to an alternate language.
Account Name
This is the name the account was originally created as. This is the “human friendly” version of the account.Account ID
This value is read-only and is what the system uses internally as a unique identifier . It can be referenced and copied into a support ticket for account debugging if necessary.Account Realm
The account realm is an important component for the internal workings of your system. It is important this setting is defined and kept static once it is defined. By default, the realm is auto-generated by the Create Account Wizard. As it is an auto-generated name it is not typically a recognizable string of characters; most accounts will rename the first portion of the string using the company or department name to more easily distinguish among multiple accounts.
NOTE: We recommend you define this during your Account Wizard setup process, and if you are white-labeling the solution set, it’s best to have this already defined before you access these pages. It is not recommended you change it here, as it can cause service disruptions.
Technical Contact
Enter the contact person who should be the first line of support for your account. This may already be included as part of your original installation.Timezone & Language
This is where the default Timezone and Language for the system is defined.Notes
-
The User Interface language displayed within the SmartPBX application can be overwritten by each user and customized to reflect a native language if it is different from the company’s home account language.
-
The Timezone setting defines a “home default” time zone that will be used to stamp incoming calls, track office hours and holiday settings, and help direct callflow variables as needed.
- The language defined here is a component to a larger network of settings involved in localizing the system’s voice prompts and redirection english language commands in the back end as well as changing its User Interface prompts. If your system is integrating an alternate default language that includes all prompts, please request access to our localization documents.
Billing
Credit Card on File
You MUST enter a credit card and maintain a balance for your main account.
Once this is entered, it will be used to:
- Purchase new numbers
-
Add credit under the Usage Charges screen for discrete charges including
- Monthly charges
- Added billing for some applications
- Added billing for SMS texts, depending on your service plan
- Manual override charges for call restrictions as defined in the Accounts setup.
NOTES:
-
Only the top level account needs to have credit card information associated to it.
-
When an account is first created and set up. A service plan will be added. Billing starts at that date (proration). When the customer enters their card, there will be a charge then. They will also then be at the beginning of each month.
-
The credit card is charged at billing cycles. When an account is first set up, after the service plan has been added, the account will be charged for the remainder of the month (proration).
- Under the Usage Charges / Subscriptions tab you can set when and how you want to set up payments for your monthly bill -- as an automatic billing via this charge card, charged against your account credit, or by manually going to check your balances. The latter, called “Self Manage” is set as the default.
Billing Contact
Enter contact information for billing questions. This is used if there is someone specific that we need to speak with regarding billing.Usage Charges
This is where you can monitor your account usage, manage credits, enable threshold alerts, enable Auto Recharge, and if a Reseller, manage subscription payment.Manage Credit for Main and Sub Accounts
-
Available Credits
Make sure you check to see if you are in the Master Account or your sub-account when you add credit.- The master account credit is the value that will be used to bill you.
-
The sub-account credit is what we call “fake money.” This is a dollar value directed at the sub account, but will be billed through the main account. All charges appear on the master account. SO if they are using per minute only, it will deduct from the sub account, and from the master account.
The fake money from the sub account is used as a way to limit and prevent fraud while it passes the actual charges onto the master account. While it appears that there are two charges only one is being deducted actually money
NOTES:
-
It is critical you maintain a positive credit balance as there are functions that require accessing this in order to work. This includes:
-
Per-minute, inbound toll-free or international calls when using trunks or not.
- If no credit is available and they have no trunks, calls will fail.
- Only toll-free outbound would work.
- Depending on the amount of trunks and call volume it can fairly quick to spot or it can take days to realize this.
-
When using trunks, if toll-free international per-minute calls, and inbound toll-free.
-
Per-minute, inbound toll-free or international calls when using trunks or not.
-
Add Credits
When you select Add Credits you will see a new dialog box with several tabs inside.-
Manage Credits
This provides an option to manually add credits to your Current Balance (shown as “available credit” in your master account).
-
Manage Credits
-
Threshold Alerts
This sets a minimum account balance threshold. When the Current Balance falls below this, you will receive an email alert.
Set this value based on how many customers you have and how many calls you anticipate will be billed per month. A common setting to start is $20-25.00.
-
Auto Recharge
Set this to ensure that your calls are not canceled due to a run-out balance. Enter the threshold amount and the amount of credit you want to add.
-
NOTE: It is important to set the recharge amount so it will cover at least a day, as the charge event occurs once a day only and it would require a manual update.
-
NOTE: It is important to set the recharge amount so it will cover at least a day, as the charge event occurs once a day only and it would require a manual update.
-
Display Filters
Below your Credit Balance summary there are filters to view your charges.
-
Per Minute
This tab displays the per minute charges incurred based on your settings in SmartPBX for call charges.
-
Mobile Data
If you have enabled SMS text messaging and/or mobile phone devices to your account, this tab will display the data (in Megabytes) that you’ve used for the month.
-
Rollovers
This reflects any credits or balances carried forward from the previous month. The value is calculated after monthly charges are applied.
-
Start and End fields
If you want to filter based on a time window, enter the start and end dates.
-
Filter
When you select the filter button you can sort the list by clicking on the field you want to sort. This is how to view different accounts’ billing summaries.
-
Download
Select the download option to save a .csv file to your desktop. This can be imported into a 3rd party billing system or simply to a spreadsheet for your own reporting process.
Service Plan
This displays a breakdown of the Account’s service plan and amount due at the end of each month. The download button allows you to download the data into a .csv file.Transactions
The transaction summary lists the charges that have been made to the card listed. This can be filtered by date.Trunking
Inbound and Outbound
This dialog box provides access to reset trunking limits originally set in the Accounts Setup. A trunk is akin to a physical phone line. Only one call can be active for each trunk. Inbound Trunks can only handle calls inbound from a carrier, Outbound Trunks can only handle calls outbound to a carrier, and Two-way Trunks can handle calls to or from a carrier just like a physical phone line.- If you are not familiar with trunking limits and how they affect your call center service and your billing structure, please contact an administrator.
-
Ask your sales representative to share the trunking price matrix.
Two-way Trunks
Two-way trunks provides added flexibility; they can be dynamically assigned as inbound or outbound. The value entered is the total amount of trunks available, for example a value of 5 could assigned at any time as 4 inbound and 1 outbound, or 2 inbound and 3 outbound.Misc
UI Errors Log
This will display if the error log option was selected in the Accounts Setup. These logs are useful if you have a question for support regarding an error message.
#####
Frequently Asked Questions
If I change my Caller ID information in SmartPBX, does that change the setting here also?
Yes. You can access this setting from either application. As the database is the same, whichever step you save last is the setting that will be active.I updated my timezone to a different one than the default, but my voicemail stamp is using the default time zone.
This is a known issue and will be resolved in the next release.I changed my language setting to German, but one of my applications is still showing English titles, etc.
The language porting effort is an ongoing project, and new additions and modules are being created both by 2600hz and many partners. If you are looking for a translation not shown when you enter your language, or your language does not appear as an option, there are some options to consider:- Reach out to the community forums to see if any other resellers/partners have already translated an app you are using
- Review the Language Pack Editor app and consider entering your translation efforts here.
- Reach out to your 2500Hz contact and ask if there’s any efforts around translations you can contribute to and/or invest in.
How do I create a sub-account?
If you want to create a sub-account, for different field offices for example, first highlight the main account from the home page listing and then select “Add Account”.Can I change the Trunk Limits value any time if I discover what I enter is not appropriate?
Yes, once your account is created, you can manage your trunking settings from the account’s Control Center page. Note this will affect your billing.When I set / change trunking limits, how does this affect my billing?
There is an overview of our pricing structure here; however please reach out to your sales representative to confirm any changes in billing related to increased trunk limits.I've set my account to enable International calls but I still cannot place outgoing international calls.
International calls to some countries can quickly get expensive and overrun your credit balance. To assure you recognize this, we require an additional permission to bill you the cost of the call overrun on a per call basis. In order for international calls to be connected, your account must- In the Accounts application, under the Limits tab, enable international calls at the account level and the user level.
-
Make sure in the Limits tab, under the Manage credit balance window you must also check the "Allow customers to make per-minute calls that go over the limit, and bill them the per-minute cost of the call" checkbox. Make sure to click on the green Update button when you select this.
-
If you still experience calls not connecting, check with your Carrier. They may have upper per-minute price limits set that are below certain countries' pricing.
What does "Real Money" v. "Fake Money" in the Hosted Accounts mean?
The distinction of types of money was created to support sub-accounts in a Hosted environment. In short, all "Real money" is managed at the top-level account, and sub-accounts are allocated "fake money" values that provide a "bank account" for calls that are not covered by the account settings (e.g. adding new phone numbers and devices, trunking overages, international calls, and in some cases 911 calls).Hosted customers must maintain balances of credits in their main parent accounts for the purposes of covering these costs. All value flows from parent account to sub accounts for the purposes of managing costs. The sub accounts, however, have the distinction of only being allotted “fake” or representational values from the parent account.
This isn’t actual value in the sense that the number seen in the accounting information of a given sub account are currency units, but rather that they represent a store of value as a portion of the credit value stored in the main account.
This has several purposes:
-
It limits sub account activities to a virtual stored currency limit can prevent situations of runaway cost overrun from things like fraud or system errors.
- Monthly accounting can be more easily tracked for each individual sub account with clear records showing when value was allotted and when costs were incurred against that per sub account. This is summarized in the Usage Charges section of the Control Center. You can generate a report showing each sub-account's charges and import that into a spreadsheet for your own billing process.
Related Articles
SmartPBX User Guide Accounts Manager Wizard User Guide API Reference Docs
docs.2600hz.com
REST API Reference for Kazoo Crossbar APIdocs.2600hz.com
REST API Reference for Kazoo Crossbar APIdocs.2600hz.com
REST API Reference for Kazoo Crossbar API
-
Now more than ever we're focusing on helping you manage your distributed workforces.
Please give us feedback on how you use and want to use our Call Recording features. Join our survey, HERE. -
We're tweaking Call Center Pro and want to learn more about how you use it and/or would want to see it updated.
Please contribute to our survey, HERE. -
Monster App Choices
SmartPBX vs Advanced Callflows vs APIsUser Story
- A new user wants to understand what application to use for getting started with and managing and maintaining their account. They are confused about whether to use SmartPBX, Advanced Callflows or system APIs.
- A new user is looking to understand how these applications interact with each other.
Overview
It’s important to understand both SmartPBX and Callflows access the same back end database and use the same APIs to transfer data. Edits from one app will reflect in the others the next time you load it. Some apps however, do not provide access to certain settings, either because it is considered more complex and requires admin level understanding, or the setting was added as a new feature not yet updated in an older app.This document will share recommendations on when to use each configuration method. In addition it will review some 2600Hz history to give context to the applications and how they evolved.
In short
Your administrator will likely use Account Manager for your initial account setup.
Once your account is accessible, Smart PBX is often set as the default application you see when logging in.
Use SmartPBX for account maintenance and management whenever possible.
It is the most current and most user friendly app for your initial setup.
Use Callflows if you are an administrator and want to set up some more advanced, complex features for your client.
Use KAZOO’s powerful API library if none of the options above provide a feature you require, if your process is a back-end calculation or for automation needs that do not need user input. Note: API use requires a developer who is comfortable using JSON APIs in their preferred programming language, is familiar with Kazoo configurations and reading Kazoo docs. A summary chart of what functionality can be managed in each app is available at the end of this document. For a detailed overview comparing access to each setting in Callflows v. SmartPBX, go HERE.
Set up your Initial Account with Account Manager
This will be accomplished with your Account administrator. Once your initial account has been set up, you will want to personalize it according to your office requirements.Get Started with your personalizations with SmartPBX
Once your account has been set up by an administrator it’s best for as much configuration to be exposed in SmartPBX as possible for End Users to see. Spend some time stepping through the application and working with the features available for you. We have a series of User Guides available also, HERENOTE:
Make sure you associate a “Main Extension” to your user name in SmartPBX. This is required for the comm.io app, and is not available to add in Callflows. (This is an example of the newer app supporting newer features). If you have set up your user in Callflows already and want to use the comm.io softphone, refer to the comm.io installation and setup document, HERE.Advanced Functions using Callflows
If it’s not possible to complete your objectives using SmartPBX, use Advanced Callflows. Some common advanced functions callflows excels at include:- Creating sub-menus for incoming calls (e.g. Spanish speaking and English speaking). We have a document HERE that outlines this setup.
- Creating secondary, tertiary, etc. callflows. For example for multiple locations/companies in a single account.
- Creating custom feature codes
Using APIs to develop further customizations
Both SmartPBX and Advanced Callflows ultimately use the same APIs, they are just viewed in different ways. If there’s some function in the Kazoo GUI that you need to do very often, often enough that it’s not efficient to use the GUI, this is an occasion where you use APIs.Some common uses for accessing the API directly include:
- Processes not supported by SmartPBX or Callflows
-
Integrations with other programs that also use APIs.
Examples include billing programs, integration with Salesforce or web pages, etc. - Repetitive processes that can run in the background and do not need user input (for example, some billing functions).
To start learning the API syntax, watch the network tab and see what APIs are being called while you complete your task in the GUI. Then check the documentation to be sure you fully understand what the API call is actually doing. And write your code to replicate it. All the documentation for our APIs is available HERE.
Anything that can be done in our GUI can be done via API as well. Simply open your browser’s development tools feature, watch the network tab and see what APIs are being called while you complete your task in the GUI. Reconcile this with the API the documentation to be sure you fully understand what the API call is actually doing. And write your code to replicate it.
Notes:
- Not all APIs are considered stable and available for end user use. Please be sure your API is supported before using them.
- Please take special care and do extensive testing if you want your application to work with SmartPBX.
- When developing using the API always develop against a sandbox environment. Never code against a production cluster.
An example configuration using multiple KAZOO applications
Below are some example configurations where more than one application is accessed. These include helpful tips on the most efficient ways to achieve this.
-
Build a sub-menu into your main number incoming call routing
If you want to build a sub-menu into your main number config (for example to support multiple languages or departments), this is not possible to do in SmartPBX.
Here’s a trick we use to streamline this process:
-
First, in SmartPBX. build all your ring groups for the sub-menu
-
Second, in Callflows, build the callflow for the sub-menu.
Instead of building the menu options all from scratch, use the SmartPBX ring groups you just made.
- Third, while still in Callflows, name the callflow and enable the “List this callflow in Main Number” check box. This will allow you to use the advanced callflow as an option back in SmartPBX’s main number section. With this example, your end users will be able to change the members and order of the sub-menu’s options via the SmartPBX groups section. This keeps the complexity of Advanced Callflows abstracted away from user, and allows them to manage the details of the process using a familiar interface, SmartPBX.
Sample of application best uses
Account
MgrSmartPBX
Callflows
APIs
Initial Setup ✔ Add/Edit Users and Devices Global
SetupUser Edits Basic Settings: - Office / Holiday Hrs
- Hold music
- Incoming call routing
- Default language interface
- Billing settings
Global
SetupUser Edits Ring Groups Create Here Trunking Controls Admin
SetupAdmin Edits Sub menus for incoming calls Create Ring
Group FirstAttach sub
menus to
Ring GroupBackground of KAZOO’s development and updates
When the KAZOO project first started over 10 years ago, everything was done via json APIs -- there was no GUI (Graphic User Interface). The expectation was the KAZOO platform would serve as a robust engine for companies to use as their back-end and that those companies would build their own GUI to best fit their customer’s needs.
KAZOO is extremely robust and with this comes complexity however, and many of our clients didn’t want to spend time diving into API docs before they even knew if a project would work for them. They wanted a quick and easy way to set up an account to test our wares.
To support these developers 2600Hz made a very basic GUI for the APIs to enable a quick and easy setup for a testing environment. This original GUI didn’t expose all of the APIs or even all the features of the APIs but it gave developers a head start. Once they felt confident in the platform, developers used it to enable them to build custom GUIs.
This served our clients who are sophisticated programmers in their own right well, and they created unique applications as we imagined, and still do. Their solutions are elegant overlays to the KAZOO engine. As we grew however, resellers started using the original tool to set up and maintain end user accounts; they requested we provide a more friendly way to enable their end users to personalize and change their account details without constant support.
This was the driving force behind our Monster-UI framework and SmartPBX application. SmartPBX was built as a general use GUI for Kazoo, one that resellers could hand off to end users. In making the system more friendly to non-programmers however, we reduced the configuration offerings to a core that most accounts need. To continue to keep some more complex features accessible for advanced administrator use we ported in the old UI as the Callflows app.
Some challenges remain with this multi-tiered approach. Because SmartPBX and Advanced Callflows share the same APIs, you could see callflows created by SmartPBX in the Callflows app, setting an expectation that users could also edit them. We needed a way to track where the input came from and how to edit it. To solve this, 2600Hz added metadata to the json API indicating what app that created the callflow. And elements made in SmartPBX were hidden from Advanced Callflows.
This is the state the system exists in today. While most now use Monster UI and SmartPBX, some companies still use Kazoo strictly as a back-end system and use their own GUIs. Developers are still welcome to use the APIs to build their own GUIs. For those developers wanting to use the APIs, but also wanting to use Advanced Callflows, SmartPBX and other Monster UI apps. This is possible as well. When doing this, however, please take great care in your code to match the formatting that Monster UI apps use as closely as possible. Remember not every single feature of the APIs is available in SmartPBX or even in Advanced Callflows, and SmartPBX expects very particular formatting to work correctly. In all scenarios, thoroughly test your code against a sandbox environment before deploying to production systems.
Additional Resources
SmartPBX User Guide Advanced Callflow configurations and setup API References
docs.2600hz.com
REST API Reference for Kazoo Crossbar API
-
Enabling the new 3-digit 988 Lifeline Number
User Story
All Kazoo Platform operators need to implement outgoing calls to 988 to reach the National Suicide Prevention Lifeline in order to comply with the FCC directive to transition all call access by July 16, 2022.
Background
On July 16, 2020 the FCC voted to reserve 988 as a new 3-digit call number Americans in crisis can call to reach the National Suicide Prevention Lifeline’s network of suicide prevention and mental health crisis counselors. This is akin to the 911 Emergency Hotline; callers dialing 988 will be directed to the existing support number, 1-800-273-8255.These rules apply to VOIP service providers in addition to telecommunications carriers. Some important details include
- Deployment deadline for this addition is July 16, 2022.
- All providers must support 10-digit dialing in areas that still support 7-digit dialing, using 988 as the first 3 digits to reach 10.
How to Deploy 988 within your KAZOO Platform
Below we outline steps for deploying 988 dialing in your account.Hosted Platform Systems
If your account uses 2600Hz carriers
The 988 Lifeline number has been deployed and is accessible now.If you are using your own carrier on hosted (BYOC)
You will need to set this up on your own. Please follow the steps below for Private Cloud and Global Infrastructure accounts.BYOC / Private Cloud / Global Infrastructure Sites
If you are using the Hosted Platform and Bring Your Own Carriers or support your own platform as a Private Cloud or Global Infrastructure account. you will want to implement this by adding a “carrier”.
To do this, use the Carriers App.
Click on the application. If you do not see it ask your administrator.
From the home screen, select "Other" to add a new "carrier"You will see the screen below.
- In the Brand field, select Other, and enter your Other Brand Name, 988 Emergency
- In the Server field, replace 2.4.5.7.8 with the IP address of a carrier who can process toll-free calls
- In the Name field, enter 988 Emergency also
-
Under Rules, select Add New Rule, and click on Emergency Dispatcher
-
You will see the screen below
- In the Prefix field, Enter the Lifeline 10-digit number, +18002738255
- In the Type a Test Number field, enter 988
-
Add the following Custom Regular Expression as shown in the screenshot above: ^988(\d{0})$
-
SAVE !!!
Your new "carrier" should display in your list of carriers.
-
Select the Gear setting to the right of your listed carrier and go to the Advanced Settings tab and select the Audio option
-
Move PCMU audio codecs to the Selected setting.
- SAVE that setting also
Troubleshooting
I'm using the Open Source (or older version of KAZOO as a Global Infrastructure installation) and after setting this up it still doesn't go to the dedicated Emergency Carrier. Any ideas?
This can happen if the 988 number is defined in the Carrier Rules as emergency, but not included as an emergency classifier in your database. It then is set as "unknown," and will find a carrier that supports unknown classifications. In pre-4.3 versions of KAZOO, you will need to add 988 to the emergency classifier file in your database.
NOTE: This kind of modification requires expert knowledge of how these databases work and can cause serious issues if not entered correctly. Please consider reaching out to support for details.
-
To check your classifier file, you can run this command
sudo sup kapps_config get_json number_manager classifiers
and search the results for the emergency classifier values. If it is not there you will need to add it.
Frequently Asked Questions:
Is there a test number I can use to make sure my settings are correct?
We are not aware of one at this time.Once this is implemented does the 10-digit phone number 1-800-273-8255 still work if called?
Yes. This number will remain operational during the transition process and after July 16, 2022I'm using the Open Source platform and can't seem to get a dedicated Emergency Carrier process to work. Any ideas?
This can happen if the 988 number is classified as "unknown." In pre-5.x versions of KAZOO, you may need to modify the classifier file in your database to include 988 as an emergency dispatch number. NOTE: This kind of modification requires expert knowledge of how these databases work and can cause serious issues if not edited correctly. Please consider reaching out to support for details.
References
-
FCC Announcement is HERE
####
-
Is it possible to provision a phone not listed in auto provisioner ?
In theory, any SIP phone can work as a very basic phone, it is not recommended by 2600Hz as it likely means you will have limited functionality and upgrades could cause issues.- If you have a specific phone model from a manufacturer (for example Polycomm) that is not listed but similar models are, you may be able to get it working.
- If however, an entire manufacturer's phone inventory is not listed it's likely that manufacturer has a proprietary setup and does not allow alternate platforms to recognize it (for example, Avaya).
-
Hi -- If you are logged in as a customer, you will have access shortly!
-
WL: Smart PBX User Guide
View File
This is an editable, MS Word version of our smartPBX user guide, found HERE.
We recommend you:
- Check the online version link above for any updates and changes. Edits are made real-time online, less often to the download file.
- Swap out the 2600hz logo with yours.
- Look for Video call outs, and either add links of your own or remove the notification.
- Check the pagination / page breaks.
- Save as a .pdf file with your personal branding.
If you have additions, edits, enhanced screenshots and/or suggestions for improving this document, please add them as a comment at the bottom of the web-based version using the link above.
-
Submitter
-
Submitted07/13/2020
-
Category
-
WL: Comm.io video conferencing user guide
View File
This is an editable, MS Word version of our comm.io video conferencing user guide, found HERE.
We recommend you:
- Check the online version link above for any updates and changes. Edits are made real-time online, less often to the download file.
- Swap out the 2600hz logo with yours
- Check the pagination / page breaks
- Save as a .pdf file with your personal branding
If you have additions, edits, enhanced screenshots and/or suggestions for improving this document, please add them as a comment at the bottom of the web-based version using the link above.
-
Submitter
-
Submitted07/13/2020
-
Category
-
WL: comm.io user guide
View File
This is an editable, MS Word version of our comm.io User Guide found HERE
We recommend you:
- Check the online version link above for any updates and changes. Edits are made real-time online, less often to the download file.
- Swap out the 2600hz logo with yours
- Check the pagination / page breaks
- Save as a .pdf file with your personal branding
If you have additions, edits, enhanced screenshots and/or suggestions for improving this document, please add them as a comment at the bottom of the web-based version using the link above.
-
Submitter
-
Submitted07/13/2020
-
Category
-
WL: comm.io webphone setup guide
View FileThis is an editable, MS Word version of our comm.io webphone setup guide, found HERE.
We recommend you:
- Check the online version link above for any updates and changes. Edits are made real-time online, less often to the download file.
- Swap out the 2600Hz logo with yours
- Check the pagination / page breaks
- Save as a .pdf file with your personal branding
If you have additions, edits, enhanced screenshots and/or suggestions for improving this document, please add them as a comment at the bottom of the web-based version using the link above.
-
Submitter
-
Submitted07/13/2020
-
Category
-
WL: comm.io installation and setup guide
View File
This is an editable, MS Word version of our comm.io Setup Guide found HERE.
We recommend you:
- Check the online version link above for any updates and changes. Edits are made real-time online, less often to the download file.
- Swap out the 2600hz logo with yours
- Check the pagination / page breaks
- Save as a .pdf file with your personal branding
If you have additions, edits, enhanced screenshots and/or suggestions for improving this document, please add them as a comment at the bottom of the web-based version using the link above.
-
Submitter
-
Submitted07/13/2020
-
Category
-
wow, this is great, thanks for contributing to the community and for sharing your knowledge!
Not sure if you all have seen this (sorry Darren if I steal your thunder) but we've created a home for these kinds of videos and training materials here on our website. We'd love to see you all contribute files and/or links here as a common library.Check it out here (under the support link on the main community menu)
https://forums.2600hz.com/forums/files/. To the right is a menu showing a bucket for Community Contributions -- click on that category to share your files.This is accessible to resellers / customers only. We're also uploading white label versions of our docs you can swap our our logo and repurpose.
Let's collect our expertise and help each other grow!emily
p.s. a cool trick: If you select "Follow" on these pages (or any on our site) you will get notified when someone adds a file. Select the down arrow and you'll get a drop-down allowing you to set preferences on how often you want to receive the notifications.
-
WL: CallThru Setup for Android Devices
View File
This is an editable, MS Word version of our CallThru.us Setup Guide for Android devices, found HERE.
This version is editable using Word. We recommend you:
- Check the online version link above for any updates and changes. Edits are made real-time online, less often to the download file.
- Swap out the 2600hz logo with yours
- Check the pagination / page breaks
- Save as a .pdf file with your personal branding
If you have additions, edits, enhanced screenshots and/or suggestions for improving this document, please add them as a comment at the bottom of the web-based version using the link above.
-
Submitter
-
Submitted07/10/2020
-
Category
-
WL: CallThru.us Setup for iOs Devices
View File
This is an editable, MS Word version of our CallThru.us Setup Guide for iOs devices, found HERE.
This version is editable using Word. We recommend you:
- Check the online version link above for any updates and changes. Edits are made real-time online, less often to the download file.
- Swap out the 2600hz logo with yours
- Check the pagination / page breaks
- Save as a .pdf file with your personal branding
If you have additions, edits, enhanced screenshots and/or suggestions for improving this document, please add them as a comment at the bottom of the web-based version using the link above.
-
Submitter
-
Submitted07/10/2020
-
Category
-
WL: CCPro User Guide
View File
This is a White Label version of the CCPro User Guide, found online here.
It is in Word format, available for you to edit. Once you download it, you can- Swap out the 2600Hz logo in the header for your own
- Double-check the spacing, font, and pagination, as Word can display differently depending on your version and platform
NOTE: You will likely want to review and compare this download with the online version to see any updates have been made there. It may be more current.
-
Submitter
-
Submitted07/10/2020
-
Category
-
User Story
- Set up a user account and possible sub-accounts for your clients.
How it works
KAZOO is designed to support a Master account (often the Reseller Master) and a hierarchy of sub-accounts. The Account Manager Wizard steps you through the basic steps for creating each account.
NOTE: It is recommended the master account is used only to manage the sub accounts and that your personal office account should be created as a sub-account also.
Before you start
Your Account setup process will ask some technical questions that may have long-standing consequences related to how your applications and calling infrastructure is installed. Please take a moment to read through this before you start, and to consider the following:-
Do you plan to white-label your account?
If so, complete the branding and DNS mapping process that is available in our branding app before you set up the accounts. This way the account realm and other default pathing structures will be inherited. For more information and a user guide on setting up white label URLs and branding, check our Branding App documents, HERE.
-
Will you be setting up sub-accounts?
If you want to create sub-accounts, it’s a good idea to map out your naming conventions and strategy ahead of time. One strategy people use is to include the sub-account name as part of the account realm naming string. (see below).
-
What Service Plan will you be using for this account?
If you are an administrator, you will be asked to identify the service plan you want to use for this account.
-
How do you want to set an initial credit balance for this account?
Setting up an initial balance for each account is required to support per-minute calling and inbound international calls.
While you work in the Wizard
Use the left NEXT button to step through the setup process. If you need to go back to an earlier section, ONLY use the navigation bar to the left to move back and forth between sections. If you try to use your browser’s back button it will not recognize your last window within the application. Your new account will not officially be created and saved until you finish the wizard.
LET'S START!
Opening Page
This is the opening page for the Account Wizard. As it states, select the Add New Account button to the left to start a new account.
General Settings
Add Account Information
Enter the core information for your account.
Notes:-
Account Name
Generally best to use the company’s name, a shortened version of their name or an acronym from their name. A DID does not provide easy recognition of who the account belongs to. It will also be used in reports and will be used on the login page by all users of that account. So simple, short and recognizable are recommended. -
Physical Address Information
You MUST include a physical address for each account you create. -
Account Realm Value
The Account Realm will be used by all the account’s phones in registrations and potentially for sending faxes. By default, the realm is auto-generated by the Create Account Wizard and is a domain name that will be matched by wildcard A and MX DNS records.
The first part of the auto-generated name is a random string, like “8dfjd6”. If you are managing multiple accounts, it may make sense to rename the string so you can identify each account separately.
Remember, if you are planning on setting up white label / custom branding DNS values, you will want to do that before you set this value and copy your newly created realm.
Add Administrators
Administrators have additional access to applications and some settings, including setting up new users, assigning access rights, adding devices for users, and activating application access for their account members.
Choose a user from the company that you are creating the account for that will have access to managing all internal aspects of their account and be able to see everything for all the users.Note:
This is an optional step. Users can be designated Admins via the user settings in SmartPBX or the Account App.Account Contacts
Enter the contact information you want related to this account.
-
Technical Contact
Assign your first point of support for technical questions here.
-
Billing Contact
This information will be used to send usage and related billing summaries.
Select Next
Service Plan
This section will be visible only if you are set up as an administrator for the account. Choose a service plan for your account.
Once you have chosen one or more plans, you will see a summary of the billing rate that will be charged.
Usage + Call Restrictions
Trunk Limits
Trunk limits define how many calls can be sent and/or received simultaneously. An incoming Trunk Limit set at 4 for example, means that only 4 incoming calls will be handled at once. Any additional calls will be directed to an automated response.A Trunk is like a physical phone line. Only one call can be active for each trunk. Inbound Trunks can only handle calls inbound from a carrier, Outbound Trunks can only handle calls outbound to a carrier, and Twoway Trunks can handle calls to or from a carrier just like a physical phone line.
Trunks only apply to calls to US and Canada numbers. If a call for an account is not able to use a trunk because it is outside the US or Canada or all the account’s trunks are already in use, the call can be applied per minute charges against their active balance.-
Inbound
defines how many simultaneous calls you can receive to your phone system
-
Outbound
defines how many simultaneous calls you can send (call out) from your phone system
-
Two-way Trunks
defines how many total concurrent calls your platform can handle at one time.
-
Allow customers to make per-minute calls
If selected and the trunk limit is met then a customer can still call in and your account will be charged on a per-minute basis. In addition, some calls require a per-minute charge depending on your service plan. These can include:- Inbound toll-free calls
-
International calls if allowed
NOTE: For more information on trunks and pay-per minute please go here: https://forums.2600hz.com/forums/kazoo-platform-guides/get-started/sip-trunks-and-legacy-pbxes/over-subscription-for-trunking-and-per-minute-services-r16/
Call Restrictions
This is where you can define limits on where your agents can make calls. By default, all calling capabilities are enabled for new accounts. If you wish to place call restrictions on this new account, toggle the slider to off.
US DID
This is your traditional service provided by KAZOO in the US. It refers to the US Direct Inward Dial phone service that is used by PBX systems. The feature allows for multiple telephone numbers over one or more analog or digital physical circuits to the PBX, and transmits the dialed telephone number to the PBX so that a PBX extension is directly accessible for an outside caller, possibly by-passing an auto-attendant.Unknown
This is the default rule that matches any number NOT matched by the other rules. IE: if it's not a “US DID” or a “US Toll” or “US Tollfree” etc, then its type is “unknown”. For example, the unknown numbers include extensions like “7903” or the feature code “*97” because those numbers don’t match the other rules.NOTES:
- Emergency dispatch must be kept on according to the new Kari’s Law requirements.
Credit Balance and Features
Account Credit
This is where you can set your monthly credit balance. You must maintain a current balance for international, per-minute calls, inbound toll-free, caller ID and other system features that incur an additional charge.NOTE:
Depending on your contract with your customers you may want to use trunks and per minute credit in a way to reduce you and your customer’s exposure to fraud. See for more options on how to use trunks and minutes together HERE.Control Center Access
This is where you can manage general features for the account. You are able to restrict which Control Center features are accessible to this new account. Select the desired features, or leave them all available depending on your business use case and this account's needs. It is suggested only the USER, ACCOUNT, and MISC. options are selected for subaccounts.
User
Allows users to adjust preferencesAccount
Enables additional controls, including to view/change account name, account realm, technical contact, account timezone/language preferences. NOTE these settings can break a setup so make sure it is available only to trained users.
Credit Card
Allows users to view and change billing contact and credit card information.Usage Charges
Exposes the “per minute” tab of Usage Charges to users for credit and minutesService Plan
Allows users to view/download a copy of the Service Plan associated with the account.Transactions
Allows users to view the Transactions logTrunking
- Inbound Enables inbound trunking
- Outbound Enables outbound trunking
- Two Way Enables two-way trunking
Misc
- UI Errors Log Exposes errortracker log. If enabled, the error log will display as a menu option in the Account Control Center.
Applications Restrictions
Define Access to applications
This is where you enable access to the applications.NOTES
- You must also enable the application within the Application Exchange process once you start up the account.
- There may be additional fees for some of these applications. Make sure you understand how this will affect your client billing structure.
- If you select Restricted Access, you will need to manually add the applications you want to enable for this account.
Manually adding access to applications (not recommended)
If you select Restricted Access above, you will see the added screen below. This is where you enable access to the applications.
Review your selections
Once you’ve selected your applications, you well see them displayed on your Restrictions page, as shown below.- You can remove an application by selecting the trash icon shown in the upper right.
-
You can add more applications by selecting the add application button at the bottom.
NOTES:
- At a minimum, you will need to select SmartPBX
- Once you select an app, it will display at the top
- You can search for specific applications using the search button, or filter your listing by using the menu to the left.
-
To “unselect” an app, click on it again.
Review, Print and Confirm
The last step in this process is to review and confirm your settings.
NOTES:
- To edit a section, select the pencil editor next to each heading. That section will open and be available for editing.
- We strongly recommend you PRINT your summary by using the printer icon at the top right of the page. This will be a useful reference when you are working on the account in the future.
CREATE YOUR ACCOUNT!
Once you have reviewed and edited your settings, select Create Account! This can take a while as the application is generating several files. Once it’s created, you will see your new Account Home Page.
- You can navigate to and update each section for editing using the top tabs
- You can select the gear to the right of each section to edit the specific field shown.
Editing Account Settings
The page above summarizes. your account settings. Each gear to the right allows administrators to edit global settings for the account.In addition, there are the following tabs above to make edits:
-
Limits
Allows you to view/change. your trunk limits and call restrictions.
-
Control Center Access
Allows you to select what settings your customers can view.
-
Numbers Features
Toggles to Enable/Disable numbers' features.
-
Carrier
View/Update your carrier preference.
-
Notes
This provides you with a WYSIWYG editor for creating an pop-up announcement page that appears when users log in.
-
App Exchange
View/Enable specific apps for this account.
Frequently Asked Questions
How do I create a sub-account?
If you want to create a sub-account, for different field offices for example, first highlight the main account from the home page listing and then select “Add Account”.Can I change the Trunk Limits value any time if I discover what I enter is not appropriate?
Yes, once your account is created, you can manage your trunking settings from the account’s Control Center page.
If I manually enable applications during this setup can I return to this and add more later?
Yes. Once your account is generated, you can select the App Exchange tab at the top of the main page and enable additional applications from there.Related Articles
SmartPBX: Overview of the Dashboard API Reference Docs
docs.2600hz.com
REST API Reference for Kazoo Crossbar API#######
-
2600HZ USER GUIDE -- ACCOUNT MANAGER WIZARD
User Story
Set up a user account and possible sub-accounts for your clients.How it works
KAZOO is designed to support a Master account (often the Reseller Master) and a hierarchy of sub-accounts. The Account Manager Wizard steps you through the basic steps for creating each account.
NOTE: It is recommended the master account is used only to manage the sub accounts and that your personal office account should be created as a sub-account also.
Before you start
Your Account setup process will ask some technical questions that may have long-standing consequences related to how your applications and calling infrastructure is installed. Please take a moment to read through this before you start, and to consider the following:-
Do you plan to white-label your account?
If so, complete the branding and DNS mapping process that is available in our branding app before you set up the accounts. This way the account realm and other default pathing structures will be inherited. For more information and a user guide on setting up white label URLs and branding, check our Branding App documents, HERE.
-
Will you be setting up sub-accounts?
If you want to create sub-accounts, it’s a good idea to map out your naming conventions and strategy ahead of time. One strategy people use is to include the sub-account name as part of the account realm naming string. (see below).
-
What Service Plan will you be using for this account?
If you are an administrator, you will be asked to identify the service plan you want to use for this account.
-
How do you want to set an initial credit balance for this account?
Setting up an initial balance for each account is required to support per-minute calling and inbound international calls.
While you work in the Wizard
Use the left NEXT button to step through the setup process. If you need to go back to an earlier section, ONLY use the navigation bar to the left to move back and forth between sections. If you try to use your browser’s back button it will not recognize your last window within the application. Your new account will not officially be created and saved until you finish the wizard.
LET'S START!
Opening Page
This is the opening page for the Account Wizard. As it states, select the Add New Account button to the left to start a new account.
General Settings
Add Account Information
Enter the core information for your account.
Notes:-
Account Name
Generally best to use the company’s name, a shortened version of their name or an acronym from their name. A DID does not provide easy recognition of who the account belongs to. It will also be used in reports and will be used on the login page by all users of that account. So simple, short and recognizable are recommended. -
Physical Address Information
You MUST include a physical address for each account you create. -
Account Realm Value
The Account Realm will be used by all the account’s phones in registrations and potentially for sending faxes. By default, the realm is auto-generated by the Create Account Wizard and is a domain name that will be matched by wildcard A and MX DNS records.
The first part of the auto-generated name is a random string, like “8dfjd6”. If you are managing multiple accounts, it may make sense to rename the string so you can identify each account separately.
Remember, if you are planning on setting up white label / custom branding DNS values, you will want to do that before you set this value and copy your newly created realm.
Add Administrators
Administrators have additional access to applications and some settings, including setting up new users, assigning access rights, adding devices for users, and activating application access for their account members.
Choose a user from the company that you are creating the account for that will have access to managing all internal aspects of their account and be able to see everything for all the users.Note:
This is an optional step. Users can be designated Admins via the user settings in SmartPBX or the Account App.Account Contacts
Enter the contact information you want related to this account.
-
Technical Contact
Assign your first point of support for technical questions here.
-
Billing Contact
This information will be used to send usage and related billing summaries.
Select Next
Service Plan
This section will be visible only if you are set up as an administrator for the account. Choose a service plan for your account.
Once you have chosen one or more plans, you will see a summary of the billing rate that will be charged.
Usage + Call Restrictions
Trunk Limits
Trunk limits define how many calls can be sent and/or received simultaneously. An incoming Trunk Limit set at 4 for example, means that only 4 incoming calls will be handled at once. Any additional calls will be directed to an automated response.A Trunk is like a physical phone line. Only one call can be active for each trunk. Inbound Trunks can only handle calls inbound from a carrier, Outbound Trunks can only handle calls outbound to a carrier, and Twoway Trunks can handle calls to or from a carrier just like a physical phone line.
Trunks only apply to calls to US and Canada numbers. If a call for an account is not able to use a trunk because it is outside the US or Canada or all the account’s trunks are already in use, the call can be applied per minute charges against their active balance.-
Inbound
defines how many simultaneous calls you can receive to your phone system
-
Outbound
defines how many simultaneous calls you can send (call out) from your phone system
-
Two-way Trunks
defines how many total concurrent calls your platform can handle at one time.
-
Allow customers to make per-minute calls
If selected and the trunk limit is met then a customer can still call in and your account will be charged on a per-minute basis. In addition, some calls require a per-minute charge depending on your service plan. These can include:- Inbound toll-free calls
-
International calls if allowed
NOTE: For more information on trunks and pay-per minute please go here: https://forums.2600hz.com/forums/kazoo-platform-guides/get-started/sip-trunks-and-legacy-pbxes/over-subscription-for-trunking-and-per-minute-services-r16/
Call Restrictions
This is where you can define limits on where your agents can make calls. By default, all calling capabilities are enabled for new accounts. If you wish to place call restrictions on this new account, toggle the slider to off.
US DID
This is your traditional service provided by KAZOO in the US. It refers to the US Direct Inward Dial phone service that is used by PBX systems. The feature allows for multiple telephone numbers over one or more analog or digital physical circuits to the PBX, and transmits the dialed telephone number to the PBX so that a PBX extension is directly accessible for an outside caller, possibly by-passing an auto-attendant.Unknown
This is the default rule that matches any number NOT matched by the other rules. IE: if it's not a “US DID” or a “US Toll” or “US Tollfree” etc, then its type is “unknown”. For example, the unknown numbers include extensions like “7903” or the feature code “*97” because those numbers don’t match the other rules.NOTES:
- Emergency dispatch must be kept on according to the new Kari’s Law requirements.
Credit Balance and Features
Account Credit
This is where you can set your monthly credit balance. You must maintain a current balance for international, per-minute calls, inbound toll-free, caller ID and other system features that incur an additional charge.NOTE:
Depending on your contract with your customers you may want to use trunks and per minute credit in a way to reduce you and your customer’s exposure to fraud. See for more options on how to use trunks and minutes together HERE.Control Center Access
This is where you can manage general features for the account. You are able to restrict which Control Center features are accessible to this new account. Select the desired features, or leave them all available depending on your business use case and this account's needs. It is suggested only the USER, ACCOUNT, and MISC. options are selected for subaccounts.
User
Allows users to adjust preferencesAccount
Enables additional controls, including to view/change account name, account realm, technical contact, account timezone/language preferences. NOTE these settings can break a setup so make sure it is available only to trained users.
Credit Card
Allows users to view and change billing contact and credit card information.Usage Charges
Exposes the “per minute” tab of Usage Charges to users for credit and minutesService Plan
Allows users to view/download a copy of the Service Plan associated with the account.Transactions
Allows users to view the Transactions logTrunking
- Inbound Enables inbound trunking
- Outbound Enables outbound trunking
- Two Way Enables two-way trunking
Misc
- UI Errors Log Exposes errortracker log. If enabled, the error log will display as a menu option in the Account Control Center.
Applications Restrictions
Define Access to applications
This is where you enable access to the applications.NOTES
-
You must also enable the application within the Application Exchange process once you start up the account.
-
There may be additional fees for some of these applications. Make sure you understand how this will affect your client billing structure.
- If you select Restricted Access, you will need to manually add the applications you want to enable for this account.
Manually adding access to applications (not recommended)
If you select Restricted Access above, you will see the added screen below. This is where you enable access to the applications.
Review your selections
Once you’ve selected your applications, you well see them displayed on your Restrictions page, as shown below.- You can remove an application by selecting the trash icon shown in the upper right.
-
You can add more applications by selecting the add application button at the bottom.
NOTES:
- At a minimum, you will need to select SmartPBX
- Once you select an app, it will display at the top
- You can search for specific applications using the search button, or filter your listing by using the menu to the left.
-
To “unselect” an app, click on it again.
Review, Print and Confirm
The last step in this process is to review and confirm your settings.
NOTES:
- To edit a section, select the pencil editor next to each heading. That section will open and be available for editing.
- We strongly recommend you PRINT your summary by using the printer icon at the top right of the page. This will be a useful reference when you are working on the account in the future.
CREATE YOUR ACCOUNT!
Once you have reviewed and edited your settings, select Create Account! This can take a while as the application is generating several files. Once it’s created, you will see your new Account Home Page.
- You can navigate to and update each section for editing using the top tabs
- You can select the gear to the right of each section to edit the specific field shown.
Frequently Asked Questions
How do I create a sub-account?
If you want to create a sub-account, for different field offices for example, first highlight the main account from the home page listing and then select “Add Account”.Can I change the Trunk Limits value any time if I discover what I enter is not appropriate?
Yes, once your account is created, you can manage your trunking settings from the account’s Control Center page.
If I manually enable applications during this setup can I return to this and add more later?
Yes. Once your account is generated, you can select the App Exchange tab at the top of the main page and enable additional applications from there.Related Articles
White Labeling your Accounts API Reference Docs
docs.2600hz.com
REST API Reference for Kazoo Crossbar API@@@@@@@
#######
API Reference Docs
Related Articles
API Reference Docs
docs.2600hz.com
REST API Reference for Kazoo Crossbar API#######
$$$$$$$$$$$$$$####
-
Do you plan to white-label your account?
-
Moving an account within KAZOO
User Stories
- I mistakenly added and configured a sub account under the wrong parent account; my “North Carolina” office should be under “East” and not “West.”
- I want to move a sub account from one home account to another parent account – for example, move my XXX East account from US to Canada?
Overview
There are two ways to achieve this:
- Use the Cluster Manager app. In the KAZOO environment.
- Execute an SSH command at the server level. This is an option available to Global Infrastructure clients who are experienced system administrators.
NOTE:
This process can be unsafe; it should only be used if an account was created under the wrong account in error, and needs to be moved. USING CLUSTER MANAGER (OPTION 1)
-
Obtain the account ID of the account you want to move from.
This ID will referenced as MOVE_ACCOUNT from now on. This can be obtained from the UI via the Accounts Manager app.
-
Open your Accounts app
- Navigate to the account you want to move to
- Select the account, and select Overview
-
Copy the account ID String and save it on a notepad
From Account:
2. Obtain the account ID of the account you want to move the MOVE_ACCOUNT TO
This ID will be referenced as DESTINATION_ACCOUNT from now on.- Repeat the steps above and copy to a place that clearly labels this Account ID is the TO: Account ID number.
3. Browse to https://ui.zswitch.net and login using your credentials and the name of your account on our hosted platform (XYZ Parent Account)
-
Open the Apps menu, and select the Cluster Manager app
-
Click the Scripts tab from within the Cluster Manager app
- Click the Red Button labeled Run Command
4. Type the command below into the command dialog box
sup crossbar_maintenance move_account MOVE_ACCOUNT DESTINATION_ACCOUNT
NOTE: While this process should take less than 5 seconds, you may want to increase the “Abort After” value to about 5 minutes. This should give ample time for the process to resolve before timing out and requiring a restart.
6. Click the Select Servers button
7. From the Cluster drop down, select the name of the cluster where the accounts live that you would like to move (pre, or prod). You do not need to select anything for Zone, or Services
8. Uncheck servers in the Filter Results section, so that you ONLY HAVE ONE server checked
NOTE: You MUST select the server that contains your KAZOO applications; a Freeswitch or Database only server will cause this process to fail. To ensure this, you can follow these steps:
- Filter your server list using kazoo_applications type of servers first.
- "Select All" to unselect everything.
- Reselect the first server on the. list.
9. Click NEXT
10. Click Run Tasks Now! to execute the command you typed into the dialog box, on the server that remained checked on the previous page.
11. Watch the "Running/Queued" section of the tasks tab to ensure the task completes.
You may need to refresh the list periodically, but clicking the refresh button (2 spinning arrows) at the top of the list. You can also go to the "Completed Logs" section to see that your "Run Command" task completed successfully.
12. Once the task is complete, confirm the account is now moved by re-opening the Accounts Manager app in the UI of your cluster.
ADVANCED USERS (OPTION 2)
This is an option available to Global Infrastructure clients who are experienced system administrators.Via SSH:
-
Obtain the account ID of the account you want to move, I'll reference this ID as MOVE_ACCOUNT from now on. This can be obtained from the UI via the Accounts Manager app.
-
Obtain the account ID of the account you want to move the MOVE_ACCOUNT under, I will reference this ID as DESTINATION_ACCOUNT from now on. This can also be obtained from the UI via the Accounts Manager app.
-
SSH to one of the servers in your cluster where the account you want to move is assigned, and where kazoo_apps is running.
-
Run the command below:
sup crossbar_maintenance move_account MOVE_ACCOUNT DESTINATION_ACCOUNT
API Reference Doc:
docs.2600hz.com
https://docs.2600hz.com/dev/applications/crossbar/doc/accounts/#move-an-account
-
Thanks lazedo for your notes! I've updated the doc to reflect this.
-
User Story
-
Reseller wants to store recordings onto Amazon Web Service while insuring as few permissions are given to the service account as is possible.
-
Reseller is looking for a solution that helps ensure strong encryption is implemented for call recording features and connect this account to a specific KAZOO account.
- Reseller plans to assign each account a unique “bucket” with its unique credentials.
Before you Start
- Sign up and Log in to your Amazon Web Services account. If you don’t have one already you can go to their website here to get started: https://aws.amazon.com/
Quick Overview of Steps
- Set up an account with Amazon Web Services
- Decide what clients and client names to use for each bucket
- Create bucket names for each client and define settings
- Create user names for each client
- Add JSON IAM policy and permissions
- Add JSON Bucket policy and permissions
- Capture your Access Key ID and Secret Access Key , Bucket Name
- Open the AWS app
- Create a new AWS account in KAZOO and enter that information.
Set up an S3 Bucket
An Amazon S3 (Simple Storage Service) bucket is Amazon’s term for a place you define to store your data and its metadata. It is the equivalent to a file folder with your company identifier on it.
- From your AWS portal, access the S3 application
- Select Create Bucket
- Enter a new Bucket name. You will do this for every client?
-
The Region field can be left blank, AWS will read the account default.
- Click NEXT and page through the remaining settings options. We recommend enabling the “Block ALL public access” option to on.
Set up an IAM User
An IAM (Identity and Access Management) User is an entity name and credential that you create in AWS to represent the person or application that uses it to interact with AWS. An IAM user with administrator permissions is not the same thing as the AWS account root user.
- From your AWS portal, access the IAM application
-
Select Add User
- Enter a new username. This will likely be your client name or client reference
- Check the Programmatic Access box under Access Type
- Select NEXT
-
Under Set Permissions, select “Attach existing policies directly”
-
Select Create Policy
This will open a new tab for you to enter your policy details into. A policy defines the AWS permissions that you can assign to a user, group, or role. Yo can create and edit a policy in the visual editor and using JSON. For this example we will use the JSON.
-
Copy the text below. Replace the “BUCKET_NAME_HERE” text string with the bucket name you entered earlier.
{
"Version": "2012-10-17",
"Statement": [
{
"Effect": "Allow",
"Action": [
"s3:ListBucket",
"s3:PutObject",
"s3:GetObject"
],
"Resource": [
"arn:aws:s3:::BUCKET_NAME_HERE/*",
"arn:aws:s3:::BUCKET_NAME_HERE"
]
}
]
}It will display something like below:
-
Review Policy
Select Review Policy using the button at the bottom right.
-
Return to the IAM tab and refresh your screen using the refresh button to the right (circled in red).
- Enter the name of the policy in the search field and select the checkbox to the left of the Policy name it to be active.
- Select NEXT
-
Go to Set Permissions Boundary, Select NEXT: Tags
The next two pages are for tagging and review, you can just leave them blank and click create user.
-
Your access key and secret access key will be displayed.
SAVE these! You will need to add these to your connector app.
-
-
Return to the main page for IAM
-
Click Users, and click on your user account. Save the Amazon Resource Name (ARN) shown. This is your identifier Amazon recognizes. (for more info on these, see HERE.)
-
-
Enter your bucket policy
Return to the S3 app and select the bucket you want to add a policy to.
- Click on Permissions
- Click on Bucket Policy
- Copy / Paste the code below
- Update your bucket name and ARN (see highlighted area). SAVE !!!
You should see confirmation of your updates here.
{
"Version": "2012-10-17",
"Statement": [
{
"Effect": "Allow",
"Principal": {
"AWS": "ARN_FOR_IAM_USER_HERE"
},
"Action": [
"s3:GetObject",
"s3:ListBucket",
"s3:PutObject"
],
"Resource": [
"arn:aws:s3:::BUCKET_NAME_HERE/*",
"arn:aws:s3:::BUCKET_NAME_HERE"
]
}
]
}Update your bucket name and ARN (See. highlighted areas). SAVE !
You should see confirmation of your updates here.
Enter saved data into your AWS Connector App in KAZOO
- Click on AWS Connector from your Apps listing
NOTE: If you can’t find it right away, use the Search Apps field at the left of the screen.
- Click Add AWS Account
Enter your saved account details
NOTE
-
Please input the host name for the zone you used for your S3 bucket. For example, s3.us-west-1.amazonaws.com. A full list of hostnames is available at https://docs.aws.amazon.com/general/latest/gr/s3.html"
Frequently Asked Questions
When is it important to assign an AWS account to a client?
AWS offers storage with enhanced privacy encryption, which is often required for HIPAA compliance and other clients who are concerned about privacy. It also provides automatic backup services to give your client files additional redundancy. If your client is concerned about tight encryption and security, this is an option to consider.
What are Bucket and IAM policies?
Below is an overview provided by Amazon, here:
IAM policies specify what actions are allowed or denied on what AWS resources (e.g. allow ec2:TerminateInstance on the EC2 instance with instance_id=i-8b3620ec). You attach IAM policies to IAM users, groups, or roles, which are then subject to the permissions you’ve defined. In other words, IAM policies define what a principal can do in your AWS environment.S3 bucket policies, on the other hand, are attached only to S3 buckets. S3 bucket policies specify what actions are allowed or denied for which principals on the bucket that the bucket policy is attached to (e.g. allow user Alice to PUT but not DELETE objects in the bucket).
Note: You attach S3 bucket policies at the bucket level (i.e. you can’t attach a bucket policy to an S3 object), but the permissions specified in the bucket policy apply to all the objects in the bucket.
IAM policies and S3 bucket policies are both used for access control and they’re both written in JSON using the AWS access policy language, so they can be confused.
Related Articles
Accounts Manager Wizard Notes on HIPAA Compliance Responsibilities API Reference
docs.2600hz.com
REST API Reference for Kazoo Crossbar API####
-
Reseller wants to store recordings onto Amazon Web Service while insuring as few permissions are given to the service account as is possible.
-
Configuring Video for use on the KAZOO Platform
User Stories
- A user wants to enable a device so it supports video calling between two office desk phones
- A user wants to call into a KAZOO video conference using a video-enabled desk phone instead of a laptop.
- A user wants to allow video replay and/or online streaming on an office phone (to replay a saved video call for example) using the KAZOO platform.
Overview
Video Calling
Video is an image capture process that takes a rapid amount of still pictures at a source, compresses the data, and transmits the packet across phone lines. The recipient unpacks them and replays the sequence to show movement, or “video.”Some notes about the transmission:
- “Frames” are single images, transmission is described in “frames per second”, or FPS.
- Typical compression is 20-30 frames per second. Lower rates and lower resolution means you will see a stuttered, jagged result.
- The resulting “video” is a stream of these captures.
As with any images, video takes up significant data bandwidth to transmit. To help mitigate this video uses one of several compression algorithms which collectively are referred to as “CODECS” (short for “COder-DECoder”).
CODECS Compression
CODECS refers to the format for compressed data transmitted across devices (including WebRTC, Softphones, mobile devices, comm.io). Some formats compress audio only, others compress audio and video.There are several different compression types available today. To successfully transmit these files, both the originating device and the receiving device must be equipped with the same codec compression interpreter. If a device transmits H264 video, then the receiver must be able to “read” that. Your office desk phone and your laptop application for example, must be able to talk in the same language. Common audio formats used by telco devices include .mp3 and Opus. Popular compression formats for video are H263, H264, and the newer Google-developed VP8.
Audio and the KAZOO Platform
All KAZOO Platform calls assume (and require) audio CODECS. Audio is typically set by default, and users can fine tune those settings in either our Provisioner setup or the SmartPBX app. KAZOO includes support for the most common audio formats. This audio information will be sent to the corresponding phone hardware so the two are synchronized.Video and the KAZOO Platform
Video is optional as its transmission takes considerably more bandwidth and can lead to an additional charge to your account. To support independent control over video, the KAZOO platform transmits audio and video on separate ports for each call. In order for the sending and receiving devices to share video, they must both recognize the same CODECS data. This requires an intentional setup in both SmartPBX and the Provisioner app.Enabling Video Calls
To use video, you will need to enable it for your devices in your user account. This is a two step process. Since the call origination device (whoever starts the call) is what picks the algorithm, or the “rules.” As your system will do both, you will need to provide available compression settings for both sending and receiving instances:- Server to Phone (using SmartPBX) and
- Phone to Server (using Provisioner)
Below is an illustration summarizing the process.
Before you start
Confirm the video format(s) that are supported by your devices. The most common include H261, H263, H264 and VP8.CONFIGURE VIDEO SETTINGS FOR SERVER → PHONE TRANSMISSION
This setting is defined in SmartPBX. Here you will define Server to Phone connections.
NOTE: If the two settings do not match you will get “incompatible destination” errors. To set these preferences, go into SmartPBX
- Select the Device tab to the left.
-
Search for your device, and select the Edit icon to its right
-
From that dialog, select the Advanced Tab, and then Video from the drop-down menu.
You will see a screen that shows a list of video compression options. Drag the compression types you want to recognize to the Selected column.
NOTES:
-
By default, there will be no options in the Selected column. This effectively means video is not enabled.
-
To enable a video type, drag the compression style your devices support to the Selected column.
-
VP8 is currently the most popular, as its compression has the best results and there is no license fee related to it. Most newer devices prefer it for these reasons, so if your devices support it, it’s recommended you use it as your primary selection.
- You can move more than one codec to the Selected column, and drag them into a preferred priority.
SUCCESS !!!
You are now ready to move to the Provisioner app and configure the settings there.CONFIGURE VIDEO SETTINGS FOR PHONE → SERVER TRANSMISSION
Define the settings for a Phone to Server video transmission in the Provisioner app.
This setting defines the transmission codec from the phone to the server.
Under the Devices tab, find your phone and select the Settings gear; Choose Configure.
Select the Codecs tab from the Blue Menu and review the video preferences.
- If Video selection isn’t visible, you’ll need to go back to SmartPBX and verify you saved your settings to turn it on.
- Even if the video is turned on, by default the selection here will be None.
- If you see a value for “Inherits”, this means the setting will carry down from your parent account.
- Your selection here MUST MATCH your selection in SmartPBX as you configured above.
- You can only select Primary, Secondary, and Tertiary types if you have moved each into the Selected column in SmartPBX.
- SAVE your settings!
SELECTING A TYPE OF CALL WHEN YOU DIAL
Some phones and web phones allow you to choose whether to make your call an audio-only or a video call. If you do not intend to share video this is a great way to save bandwidth and unnecessary usage fees.
On the Bria softphone
To the right of the phone # field, you will see a drop-down menu arrow. Select that to choose your phone call mode. If you choose video, a video “screen” will appear. Yealink phones
Yealink will ask for audio/video on your screen once you dial the number.
NOTE:- It’s best to define your type of call at the beginning of your call. While some phones may provide a way to switch mid-call, this may interrupt the call integrity and cause reduced quality and/or a disconnect.
HOW KAZOO MANAGES VIDEO CALLS
Because video takes significant bandwidth and processing power to compress and decompress, KAZOO has set up dedicated servers to process video calls.ADDITIONAL NOTES
-
Once video is enabled, it typically is used as the default for every call.
- Newer devices may give you the option as the call is made (see above), so you can choose audio if you do not want to incur extra costs.
-
Older models have a configuration setting that can be set to “optional.” You will need to make sure this is set correctly in the back end configuration. Usually this can be found in the Provisioner app.
- If you turn on video on as a default in your device, all calls will include the video codec even if the receiver has no video capabilities. This is clearly a waste of bandwidth so it is recommended you find and enable an “optional” setting to trigger the setting for each call.
FREQUENTLY ASKED QUESTIONS : VIDEO SETUPWhat devices does KAZOO support for video?
KAZOO supports any device that supports the CODEC options listed in the SmartPBX and Provisioner settings. Currently this includes H261, H263, H264, and VP8. This is typically provided as part of the device specifications.
Do I have to configure my comm.io video to use the conferencing there?
No. comm.io has automatically configured the video codec in its software. It should work without any added configuration.
When I try to use my video I get an error message that says “incompatible destination”.
This error is indicating that the CODEC algorithms on the sending and receiving devices do not match. You will need to review the settings for each device and add a matching CODEC in the configuration.
If I have vp8 set as primary and H263 set as tertiary on my sending device, and my receiving device only has H263 set, will the call connect?
Yes. As long as the codec has been moved to Selected in SmartPBX under your device, it won’t matter which is primary, secondary or tertiary. Those priorities will kick in only if multiple options exist. Typically it makes sense to select VP8 as the primary as it has the most efficient compression and therefore will likely incur less charges.
My device settings in Provisioner say “inherited”. Where from?
This references a parent account setting. If you have a hierarchy of accounts, it comes from the account, or reseller, or system defaults – whichever one is found first (in that order).
Does the order (primary, secondary, etc) of the video selection(s) I add in Smart PBX have to match the order I enter in Provisioner or do they just need to be enabled in both places?
As long as the codec has been moved to Selected in SmartPBX under your device, it won’t matter which is primary, secondary or tertiary. Those priorities will kick in only if multiple options exist.Do I need to configure these settings for mobile phones?
Mobile phones are pre-configured for both audio and video. Phone browsers often choose a codec and then optimize it for best use of battery life and resolution for their device.If you cannot see a video transmitted from a mobile phone on your desktop phone (or vice-versa, and you get a “Can’t play video - video codec not supported) it may be you need to configure the desktop so it supports the mobile phone video codec.
Below is what is currently supported:
Apple iPhones: H. 264 and their new format for Apple only, HEVC
Apple Safari: H. 264 and now also vp8 starting with Safari 12.1
Android Phones: H. 263 / H.264There are apps available for each operating system that will convert and/or display files using other formats such as VLC Media Player; you can search for these in their app stores.
Why do some of my calls cause video errors and others don’t?
There are several reasons this could happen. Consider the following as a way to troubleshoot this:-
Are the calls that are working internal calls within your office?
This may be related to your carrier configuration if you have a BYOC account. Refer to the Carrier section above.
-
Is the difference related to incoming v. outgoing calls?
Check your configuration and codec assignments in SmartPBX (server to device or incoming) and in Provisioner (device to server, or outgoing).
-
Is it specific to a device type?
In some cases a device does not support the video codecs you have configured and/or it may not support video at all, and your calls are sending video requests. Often these issues will provide an error saying “video not supported” or “incompatible destination.”
Does the KAZOO CallThru.us mobile app support this video process?
Not at this time.Configuring Video for use on the KAZOO Platform
Reseller NotesBilling Structure for Video Calls
Currently video is currently enabled for all accounts at no additional charge for our introductory beta rollout; once the product is officially released you will be charged $20/video channel. Once we have video call features (such as inviting external participants to video conferences) that significantly increase the video load we will add a setting to the Control Center to manage maximum channels -- similar to the trunking setting. This will mean account managers will be able to distribute charges in a similar manner.
How KAZOO detects video calls (back end SIP code)
Audio call request is shown in the gray sectionAdditional Video call request is shown below the added gray line
BYOC Carrier Configuration
If you are using your own carrier it is critical you also assign audio settings. If you do not, the system will assume your devices support both audio and video and will by default try to make video calls. As no 3rd party carriers are supporting video at this time this will cause- Outbound calls made from a video phone to a carrier to fail.
- Calls within an office will work correctly.
To configure the carrier settings, go to the Carrier app. And select an account you have created or create a new account.
Then select Audio and add specific codecs. Continue with video, even though they are likely not supported.
#####
-
Below is an overview of what the SmartPBX dashboard is showing about your account configuration.
NOTE: For details on each setting and strategies for how to define them, refer to our companion User Guide that walks through the setup process, HERE.Dashboard
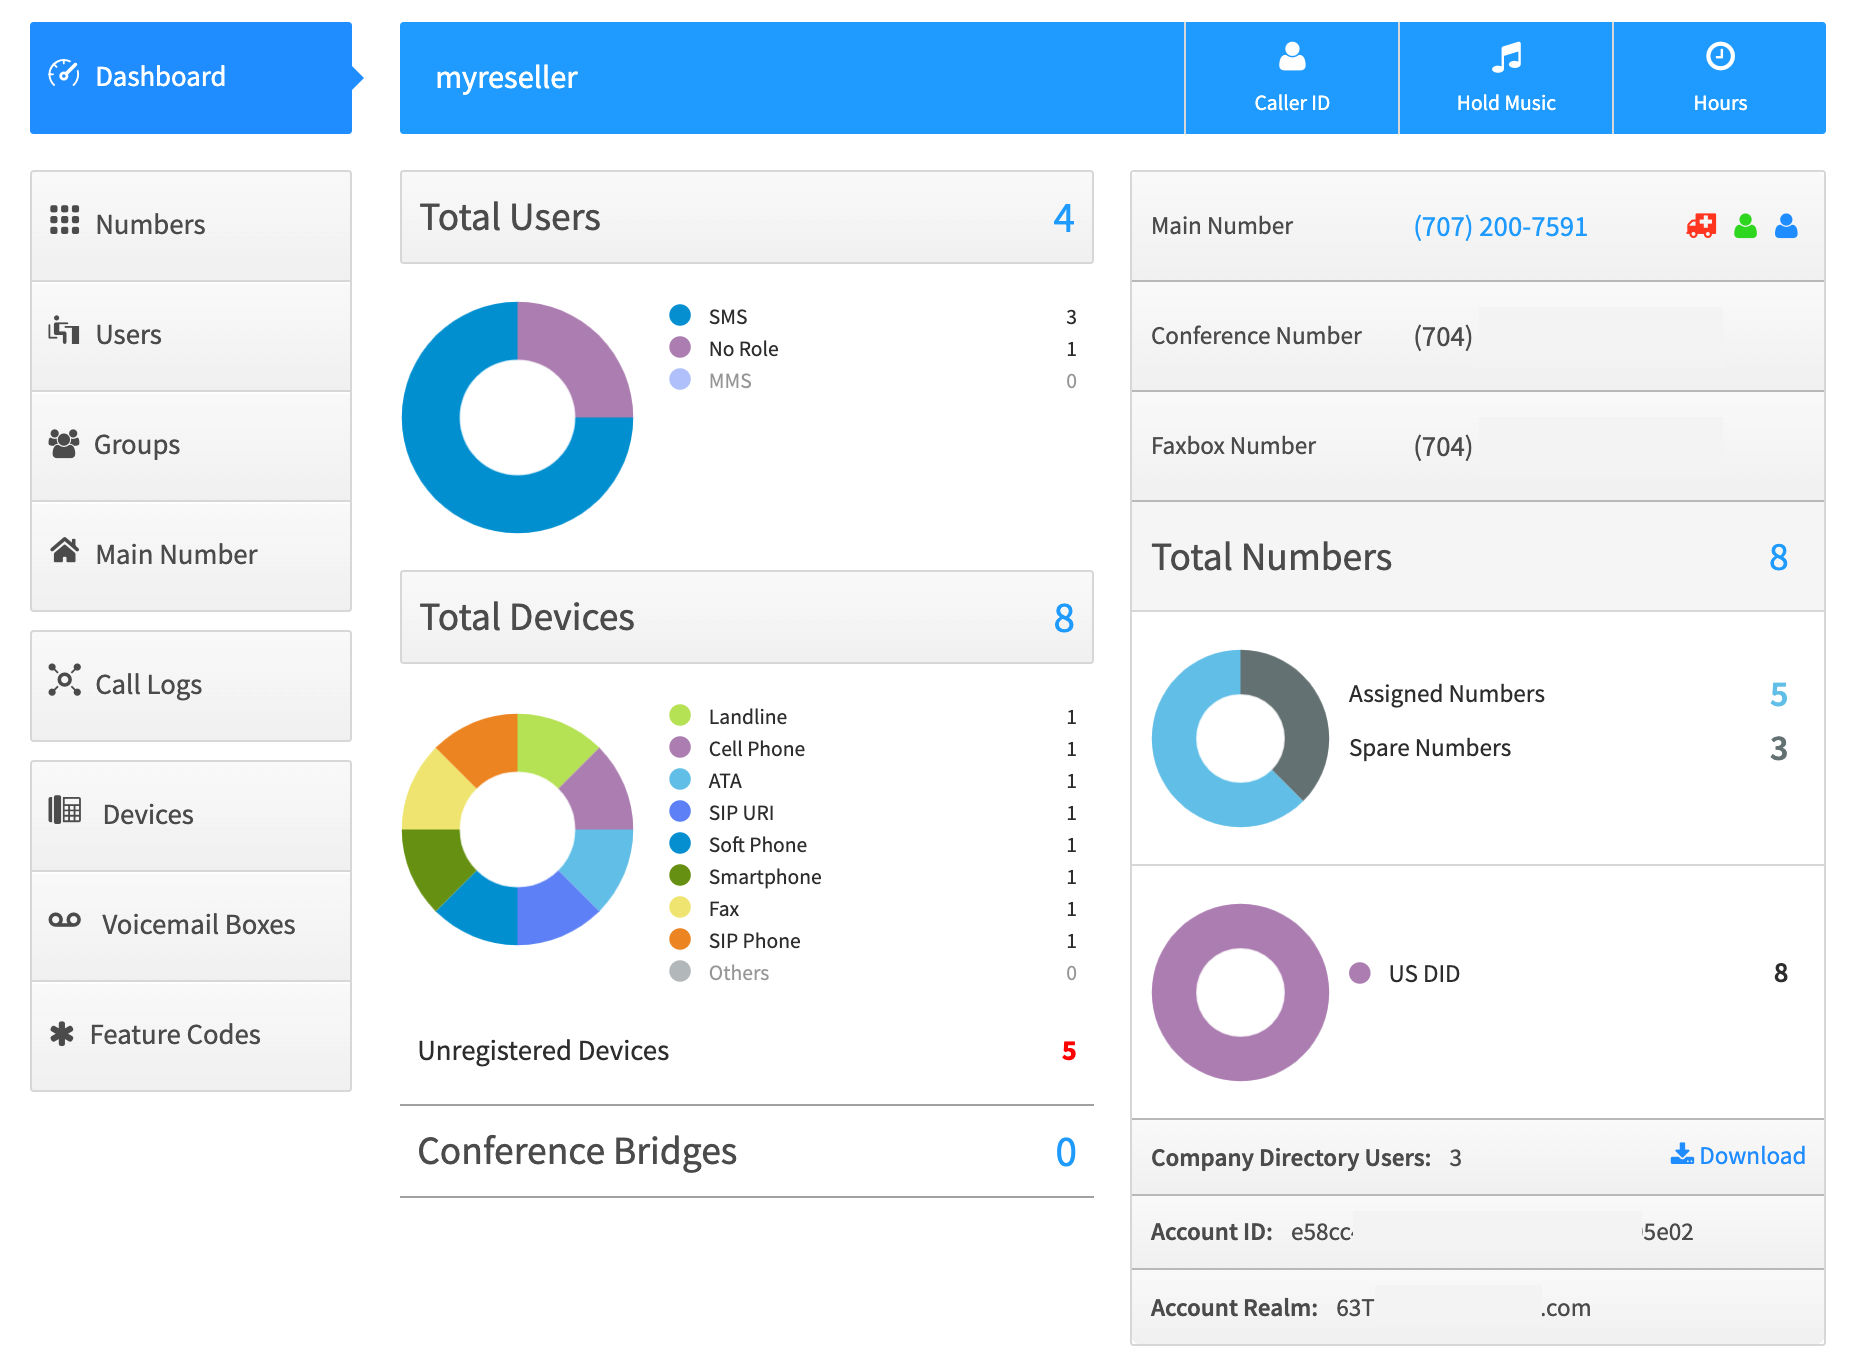
Header Information
This information provides quick access to some of the main features of your account.
The top left displays the account name you are viewing and is read-only. The tabs to the right are clickable and provide access to the following settings:
Account Default Caller ID Number
Here you can set what number is used as the default Caller ID for outbound calls from the account. You can also set the CNAM and E911 info associated with the number. For more info on CNAM and E911 see the Main Number section below.
911 VERY IMPORTANT: Calls to 911 will not be allowed if one of the DIDs belonging to the account is not configured with proper E911 address information. If the account has multiple physical locations, each location must have its own DID with E911 address information specific to that location. Devices that are not at the location matching the E911 address of the account’s default E911 configured number must specify the correct DID to be used for emergency calls placed from that device so that the 911 call can be handled by the correct 911 call center and so they can if needed send emergency responders to the correct address. If a call to 911 is placed and it is determined that the address is not configured or incorrect there are significant penalty fees charged.
If you bring your own carrier (BYOC) then E911 is not managed through Kazoo’s Monster UI and no check can be made to ensure you have E911 address information properly configured for the emergency Caller ID that you have configured.
Account Default Hold music (MOH)
Set what the account’s default hold music is. It will play when someone is on hold, in a conference room when there is only one person there, if you get Call Center the hold music there.
NOTE: This can be over-ruled by add-on applications. For example, the Call Center Pro application provides added choices for uploading music and a sequence of "on hold" interactions, including "approximate waiting time" and "number in queue ahead of you."Hours
This allows you to revise the office hours you previously set up.Total Users
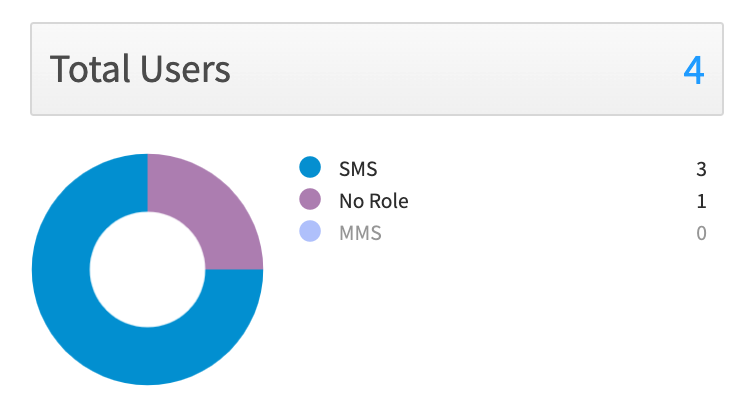
The total users graph shows the total number of users assigned to this account, and how many, if any have been given access to SMS/MMS messaging. There is an added charge for this so it is helpful to see what the summary here.
Total Devices
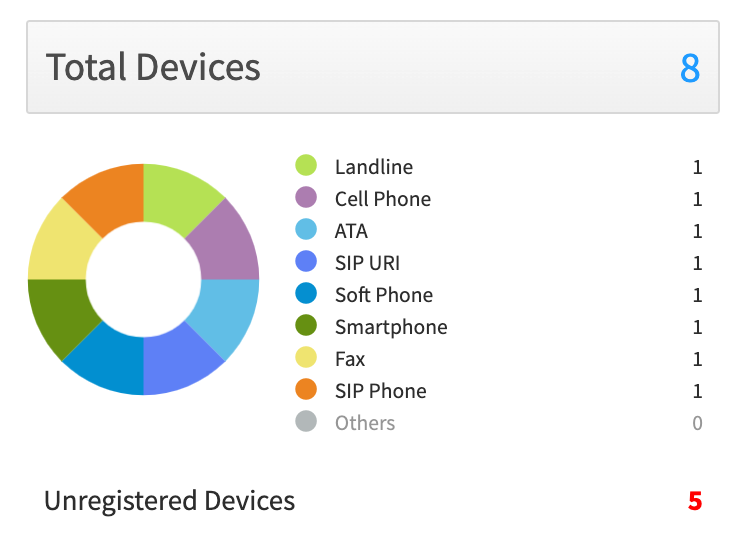
This summarizes the number of devices (not users, remember many users will have more than 1 device) configured for the account.
A desk phone is one type of device that is called a “SIP Phone” device type. Not all devices are necessarily themselves a “Phone”. Some can be a static forward to a phone number off net like a Cell Phone or might be an ATA that an old analog phone is connected to.
A circle graph representing the percentages of types of devices with a legend showing the actual count of each device type.
Unregistered Devices
The total number of device that are not currently registered. It will include SIP phones/devices that are not registered and will include device types that by nature do not register like Landline, cell phones, and RTC webphones used in the comm.io app.
Conference Bridge count
Summarizes the total number of conference bridges set up for this account.Main Number

This displays the main numbers and the features active for each number. If you bring your own carrier E911 and Caller ID Name will not be available for you to manage with Kazoo.When you first set up the account there will be a special message here to assign a Main Number.
Once you have one assigned, there will be a message to configure E911 for a Main Number.
See the Numbers section below for the meaning of the icons like
 that may appear with a number.
Conference Number
The account’s conference number if assigned.One of the available user features is to have their own conference room, and/or a video conference room as part of the comm.io app. The user would give out the main conference number and the user’s conference room number along with an optional PIN access code.
Main Faxbox Number
The account’s Main Faxbox number if assigned. This faxbox only handles inbound faxes and will send inbound faxes to the email address configured when a number is assigned to the Main Faxbox.Total Numbers
Summarizes the total Numbers owned by the account and indicates any and spare numbers you may have purchased in a group but not yet assigned. It also identifies 800 numbers you manage.
A Graph showing the classification of the Numbers owned by the account. The available classification names can be seen in the Restrictions portion of a device. US DID includes United States and Canadian numbers.
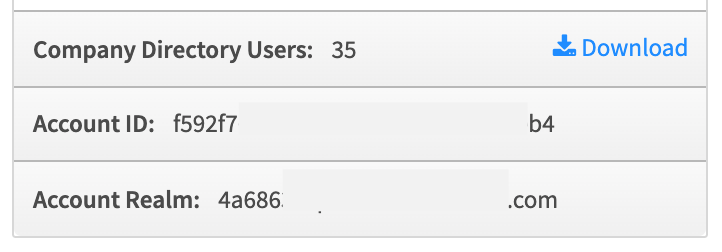
Company Directory
Shows how many users there are in the company directory. You can configure a user not to be listed in the company directory. But by default, users will be added to the company directory. You can download this information as a .csv file also, and import it into a document for distribution.Account ID
This number will be used if you need a support person to help track down call routing issues or any other support questions.Account Realm
The realm of the account. This is used as part of SIP authentication and for faxboxes so the account users can send an email to the system that will then be sent as a fax to the destination number. See the Creating Accounts and Branding articles in the Getting Started resources for more info on the significance of the realm and the implications of changing it later.Numbers & Users
Below is a quick overview of the pages displayed when you click on the icons in the dashboard.NOTE: A more detailed discussion of these settings can be found in the SmartPBX User guide, HERE.
Numbers in use shows the phone numbers, the users assigned to the numbers, and some of the attributes assigned to that number.

When a number is selected there are actions displayed above the list of numbers that can be performed on that number.
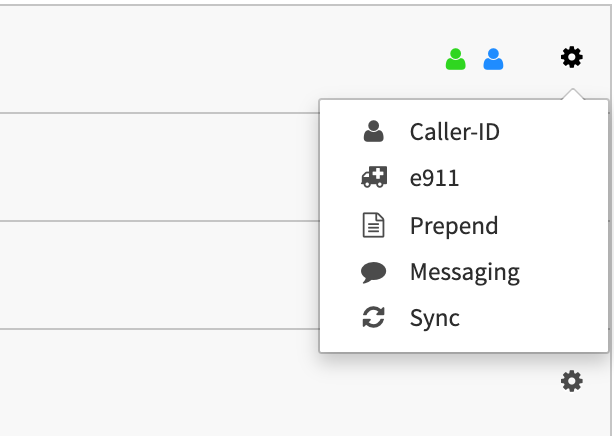
Here the actions for selected numbers are
 and
and  .
.
In Number Manager App there is also the
 action which allows you to move a spare number to another account. Be aware, if you move a number to another account and later Delete it from that account the number will go back as a spare number to the account it was previously moved from. If you believe a number is in the wrong place (Spare/In Use) you can use the to try to correct it.
Charges for DIDs apply to spare numbers as well as Numbers in use.
Meaning of Number Icons like

 indicates the number was added manually or imported to the system and features like inbound and outbound Caller ID and E911 are not available for it. Generally, this is the case because it is from a BYOC carrier and those features need to be managed through the carrier that the number was bought from.
 icon when clicked displays a menu that allows you to manage features of the number like Caller ID, CNAM, and E911.
 E911 is configured on the number.
 Caller ID name will be looked up for the number the call came from, AKA Inbound CNAM lookup.
 number has set a name in the national CNAM database that can be looked up by OTHER systems that do Caller ID lookup. This is not to be confused with the External Caller ID Name. The External Caller ID Name is only effective for calls between accounts. The PSTN network does not support transmitting Caller ID information so when a call goes out a carrier across PSTN the Caller ID name is lost. But the destination number’s service provider, like we offer with the “Inbound CNAM lookup” described above, can do a lookup in the national CNAM database and provide that to their users.
 . indicates the number is in the process of porting.
 Indicates that the number has been enabled for SMS text messaging
 Indicates the number has Prepended value to it that will display on caller ID.
Spare Numbers
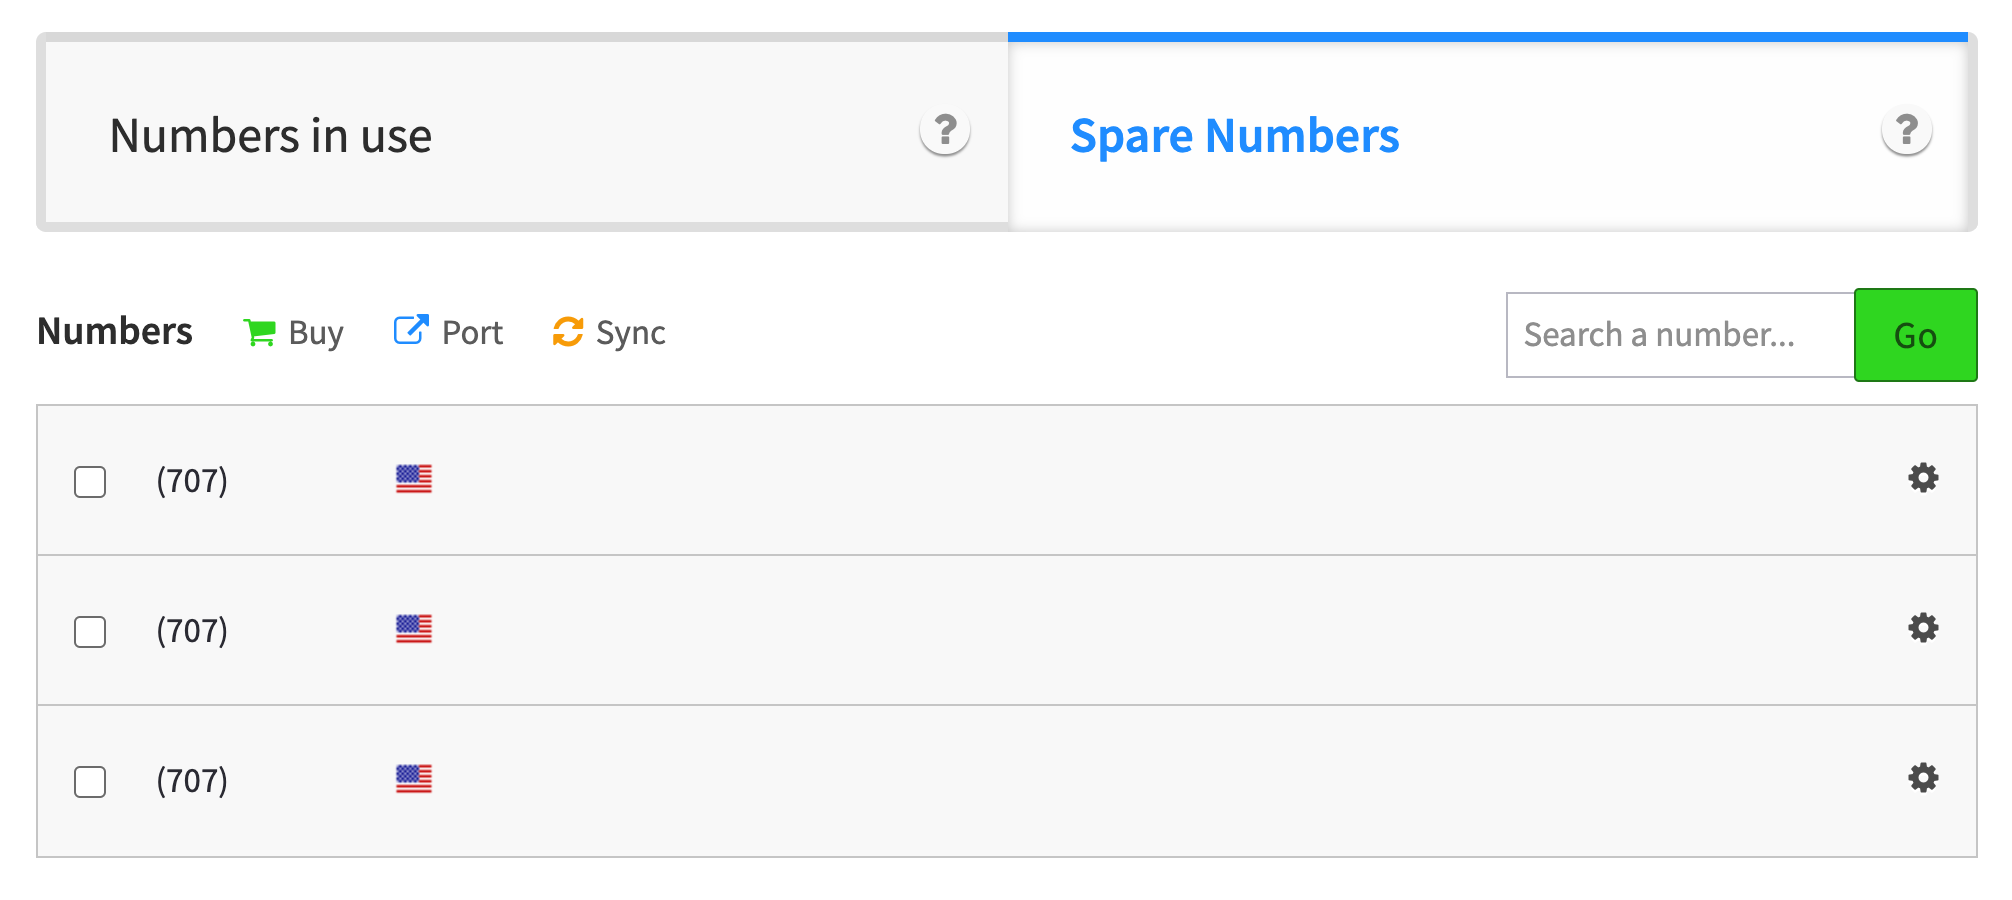
Users
Here is where you can view and manage the account’s users and the features they have set up.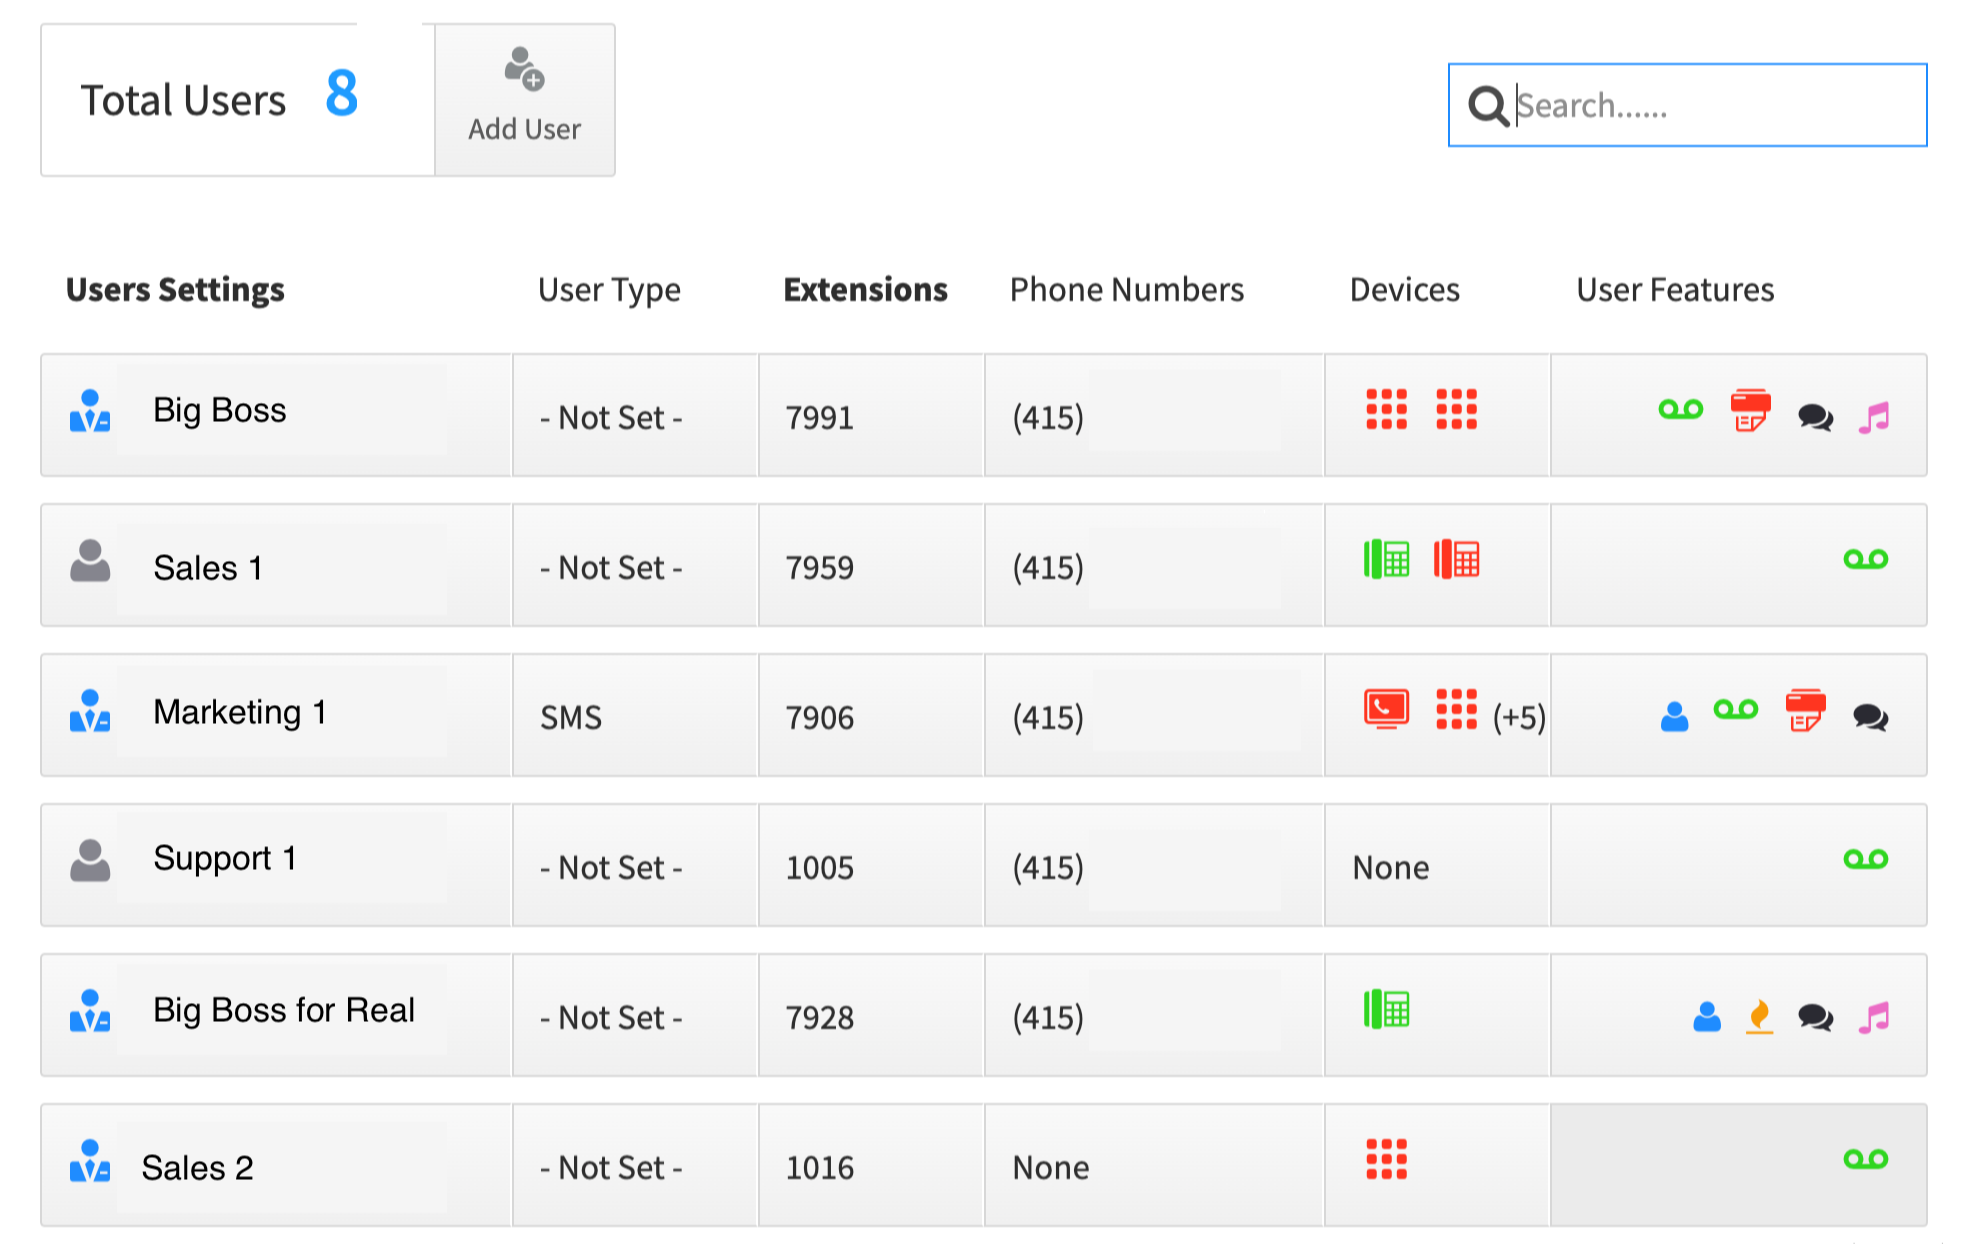
Each Column for the user reflects primary info of that column’s category for that user and you can click it to access the settings for that category for that user.
For a detailed description of what the icons represent and how to assign them, refer to the SmartPBX User guide.


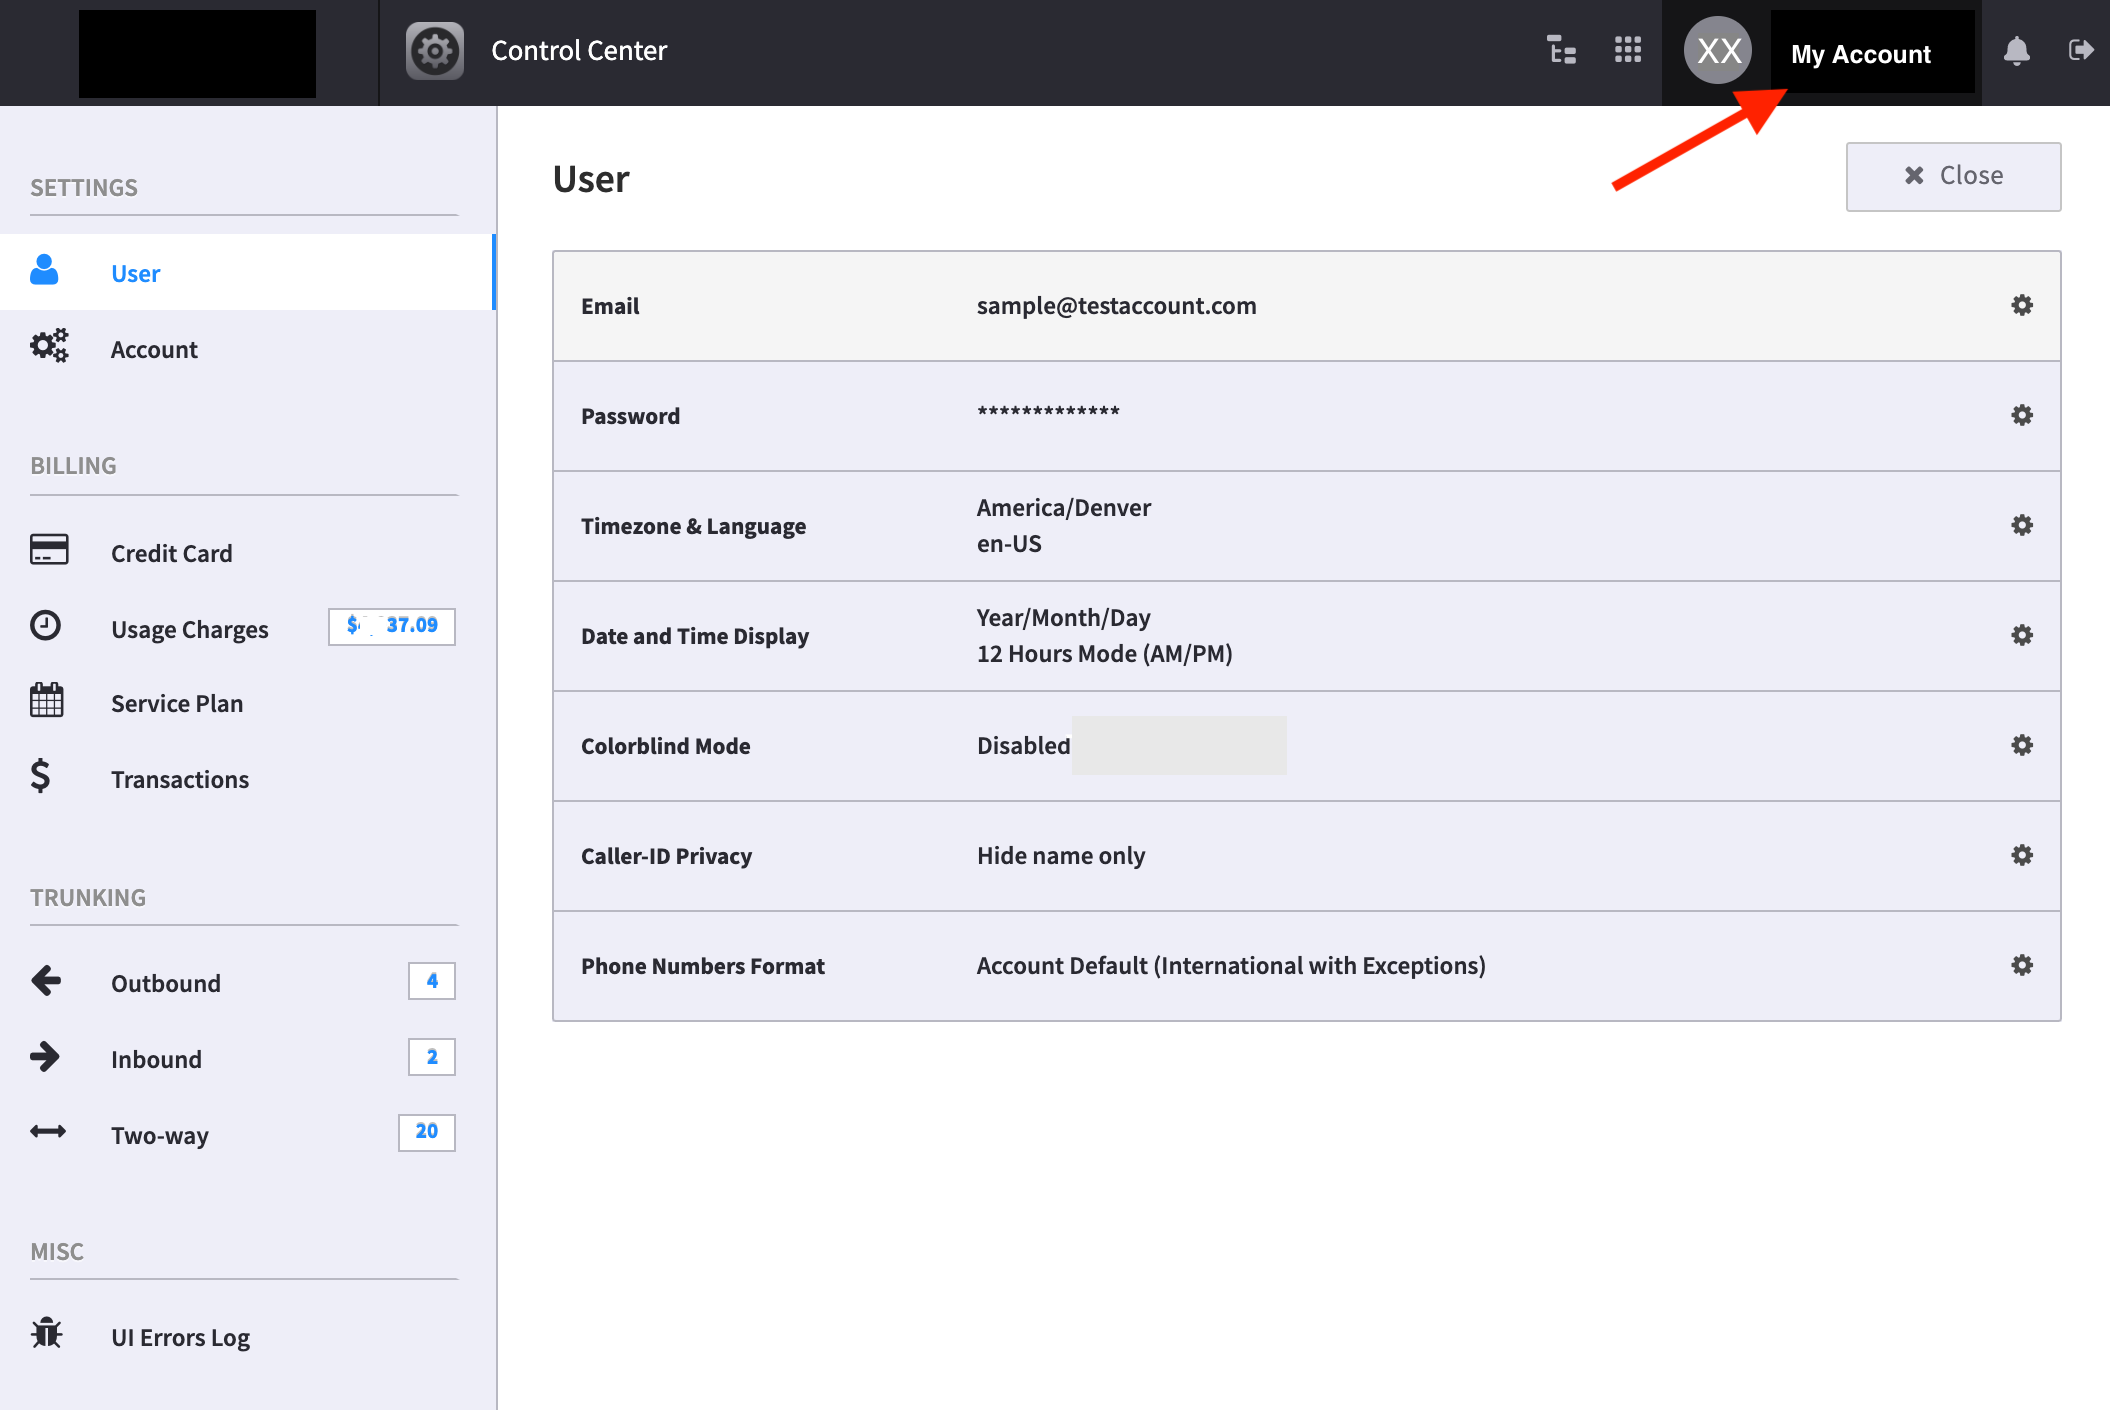

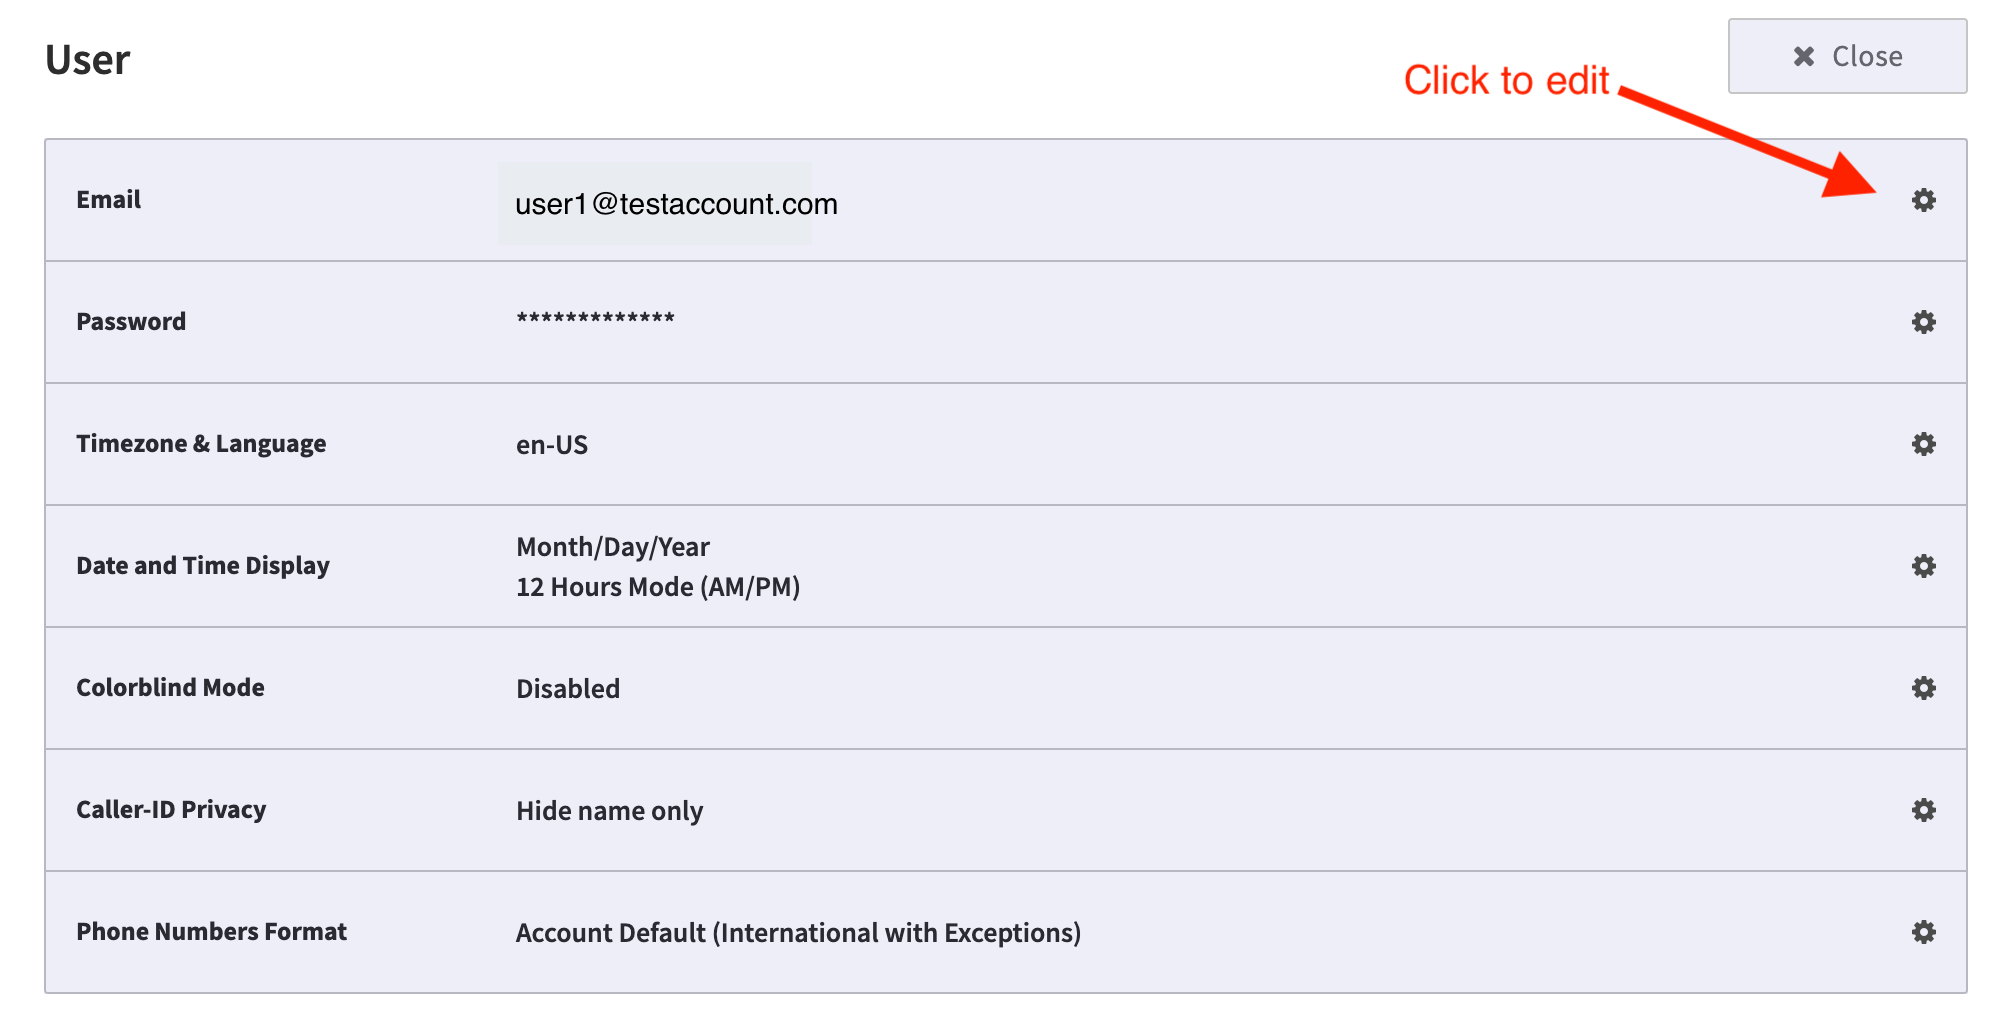
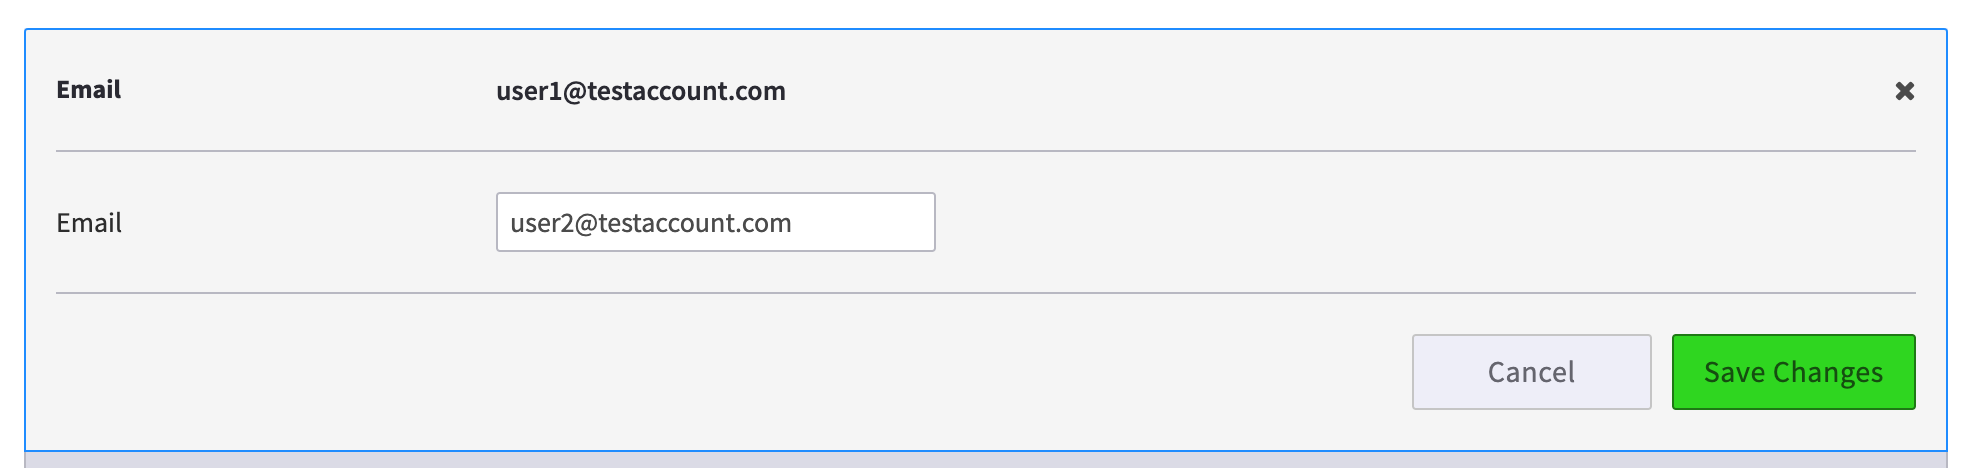
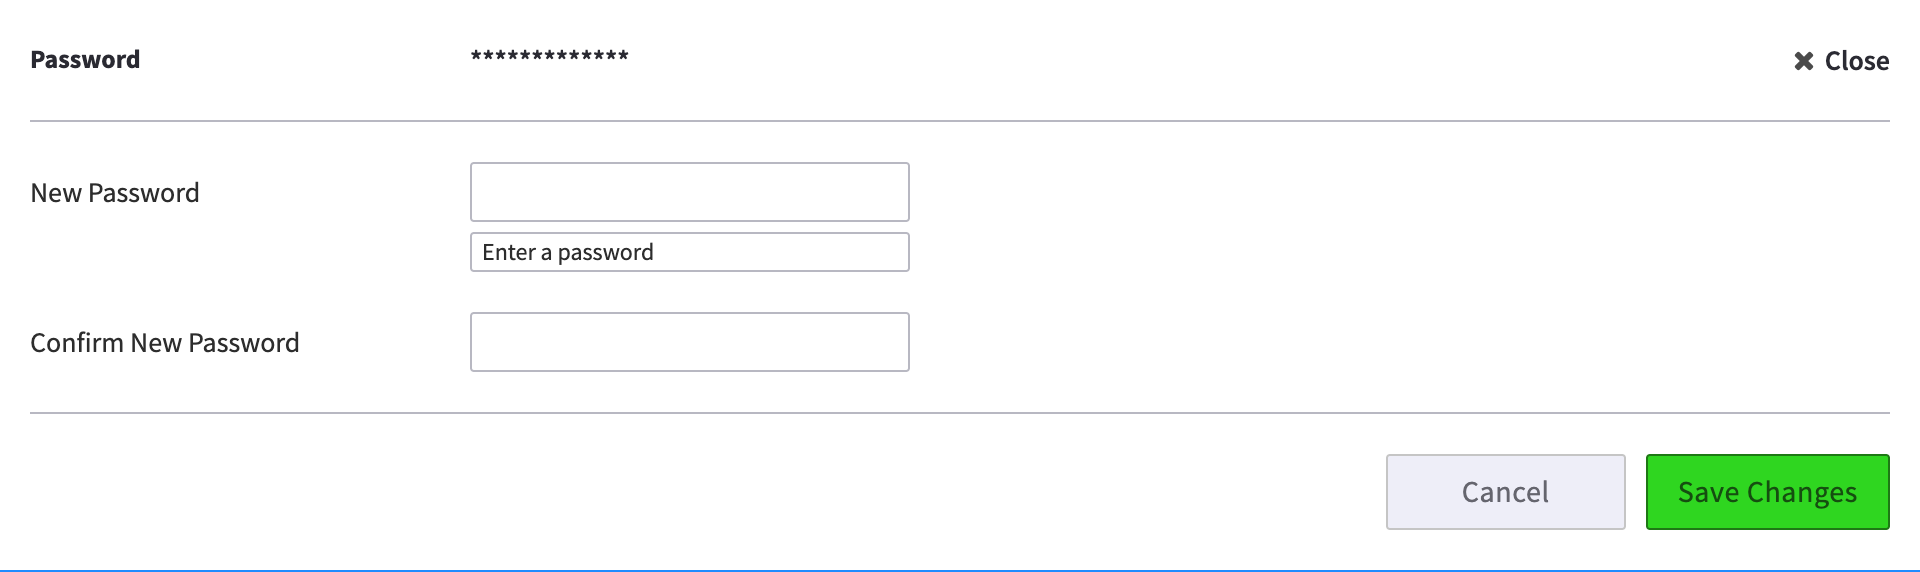
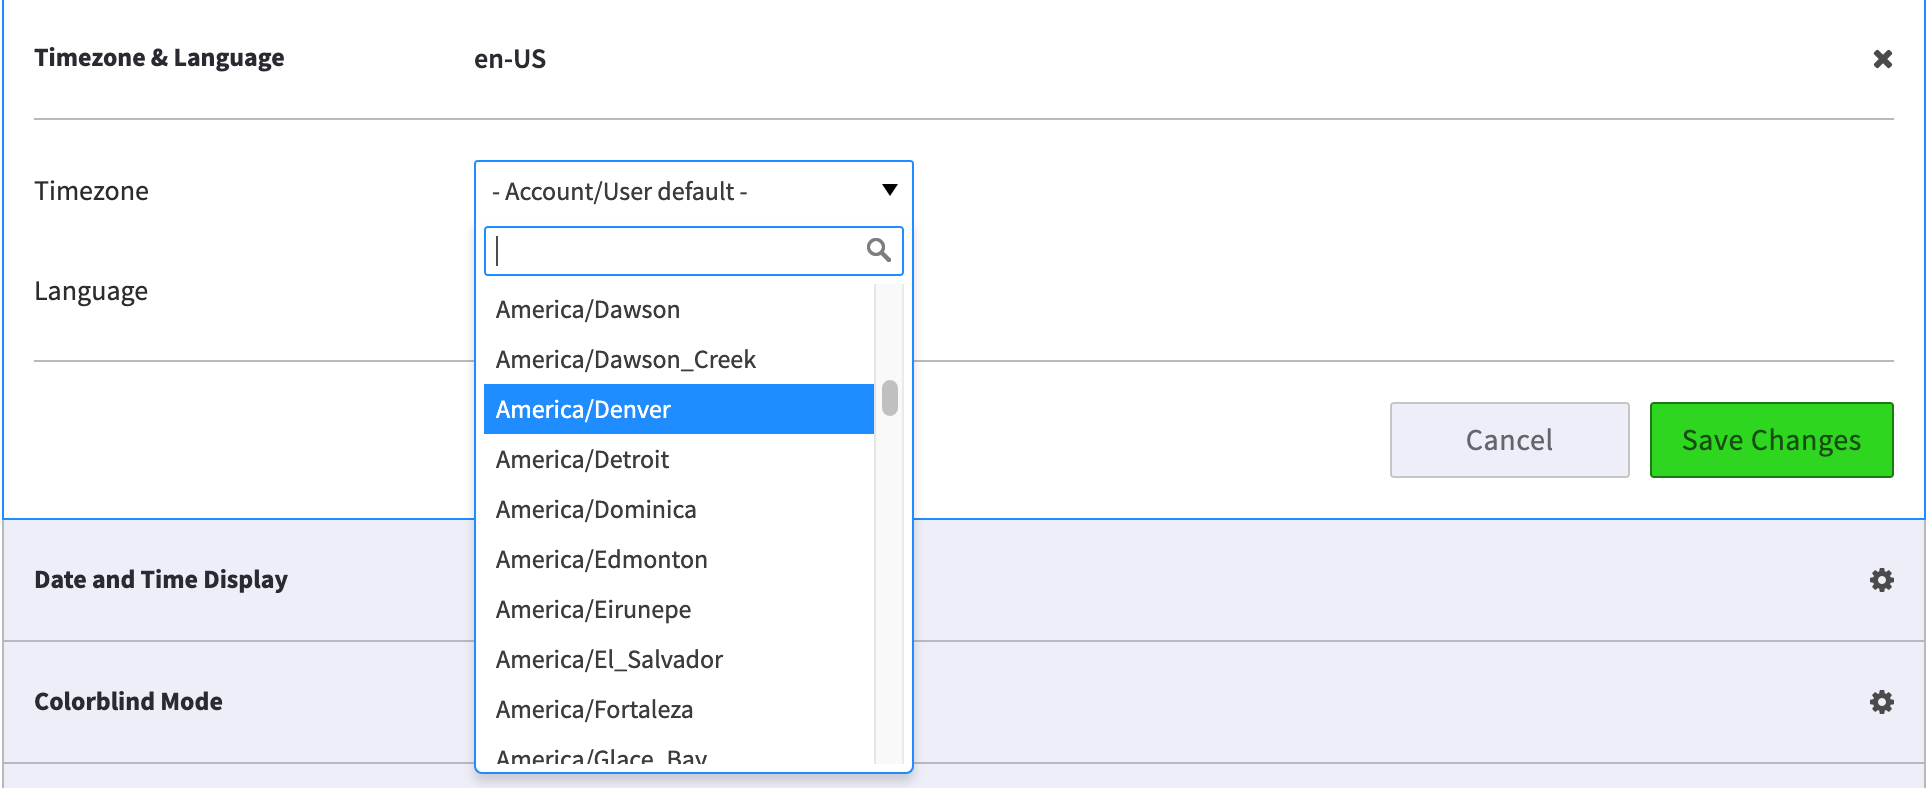
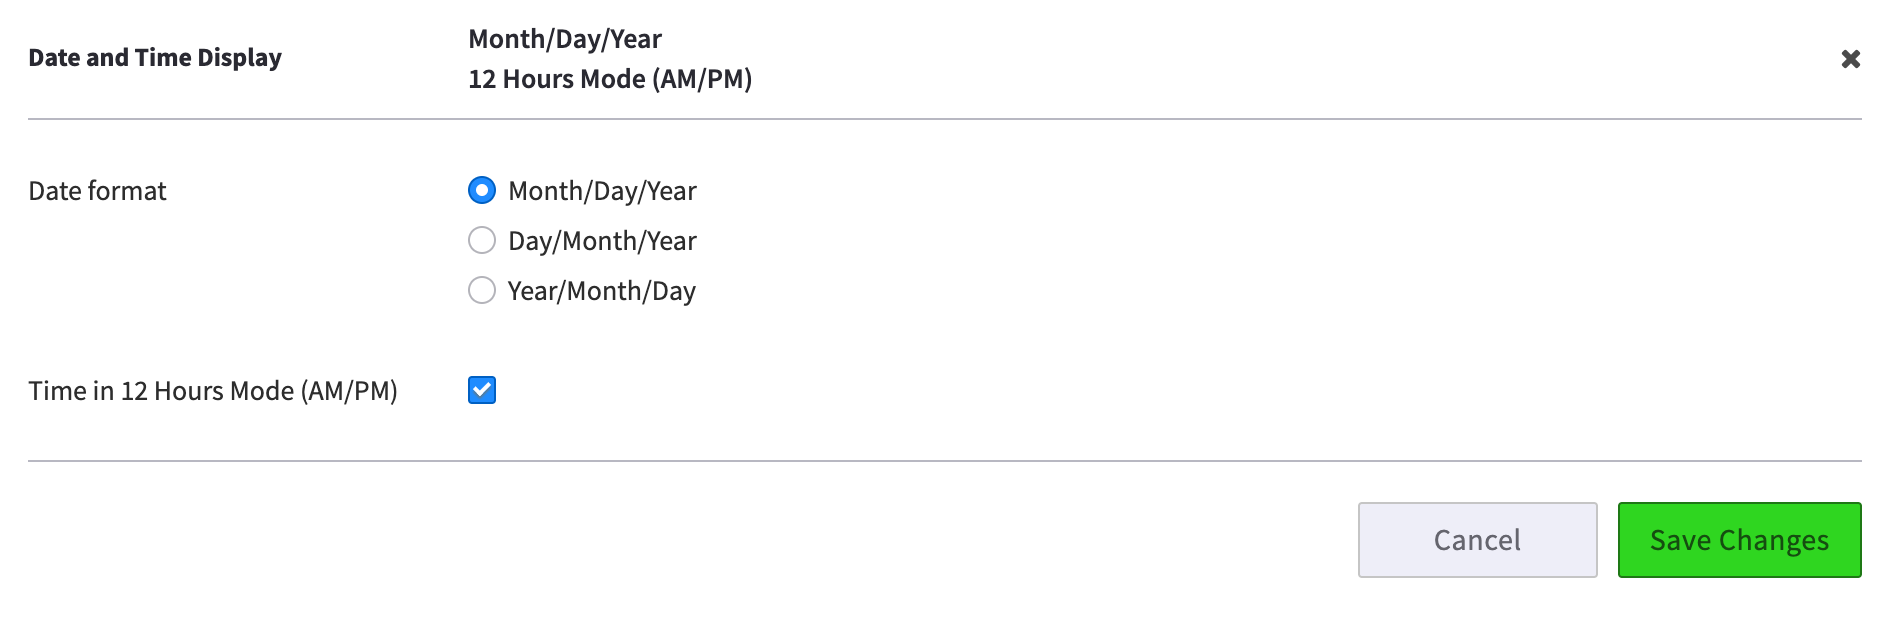
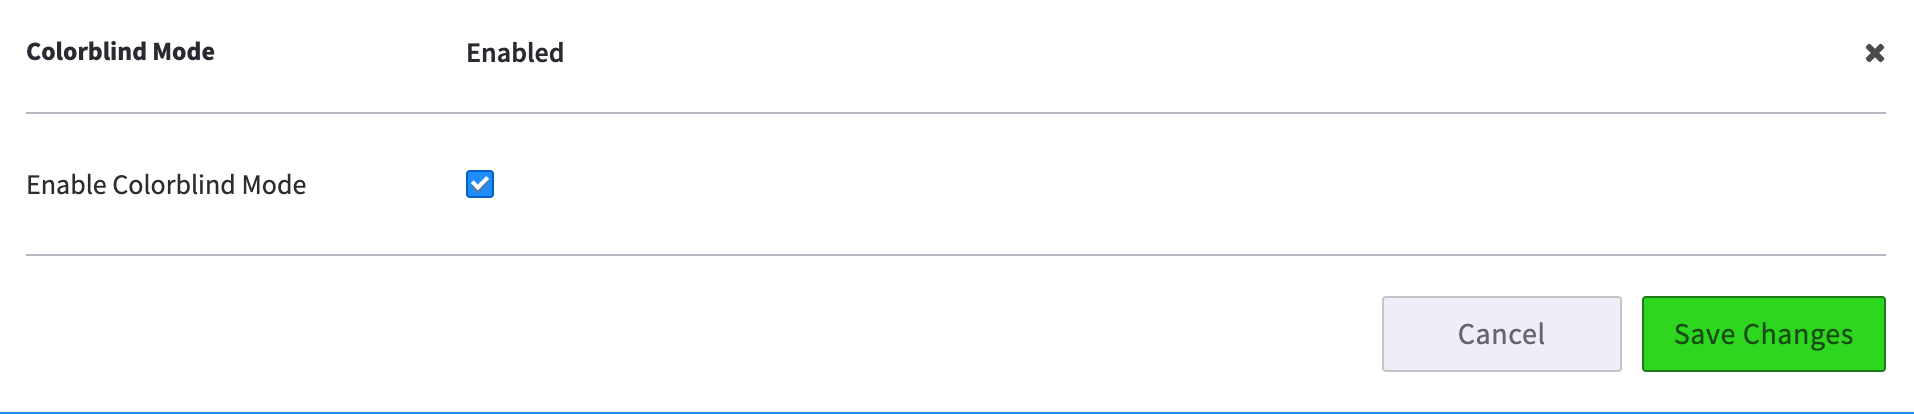
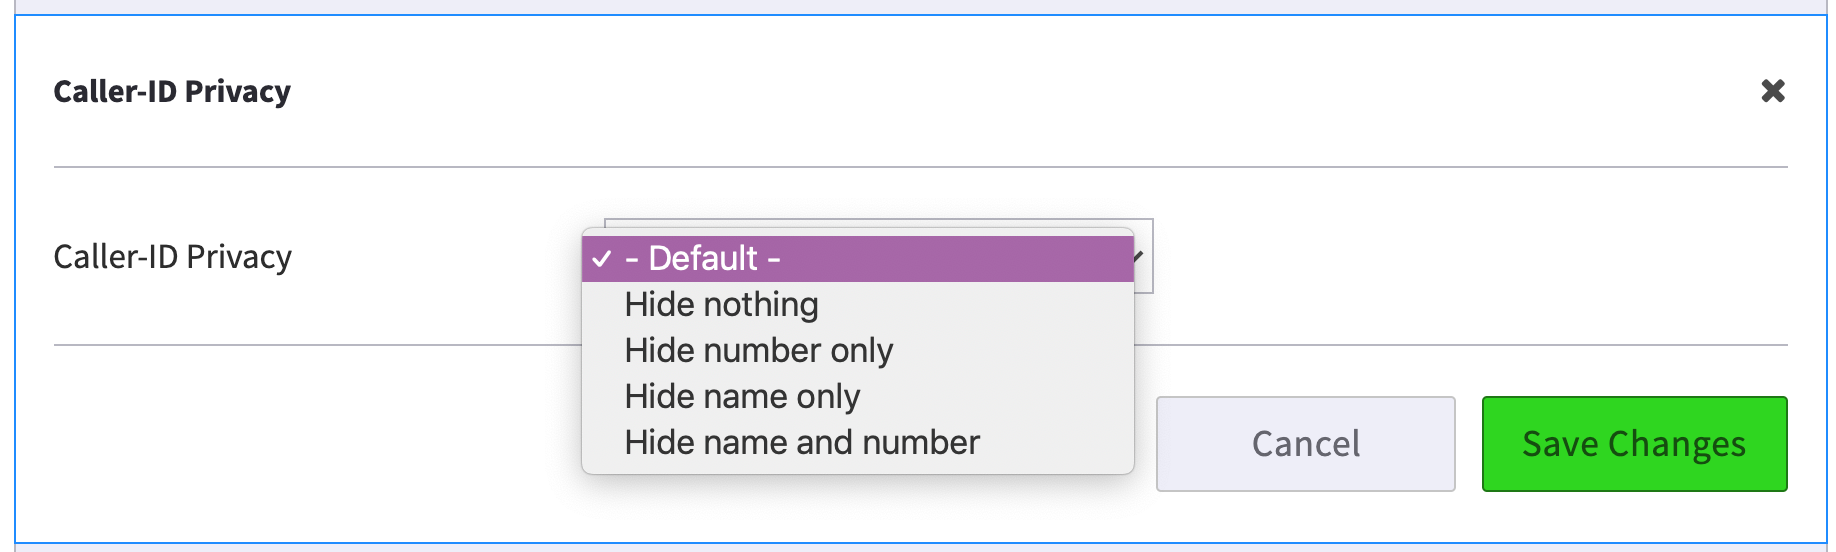
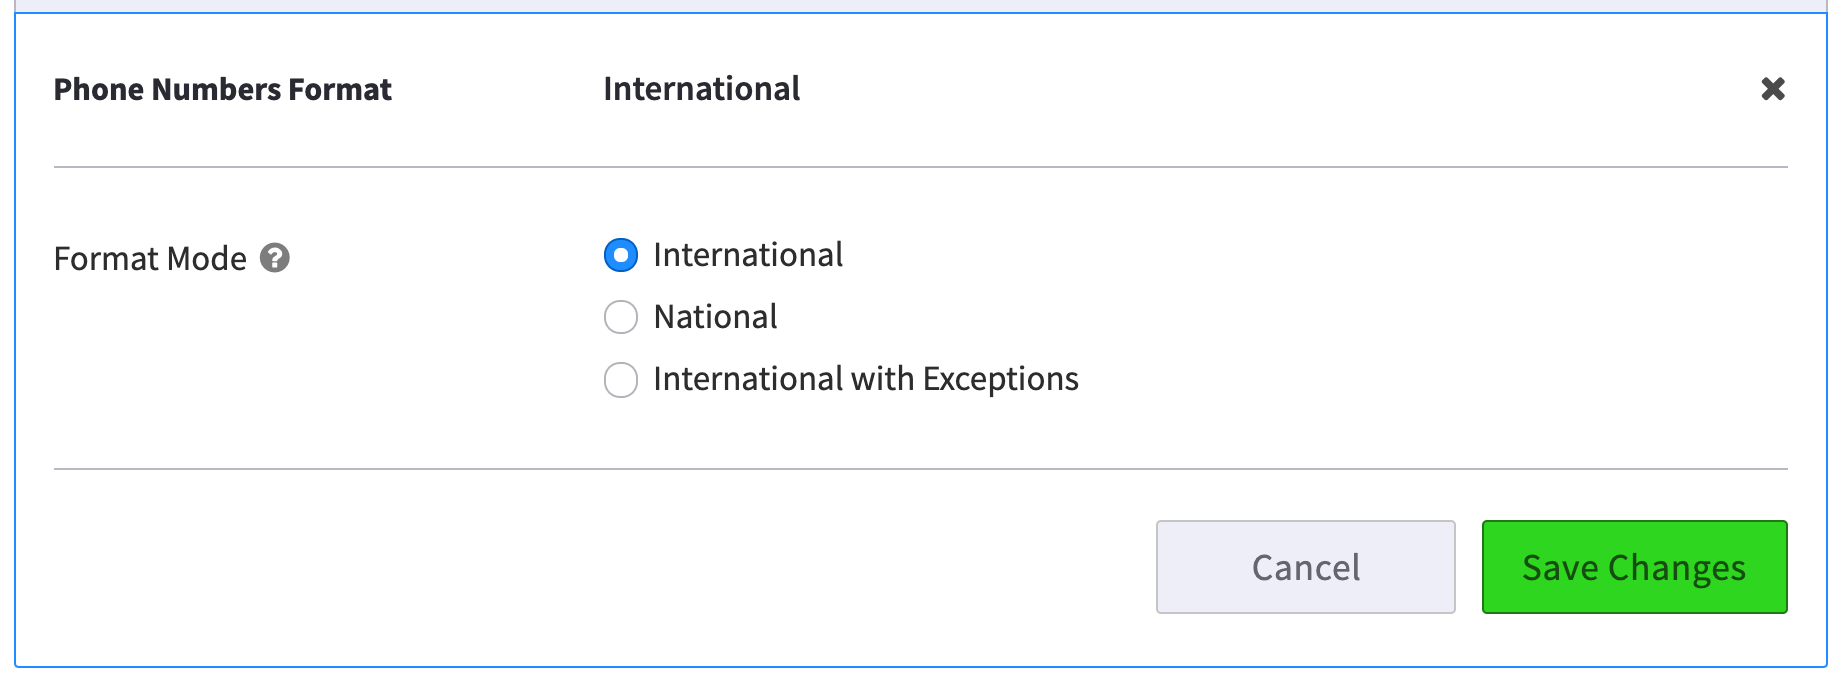

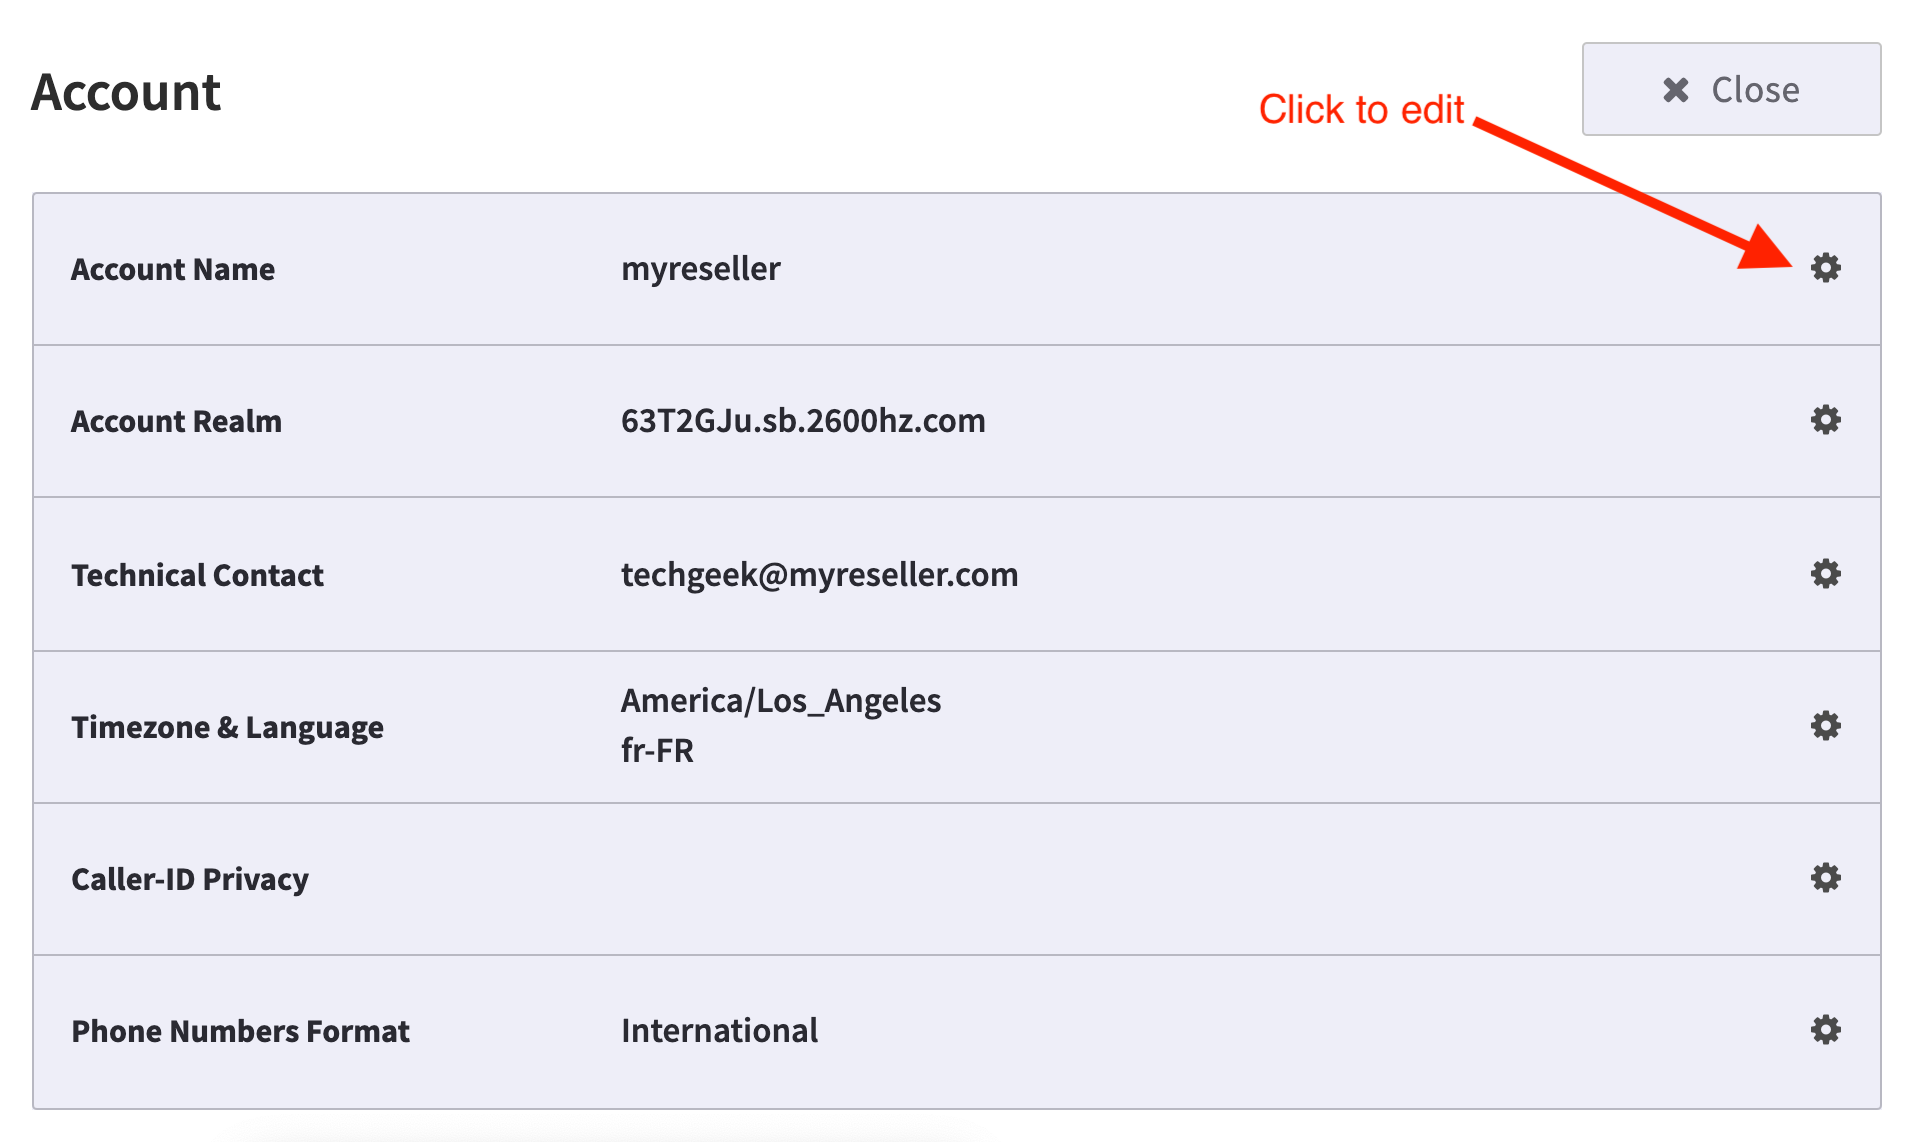
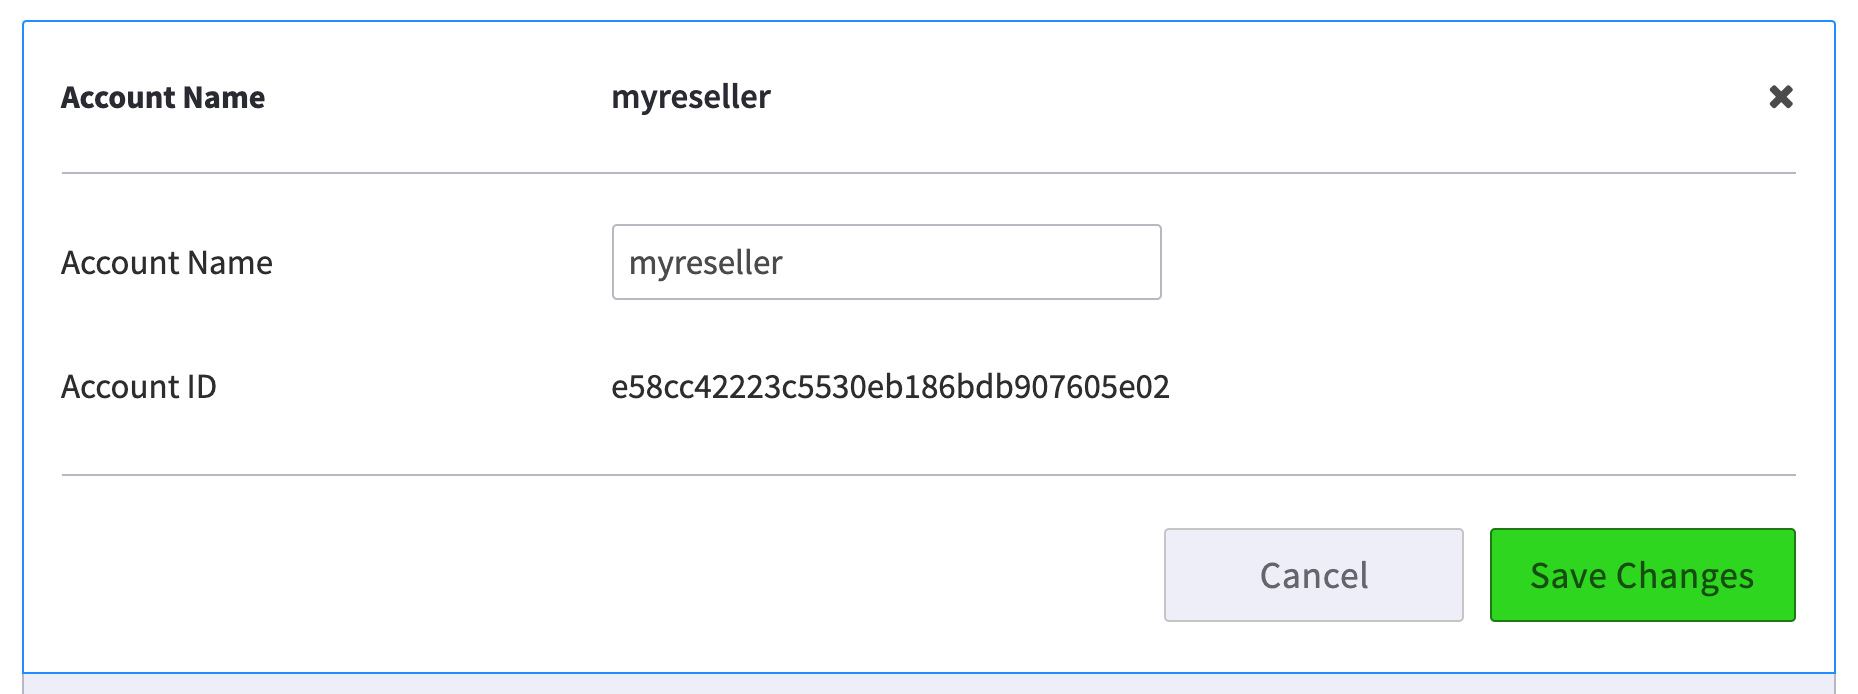
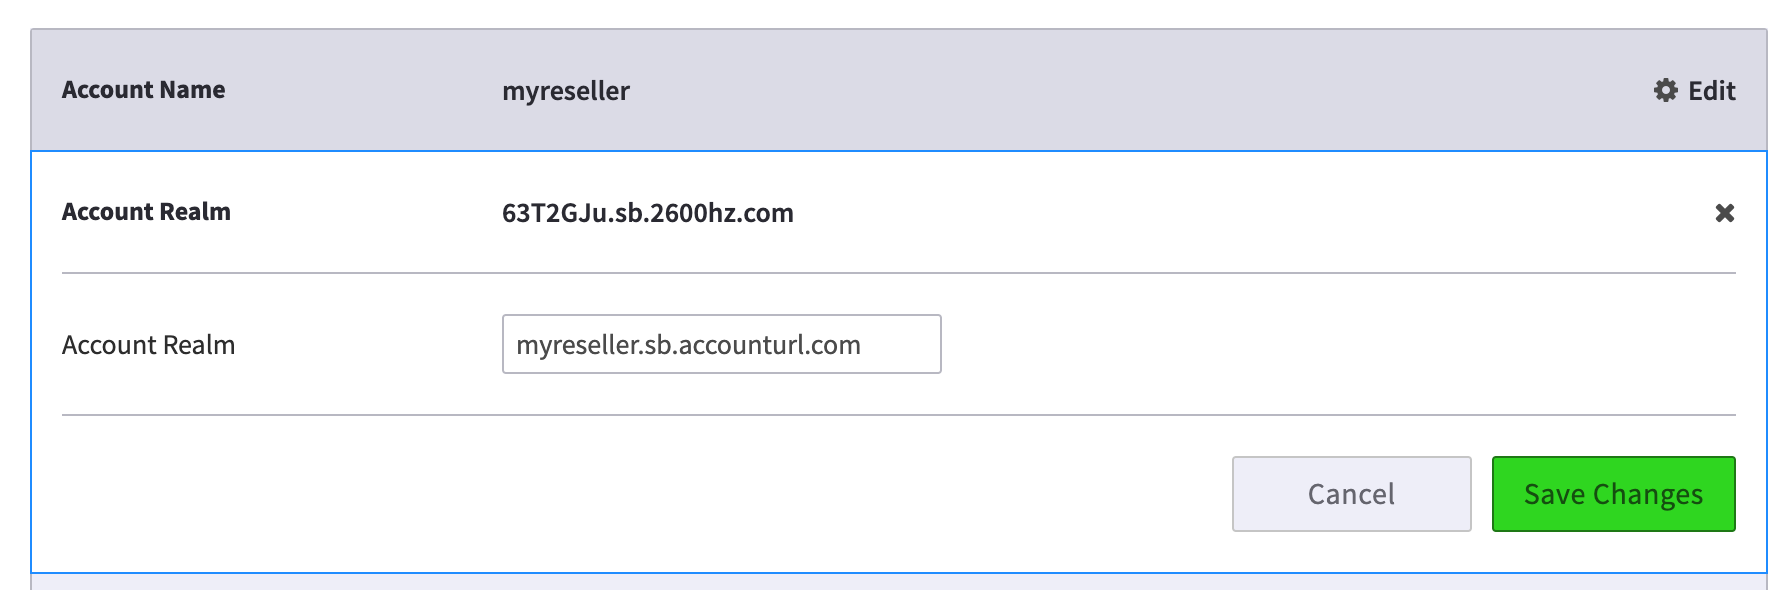
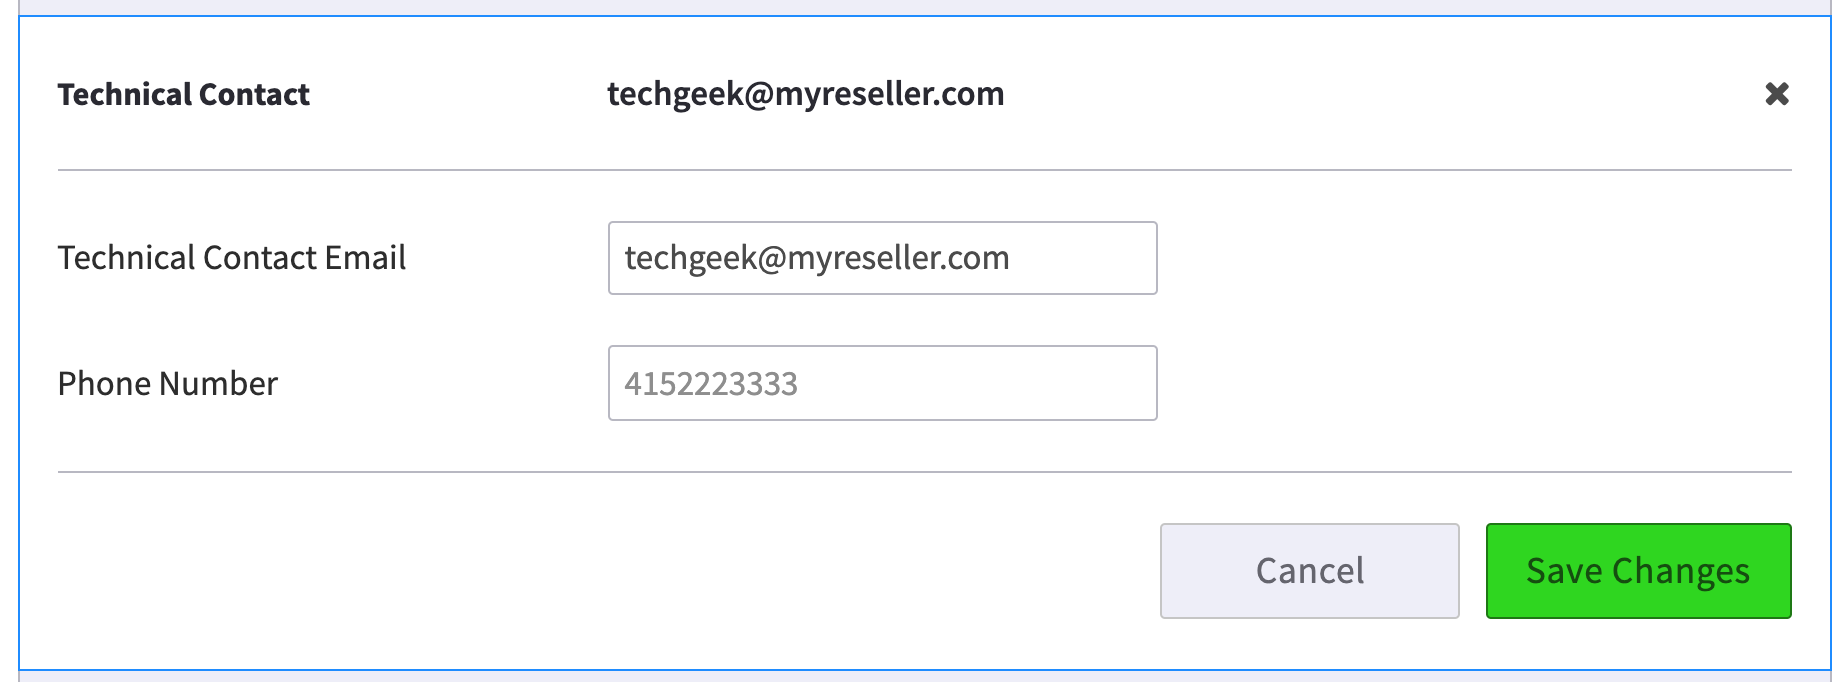
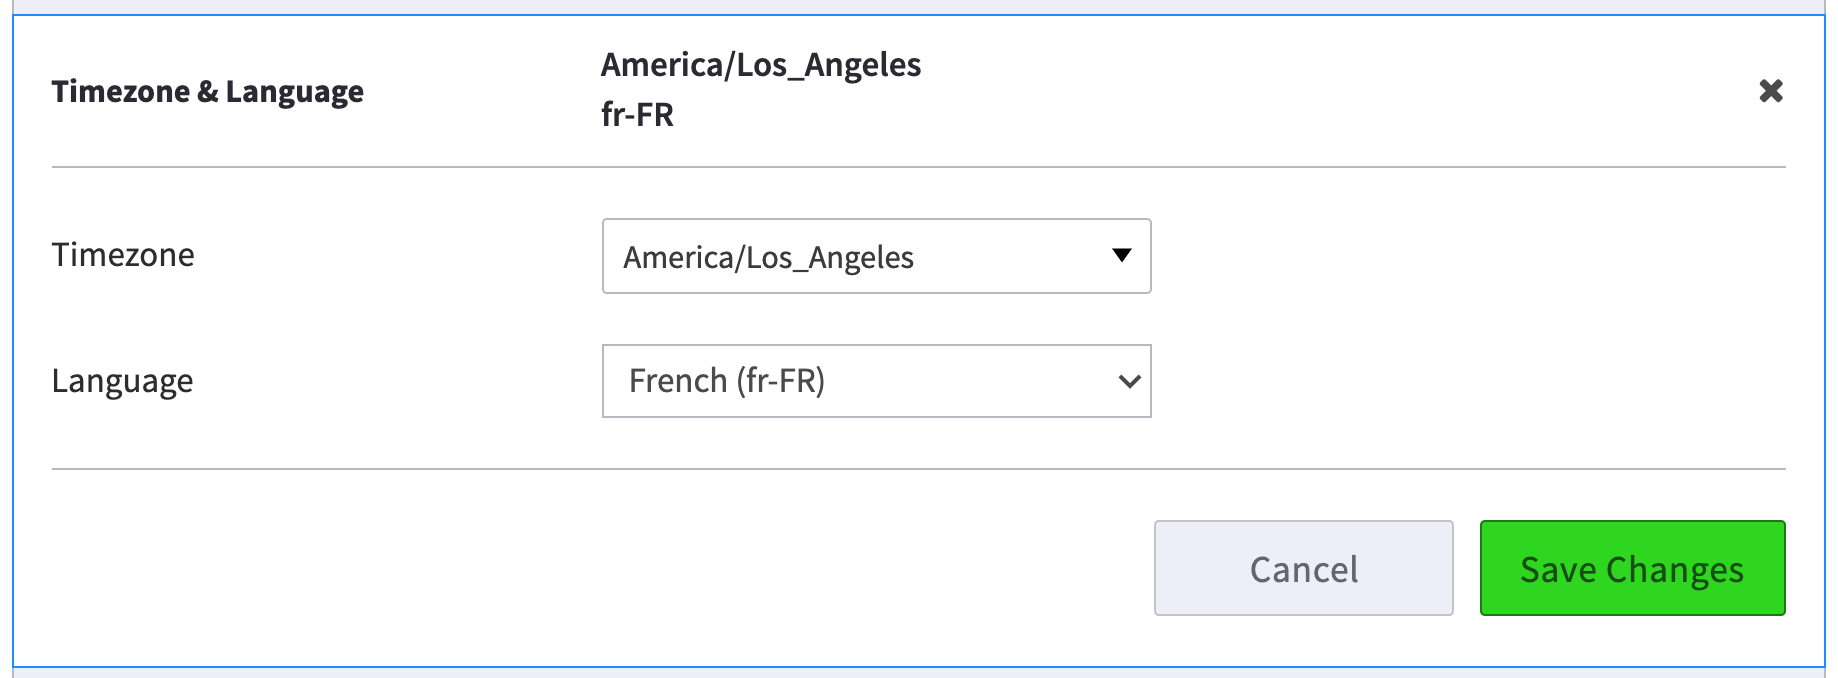

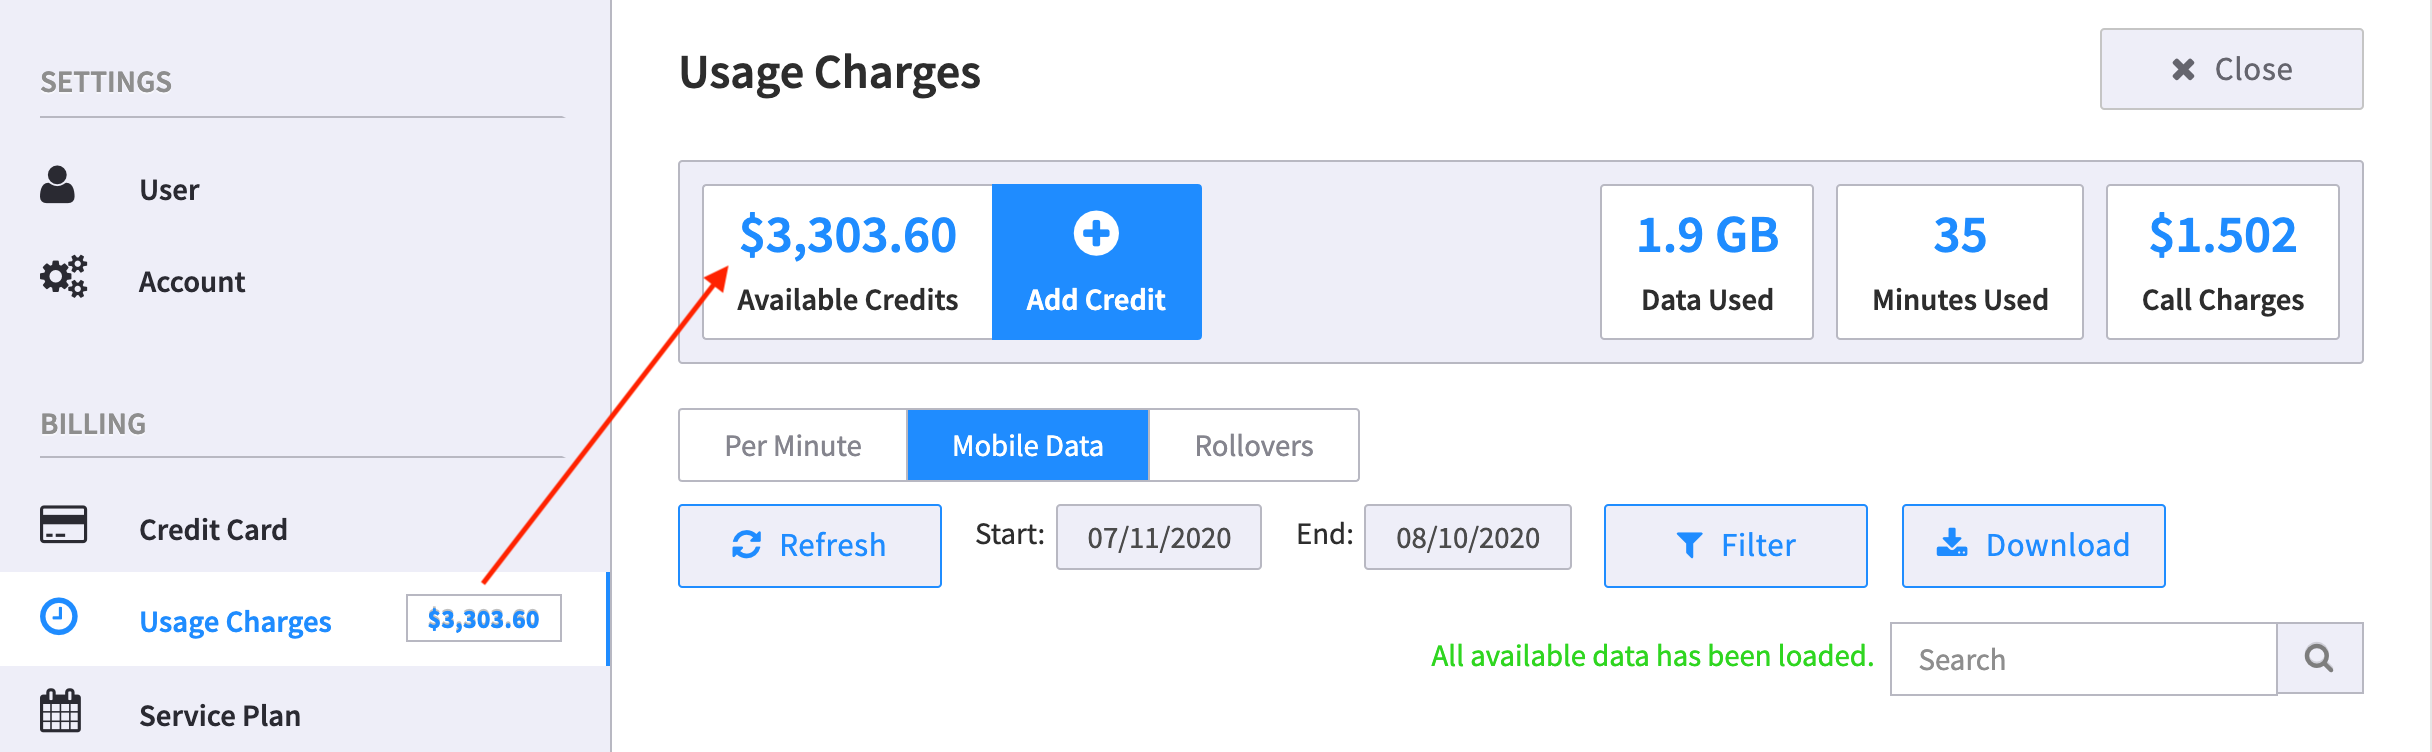
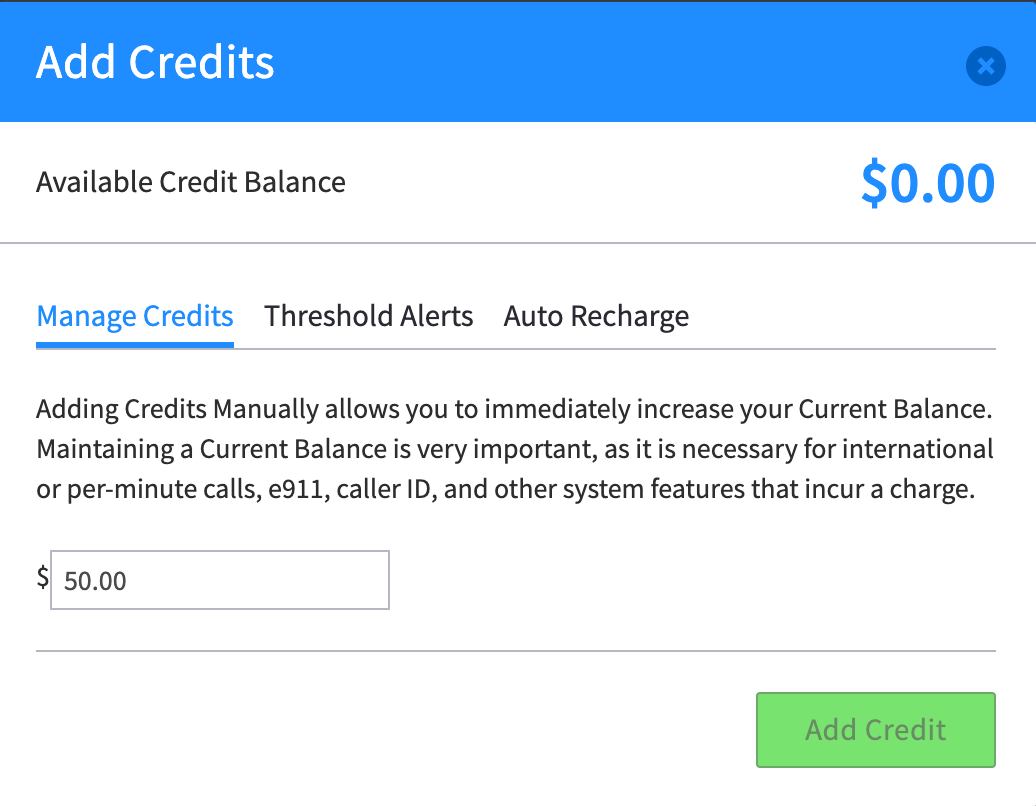
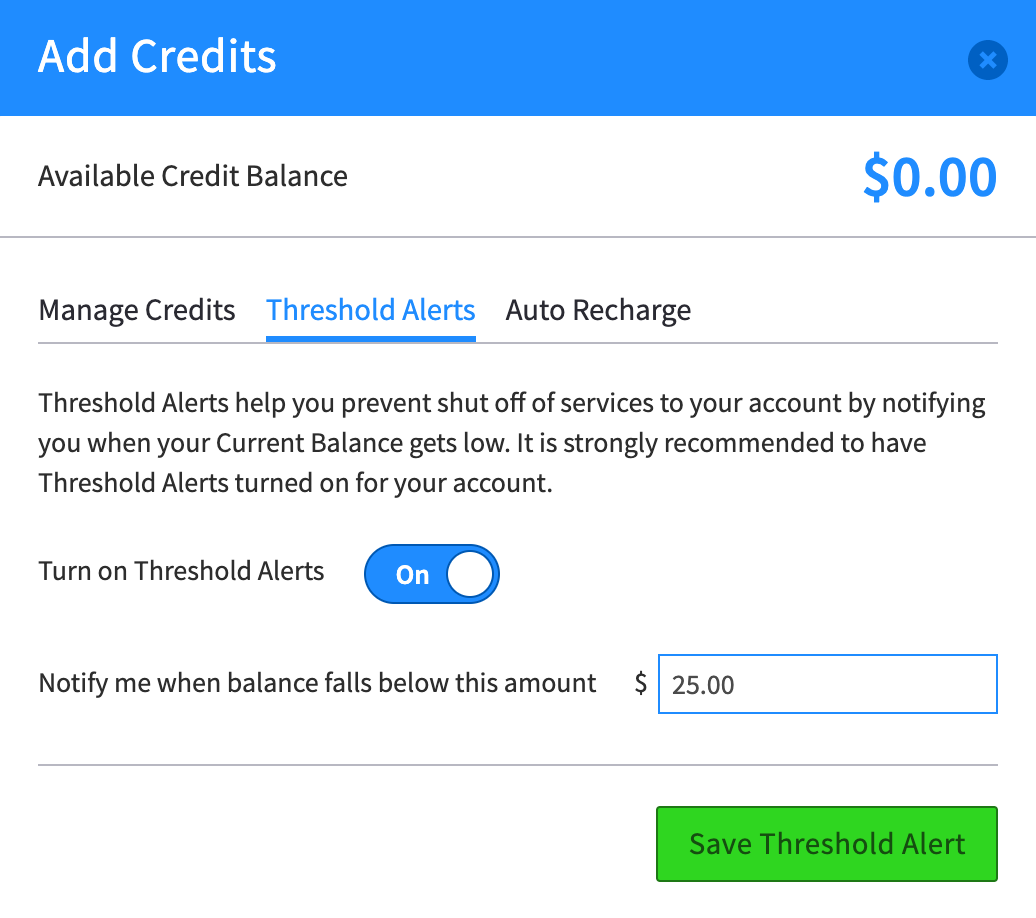
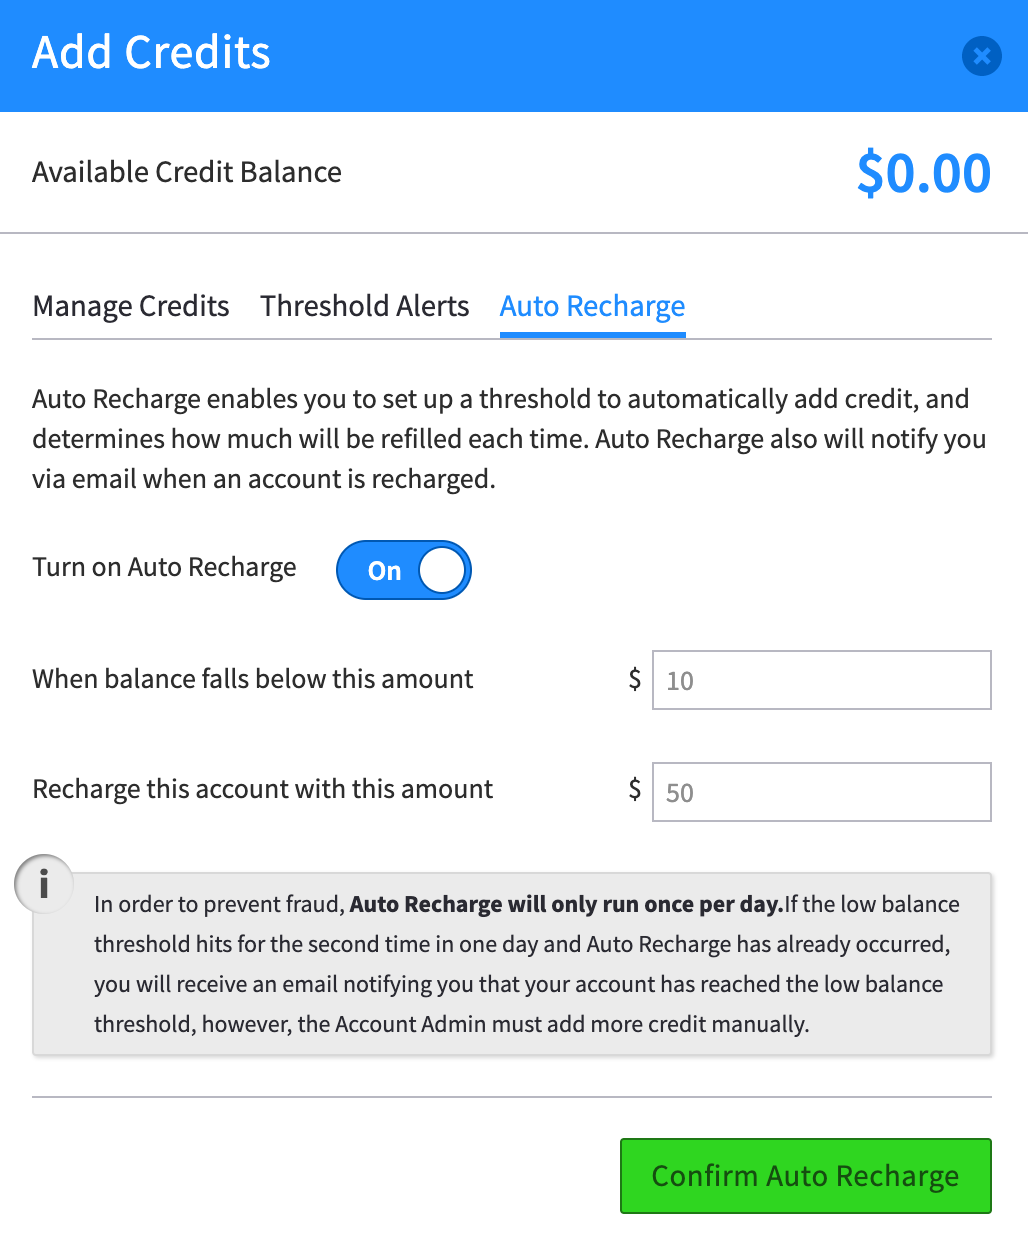
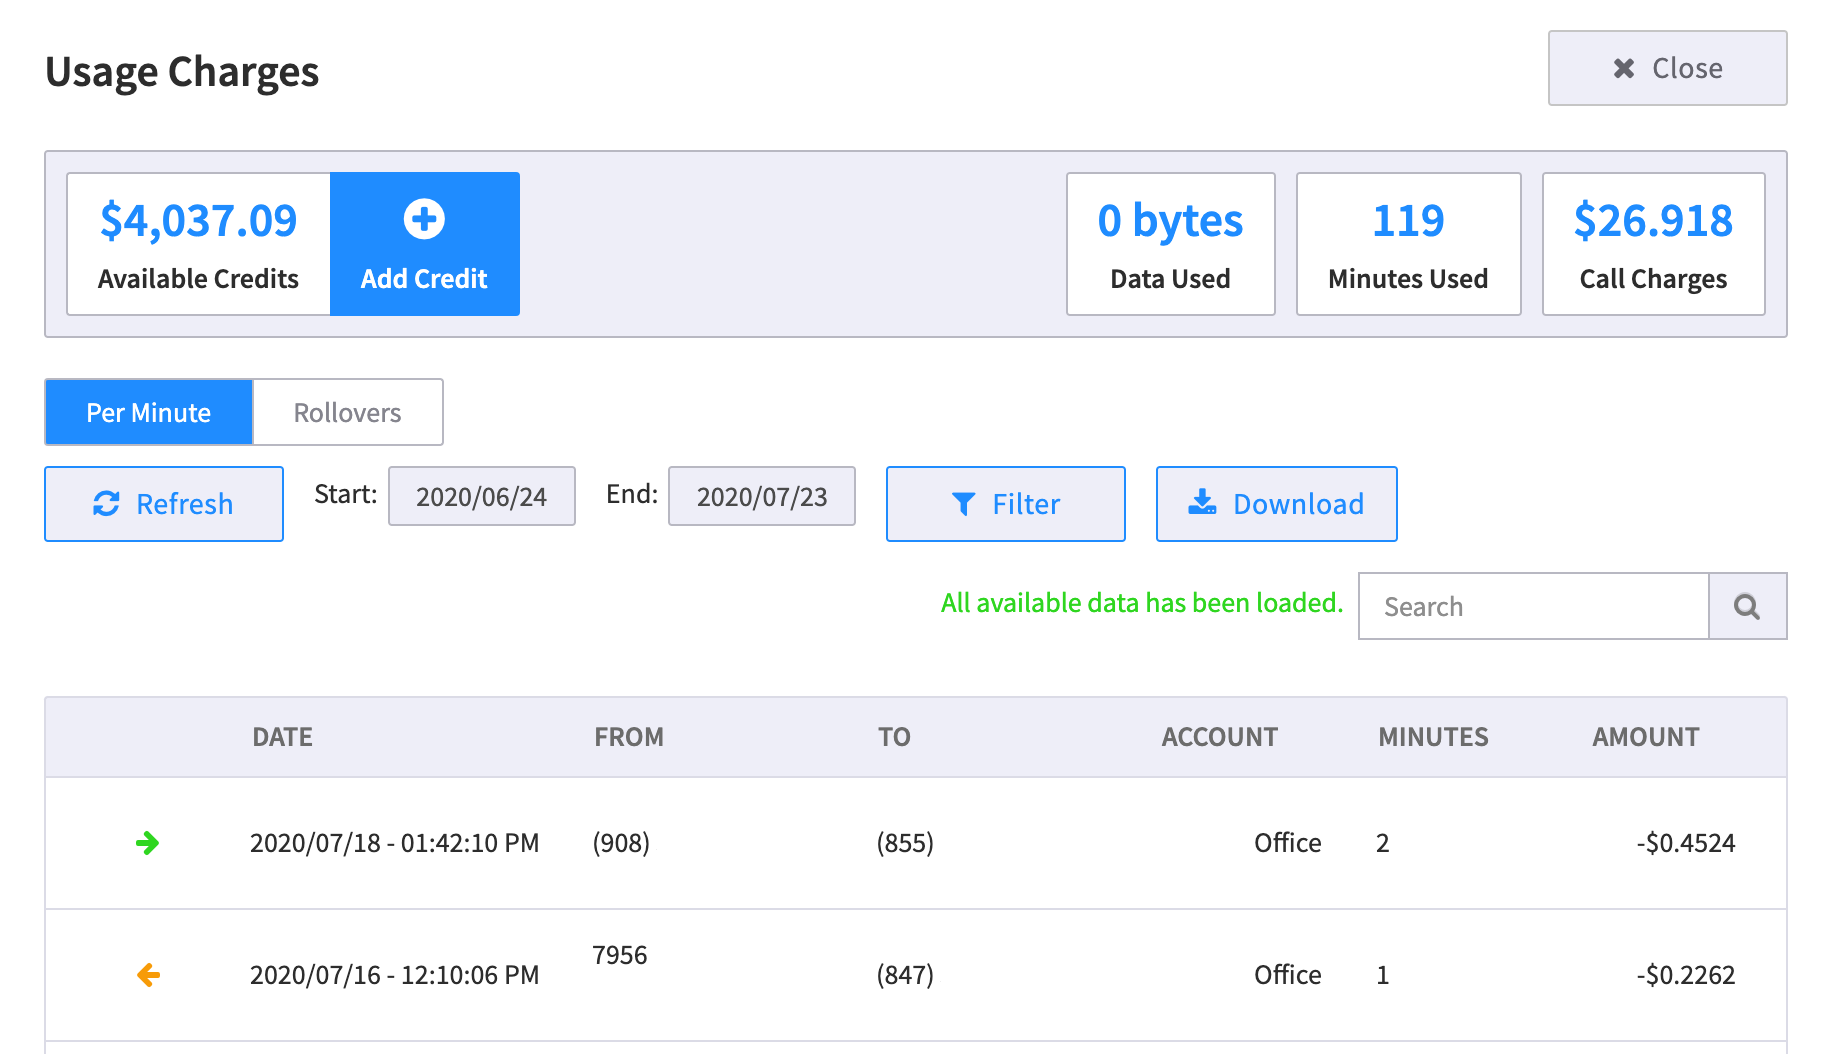
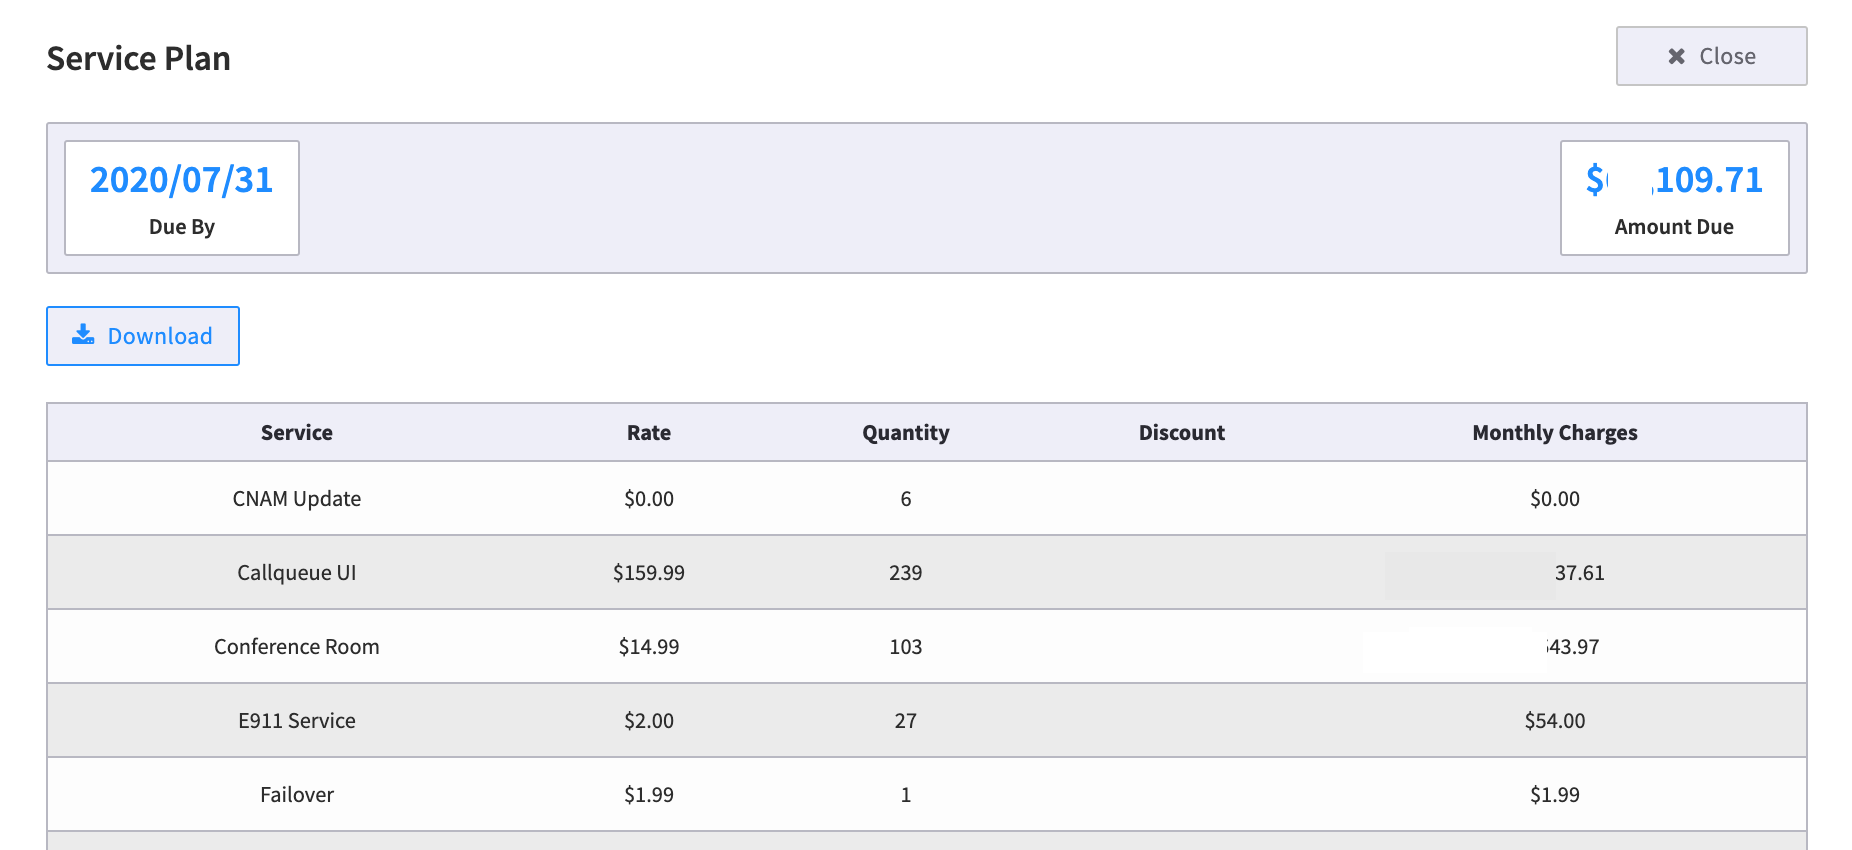

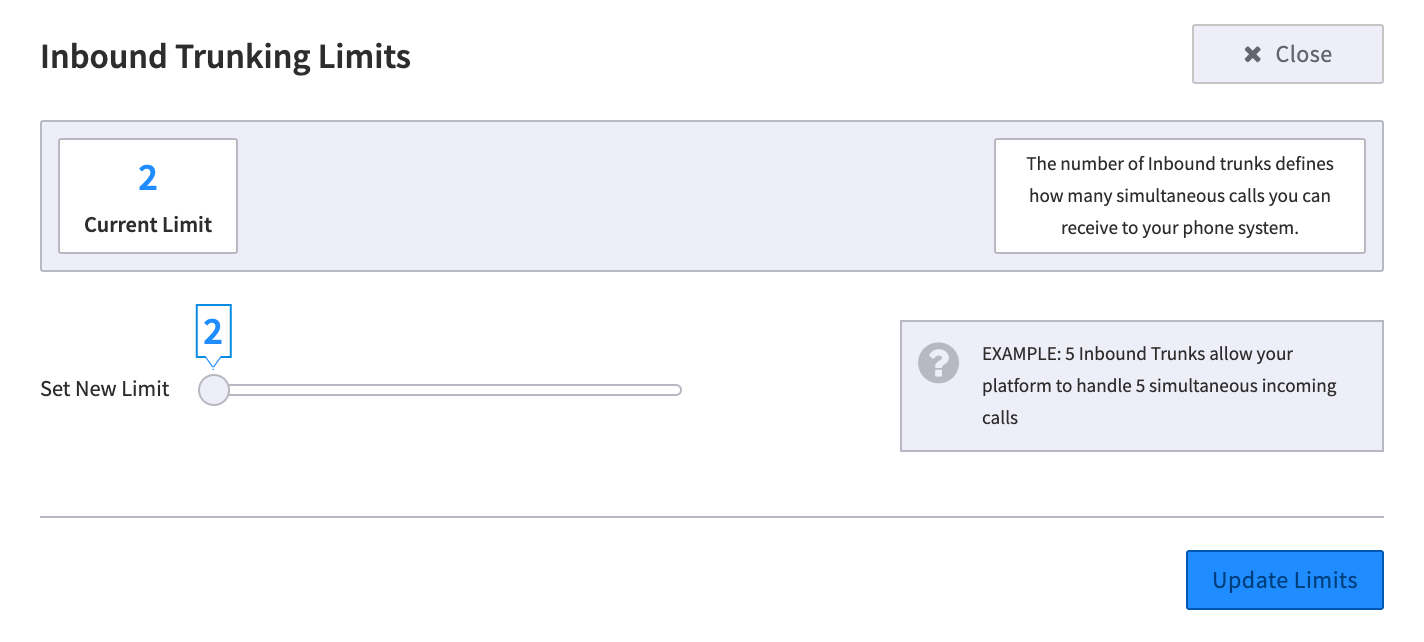
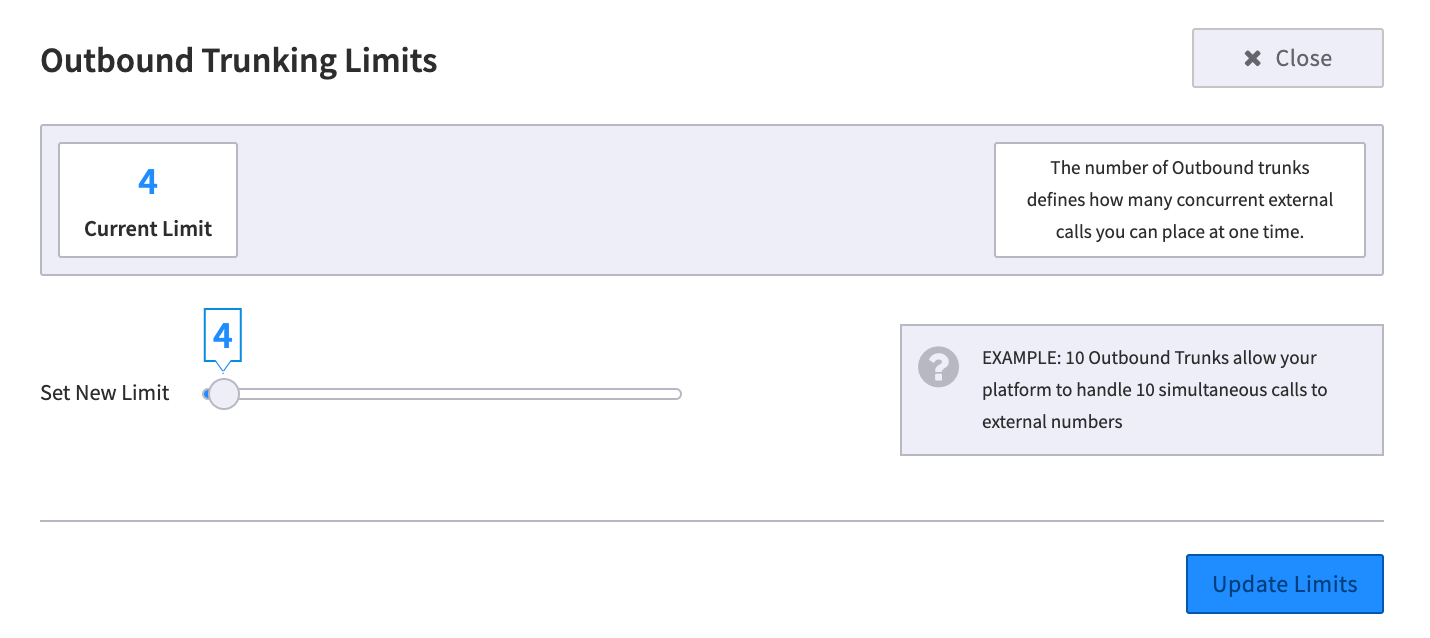
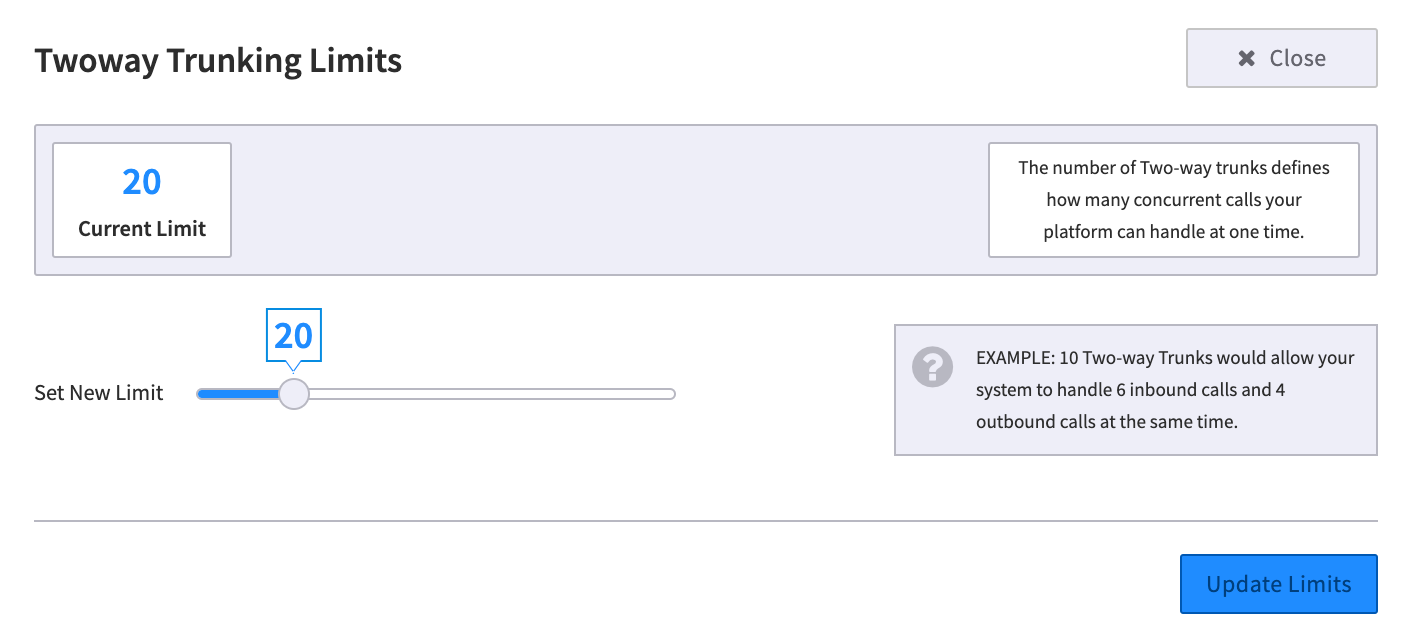
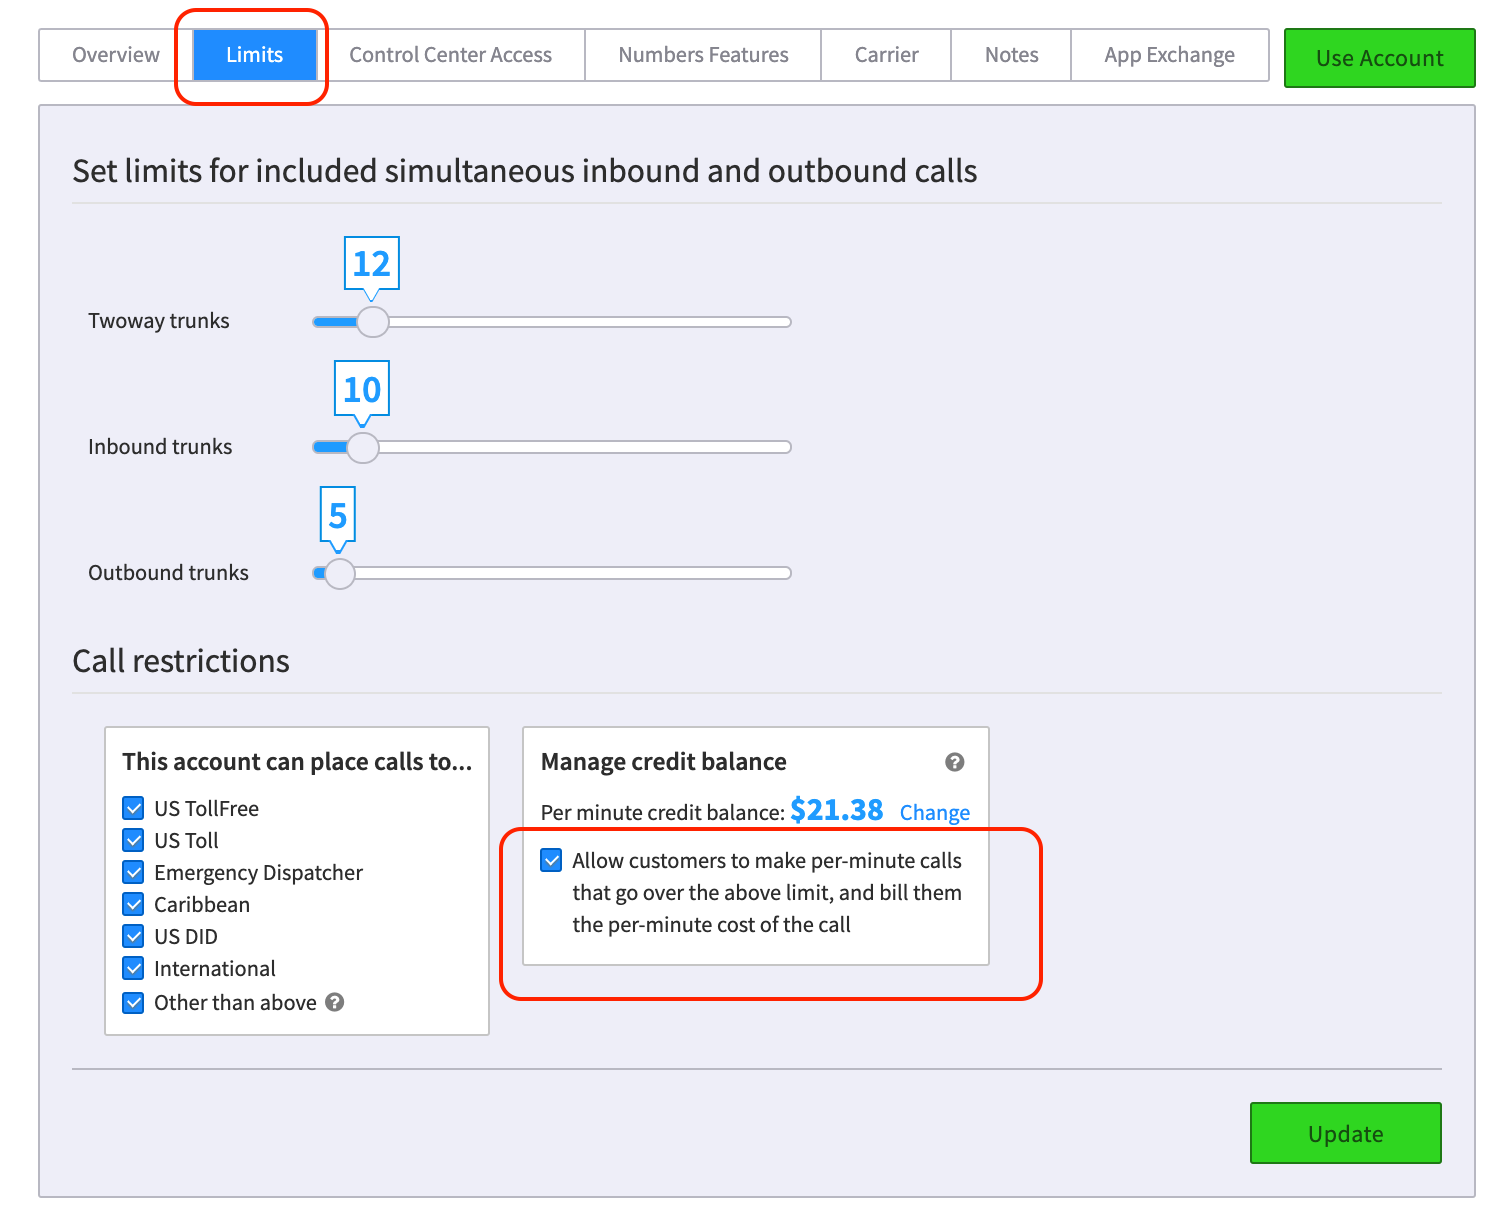


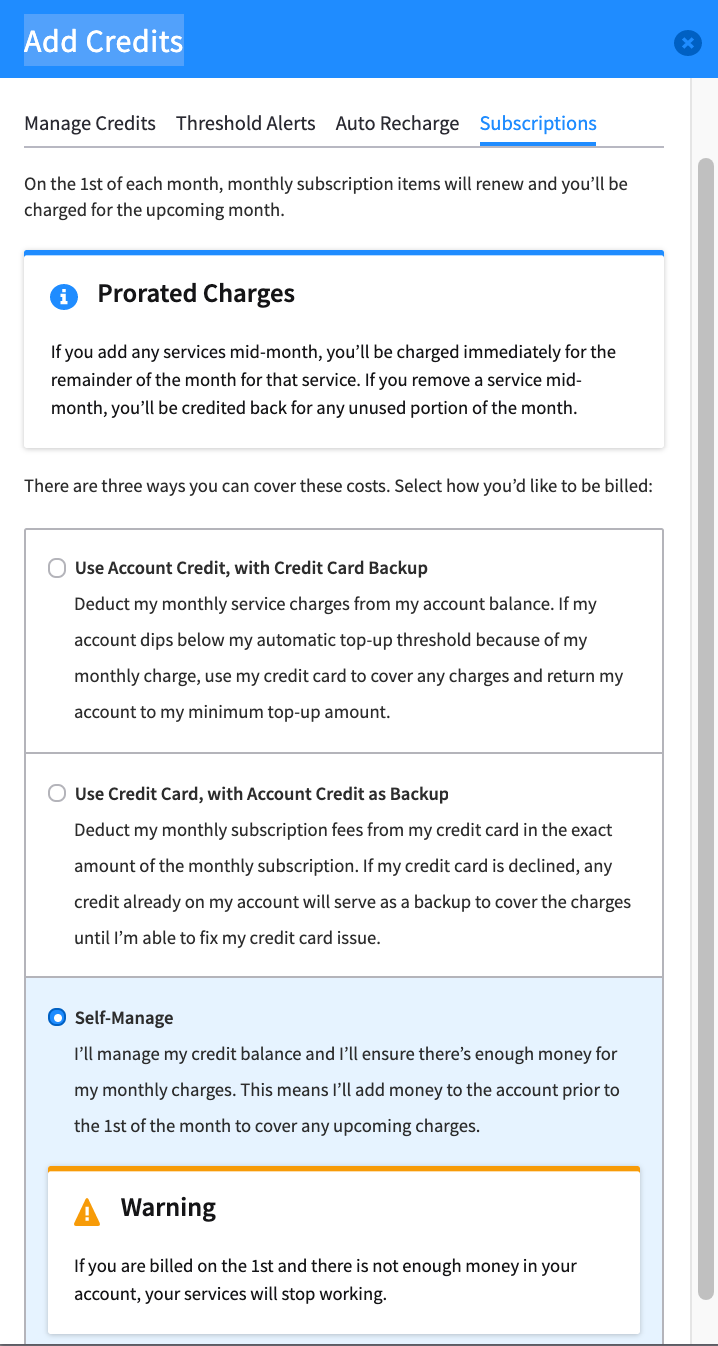
 Now more than ever we're focusing on helping you manage your distributed workforces.
 We're tweaking Call Center Pro and want to learn more about how you use it and/or would want to see it updated.


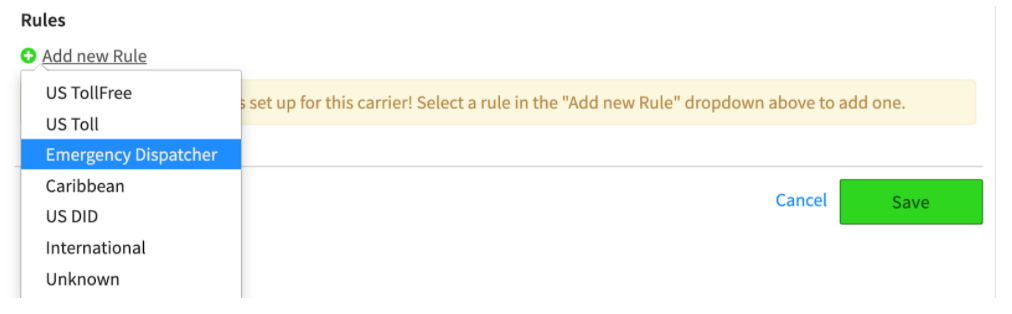
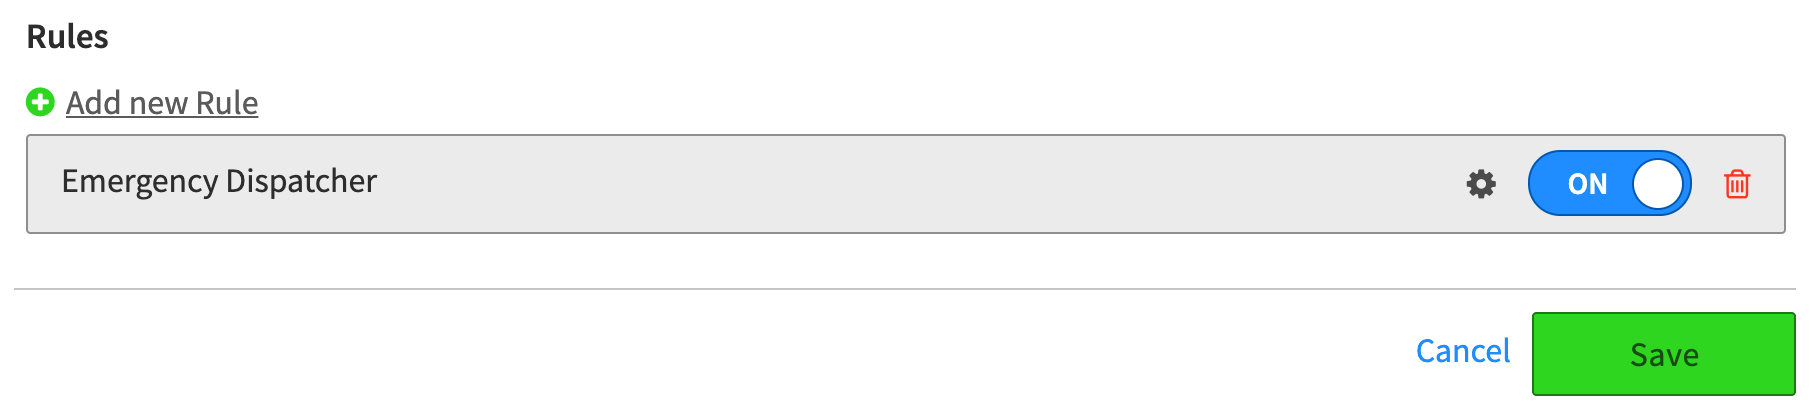
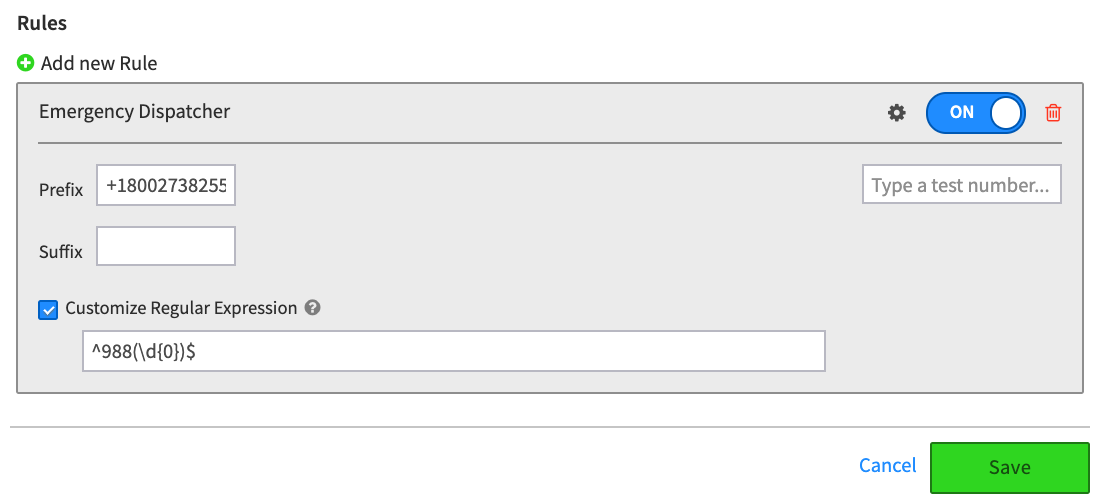

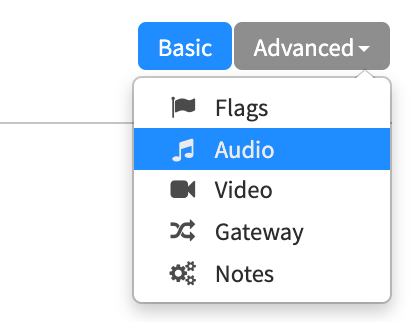
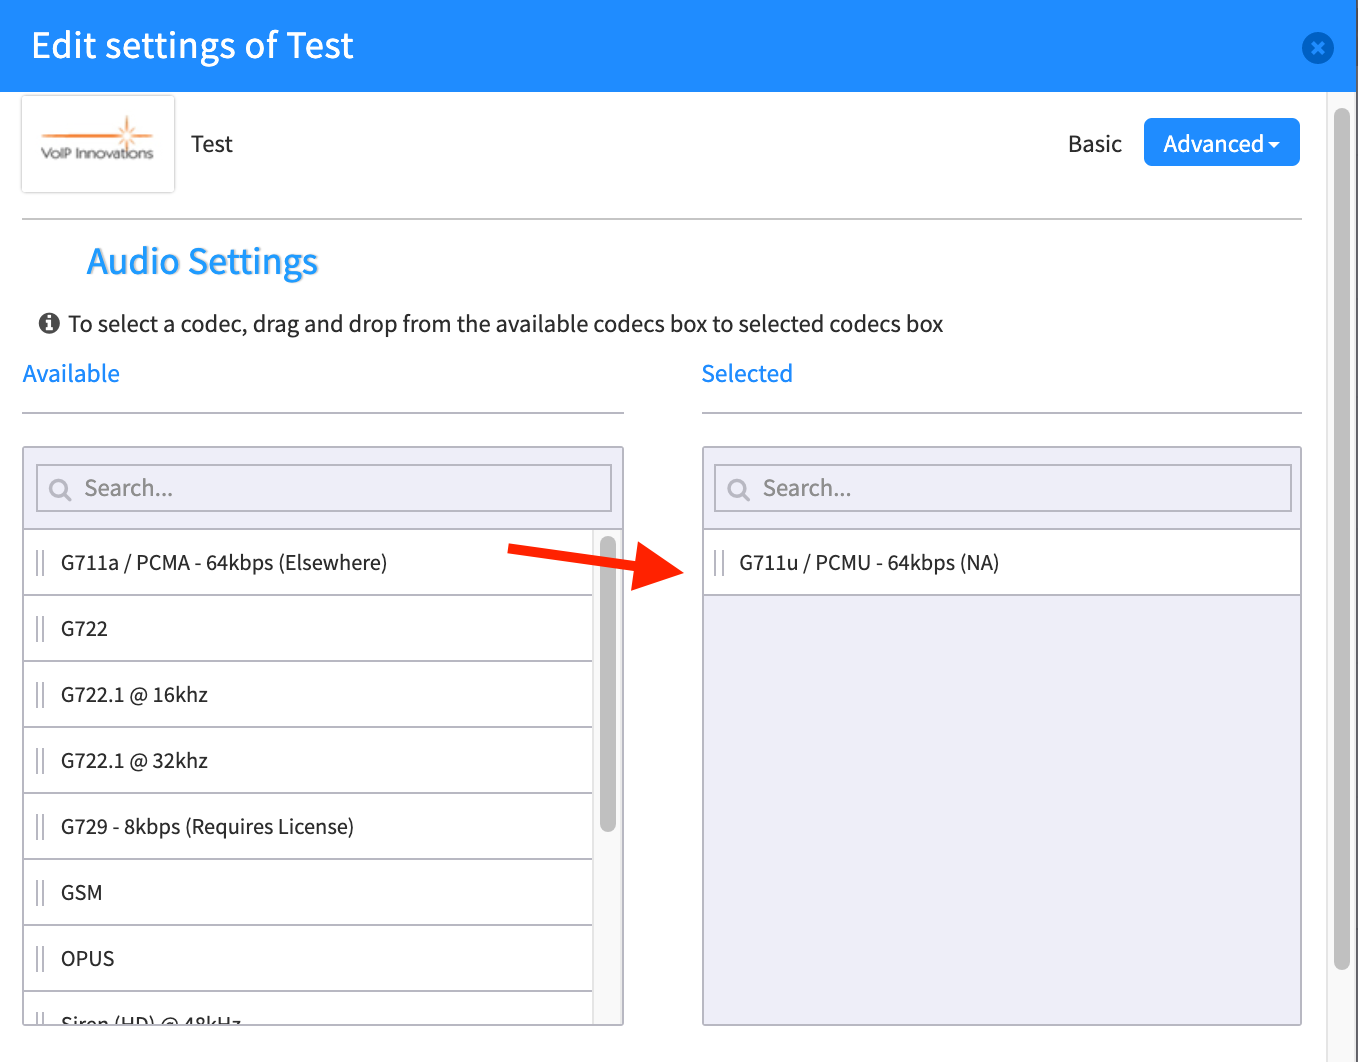


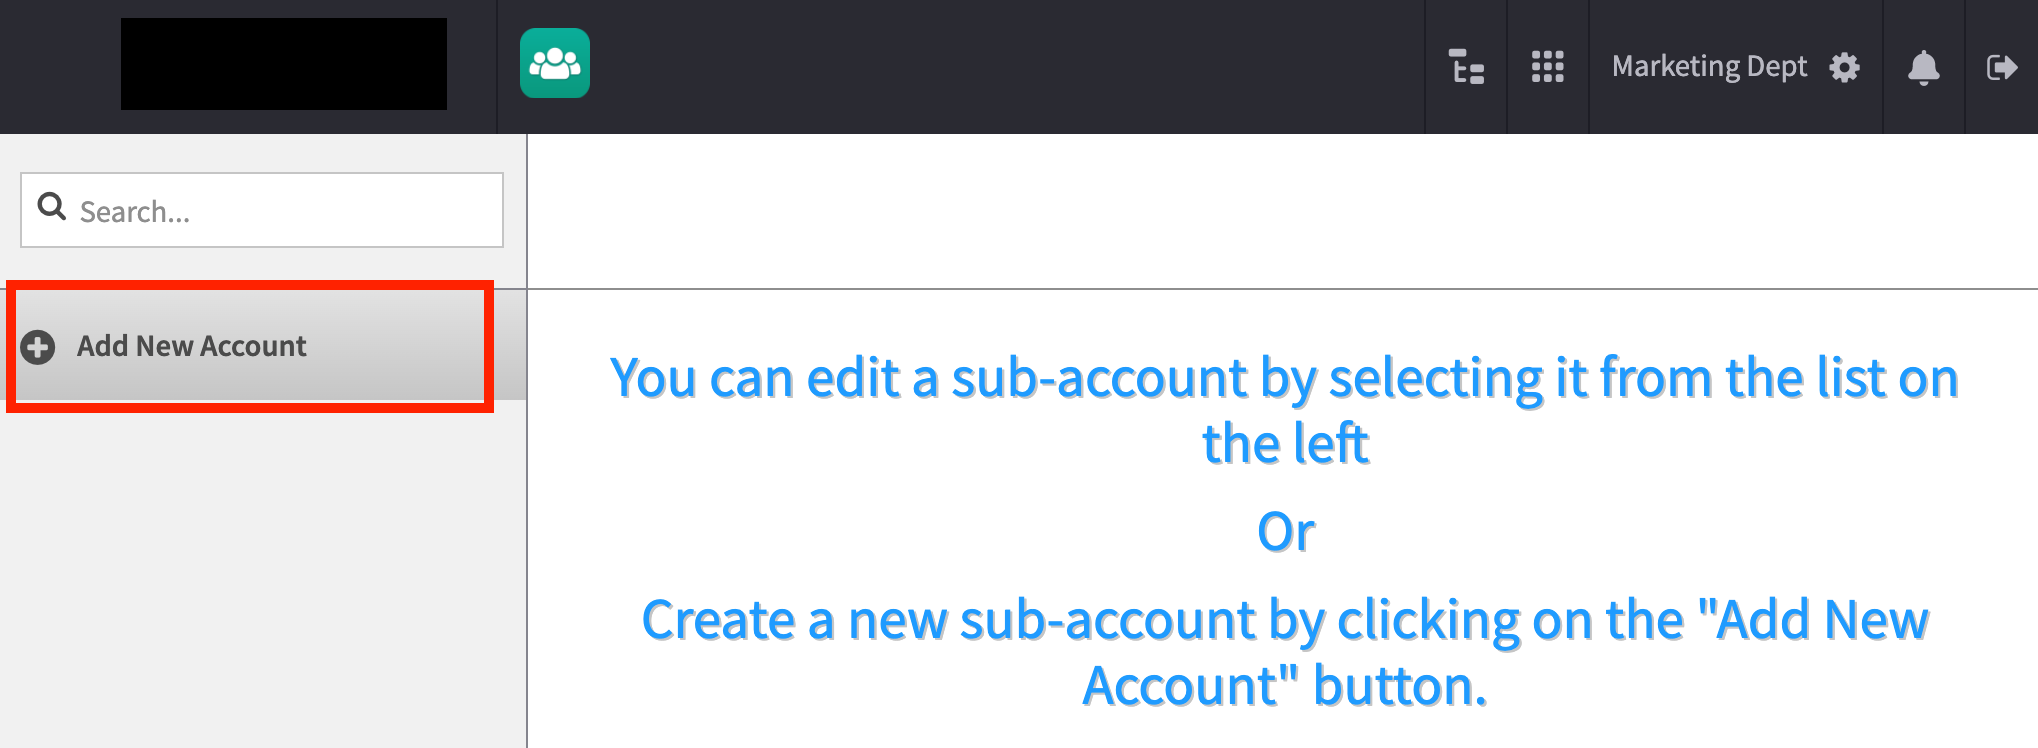
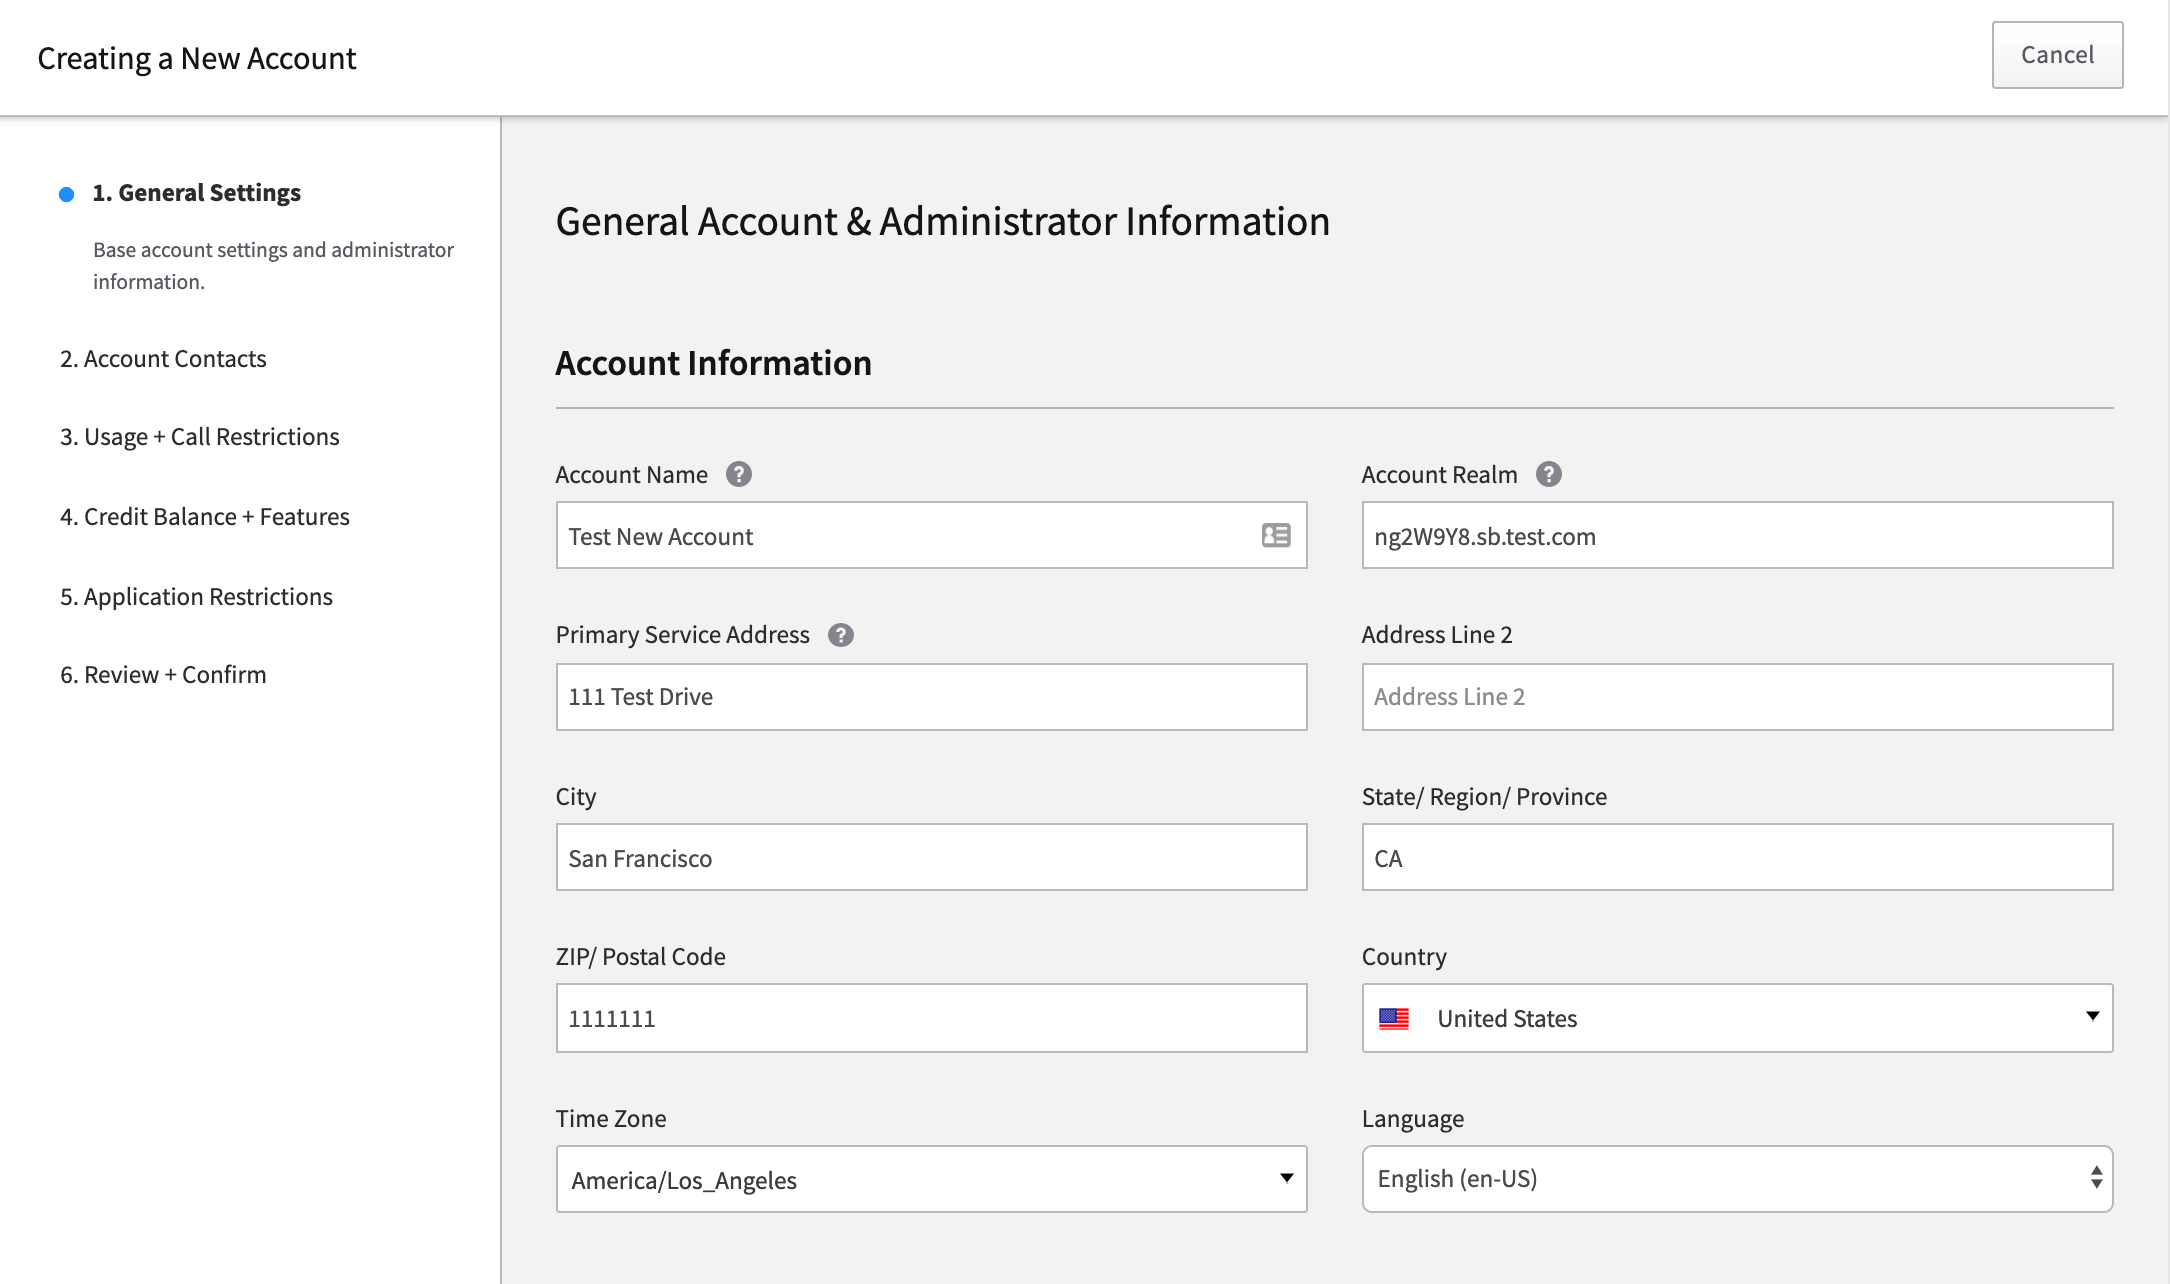
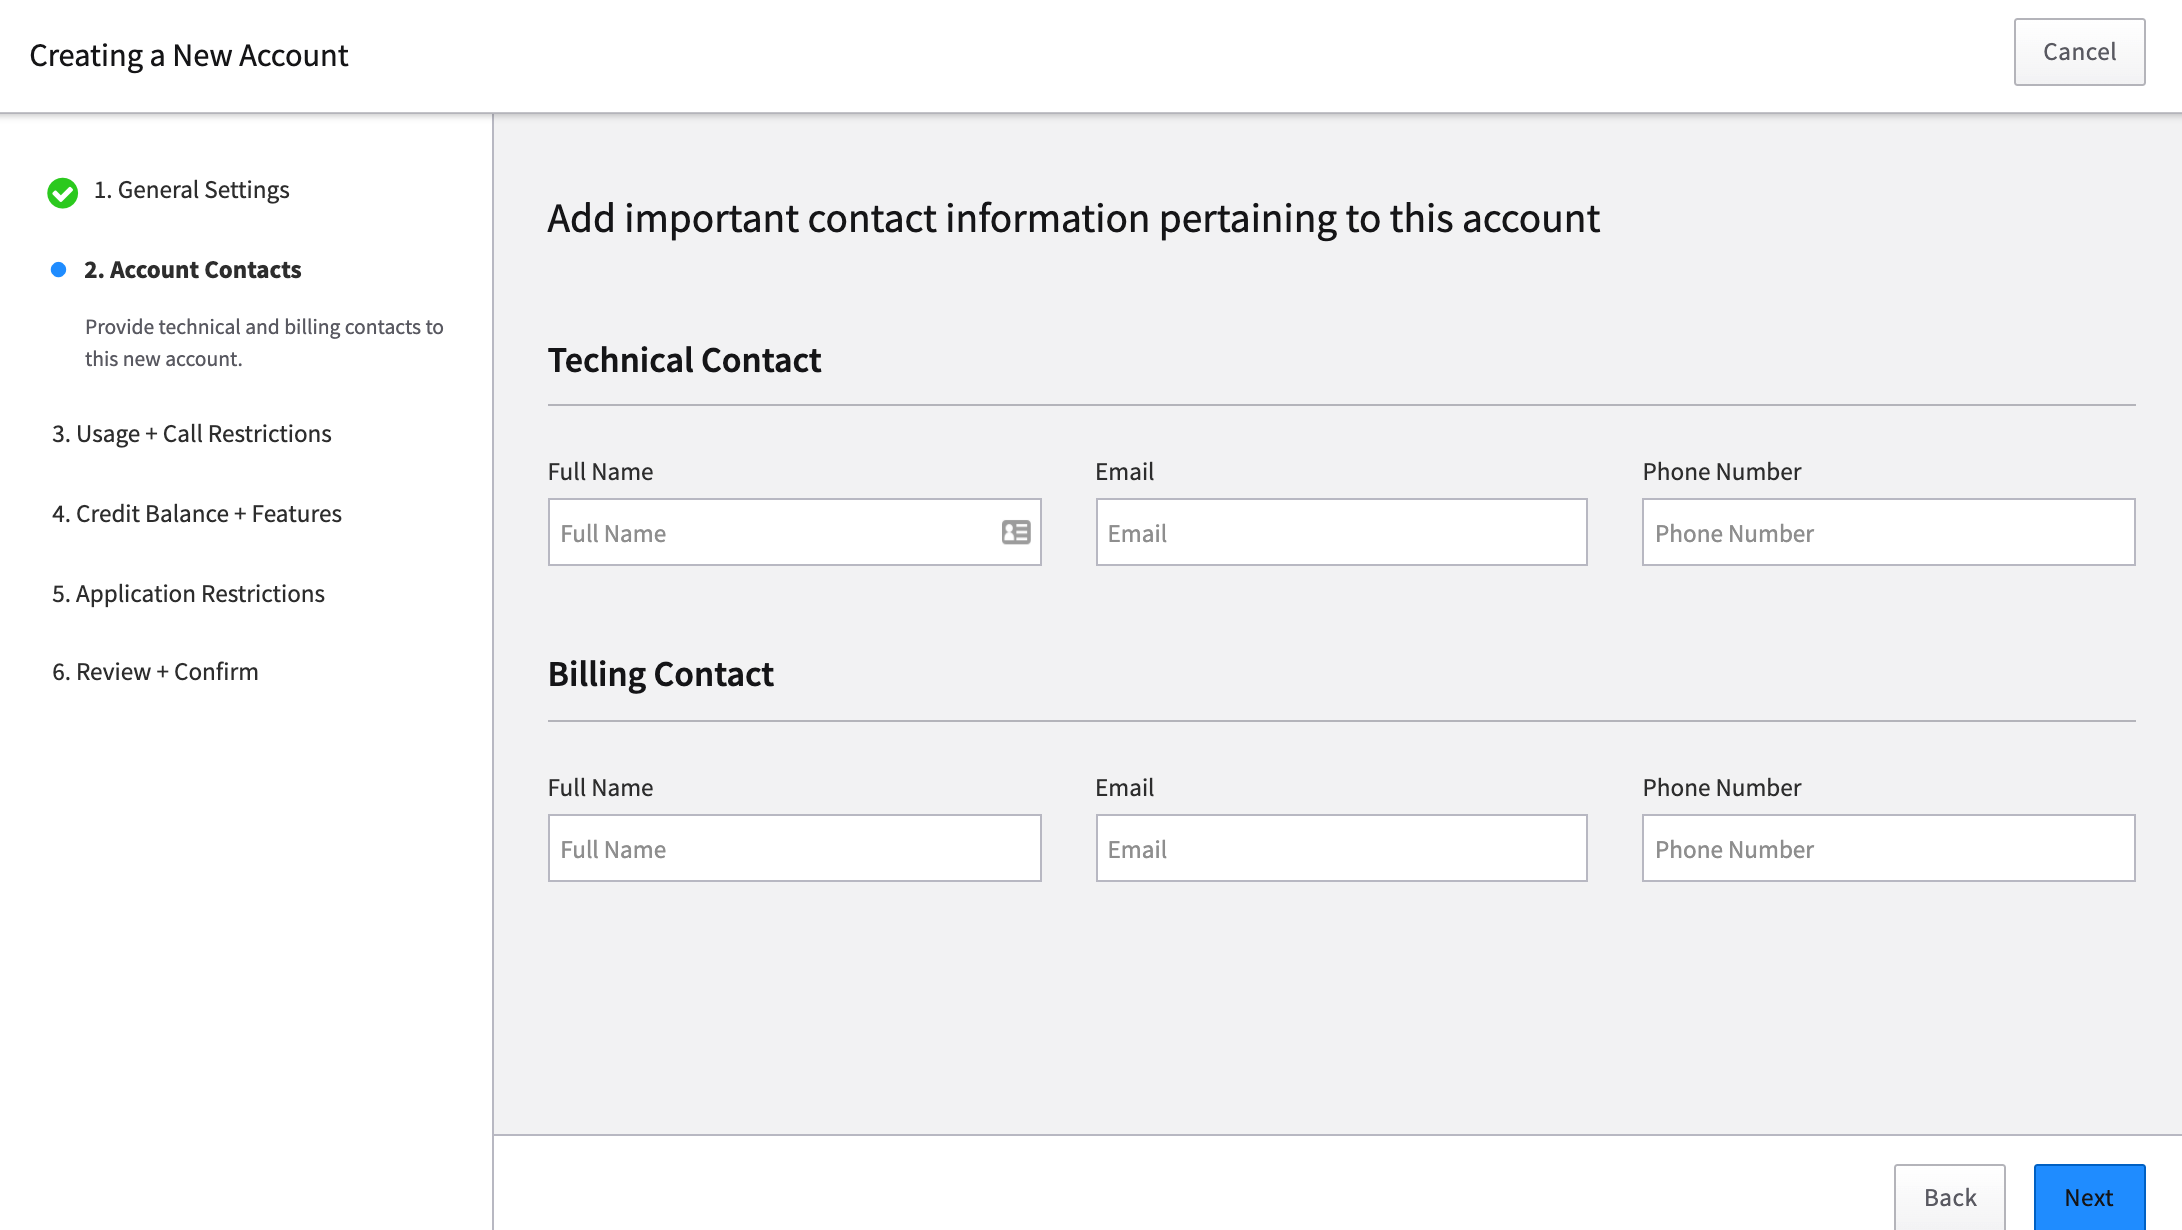
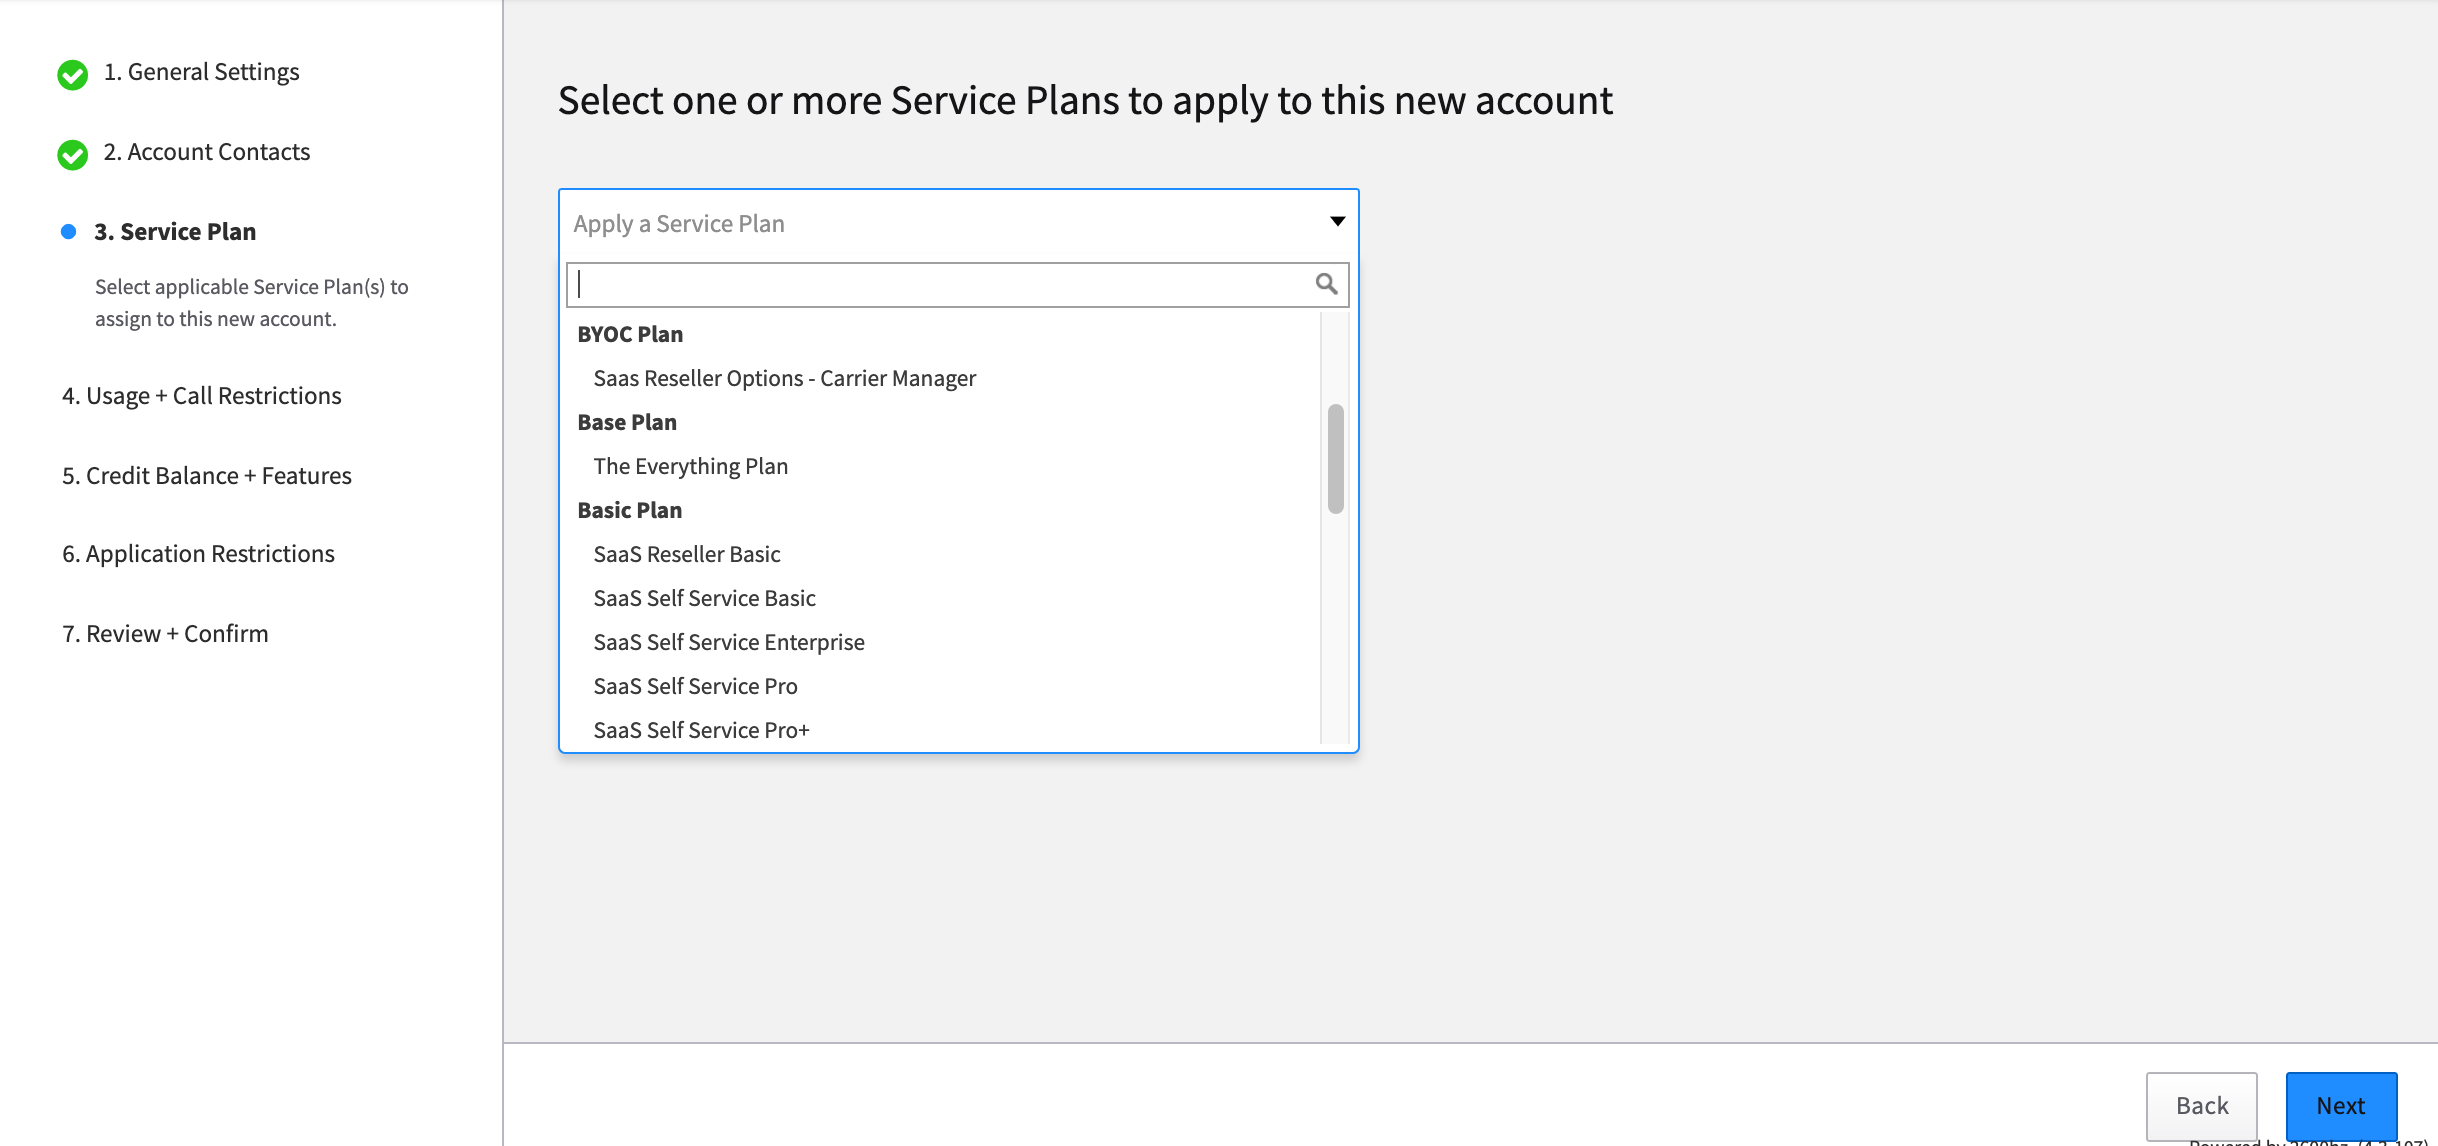
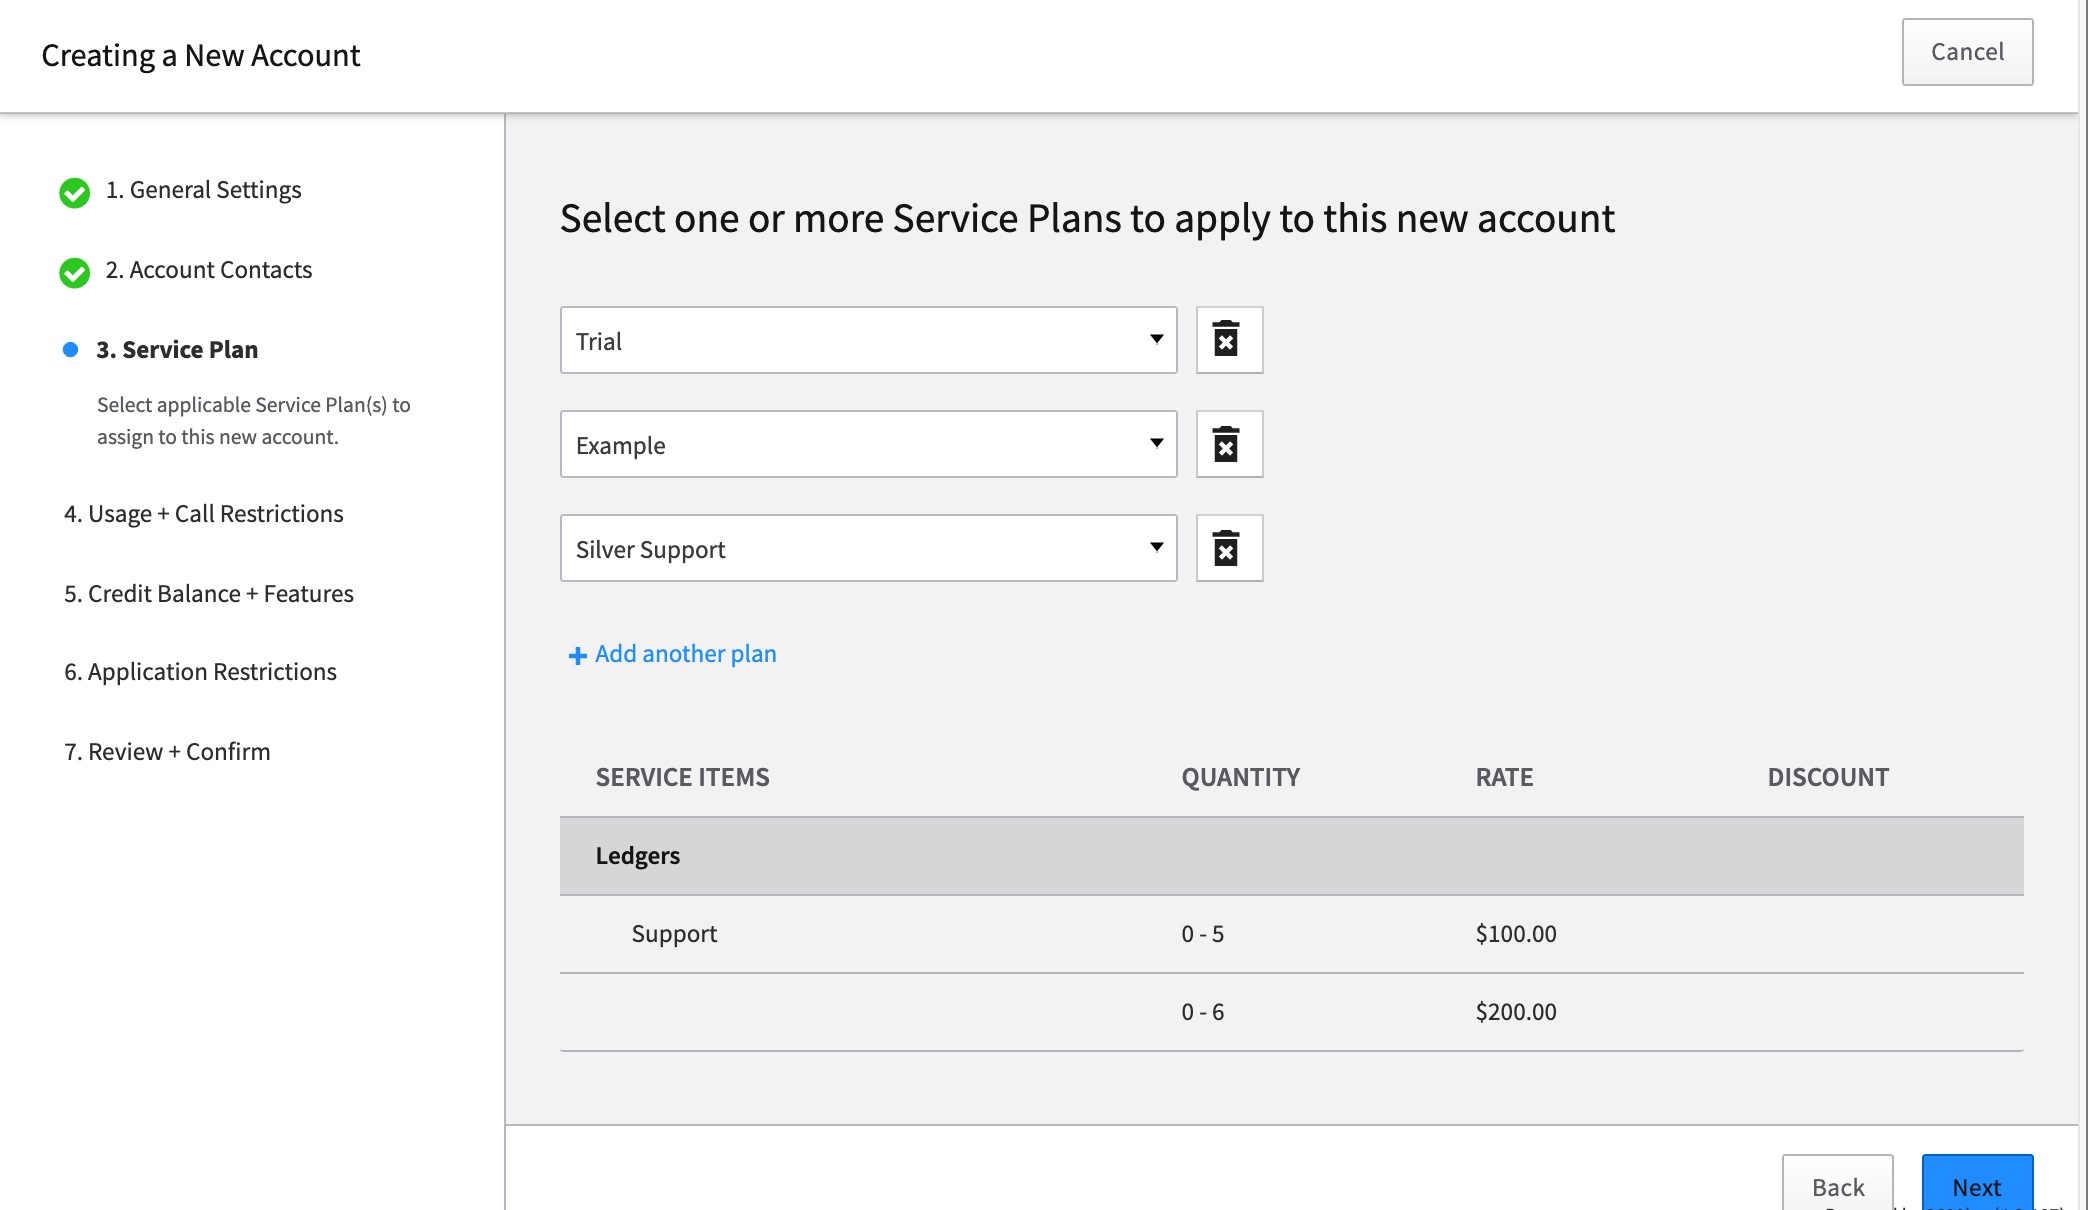
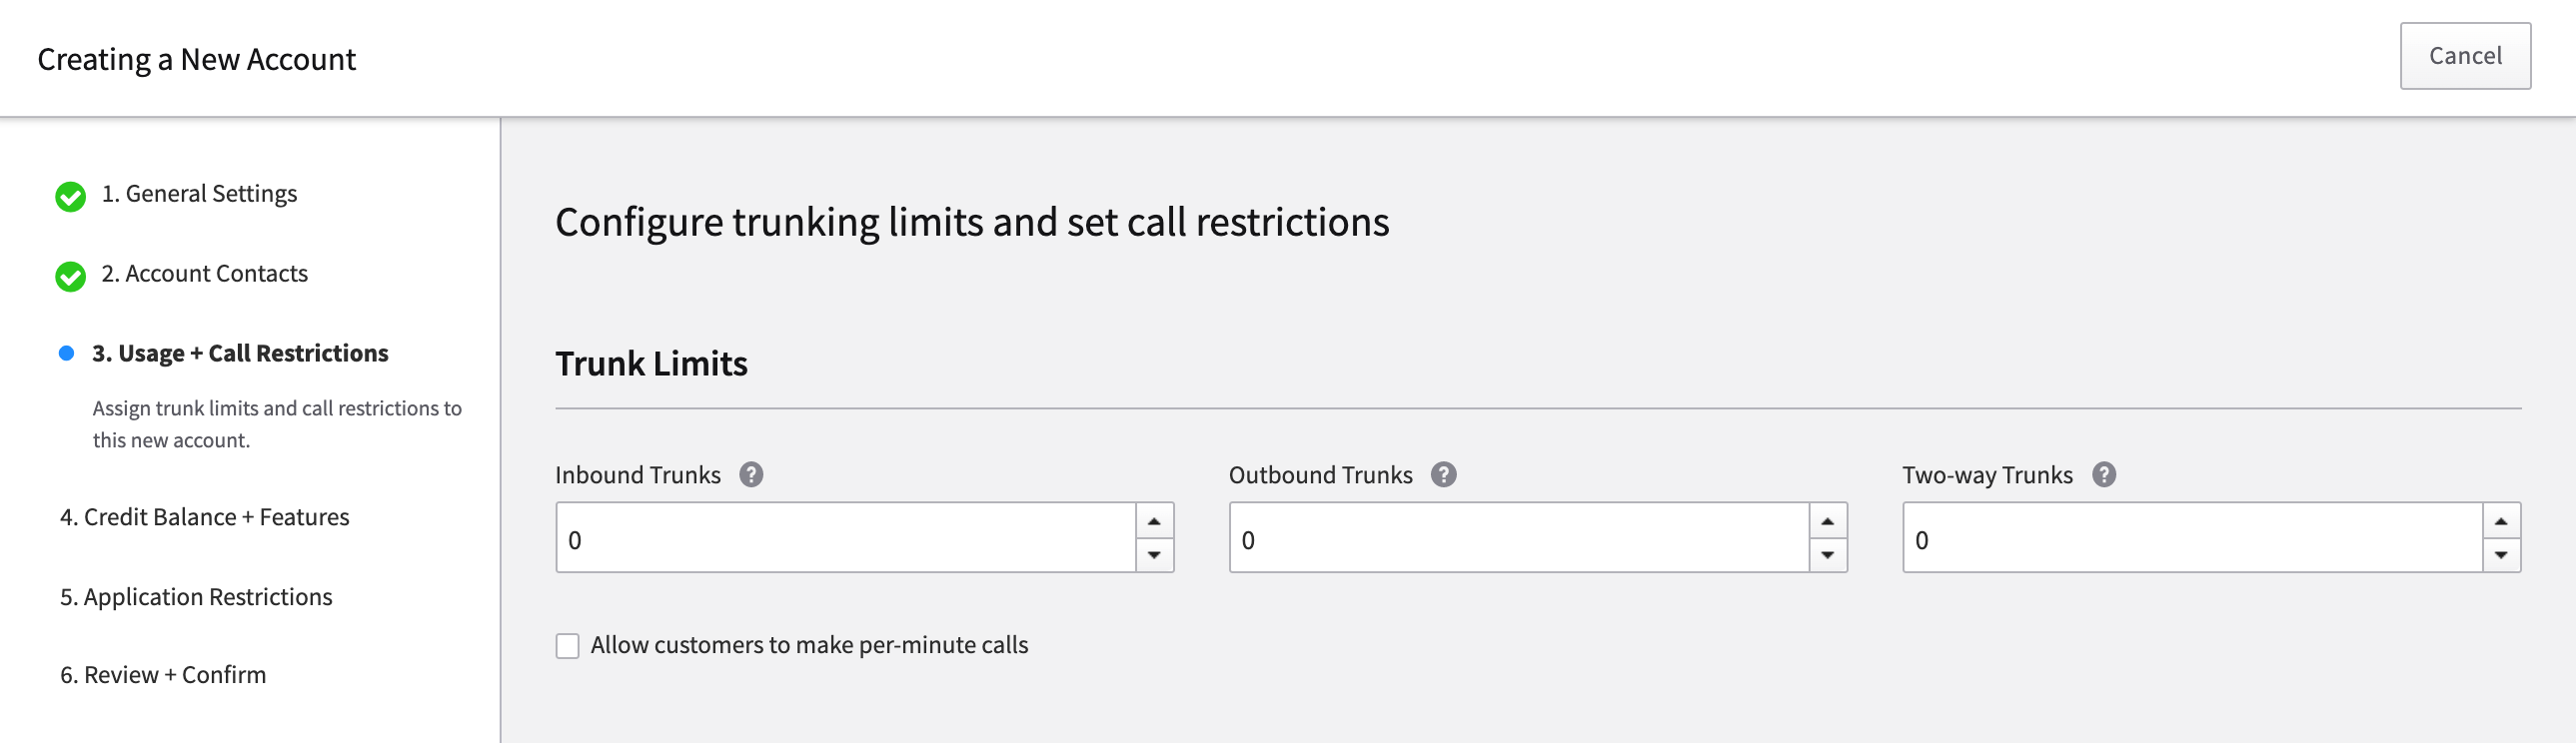
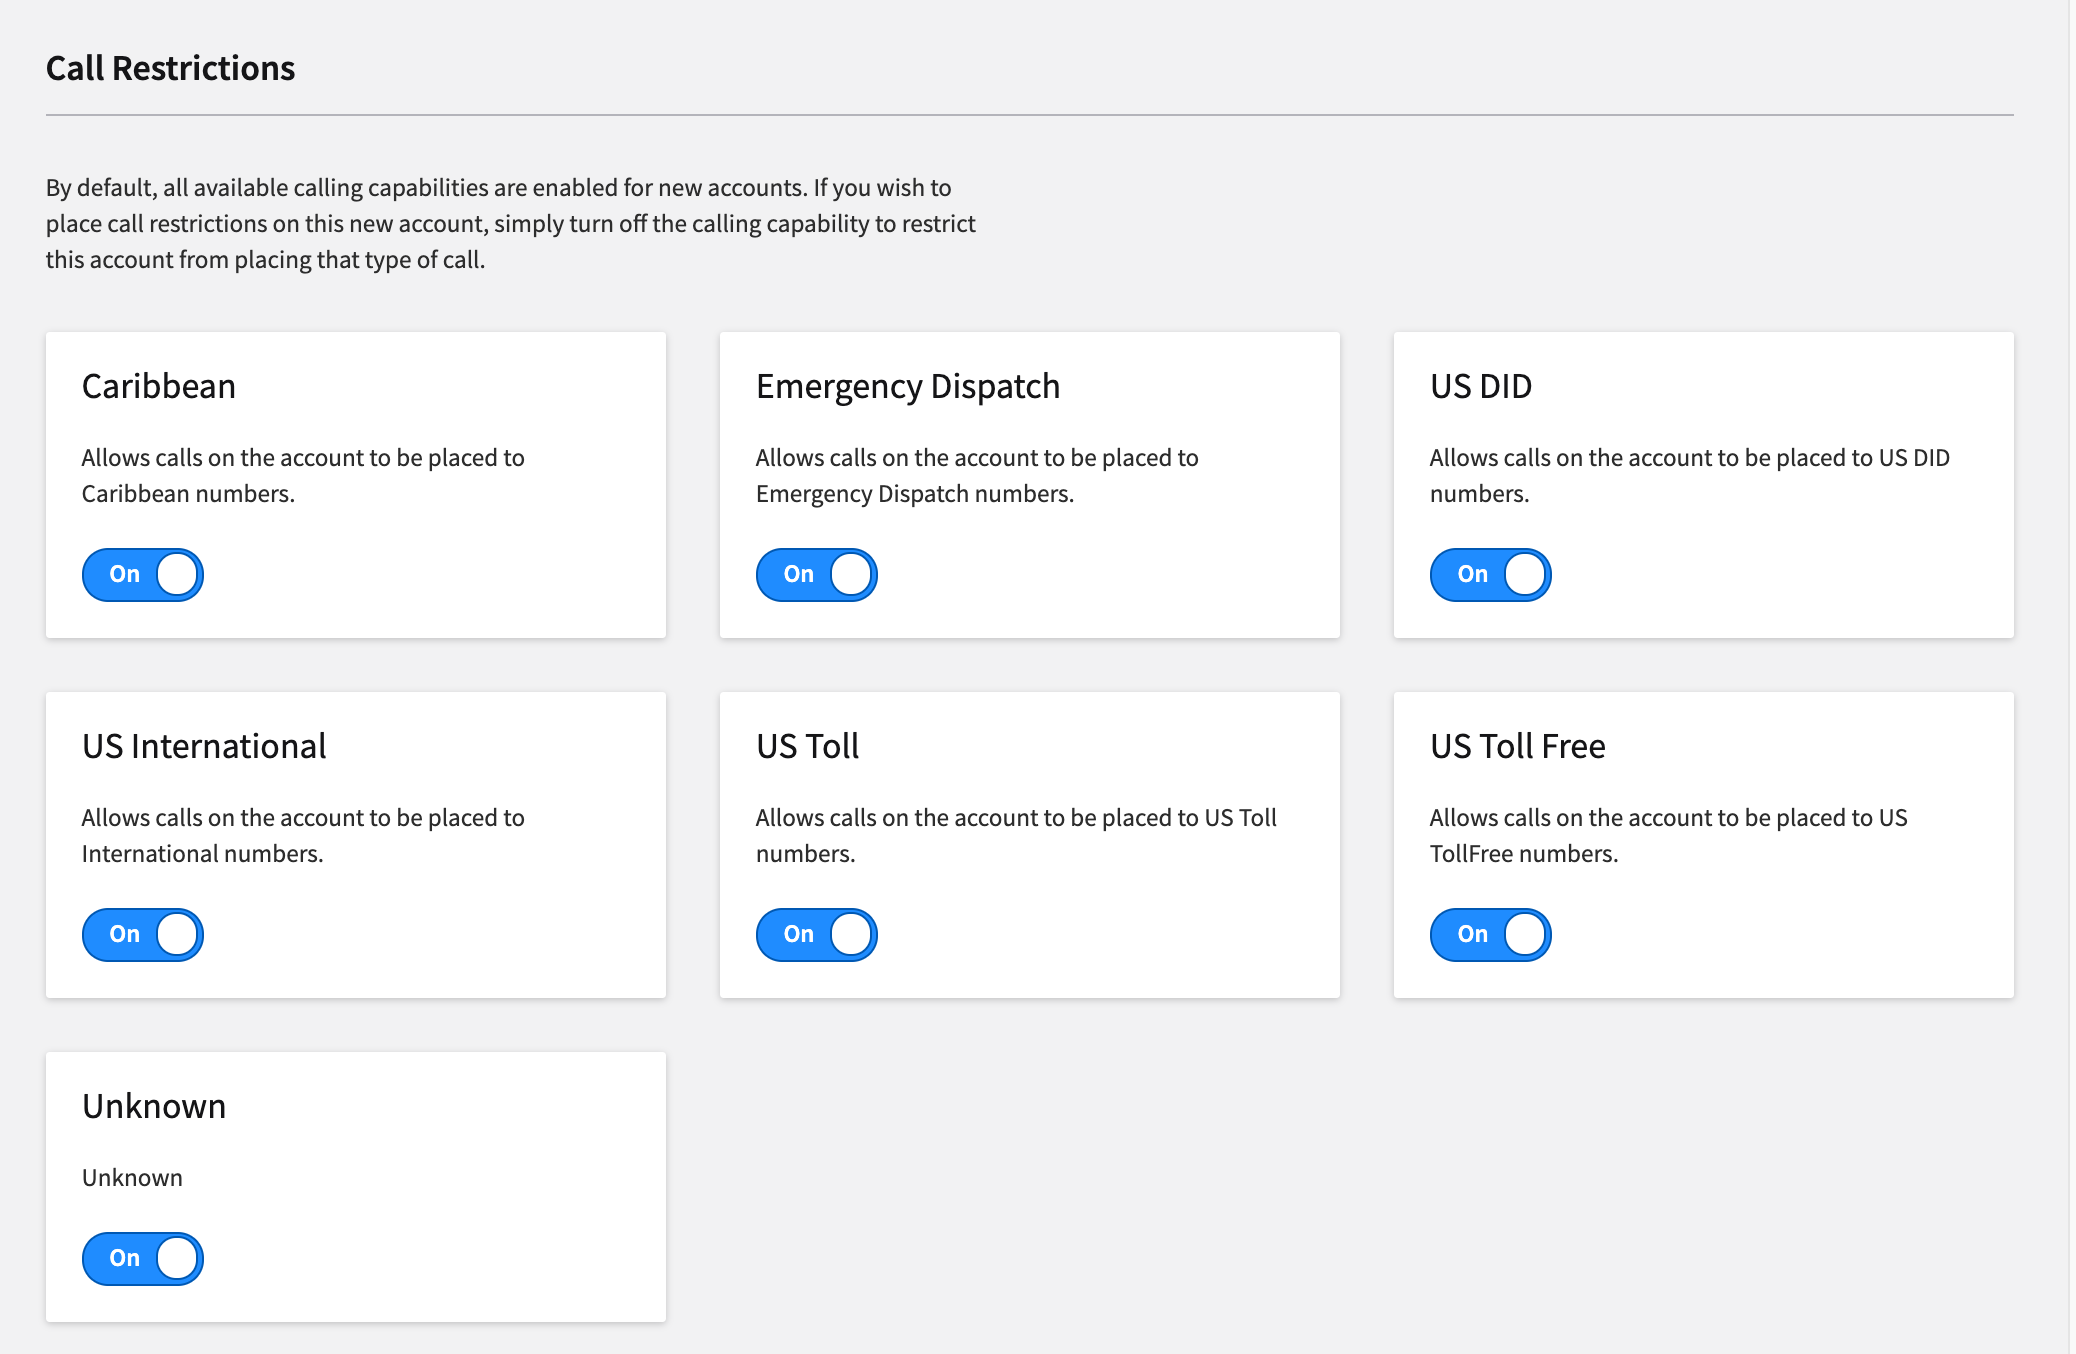
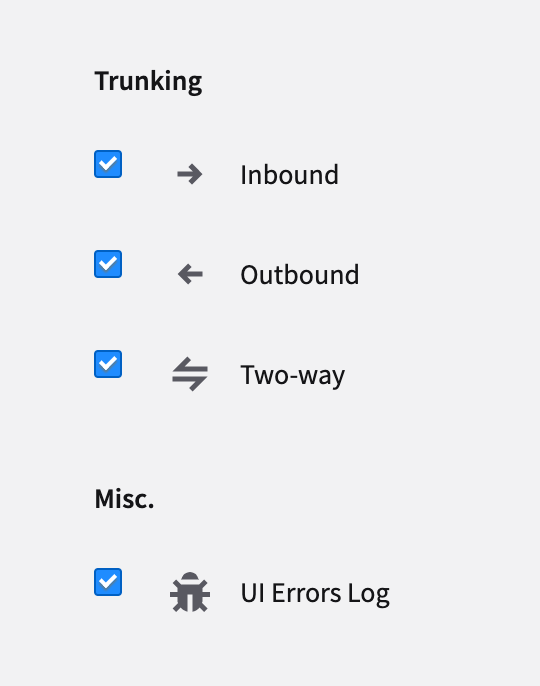
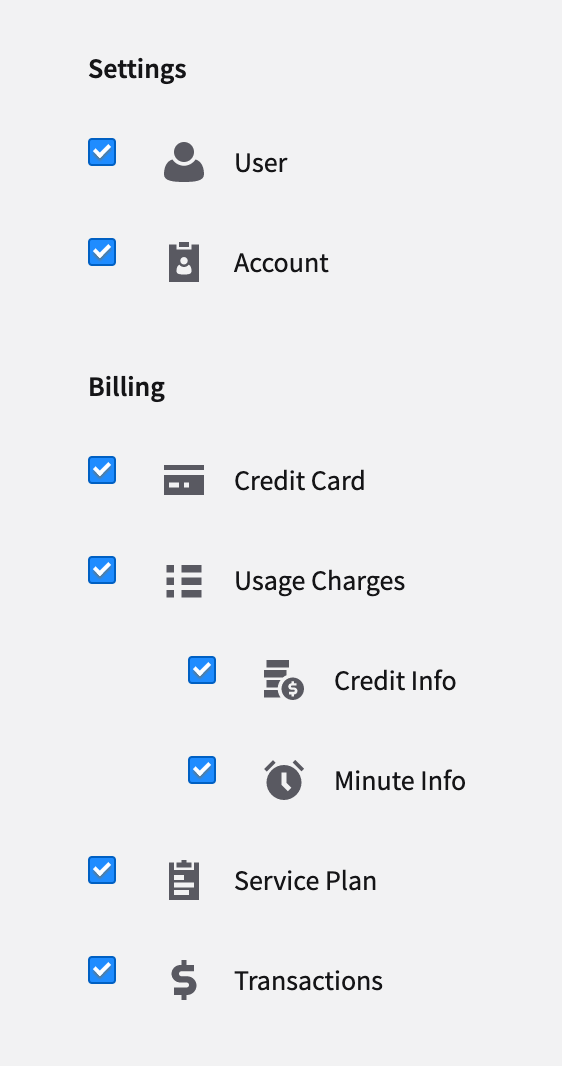
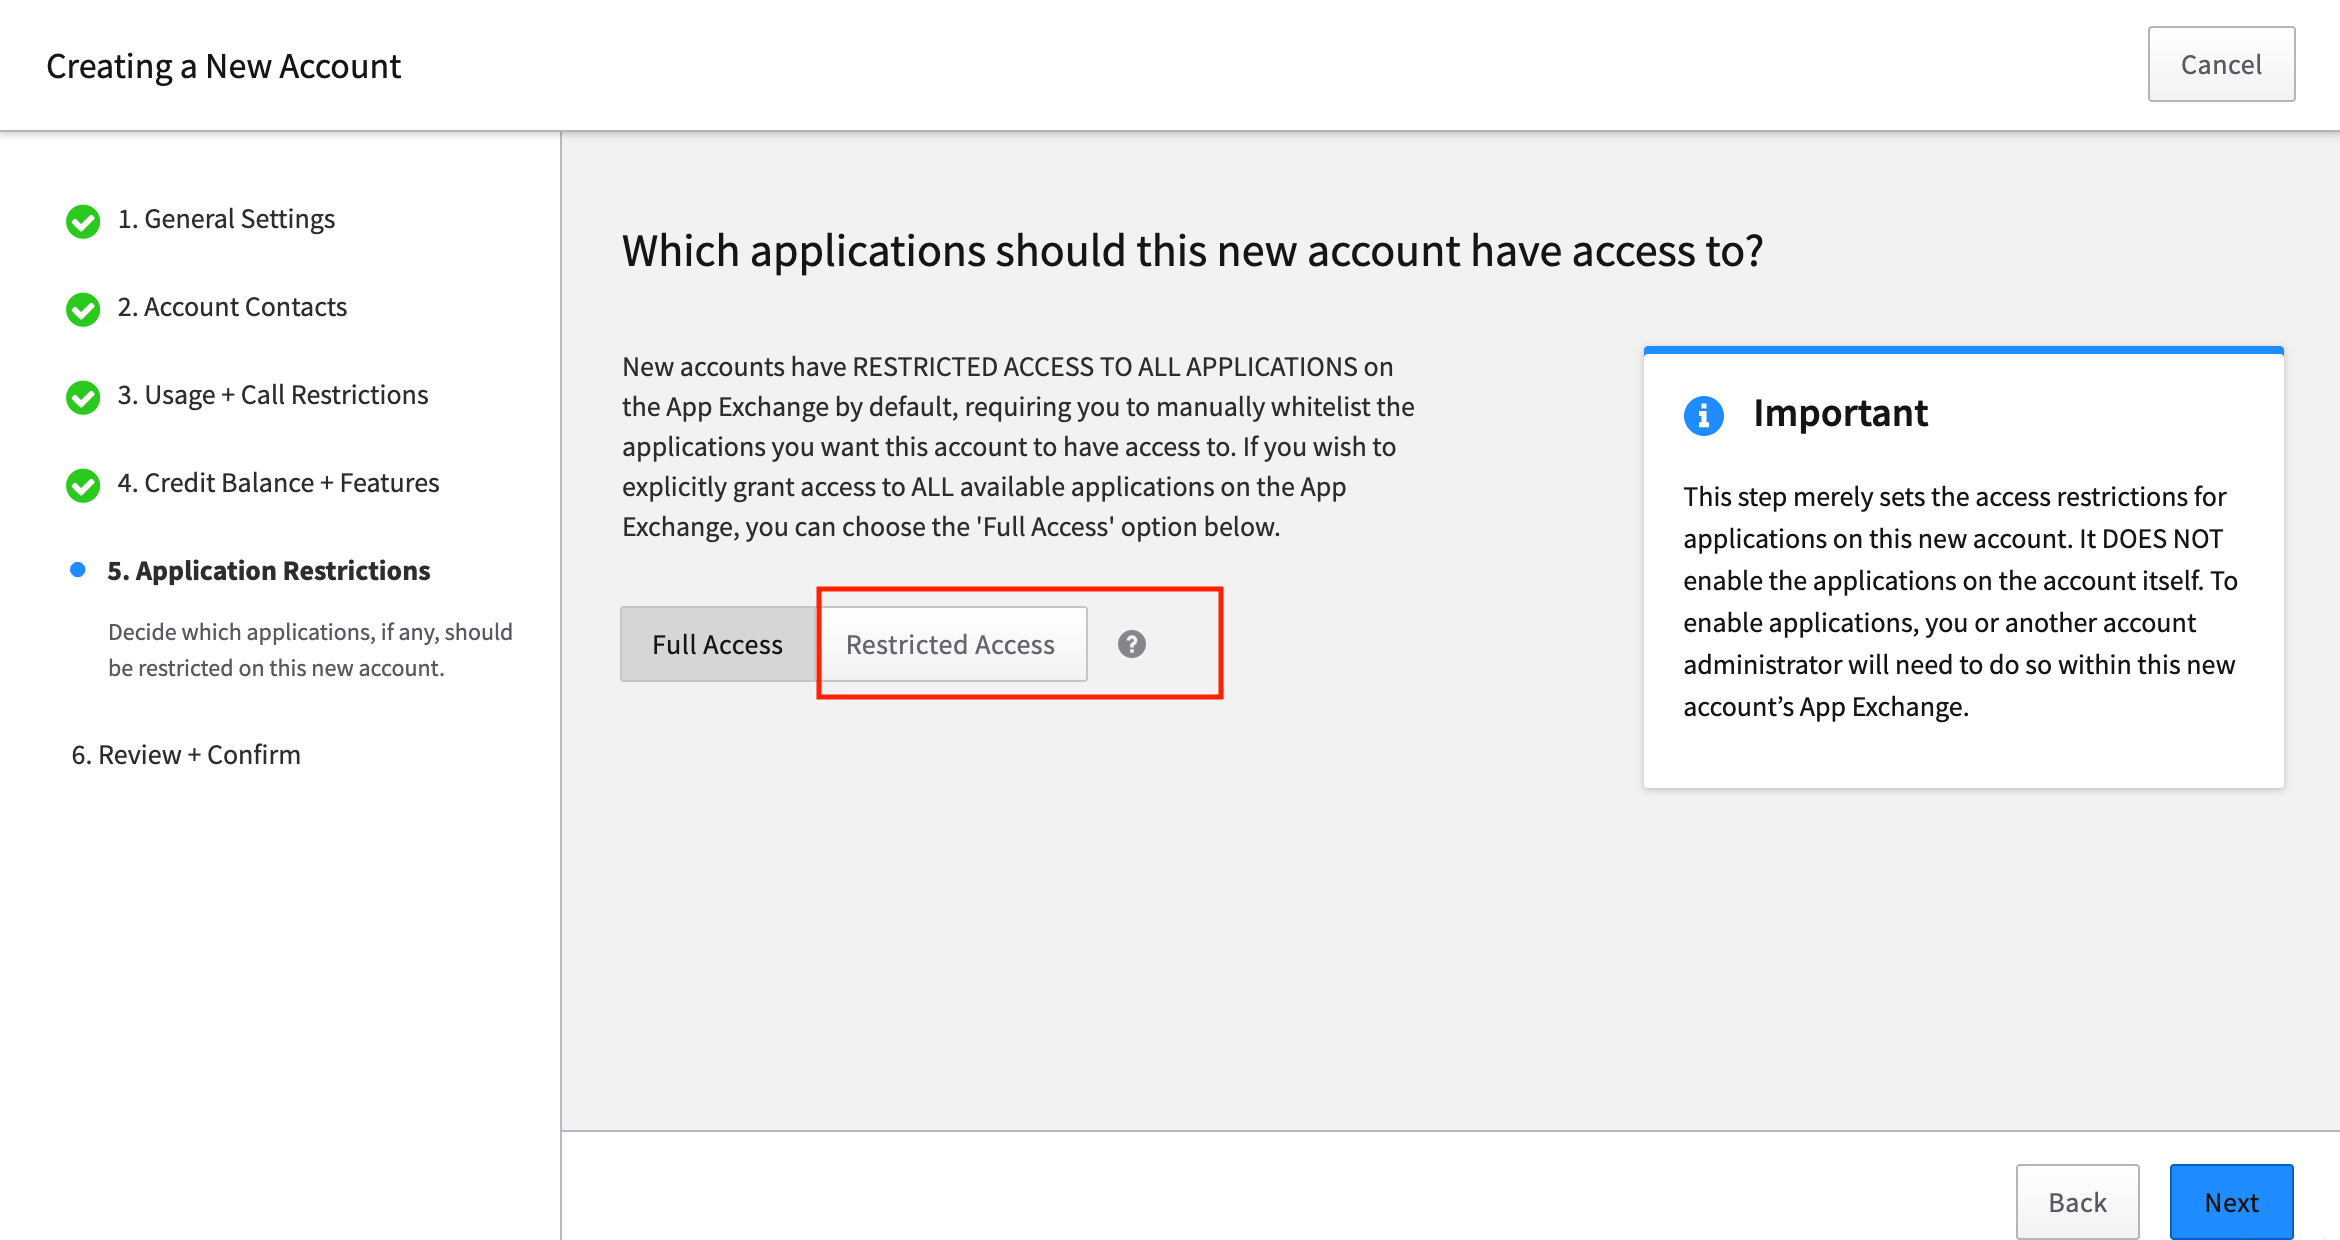
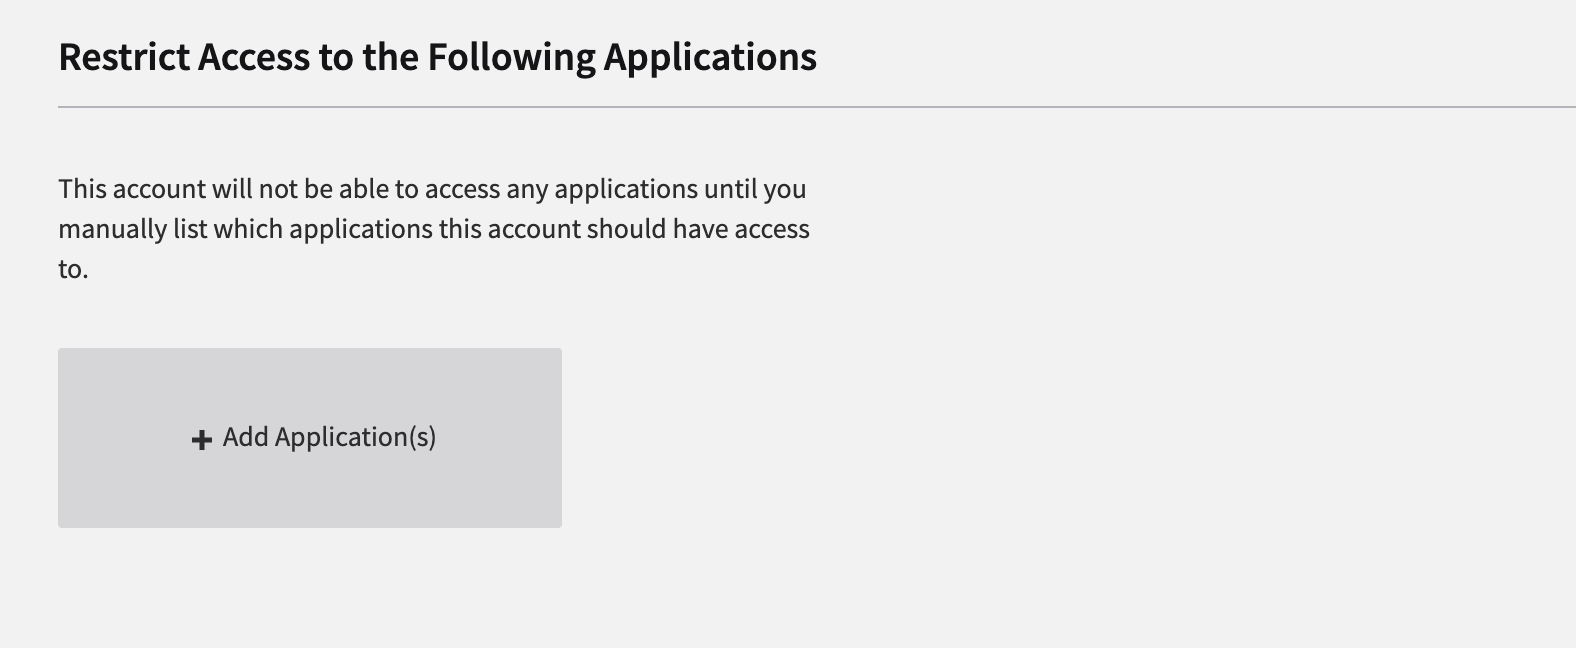
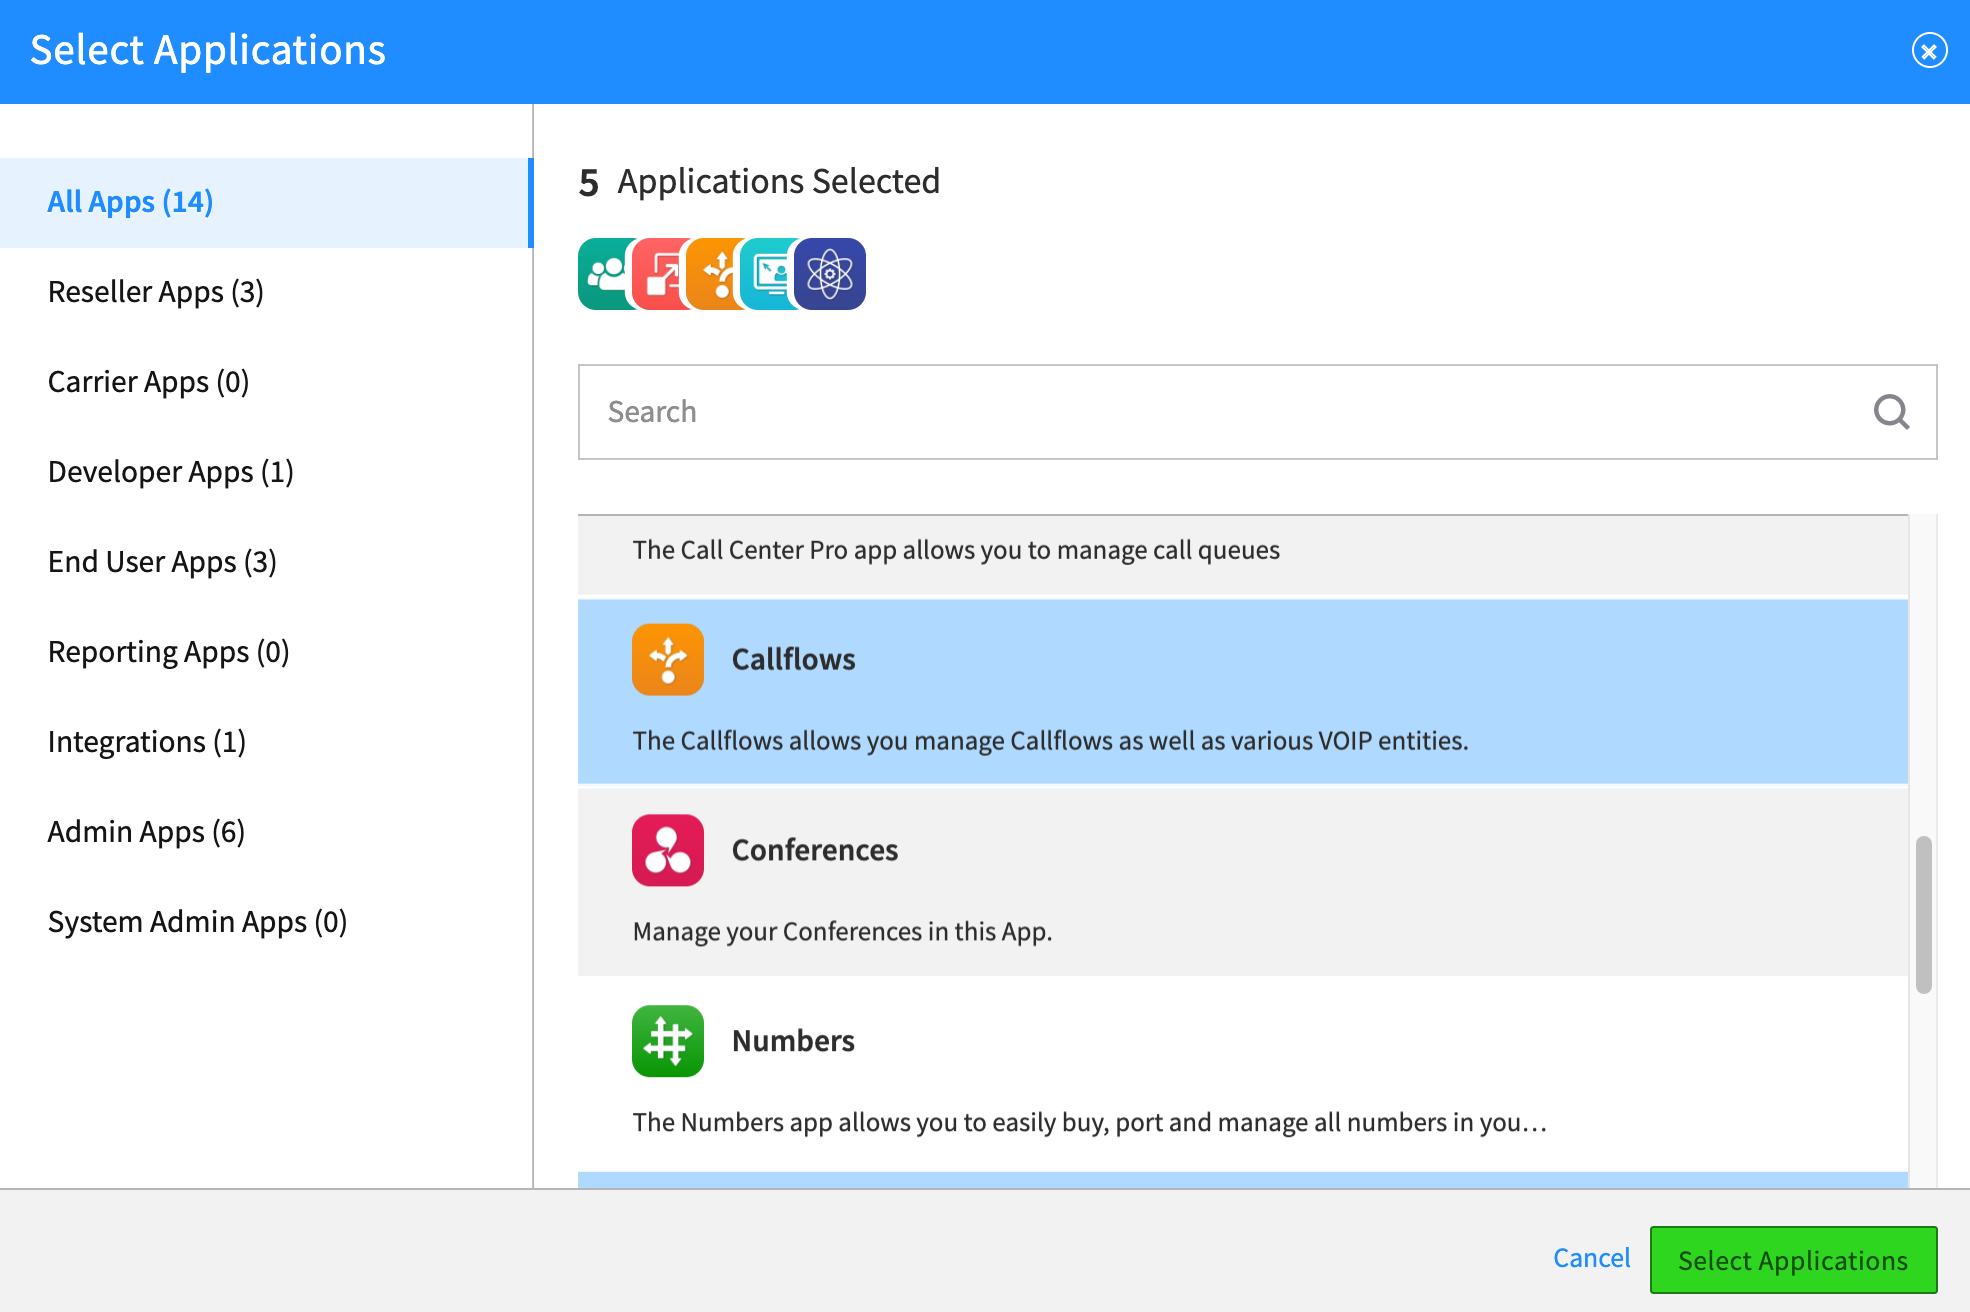
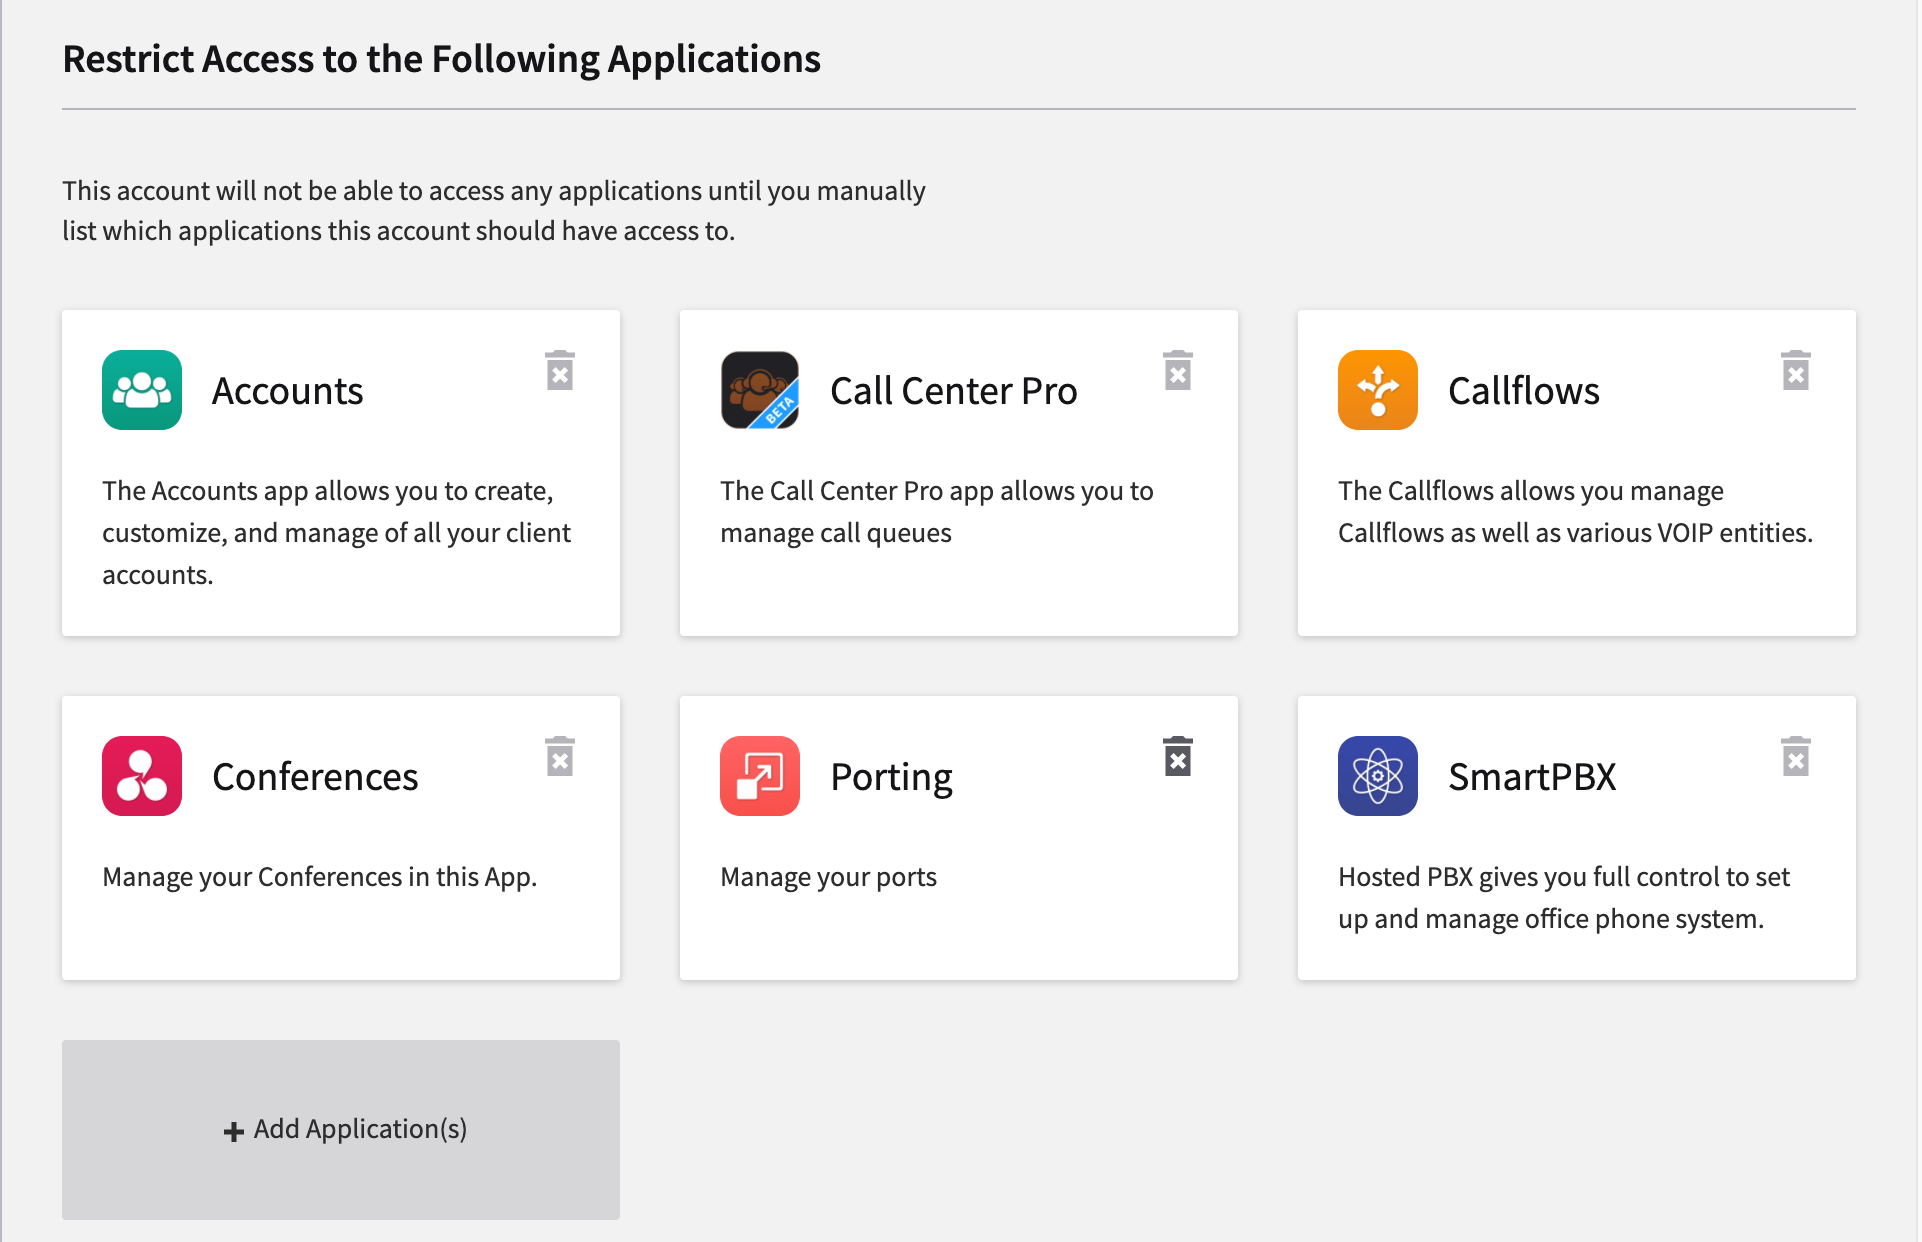
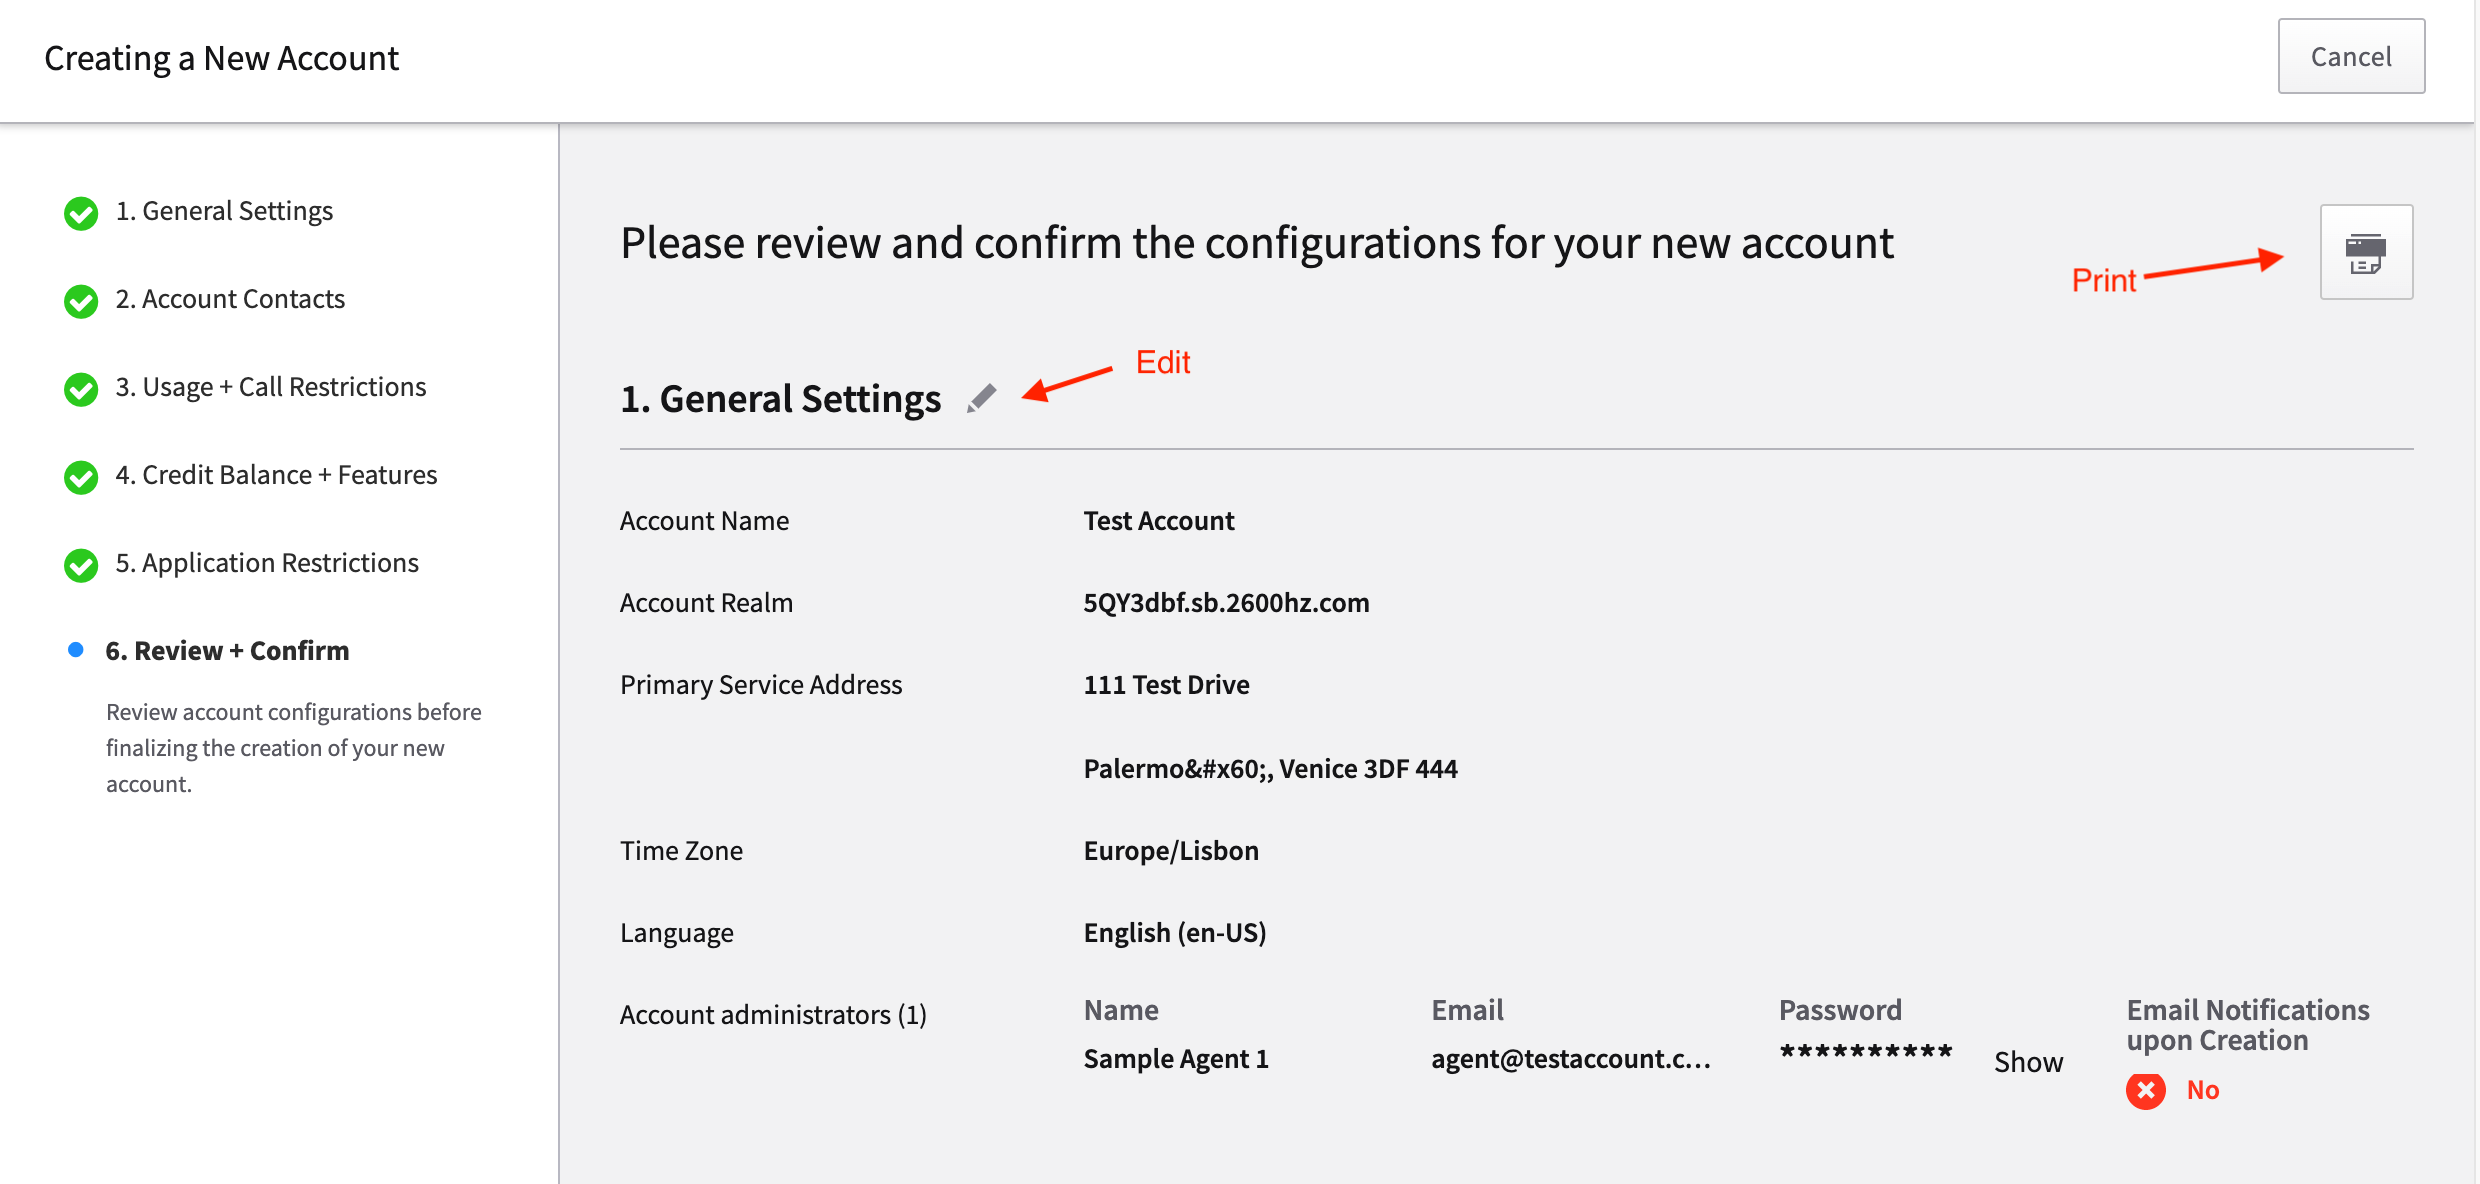
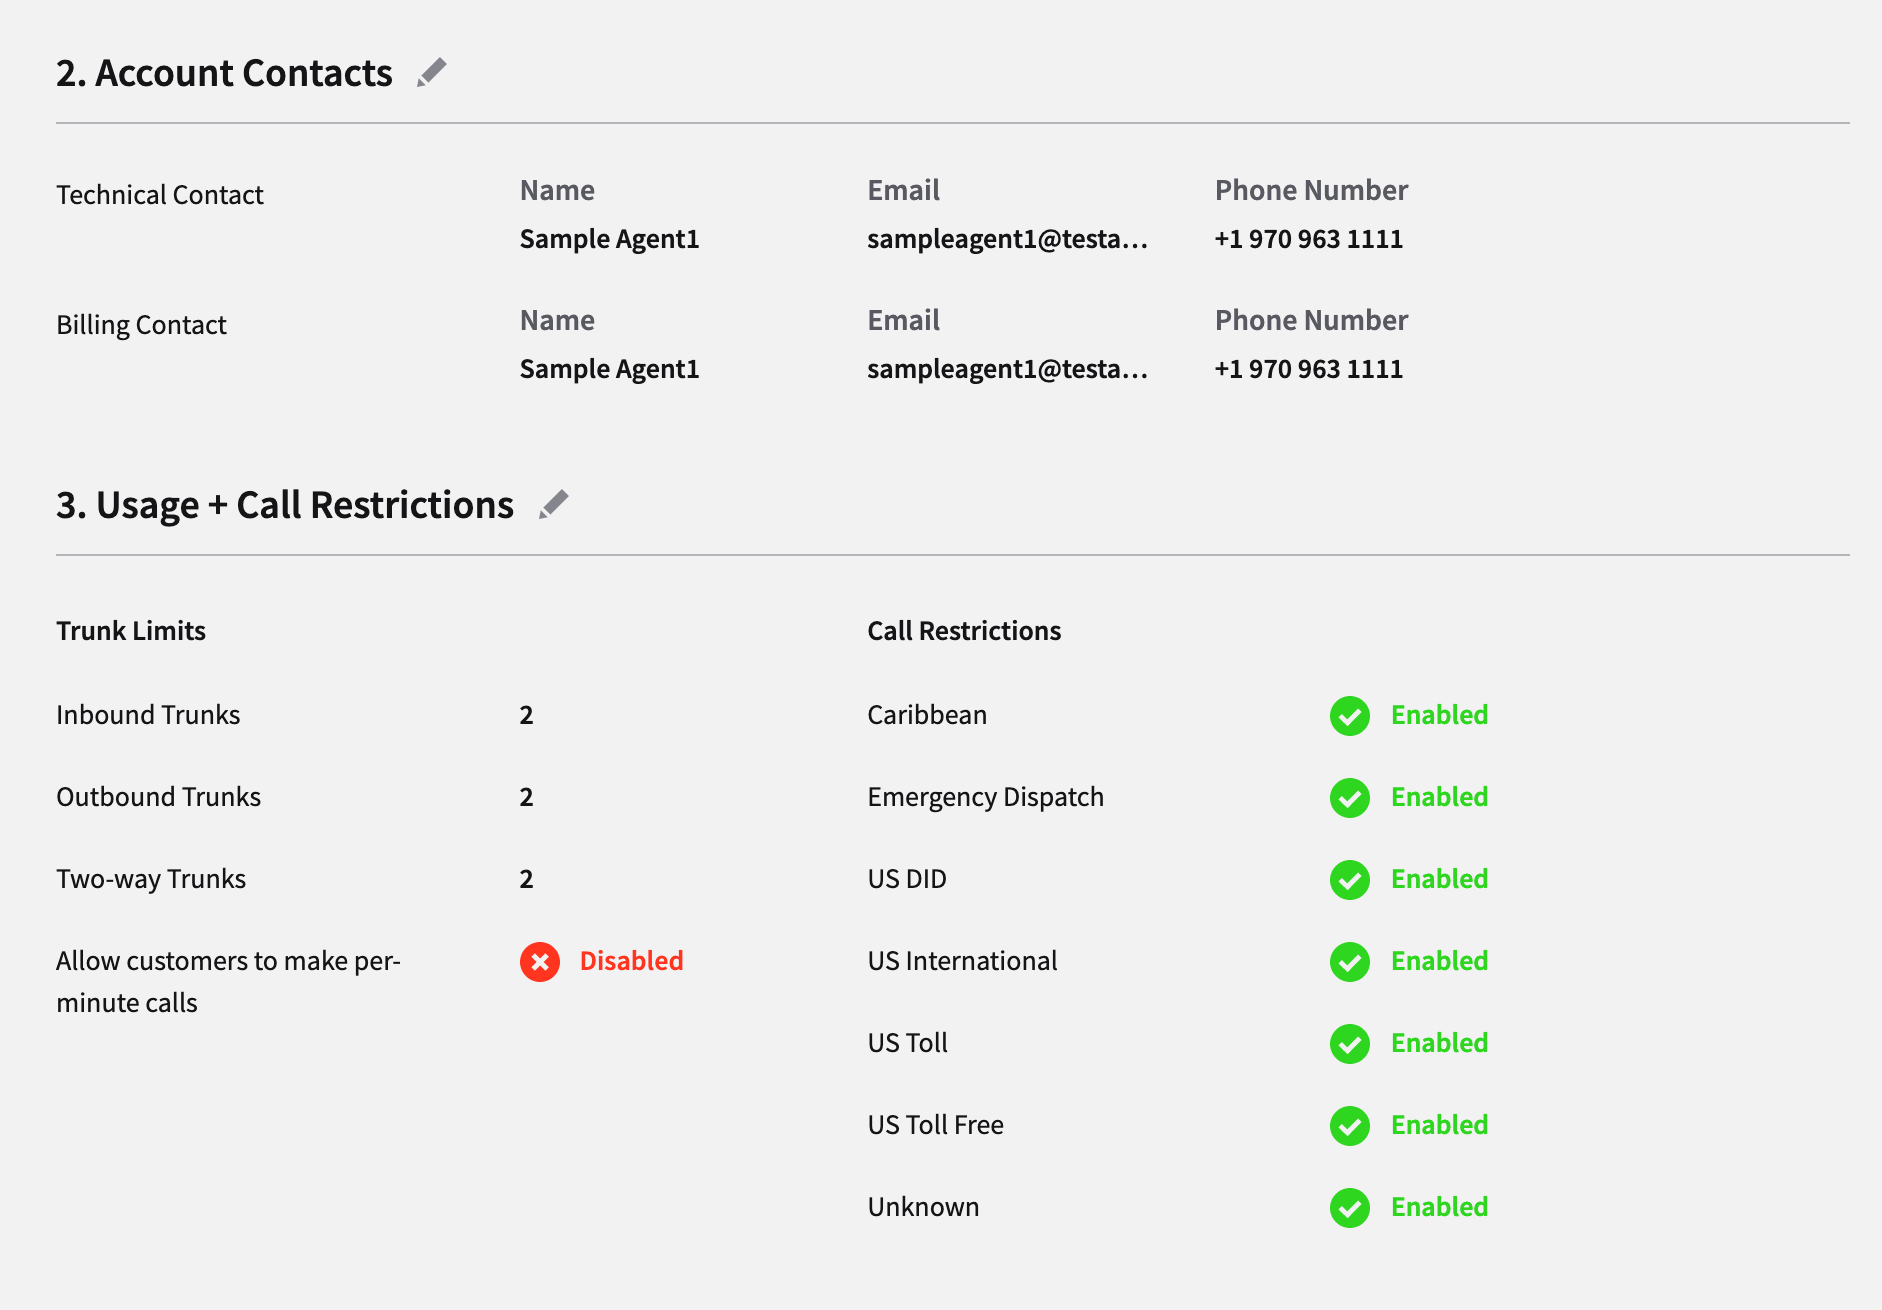
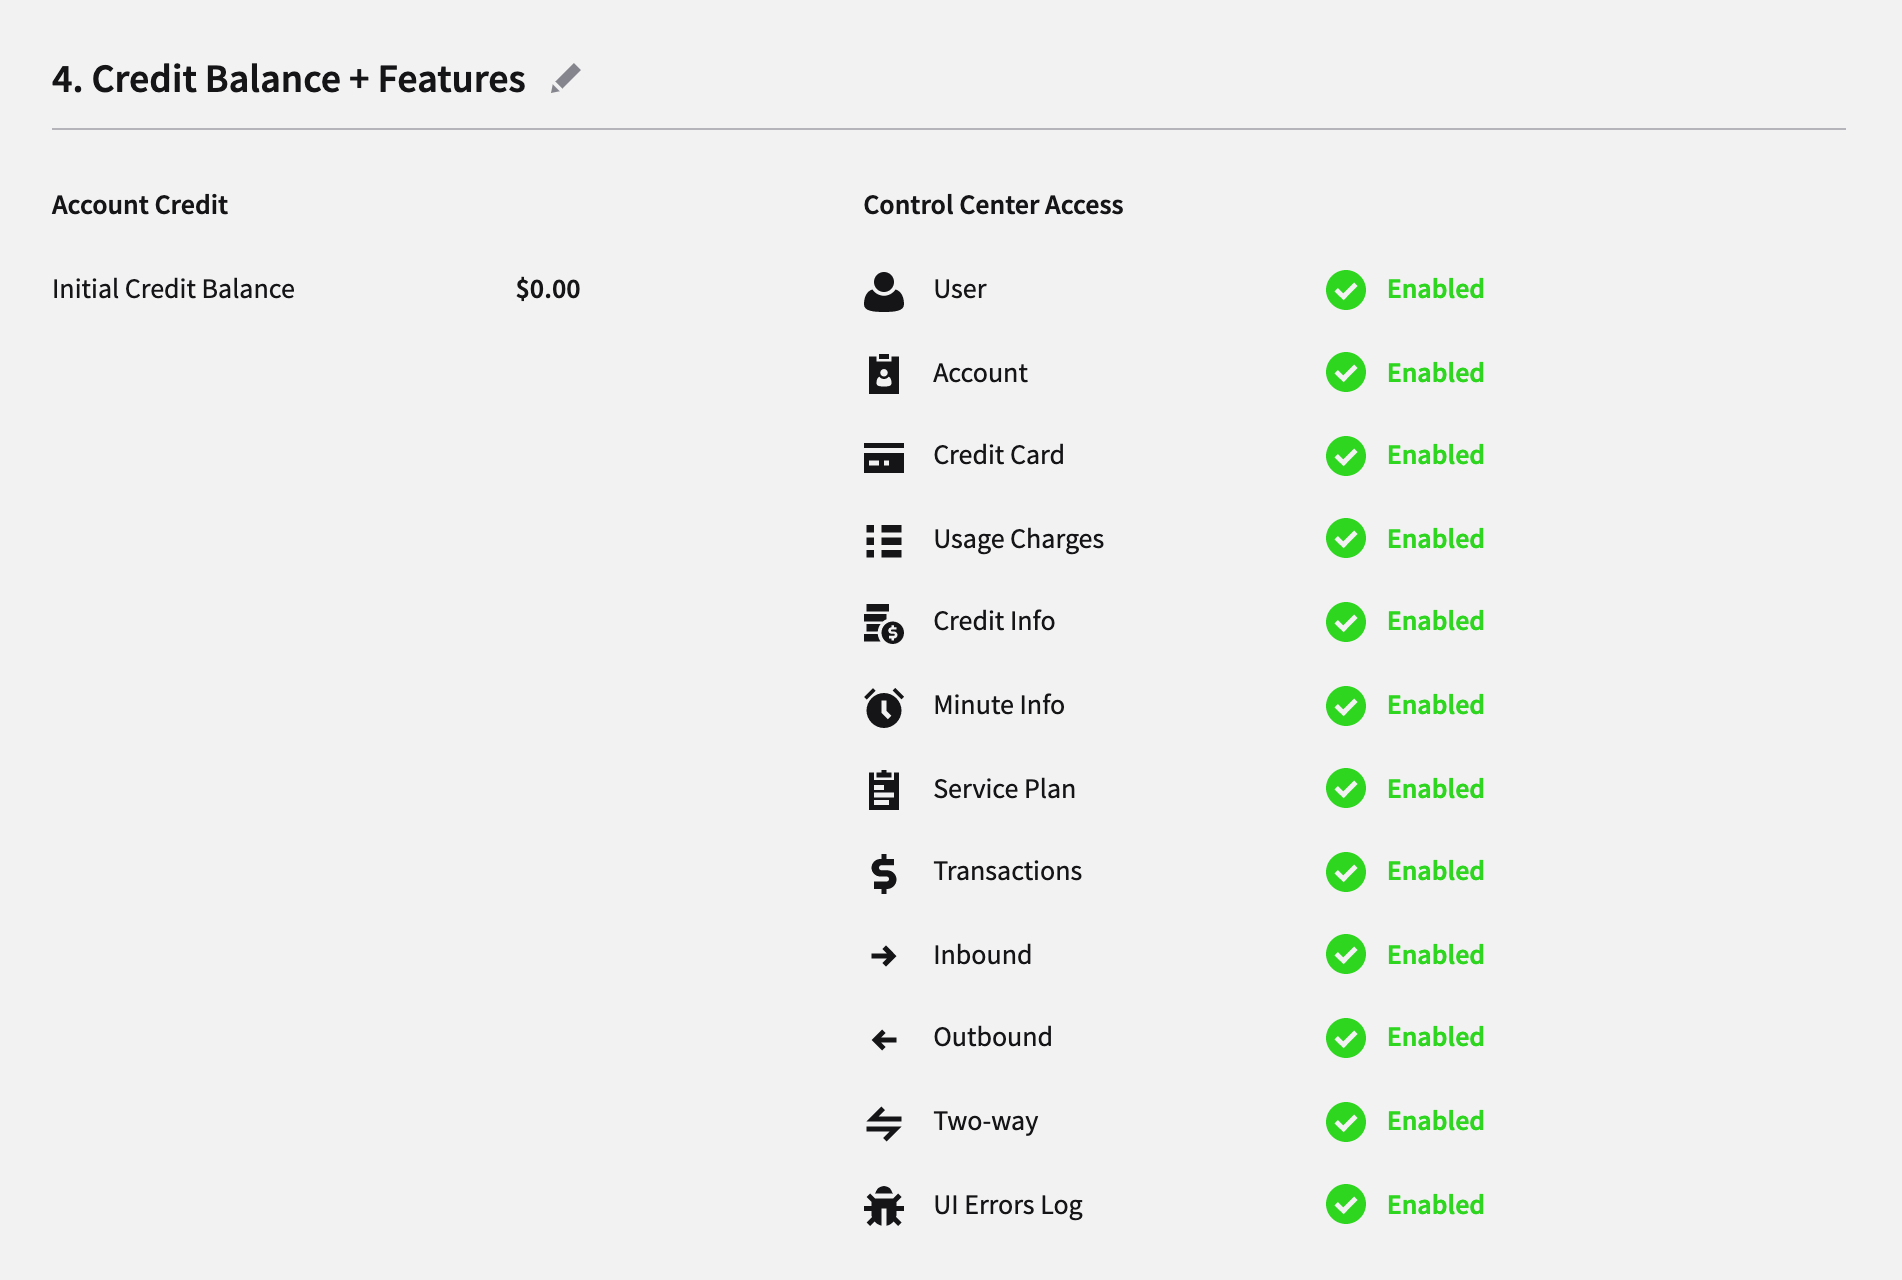
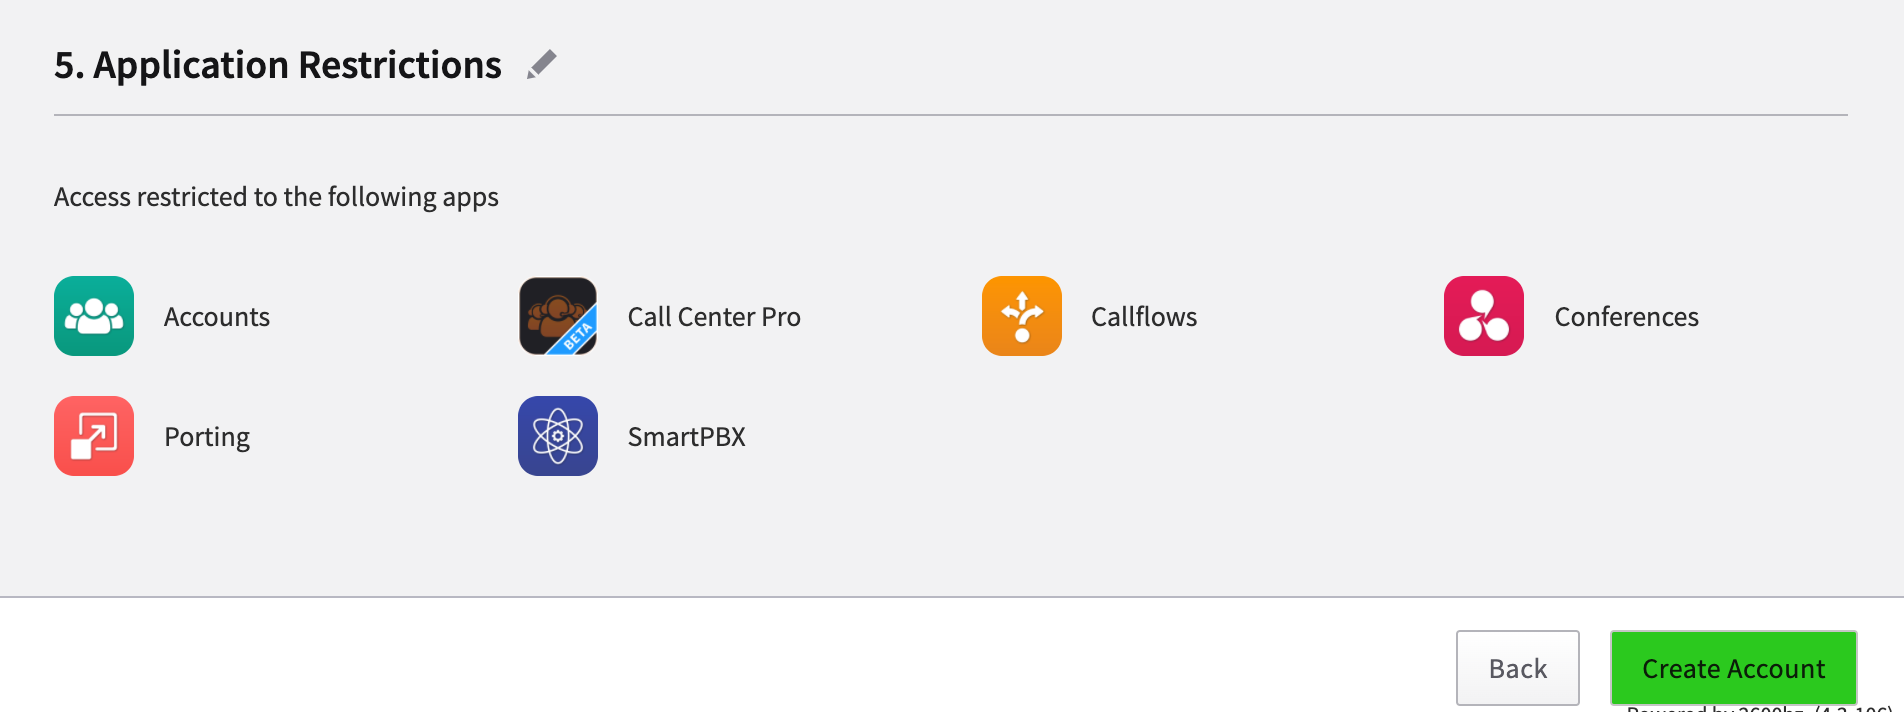
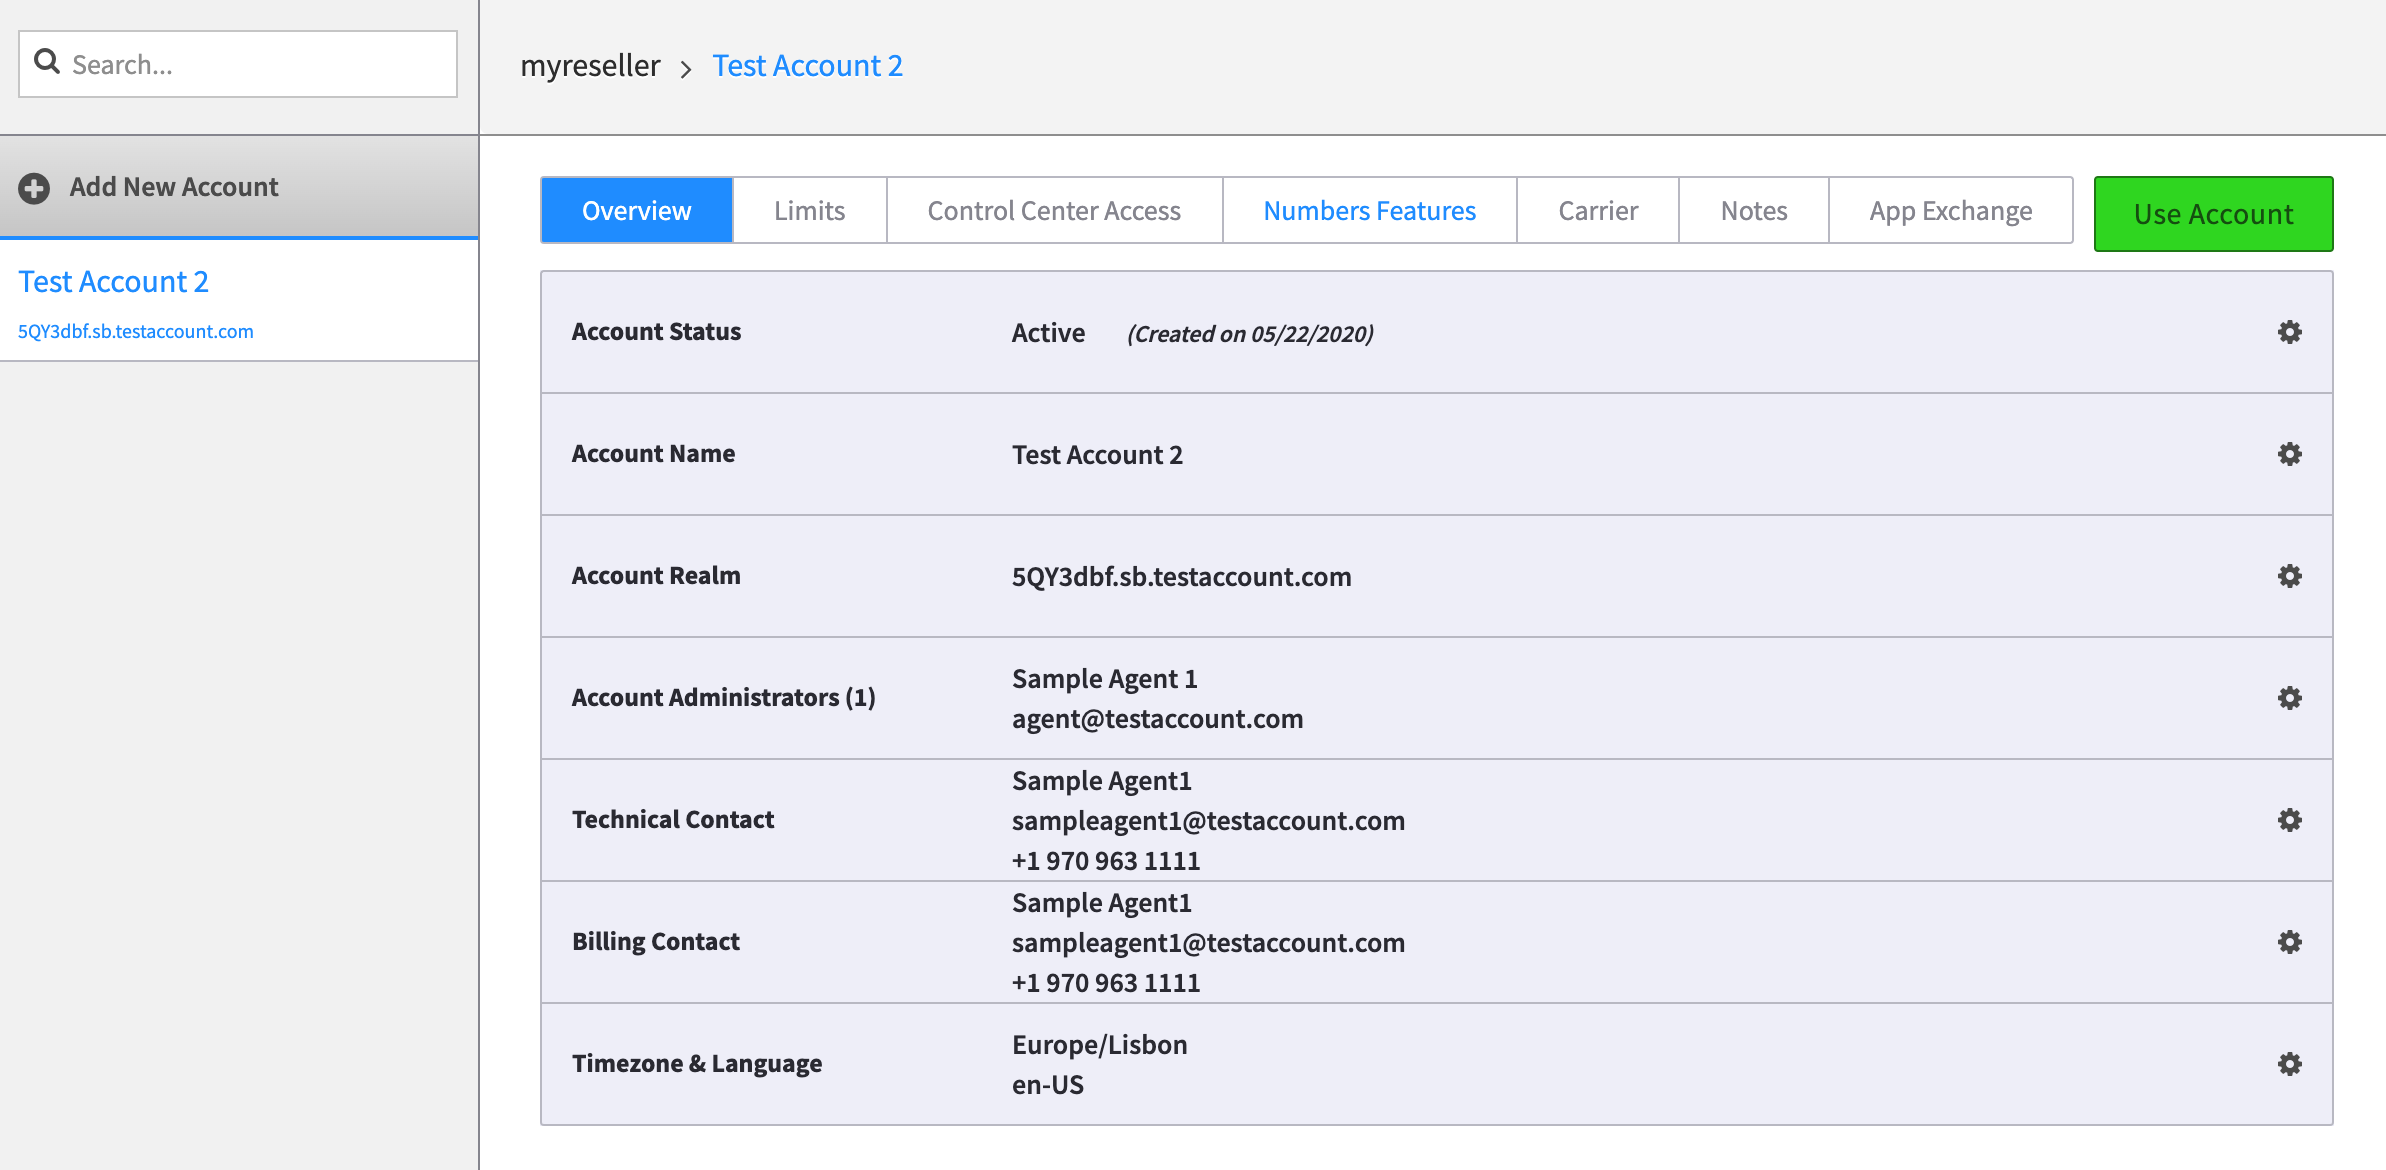

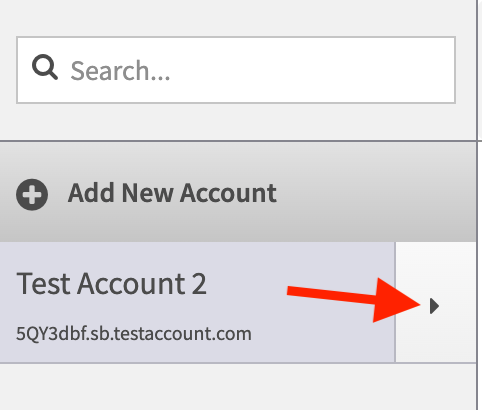
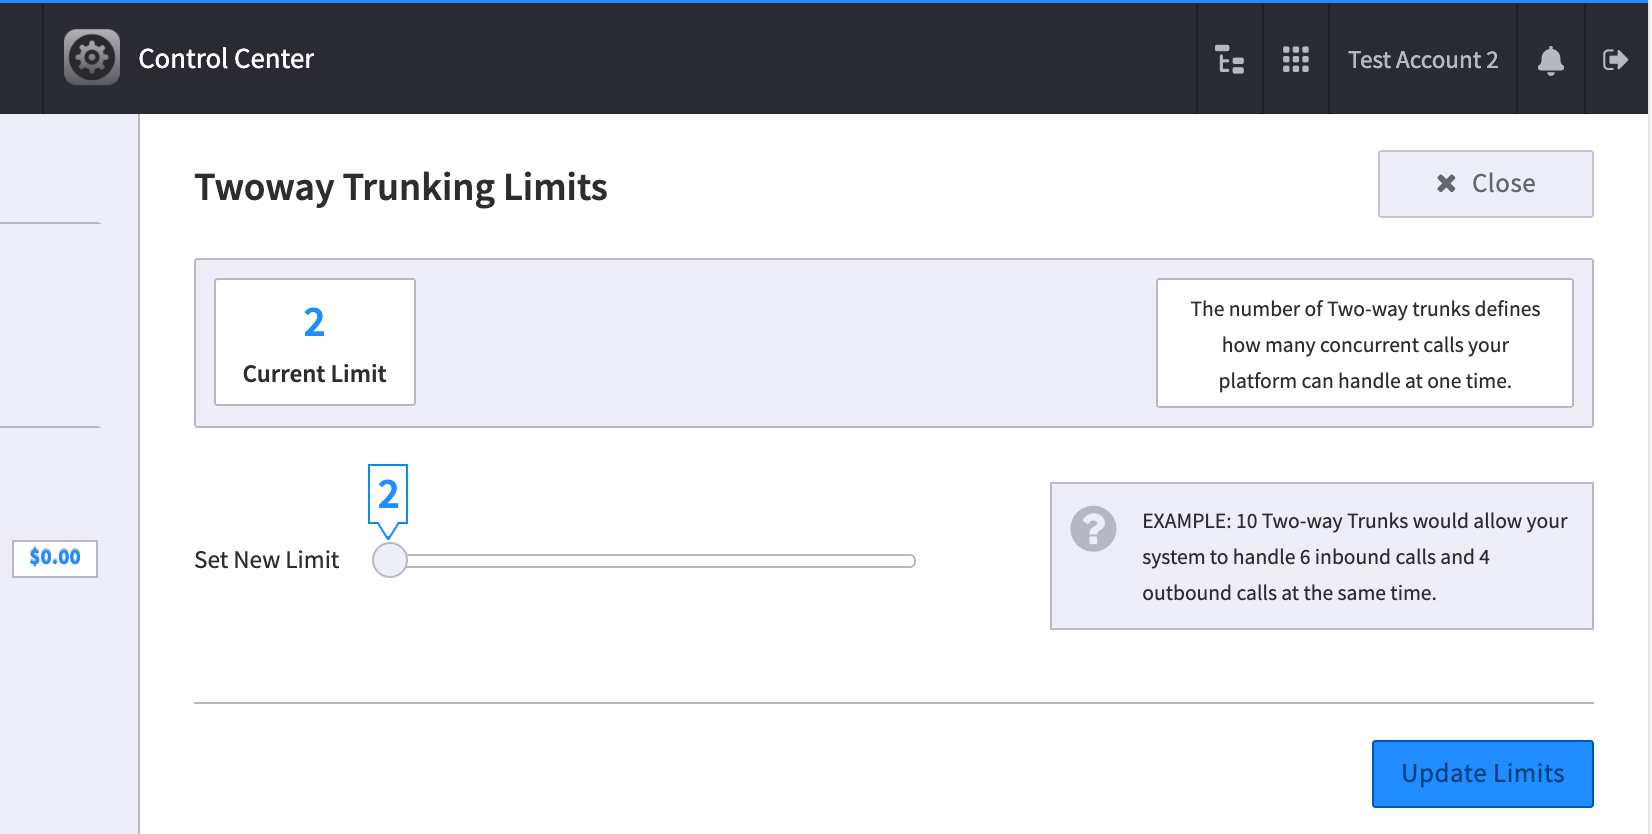
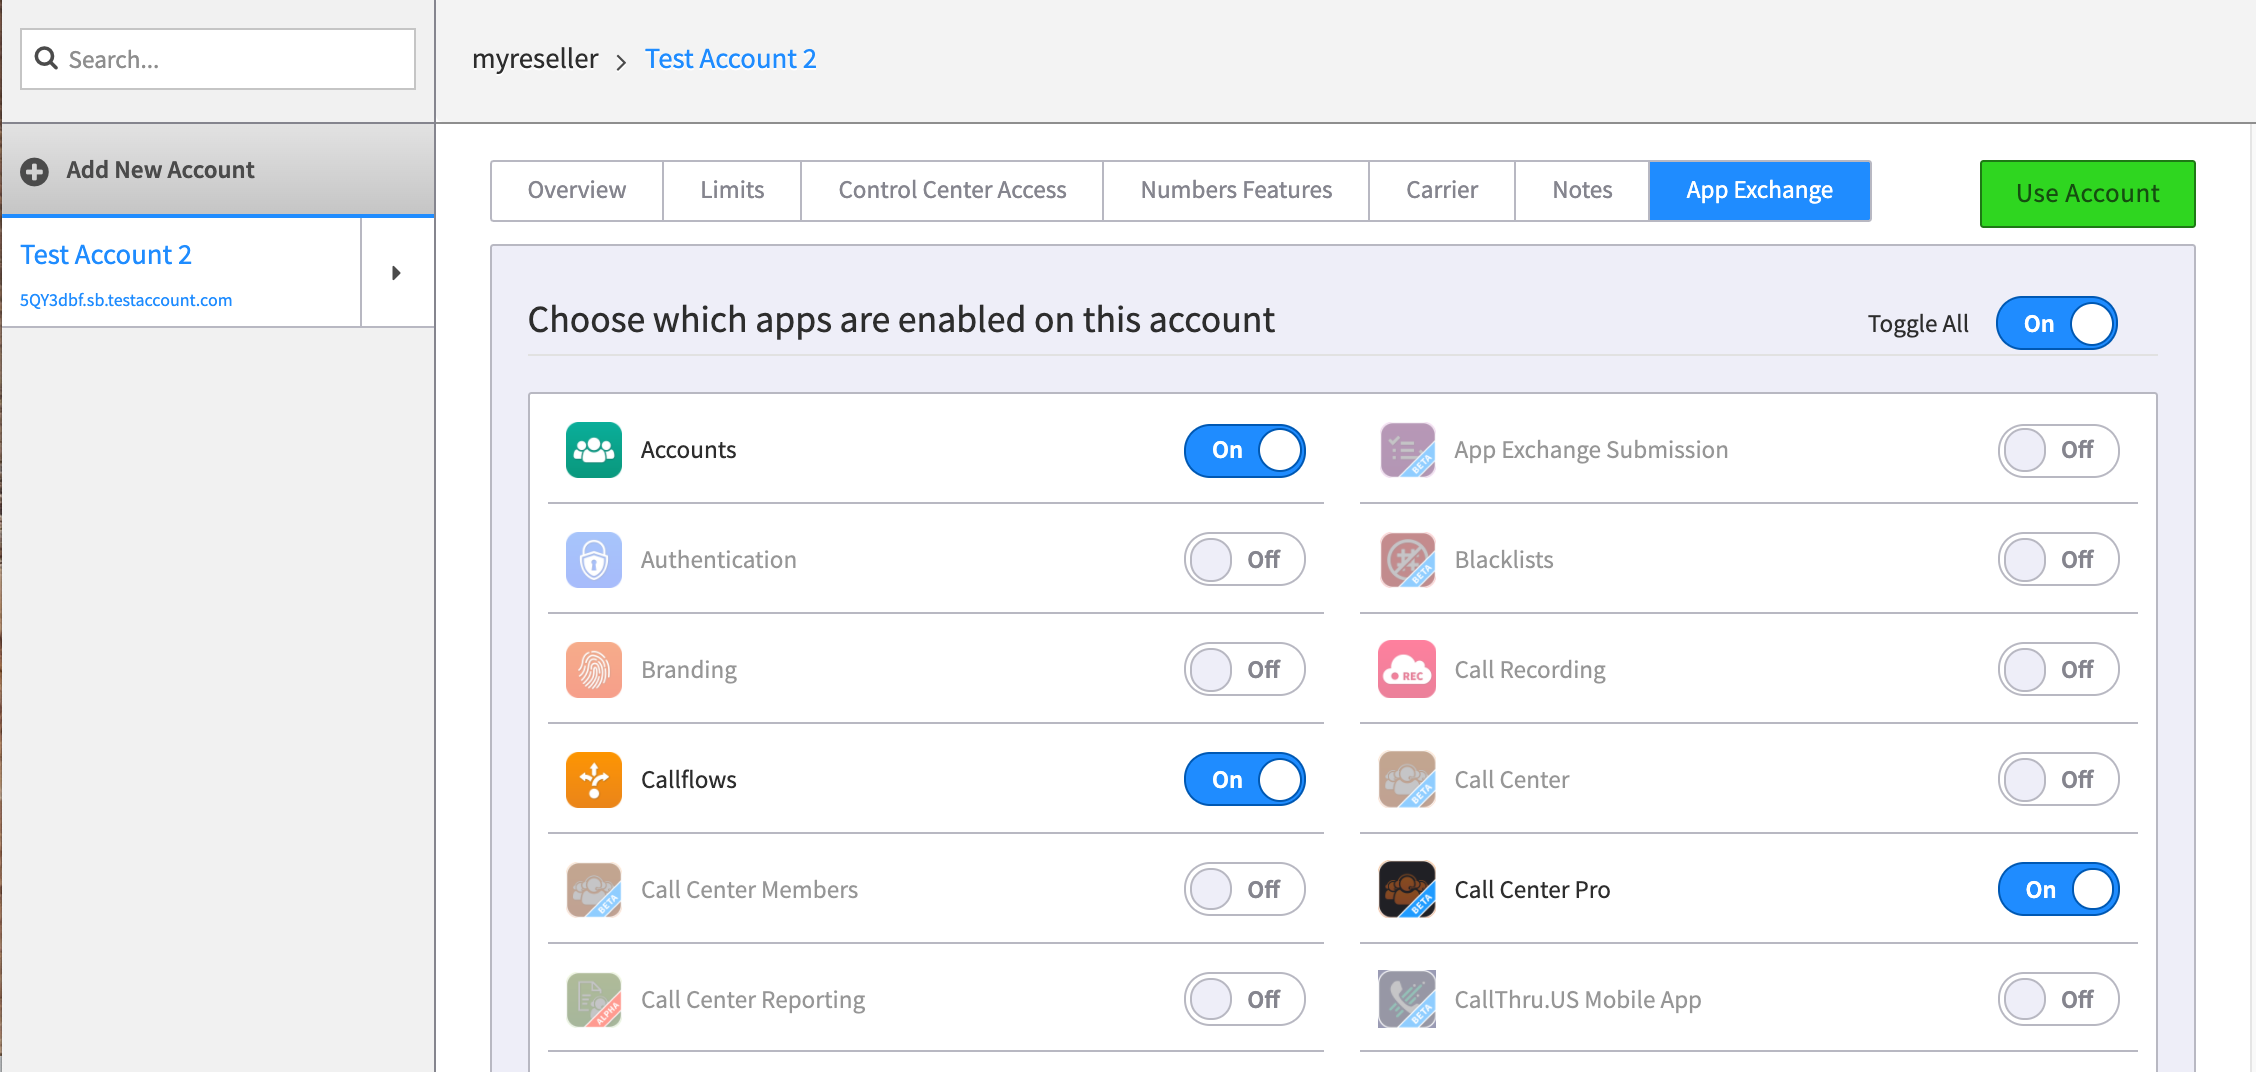


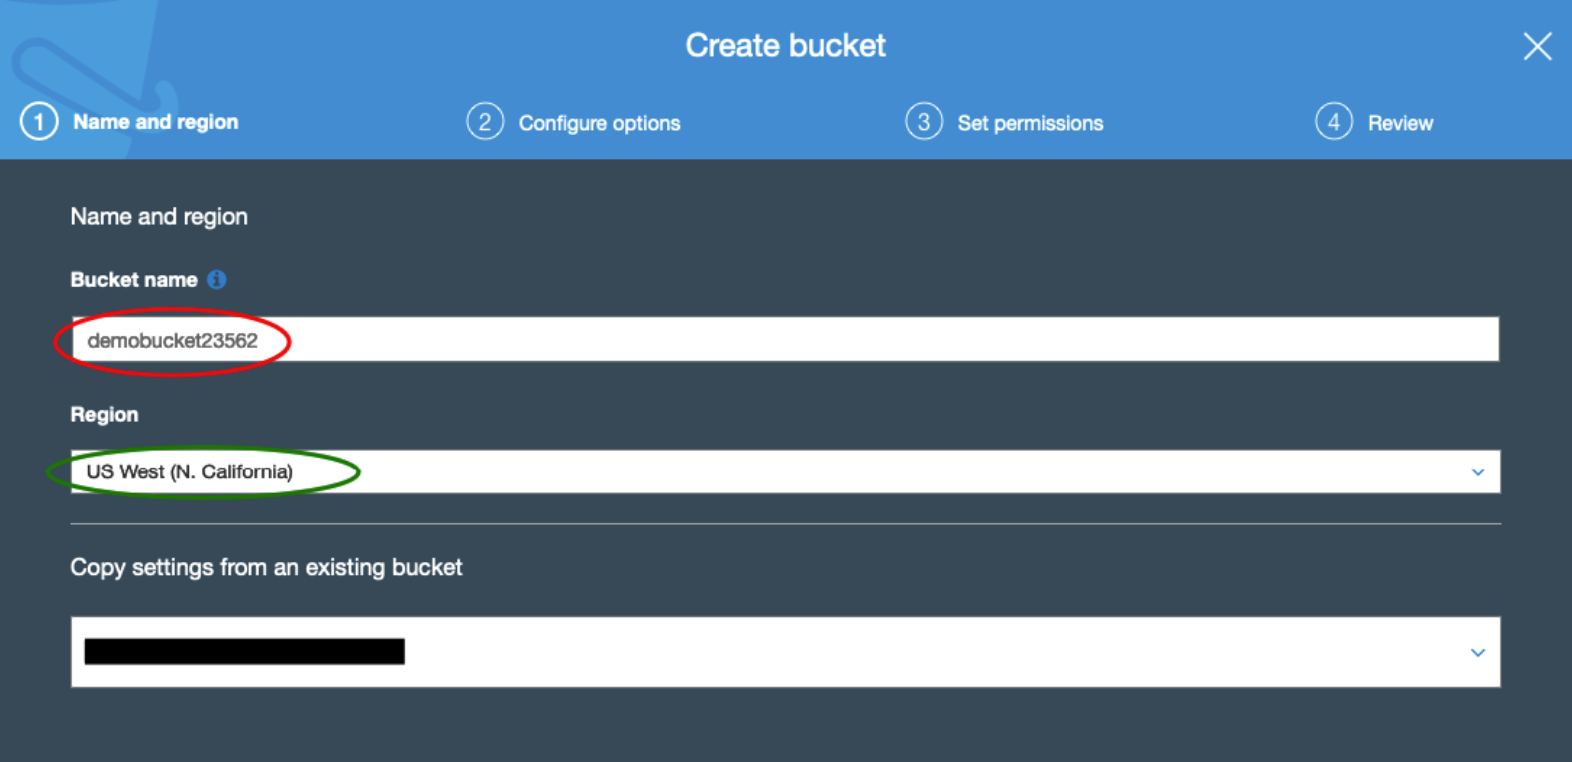
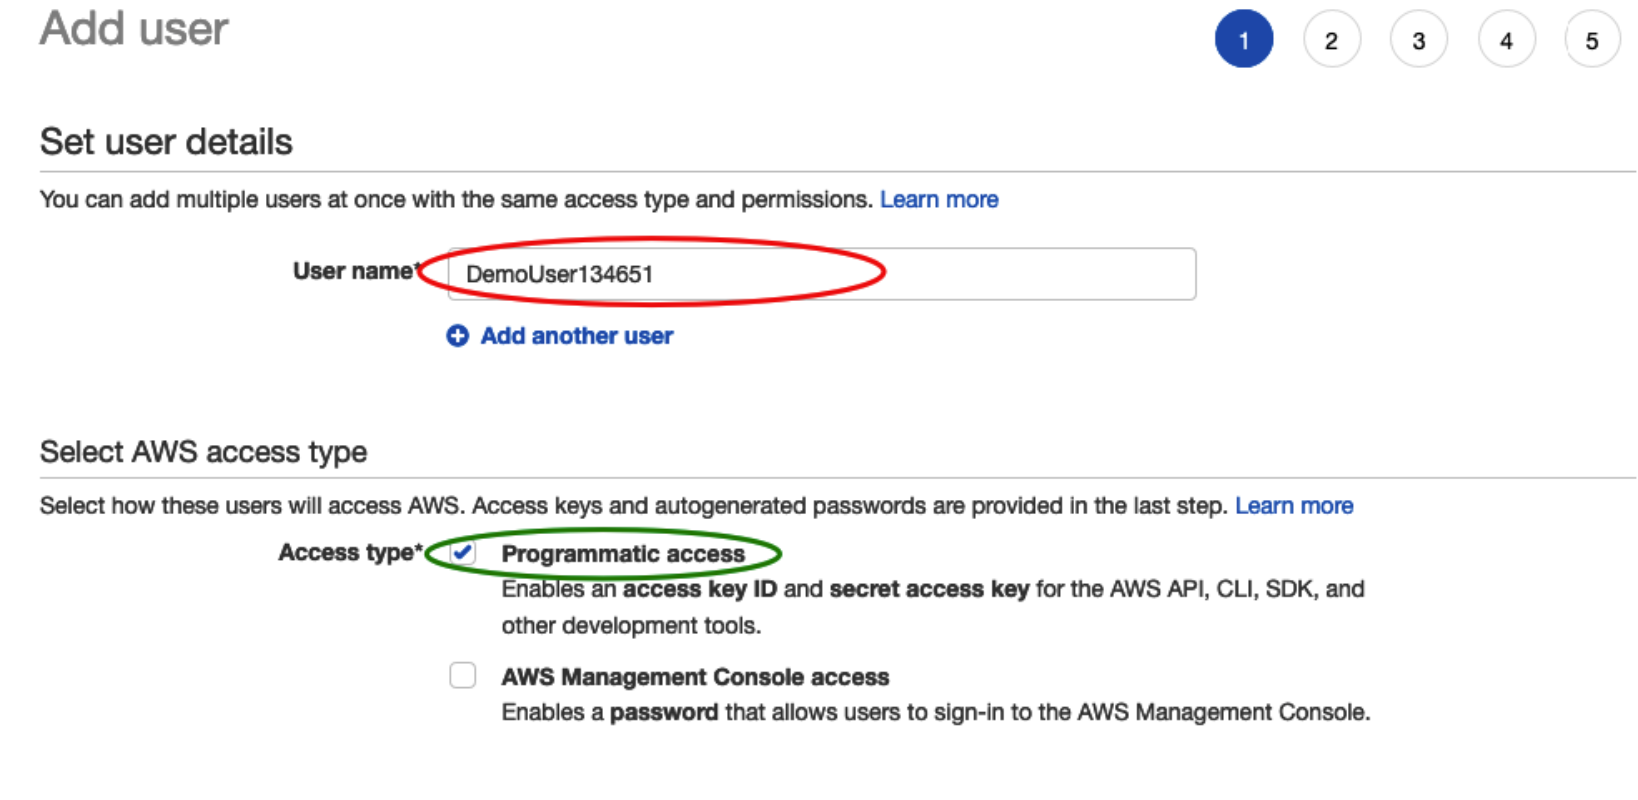
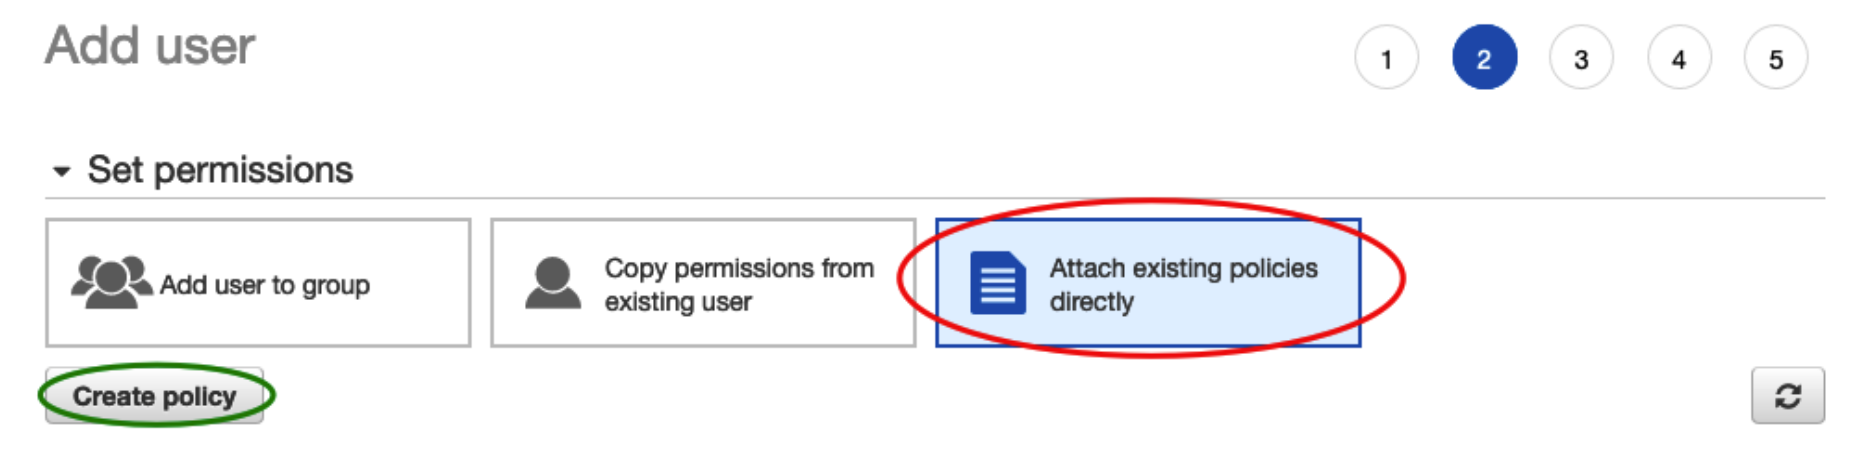
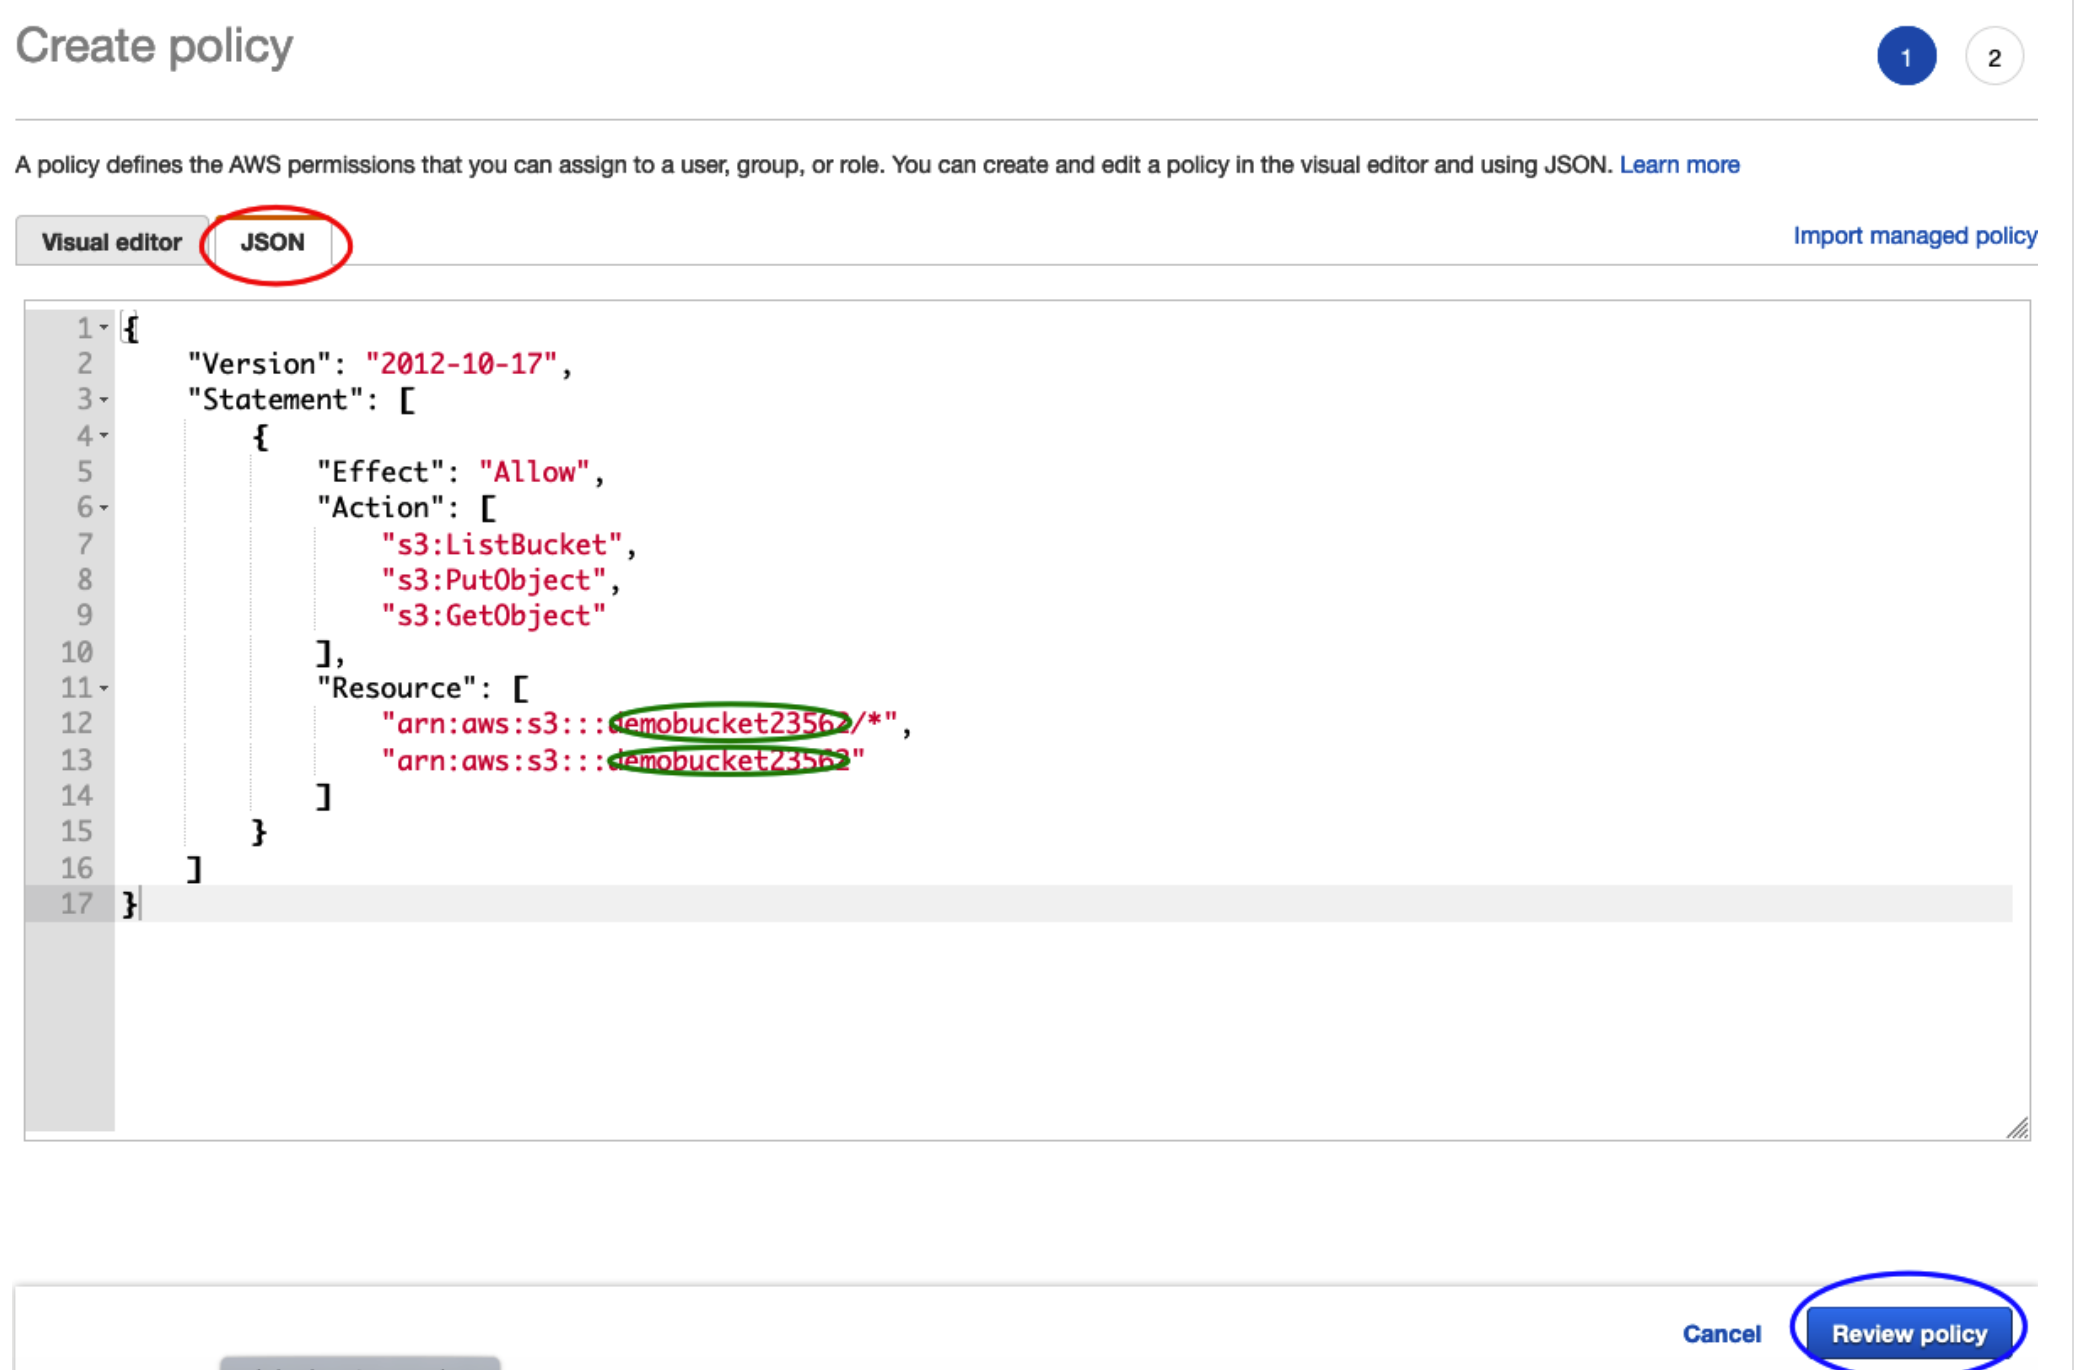
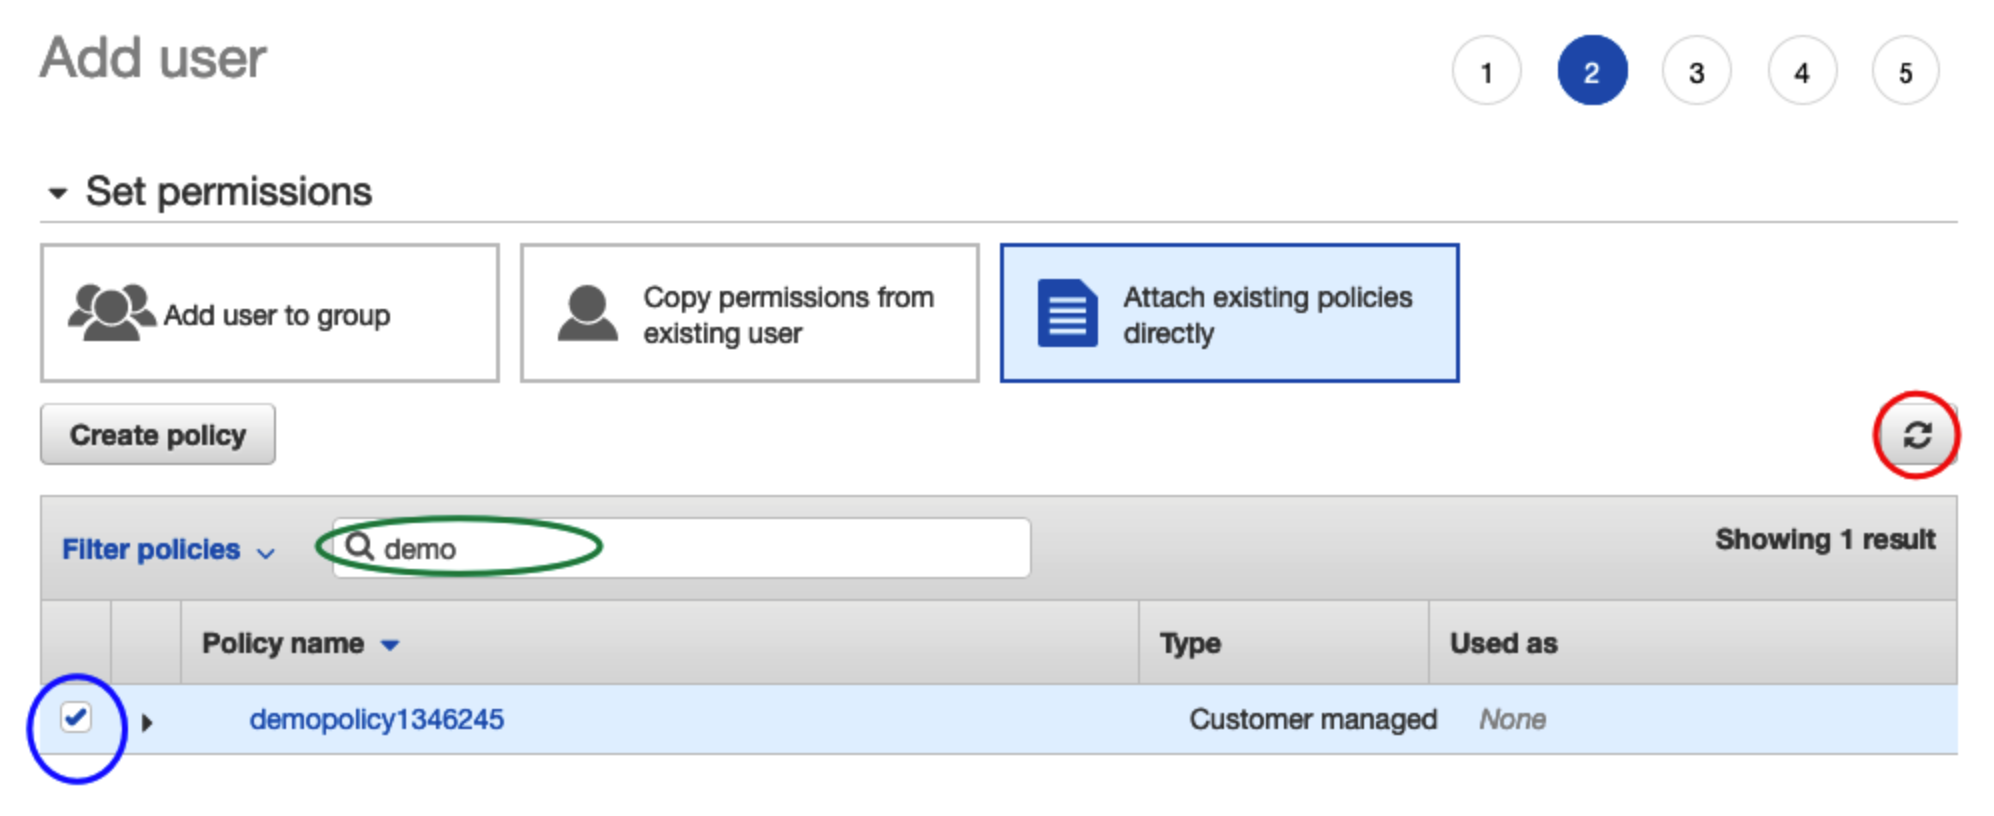

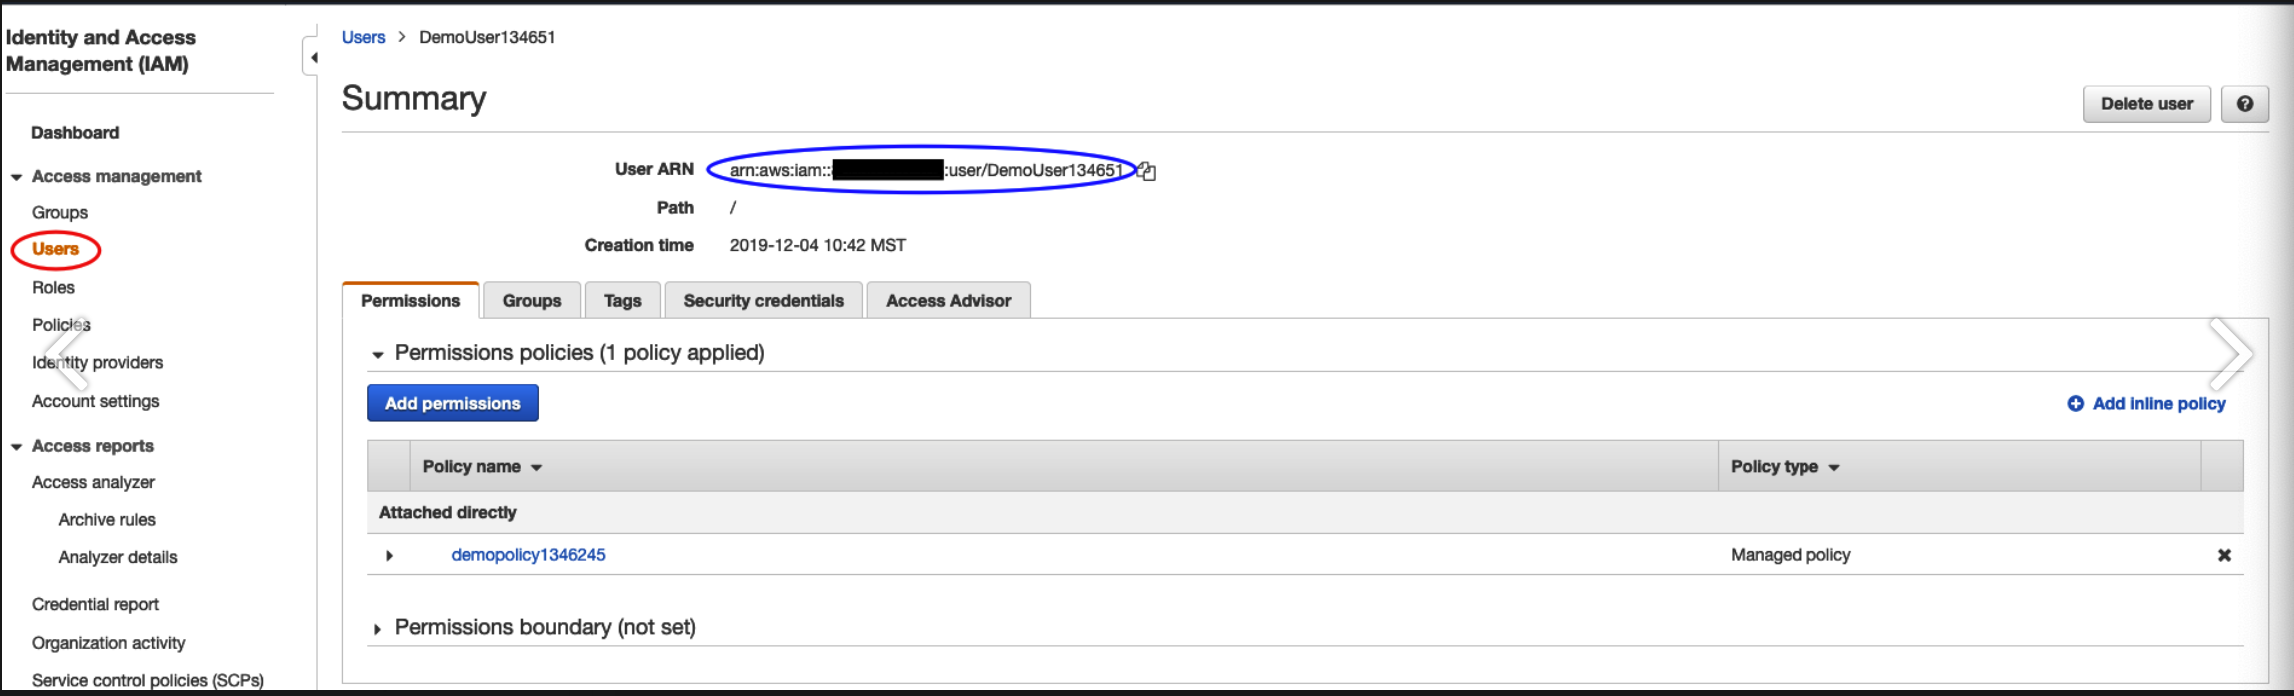
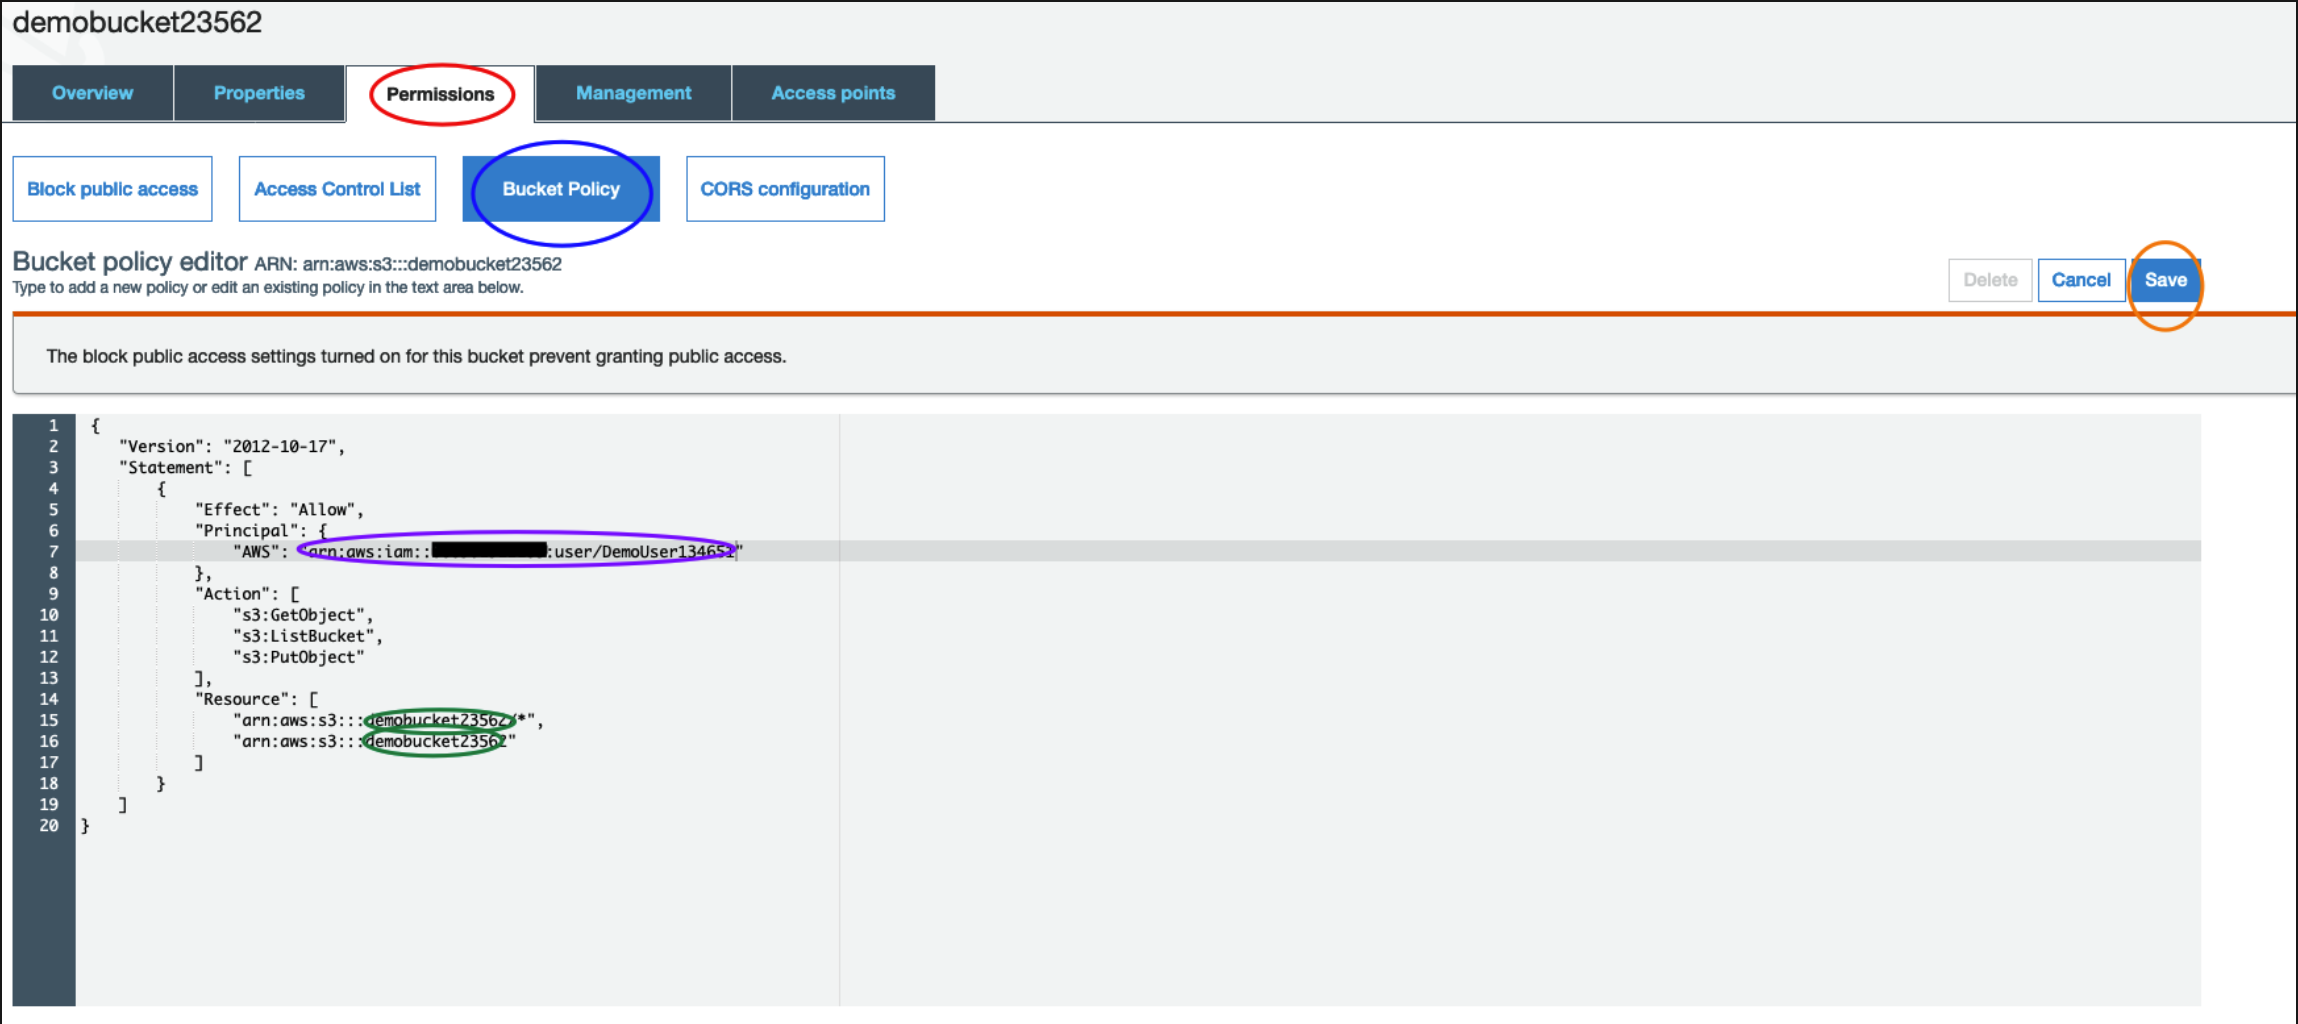
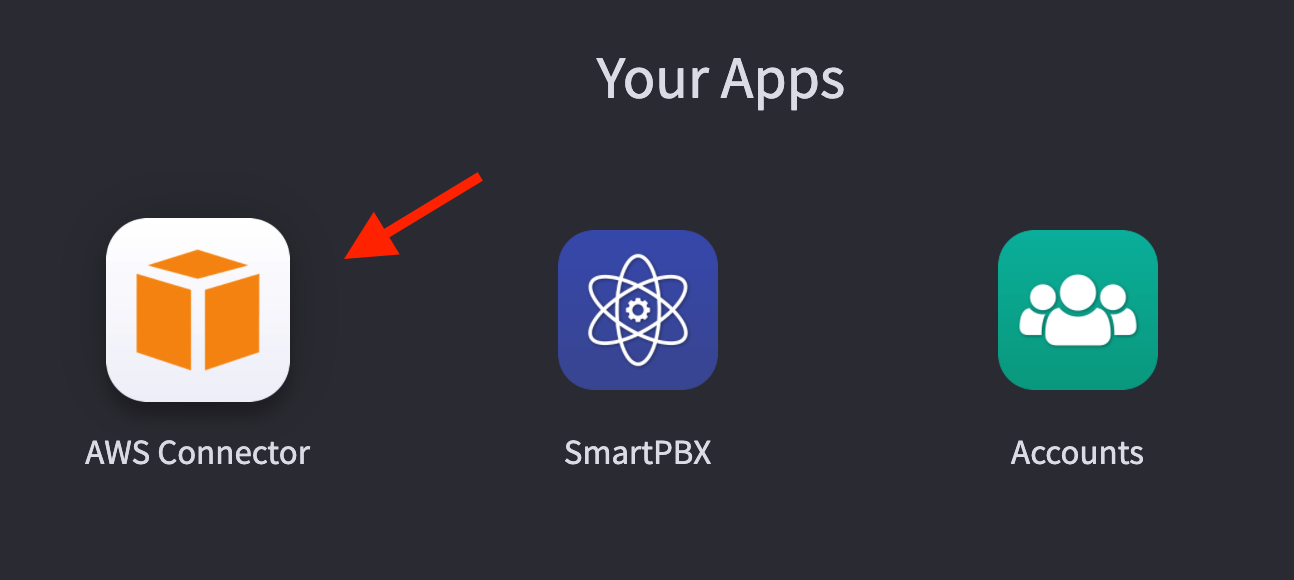


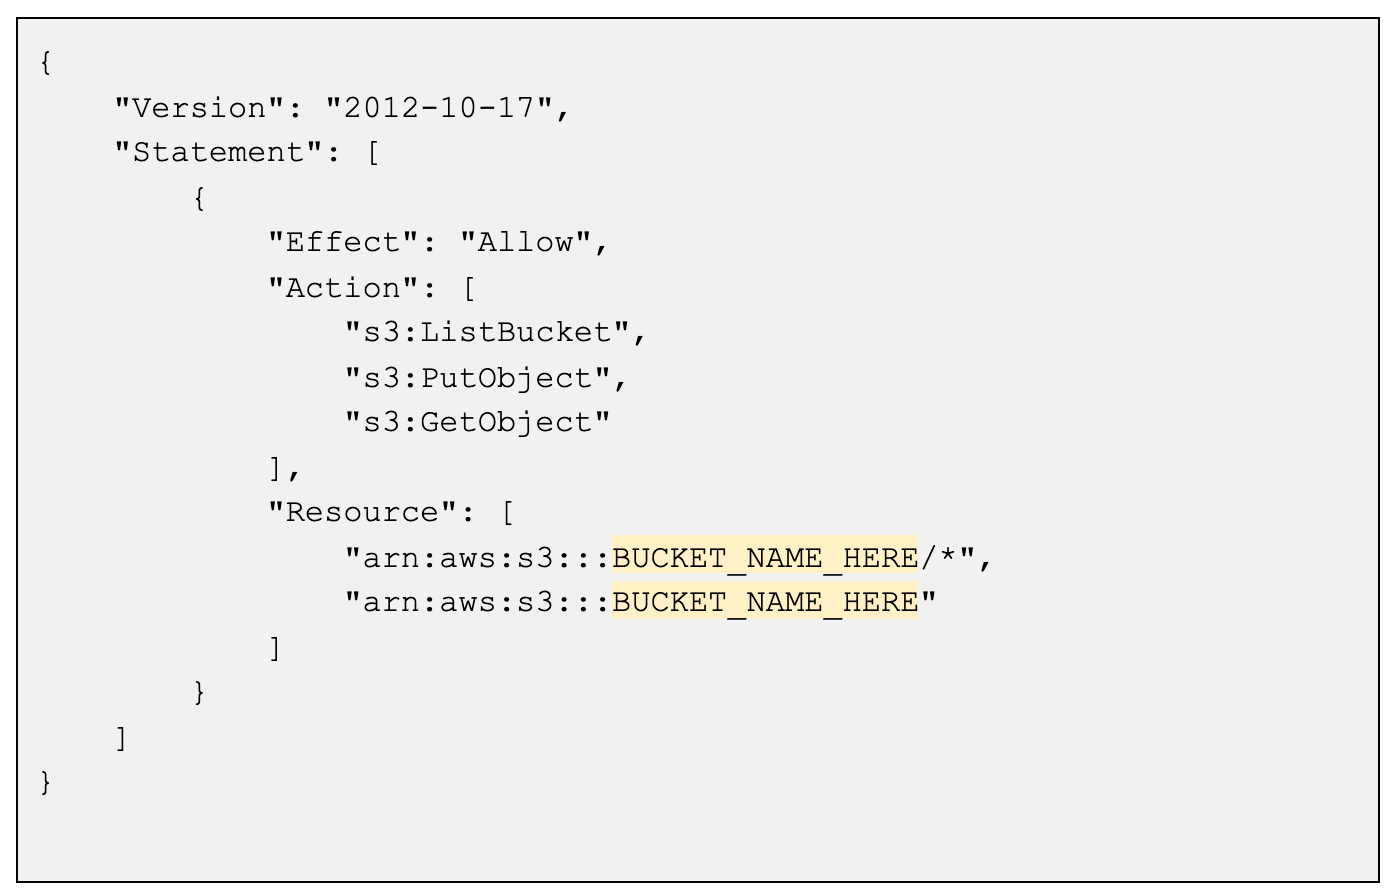
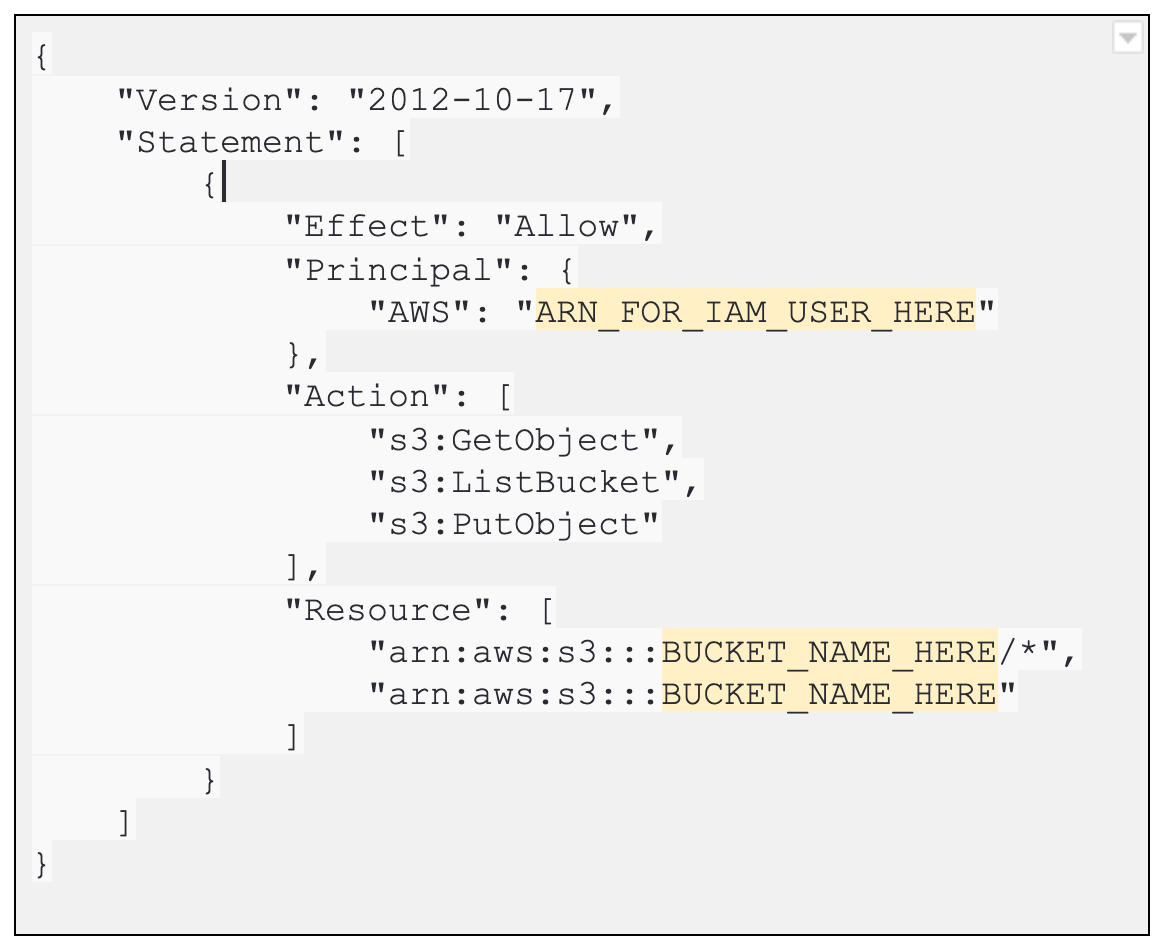

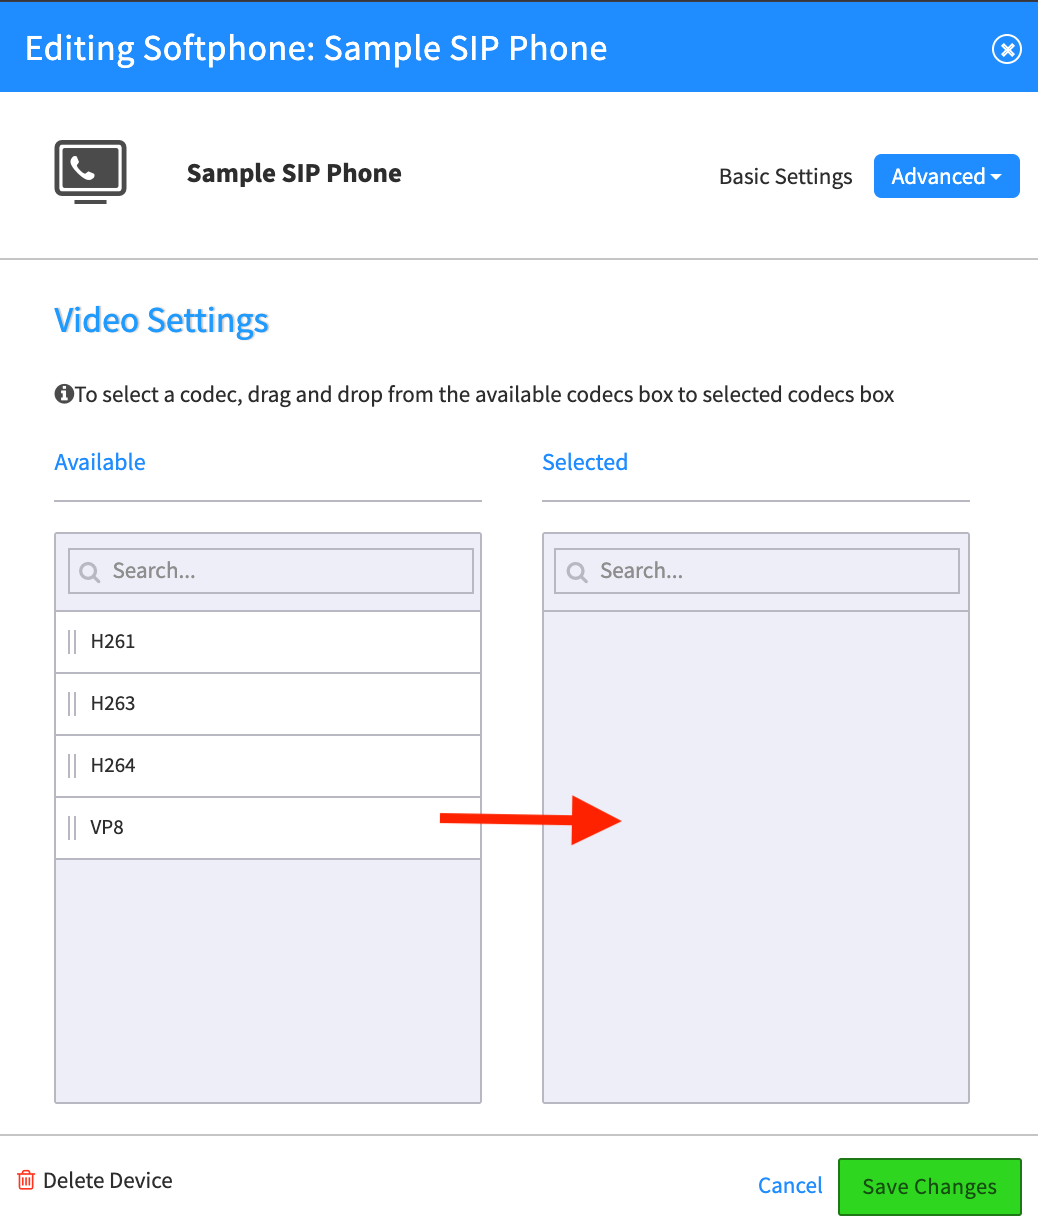


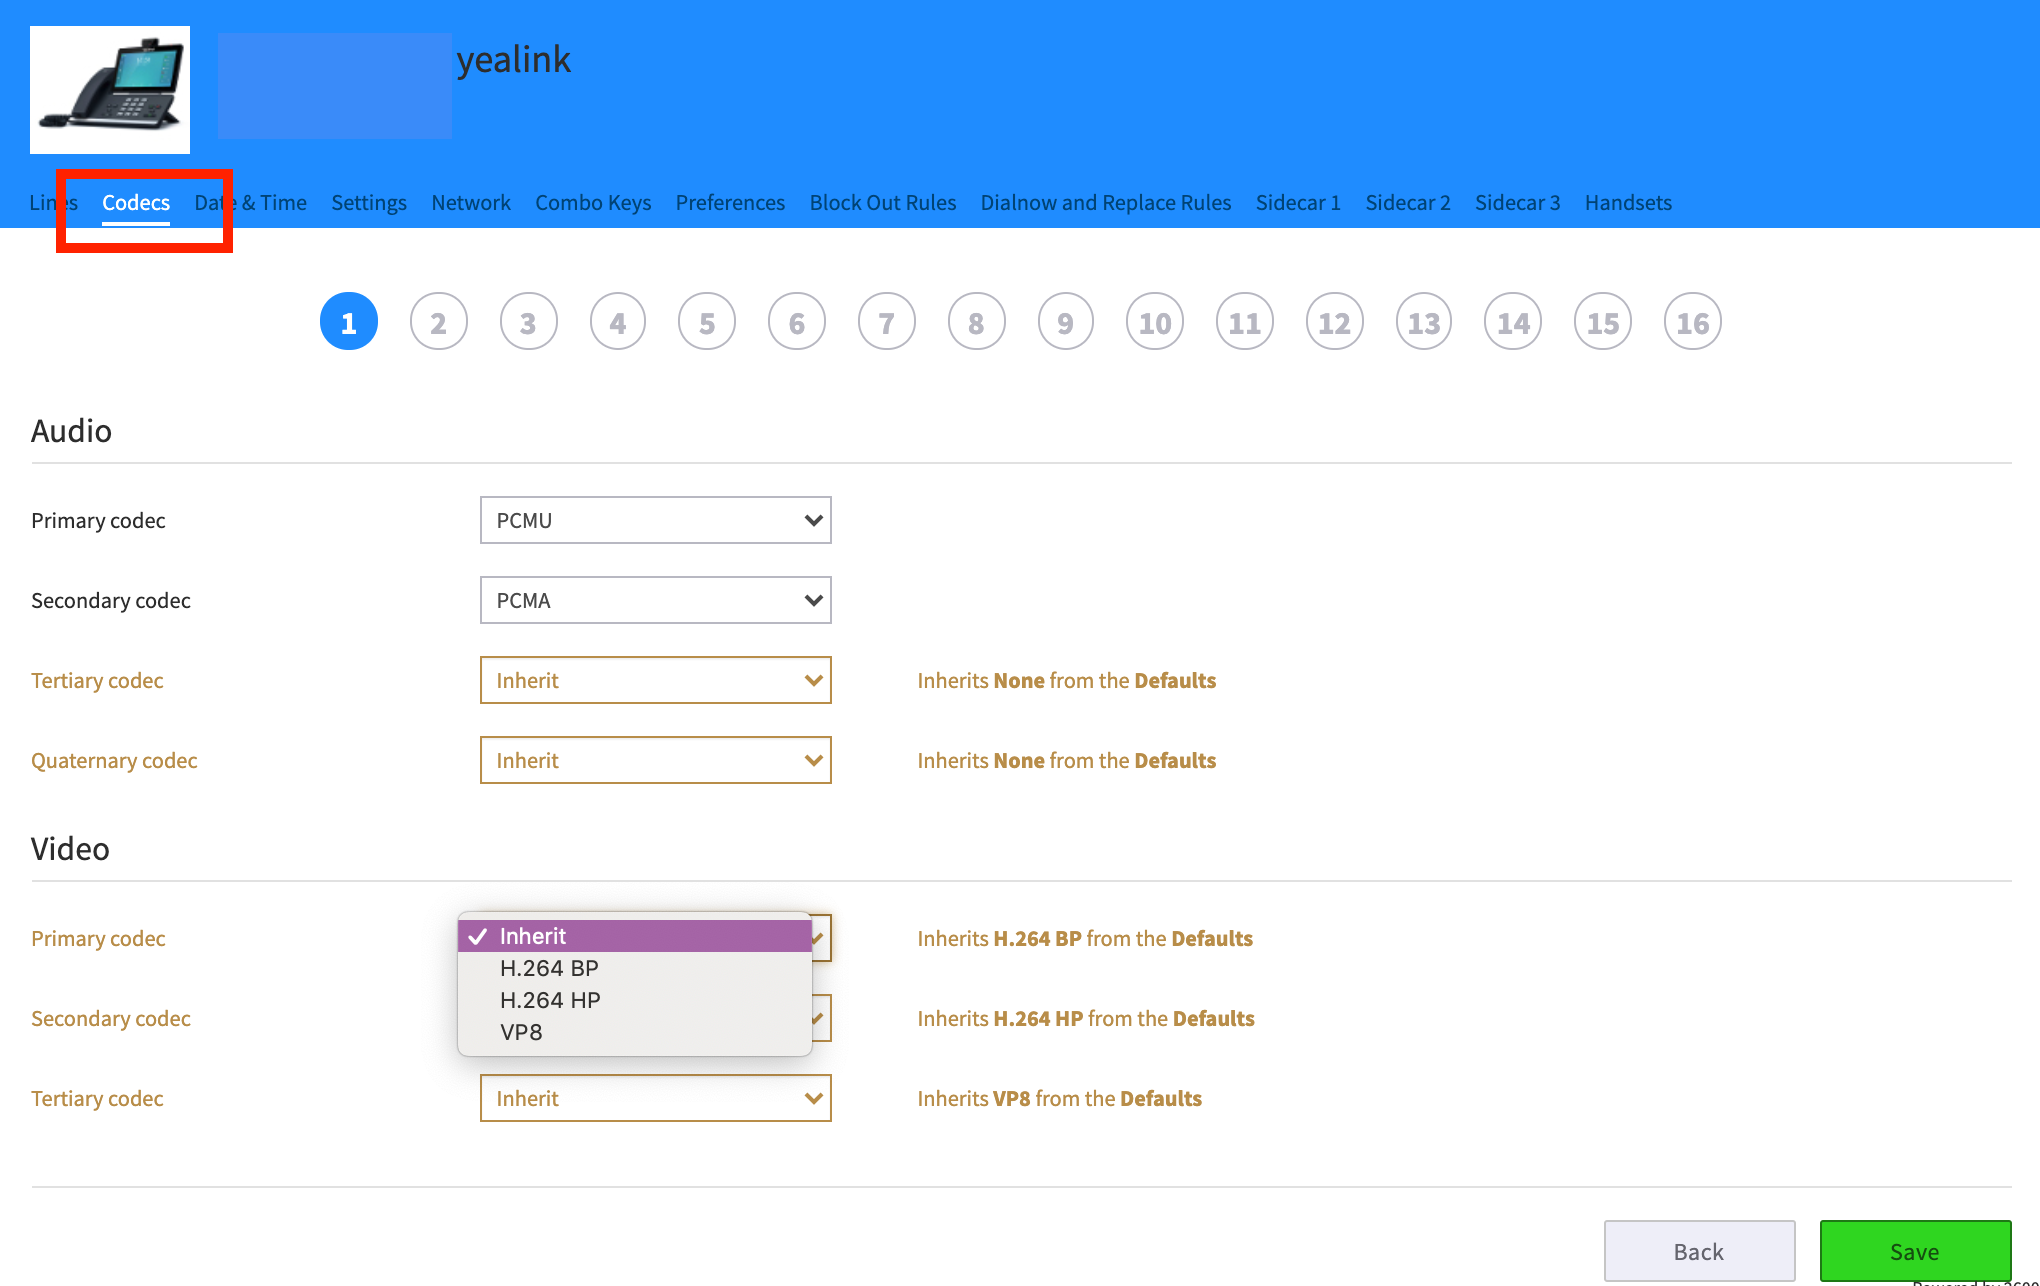
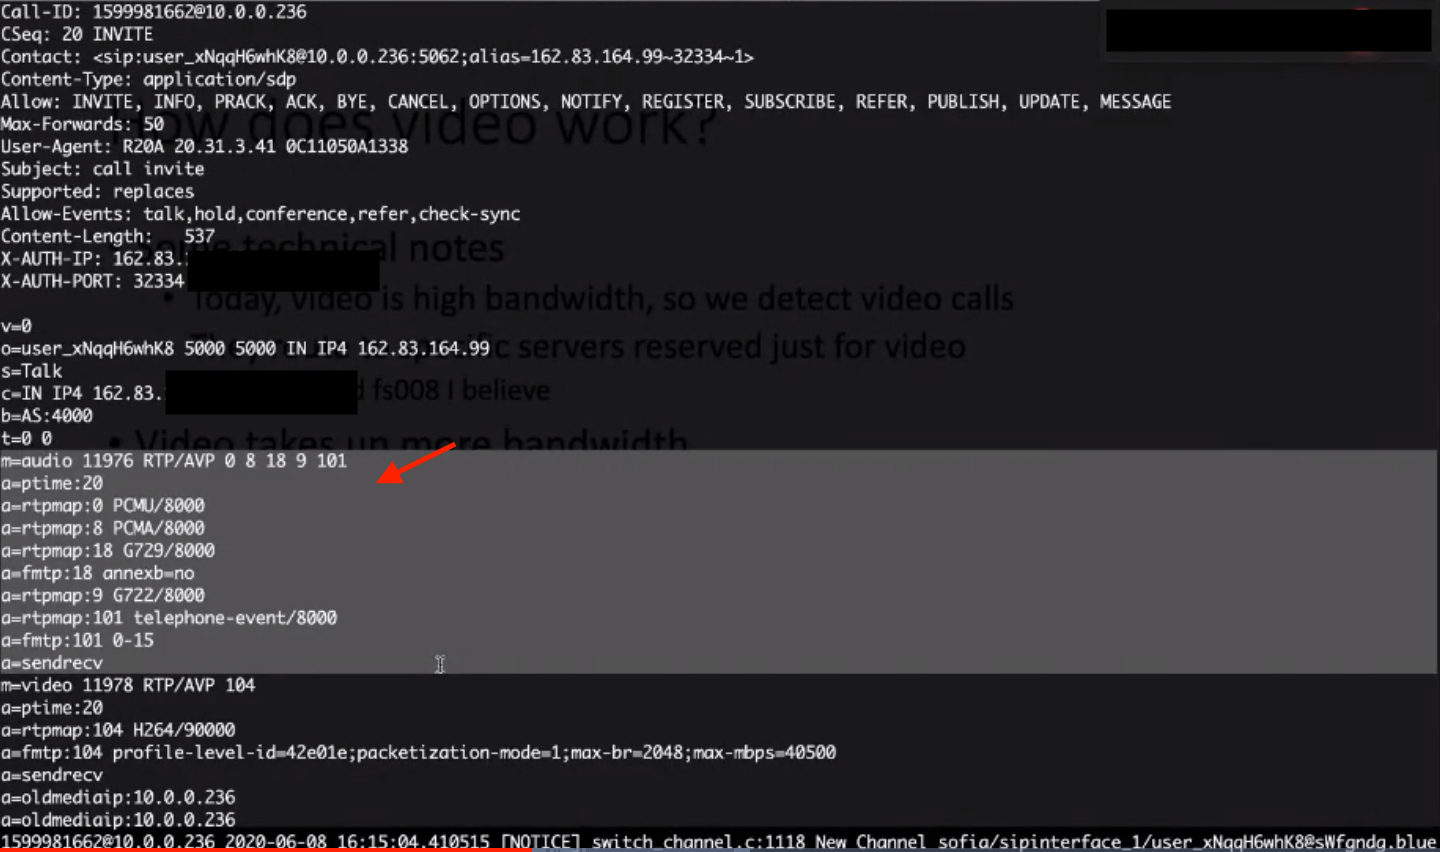
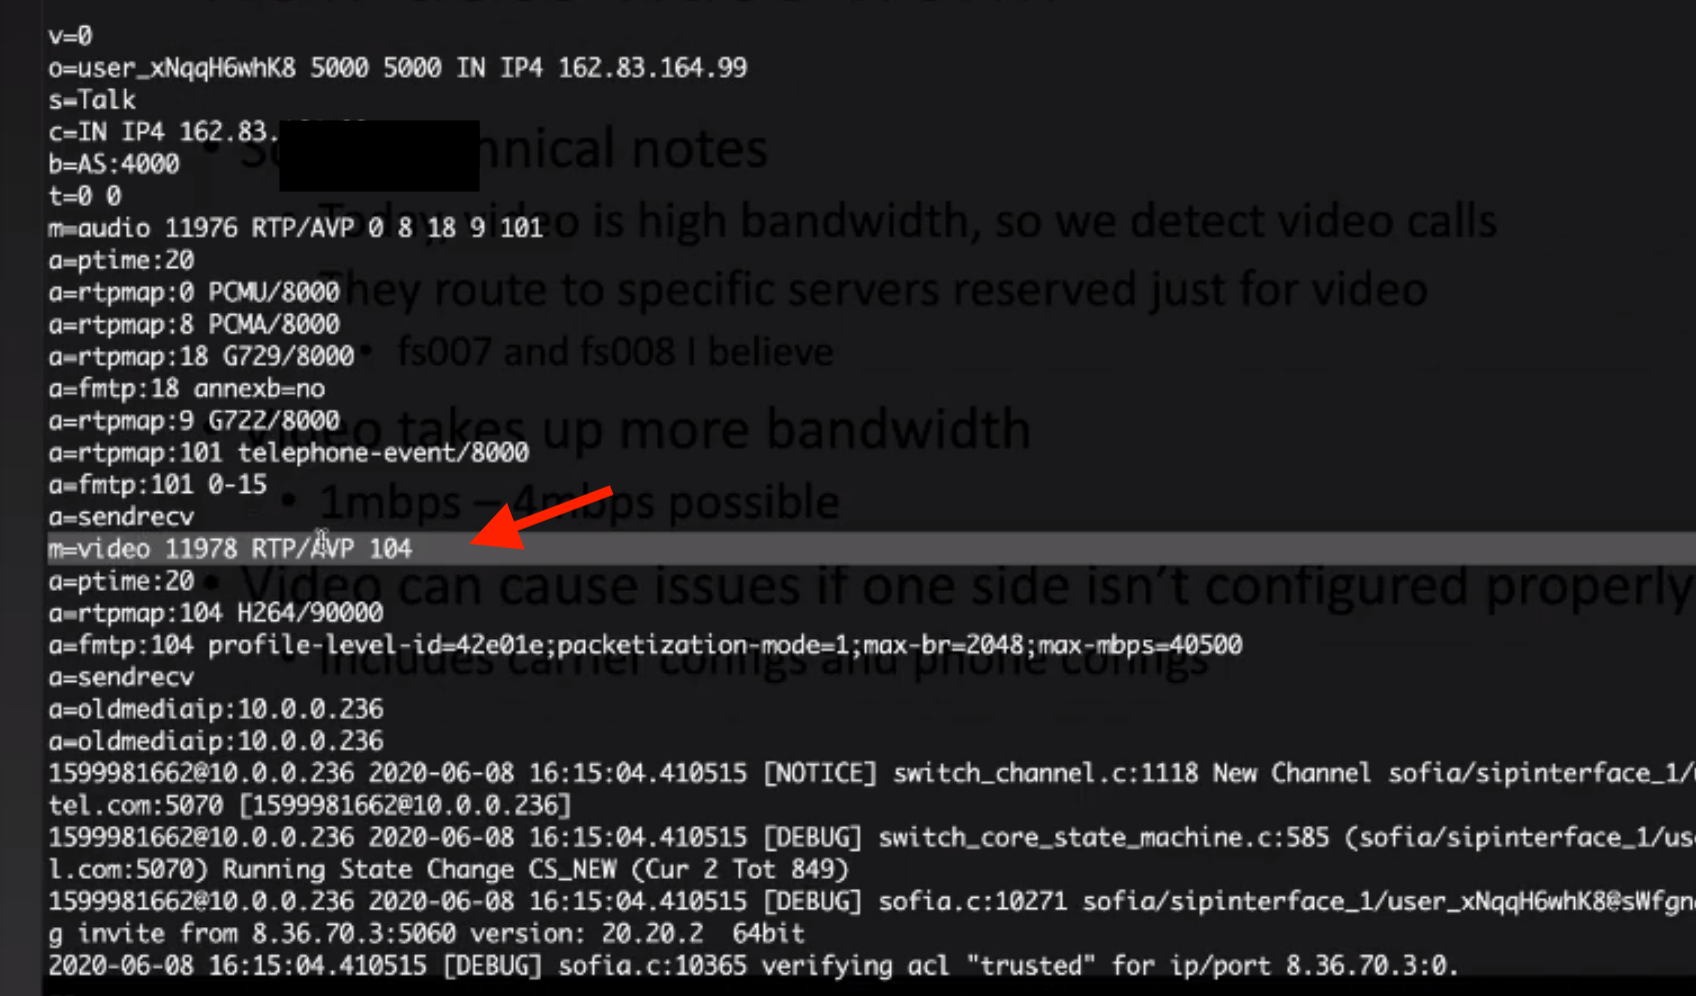

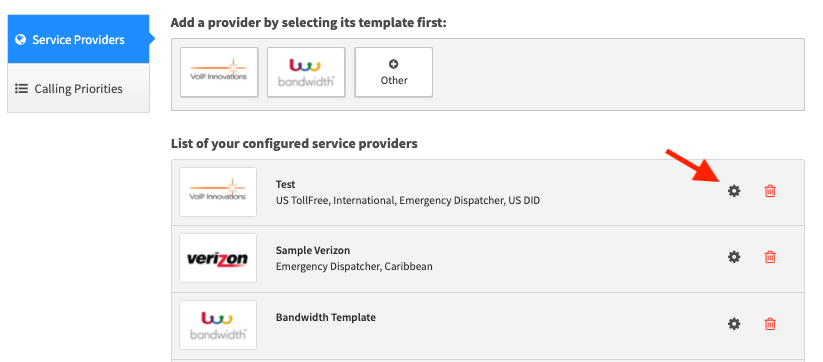
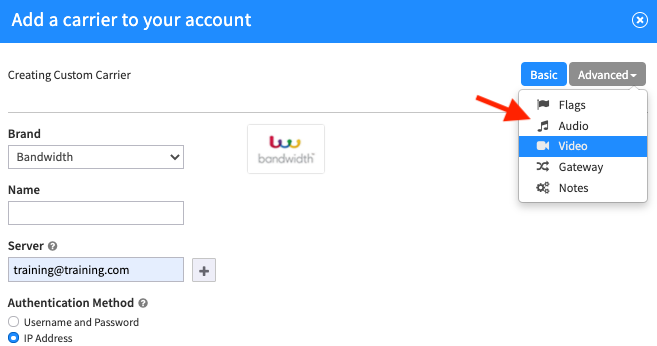
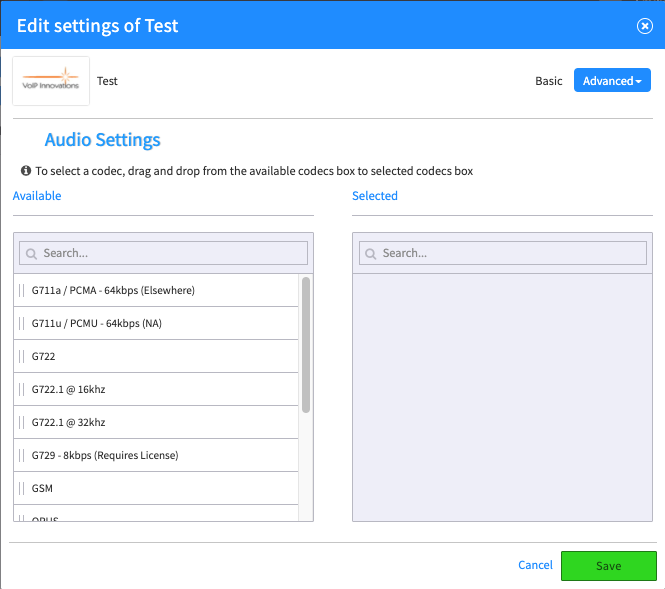
Purchase Monster App?
in Starting Out and Training
Posted
Well thanks ... for your vote for more access to our awesome Monster UI apps! Hang on, we got a tad bit sidetracked with work-from-home-related enhancements for our customers, but it's all on our roadmap as part of our upcoming App. Exchange project (see a description here). Reach out to our sales team lead, Erik@2600hz.com, and he can review your immediate needs -- in general however our goal is to distribute our apps through the exchange and to allow 3rd party developers to showcase and distribute and monetize their apps as well. Let's grow KAZOO together.