

Emily R
-
Posts
591 -
Joined
Content Type
Profiles
Forums
Resource Library: Monster UI Apps for KAZOO
Events
Downloads
Posts posted by Emily R
-
-
Overview
Today’s users demand more control of their phone system than ever before. Administrators are tasked with providing these features while avoiding complicated user interfaces and instructions for end-users.
The User Portal app gives you all of your personalized communications information in one place. View corporate contacts, manage voicemails and faxes, see devices registered, and more. All without exposing end-users to complexities of the entire platform.
The User Portal’s UI is easy to navigate. You can ensure devices are online and registered.
You can view and listen to voicemails, see who has sent you a fax and download the fax online, or delete it from your fax mailbox.
In addition, if you have changing needs, you can modify incoming call handling settings such as call forwarding or simultaneous ringing across devices.
User Portal also exposes an advanced personal conference bridge system, allowing you to manage your own dedicated conference bridge. See who has called in, manage user access to the conference and see who is talking, real-time.

Features

Device Status and Configuration
You can view a visual representation of the devices configured and assigned to you. Additionally, you get a thumbs up if the phone is operating normally, and a thumbs down if the device is offline.

Settings
You can set your own call forwarding number or configure their voicemail to email settings. You can manipulate Caller ID handling on forwarded calls to help identify work calls on your personal number.

Conference bridges
You can set your own pins and manage moderators for every conference. Every call is tracked, and every device that connects is shown. You have real-time control on conference using lock, mute, unmute and hangup options.

Contact list
You have your own list of contact numbers, in addition to direct dialing out of the UI.

Voicemails
You can search or select voicemails from the list in order to view and manage them. You can download any visible voicemail message by clicking on the Download icon, which will download a .WAV file to your desktop.
Technical Specifications
Voicemails
- Supports multiple voicemail boxes
- View and sort the user’s voicemails by date, numbers or duration
- Search for voicemails within that list
- Listen to the user’s voicemails directly in the app
- Download any voicemail as an mp3 file
- Mark any voicemail as new, listened, or deleted
- Real-time MWI sync with the user’s devices
Call History
- View and sort the user’s past calls by date, number/caller ID, or duration
- Search for calls within that list
- Filter the user’s call history to view calls within a specific date and time range
Faxes
- View and sort the user’s faxes by direction, date, faxboxes or numbers
- Search for faxes within that list
- Filter the list to view faxes within a specific date and time range
- Download any fax as pdf
Contact List
- View and sort the user’s contacts by name, extension or number
- Search for contacts within that list
- Call anyone from any of the user’s registered devices by using by clicking on their number in the user’s contact list or simply typing the number thanks to the QuickCall feature
Conference
- View whether the conference is currently active as well as its duration
- View the current Moderators and Participants in the user’s conference live thanks to websockets
- Perform actions on the whole conference room such as Lock, Mute/Unmute or Hangup
- View the Call-in number for conferences in the account, as well as the user’s conference number
- Set up different PINs for moderators and participants
- Choose whether the participants will join the conference muted/deaf.
- Choose whether to play an entry and/or exit tone
Devices
- View and sort the user’s devices by registration status, name, type or mac address
Settings
- Enable/Disable call forwarding:
- Choose the forwarding target
- Choose whether to also ring the user’s VoIP phone
- Choose whether to keep the Caller ID
- Enable/Disable voicemail-to-email
- Choose the email address to send the user’s voicemails to
-
Overview
Our unique provisioning design allows for systemwide, reseller, account and device-wide defaults. Setup intelligent defaults for a reseller, then override specific features on a per-account basis as customers request different behavior. Or, further customize individual phones as needed.
Provision most popular SIP endpoints quickly and easily. Our auto-provisioning service allows you to program physical VoIP devices remotely, speeding up deployment and allowing for ongoing management.
Device support is rich as well. Provision multiple types of devices with ease. Provide single users with multiple devices. SIP devices and analog ATAs are all supported. Remotely reboot phones to force them to update their configuration, without having to visit the customer’s site.
Enhanced security also provides for unique peraccount hashes for added security and IP-based abuse detection to deter hacking.
Features

Auto-provisioning
Auto-provision Cisco, Polycom, Yealink, Grandstream, Obihai and SNOM devices.
Simple Brand Guidance
Our easy-to-use selectors allow you to provision a phone simply by clicking it’s logo or icon.

Visually Identify Your Device
You can choose a specific device from Cisco, Polycom, Yealink, Grandstream, Obihai and SNOM. Once a device is selected, only two fields are required to provision - the device’s MAC address on the back of the device.

Provision and Monitor Multiple Devices
Monitor multiple devices, add/ delete phones, change configurations and customize settings. It doesn’t matter what type of device or brand, its all supported.

Customized Device Settings
Lines: Set up the basic phone lines and SIP Trunks. You are able to set up a SIP primary and backup port and server, create primary and secondary outbound proxy server, and enable SRTP in the UI.Preferences: Adjust the time format, create a timezone, set up a server, improve the network and security by setting up a VLAN. Also able to customize your BLF (Busy Lamp Field).

Reseller-Centric, Multi-Tier Settings
Setup reseller-wide settings. Then set specific settings or override settings for just a single account, or a single phone. The tiered architecture lets you specify who gets which settings by default while still allowing the flexibility for custom settings on a per-account basis.
Technical Specifications
Provisioning Protocol
- HTTP provisioning
- HTTPS provisioning
Brand Support
- Cisco (30Xg, 5XXg, 9XX)
- Polycom (3XX, 4XX, 5XX, 6XX, VVX, 4000-7000)
- Yealink (CP860, T2X, T3X, T4X, W52P)
- Grandstream (HT502, HT704)
- Obihai (20X, 30X, 50X, 10XX)
Basic Configurations
- SIP Profiles (User/Pass/Realm)
- Screen Display Name Configuration
- Codec Configuration and Preference
Advanced SIP Configuration
- Registration Timer
- Subscription Timer
- Primary / Secondary Proxy + Port
- Local SIP Port
- RPort Configuration
- Keep-Alive Configuration
Network
- IP Address
- VLAN Support
- NAT/STUN
SimplePBX BLF Auto-Configuration
- User-based BLF Auto-Configuration
- User-based Personal Parking
- Account-wide Parking
- Speed Dial
Advanced Key Configurations
- Manual BLF Configuration
- Memory Keys
- Line Keys
- Programmable Keys
Advanced Features
- Encryption (SRTP)
- Voicemail/MWI Subscription
- Intercom/Barge
- Admin password
Customizable Interface
- Custom Logo
- Pictures
Management Services
- Remote reboot / configuration reload
Date & Time Configuration
- Timezone Configuration
- Daylight Savings
- NTP Time Server
- International Date/Time Format
Hotline Configuration
- Hotline Auto-dial Number
- Hotline Delay
Password Management
- Per-Device User/Admin Password Setting
- Account-Wide Admin Password Setting
-
To Do List, SmartPBX
Below is a list of issues and feature requests logged.NOTE: The list is only a list, it does not represent any order or timeframe for completion. If you have new requests or issues not shown here, please add a comment below and/or send an email to feedback@2600hz.com.
General Requests
Scheduled for next release
- Provisioning model updates
Recently Released
- Announce-only VM box. (under voicemail tab)
- Hold Music Resume -- hold message starts and stops where it left off
- Voicemail Transcription using Google ASR Premium, encrypted through https (added charge when enabled)
-
To Do List, Global Infrastructure
Below is a list of issues and feature requests logged that apply across applications.NOTE: The list is only a list, it does not represent any order or timeframe for completion. If you have new requests or issues not shown here, please add a comment below and/or contribute to the Product Feedback forum, here.
Requests
Recently Released
- Announce-only VM box. (find in VM Mailbox, SmartPBX or Callflows under voicemail tab)
- Hold Music Resume -- hold message starts and stops where it left off
-
To Do List, Private Cloud
Below is a list of issues and feature requests logged that apply across applications.NOTE: The list is only a list, it does not represent any order or timeframe for completion. If you have new requests or issues not shown here, please add a comment below and/or contribute to the Product Feedback forum, here.
Requests
Recently Released
- Announce-only VM box. (find in VM Mailbox, SmartPBX or Callflows under voicemail tab)
- Hold Music Resume -- hold message starts and stops where it left off
-
To Do List, Hosted Platform
Below is a list of issues and feature requests logged that apply across applications.NOTE: The list is only a list, it does not represent any order or timeframe for completion. If you have new requests or issues not shown here, please add a comment below and/or contribute to the Product Feedback forum, here.
Requests
Recently Released
- Announce-only VM box. (find in VM Mailbox, SmartPBX or Callflows under voicemail tab)
- Hold Music Resume -- hold message starts and stops where it left off
- Voicemail Transcription using Google ASR Premium
-
Wowza Wednesday !!!
Just got news from Ashley and her awesome team that a new release of comm.io should be hitting your desktops!
Check here for the ongoing list of what's changed and what's pending:
https://forums.2600hz.com/forums/monsteruiapps/comm-io/262_user-resources/commio-to-do-list-r172/ -
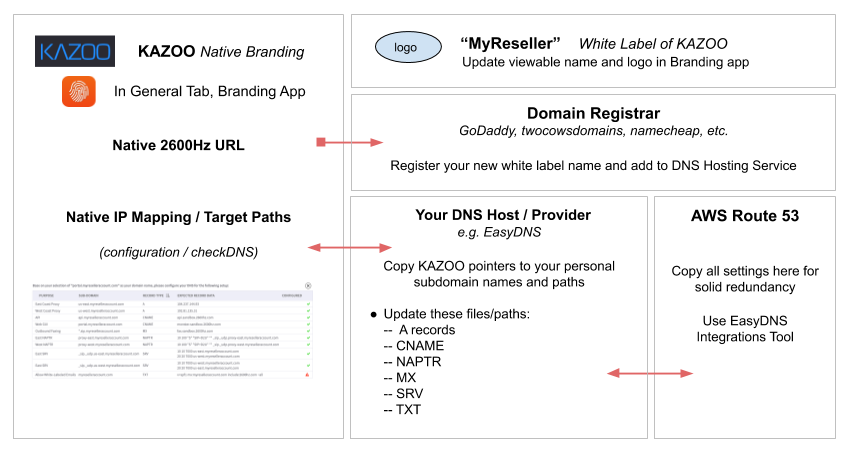
2600HZ USER GUIDE – SETTING UP YOUR WHITE LABEL DNS
NOTE: We recommend completing this setup prior to setting up any new accounts. This will ensure all accounts will use your white label domain.
User Story
A KAZOO reseller account wants to use their one of their own domain names in place of zswitch.net for white-labeling purposes.
How this works
On its most basic level, DNS points human readable “names” to machine readable “data”. These are called DNS records. The most basic of which (an A record) points a “name” such as www.2600hz.com to an IP address 23.239.13.252. More advanced records can tell phones what port numbers to use, what servers they should prefer most and least and what protocols to use (SRV and NAPTR records). 2600hz uses over a dozen of these records for its hosted KAZOO service, zswitch.net. Resellers wishing to white-label zswitch must configure their domain names to include all these records. In this guide, we will show you how to point your domain to a supported DNS provider (easyDNS), configure your records, then replicate those records to another DNS provider (Amazon Route 53) for extremely reliable white-labeled DNS configuration.Here’s an illustration:

Disclaimer
If you are very familiar with DNS, you may be aware that there are other services and methods you could use to implement your DNS. This purpose of this document is to provide as easy a path as possible for those who are not as familiar with DNS to successfully white-label without complicating the process by explaining all possibilities. You are free to use the services and methods that suit you best.Before you start
- Purchase a new domain name specifically for your white-label branding via a Domain registrar, such as
- Setup an account at https://easydns.com
NOTE: Some DNS providers also offer domain registrar services. Using a DNS provider’s built in registrar service can seem like it simplifies nameserver settings, however it’s generally best to keep your registrar service with a major provider to ensure the security of your domain registration.
- Make sure you have access to your login credentials for both services, as you will need to update them below.
Overview
This guide is set up in parts.
- Part 1 Enter basic company setup information in the KAZOO Branding app.
- Part 2 Synch the server name for your DNS registration service with your DNS management service.
- Part 3 Copy the IP address and target data path information from the Branding app to correlated EasyDNS fields. Paths to define/remap include A records; CNAME; NAPTR; MX, SRV, and TXT.
- Part 4 For redundancy, consider copying the entire remapped data system to Amazon Web services.
- Part 5 Notes on Branding & Sub Accounts
Part 1: Branding App Setup & Configuration
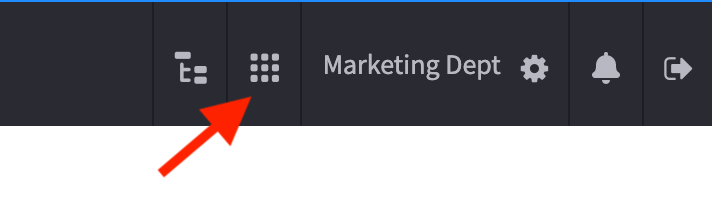
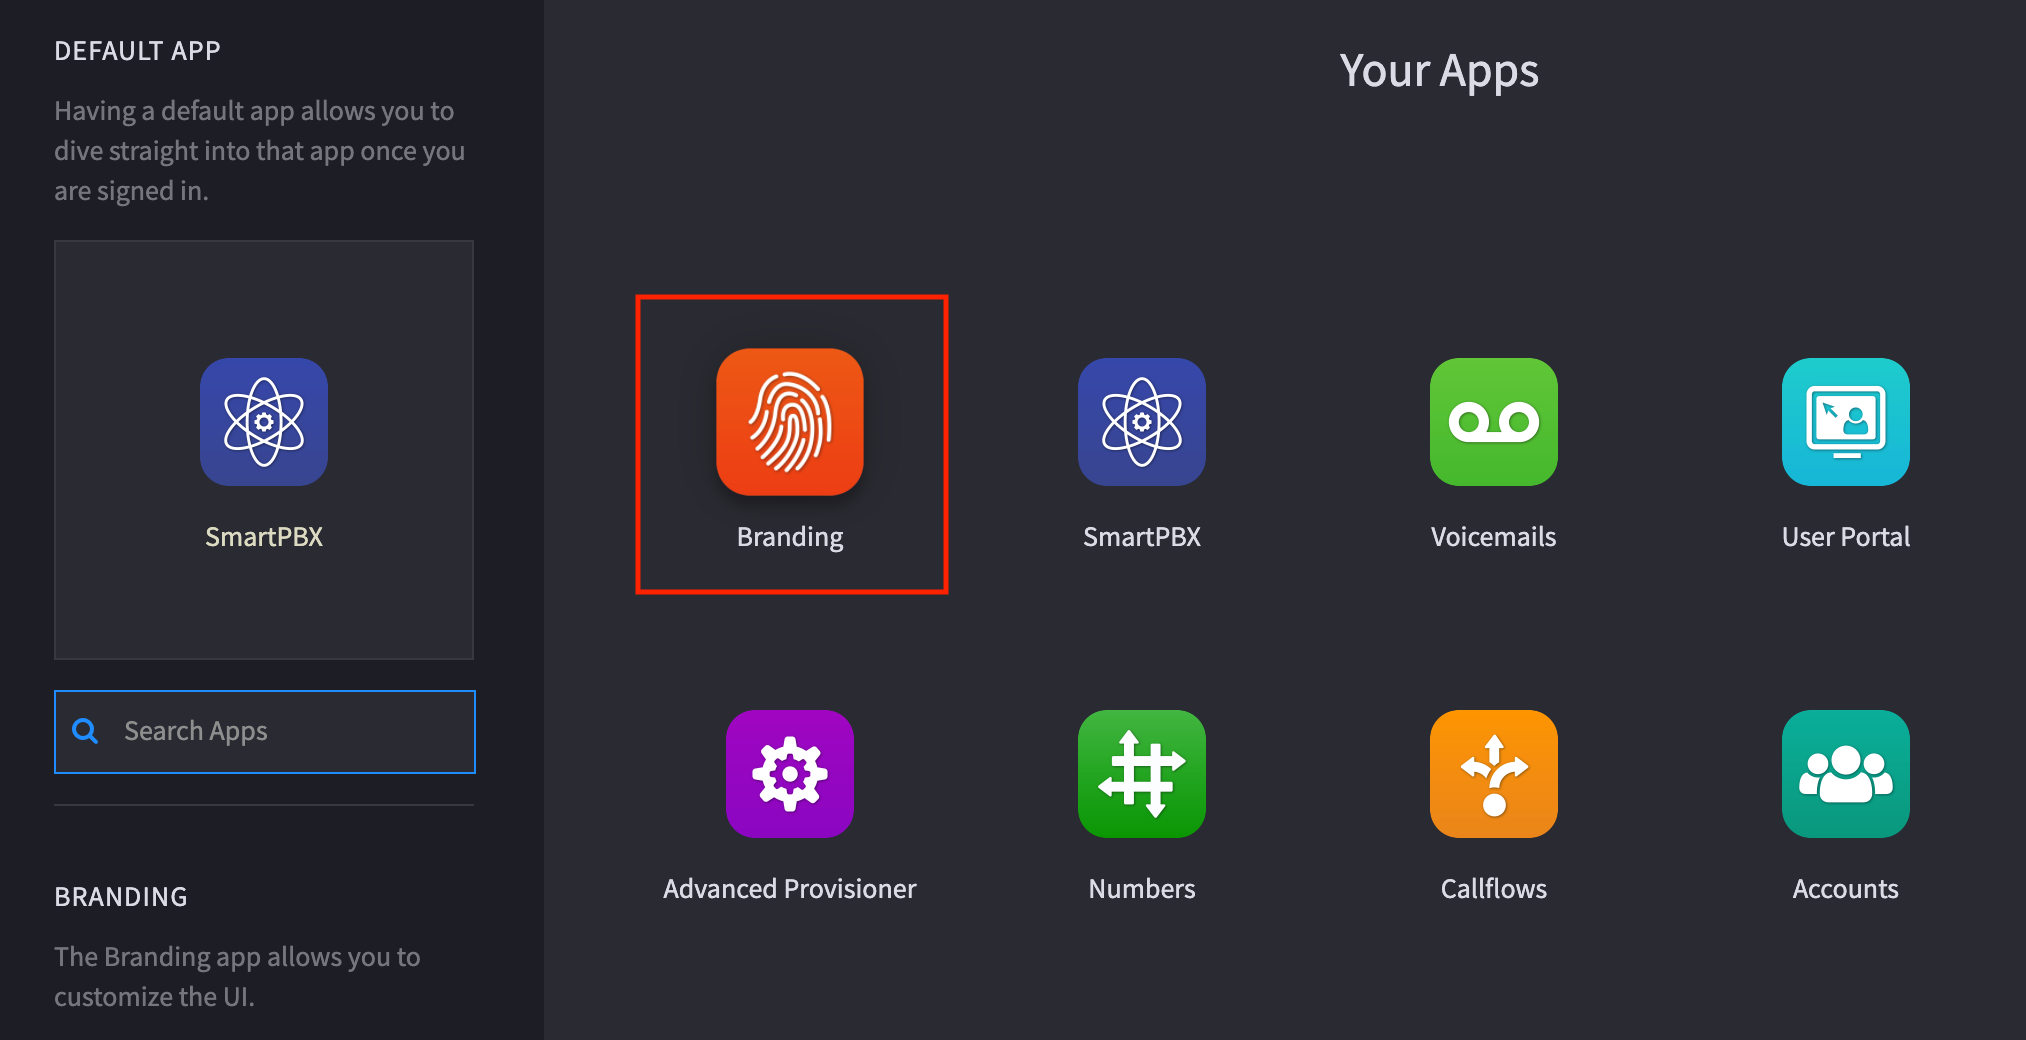
1. Access Your application Directory
2. Open the Branding application3. General Tab : Review the initial configuration settings
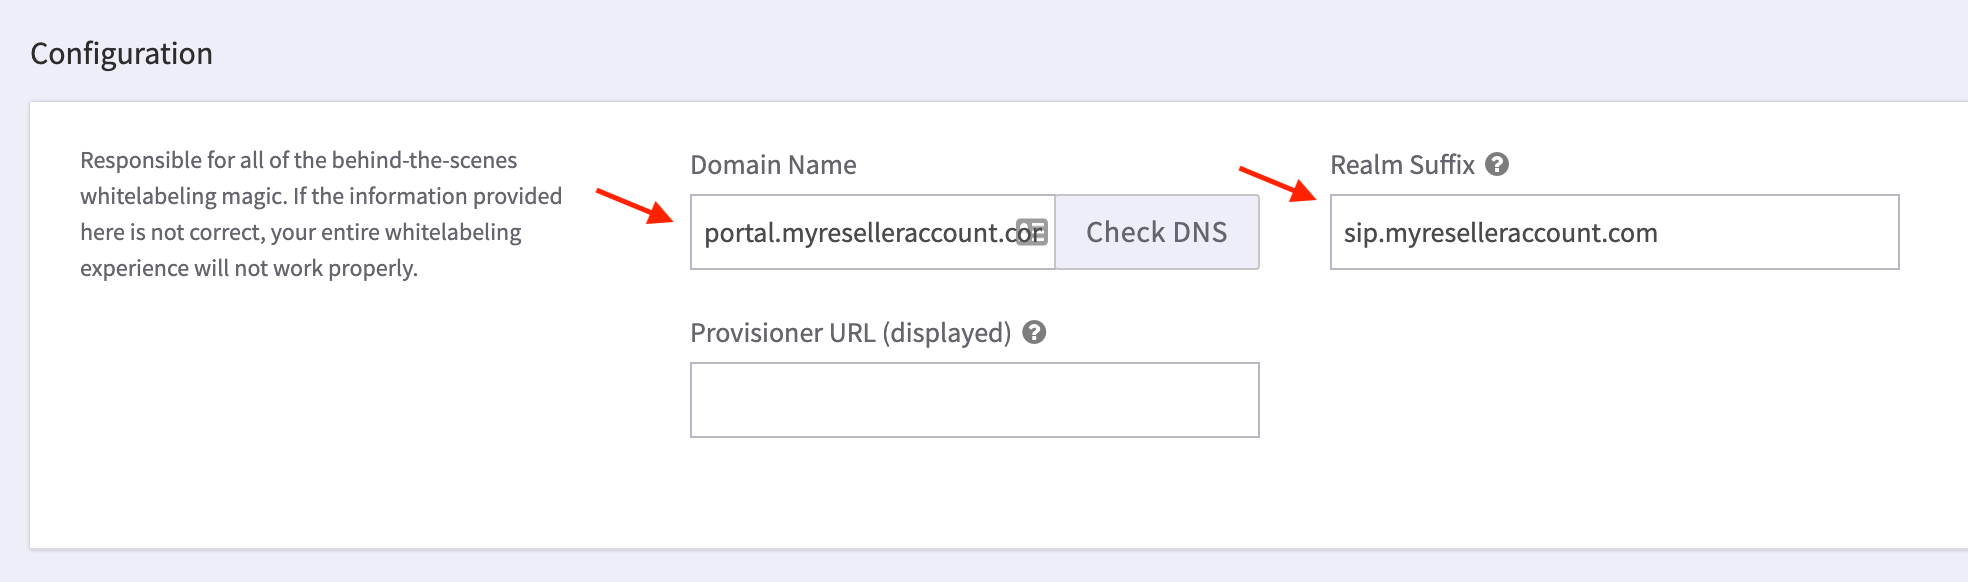
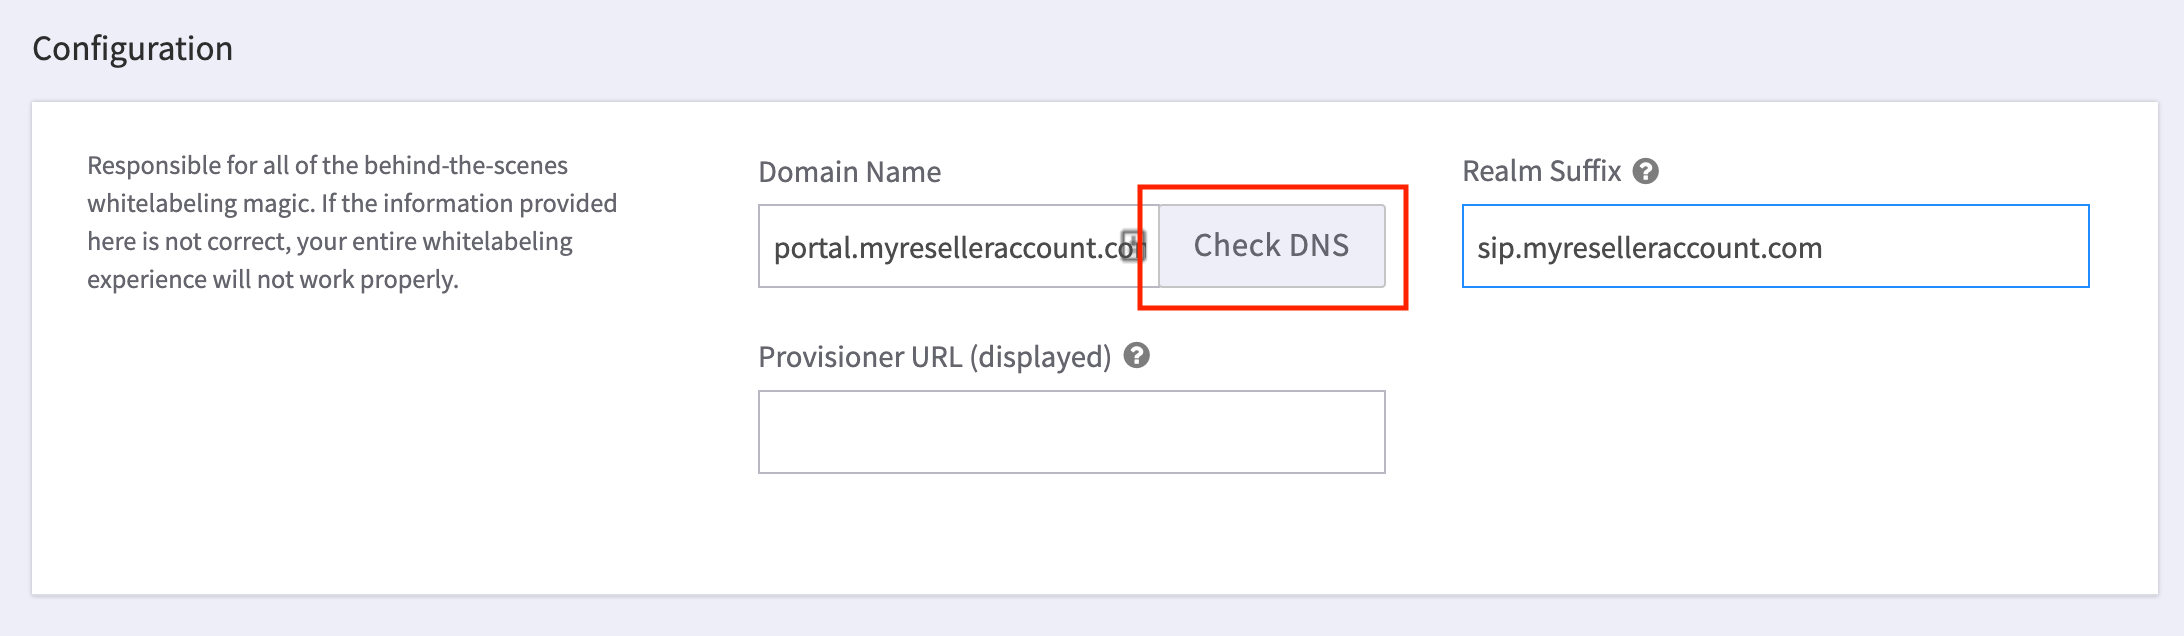
- Enter your white label Domain name URL, using "portal" to prepend it.
-
Enter the Realm Suffix using "sip" to prepend your URL name.
The Realm Suffix will be used to generate the account realms of accounts created by your white label interface.
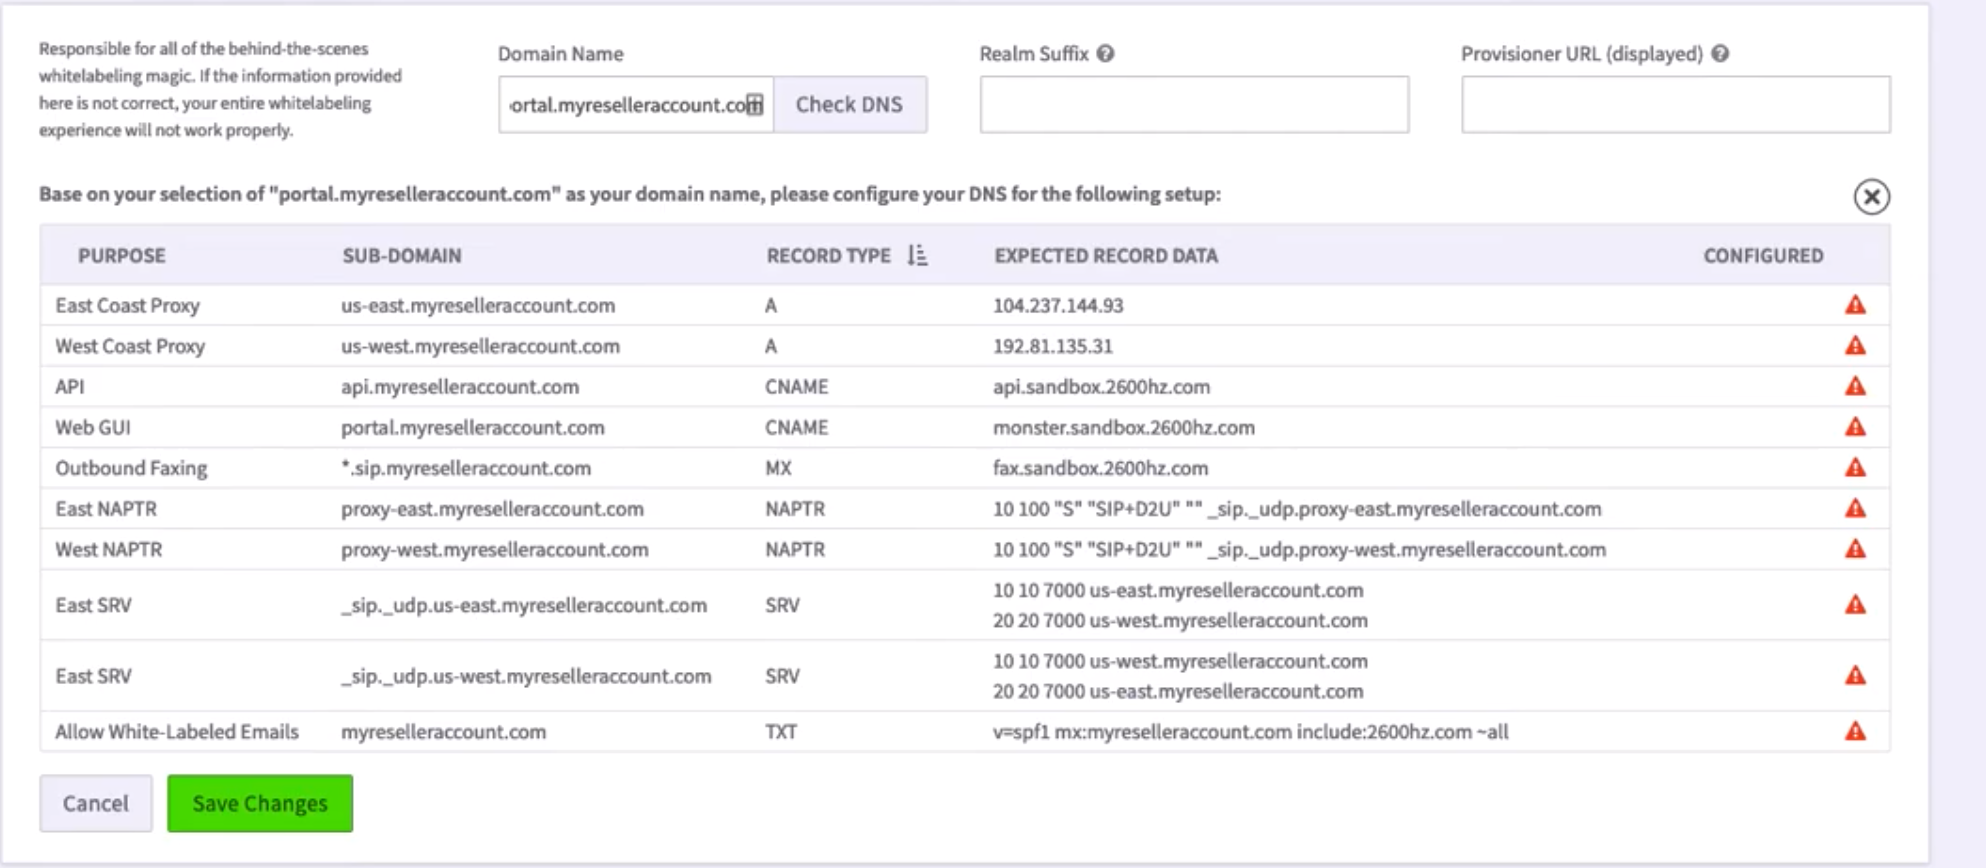
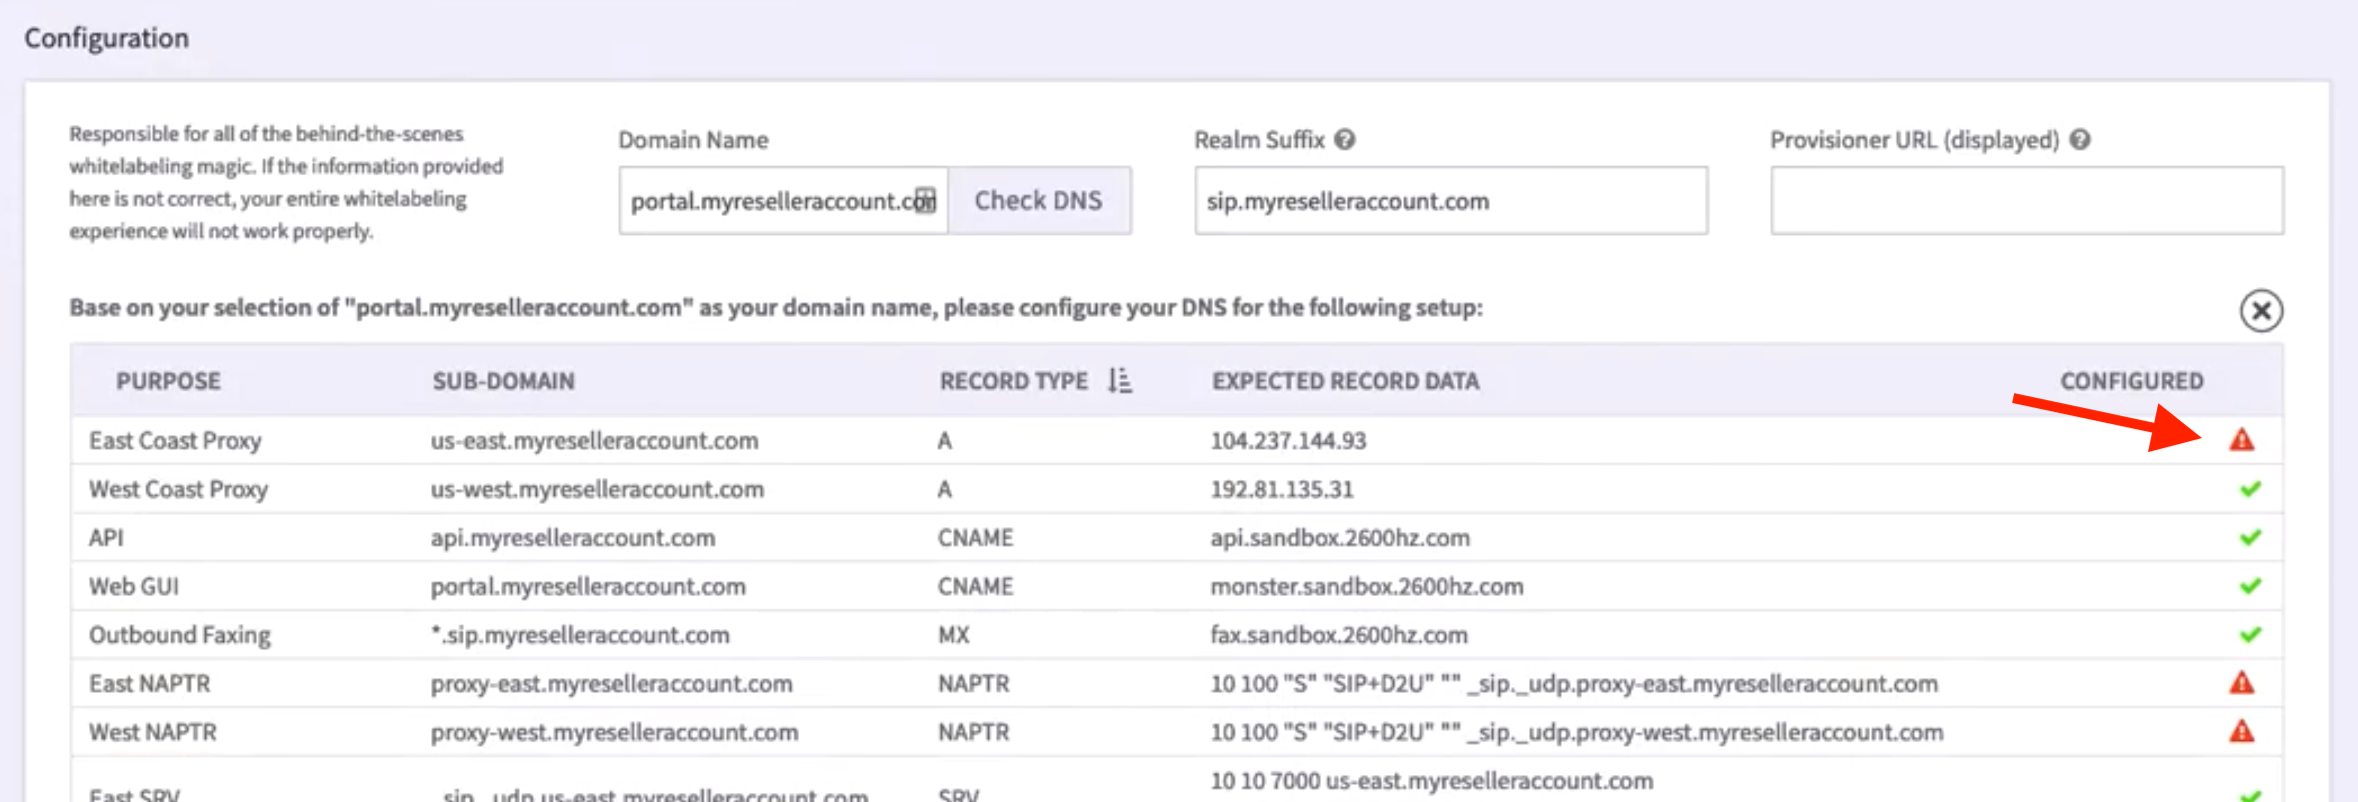
4. Select the "Check DNS" button to the right of the Domain Name field
This displays a template of all domains records that need to be configured. You will want to keep a tab showing this open at all times, as you will be copying the information from this page to your DNS management system.
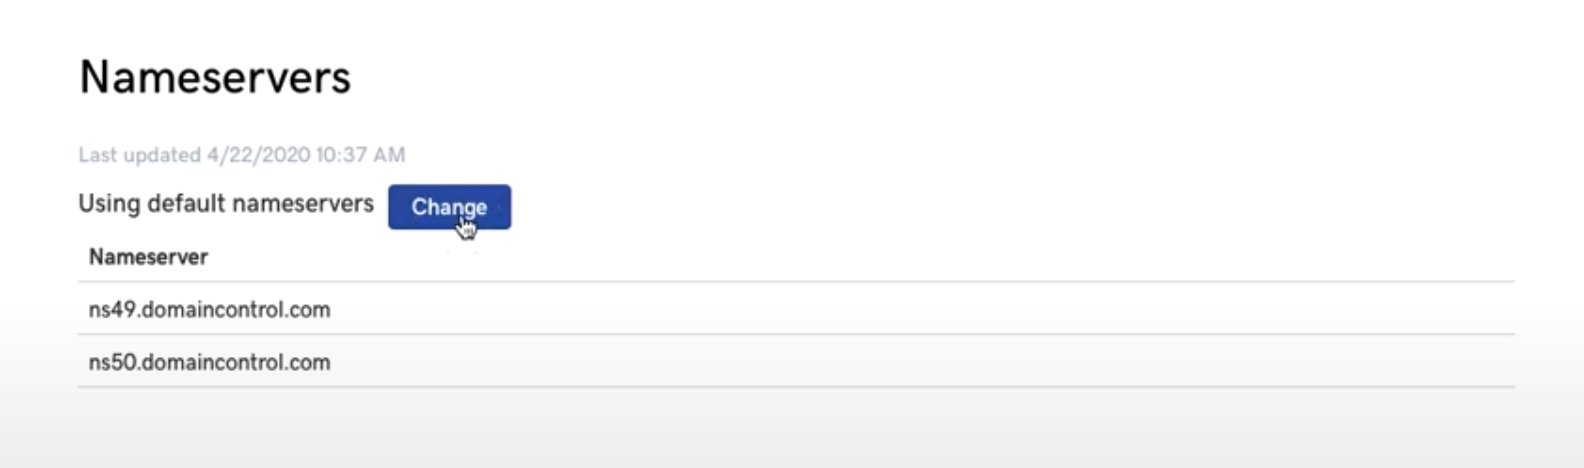
Part 2: Set up your EasyDNS account and copy its nameservers to registrar
WARNING: This guide assumes the domain you are using will be used ONLY for white labling zswitch services. This step is dangerous if not.
- Setup your account with easydns.com, selecting an appropriate plan for your expected volume
-
Get your new nameservers from easyDNS
- Overwrite your nameservers on your registrar (godaddy or the like) account
-
Part 3: Configure your DNS records
You may want to keep 2 windows open, 1 showing the Branding app in KAZOO, the other showing the records entry window in your easyDNS software.
To configure the different kinds of records, you will step through these links and assign the records shown in the branding app to the fields shown.
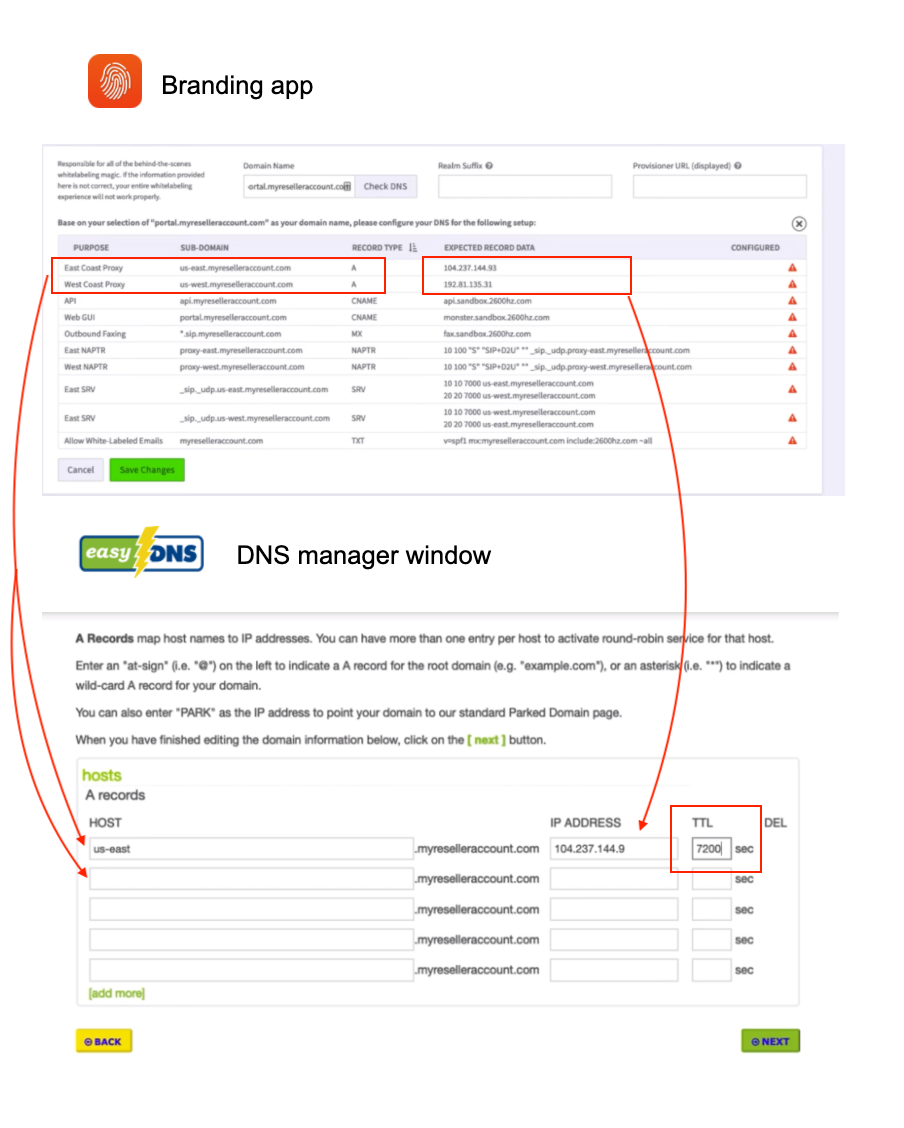
Configure “A Records”
"A Records" map host names to IP addresses. Click on the “A” option next to DNS Information in easyDNS (see above). Copy the data from the branding app. to easyDNS as shown in the illustration below:NOTES:
- Only copy the “A record” types listings to this page.
- “Expected Record Data” field in the Branding App = IP Address
- Make sure the IP address starts flush against the field and does not show a tab or space to the left.
Enter a value for TTL
A TTL is “Time To Live”. Set as seconds, it defines how long a DNS record should reside in a client’s DNS cache without being discarded or regenerated.
A common value for TTL is 7200 seconds (2 hrs) and is our recommendation for all record entries. Most DNS providers charge based on record lookups. The higher this setting, the less lookups will hit your provider; also the higher your TTL is, the longer changes to your records will take to roll out.Save / CONFIRM your changes!
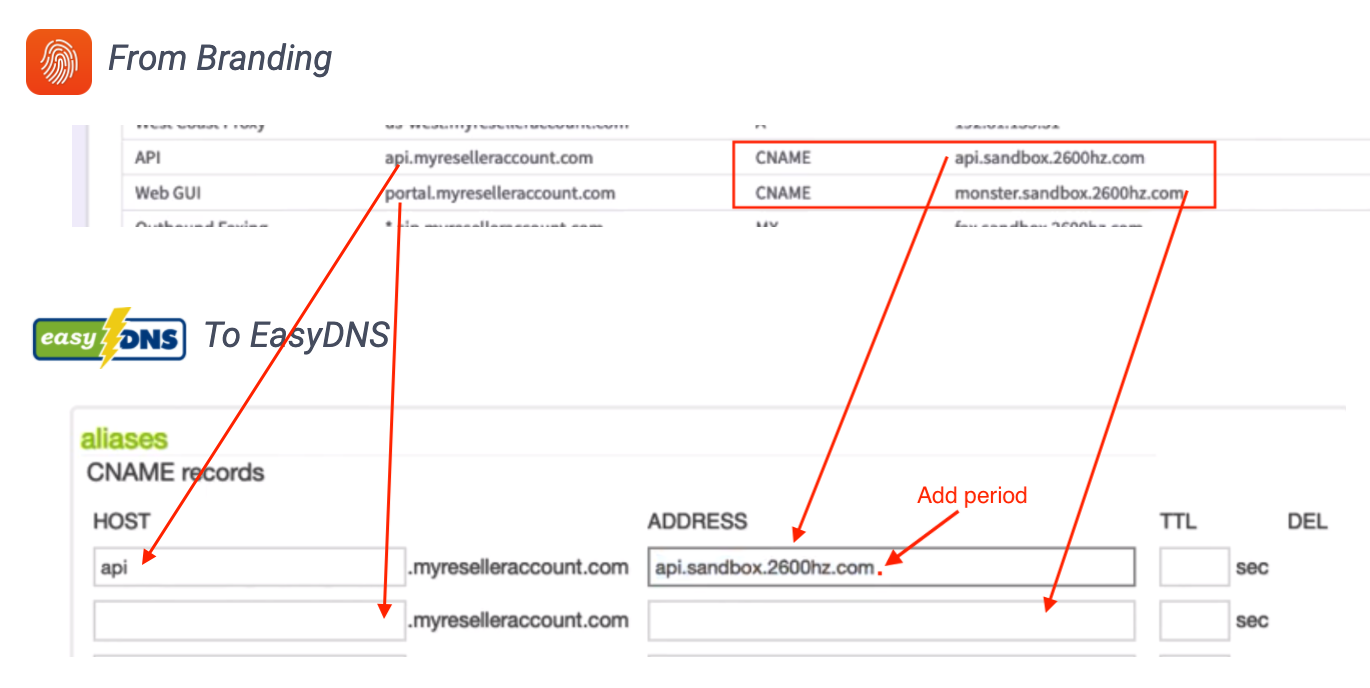
Configure “CNAME Records”
Once the “A records” are copied, move to the next page in easyDNS and copy the CNAME data from the Branding app. to the correct field in easyDNS.CNAME records map host names to other host names, including hosts at other domains.
NOTES:
- You MUST add a dot to the end of the CNAME URL (see above). This will indicate that the URL is a fully qualified domain name and does not need to be appended by your domain name (for example .myreseller.com).
- Copy both the API and the WebGUI
-
Use 7200 TTL as default to start
Configure “NAPTR Records”
NAPTR refers to the “Name Authority Pointer Record. It is used by your phone to map SIP servers and protocols. You will need to break out the information provided in the Branding app to the specified fields in the easyDNS listing.
NOTES:
-
The values in the KAZOO branding app are concatenated in a single string. Many applications will provide separate fields for these. See red arrows.
- In the branding app you will see a set of empty quotes; this is a “null” listing for Regex. Leave that field empty and copy the remaining to the “replacement” field.
Configure “MX Records” for Outbound Faxing
MX refers to the “mail exchange” record. This specifies the mail server responsible for accepting email messages on behalf of the domain name.
From Branding App
To EasyDNS
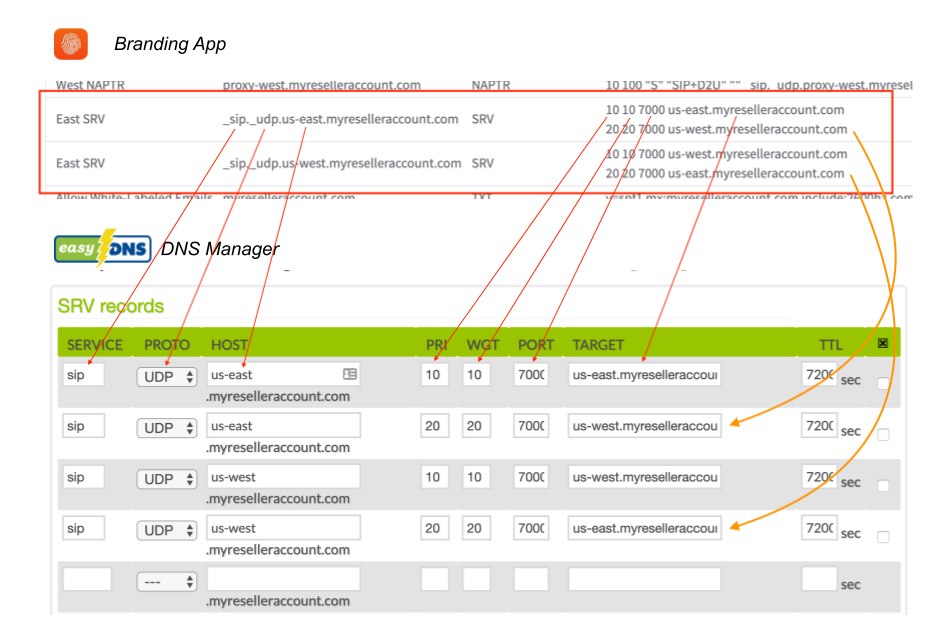
Use *.sip, so anything .sip will be forwarded to the fax domain URL.Configure “SRV Records”
SRV refers to the Service Record in the DNS. It is a specification of data in the Domain Name System defining the location, i.e., the hostname and port number, of servers for specified services.NOTES:
- You must put the “dot” at the end of the Target URL for this record also.
- The values in the KAZOO branding app are concatenated in a single string. Many applications will provide separate fields for these. See above red arrows.
- Each SRV value should be added as a separate line. For example the branding app image above shows 2 lines per sip account; you must add these as separate lines, so there should be a total of 4 entries in the easy SRV records list. See above orange arrows.
Configure “TXT Records” (SPF Record)
An SPF record is a specifically formatted TXT record. It lists all authorized hostnames / IP addresses that are permitted to send email on behalf of your domain. This will permit KAZOO to send emails such as voicemail notifications under your domain name. From Branding app:
To EasyDNS
Check for errors!
You should now see in the Branding app page the list with all green checkmarks at the right.
NOTE:
You MUST resolve any and all errors for your branded solution to work correctly. If there are still red configuration error notes, go back in and see if you can find the error. Common mistakes include:- Not copying the full URL over (missing the last digit for example)
- Unwanted space to the left of your pasted data.
- A missing “dot” at the end of URLs, which causes EasyDNS to append your company URL at the end.
Additional Notes
- Make sure your records match EXACTLY.
-
You may need to use the paging option at the bottom right of the branding app to see all records you need to apply.
Part 4: For added redundancy: Copy these records to Amazon Web Services
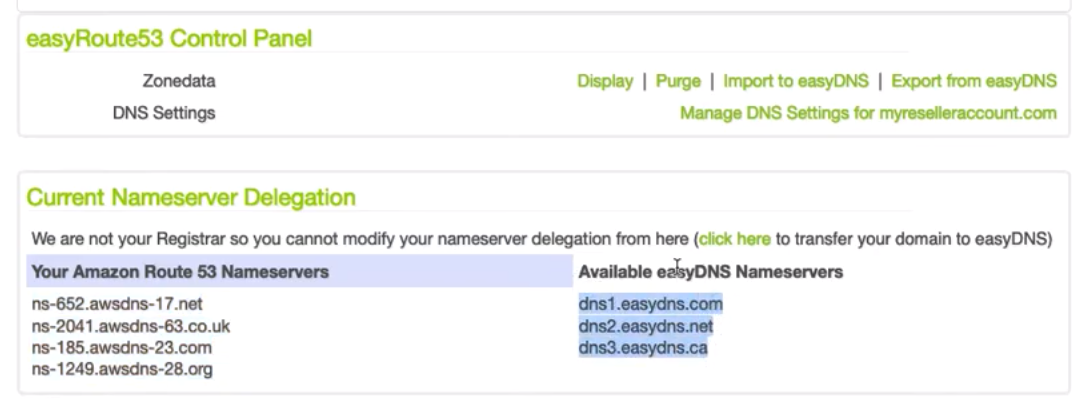
We recommend you copy all your settings to the Amazon Route 53 for additional redundancy. We have learned over the years that any DNS provider can and will have an outage eventually. This will allow your records to persist even if EasyDNS goes down. Here we will show you how to replicate your records using EasyDNS’s built-in replication feature.
- First, purchase the Amazon Route 53 integration service from EasyDNS.
- Then activate and copy your records.
-
will copy all your records and supply you with additional nameservers:
Once confirmed, you should see both nameservers listed.
-
Finally, go back to your original Domain Registrar and add the AWS Route 53 nameservers, alternating between the EasyDNS and Route 53 name servers.
SAVE AND TEST!
You should now be able to test your new setup.Notes on Branding. & Sub Accounts
Overview
How notification templates are read is mostly how Kazoo always allows sub accounts to override their parent accounts, with some twists :))
In simpler term, KAZOO performs something called walking up the account hierarchy, or we like to call it The Walk. We start from sub account to read the notification template and if not found we walk up the account hierarchy (going to parent account/accounts) stopping in each parent account to see if the document exists in that parent account and if not continuing the walk UNTIL we reach to the first parent account that is the reseller of the original account that we started our walk. In that case if the reseller doesn’t have that document then we abandon our walk and fall back to read system_config notification template.
If during our walk any parent account has the document we stop the walk and return that document.
We also repeat the same process for template attachments. So a child account can only customize just only JSON part of document and not customizing the HTML/Text template, doing so will that account to inherit its parent template attachments.
Monster UI branding app and even Kazoo is totally showing its age and the UI part is somewhat confusing.
Some visual notes:
-
On side bar when a a template name is in grey or has a red circle next to it it means that template is disable which means the account has the document (so if you see that in
brandingtestaccount that meansbrandingtestis overriding its parents and reseller. Also it means when one of the child accounts (likebrandingtest2here) doesn’t have the document, it would inherit it frombrandingtestand not reseller, other ancestors or system.- So in summary disable means this account has document and the walk is always stops in this account level
- A Green cog means the notification is enabled and the account is overrides the notification. That means the account has the document and the walk stops in this level
- When changing enable/disable the effect of red circle is not visible away you need to change view (go to other apps or tabs) and come back
- There is another cog next to Template name in title of the page when you go to that template that allows you to remove the customization in that account so it would inherit the template from its ancestors. Also there is an option to force write the template from system config itself. that means it override its parents settings and the walk with stop in this level for its
-
If in doubt you can always check the payload from API when loading the template, look for something
account_ovverriddenoraccount_definedfield set totrue. Kazoo is never wrong :))
Frequently Asked Questions
Can I do all this DNS mapping in a single application, e.g. GoDaddy?
While it seems like tedious work to juggle both a registrar (GoDaddy or other) and a DNS web hosting service (easyDNS), we recommend using both. Each is an expert in its field. Domain registrars focus on indexing and protecting your domain name and the most popular have solid reputations for just that. DNS hosting systems are focused on reliably providing the records computers need to enable services to run on your domain name. These also offer different levels of support; we have found easyDNS provides us with all the record types we need (including NAPTR which some do not recognize) and easily creates a redundant occurrence of all settings to Amazon’s Route 53 Web Service. There are likely other systems that offer similar solutions, we are happy to hear what works well for you.Can I add just my branding logo, etc. and not update my DNS?
No, the KAZOO platform needs some way to “know” what branding to show. The hostname that you use to visit is how this is determined. For instance if you visit http://portal.myreselleraccount.com/, KAZOO will know to show the Branding we configured in this article. But if you just visit http://ui.zswitch.net/, it won’t know of any reseller branding and will default to KAZOO branding.
Do all the Lines in the Branding app need to show a green checkmark?
Yes, with one possible exception: there may be an instance where the TXT value does not show a green checkmark and the white-labeling redirect processes will still work properly. But you should be well versed in DNS, SPF and mail servers if you have a custom SPF record. If ANY other record does not have a green check mark, it WILL fail.
What are some of the problems that occur if my setup is not correct?
- Your custom UI branding may not display.
- Your phones may not be able to register to make/receive calls.
- Your phones may may not fail over to a secondary cluster if their primary cluster goes down.
- Your customers may not receive their email notifications.
- Your email notifications may go into the SPAM mailbox.
API Reference Docs
docs.2600hz.com
REST API Reference for Kazoo Crossbar API####
-
Below is a running list of trigger calls that are supported in KAZOO for Zapier "zaplets".
We will update this as new calls are enabled.call_ended call_received new_call_recording sms_received account_zone_change bill_reminder cnam_request customer_update denied_emergency_bridge deregister first_occurrence inbound_fax_error inbound_fax low_balance missed_call new_account new_user outbound_fax_error outbound_fax outbound_smtp_fax_error password_recovery port_cancel port_comment ported port_pending port_rejected port_request port_scheduled port_unconfirmed register service_added topup transaction voicemail_full voicemail_new voicemail_saved webhookActions supported in SMS
SMS action accepts for sending
- sms_send
- fax_send
- ringout
SMS action accepts for receiving- to
- from
- body
-

We're on a roll here at 2600Hz ... SMS is here.
Some more good news is we’ve enabled SMS on all existing Hosted Platform accounts! You can now send and receive SMS texts on more 2600Hz DIDs.
Receiving inbound SMS is configurable via Webhooks and outbound SMS can also be sent by utilizing our APIs or Zapier. If you have a Zapier account, you can connect SMS by Zapier with over 2,000 apps to create automations and custom notifications.
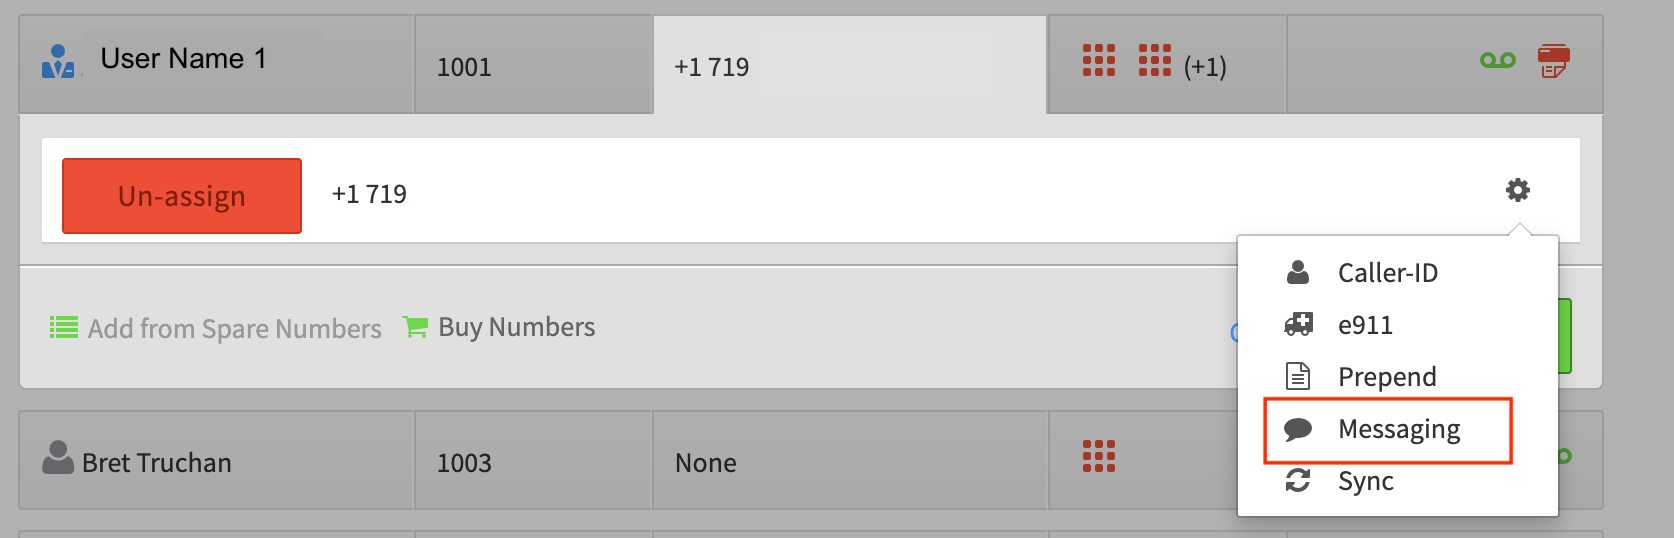
SMS is currently available for all Hosted Platform customers and can be enabled on most DIDs purchased through 2600Hz. You can easily enable SMS anywhere you can access a number’s settings (SmartPBX, Numbers, etc.). Simply click on the settings cog next to the number, select Messaging, and toggle it on. Once enabled, there’s a $0.25 monthly fee per number activated, and each inbound and outbound SMS costs $0.009 cents.
Our Setup and Config doc will show you the screen shots, check out here.
And as always, send us your questions and feedback. Either post here, or check in with our support team. We can’t wait to hear how you integrate your messaging into your accounts!
-
What is SMS?
SMS, or Short Message Service is the most widely used system for messaging among users and/or applications. In addition to simple conversations, SMS can be implemented as a powerful notification system to automate your workflow by communicating from one event to trigger follow up event.Some examples include:
- A restaurant software system triggers a take-out delivery order is ready, and sends a message to the order source.
- A security system triggers a notice to your phone number that someone is at your gate.
- A notification that someone has signed up on your website and needs a verification code.
- A notification from your support queue that there are more than 3 calls waiting or an expected wait-time is longer than [ x ] minutes. Send the notice to Slack.
- When a service is not working, send a group text to a pre-set list of customers.
- A notification from Uber Eats or other delivery service your order is on its way.
These kinds of inter-application events can be enabled using our Zapier integration as well. Please refer to the Zapier documentation HERE for information on setting that up.
NOTE: Some companies have been know for a policy to not send SMS messages to VoIP accounts due to privacy concerns. At times these have included Chase Bank, What'sApp, Google, Amazon, Facebook, WhatsApp, and Bank of America. If you have having trouble receiving messages you may want to find out if the sender has a similar policy.
How is this implemented in KAZOO Accounts?
Currently SMS
- Works with numbers provided by one of 2600Hz carrier partners
- Works on numbers that are routed to a user or device, not to a ring group.
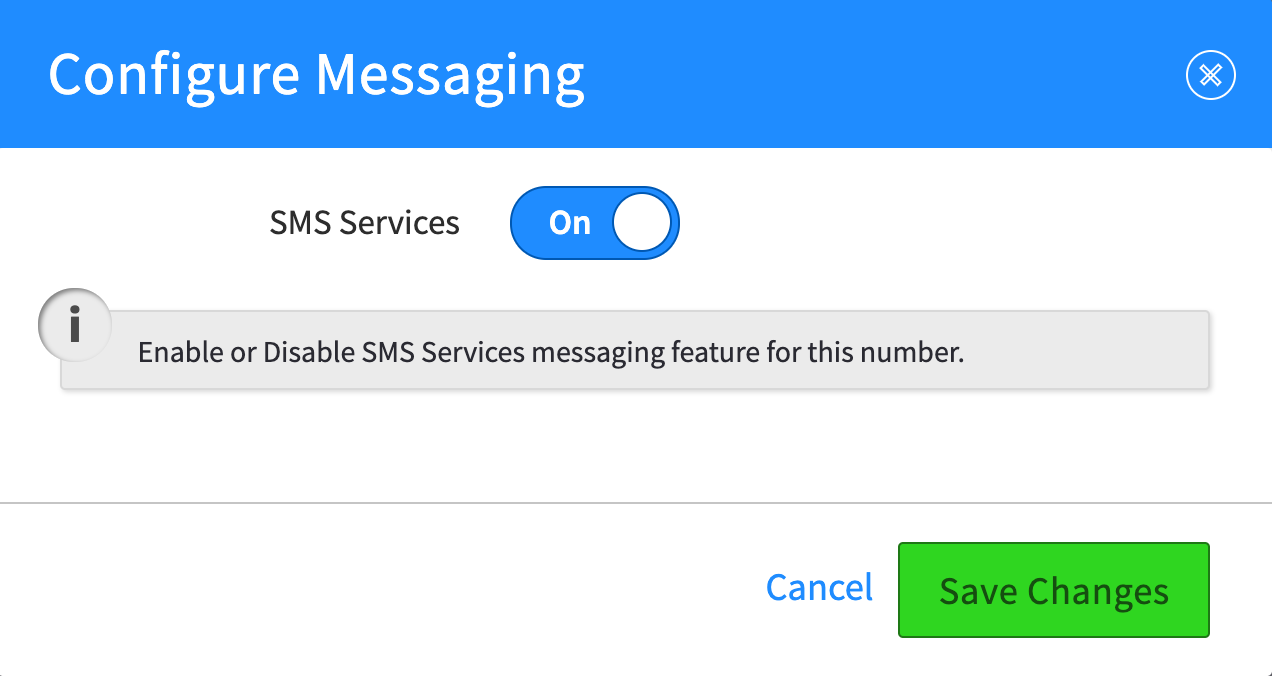
To enable SMS in your account, you must configure the following settings within SmartPBX.
-
Go to your phone number field, and click the settings Gear.
Select the Messaging Option.
-
Toggle SMS On
-
Confirm it was set.
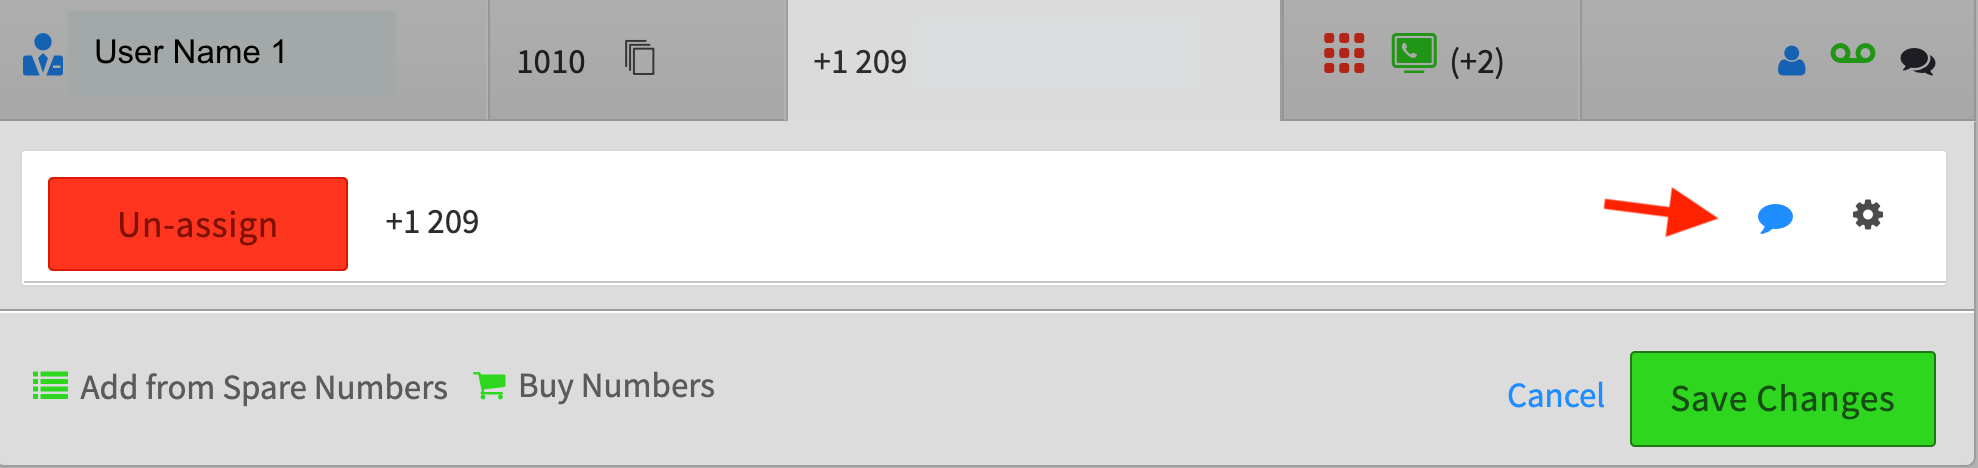
You should then see the messaging icon display next to your user name
Frequently Asked Questions
Are there charges to my account related to SMS Messaging?
There will be charges to your account based on your volume of text messages and number of devices. Once enabled, there’s a $0.25 monthly fee per number activated, and each inbound and outbound SMS costs $0.009 cents.Can I use this SMS for any of my numbers?
The SMS capabilities we are offering require you to buy and service DIDs from our upstream providers. This will be something you'll soon be able to do on private cloud and global infrastructure but for now it's limited to our hosted platform customers.I was hoping to use my own number providers?
Unfortunately the complexity of supporting multiple SMPP connections to each provider on behalf of each customer is too cost and labor prohibitive, and adds little value - you can already send/receive SMS's directly with your own provider. So we will not be pursuing that. However, we are looking at ways to match pricing offered to you from other providers directly so if you'd be willing to switch to utilizing DIDs from 2600Hz, let us know.Does this work using numbers I have ported to KAZOO?
If the ported numbers are assigned to one of our carriers that support sms, the feature should work correctly. We are looking to include other carriers in the future.Is this available for international phone numbers?
International texting services are available, however we will need additional information about the countries involved before enabling this. Please contact your sales representative for details.How do I integrate SMS with Zapier?
There are endless options for integrating with Zapier SMS!- A good reference for starting can be found here at Zapier
- A list of KAZOO triggers supported in Zapier is HERE.
What SMS actions are Zapier triggers?
SMS action accepts for sending
- sms_send
- fax_send
- ringout
SMS action accepts for receiving- to
- from
- body
######
Related Articles
SmartPBX Frequently Asked Questions (FAQs) API Reference Docs
docs.2600hz.com
REST API Reference for Kazoo Crossbar API
-
Hi all:
Thanks to all of you who have sent us feedback and ideas, either here or by email. Keep it coming!We are keeping a list of feedback items you and our staff have logged, and will add/comment/update it when we can. This way you can see if what you've found is already logged and under review by our team. The list is HERE. You can add comments below the list also. We're all ears and keeping watch on all channels.
-
To Do List, comm.io
Below is a list of issues and feature requests logged.NOTE: The list is only a list, it does not represent any order or timeframe for completion. If you have new requests or issues not shown here, please add a comment below and/or send an email to feedback@2600hz.com.
General
- Supporting Firefox when downloading comm.io app
- Helper text / Tool tip to show why a device is unregistered
- Add Linux / Ubuntu distribution
- White label enhancements - replace comm.io logo
- Support for Private Cloud and Global Infrastructure installations
- Add a changelog file
- Websockets for real-time events
Video Conferences
-
-
Permissions for controls
- Disable "Kick" for Participants
- Ability to include attendees outside account (desktop access)
- Ability to add a text banner for video conferencing
Webphone
- Show current call duration for calls on hold
- Add contact list access
- Support 3-way calling
Release Notes
Scheduled for next release:
-
Bug fix:
- Webphone settings not being accessible
-
Bug fix:
- fax filter with date picker
Released in 1.0.18.4981:
-
Tray icon enhancement:
- DND devices are collapsed
-
DTMF Defect
- auto focus on keyboard input
-
Conference Bug
- ending a conference before it fully initiates doesn't kick you out of the conference
Released in 1.0.17.4736
- Call History bug fixes
- Bug fix on webphone not resizing on incoming call failed
- Bug fix zoom-in shortcut
- Fix for race condition with webphone upon first install
- Pressing "enter" does not hang up an existing call
- On-going internal improvements to improve app performance
- Webphone is resizable
Released in 1.0.16.4602
- Hide menu for Windows OS
- Resize webphone for incoming calls
- Confirmation dialogue when exiting conferences
-
Tray icon:
- Default Windows is white
- Bug fix for switching between dark/light themes on mac fixed
-
Windows enhancements:
- When the user left-clicks the tray icon, the app is opened
- When the user clicks the app launcher and the app is running in the background, the app is opened
- Fix missing label on fax filter
- Update verbiage to improve UX when sending a fax to "fax in queue"
- Bug fix for updating last_seen on timestamp
Released in 1.0.15.4178:
- Re-opening application on Windows shows the app rather than reopening the app a second time
- Stripping out non-numerical characters for input on dialpad
- On-going internal improvements to improve app performance
- Additional unit tests
- Internationalization for translation purposes
- Fax filter datepicker enhancements
- Fix if a user was created in callflows and does not have a number or extension assigned
-
Dedicated keypress for opening webphone if comm.io is open and running.
- Windows: ctr+p
- Mac: cmd+p
- Please note, if comm.io is not open and is running in the background, this keypress will not work
- Conference caller-id with `no_user` is now replaced with Conference extension
- If webphone is hidden and I have a missed call or decline a call, hide webphone
Released in 1.0.14.3407:
- Fax preview button downloads instead of preview
- Update behavior when user moves away from conference window then returns
- "TO" calls intermittently do not appear in Call History
- Bug: exiting screen-share in conference timer restarts main conference timer
- Added bandwidth and connectivity to conferences
- On-going internal improvements to app, including unit tests to improve app performance
- Windows tray icon now supports dark / light OS theme
Released in 1.0.13.2973:
- Fax bug: caller_id_name missing in Header results in failed sent fax
- Exiting webphone window should ask the user, "End Call? Closing the window will end the current call and all calls on hold."
- Force manually check for an update
- Username is missing on comm.io device and displays as " 's comm.io Device" NOTE: any devices created BEFORE this fix, will not be corrected
Released in 1.0.12.2730:
-
Windows, app doesn't close as expected using Windows commands
- minimize / restore behavior
- using windows X button in dialog header
- Conference timer on conferences does not restart
- Bottom toolbar should sticky to bottom of the Conference page
- Green dialpad in webphone disappears causing unregistration, competing with other OS softphones
- Add log file for debugging purposes
- device icon for comm.io webphone showing as unregistered on Devices page and Devices widget, despite being registered
Released in 1.0.11.2586:
- Disable autolaunch of comm.io from within the app once installed (as a checkbox in Settings)
- Add versioning information on Settings page (esp. for Windows users)
- Incoming call comes in with existing call causes odd behavior
- Enable ringtone option for incoming calls
- Focus on webphone dialpad
- Selecting row in call history dials TO, rather than FROM
-
Hello Community --

We're on a roll. Last night we released the beta version of our new desktop app, called comm.io. Account holders can enable it from the App Exchange, download it to a desktop and have office call data easily accessible, including- Summary and access to office calls, voicemails, faxes and devices.
- Your own Webphone and
- Video conferencing with your remote office mates !!
Perfect stuff for working at home. Here's some reading material to get you oriented (make sure you're logged in to see these)
- comm.io Installation & Setup
- comm.io User Guide - beta
- comm.io Video Conference Calls User Guide - beta
- comm.io FAQ
- comm.io Webphone Setup and User Guide
Yes, this is beta ... we've been using it internally a while now, and now we're looking for feedback from your COVID prescribed or other "office".
We'll be posting our "to do" list already logged and in the update queue shortly.GREAT news is it will automatically update on your desktop as we make changes, so let us know your experiences and how to keep improving.
Share your thoughts and experiences to our Product Feedback forum here.
-
Here's your space to give us feedback on comm.io. Read up on it here!
-
USER GUIDE – comm.land Audio and Video Conference calls
comm.land 2.1 Video Conference Calls User Guide - beta (5.0 only)
User Story
This guide is for understanding the setup and use of the using the VOIP conference call feature available in the comm.land Monster application. This application supports both Audio and Video Conference calling among users in a company account.
A business user has installed comm.land on his or her desktop and wants to- Engage in audio and video conference calls with people within his organization from his comm.land. application.
- Ensure these calls are tracked in comm.land as part of their business phone system.
Before You Start
This guide assumes the following basic setup has already been established-
comm.land has been downloaded to a local computer and is associated with a business account. If you are not sure, contact your administrator.
Look for the comm.land icon shown below in your applications folder and be able to launch it.
- A conference call ID has been created by your administrator in the Conferences app and video conferencing is enabled. If you have already used the conferencing app in Monster UI, these conferences will display, but you will need to enable video conferencing for each existing setup. For more details, refer to the quick reference to how to set this up provided below.
Quick Overview / Steps
- Confirm there is a conference ID available in the Conferences tab in comm.land
- If not, ask your administrator to create one or create one yourself (steps below)
- Join your conference!
- Adjust settings as needed. Details are provided below.
Detailed Steps
-
Launch comm.land
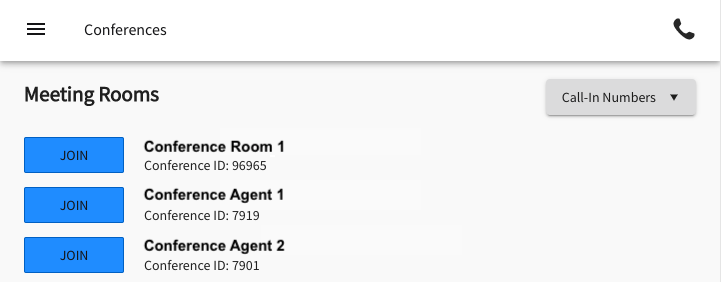
You will see your home screen below. -
Check for existing Conference Rooms
If your administrator already has some set up in the conferencing app, you should be able to see them here.
-
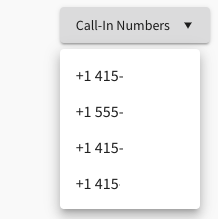
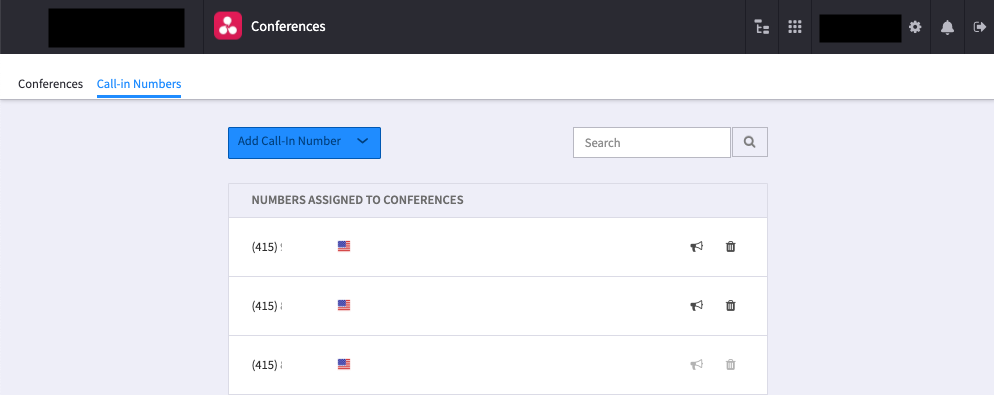
AND/OR Select a Call-in Number if you want to use a phone line
Use one of the Call-In Numbers provided in the drop-down menu.
When prompted enter your Conference ID.
NOTE: These call-in numbers are defined in the Conference application.
-
Join your Conference!
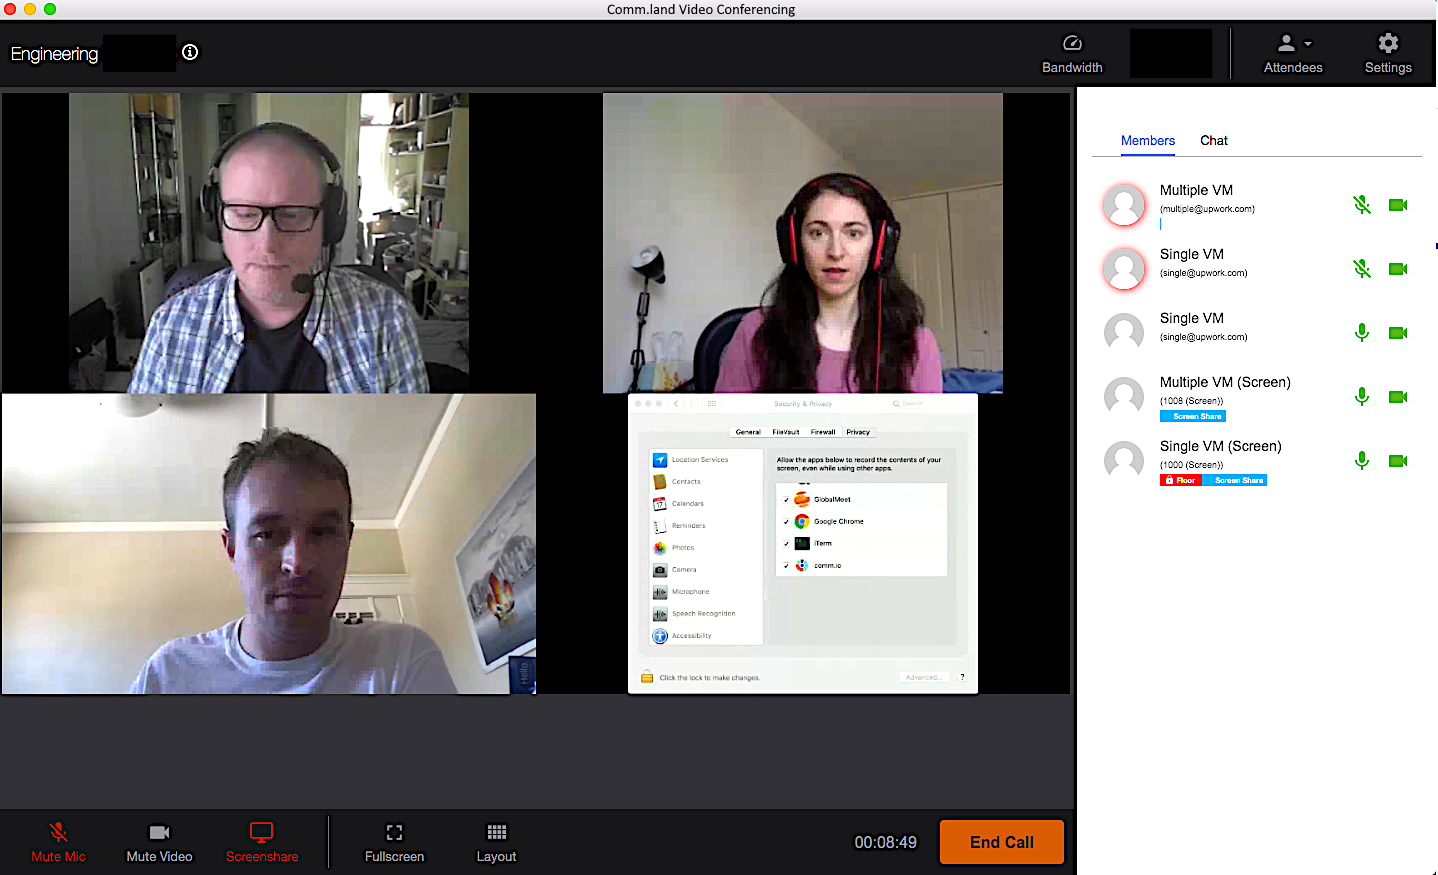
You will see a screen something like this; your actual screen layout may be different depending on the layout options available to you. This version shows a screenshare in one quadrant. -
Adjust your settings
Below is a list describing the basic settings once you join your conference call
Top of Screen
-
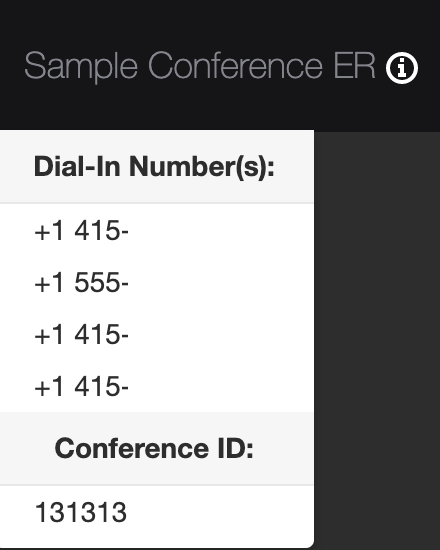
Top left, Conference Name and Information
By clicking on the information bubble you will see the dial-in and conference ID numbers associated with the call.
-
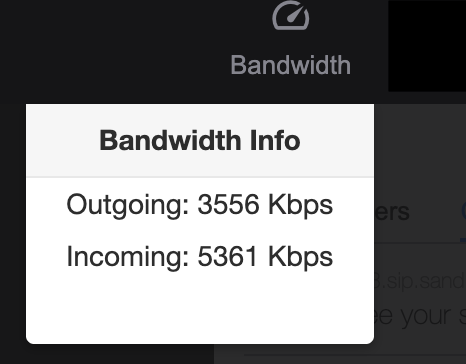
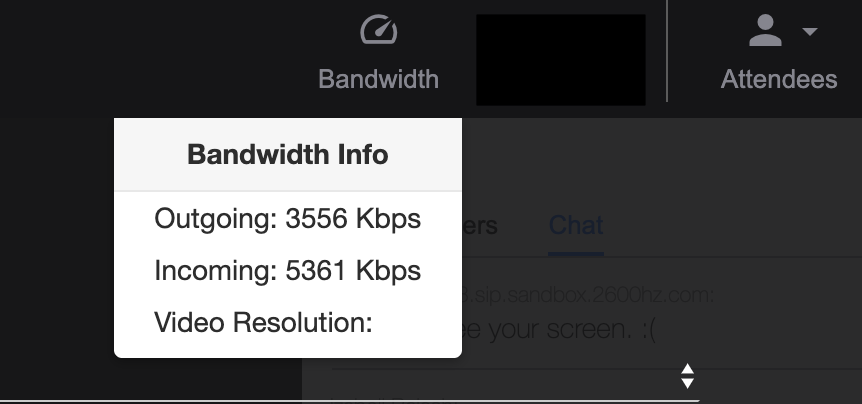
Bandwidth
This will display the bandwidth speed available from your network.
-
Attendees / Chat
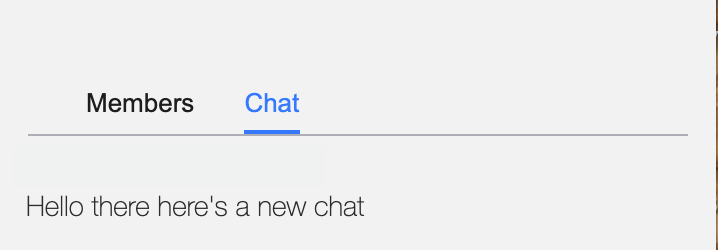
This will allow you to open or hide the Attendees list for your call. Note there is also a tab to toggle to a chat screen.
NOTES on CHAT:
-
To enter a chat, use the text field at the bottom of the window and select SEND.
-
Currently the chat history will only show chats received after you have joined the call. If another caller has added something there before you joined, please request they resend it.
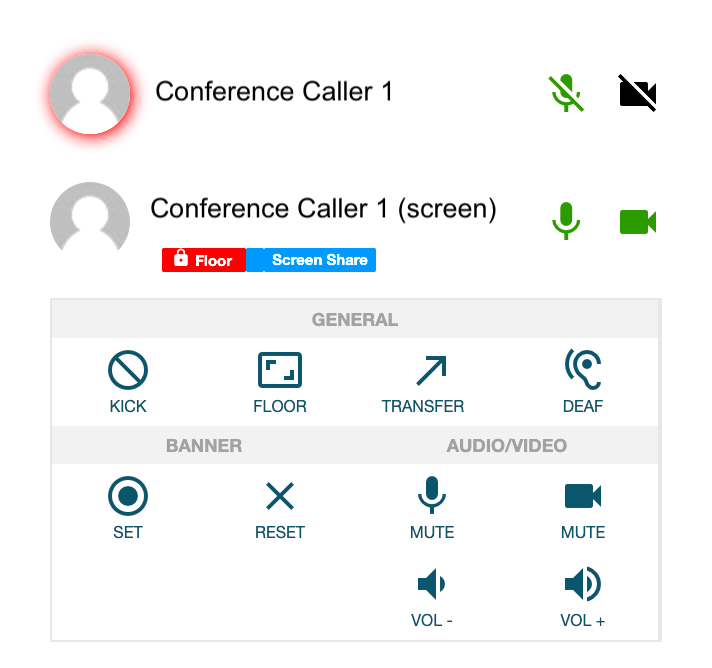
Attendee Settings Menus
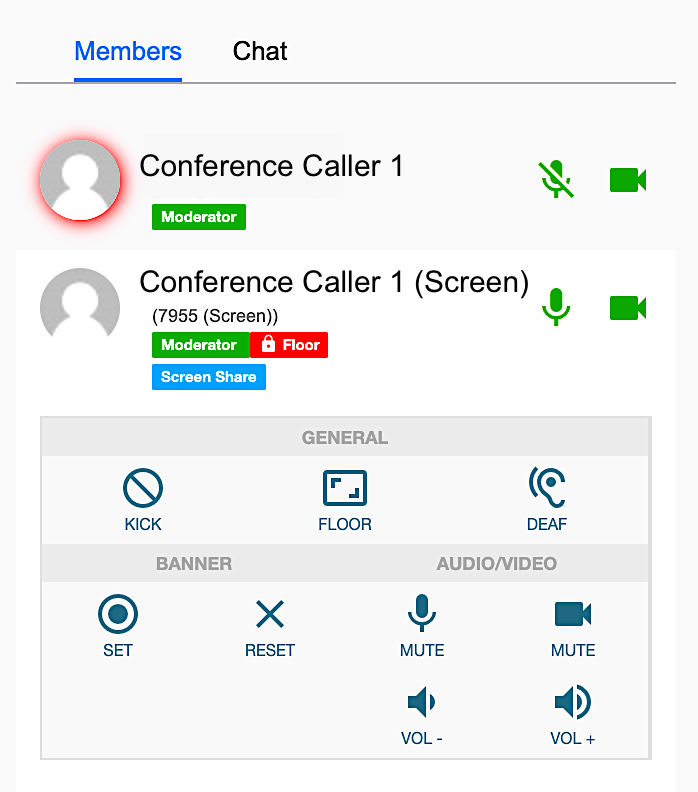
When you click on your name (or another person’s name if you have moderator status) in the Attendee menu, you have access to some additional user controls. They are described below.NOTES:
-
Access to these settings may depend on how your administrator configured your user name. There are three levels of callers: Moderators, Administrators, and Caller. There is a reference grid that outlines the different levels below.
-
You will see that if you are sharing a screen a second version of you will display. These controls are unique to your screen share activity.
-
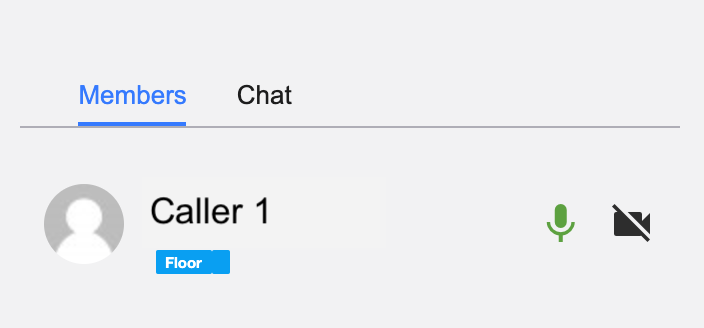
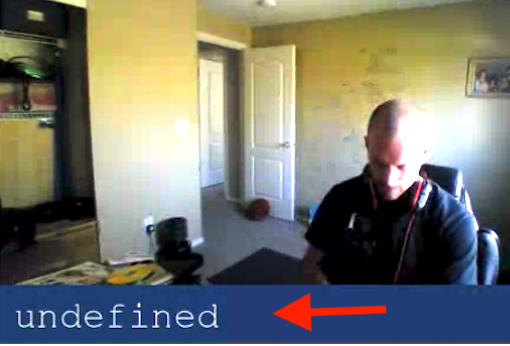
The red "Halo" around your profile image indicates you are on mute, as does the microphone image crossed out.
Kick
By clicking this icon this attendee will be kicked off the call (available to moderators)Floor
Gives “Floor” access to the attendee. The person with the "floor" will show the red tag as seen above.Deaf
This temporarily turns off the audio to the attendee.Audio / Video
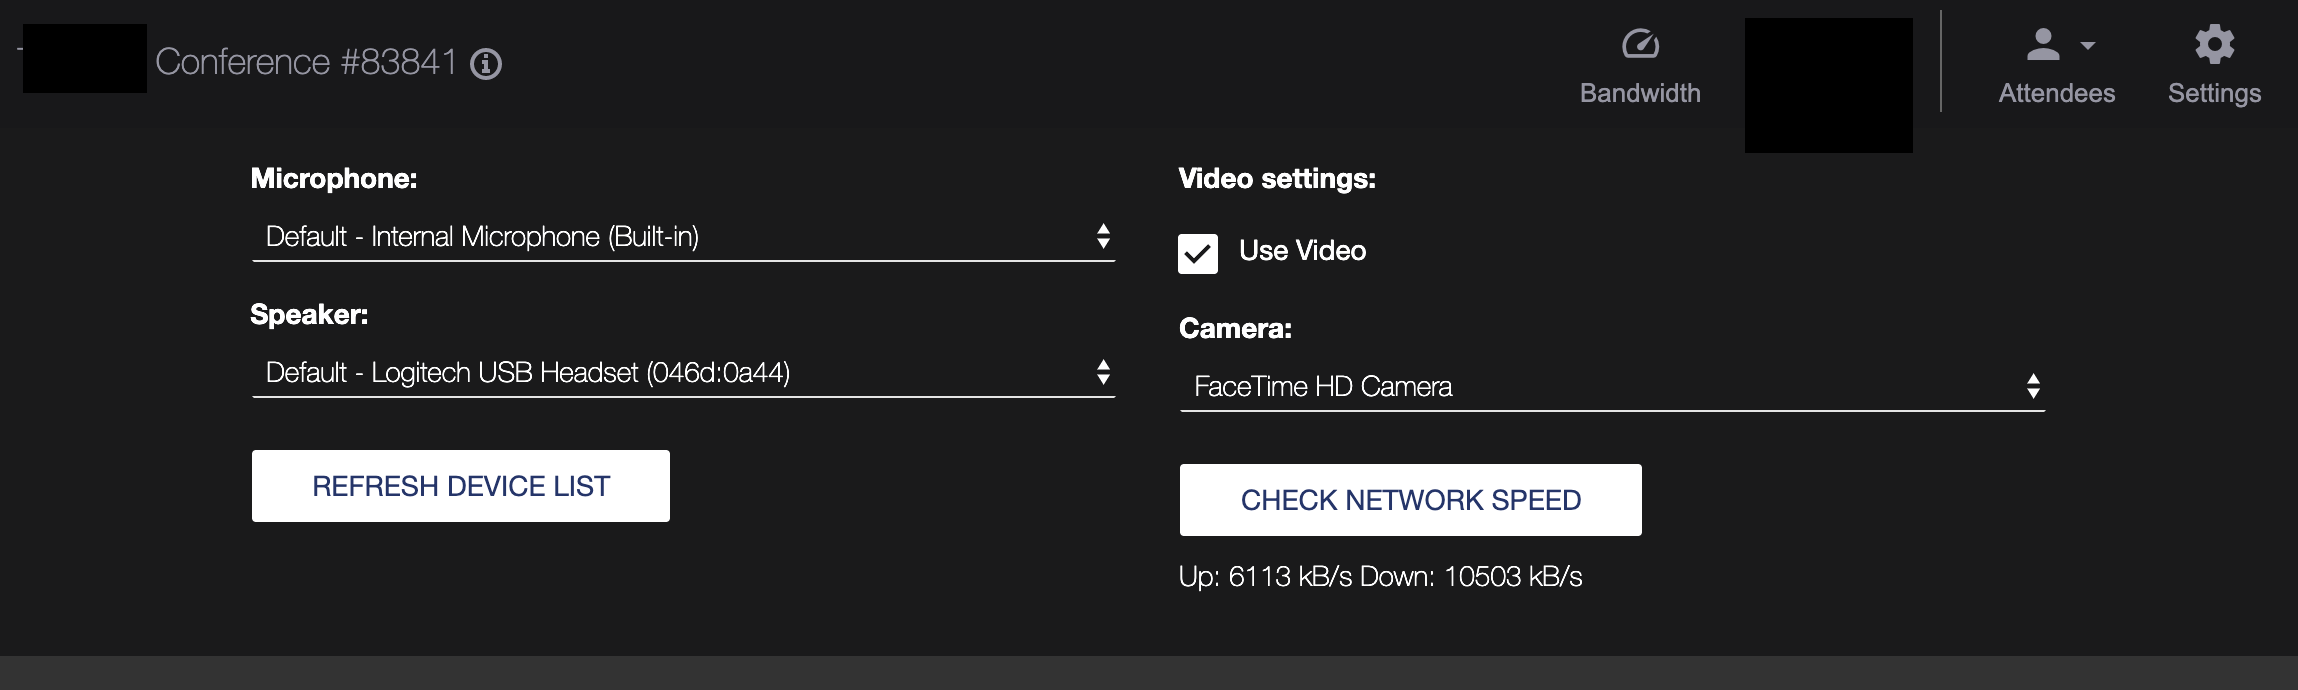
This is another way to access an attendee’s audio and video. It is handy for a moderator to be able to mute an attendee if he/she is making too much noise and has not muted.Device Settings
Here you can adjust the settings for audio and visual you want to use on the call. Use the drop-down to select any device that is recognized by your computer settings.
NOTE: Some computers and browsers allow you to disable certain devices. If you do not see a device displayed check your permissions to access devices.
-
Microphone and Speaker settings
This will read your default settings for your computer. You can change it for the specific call if you want. Note, if you add a new device, such as a new camera or headset you may need to select the Refresh Device button before it displays as an option. -
Video Settings Checkbox – Use Video
If you check this box, it sets “no video” as the default setting for all your calls. You will have to remember to uncheck it with every call if you enable it. If you leave it checked, you can also choose “No Camera” below for the particular call.
Bottom of Screen
Mute Mic
Mute your own microphoneMute Video
Mute your VideoScreen Share
If you have the permission to share your screen, when you click on this it will give you options for what to share: It will display both screens and windows within your screen, and a small thumbnail as a preview.NOTES:
- The image above shows a screen share as one of the 4 windows in your layout. Where a viewer sees the screen share can be managed by any viewer with permissions.
-
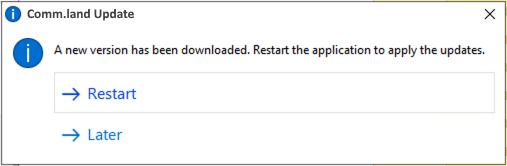
If you are trying to share your screen and you only see your desktop photo, it may be you need to grant permission in your operating system to allow "screen recording."
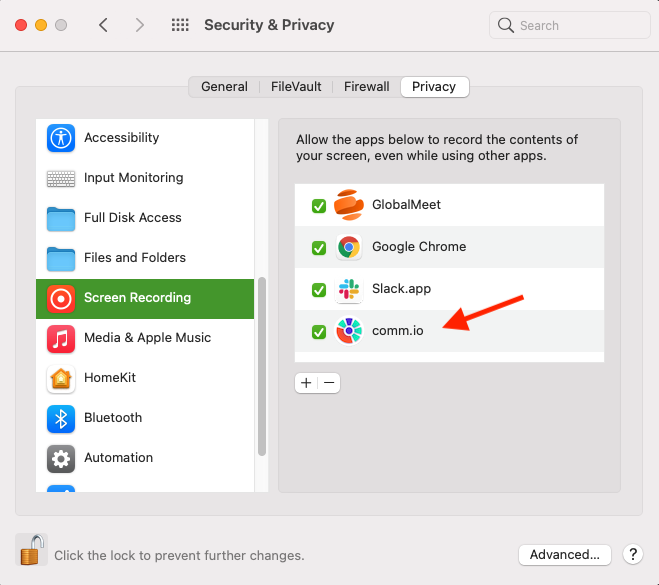
For Mac Users
- Close your comm.land app.
- Go to your System Preferences page and select the "Security and Privacy" icon.
- Select the Privacy tab
- Scroll down to Screen Recording
- Unlock your page access using the padlock at the bottom left. You will need to enter your system password.
- Look for the comm.land app in your list, and enable permissions by selecting the box. If you don't see the app, select the + button, and add it.
- re-Lock your access
-
Restart comm.land.
-
Fullscreen
Enables you to toggle your window to cover your entire screen or return to a window view.Layout
If you have permission, you can control how you want the layout to be displayed. There is an overview of what these look like and how they behave at the end of this document.
NOTES- The layout option and icon is only available to users who are assigned Administrator Status in SmartPBX
- This layout is global; once you choose it it will be seen by all participants.
Timer
This shows the duration of your time on the call.End Call
You will exit the call.comm.land Application Updates
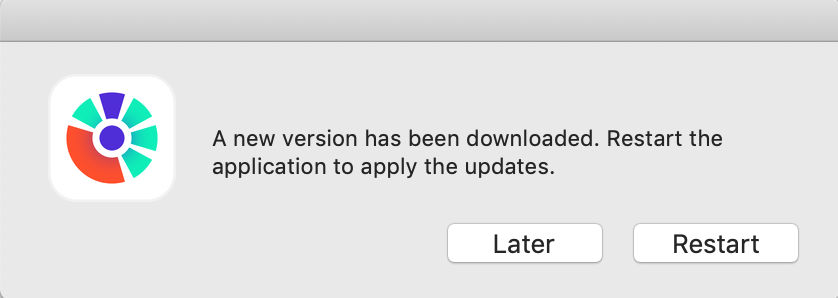
Once you have downloaded comm.land to your desktop, you will receive automatic application updates. When this happens you will see a notification asking if you want to restart comm.land and launch the update immediately or later.
How to Add a Conference Room that displays in comm.land
Quick Steps:
- Navigate to the Monster UI Conferences app
- Confirm you are in the correct account
- Create a new conference
- Assign a conference ID number
- SAVE!
- The conference will automatically appear in your comm.land desktop window
Detailed Steps:
Load the Conference app
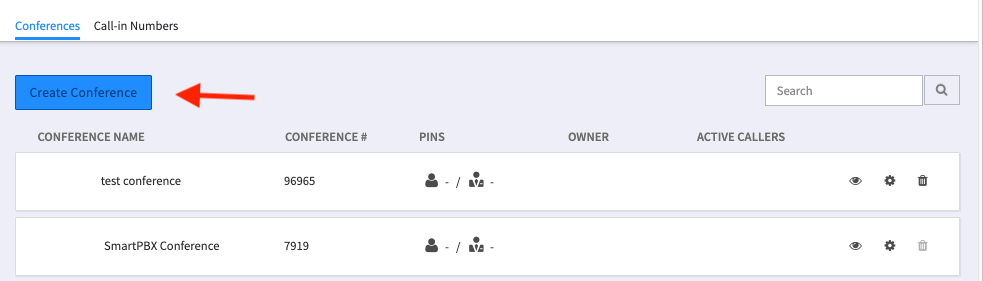
Select Create Conference
Select Conference Settings
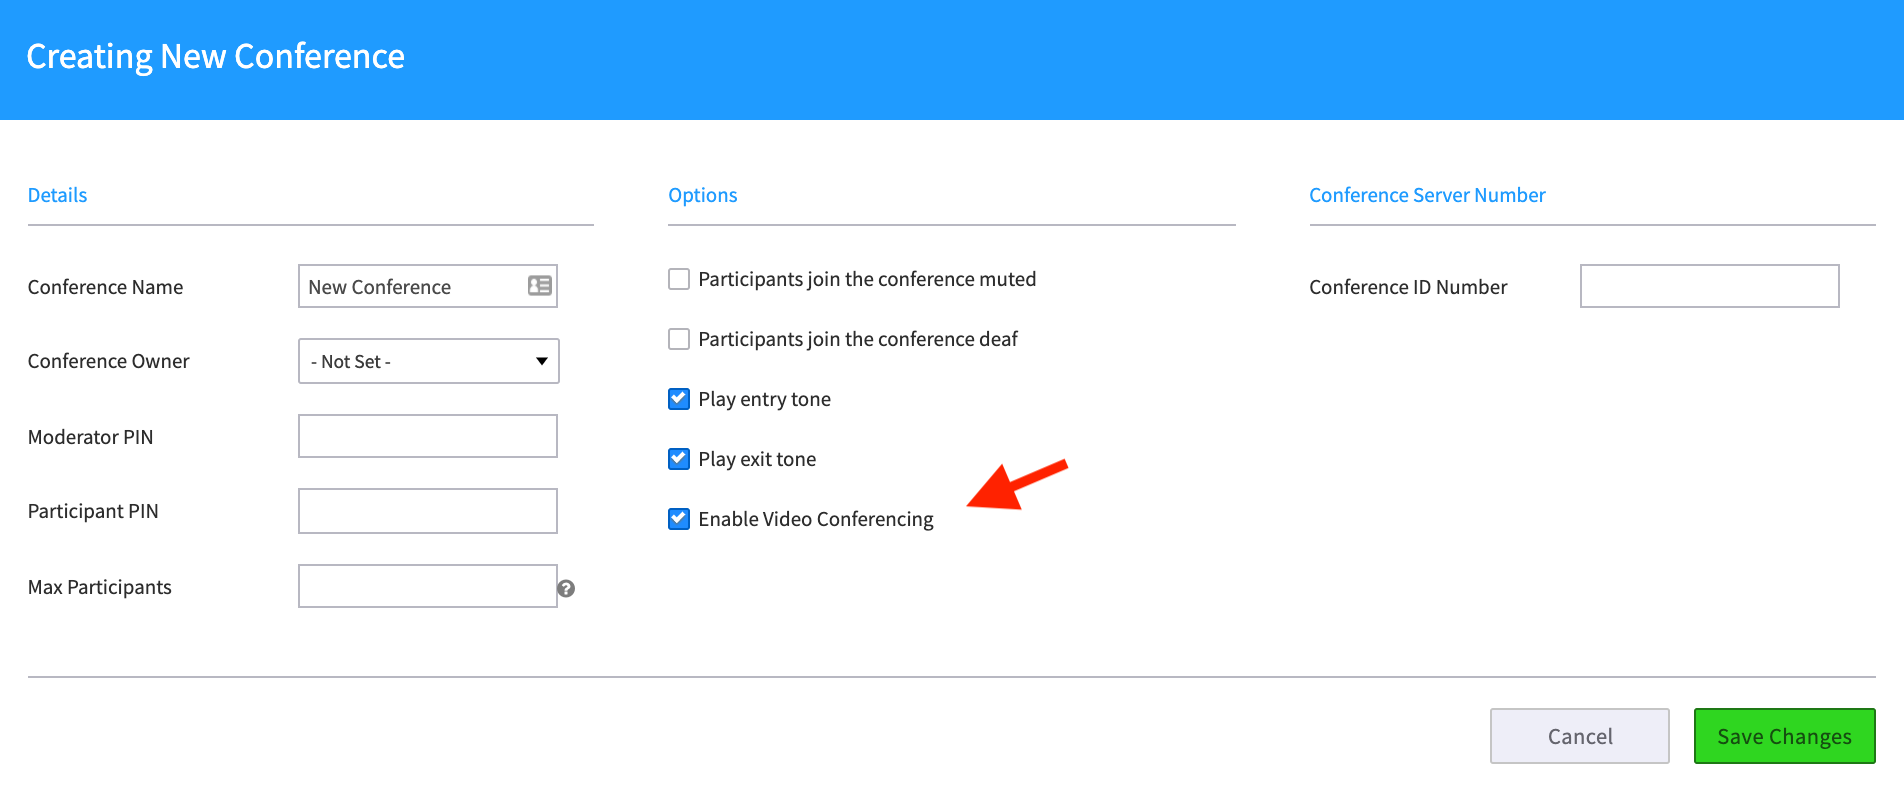
Add a conference name, select an owner name from the user list, and enable the video conferencing using the checkbox.NOTES:
-
You MUST Select Enable Video Conferencing for the feature to work correctly. If you have an existing conference set up, you will need to edit those settings and check the new box.
-
The PIN numbers will define access to controls for moderators and participants.
-
Add any value to the blank field. This is a legacy field looking for “maximum participants.” It will be removed, but in the interim the system requires a value.
Review Dial in numbers
These numbers will be displayed as optional dial in numbers for participants who do not have access to the internet.SAVE!
Return to your comm.land desktop.
Your new conference ID should appear.Frequently Asked Questions
How do I invite others to my conference ID?
Currently the conferencing application in comm.land is only available within a single comm.land account. If you wish to invite a fellow employee to your conference, you can:- Send them the meeting room name for them to navigate to within comm.land
- Provide them with a call-in number and PIN attached to the conference. Note this is for audio only.
NOTE: This release limits attendees to users within your organization who have downloaded comm.land. Once we have thoroughly tested the security requirements for external attendees we will add that option.
How do I create a conference ID and Meeting Room?
Conference “rooms” and IDs are set up in your Monster UI Conferences application. If your system has already been set up and using the conference call application, any rooms you are a participant in will be available automatically. If you do not have access to this ask your administrator.Can I share a screen?
Yes! If you are given moderator access you can use the Share Screen icon at the bottom of your screen to share. You will be asked which screen and/or which application window you wish to share.Are conference calls added to my call log?
Yes! They will show in your comm.land. home page log as a conference call.I’m not seeing chat entries from before I logged in to the call
Currently the software will not populate the chat window with data shared before you logged in. You will need to request someone resend the information.Can I access the conference app in Monster UI during my call?
Yes! If you have access to the conference app you can also view and monitor the call from there. Additional options may be available if you are a call owner or moderator.How do I control the “on hold” music settings?
This is set in Smart PBX.API References
docs.2600hz.com
https://docs.2600hz.com/supported/applications/crossbar/doc/conference/#####
-
USER GUIDE – comm.land Webphone setup and user notes
User StoryThis guide is for understanding the setup and use of the webphone available in the comm.land Integration Monster application.
A business user has installed comm.land on his or her desktop and wants to- Make business calls using VOIP services available through comm.land.
- Ensure these calls are tracked via the comm.land application as part of their business phone system.
Before You Start
This guide assumes the following basic setup has already been established
-
comm.land has been downloaded to a local computer and is associated with a business account. If you are not sure, contact your administrator. You should see this comm.land icon in your applications folder and be able to launch it.
-
Your account administrator should also have enabled a webphone to your user name in the User Portal account. If so, when you launch comm.land your header should display the phone icon, as below:
Enabling the webphone
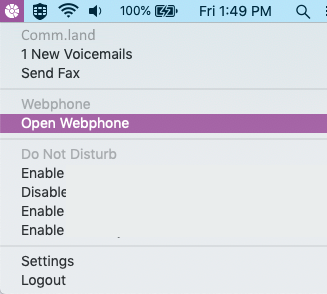
If your webphone is not yet enabled, follow these steps:-
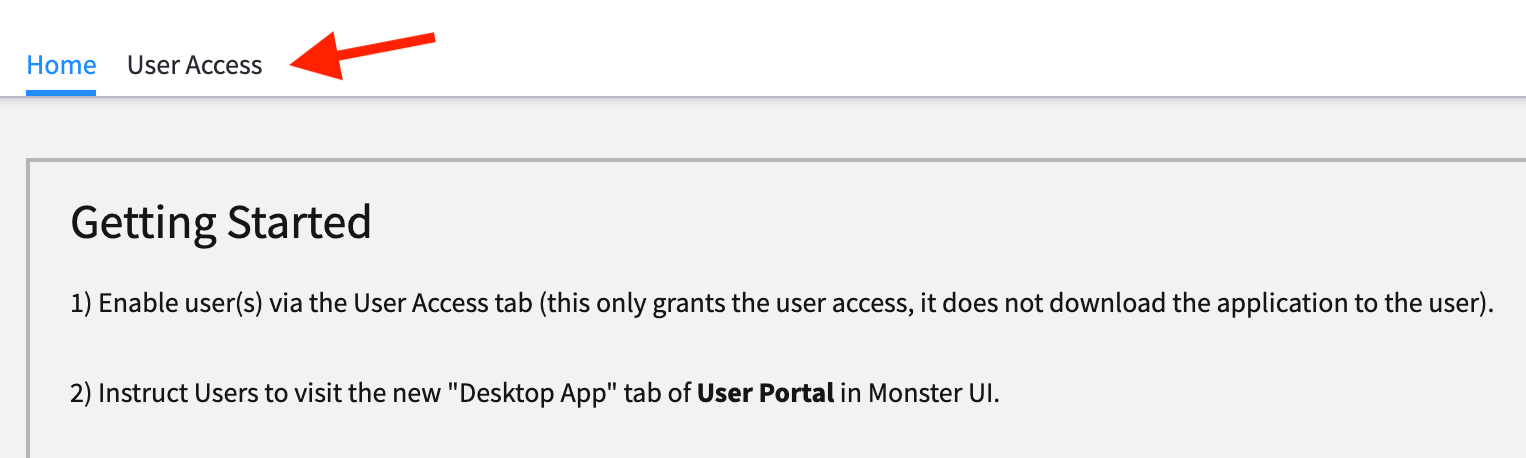
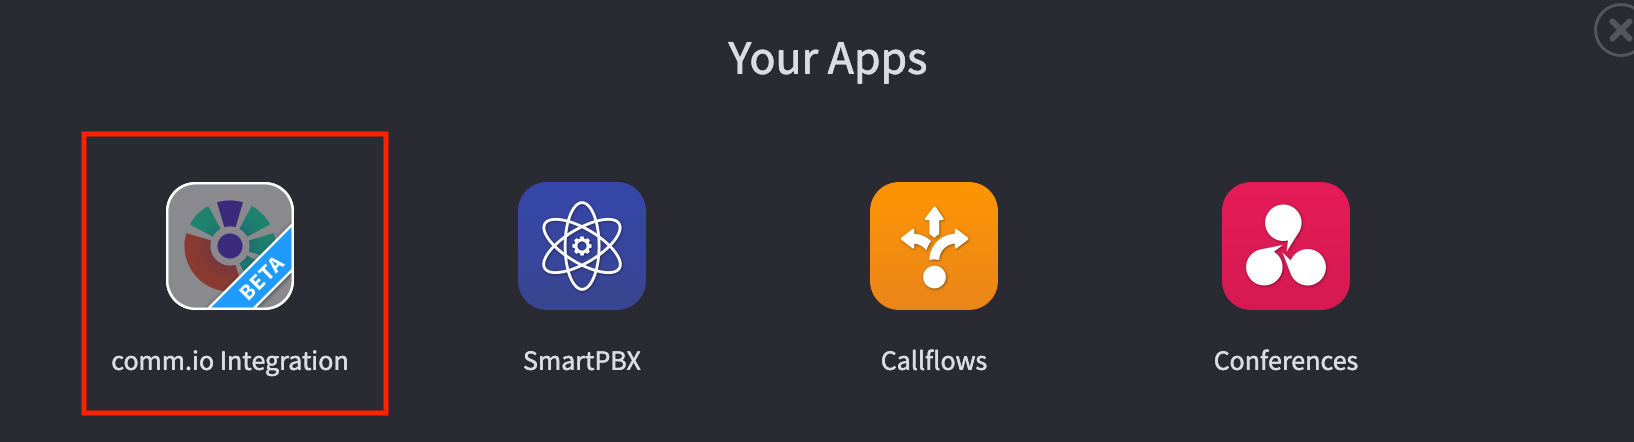
Go to the comm.land Integration app in Monster UI.
If the icon is not showing, click on the App Exchange and turn it on.
-
Select the User Access tab
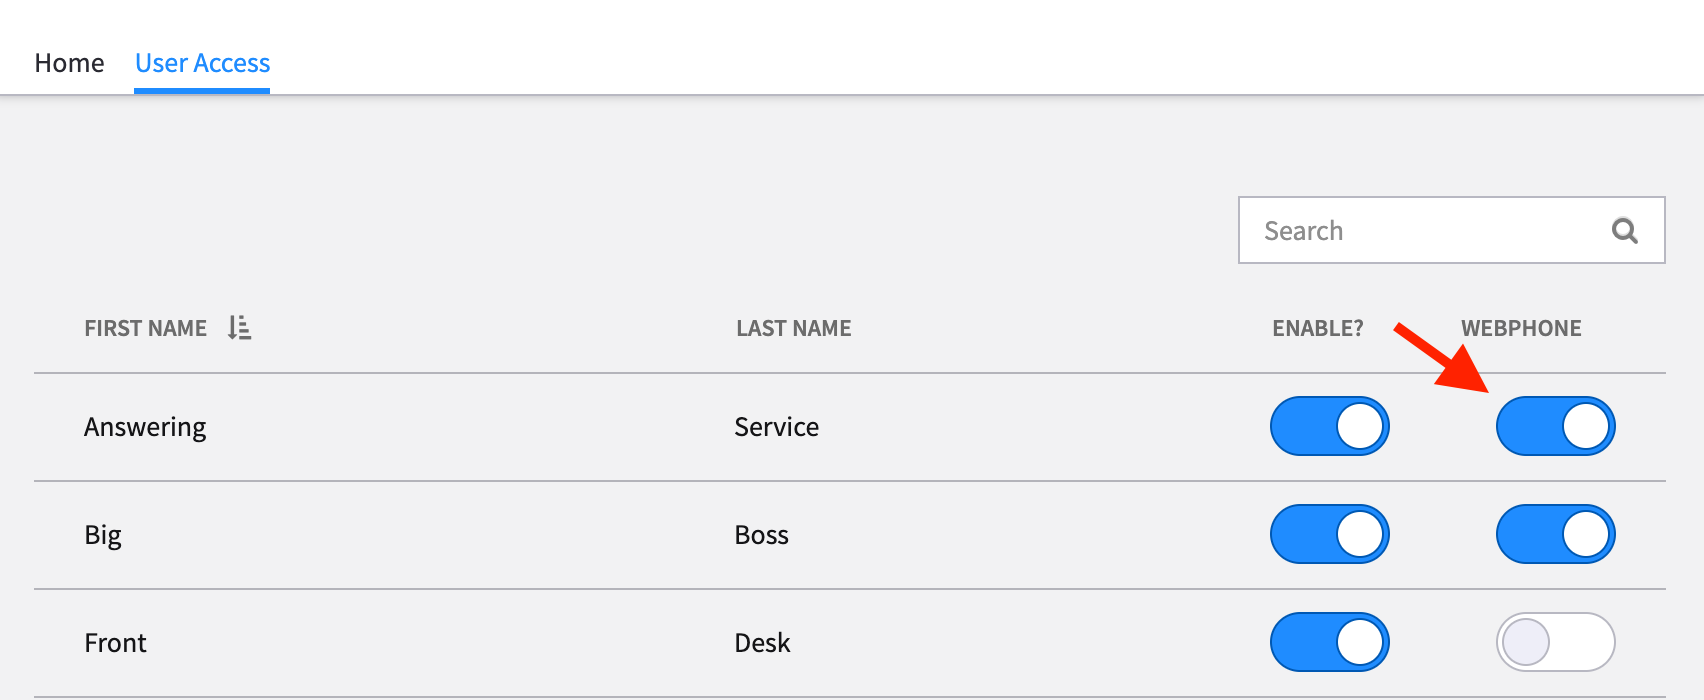
-
Turn on the Webphone toggle next to your user name.
NOTE: The "Enable" toggle enables the general comm.land app, the "Webphone" toggle enables the webphone in addition to the app. This must be turned on for the webphone to work correctly.
- Once this is updated, you should automatically see the phone icon at the top right of your home screen in comm.land
- You should also see a “webphone” display under your devices & numbers tab.
Using the webphone
1. Access the webphone dialer
Once the webphone is visible and active. you can access it several ways:
-
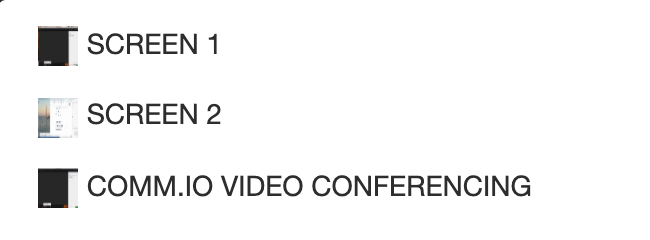
You can select the phone icon from any comm.land page OR
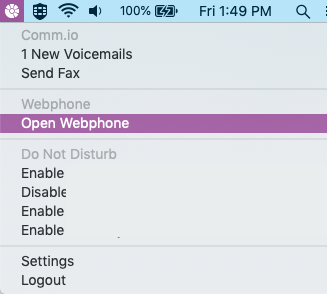
-
If you do not have comm.land open, you can access it from the drop down tray icon at the top right of your browser (Mac Users), or the bottom right icon list (PC Users).
2. Open the webphone dialer
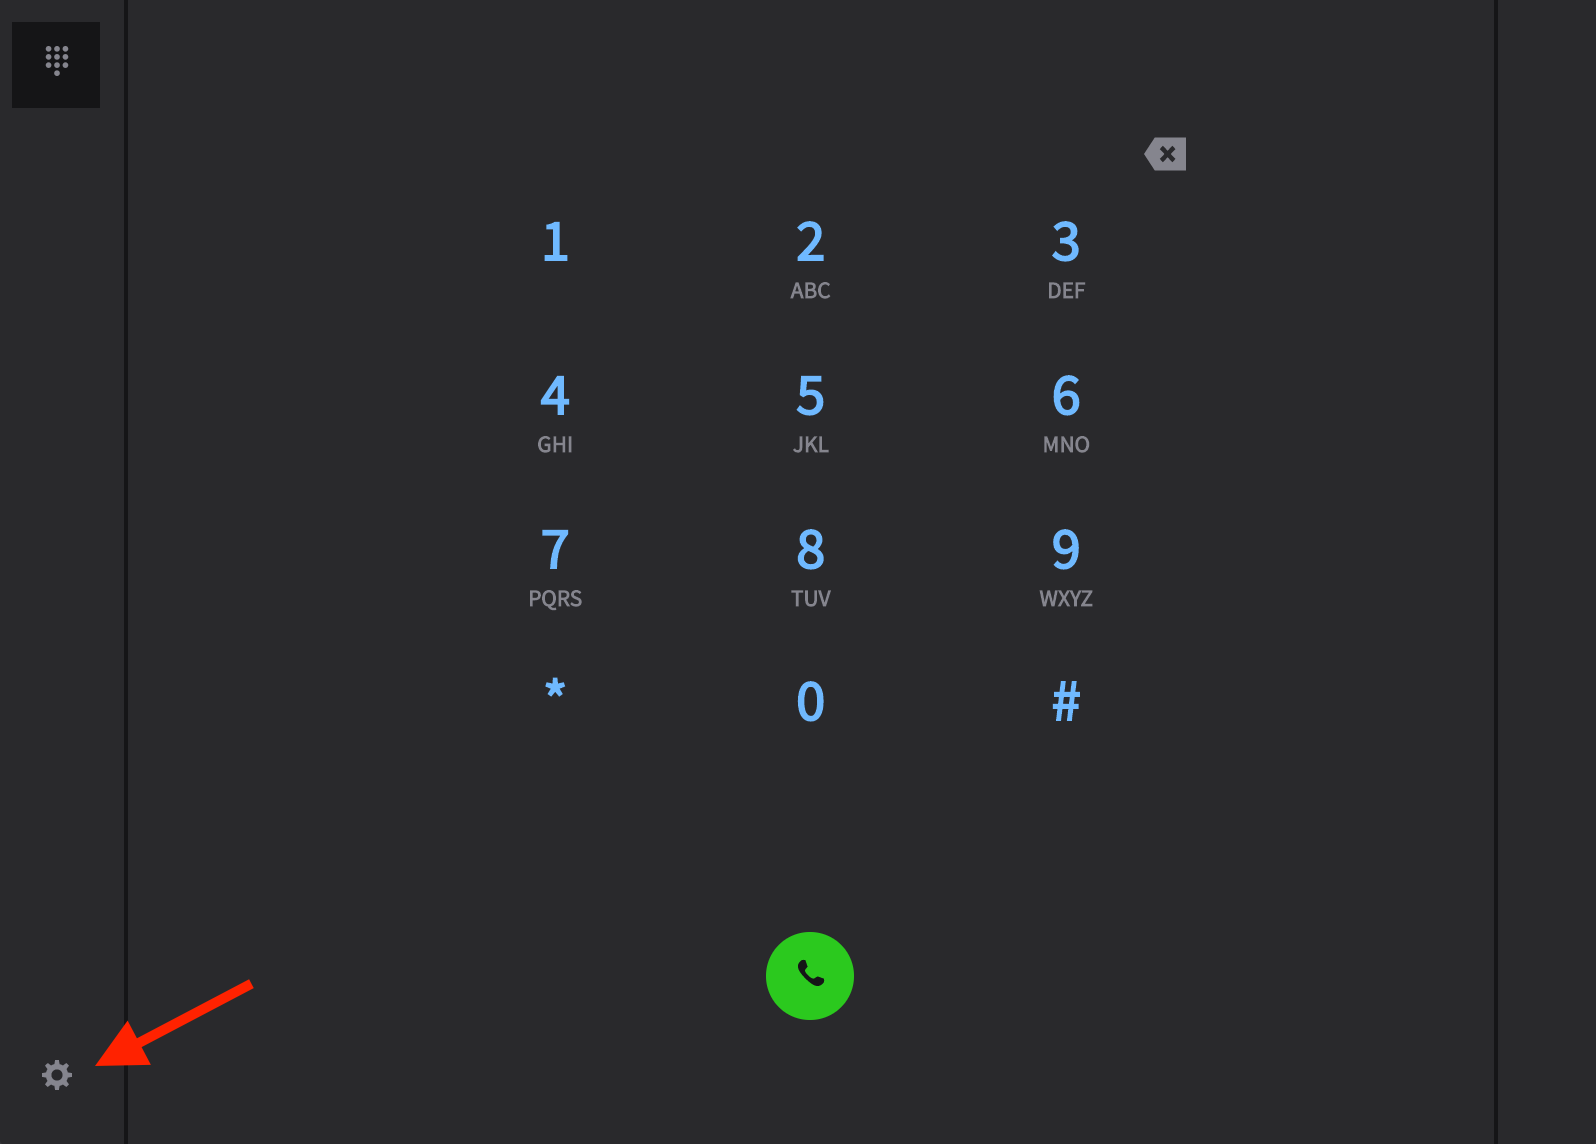
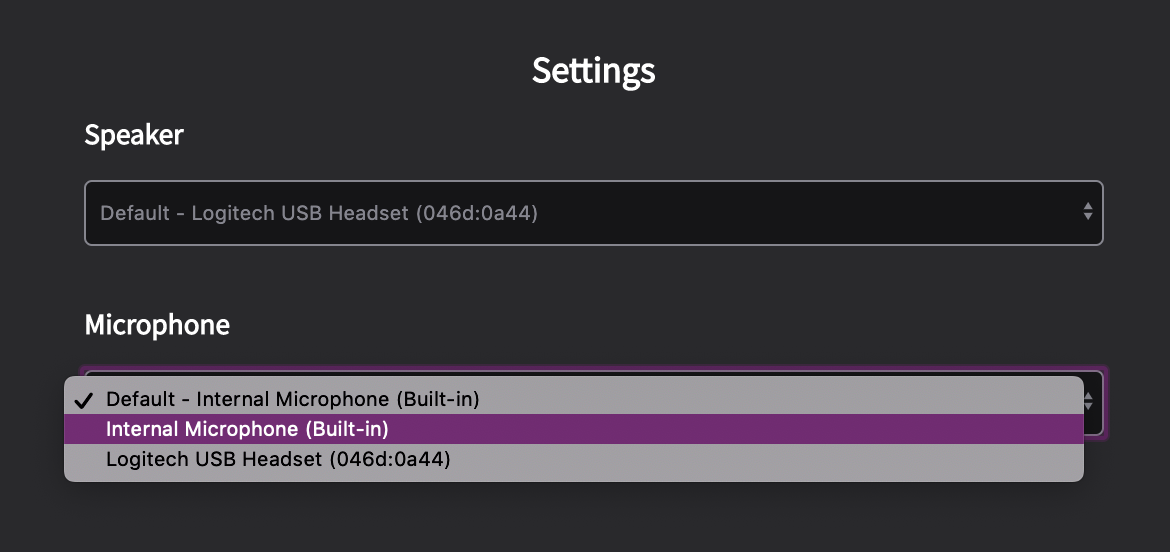
3. Review and Select your speaker and microphone settings
Click on the settings gear at the bottom left of the screen. You will be able to select any options that are enabled by your browser.
4. Dial a number and press the green Call Button.
NOTES:
- If you do not see a green call button, it is likely the webphone toggle was not assigned to your user name in the comm.land application. Please. check with your account manager to get this enabled (see steps above).
- If you have internal business extensions you can dial just the extension
- If you have another softphone installed on your desktop, it may conflict with the outgoing calls, and calls will not connect. Please disable your other phone from your user and then “disable” it in the device section. That should make the webphone work properly. We are working on how to let them co-exist.
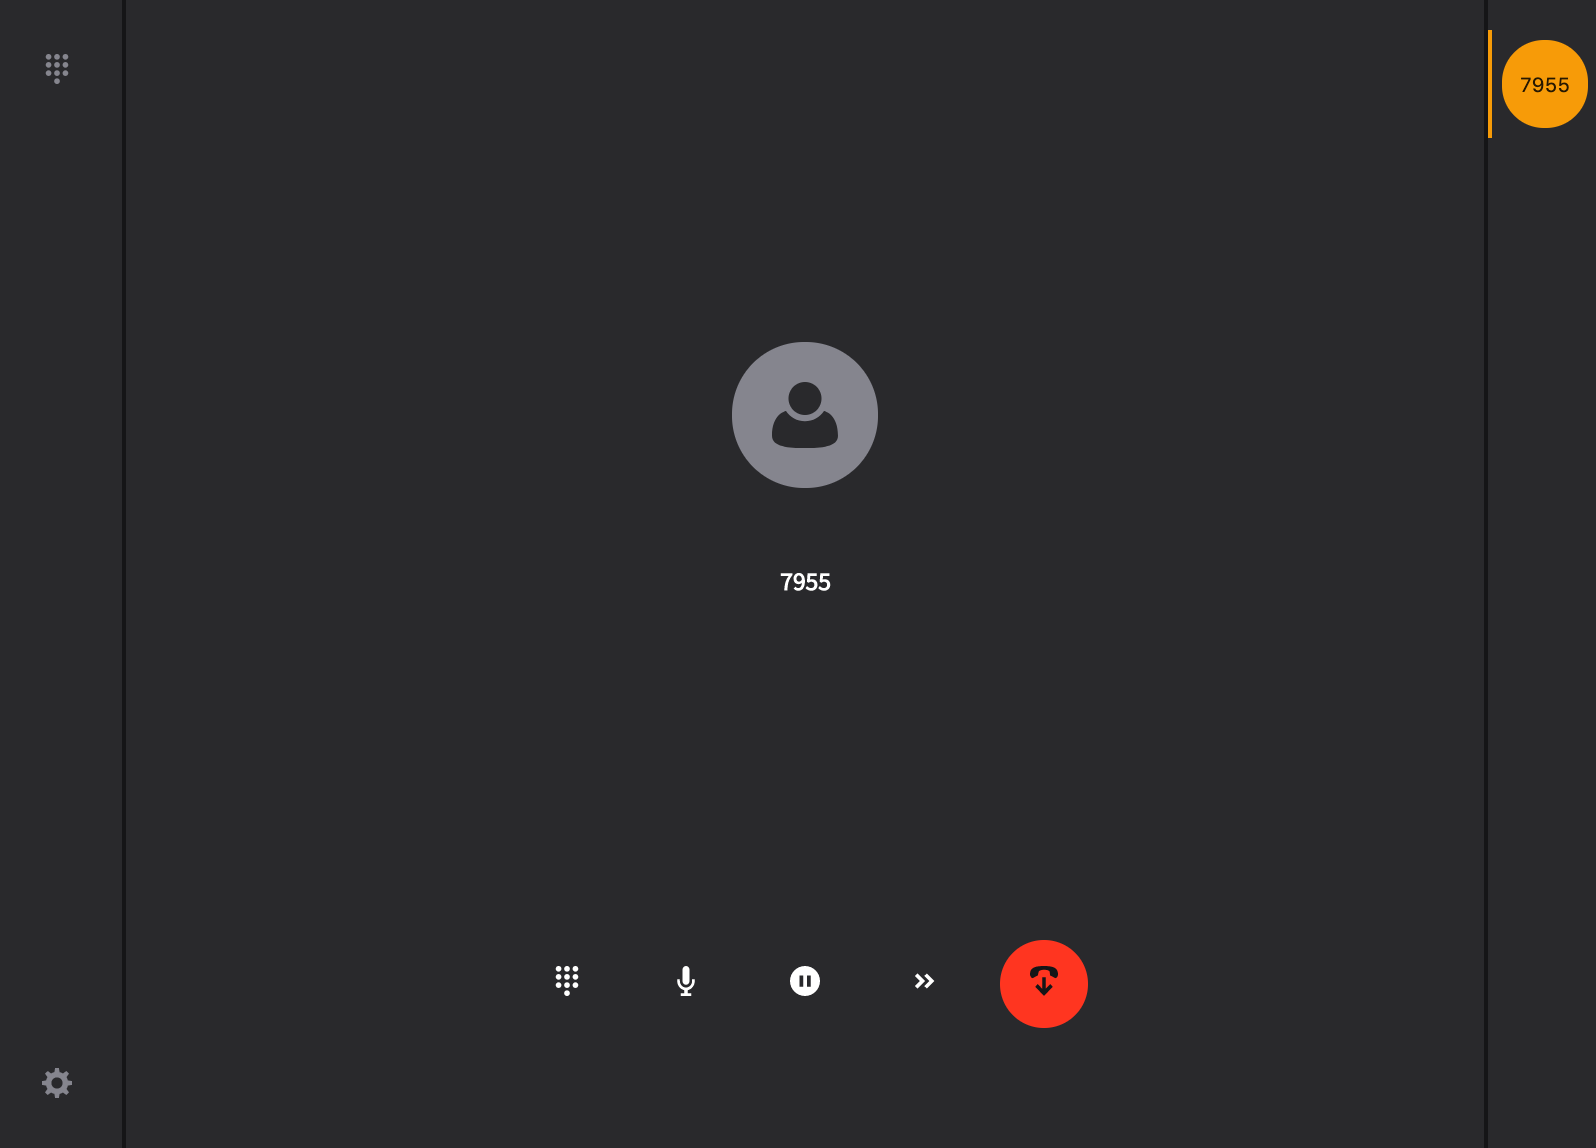
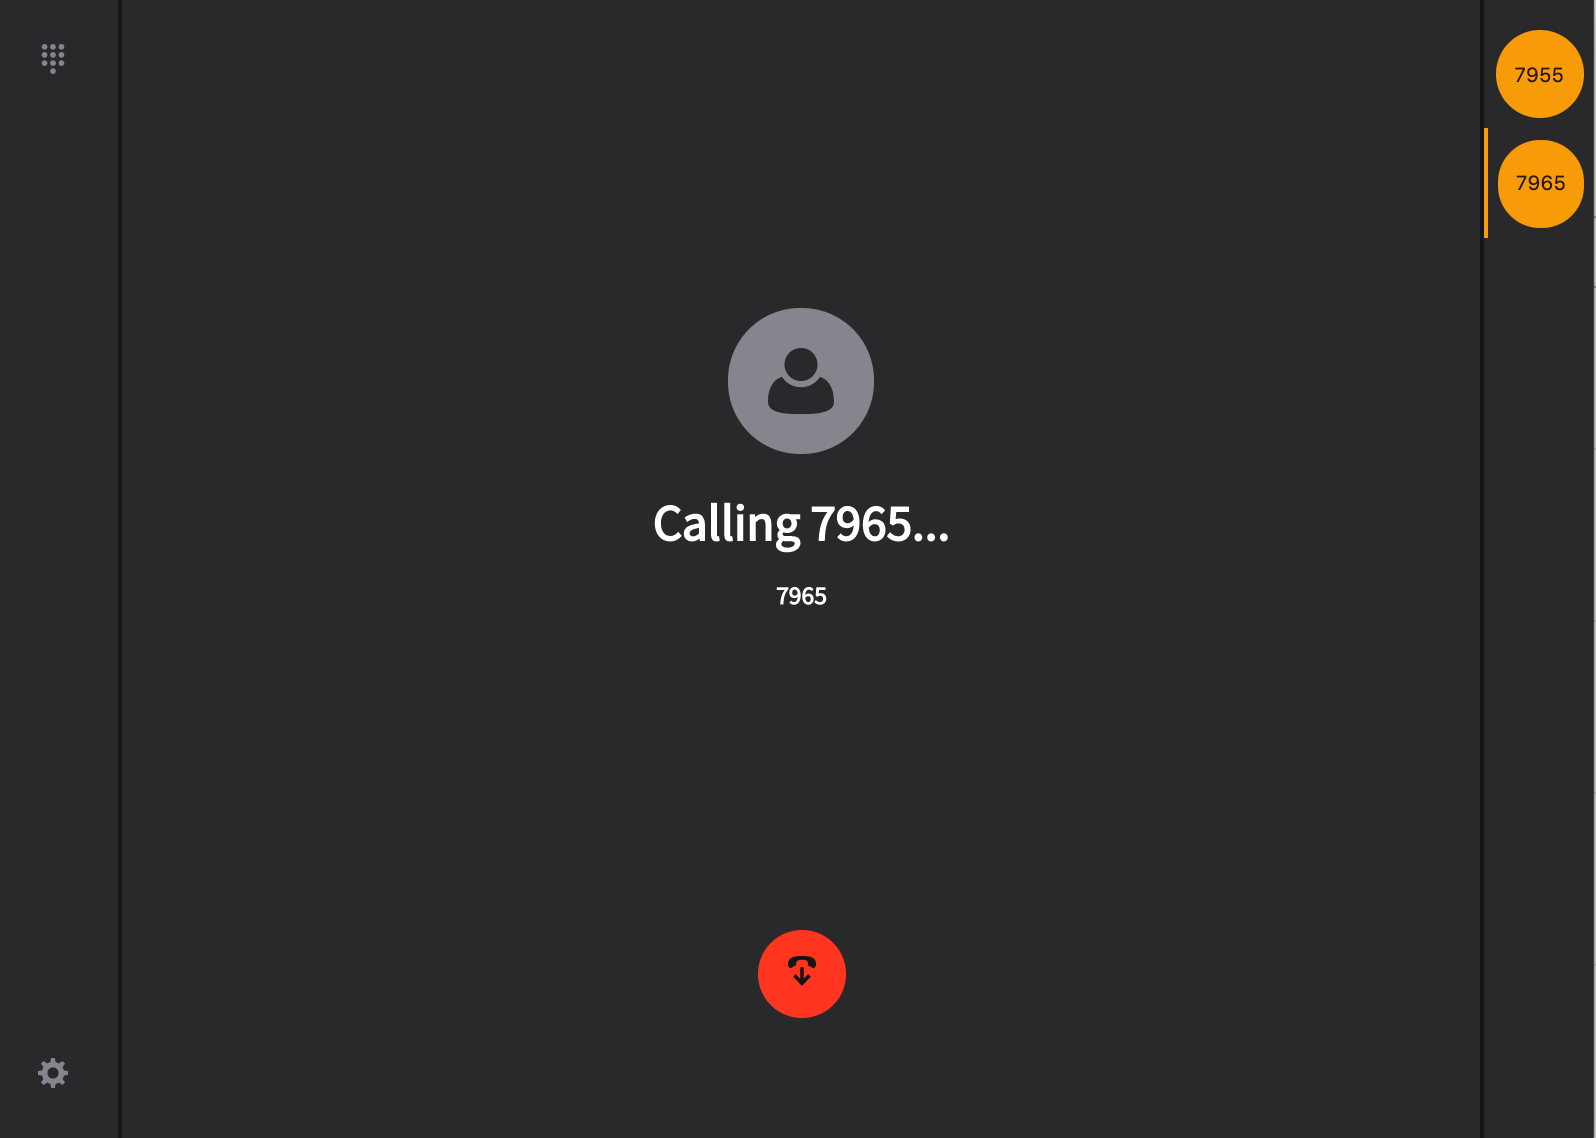
As the number dials and connects, you will see the screen below.
- The orange button at the top right is your "extension button". If you were to put this call on hold and call another extension, you can return to the original call by selecting the extension "button". The orange vertical line displays which extension is active (see right screen shot)
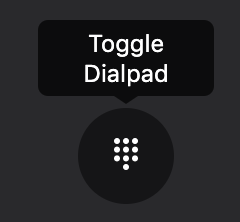
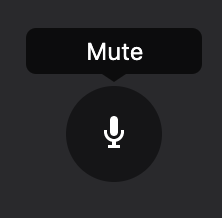
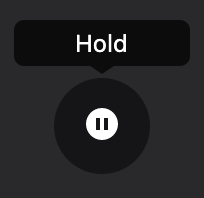
The icons below are actions available to you during your call. They are as follows:
This allows you to toggle to a dialpad to enter extensions prompted by your call.
This allows you to mute / unmute your call
This allows you to put your call on hold, and initiate a second call This provides a way to transfer your call to another extension
Terminate your call.
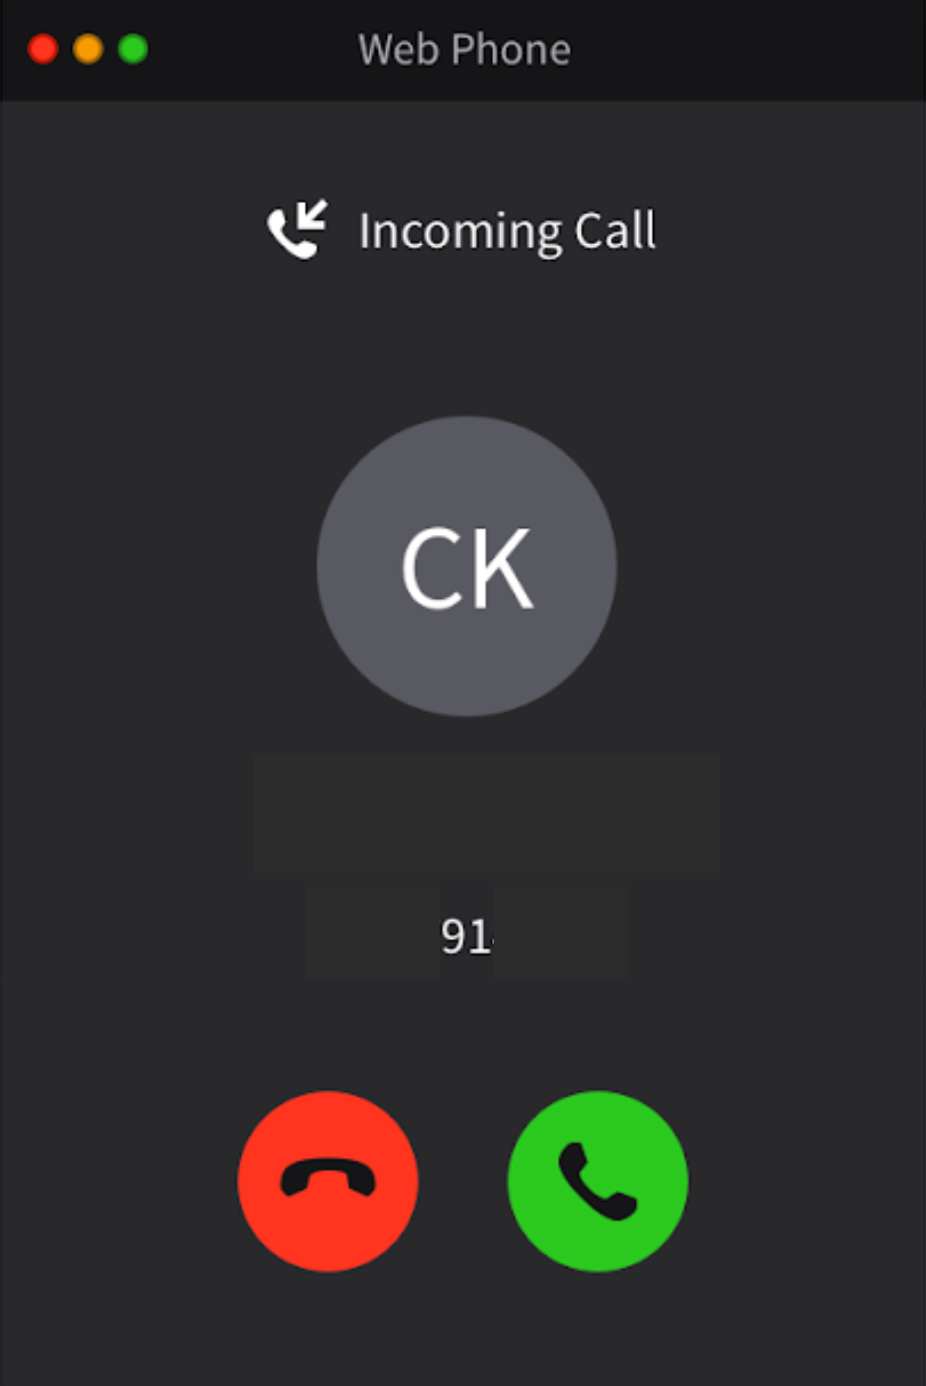
Receiving a call
If you have your comm.land app installed and you receive a call to your extension, you will see the following window display. We expect to be able to assign a ringtone shortly.
Webphone Frequently Asked Questions
How do I set up my webphone?
To add a webphone within comm.land you must enable it within the comm.land Integration app. Ask your administrator to help you with this.If you have already downloaded the comm.land app, in short the added steps are:
- Go to the comm.land Integration app in Monster UI as an administrator
- Select the User Access tab
- Make sure the enable toggle is ON for your user name
- Turn on the “Webphone” toggle as well. This will set up a virtual webphone to be used in comm.land
- Once this is updated, you should automatically see the phone icon at the top right of your home screen in comm.land
- You should also see a “webphone” display under your devices & numbers tab.
If you are just getting started and need to download comm.land as well,
- Ask your administrator to enable the webphone (step 4 above) at the same time they are enabling your comm.land access.
- Then refer to the step guide for downloading the comm.land app. Your phone should automatically display. You should also see a “webphone” display under your devices & numbers tab.
I do not see a green "call" button on my webphone dialpad
If you are missing the green "call" button when you initiate the dialpad within comm.land it is likely that the user you are logged in as has not been "webphone activated." To do this, you will need to have your account manager go into the comm.land application and toggle the webphone swtich that is next to your user name. See the notes above.I dial a number and press the green button and nothing happens.
If no connection is made once you dial a number, it could be you are experiencing a conflict with another softphone installed on your desktop. If you can, remove the other phone from your user and then “disable” it in the device section. That should make the webphone work properly. We are working on a solution to circumvent this in a future release.Once my webphone is set up do I need to also set up voicemail and call forwarding, etc. for that phone?
No, the phone will adopt the settings from your device/phone number as defined in SmartPBX.Can I use my headset for these calls?
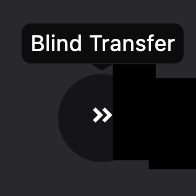
Yes, you can define both your speaker and microphone sources. To access these settings, click on the gear at the bottom left of your keypad screen.How does the “blind transfer” work?
The blind transfer forwards a call to a different number without answering the call first. It maintains the initial caller ID. Select this button and enter an extension # to transfer the call to.
Where do I define / manage my caller ID information for this phone?
This is controlled in SmartPBX, navigate to your Users screen and selecting User Features for your devices. If you are using a callThru.us device, some of those settings are defined on your phone.How is this comm.land webphone different than the WebRTC phone app available in Monster UI?
The comm.land webphone is available only as part of the comm.land application. All calls and voicemails made and received will be tracked and included in the comm.land dashboard so users can easily manage them there. The WebRTC phone is installed independently from the comm.land application and can be used in conjunction with other Monster applications when comm.land is not installed.
-
-
-
When we post new documentation, videos, or demo material, you should see a notification here.
AND if you want to share any of your own notes, we welcome the contribution!
-
-
With the added focus on Telemedicine and Telehealth activities these days, we thought it might help to provide an overview of HIPAA and 2600Hz.
NOTE: We are not legal experts. Please contact your lawyer to implement your HIPAA compliance strategy.
Overview
What is HIPAA?
HIPAA (Health Insurance Portability and Accountability Act) Is a privacy law enacted in 1996 that is designed to protect consumers by ensuring any data related to their personal or “protected health information (PHI)” is not shared and/or used without their express permission.The general requirements of HIPAA Security Standards state that covered entities must:
- Ensure the confidentiality, integrity, and availability of all electronic protected health information the covered entity creates, receives, maintains, or transmits.
- Protect against any reasonably-anticipated threats or hazards to the security or integrity of such information.
- Protect against any reasonably-anticipated uses or disclosures of such information that are not permitted or required under the privacy regulations.
- Ensure compliance by its workforce.
In short this means a business must
- Protect and not disclose health information unless expressly given permission
- Use appropriate measures to keep the information secure
- Report any breaches of unsecured health information
- Make available any accounting of disclosures
- Make internal practices available to the Secretary for audits, to determine compliance.
Some guidelines HIPAA outlines
HIPAA provides guidelines that outline how to manage the transfer and storage of data on digital channels. The guidelines include details about the use of data, encryption, servers, authentication, and audit trails.
A copy can be found here:
https://www.hhs.gov/hipaa/for-professionals/privacy/guidance/index.htmlIf your business provides a service that handles personal health information, data handling details will need to be identified, and a legal agreement outlining how to share the responsibility for keeping data private may be advised. As a provider, you will want to reach out for legal advice and make sure any contract you enter is appropriate for your situation.
2600Hz and HIPAA
Is 2600Hz software HIPAA compliant?
Currently 2600Hz software is not certified by HIPAA. Our installations are built to be customized for different client environments by both resellers and users. We are not in a position to control the HIPAA related settings and ensure the installation is and remains compliant. For this reason any BAA agreements should be reached and signed between the reseller and the user.Why should I be concerned about HIPAA compliance using KAZOO?
If you are working with a client who is involved in personal health -- for example a doctor’s office, a mental health provider, a pharmacy, or medical equipment company -- you will want to meet with them to identify any requirements or guidelines they have been advised to follow. At times they may want to engage a HIPAA auditor to clarify their responsibilities.It is important you research your responsibility to protect any data you process and understand any liability you may face.
What are the areas within your software that HIPAA would not approve?
As with any phone system (and web-based email, texting, etc), some “features” are useful and also fodder for nefarious activity. Where and how they are stored and how easily these features are activated are some of what concern HIPAA auditors. These include (and there are others):- https:// web viewing channel
- Attached faxes and image files
- Voicemails transcribed to email
- Recorded audio/VOIP calls
- Video calls and recordings, if stored
- Text and chat messages
What is a BAA, or Business Associate Agreement?
Often the responsibility for adhering to the guidelines is shared between the vendor (for conferencing, texts, etc) and the health provider through a legal agreement.The HIPAA BAA stands for a Business Associate Agreement. This references a legal agreement between two businesses that handle HIPAA related data that outlines what and how they are responsible for it and where they can and cannot use the information. There is a sample copy of this kind of agreement provided by the US Health and Human Services website, here.
https://www.hhs.gov/hipaa/for-professionals/covered-entities/sample-business-associate-agreement-provisions/index.htmlWe recommend you invest in legal review to make sure your BAA covers your client profile.
Who do I sign a BAA with?
You are responsible to sign a BAA with your client. As 2600hz does not control or have access to your account configuration it is your responsibility to ensure the account is compliant and to sign the agreement with them.What role does 2600Hz play in my HIPAA compliance?
At this time, 2600Hz native software is not HIPAA certified. Depending on the applications used, accounts may be configured in a way that does support HIPAA compliance. This kind of adjustment made by resellers and/or clients may include disabling some features that are less secure, such as electronic faxing, or redirecting the storage for these features to a more secure storage service. Note however, if settings for these features are easily changed by a user it is not an optimal solution.How can I make sure I’m HIPAA Compliant using KAZOO?
We recommend you meet with your client and assess the following:- Identify what applications and use scenarios are subject to HIPAA guidelines
-
Review application settings to see if they can be adjusted to satisfy HIPAA
(for example, disabling some features that may not be required) - Enter into a BAA agreement if advised by an auditor or legal counsel.
One of the first steps offices take is to move all data storage to a HIPAA recognized secure system such as Amazon or Google. This is neither technically challenging nor a big financial investment; please contact our support team for more information.
Can I redirect PHI data to a different server that is secure?
Yes. We are compatible with secure, encrypted 3rd party storage solutions, such as Amazon's S3 or Google. We can help you redirect your faxes to these services.Do you support S/MIME encryption for emails (in and out) as a way to be compliant?
At this time we do not support S/MIME encryption. There is some activity from the community requesting this as a feature; if you want to join their efforts, add it as a request here:
Reference Links
Where can I find more information on HIPAA requirements?
The HHS website below provides an extensive overview, FAQs, and a sample agreement you can review:
https://www.hhs.gov/hipaa/for-professionals/covered-entities/sample-business-associate-agreement-provisions/index.htmlIn addition, the HIPAA Journal has up to date information,
https://www.hipaajournal.com/
-
USER GUIDE – BUILD A VIRTUAL RECEPTIONIST IN SMART PBX (also called an IVR)
User Story
An office wants to set up a system on their PBX where the caller selects different extensions/options for:- Receptionist
- Directory / List of Extensions
- Sales group
- Voicemails for Users and Groups
- Answering Service or 3rd party number
- Spanish language menu
This is often called a “Virtual Receptionist” or an “IVR” (for "Interactive Voice Response") setting. You will be able to guide your callers to different extensions depending on their purpose.
Overview
This guide is set up in two parts.- Part 1 steps through an initial setup for a main menu using SmartPBX.
- Part 2 steps through how to add sub-menus and additional features to the standard virtual receptionist process.
This addresses our initial user story item for adding a Spanish language menu.
To achieve this we will leverage our powerful Callflows application and create a “submenu” there, and then reference it in SmartPBX.The process looks something like this:
Before you start
Part 1 will take you through setting up a basic Virtual Receptionist, or call directing menu. This guide assumes you have gone through basic SmartPBX setup steps (add link for setup reference) and have:
- Configured a Company main number and emergency / 911 address
- Added users to a directory and assigned their extensions
- Added/enabled devices and phone numbers to the device tab.
- NOTE: If you use an external answering service, you will want to add their phone # and landline as a device.
- Added/enabled a group of users (such as sales, billing, appointments, etc) if that will be an option for your Virtual Receptionist
- List of your office hours and holidays
Part 1: Create an initial Virtual Receptionist Menu in SmartPBX
Open SmartPBX
Quick steps include as follows:
- Go to the Main Number / Incoming Call Handling menu
- Enter office hours, and vacation and holiday times that may affect your Virtual Receptionist response
-
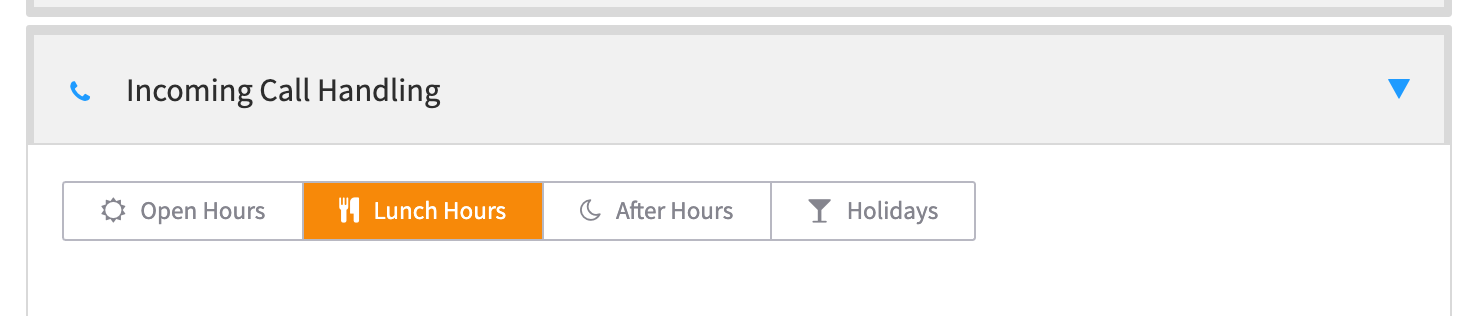
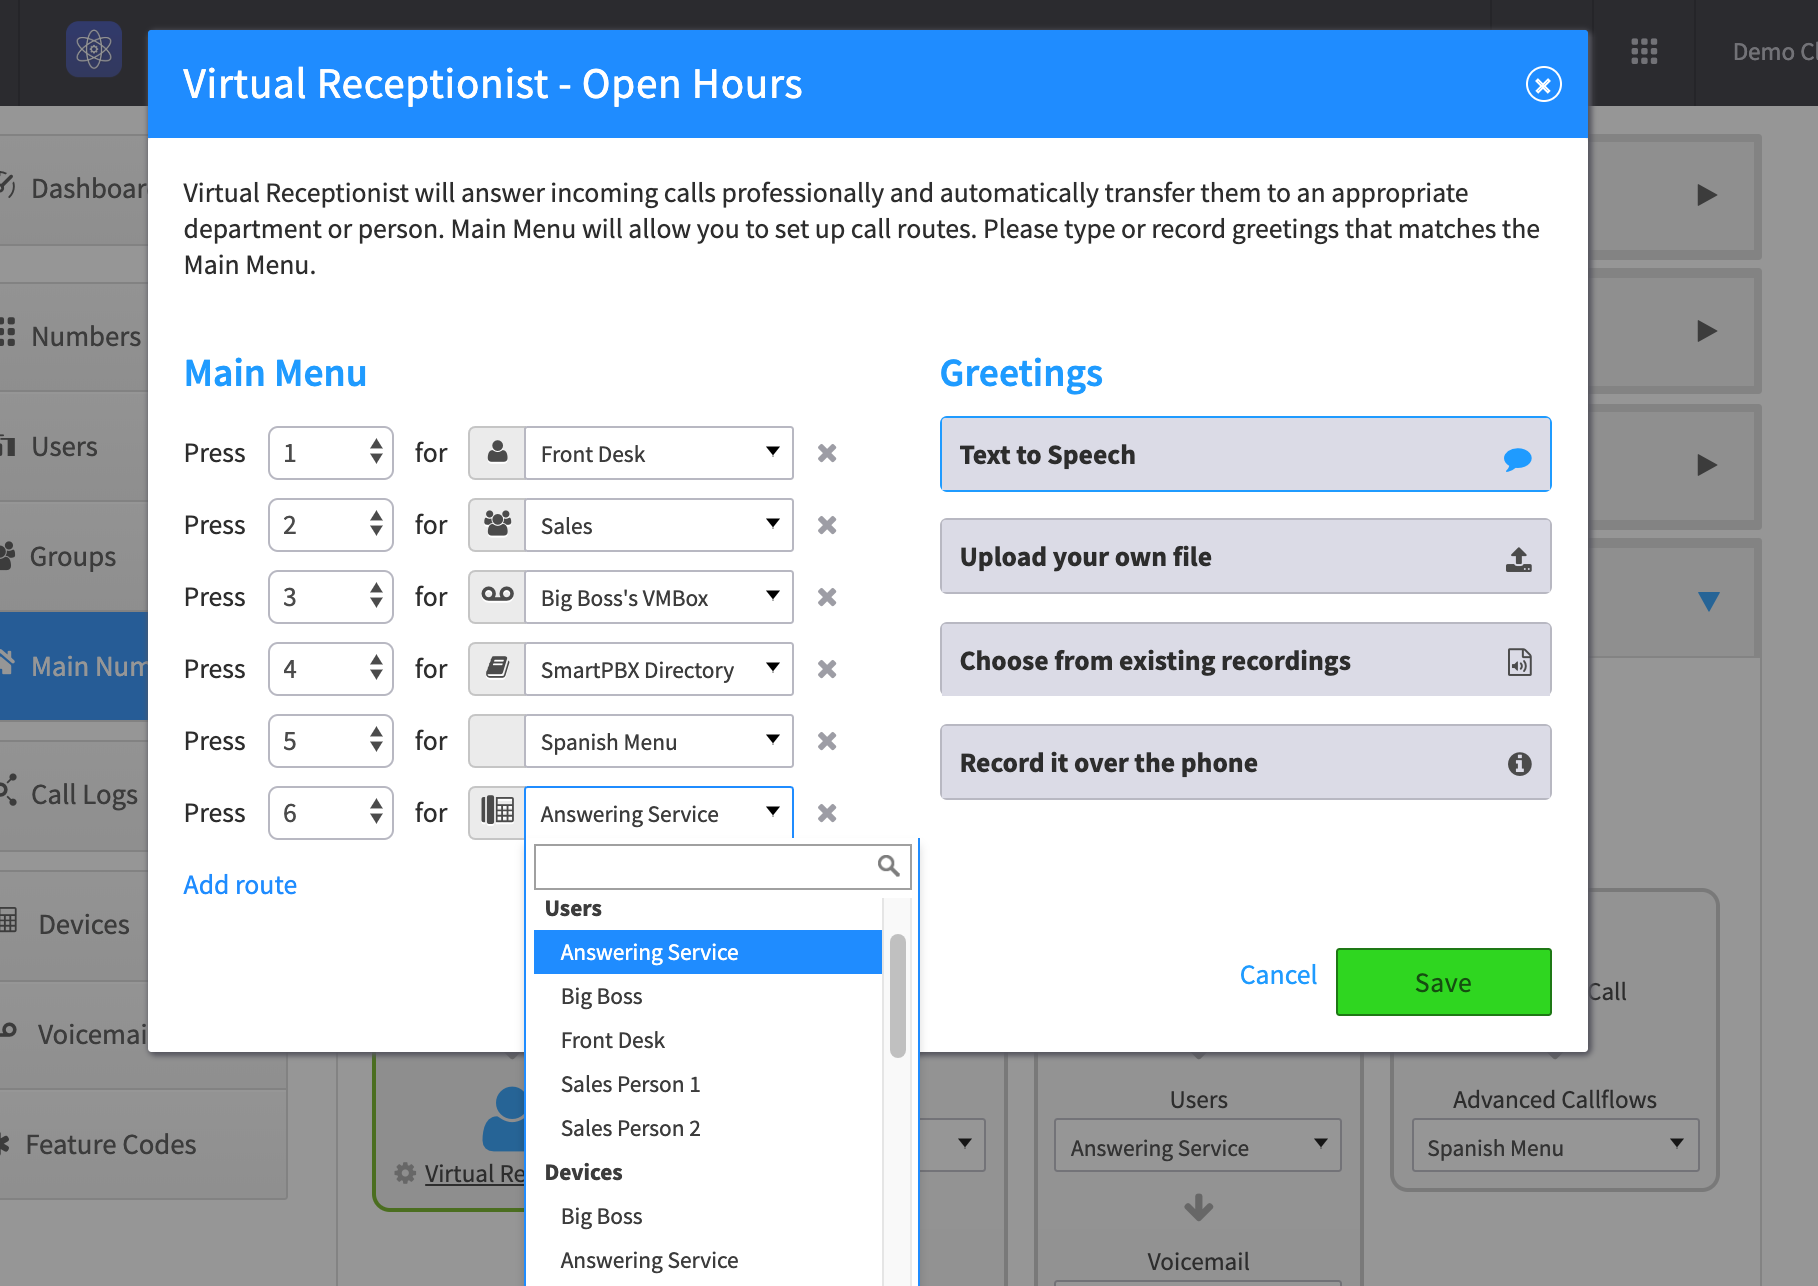
For each “setting” -- Open Hours, Lunch Hours, After Hours, and Holidays, choose an initial Callflow and click on its Virtual Receptionist link.
- Add menu number item and attach its destination
- Add Greetings for each extension if desired
- Save
- Save as part of the Company Directory for future access
Detailed Steps
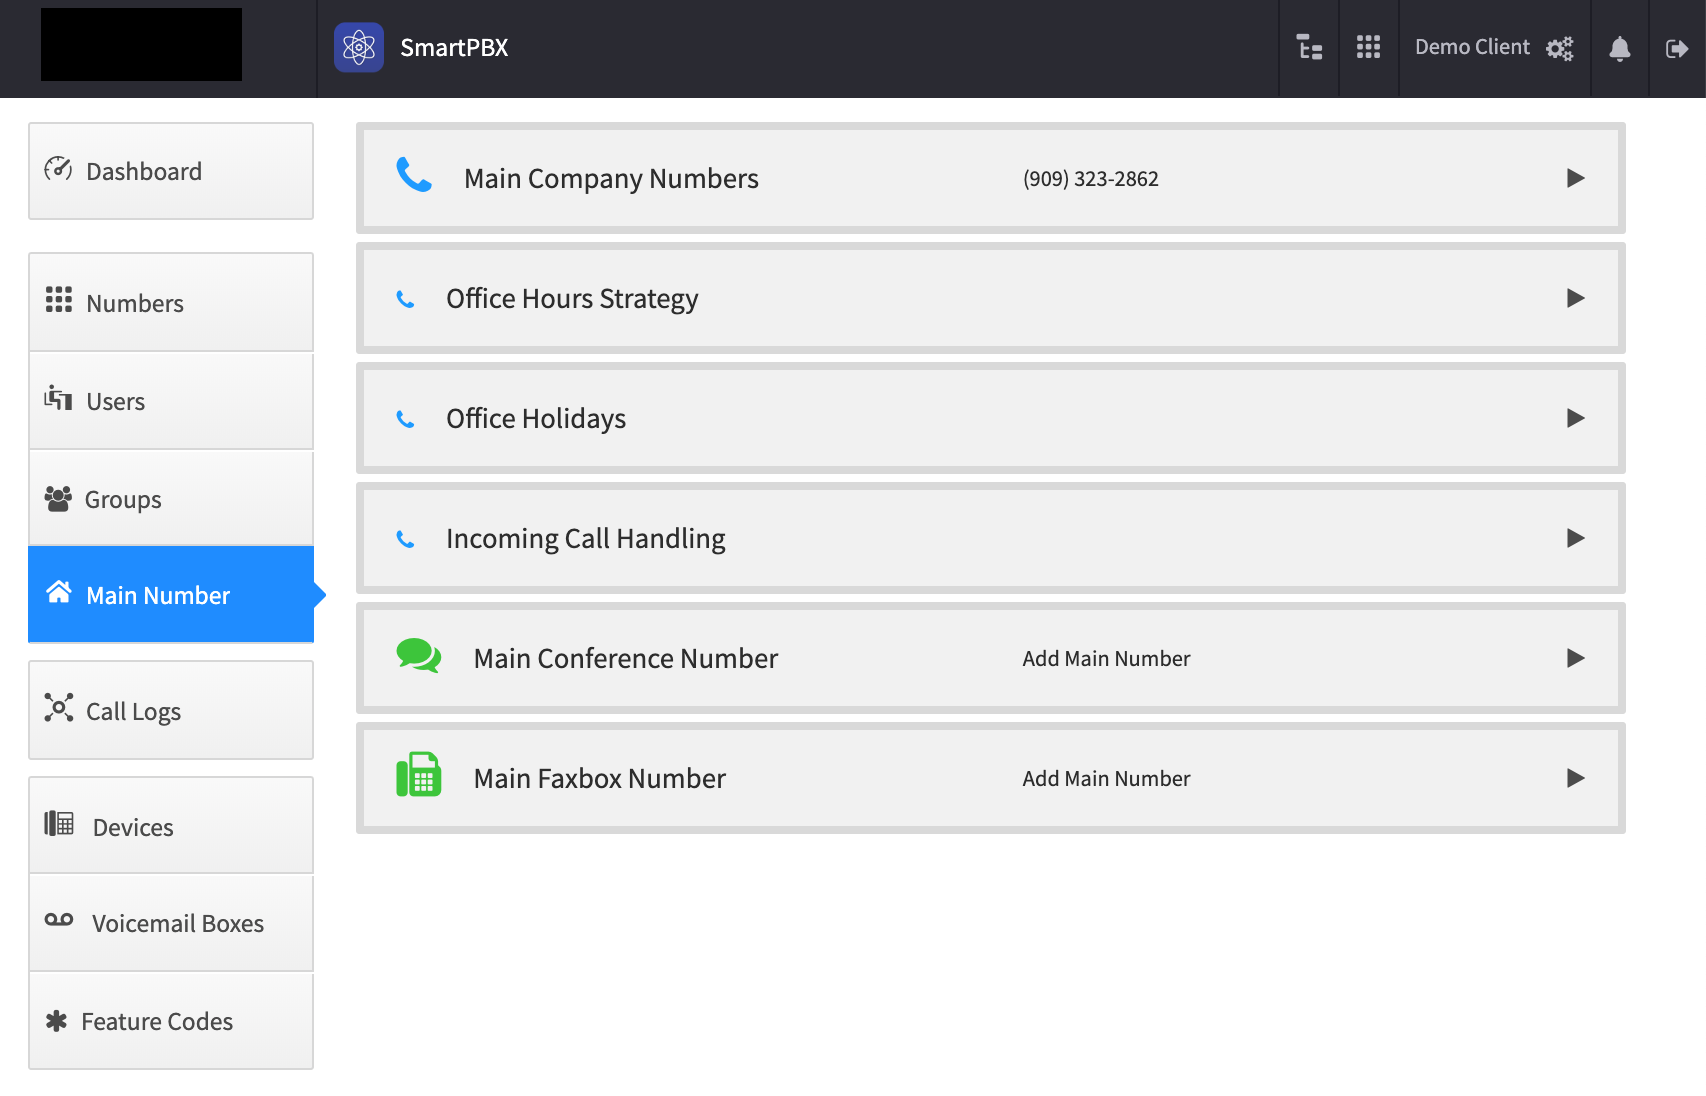
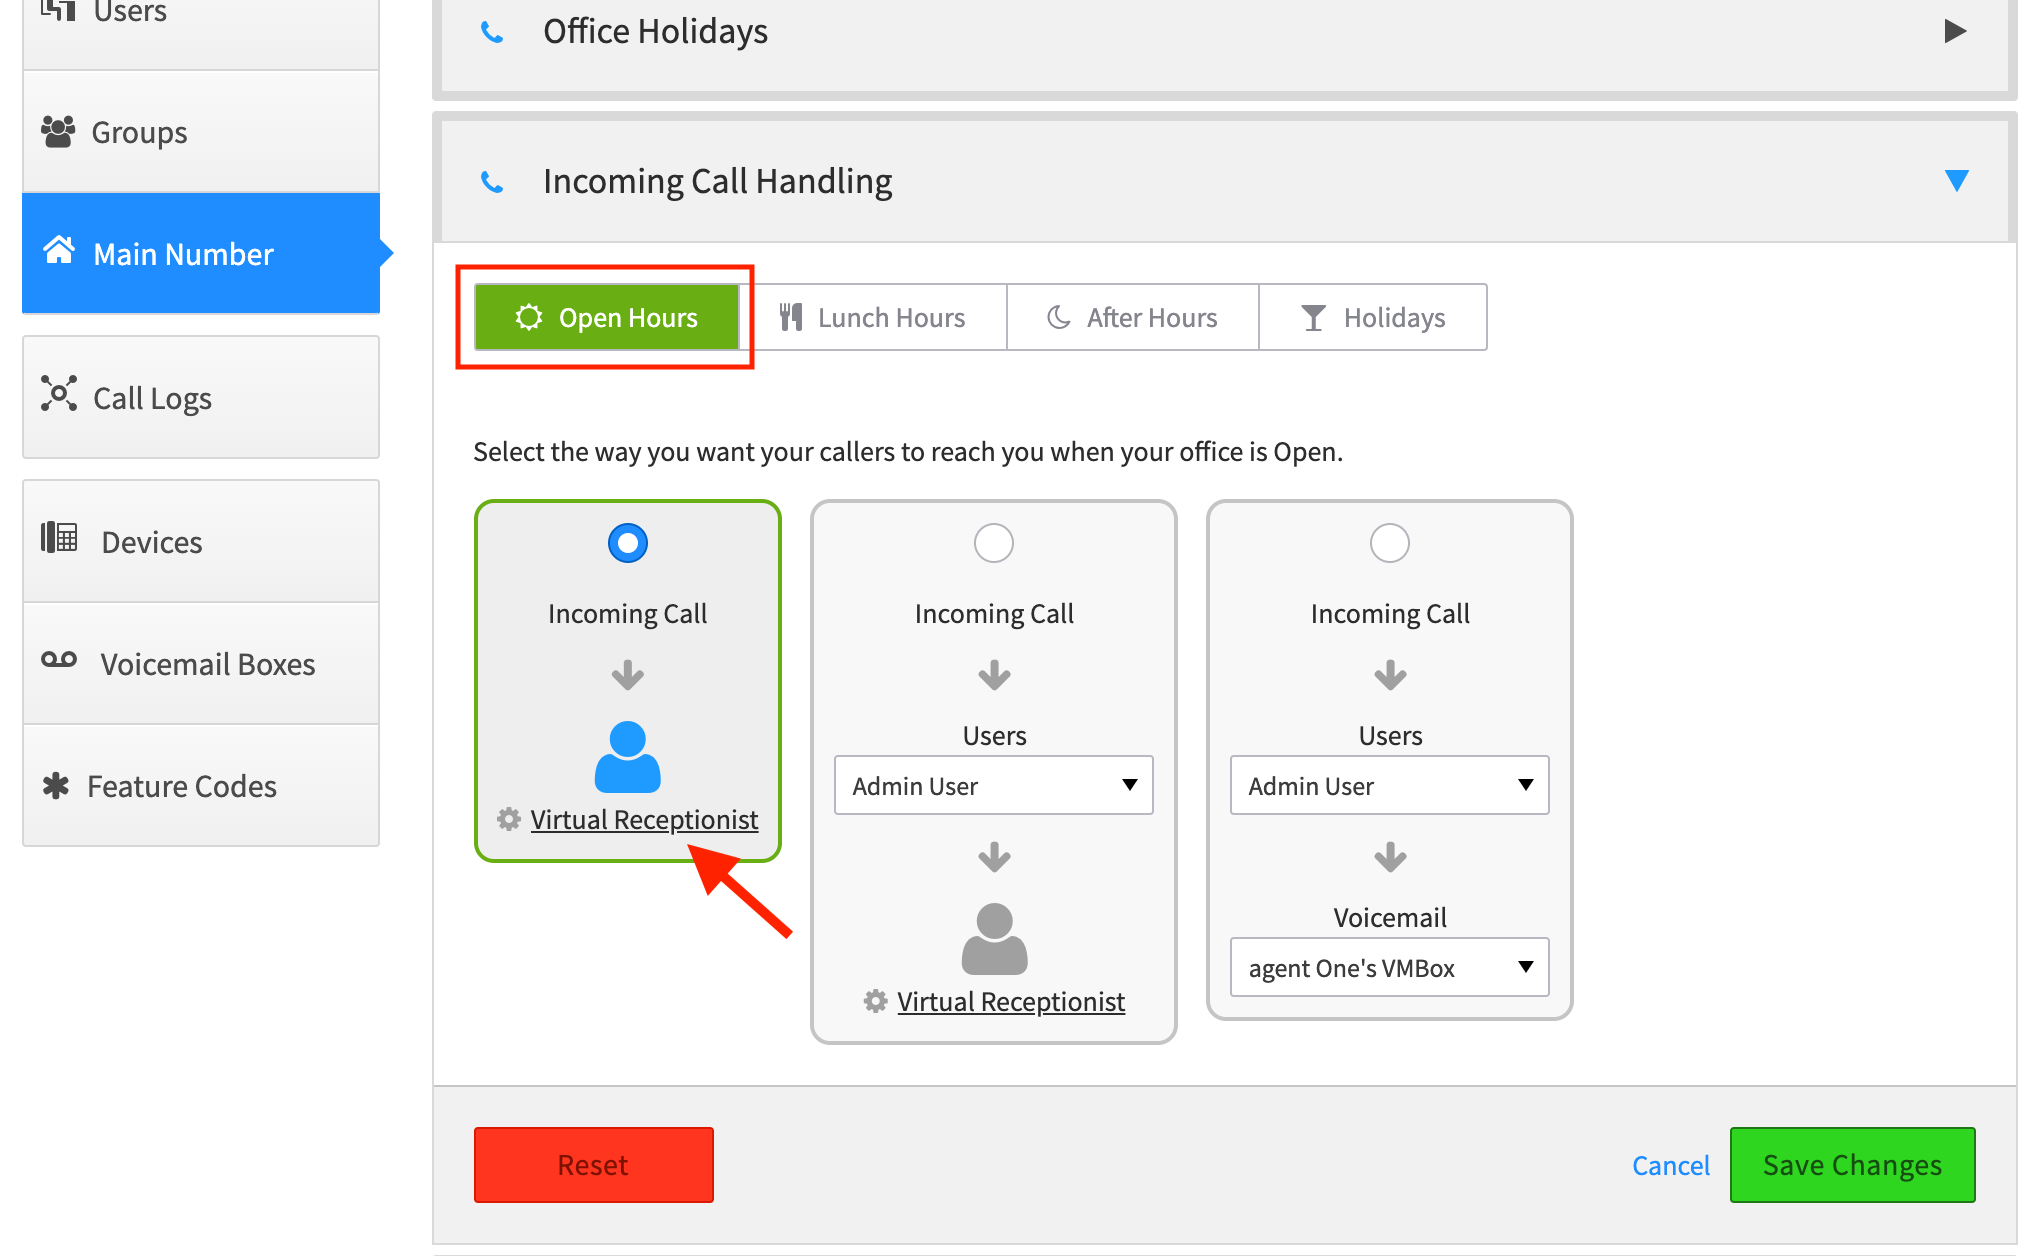
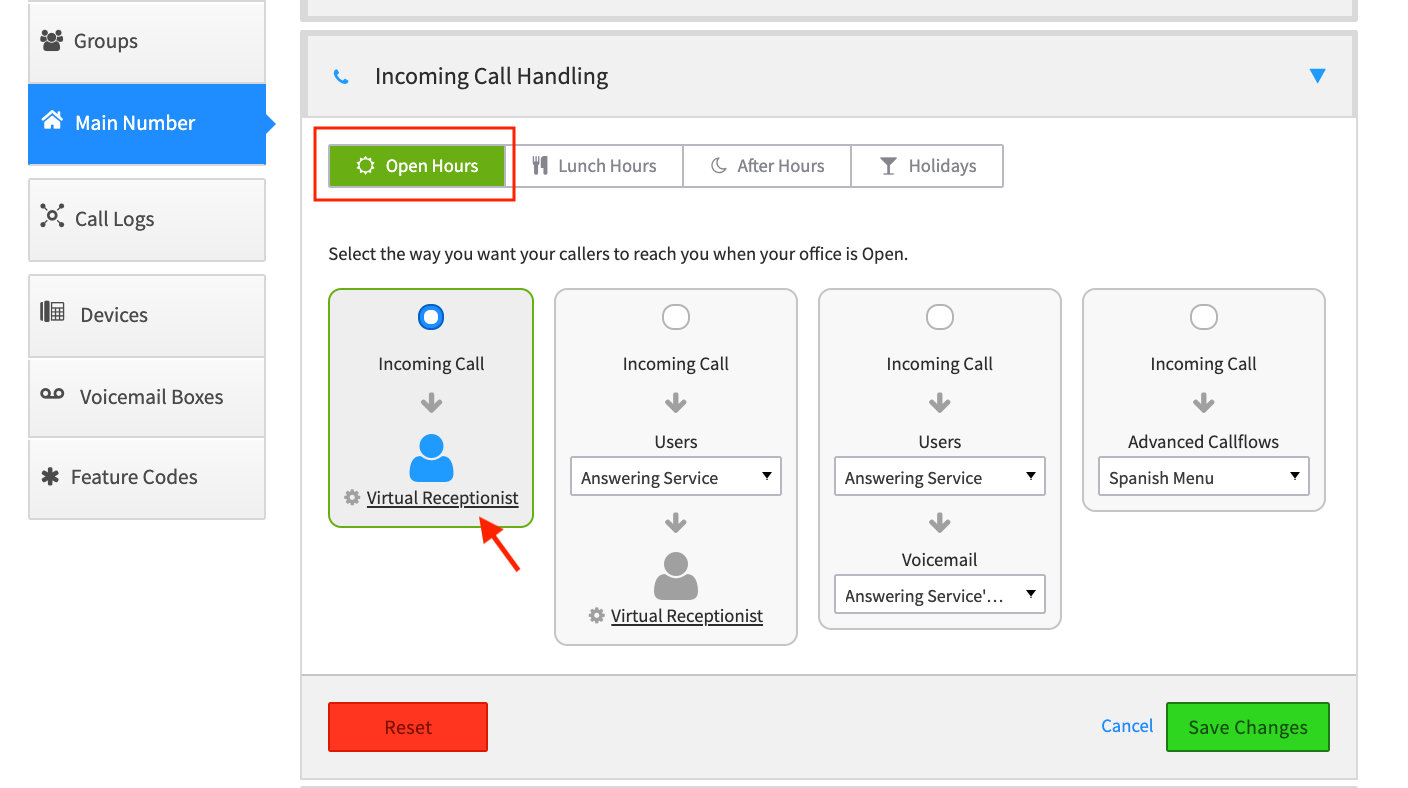
STEP GUIDE – BUILD A VIRTUAL RECEPTIONIST IN SMART PBX (also called an IVR)1. Select Main Number tab from the left menu. You will see this screen:
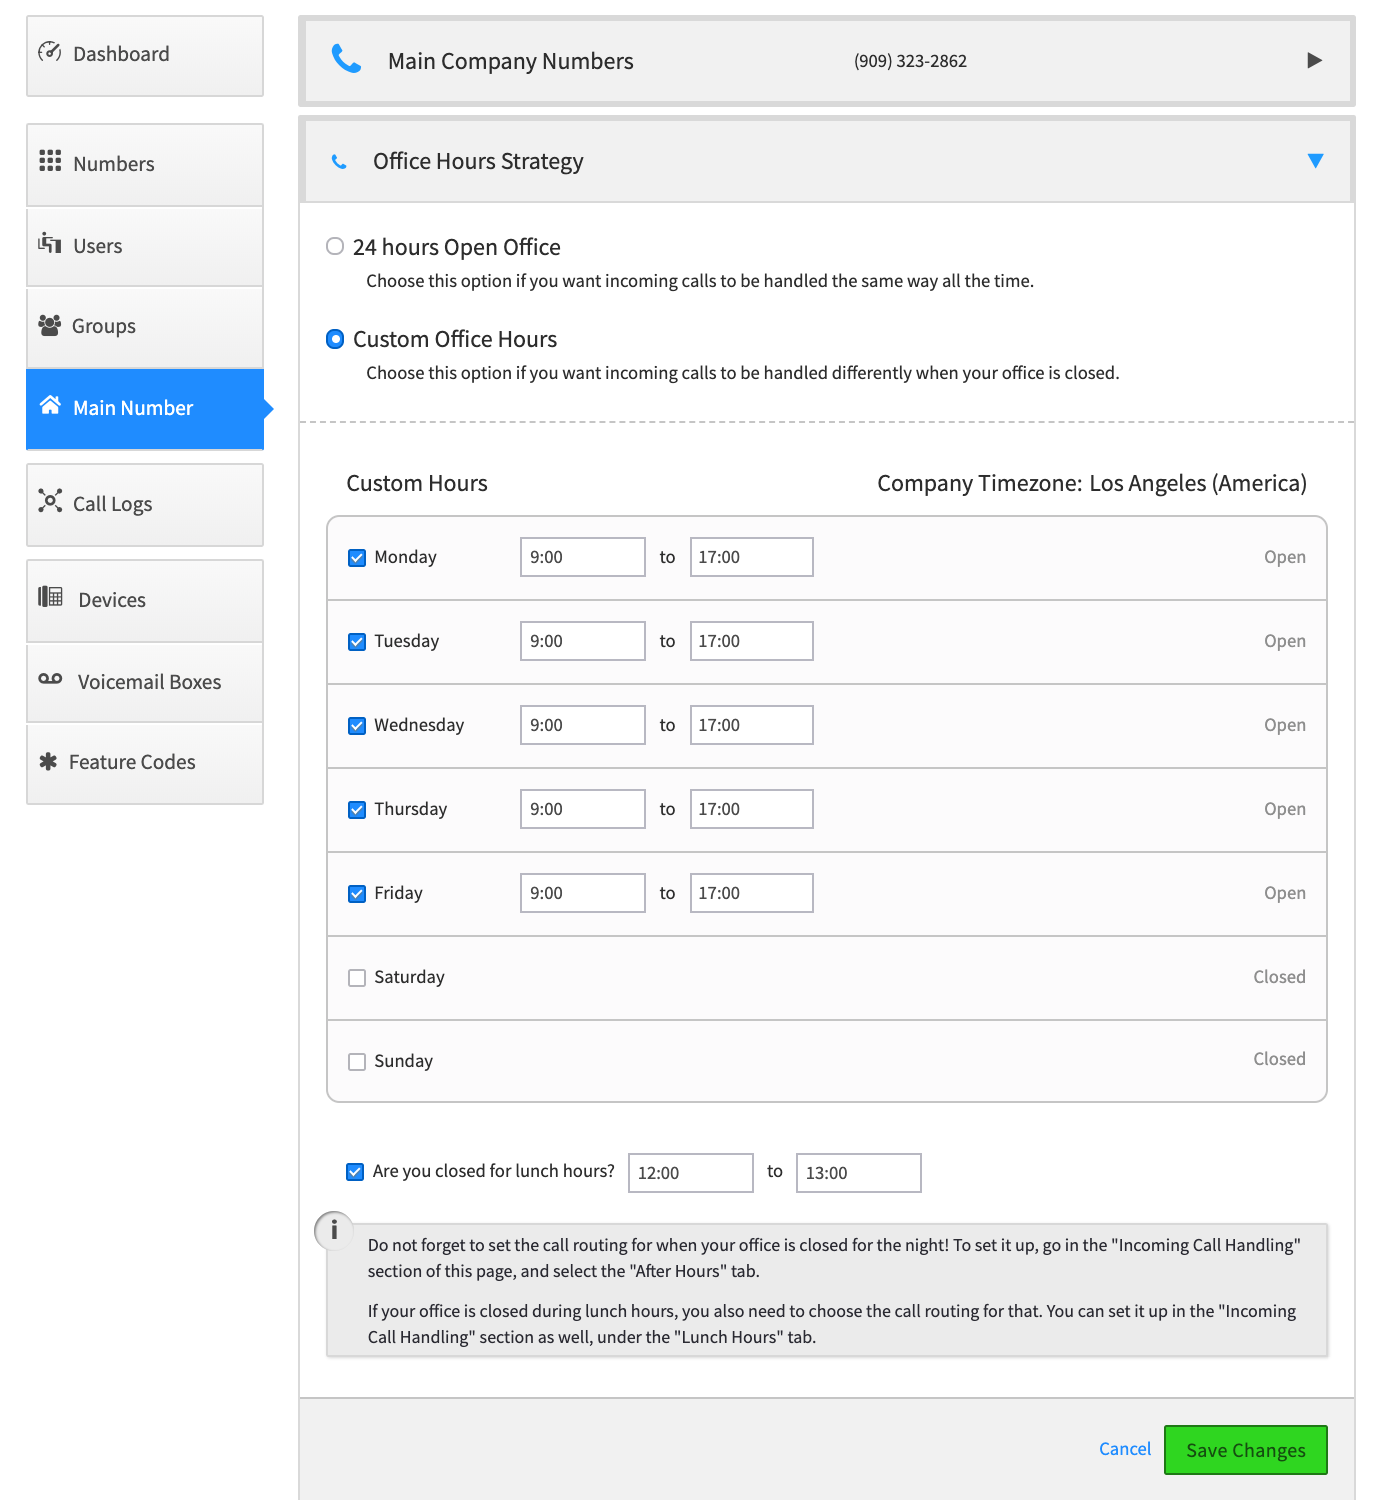
2. Enter Office Hours Strategy
This is important as you will likely have different call routing options when your office is closed, either for lunch, after hours or a holiday.NOTES:
- Verify your time zone
- Enter your “lunch hour” if you send calls to a different number during that time
- SAVE your edits!
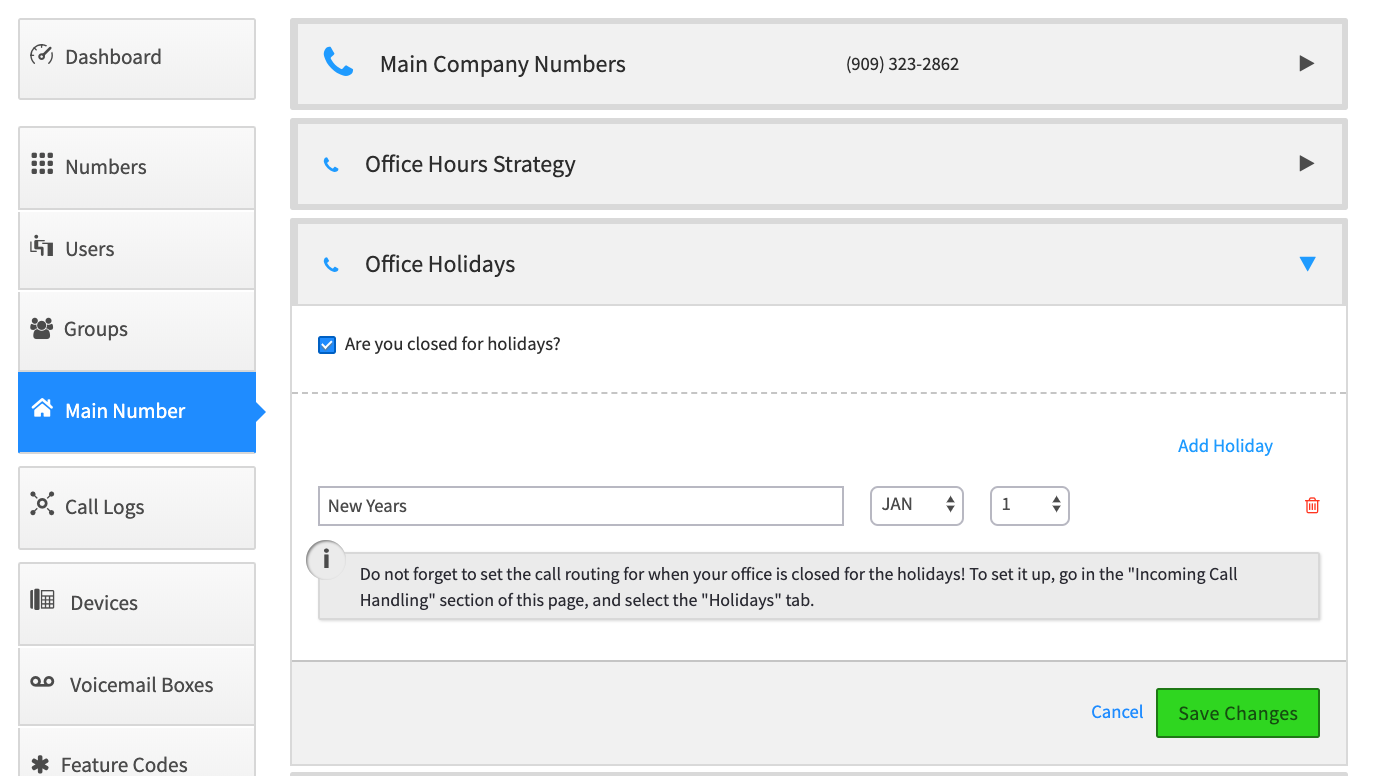
3. Enter Office Holidays
Again, these notes will trigger different call routing procedures.NOTES:
- Once you add holidays, you will need to make sure you create an Incoming Call Handling scenario for holiday routing.
- SAVE your changes!
4. Configure your Virtual Receptionist routing for each time setting
There are four different settings to configure for incoming calls: Open Hours, Lunch Hours (if you define this separately), After Hours, and Holidays. With each tab, you will see the menu choices shown below. The first box will send calls directly to the Virtual receptionist. The second box will provide a single option, and then forward to the Virtual Receptionist. For this session we'll work with option 1.
-
Check to see that Open Hours is selected in green.
Note: if you don't see the "Lunch Hours" or other options to the right, it is because you have not defined these in the dialog boxes above - they are optional. - Select the first box, and click on the Virtual Receptionist link.
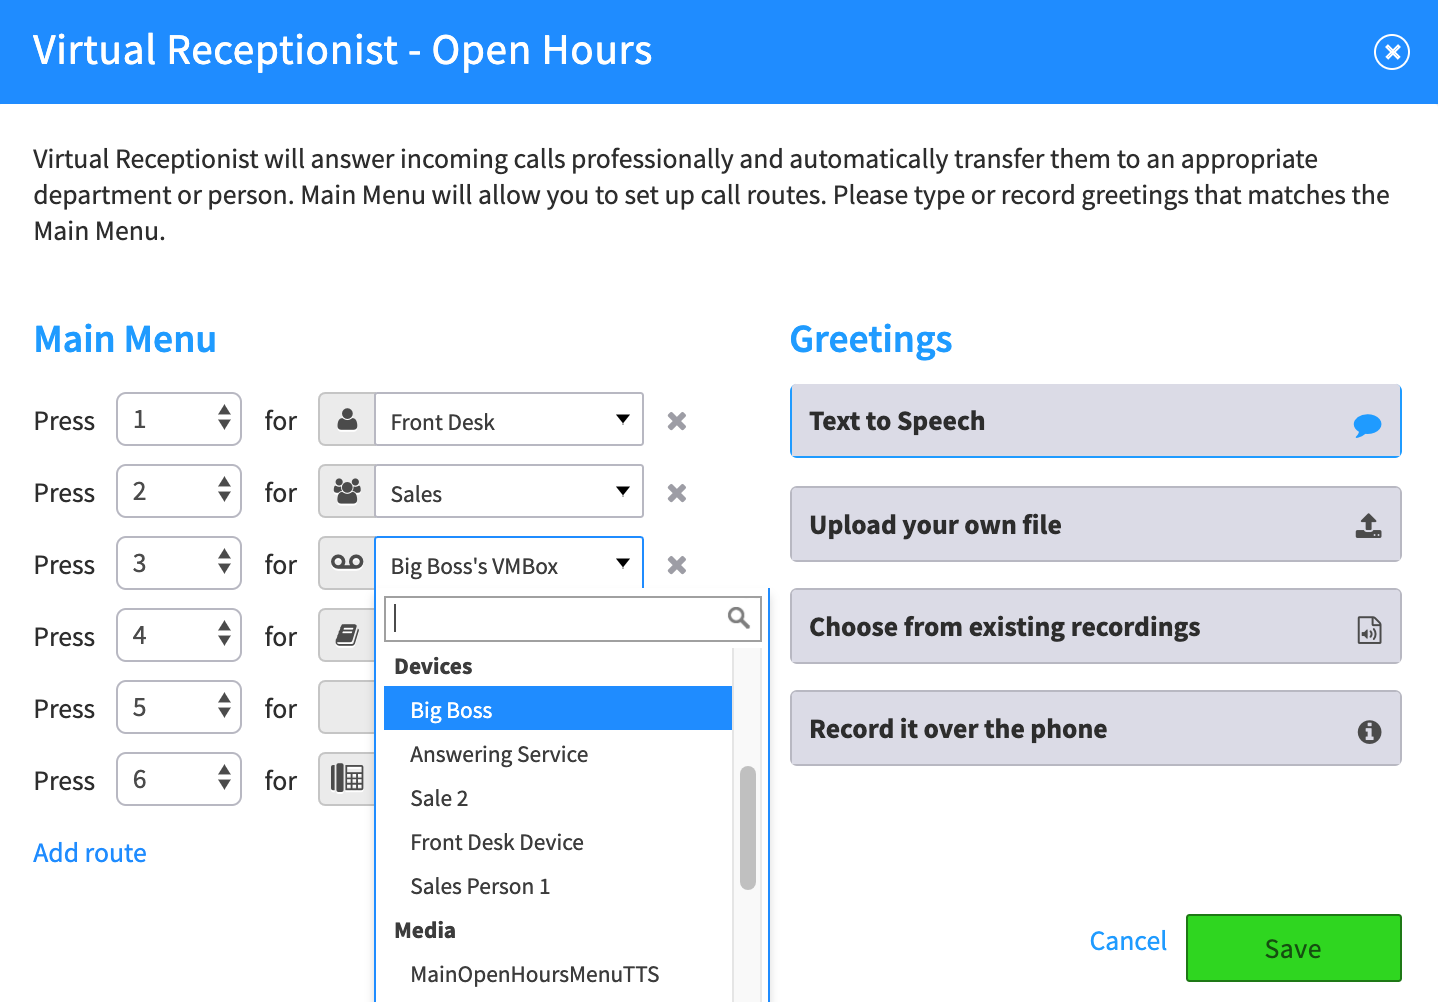
You will see a dialog box like below:
5. For each menu item number, assign an extension or a device.
NOTES:
- You should see all the users, devices and messages assigned to this account in your drop down. If you do not, return to the main SmartPBX menu and add the connections you need.
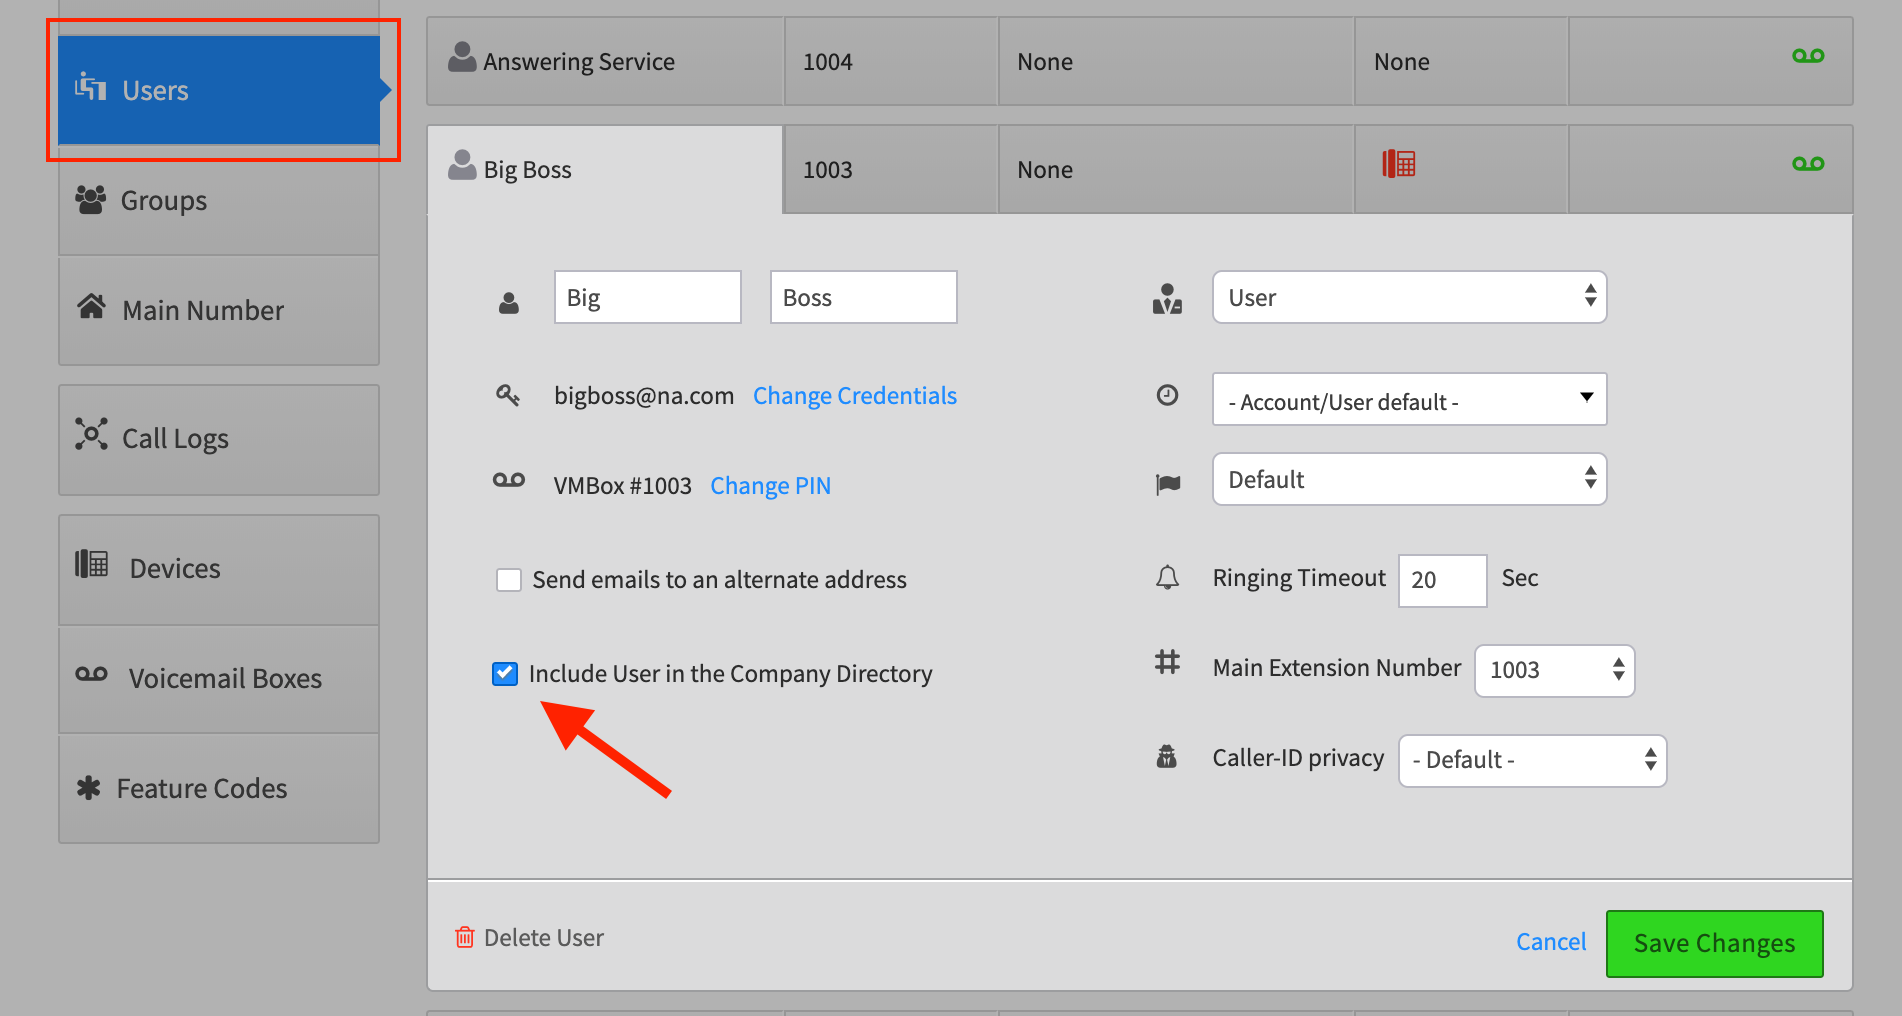
-
If you do not see your “Account Directory” as a top level choice in the drop down, you will need to go back to your Users tab, select each user and check the box “Include User in the Company Directory".
(See dialog box below)
SAVE! your settings so far.
Return to your Main Menu / Incoming Call Handling / Virtual Receptionist - Open Hours menu and
6. Add a Greeting
If you want to add a greeting before you offer menu choices, choose from one of the options for creating that greeting shown on the right.You can:
- Type a text that converts to speech
- Upload a pre-recorded .mp3 file
- Choose from existing recordings
7. Step through the same process for Lunch Hours, After Hours, and Holidays.
This is important! If you do not add your preferences for the different hours and holidays, your callers will only hear your first setup option.
8. AND SAVE!
Part 2: Advanced Virtual Receptionist Setup using Callflows
This section is optional. It demonstrates how to use Callflows to add more complex steps to the Virtual Receptionist process. This includes:
- Adding sub-menus for different languages
- Adding call routing options to groups
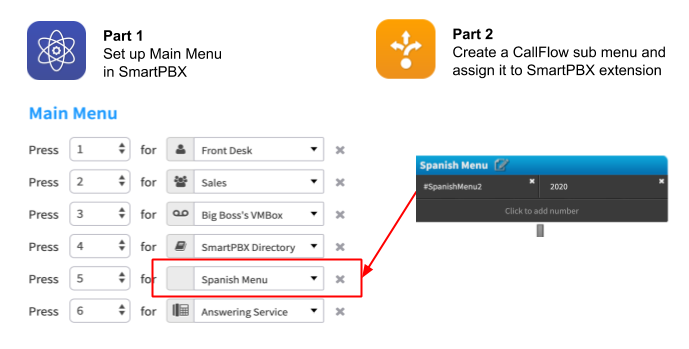
Add a Spanish Speaking menu option
If you want to add a second menu option, for example in a different language, you will need to set up a Callflow that directs the caller to a separate menu.Quick Steps
- Open Callflows
- Create and build a new Callflow
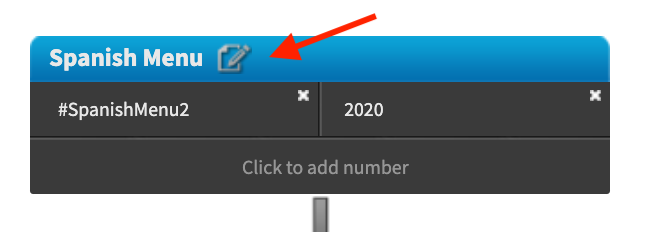
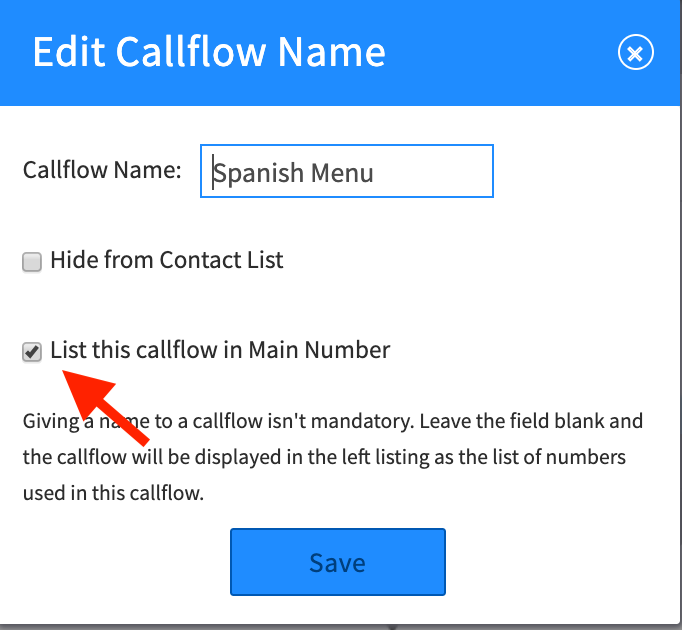
- SAVE your Callflow
- EDIT your Callfllow and make sure to select “List Callflow in Main Number” option so it is displayed in SmartPBX.
- Open SmartPBX and assign your new Callflow to an extension in the Incoming Call menu.
Detailed Steps
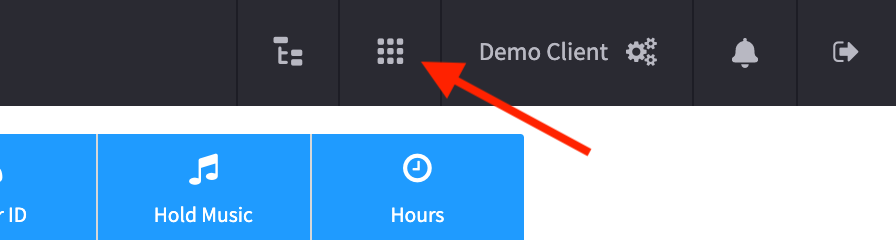
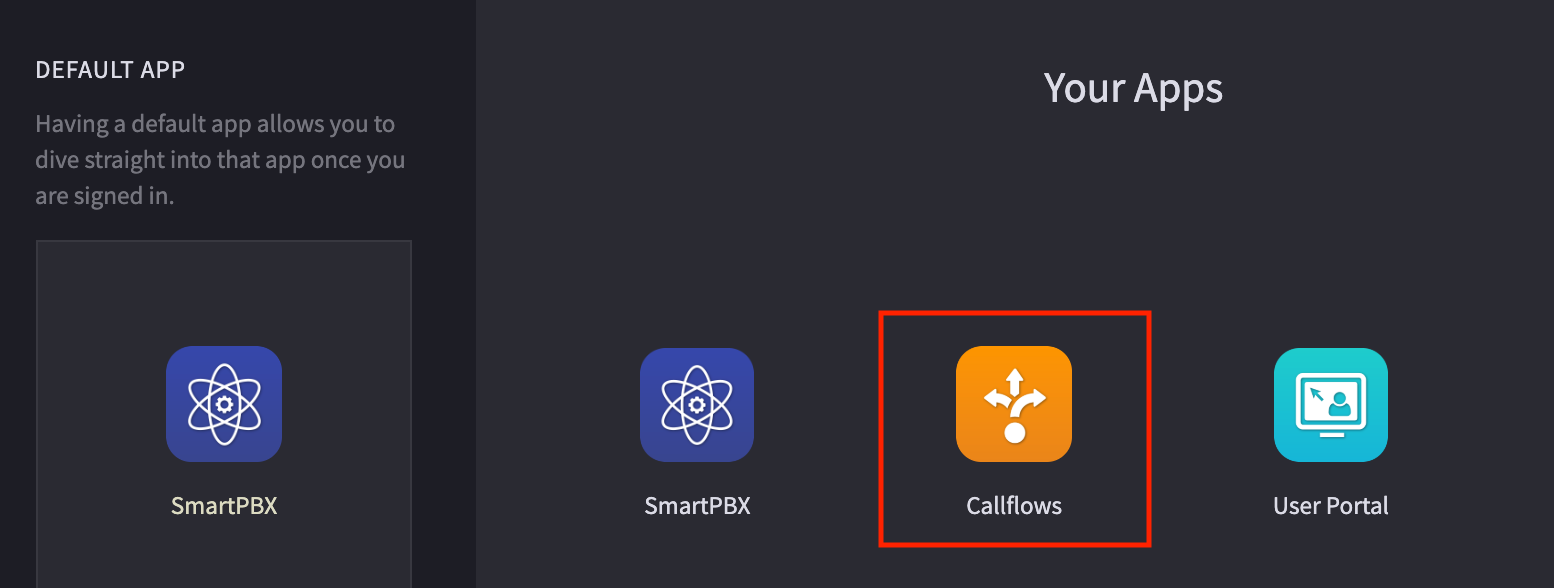
Open the Callflow Application
1. To access this application, select the Apps icon at the top right of your screen.
2. Click on Callflows
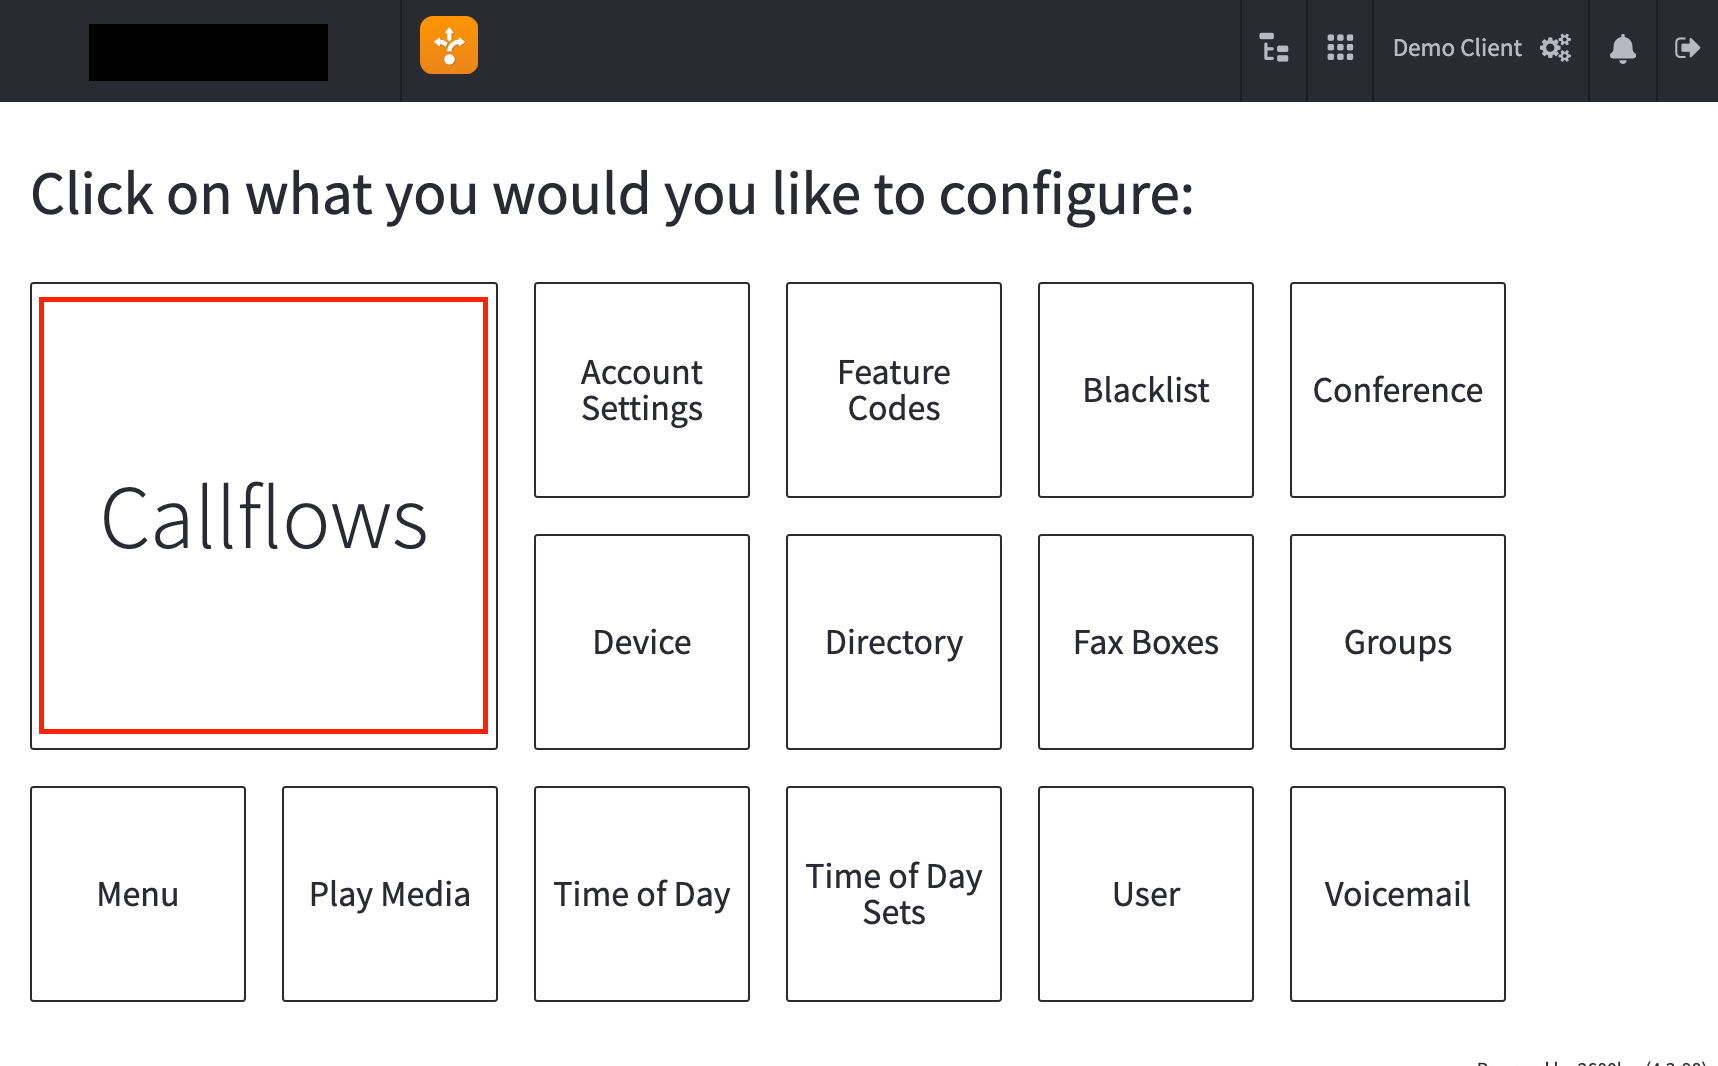
If you do not see it, enter it under “search apps”. If it is still not visible, ask your administrator to enable it for you.3. Select Callflows from the Main menu
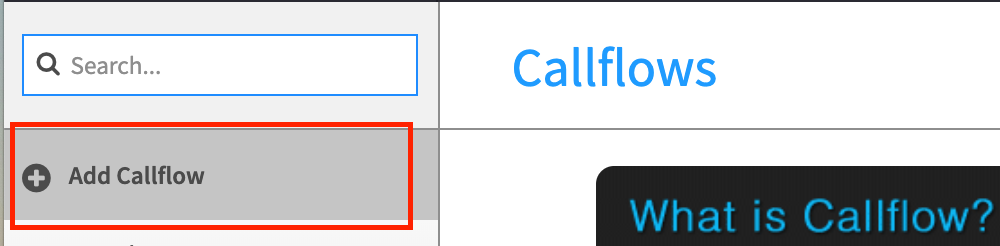
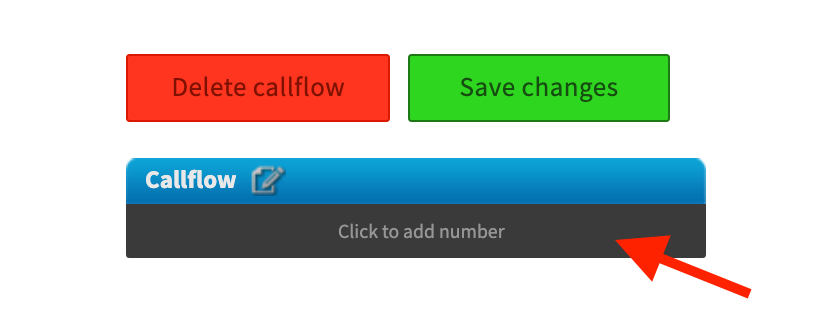
4. Then select Add Callflow
And add the phone number or extension associated with this flow, or routine. You can choose a spare number in your inventory or define an extension to be used.
NOTE
This extension is what you will use as the beginning of your Spanish Speaking Callflow.
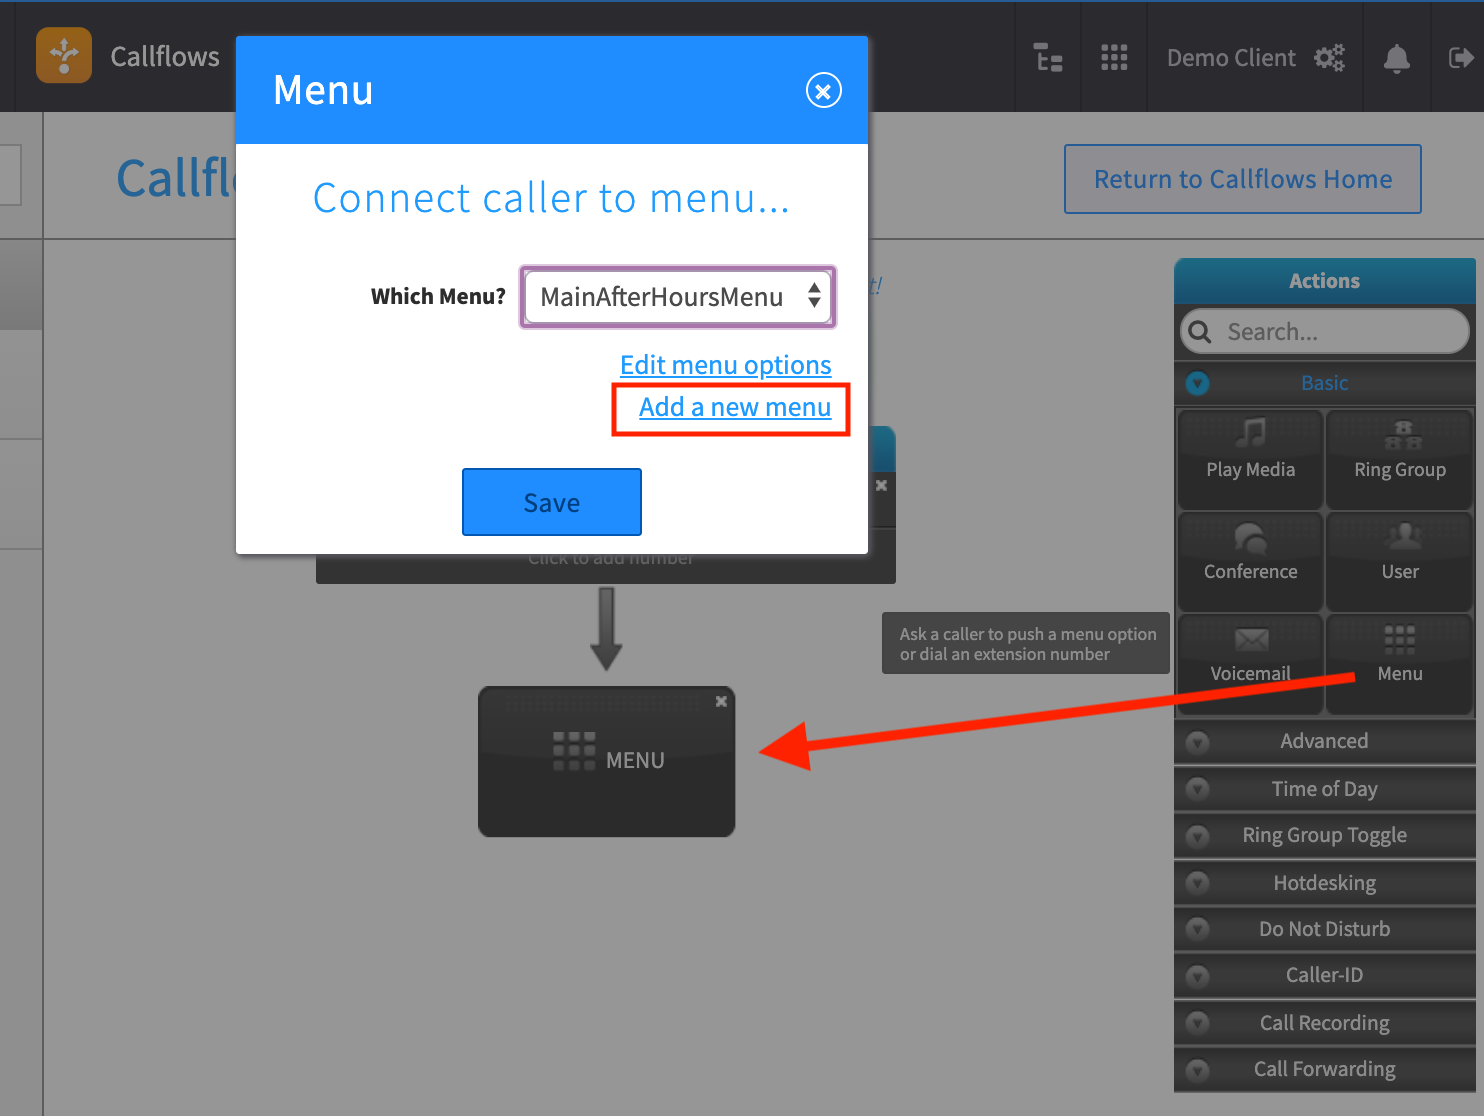
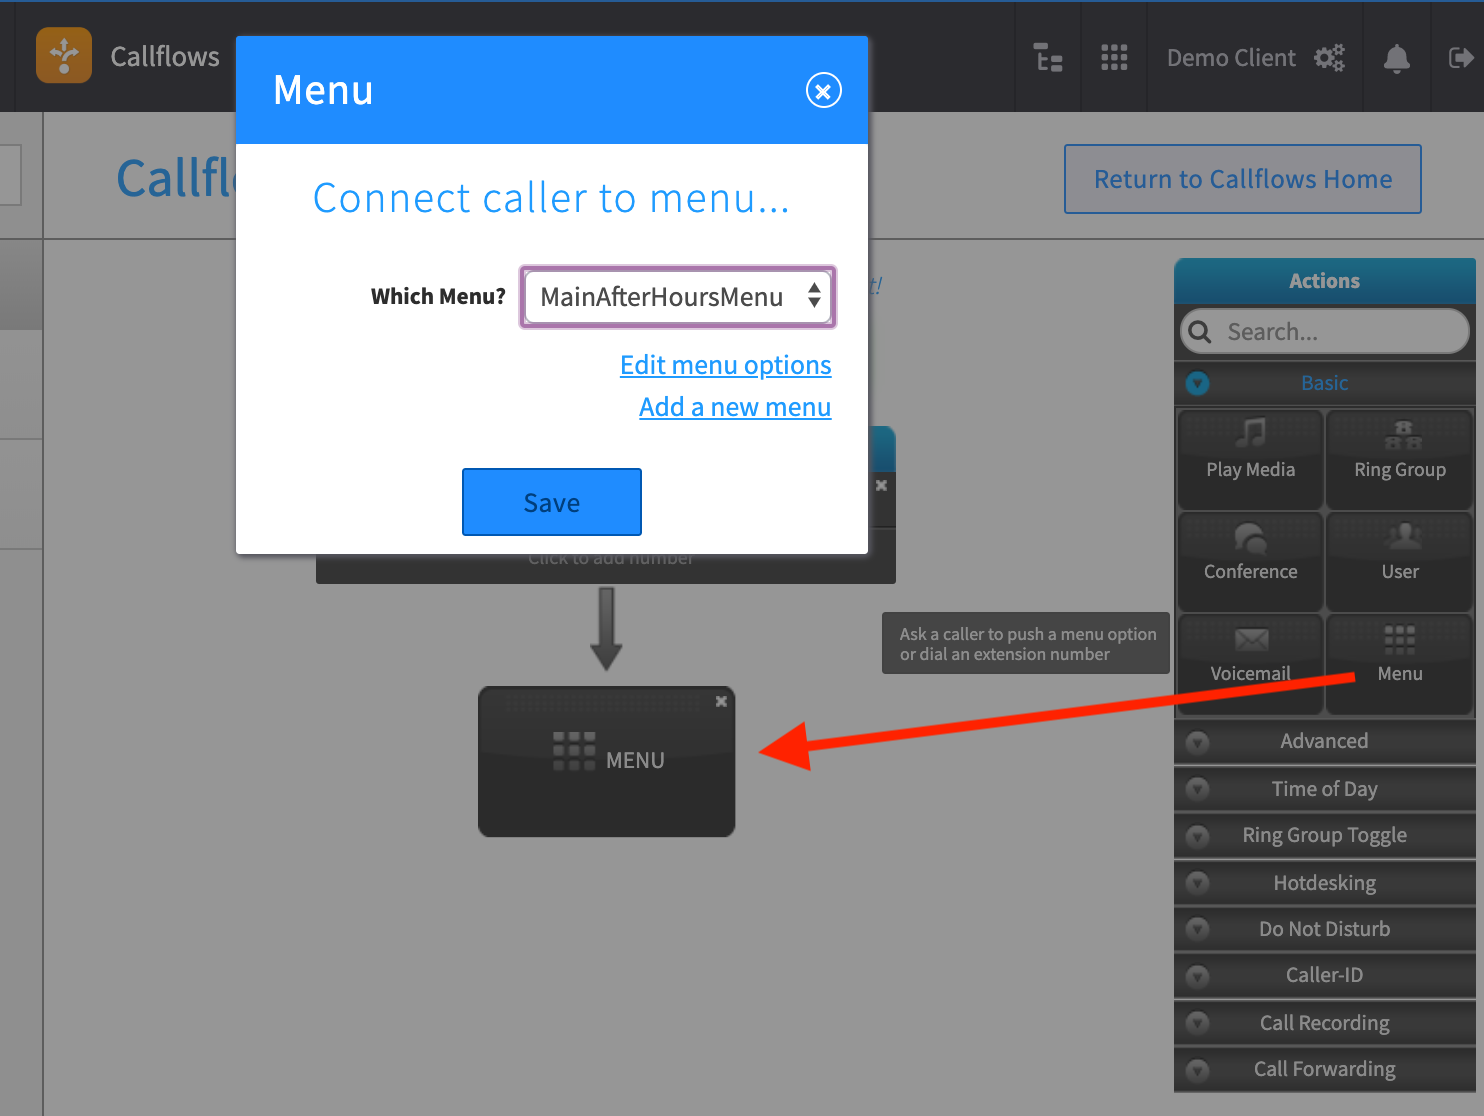
5. Add a new menu to your Callflow
Find the Menu button in the Actions bar to the right, and drag it dynamically to below the Callflow block. The menu dialog box will pop up.
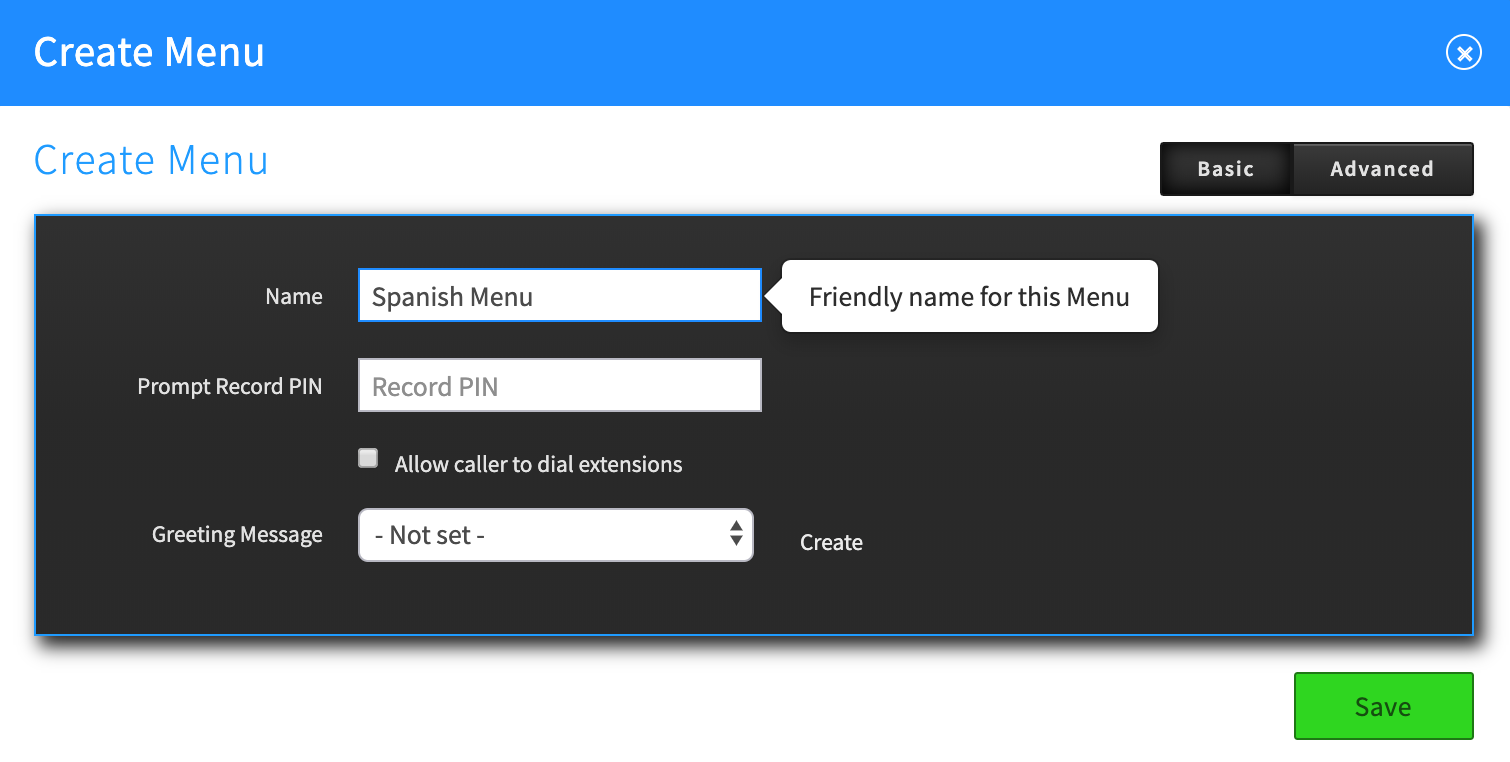
6. Add a greeting message using the bottom selection options. You can
- Type in a message that will be converted to speech (TTS) and define the “profile” of the speaker (e.g. female/male, etc.)
-
Upload a pre-recorded .mp3 file
NOTES:
- A “Not set” option will mean no greeting is played and the menu options begin.
- “TTS” is short for Text to Speech. Enter text and it will be spoken for you.
- You can edit your media file using the edit option; this includes defining the “speaker” profile.
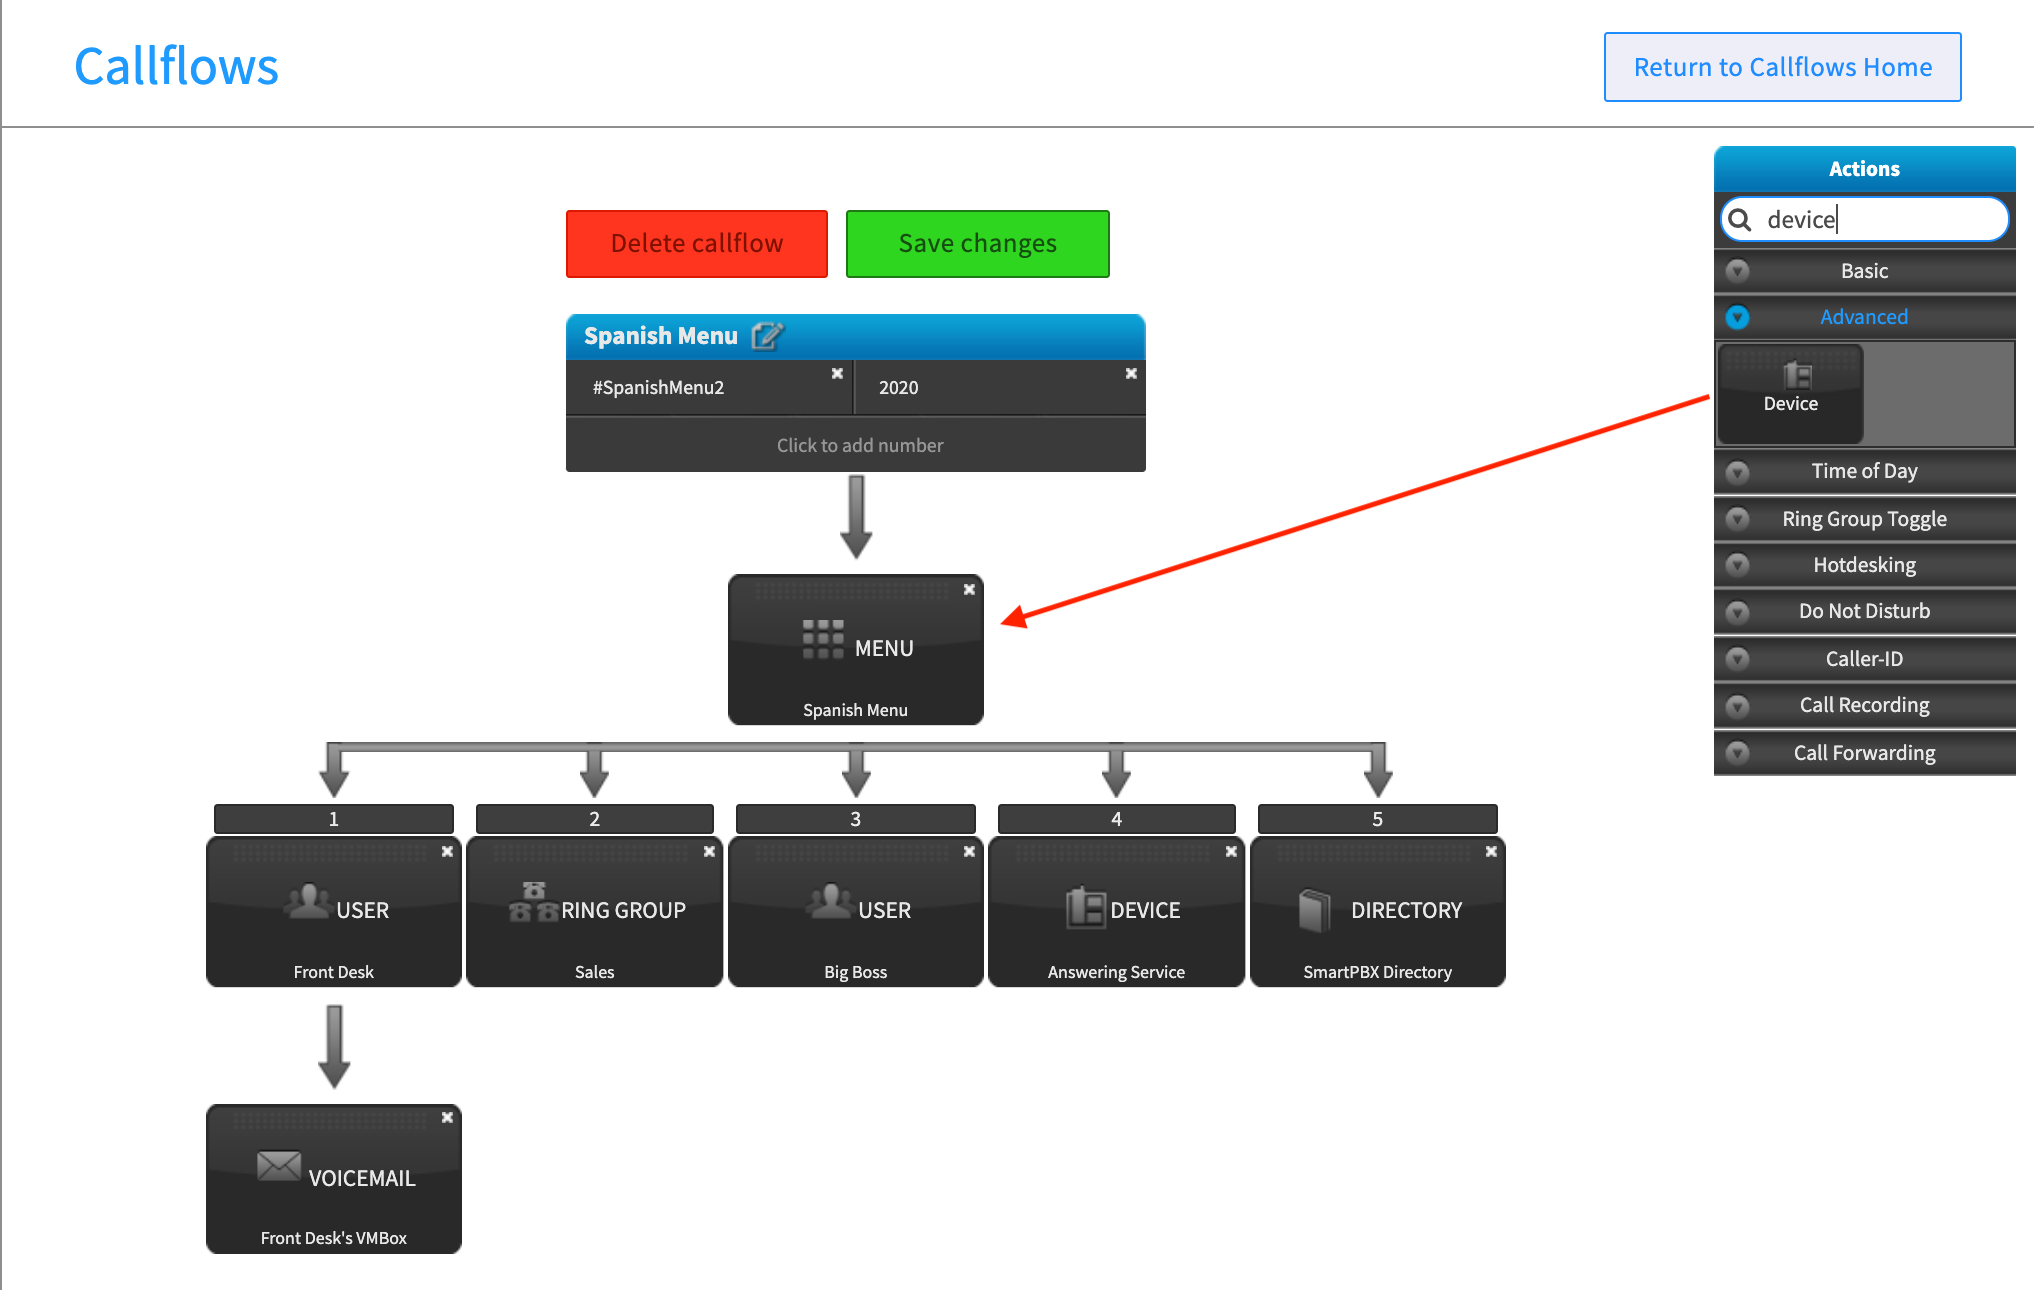
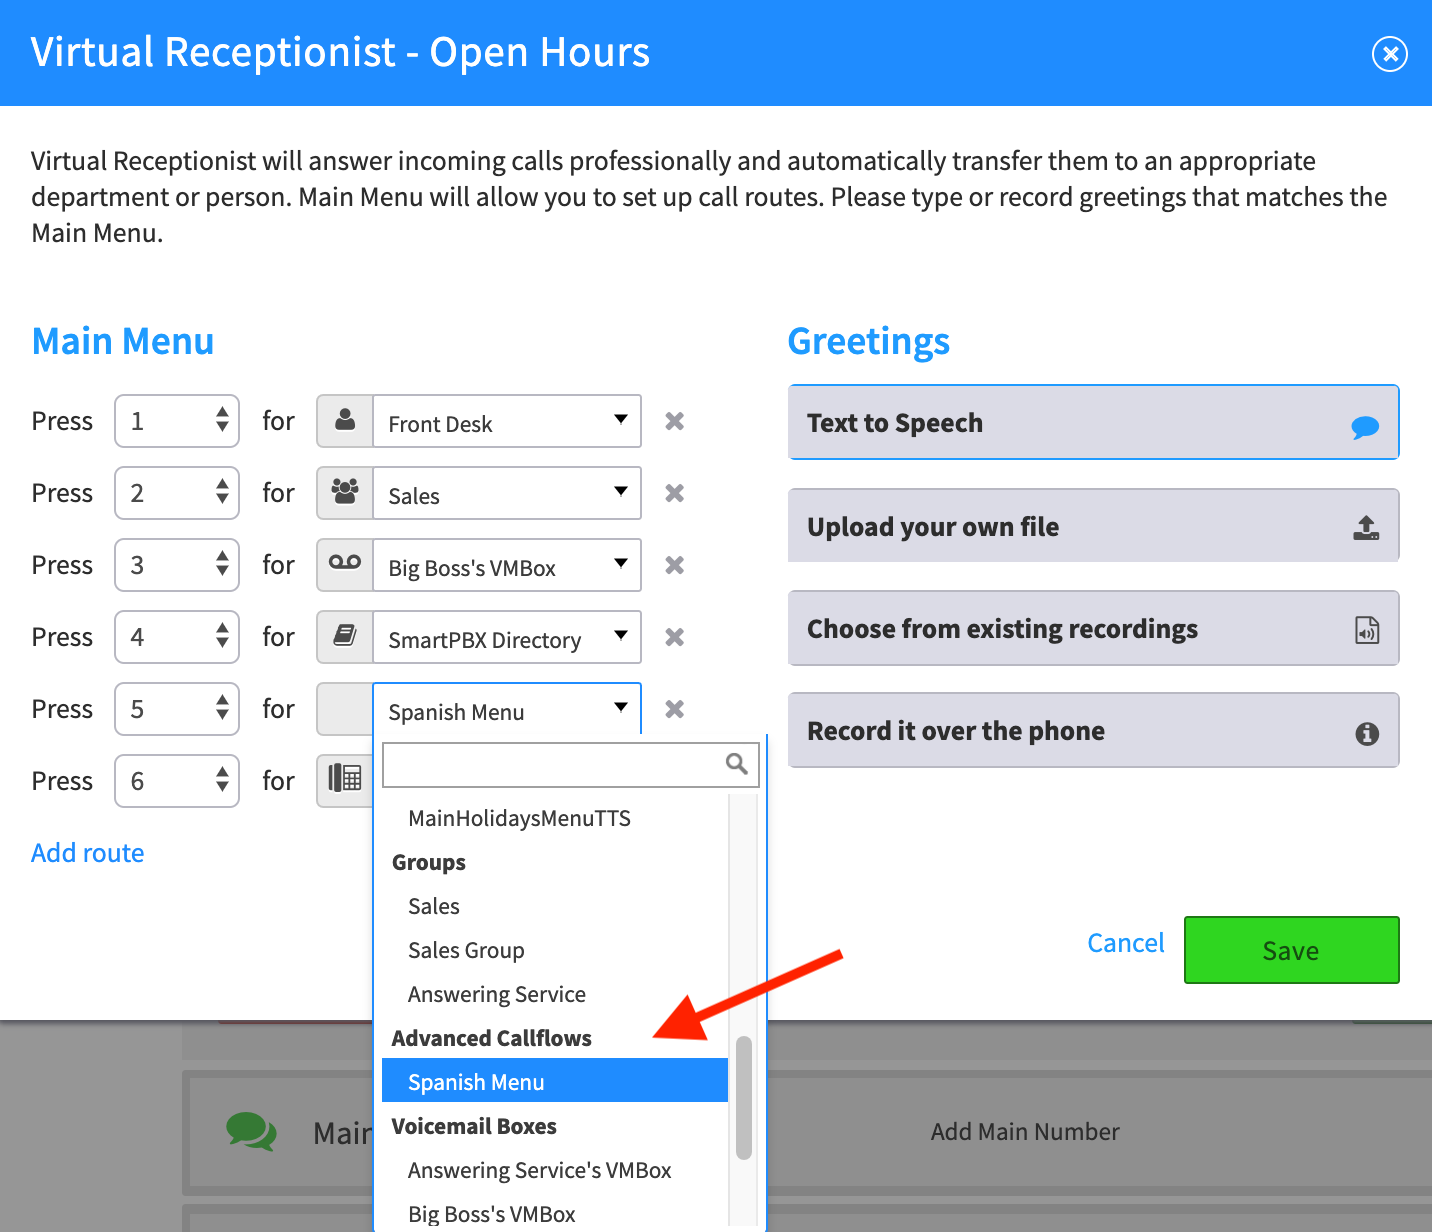
7. Add extensions to the Spanish Menu Callflow
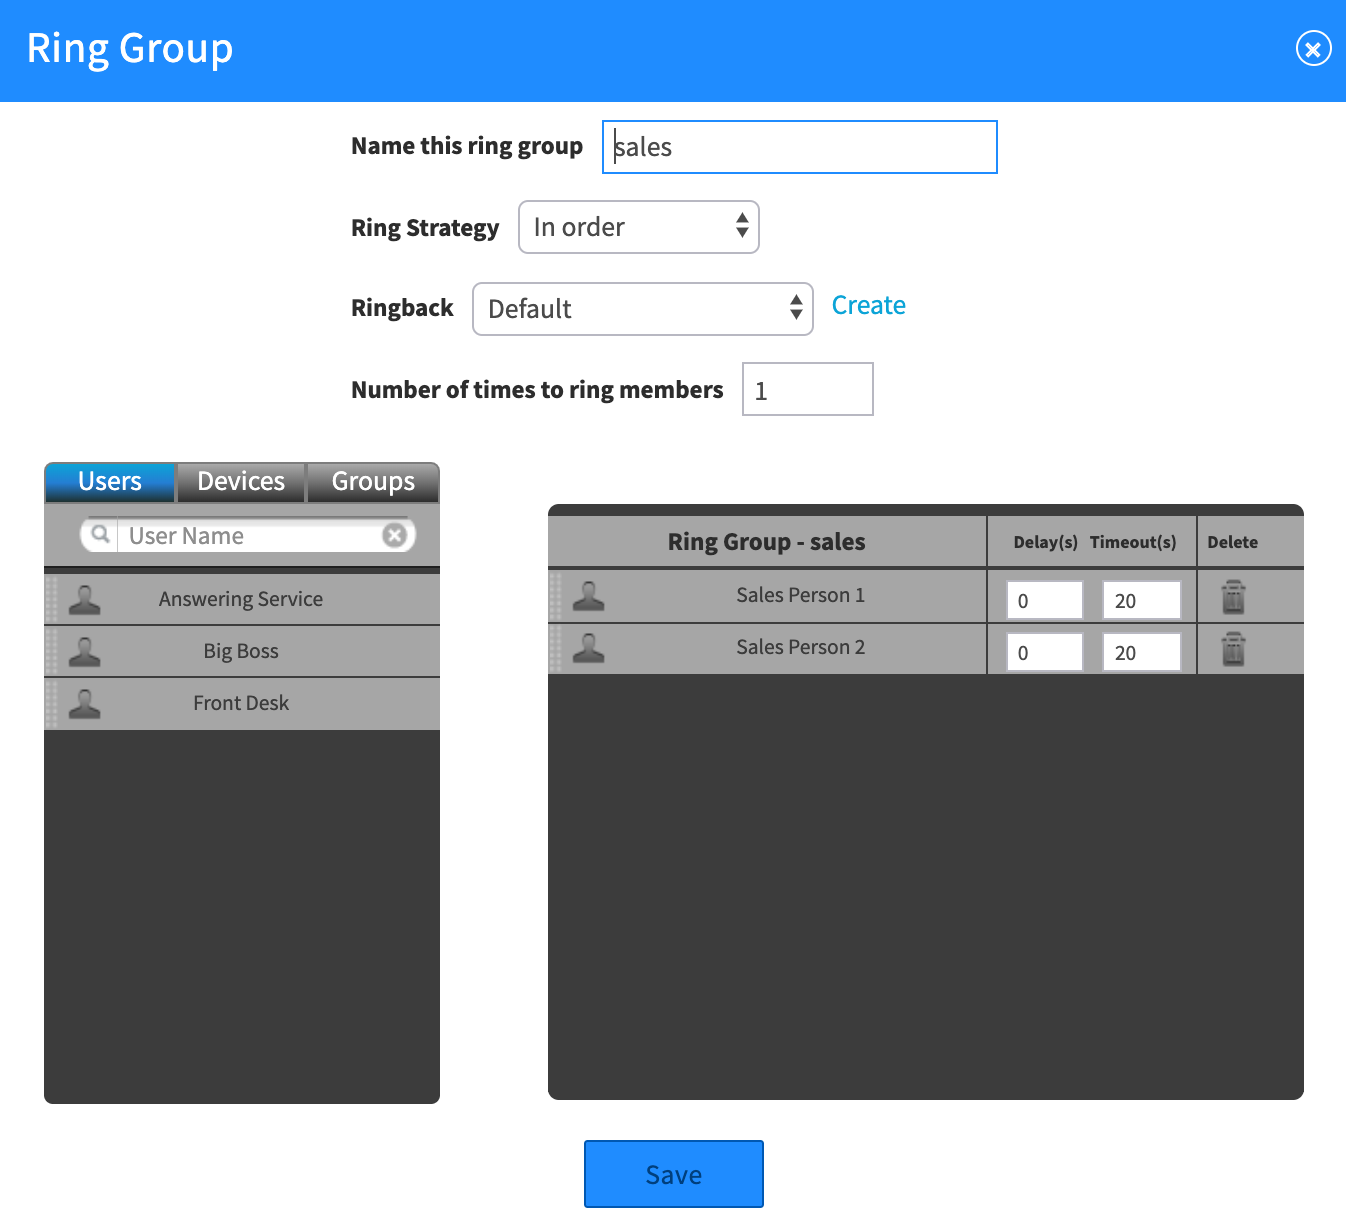
Once you have the Spanish menu set up, you will want to attach the extensions that you had defined in SmartPBX, basically copying the same navigation from the main menu to the Spanish menu.To do this, drag the user, ring group, directory, and device buttons from the Actions menu to the Callflow diagram.
TIP: A quick way to find the device button: enter the word device in the search box at the top.NOTES
- When you save this callflow, it will re-arrange the blocks in the correct extension order, 1,2,3,4, etc.
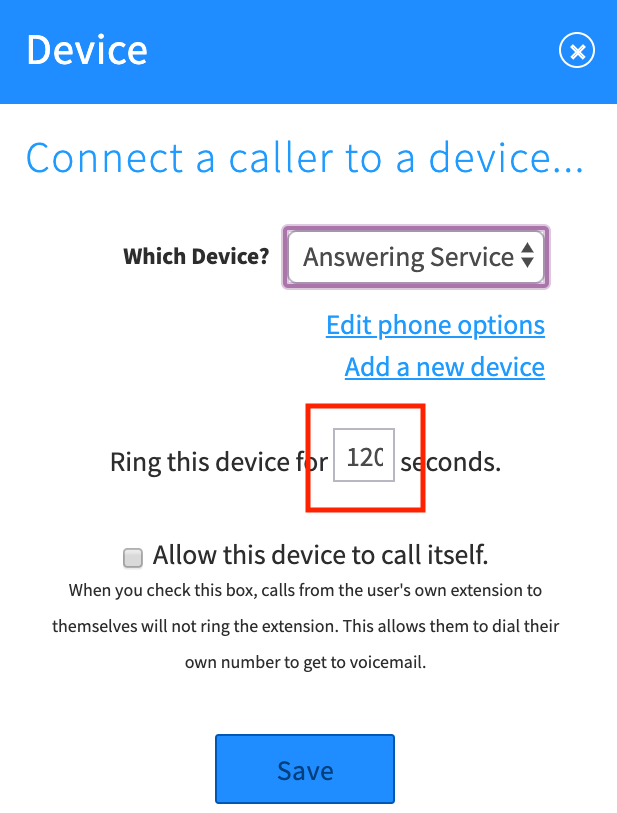
- When assigning a remote call forwarding device, it's recommended you increase the time setting for "Ring this device for ... " It defaults at 20 seconds, you may want to increase to as much as 120 seconds to allow enough time to reach the forwarding/destination phone number. See image below.
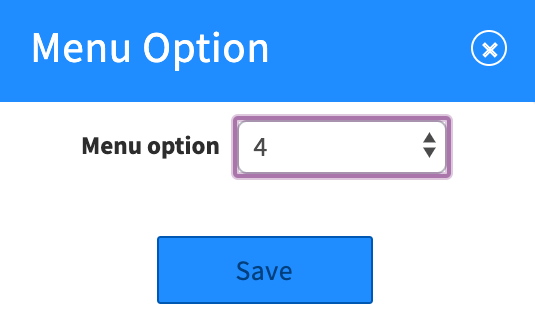
Once you drag an action to its place, it will prompt you to assign a user, a phone extension or voicemail box, depending on the action you’ve selected.
.
8. SAVE your Callflow
9. List your Callflow in Main Number
Confirm it is set to “List this Callflow in Main Number.” This will flag the Callflow and enable it to display as an option in SmartPBX.To verify this is checked, select Edit at the Callflow name level, and check the “List …” box
10. Return to SmartPBX to assign your new Callflow!
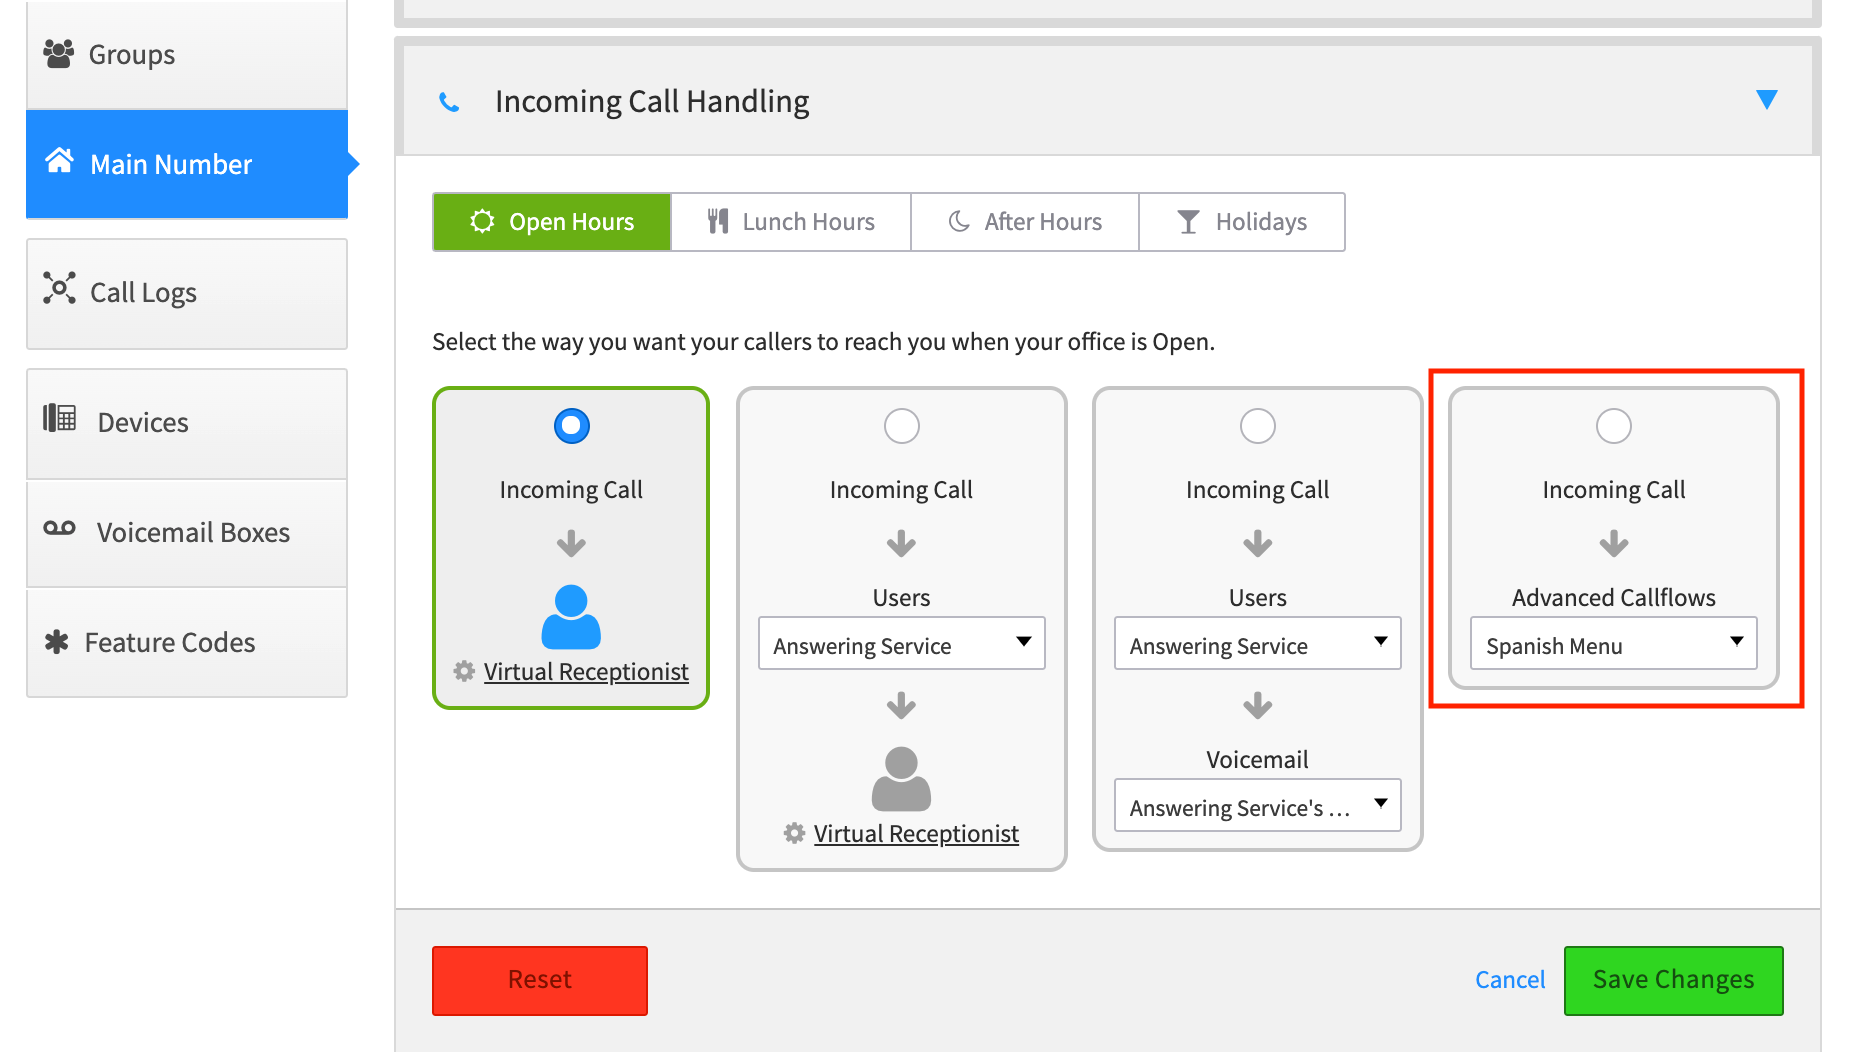
Go back to your SmartPBX Main Number menu / Incoming Call Handling, and re-select Virtual Receptionist.
- Note you will now see a 4th option in your configuration screen that is pulled in from the Advanced Callflows application. Unless you want to only use a callflow you have set up that includes multiple menus, etc., you can ignore this. We will add the menu we created in our original Virtual Receptionist navigation.
Here, you are now able to select your newly created Spanish Menu options under the Advanced Callflows category.
11. Step through the same process for Lunch Hours, After Hours, and Holidays.
This is important! If you do not add your preferences for the different hours and holidays, your callers will only hear your first setup option.
NOTE: If you do not see these options, it means you have not defined settings for these options. Use the Main Menu drop-down options and fill out the details.
12. Test your Magic!
#####
-
Hi 2600hz Community! I'm experimenting with how best to use these polls, and would love to see if we can get some traction here.
Please take a look at our poll and let us know your opinion! We want to make sure our investment in time is well spent.


 .
. 


Pivot: Product Overview
in Product Discussion
Posted
Overview
Pivot enables you to generate real-time KAZOO callflows via a REST API. This means your web application can tell phone calls what to do, during the call!
Some examples use cases:
Here’s how it works:When you add the Pivot module to your call flow, you provide Pivot with a callback URL to your webserver. From then on, when KAZOO receives a phone call for a Pivot-enabled phone number, KAZOO sends an HTTP request to your webserver asking it for a new callflow. Along with the request, KAZOO passes information about the call, such as the originating number. Your web application will then generate a new callflow, which KAZOO will run. Since your new callflow can itself contain another Pivot, you have the ability to make completely dynamic callflows.
Features
Routing a call based on accounts in a remote system
Here’s an example where PIVOT is used to check if a customer record exists in Zendesk based on the incoming phone number. If so, the caller is connected to support. If not, the caller is played an audio message.
Create a Call Flow based on a menu selection.
Here’s an example Call Flow where a menu is presented to the caller. Once a selection is made, PIVOT makes a request to your webserver, passing along the menu item selected by the caller. Your webserver then returns a new Call Flow based on the menu selections.
View full File