

Emily R
-
Posts
591 -
Joined
Content Type
Profiles
Forums
Resource Library: Monster UI Apps for KAZOO
Events
Downloads
Posts posted by Emily R
-
-
Thanks for the added tip @fmateo05, it's great to get notes based on your experience. Anyone else?
-
Darren whipped this up for those of you wanting to leverage your office PBX while making outgoing calls from home.
it's HERE.
PLEASE NOTE THIS FEATURE CAN RESULT IN FRAUD. You are responsible if fraud occurs on your account due to use of this feature. Please make sure to keep your password secret and optionally restrict calls to international locations for your account to be extra-safe. -
Goal
You are working remotely and want to make a call that leverages your office PBX system.-
You do not have access to the CallThru.us app on your mobile phone.
If you use CallThru.us, this behavior is a feature! - You want to make sure your calls are logged in the company call logs.
- You want the recipient to see a Caller ID associated with your company.
- In techie parlance, you want to "Enable DISA (Direct Inward System Access)."
NOTE: THIS FEATURE CAN RESULT IN FRAUD. You are responsible if fraud occurs on your account due to use of this feature. Please make sure to keep your password secret and optionally restrict calls to international locations for your account to be extra-safe.
Overview
In Advanced Callflows
- In your account, go to Callflows / Account Settings
- Set a default Caller ID Name and Number on the account for external calls
- Go to Callflows / Callflows
- Using a phone number on the account, Create a new callflow and add the DISA action.
- Edit the pop-up by adding a PIN #
- SAVE
Detailed Steps
 Advanced Callflows
1. Access Advanced Callflows
Click into the application from your desktop. If you do not see it, ask your administrator to help you.2. Select Account Settings from the main menu
3. Set a default external Caller ID Name and Number
Return to the main screen by picking the Return button to the top right.
4. Click on the Main Callflows menu item
5. Select New Callfllow.
- Click on the Callflow banner and add your phone number
6. Add DISA to your Callflow Flow diagram.
Access the DISA app button by typing it in the search window to the right. Then drag the button into the Callflow diagram.7. Enter an Access PIN in the dialog box
Add your PIN When you do the above, you will get a pop-up like this where you can set the PIN and some options. You really just need to set the PIN (and make it something hard to guess!)NOTE: Accessing these numbers is a huge source of fraud. Make sure to use a PIN that is not easily guessed.
8. SAVE the Callflow
Now you can call the phone number you assigned.When you call into this phone number follow these steps:
- You will hear a dialtone
- Enter the PIN number
- If your PIN is correct you will hear a second dialtone.
- Dial the number you wish to call.
- You will be connected but the Caller ID Number will match the customer's account settings.
- NOTE: We're working on the Caller ID Name for you as well, which currently isn't change-able).
####
-
You do not have access to the CallThru.us app on your mobile phone.
-
-
STEP GUIDE – How to set up your web phone
OVERVIEW
Here's an overview of the steps needed to set up a soft phone within your PBX environment using WebRTC.
STEP 1:
In Smart PBX Add and/or enable a SIP "device" to your user listing in. This can be a softphone, a SIP desk phone, or a SIP Smartphone. NOTE: If you have a device already set up and wish to use that, you can skip the first part of this STEP guide and go directly to "Activating your webphone".
STEP 2:
In WebRTC Activate / assign which "device" you want to use as your WebRTC phone.
--------------------------------------------------------------------------------------------------------------------------------
DETAILED STEPS
Adding a device to your user device list.
NOTE:
You may need to request step 1 be completed by your system admin, depending on the access and permissions assigned to you as a user. Go to your Smart PBX application.
Pick Devices from the menu at the leftPick Add Device from the top of the menu, and Soft Phone from the drop down. NOTE you can create any type of SIP phone or use one you have already added.
Add your information in this dialog box.
BASIC SETTINGS NOTES:
-
Give your softphone a device name that is easily recognizable.
-
A password is generated and saved automatically. If you want to change it make sure to write it down.
- Assign the softphone to an existing user.
Review Advanced Settings
If you want to control additional settings here, select the Advanced tab. You will see the options below.
NOTE: These can also be set and edited within SmartPBX at a later time; Advanced Settings notes
-
Audio:
Set a ring tone from a list of pre-installed codecs. Drag your selection from "Available" to "Selected." -
Video:
Set a ring tone from a list of pre-installed codecs. Drag your selection from "Available" to "Selected." -
Restrictions:
See above. This allows. you to control the outgoing call this softphone can make. -
Emergency Caller ID:
This assigns a physical phone number to this softphone. If 911 is called from this softphone the dispatcher will see the phone number assigned. NOTE: Please review the new settings and guidelines here for complying with Kari's Law in reference to e911 calling. -
Miscellaneous:
See the information below related to additional settings.
Miscellaneous
-
Ignore Completed Elsewhere
When checked, supporting phones will show a call missed if it was part of a ring group answered elsewhere. -
Notify when Unregistered
Will notify the administrator if phone is unregistered -
Caller-ID Privacy
Set your preferences for Caller-ID -
WebRTC
If checked, forces a WebRTC comaptible SDC on INVITE -
Encrypt Audio
Select either SRTP or ZRTP encryption
SAVE your new device!
Confirm your device is enabled in the device list
Once you have saved your device in Smart PBX, you will be returned to the device listing page. Search for your new device and confirm it is enabled.
Confirm the Softphone is assigned to the correct userIf the setup is successful, you should see this phone listed next to your user name as shown below.
Activating your Webphone
Once your device is assigned in SmartPBX, you can manage its use in the WebRTC application.
From your main applications screen,
Launch the WebRTC app
NOTE: You can choose to select the WebRTC app by double-clicking on the icon AND/OR you can move the icon to make it the default application for your desktop. As default, this will mean your Softphone will automatically be enabled when you log in.
- If you choose NOT to set WebRTC as your default app, you must
Assign your webphone
You should see a screen similar to below. Select the softphone you want to enable and pick save.
NOTE: If you do not see the softphone you expect, return to SmartPBX and verify it is enabled there. If you do not have access, check with your administrator.Once your SIP Username is assigned and saved, you should see the WebRTC phone dialer on your screen. You can minimize it by picking the icon at the bottom right corner. The "minimized" phone will display as an icon, shown to the right.
Minimized phone icon
NOTES:
- The WebRTC phone will appear on any screen you have open for your PBX.
- You can set your default audio settings (in and out) within the virtual dialer.
- All settings can be edited from the SmartPBX application.
-
Give your softphone a device name that is easily recognizable.
-
Hi Kadrel:
Thank you for your detailed response! It is incredibly helpful to hear real-world examples for feature requests.
We have added them to our update list and our engineers will review the effort needed for these updates and decide how and when they might fit into our timeline.We log our requests using an Agile framework, so help me with the wording! Here goes:
As an agent I would like to see real-time updates for all the stats on my dashboard page. Some notes:- I do not need to see the seconds variable in real time
- Best if this can be a user-defining toggle in case some agents feel it is too busy a display
As an agent I would like to be able to quickly identify the details of a missed call in the Activity Log
- Similar to a cell phone “Missed Calls” tab
- Include fields to display DID / Time / Who missed it, etc.
- Data for missed calls is preserved longer than the time limit in the Activity log
- Access these details using a quick link from the dashboard
If any other users have additional input please let us know here! When we specify updates it is incredibly valuable to get feedback from multiple client stories.
-
 Hello 2600hz community! Help us refresh our website
Some of you may have seen some updates here, with a new Monster UI apps page in progress [HERE] and some docs moving around.
We'd love your feedback and ideas on- Whether the new pages are helpful / usable / need work (and if so how?)
- What kind of information is most important for us to provide
- What kind of information you can help us build !!
Please add comments here, and/or on the content pages you find useful -- and not. We'll be posting some ideas and even some sweet rewards for those of you who are willing to help.
Stay tuned, and let's get talking!
emily
-
2600HZ STEP GUIDE – CallThru.us - Android Devices
NOTE: This document reflects recent updates in the Android version of CallThru.us as downloaded from the Google Play store. Please suggest any edits or ask questions in the comments tab below.
What is CallThru.us?
CallThru.us is an application that routes calls through your office PBX system to an iOs or Android mobile device. The app provides a familiar caller dial pad and call management options on the mobile phone, including access to local contacts, import and save contacts, and view call history.Before you start
- Access the account you want to enable and find the CallThru application.
- Make a list of the users you want to give access to for mobile phone use.
- Have the mobile device you are activating available for downloading the CallThru app through Google Play or the Apple App Store.
Next Steps
Set up CallThru.us access in Monster UI
STEP 1
Find the CallThru.us app in your application window.
STEP 2
Click on the icon to open the application. The Getting Started screen will display with a User Access tab at the top.STEP 3
When the tab is open, a list of users will display. Search for the user(s) to enable and toggle the switch on.
Download and Register the CallThru App on a mobile device.
STEP 1
Open the User Portal app from the desktop.STEP 2
Enter your mobile Phone # as it requests.You will see the screen below.
- The QR code is an easy way to register your device! Once the app is downloaded on your phone, open it. You will be prompted to aim your phone at this code.
- The phone's camera must be available to read the code generated on the desktop.
NOTES:
- The CallThru.us app can be downloaded any time, either from the desktop or from the appropriate app. store on your phone.
-
The Android preview is below, as seen from the desktop and mobile phone.
Notes on downloading the application
Search on Google Play for the Callthru.us app. You should see a result something like this
(Left, desktop | Right, Device)
Install the application. When you open the application, you will be prompted as follows:
-
Enter your credentials and accept Terms of Service
-
Using the phone's camera, scan the QR code generated from the User Portal app on your desktop.
-
Using the phone's camera, scan the QR code generated from the User Portal app on your desktop.
- Accept the terms of service
. -
Check / Set Access permissions to phone services
-
For Contacts
NOTE:- If you choose Don't Allow Access to Contacts, the phone's contact list will be blank. A message will ask for permission each time the contact icon is accessed.
-
For Microphone, and Phone
-
For Contacts
View your home screen!
Once you agree to the terms, you will see the "home screen" for CallThru.us.
This is shown at the left, below. To access additional screens you can:- Select the "hamburger" icon next to the Home text at the top; this will show a pop-out menu.
-
Select one of the icons at the bottom of the screen, for Contacts or the Dial Pad.
And, if you select the dial pad grid at the top left you will see your ticket out.
CallThru.Us Screens
Recent Calls / Call History
From your menu, select Call History for a list of your recent calls.
Voicemail Screen
- Click on the Voicemail area to view details and listen to your voicemail.
-
The icons below the VM recording bar allow you to:
Return a call
Delete the voice mail
Change the tag from Listened to New
(icon will show once a voicemail has been listened to)
Faxes Page
If your fax page shows "no faxes setup" (see below left), check with your administrator, it will need to be configured and assigned to you as a user in the SmartPBX console. If a fax page is configured, you should see a screen similar to the one to the right.
Call Settings
To access the settings page for CallThru.us, select the Settings option from the home screen, as noted below. You will then see the Settings page, also shown below.
-
Enable Call Forwarding
Set the phone number you want to forward the call to.
Also ring my other devices. If checked, will ring all devices that are assigned to this CallThru phone #.
Keep Caller ID: This will retain the caller ID from the originating call, even when forwarded. If this is not checked, the Caller ID will show your CallThru.us phone #.
-
Send Voicemail to email
Enter an email address where voice mail notifications should be sent.
-
Do Not Disturb
Select any devices that are assigned to this number to be in DND mode. This means the device will not ring, and if a voicemail is configured, it will go directly there.
Account Settings
This screen is accessed from your home screen, by selecting the Gear icon on the top right.-
Account Setup
This shows the Username and Password as transcribed from the QR code you used during the install process. It is not recommended you change this manually.
-
About
This displays the version of CallThru.us installed on your phone.
-
Reset Application
Use this if you want to reset the application. It will delete all your data related to the app, including the associated phone number. If you are having trouble receiving incoming calls, it's possible the phone number you entered was not paired correctly with your phone.
Making a Call using CallThru.us
Dial your number !
In the background, the CallThru app follows these steps when making a call:What callers will see is something like this:
- A quick screen that says "initializing" before the call is completed.
- An access number that the app is dialing. NOTE: This is not the phone number you are calling, it is the access number that the CallThru.us has allocated to relay your call.
-
Select the access number to initiate the call.
What the call recipient will see depends on your settings:
- The person receiving your call will see a number you have assigned as your caller ID in your PBX system.
- If your caller ID is not set up to be shown, then your caller ID will show as Anonymous.
Receiving a call from CallThru.us and your PBX system
What callers will see / hear depends on your settings in your PBX application.
- Your cell device is added to your user settings, and will adopt the general settings you've applied to your other devices.
- The caller will hear what your PBX system had defined, and a possible pause during the phone forward process.
What you will see / hear
-
When a call is forwarded to your cell phone, it will ring as a normal call. When you answer however, it will prompt you to "Press 1 to continue." This is currently what indicates the call is from your PBX system. Future releases will provide alternate preference options for identifying these calls.
- If you want to turn the ring off at certain times go into the device settings for this CallThru device, and toggle the DND switch on.
If you are not receiving calls
Here's some troubleshooting ideas if your phone is still calling out but not receiving calls:
-
Verify your phone has been added to you as a user in your PBX setup.
- It should display in Smart PBX as in the above post, as a listed phantom device (without an icon for now)
-
it should display in User Portal under Settings & Devices.
-
Check your settings for and make sure the DND is not toggled on for this CallThru.us device.
-
As a last resort, if you are still not receiving calls, you may want to reconfigure the phone -- the phone number you entered may not have synched correctly as the number of your cell phone (think typo, we are adding a way to verify your input, will be available shortly). It is possible to dial out with an incorrect cell phone, but not to dial in. To reset,
- From the app on your phone, under the settings, choose Reset Application.
- Go to the User Portal app on your desktop, pick the Mobile Tab
- From this tab, type in your number.
- When you see the QR code screen, instead of capturing the code there, choose the "Link new phone number" arrow at the top left
- Enter your phone number again very carefully and double check it!
- Capture the new QR code
- This should reset your phone and your desktop
NOTE: For a more detailed view of these steps -- with screen shots, refer to the CallThru FAQ.
#####
-
2600HZ STEP GUIDE – CallThru.us - iOS Devices
NOTE: This document reflects recent updates in the iOs version of CallThru.us as downloaded from the Apple store. Please suggest any edits or ask questions in the comments tab below.
What is CallThru.us?
CallThru.us is an application that routes calls through your office PBX system to an iOs or Android mobile device. The app provides a familiar caller dial pad and call management options on the mobile phone, including access to local contacts, import and save contacts, and view call history.Before you start
- Access the account you want to enable and find the CallThru application.
- Make a list of the users you want to give access to for mobile phone use.
- Have the mobile device you are activating available for downloading the CallThru app through Google Play or the Apple App Store.
Next Steps
Set up CallThru.us access in Monster UI
STEP 1
Find the CallThru.us app in your application window.
STEP 2
Click on the icon to open the application. The Getting Started screen will display with a new User Access tab at the top.STEP 3
When the tab is open, a list of users will display. Search for the user to enable and toggle the switch on.Download and Register the CallThru App on a mobile device.
STEP 1
Open the User Portal app from the desktop.STEP 2
You will see a new tab for Mobile to the right.STEP 3
Click on the tab. A prompt will ask for a mobile phone number.Once the number is verified a screen similar to below will display, prompting to download the CallThru.us app to the device.
- Once the app is on your phone, open it. You will be prompted to aim your phone at this code.
- Make sure your phone's camera setting shows it is available.
NOTES:
- The CallThru.us app can be downloaded any time, either from the desktop or from the appropriate app. store on your phone.
-
Remember your phone camera must be available to read the QR code generated on the desktop. Review the "downloading your app" section of this STEP guide for notes on this process.
Notes on downloading the application
Search for CallThru.us in your Apple App. store. You should see a screen similar to below:As you download the app, you will see the following prompts:
-
Enter Credentials:
Choose to use your phone camera to read the QR code generated from your User Portal app. NOTE: The login Username and Password referred to here are derived from the QR code and very long and cumbersome to enter. They are NOT your login and password used on your desktop PBX.
-
Choose to Allow Access to your Contacts (or not).
If you choose to not allow access to. your contacts, you can change these settings later in the app. settings screen in iOs.
- Accept License terms: Read the terms and choose I Agree
-
View your home screen!
Once you agree to the terms, you will see the "home screen" for CallThru.us.
This is shown at the left, below. To access additional screens you can:- Select the "hamburger" icon next to the Home text at the top; this will show a pop-out menu.
-
Select one of the icons at the bottom of the screen, for Contacts or the Dial Pad.
.
CallThru.Us Pages
Recent Calls / Call History
-
To refresh your screen and review updates, select the circular arrow at the top right.
-
Your screen will display recent calls made from your CallThru account.
- NOTE: Currently the phone number will display the number used by CallThru, not the number you actually called. This will be captured in your SmartPBX call log.
Voicemail Page
- Click on the Voicemail area to view details and listen to your voicemail.
-
The icons below the VM recording bar allow you to:
Return a call
Delete the voice mail
Change the tag from Listened to New
Faxes Page
If your fax page shows "no faxes setup" (see left), check with your administrator, it will need to be configured and assigned to you as a user in the SmartPBX console.
.
Below are images that show how sent (left) and received fax information will display on your phone.
You can view and delete the faxes from these pages. NOTES
-
In this release, saving a fax is not supported; the fax can be saved from your desktop in SmartPBX however.In the interim, some of our users are "saving" these fax images by taking a screen shot with their phone.
- In SmartPBX you can define if you want to receive an email of your fax, and/or send a fax to another number by email. If you have turned this setting on and are not receiving your emails, please check your "Junk" mailbox. You may see notifications like below. Remember to allow incoming emails from the no_reply server your system uses.
Settings Pages
To access the settings page for CallThru.us, select the Settings option from the home screen, as noted below. You will then see the Settings page, also shown below.
. Settings Options
-
Enable Call Forwarding
- Set the phone number you want to forward the call to.
- Also ring my other devices. If checked, will ring all devices that are assigned to this CallThru phone #.
-
Keep Caller ID: This will retain the caller ID from the originating call, even when forwarded. If this is not checked, the Caller ID will show your CallThru.us phone #.
-
Send Voicemail to email
-
Enter an email address where voice mail notifications should be sent.
-
Enter an email address where voice mail notifications should be sent.
-
Do Not Disturb
- Select any devices that are assigned to this number to be in DND mode. This means the device will not ring, and if a voicemail is configured, it will go directly there.
Dial pad and Program Settings
When you select the dial pad icon at the bottom of any screen you will access your calling window, as seen below. In addition, you will see a gear at the top right. This will display the Program Settings screen, seen to the right (for reference ONLY!).
NOTE:
Most of this Program settings page is provided FOR REFERENCE ONLY. Check with your system administrator before resetting any of these fields.-
Account Setup
This displays the User Name and Password generated by the QR code during setup.
Delete this ONLY if you want to remove the application entirely from your phone.
-
About
At the bottom of this screen you will see a version number for your app. This can be useful during troubleshooting calls. If you have auto-update set to on in your Apple apps. settings you will likely have a current version.
-
Reset application
This may be recommended if there is inconsistencies with your SmartPBX application and/or you are changing your phone number.
Making a Call using CallThru.us
Go to your Dialpad and Dial a Number !
In the background, the CallThru app follows these steps when making a call:
What callers will see is something like this:- A quick screen that says "initializing" before the call is completed.
- An access number that the app is dialing. NOTE: This is not the phone number you are calling, it is the access number that the CallThru.us has allocated to relay your call.
-
Select the access number to initiate the call.
What the call recipient will see depends on your settings:
- The person receiving your call will see a number you have assigned as your caller ID in your PBX system.
- If your caller ID is not set up to be shown, then your caller ID will show as Anonymous.
Receiving a call from CallThru.us and your PBX system
What callers will see / hear depends on your settings in your PBX application.
- Your cell device is added to your user settings, and will adopt the general settings you've applied to your other devices.
- The caller will hear what your PBX system had defined, and a possible pause during the phone forward process.
What you will see / hear
-
When a call is forwarded to your cell phone, it will ring as a normal call. When you answer however, it will prompt you to "Press 1 to continue." This is currently what indicates the call is from your PBX system. Future releases will provide alternate preference options for identifying these calls.
- If you want to customize when you get calls (e.g. turn the ring off at certain times, customize a voicemail) go into the device settings for this CallThru device, and select which devices. you want to set to DND (see Settings Options, above)
If you are not receiving calls
Here's some troubleshooting ideas if your phone is still calling out but not receiving calls:
-
Verify your phone has been added to you as a user in your PBX setup.
- It should display in Smart PBX as in the above post, as a listed phantom device (without an icon for now)
-
it should display in User Portal under Settings & Devices.
-
Check your settings for where your calls are sent to. By default when you set up your cell phone the calls will be treated as your other devices are treated. If you want your cell to have unique behavior, adjust the settings in Smart PBX under Find Me, Follow me, as above.
-
If you are still not receiving calls, you may want to reconfigure the phone -- the phone number you entered may not have synched correctly as the number of your cell phone (think typo, we are adding a way to verify your input, will be available shortly). It is possible to dial out with an incorrect cell phone, but not to dial in. To reset,
- From the app on your phone, choose the gear at the top right of your dialpad, and select Reset Application.
- Go to the User Portal app on your desktop, pick the Mobile Tab
- From this tab, type in your number
- When you see the QR code screen, instead of capturing the code there, choose the "Link new phone number" arrow at the top left
- Enter your phone number again very carefully and double check it!
- Capture the new QR code
- This should reset your phone and your desktop
NOTE: For a more detailed view of these steps -- with screen shots, refer to the CallThru FAQ.
Reviewing your CallThru.us settings
There are three places to check and set your CallThru Settings and preferences:
-
From your CallThru.us settings screen
-
From your SmartPBX and/or User Portal application on your desktop (soon also on your mobile phone)
- Control the ringing and routing behavior of incoming calls, e.g. voicemails, etc.
-
Set your assigned devices and fax boxes.
-
From your iPhone settings screen
- Control permissions for the CallThru mobile app related to iPhone data access, for example if CallThru can access your Contacts, Microphone and Camera. During your installation, you are asked to enable these; however if you choose not to at the time, you can through the iOS settings screen. See below
-
Reset and/or re-couple your phone with your CallThru app.
CALLTHRU.US SETTINGS FROM YOUR PHONE
Settings controlled from standard iPhone settings screen
These are the traditional settings that you can control through your iPhone for most applications. If you declined access to your contacts during configuration, you can override that in these settings. Your contacts will display once the setting is changed.
#####
-
Overview
Conference manager is a tool that provides an intuitive experience for conferencing activities.
This is the perfect app for managing one or multiple conferences in unison. Account set up is as easy as assigning a conference bridge, phone number and pin. Once these items are confirmed, you can schedule conferences immediately.
As a moderator, you can initiate and end conferences on demand, see all activity for live participants, and manage microphones, all in realtime, thanks to Webhooks!
In addition, you can use conferencing globally, without racking up high international fees, providing for the best business conferencing experience available.
Features
Real-Time Activity of Participants & Moderators
Complete visibility and control for features such as participant mute and unmute, control of participant activities and a real time attendee dashboard for complete participant management.
Complete Control
Conference manager provides you with complete control of conference activities and management of default settings. You can lock, mute, end live conferences at any time while still providing a seemless conference experience.
Global Conferencing
Conference Manager’s globally optimized network provides locally dedicated numbers across the globe. Global attendees can select from a multitude of dial ins, using various country codes, while only accumulating local call charges.
Conference Set Up & Customization
During initial set up, you can set controls to enhance conference experience. Features such as muting and deafining participants and adding or removing entry/exit tones can be set based on user needs.
On Demand Conference Access
Host meetings anytime, anywhere. Use custom dial in and pin for on demand conferences, in a matter of minutes.
Technical Specifications
Conferences
- Create Conference:
- Conference Name
- Conference Owner
- Moderator PIN
- Participant PIN
- Participants join conference as muted
- Participants join conference as deaf
- Play entry tone
- Play exit tone
- Conference ID number
- View:
- Conference Name
- Number
- PINs
- Owner
- Number of Active Callers
- View conference:
- Moderators
- Participants
- Lock
- Mute All
- Unmute All
- Hang up
- Search All Conferences
Call-In Numbers
- Add Call-In Number:
- Buy new number
- Add from spare numbers
- Assign new extension
- Assigned conference number:
- Customize greeting
- Delete conference number
-
Overview
Dial Plan Manager allows you to create rules to modify outgoing phone call numbers. This is especially useful for appending international prefixes to phone numbers, saving the caller time in entering them.
The Dial Plan Manager applies rules whenever an outgoing telephone number matches a specified pattern. These rules can be applied per Account, User, or by Device. Either prefixes or suffixes can be added to outgoing calls.
Powerful and Highly Customizable - Regular Expressions (pattern matching rules) determine which numbers will be modified by the Dial Plan Manager.
For example:A customer based in France does not use any prefixes and only places calls to local phone numbers. Typically, the customer would have to type a prefix in order to place a call. However, with Dialplan Manager, you can configure a new rule that will allow the customer to dial as if they were located within the country, kipping the prefix and country code.
Features
Powerful and Highly Customizable
The Regular Expression editor, gives you the ability to support call flows natively from/to any country in the world.
Easy to Test
When creating your rule, you can test the Regular Expression with our easy-to-use tester, catching any typos that might hinder your call going through properly.
Fine Level of Control
Customize rules on an account, user, and even device basis.
Technical Specifications
International Support
- Configure any Country
- Easy Set-Up
Custom Rules
- Support for local country rule examples:
- 7 Digit Dialing in the US 8 Digit dialing in France…
Prefix and Suffix support
- Support for prefixing numbers
- Support for adding a suffix to a number
- Support for dropping parts of a number
High Level of Control
- UI Can Define Rules for:
- An Entire Account A Specific End-User A Single or Multiple Devices
Test Tool
- Test your Regular Expression in the GUI before applying the ruleset.
-
Overview
The Fax Manager gives full control over your fax logs and acts as a central administration hub for managing and downloading all real-time fax logs.
You can view and manage fax activities across users. The Fax Manager platform allows visibility across all inbound, outbound, and fax-to-email transactions.
You can bulk delete faxes from the database, recover missing logs, download fax conversions, and view status of faxes sent.
Features
Inbound Fax Control
Dependable, real-time dashboard that provides activity reporting of all inbound faxes received, lost fax transmitions and sender/receiver information and more. You can also filter search capabilities and review fax activites both past and present.
Outbound Fax Assurance
You have visibility across mailboxes for all recipients. Each user can have faxes delivered to their own personal fax number. Faxes are delivered conveniently to the email box. Download onversion activities, contact info and confirmation details.
Fax to Email Analysis
Fax to email is a seemless interface that hosts every fax to email transaction. You can analyze delivery activities, locate missing faxes, obtain time stamp stats and troubleshoot uncertain fax activities through detailed transaction data.
Instant Download of all Fax Log Activity
You can download personal fax reports and receive real-time activity data of all inbound, outbound and fax-to-email transactions. Reports can be downloaded immediately and customize the data by the specific need.
Technical Specifications
Inbound Faxes
- Select Multiple Faxes
- Filter to a Specific Faxbox
- Refresh
- Filter Dates (Custom Dates)
- Search
- Download Fax
- View Fax Details
Outbound Faxes
- Support for local country rule examples:
- Select Multiple Faxes
- Filter to a Specific Faxbox
- Refresh
- Filter Dates (Custom Ddates)
- Download Fax
- View Fax Details
- Retry Send
Support Procedures
- User Experiences a UI Error
- User is Unable to See any Faxes
- User is Unable to Resend Faxes
- Outbound Fax Delivery Failures
- Inbound Fax Delivery Failures
- Fax to Email Delivery Failures
-
2600HZ STEP GUIDE – CLUSTER MANAGER -- HOW TO UPGRADE KAZOO APPLICATIONS
How to upgrade Kazoo applications using Cluster Manager
If you are using proper NAPTR or SRV records, we do not expect any downtime during the upgrade; however please schedule your upgrade during non-peak hours/days to avoid any issues.
1. Open Cluster Manager app from your monster UI panel. Select “Version manager” tab.
2. Select the cluster name (normally “production”). And select upgrade arrow icon.
After discovering available versions of the applications, Cluster Manager will display target versions.
3. Select the order of the region / zone.- Interactive Upgrade will pause the process after each zone and you will need to click to continue to next zone. If you want to upgrade all zones, you can uncheck the option.
The confirmation page will be displayed before the actual upgrade process is started.
4. Click Upgrade Now
- Once you click on the “Upgrade now” button, upgrade process will be started. You can click the “refresh” icon to update the page, if it is not refreshed automatically.
5. Check the "Completed" to to see the final result of the upgrade
Once the upgrade process is completed. The “Running” tasks tab will be empty. But you can check the “Completed” tab to see the final result of the upgrade.
After the upgrade, please go through your verification plan. If there is any issue, you can “downgrade” to your previous version by going through the similar process.
2600HZ STEP GUIDE – CLUSTER MANAGER -- HOW TO DOWNGRADE KAZOO APPLICATIONS
How to downgrade Kazoo application
-
NOTE
Downgrading should be only conducted when your new upgraded application is not working properly. Downgrading to random “old” version of applications will create more issues with the cluster configuration and prolong downtime.
1. Select “Downgrade” under “Version Manager” Tab.
2. Select applications and components you want to downgrade.
You can check the current version for each applications / component. Do NOT downgrade to versions which are too old and backward because some of the new modules will not be supported in the old version. Only downgrade to the versions you were running in the previous state.3. Select the ORDER of the downgrade operation.
Check if you want to it to be interactive (pause between zones).
4. Confirm before actual operation.
5. Check the status during the downgrade process.
You can click on Refresh button.
Once the downgrade process is complete, you can verify that the cluster is in good working condition (UI, SIP, etc.).
Related Articles
How to move an account within KAZOO
API Reference Docs
docs.2600hz.com
REST API Reference for Kazoo Crossbar Accounts#######
-
Hi Marie:
I just tested the recent links I posted Tuesday and they seem to work? Are you logged in? Let me know which files are not working.... let's get this solved! -
2600HZ SETUP GUIDE – CREATE A NEW ACCOUNT
Below is an overview of creating a new account in the Accounts app.
Accounts Home Screen
The Accounts Manager app shown below is the default when you log in until you identify a “default app”. If you do not land here upon logging in, you can click on the Apps icon identified here by the red circle and select it from the available icons.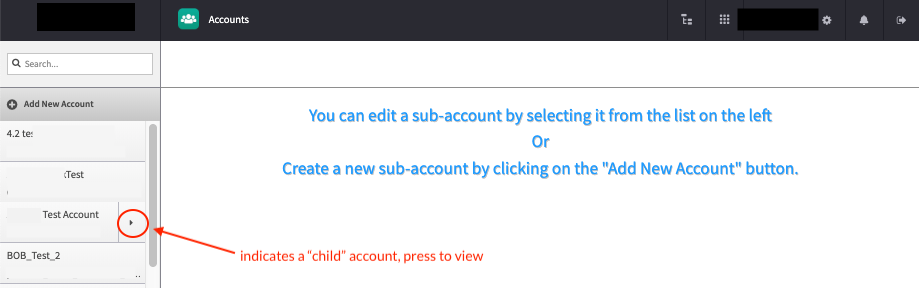
Pick Add New Account
You will see a screen that looks like this. Note the symbols will show some tips on what the field is looking for.
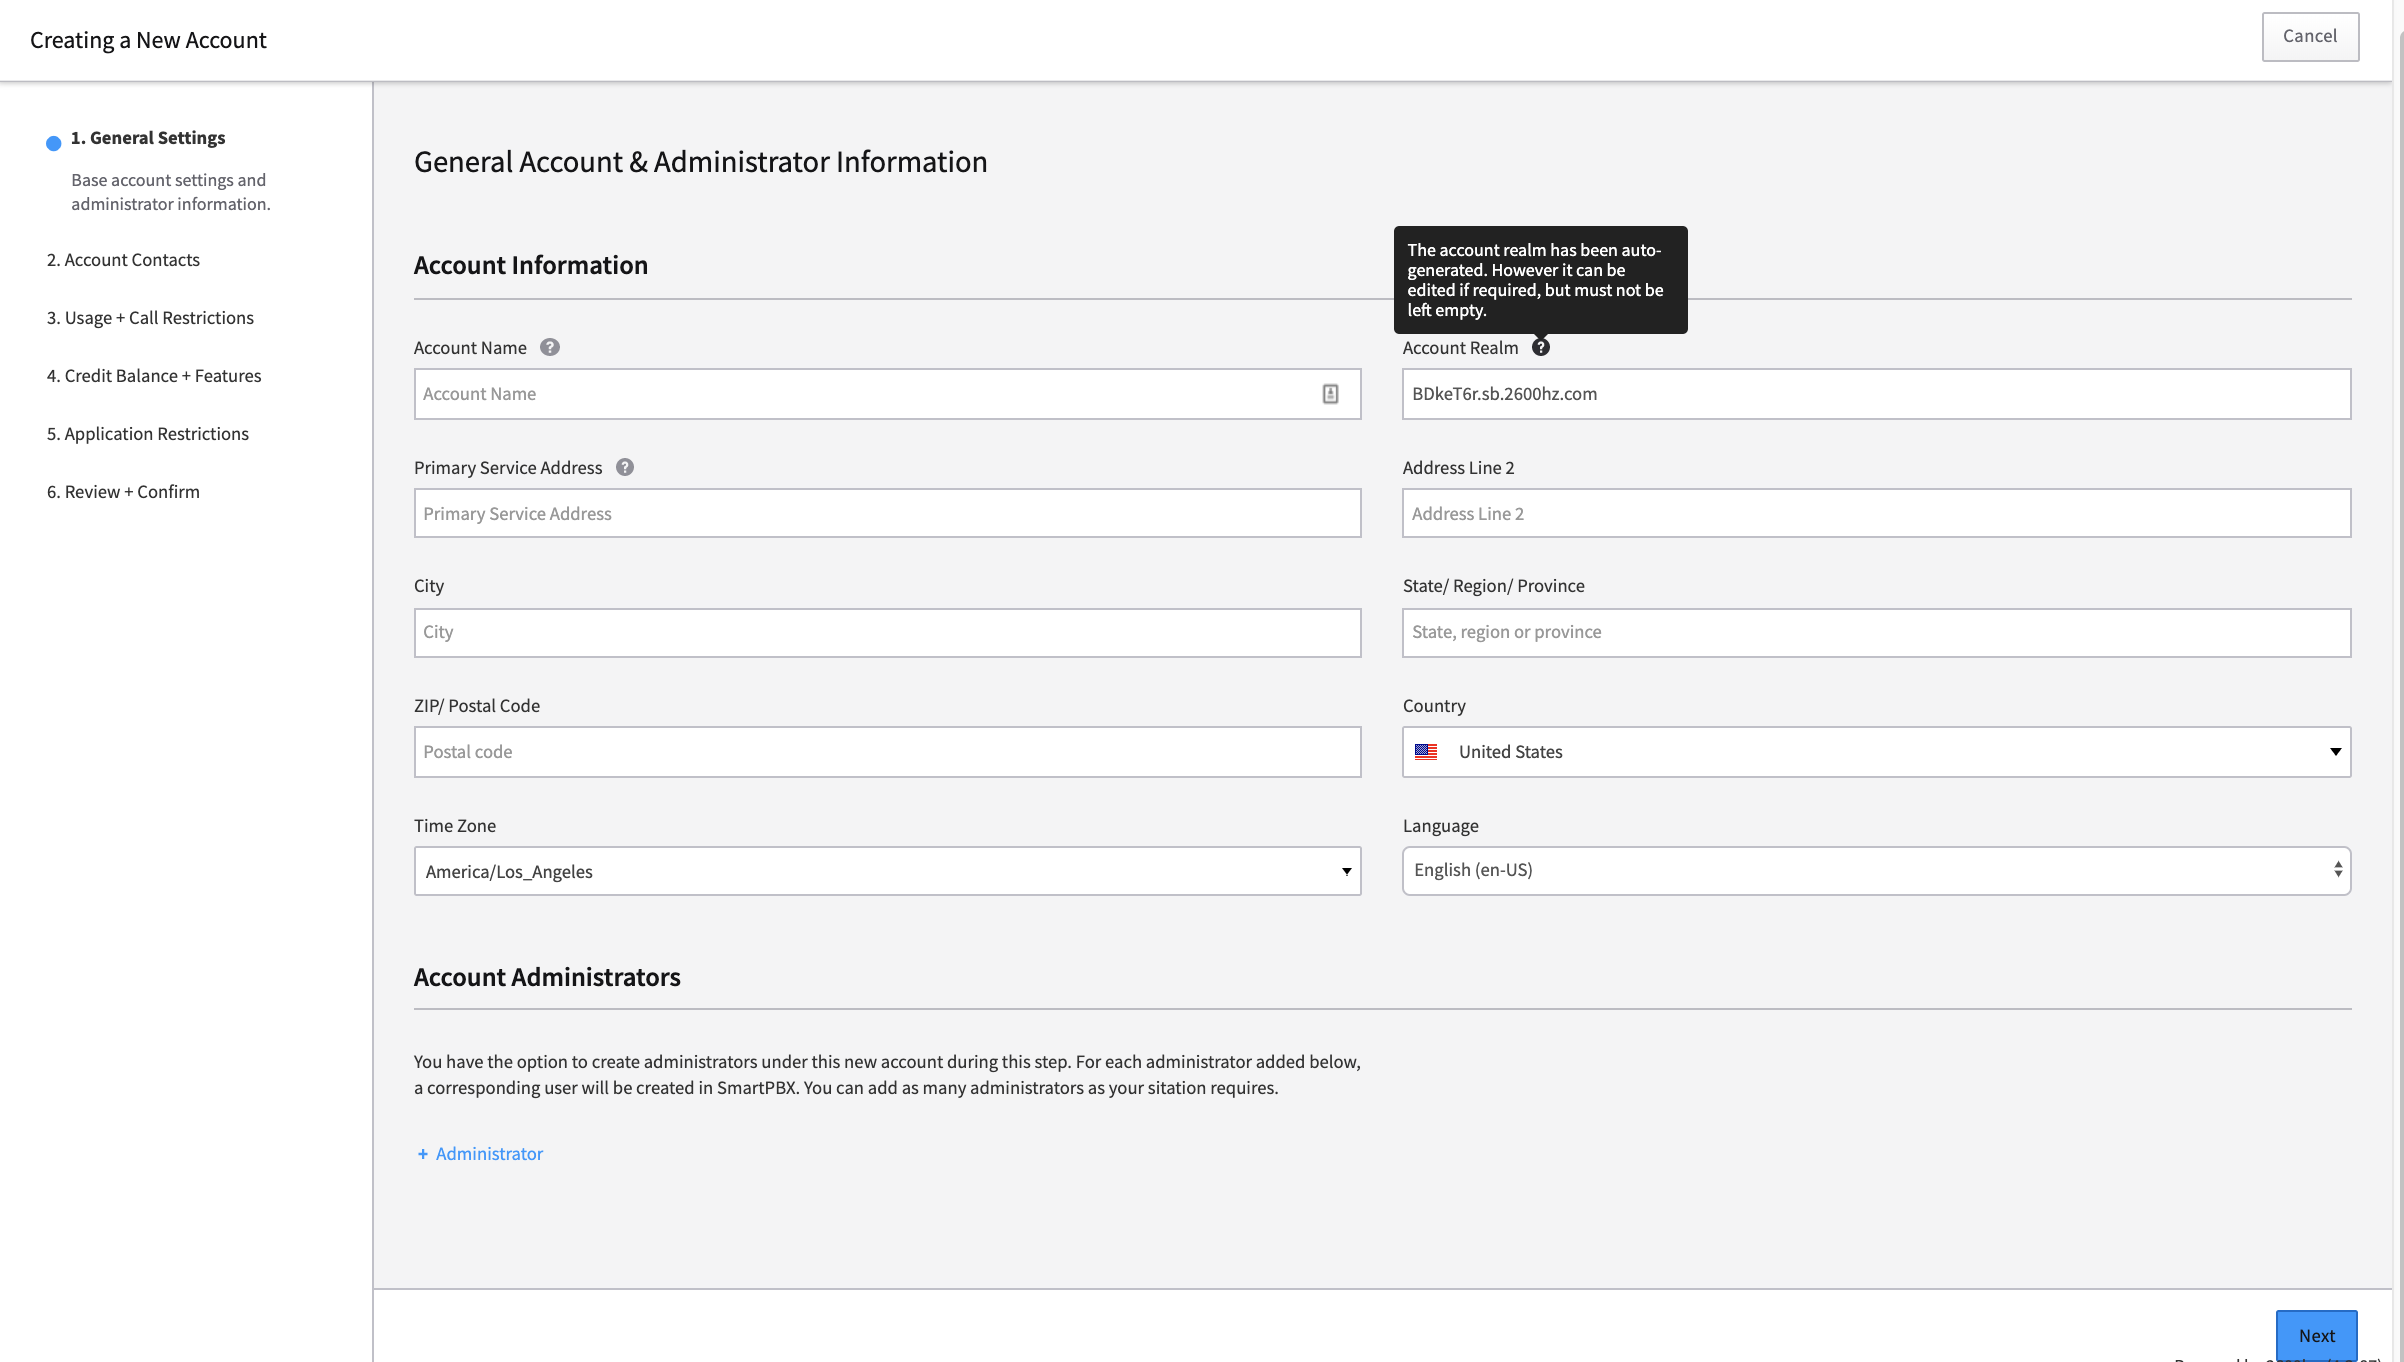
General Settings
Account Information
All these fields are required except for the Time Zone and Language.-
Account Name (i.e.; ABC Company)
The name must be unique system-wide. For example, if you are creating a sub-account, the name must not be the same as its parent.
-
Account Realm
This will auto generate. While not recommended, this can be changed by administrators but it cannot be left empty.
-
Account Realm suffix
This should never be changed or edited!
-
Time zone
Main time zone for your customer.
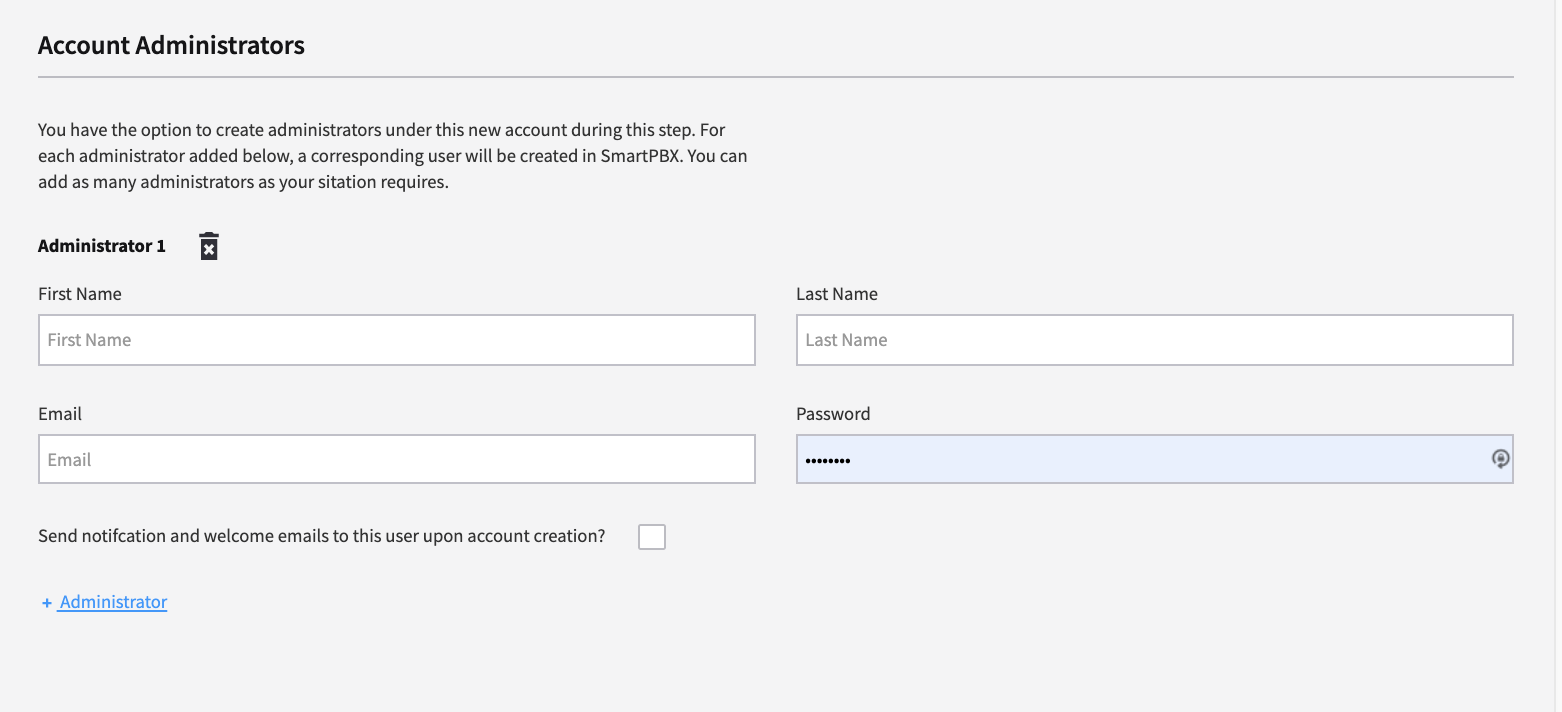
Account Administrators
You have the option to create administrators under this new account during this step. For each administrator added below, a corresponding user will be created in SmartPBX. You can add as many administrators as your situation requires.
Click.
 at the bottom of the screen to continue
Account Contacts
This is where you add the technical and billing contacts for this specific account.
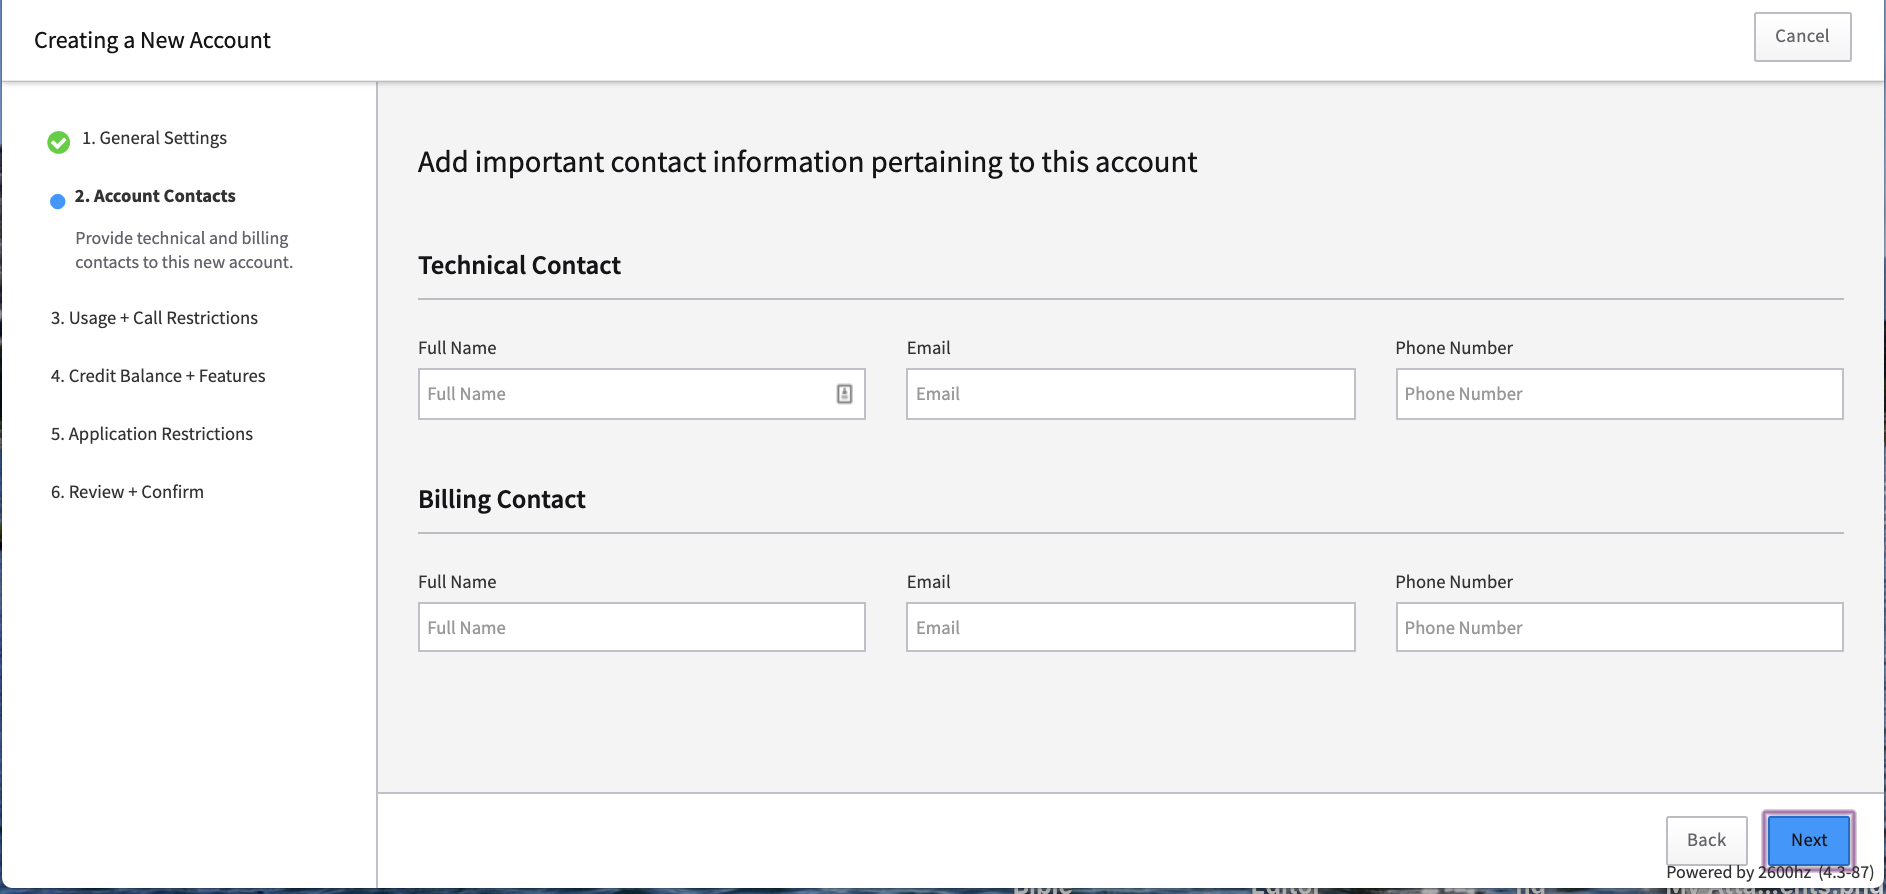
Once added, click on
at the bottom right to continue.
Usage and Call Restrictions
On the Call Restrictions tab, select how many unlimited trunks you would like to allocate to this customer. This would be the number of concurrent calls your customer should need and this number will be part of your total trunks set at your reseller level. Trunks can be inbound, outbound or two-way and a combination can be used.
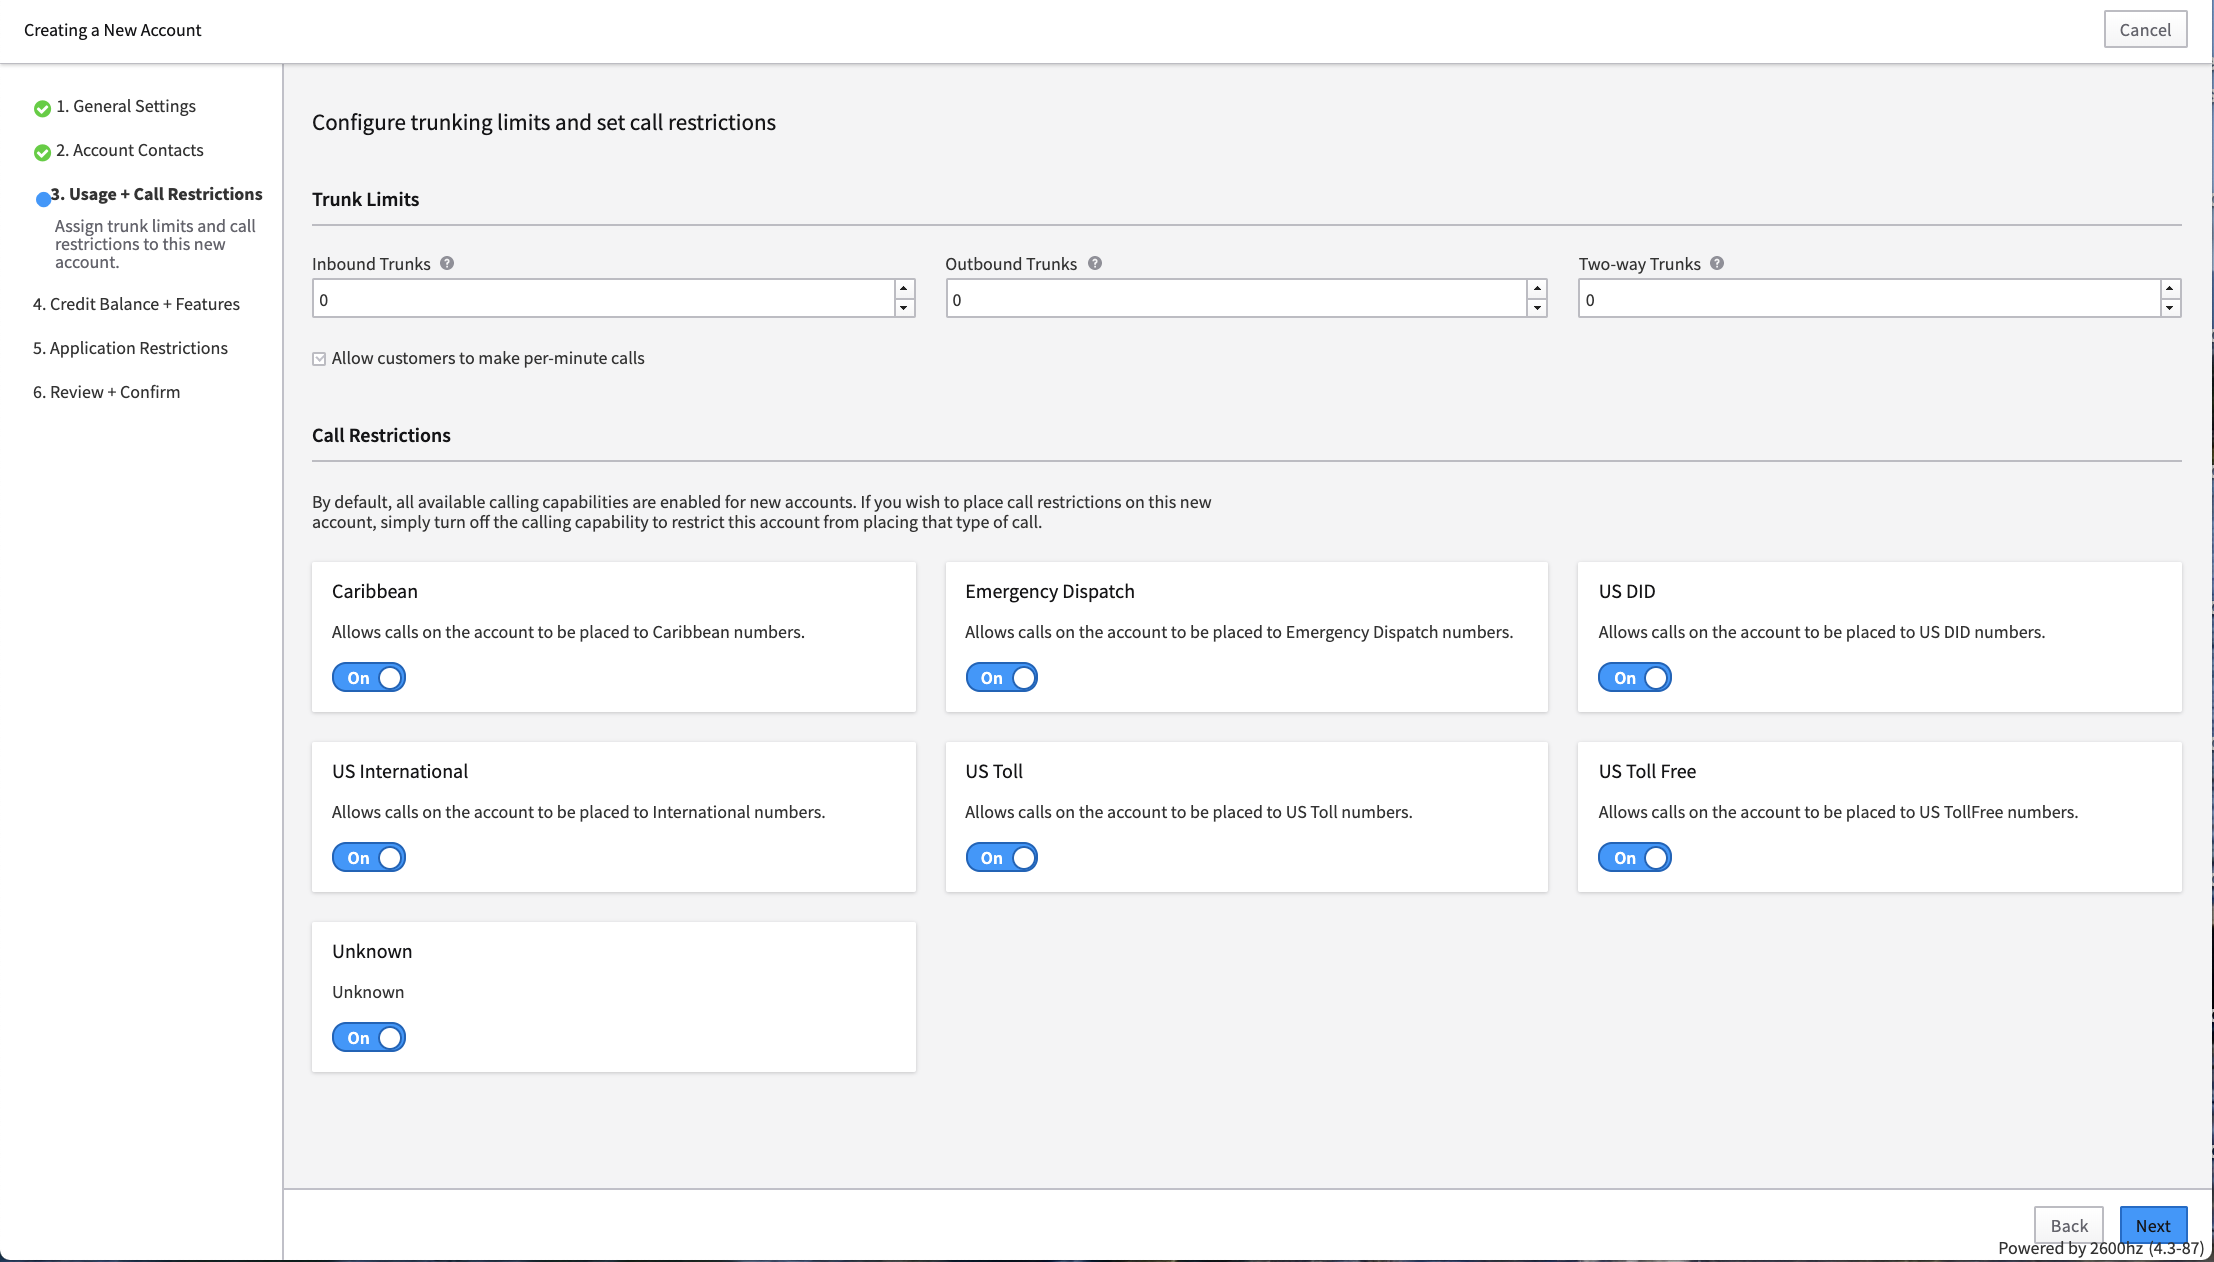
Trunk Limits
-
Inbound Trunks
The number of inbound trunks defines how many simultaneous calls you can receive to your phone system. Once this number is met, any additional calls will be routed to a queue and/or voice mail depending on your settings.
-
Outbound Trunks
The number of outbound trunks defines how many concurrent external calls you can place at one time.
-
Two-way Trunks
The number of two-way trunks defines how many concurrent calls your platform can handle at one time.
- Allow customers to make per-minute calls
Call Restrictions
By default, all available calling capabilities are enabled for new accounts. If you wish to place call restrictions on this new account, simply turn off the calling capability to restrict this account from placing that type of call.
NOTES
- If you have checked the box above "Allow customers to make per-minute calls" this will / will not? override the geographical settings.
- To comply with the new Kari's Law, you MUST enable the Emergency Dispatch option. For more information on this requirement, review this page.
Once you have confirmed these settings, click
to continue.
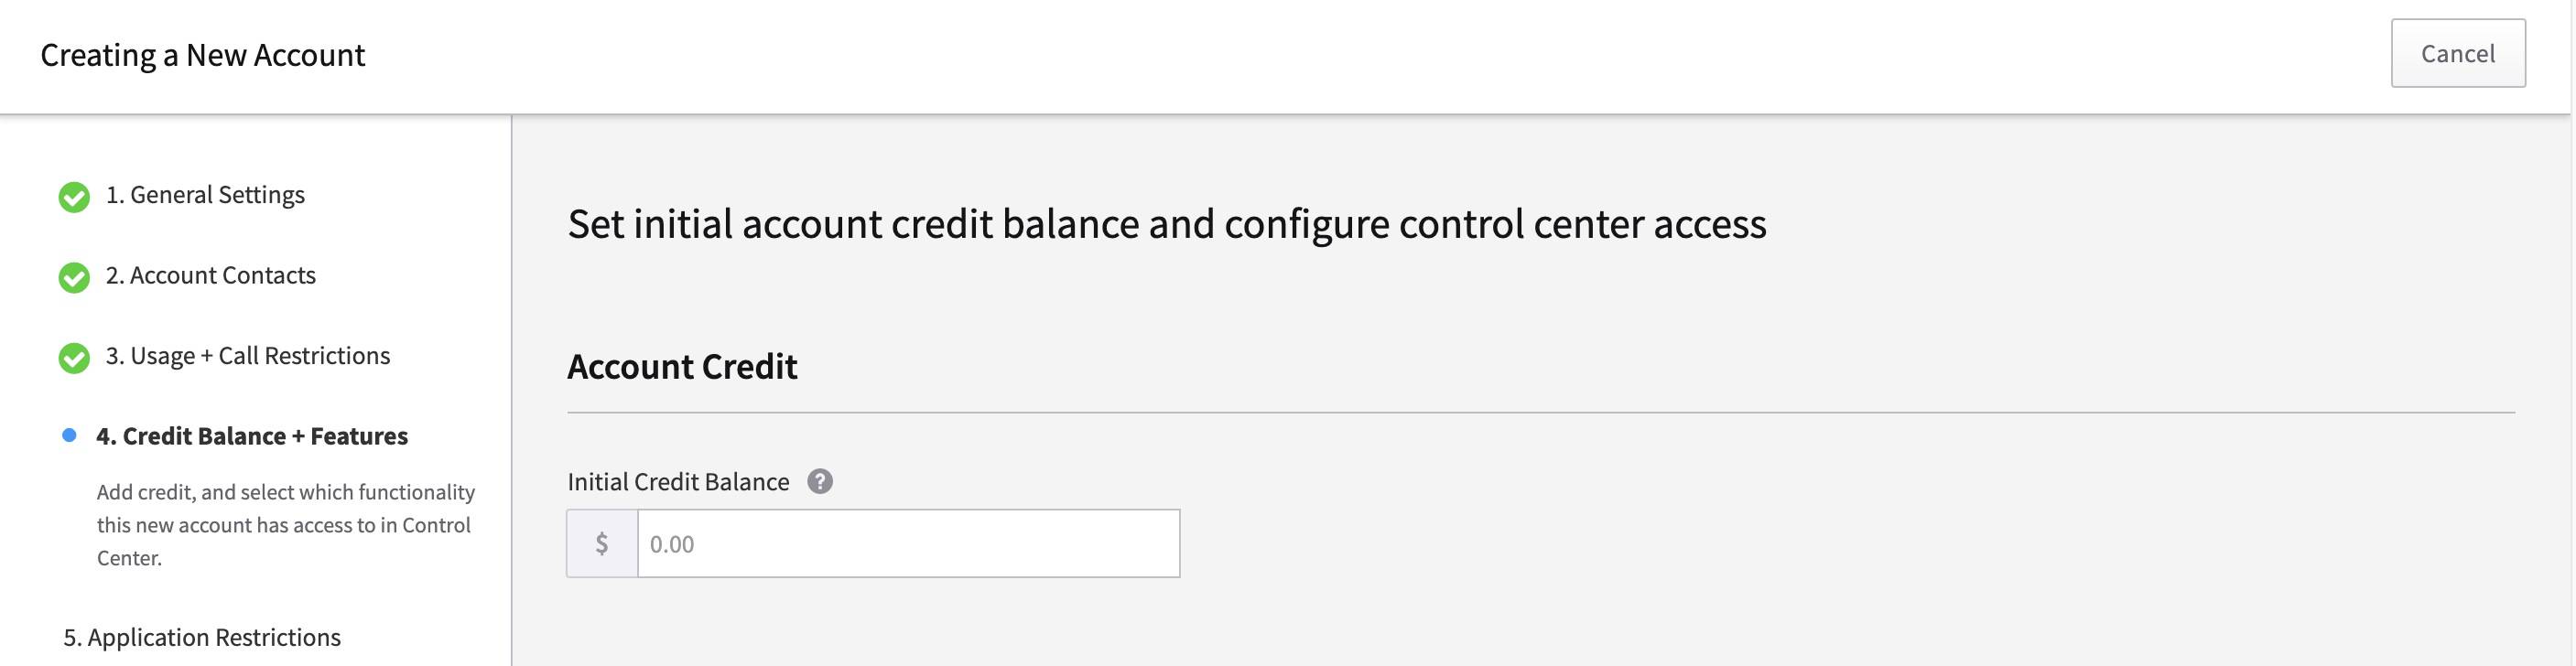
Credit Balances and Features
This page will set an initial account balance and configure control center access.
Account Credit
Adding credits manually allows you to immediately set your initial current balance. Maintaining a current balance is critical as it is necessary for international or permanent calls, e911, caller ID and other system features that incur a charge.
NOTE: In order to be compliant with Kari's Law, you MUST keep a minimum balance here. For more information on this requirement, review this page.
Control Center Access
You are able to restrict which Control Center features are accessible to this new account. Select the desired features, or leave them all available depending on your business use case and this account's needs.
-
Settings
- User: Allows users to change their passwords, time zones and language preferences, date/time, and color blind settings.
- Account: Allows users to view/change account name, account realm, technical contact, and User account settings above.
-
Billing
- Credit Card: Allows users to view/change credit card information on file and billing contact information.
-
Usage Charges: Allows users to view "per minute" tab of usage charges.
- Credit info: Allows users to vie the "credit info" in the control center.
- Minute info: Allows users to vie the "minute info" in the control center.
- Service Plan: Allows users to view/download a copy of the Service Plan applied to the account.
- Transactions: Allows users to view the transactions on the account.
-
Misc.
- UI Errors Log: Allows users to view the UI Errors Log, which may be beneficial in troubleshooting.
Application Restrictions
Manage which applications are available to this account.
New accounts by default have restricted access to all accounts and applications must be manually approved.NOTE:
This step merely sets the access restrictions for applications on this new account. It DOES NOT enable the applications on the account itself. To enable applications an administrator will need to do so within this new accounts Application Exchange.
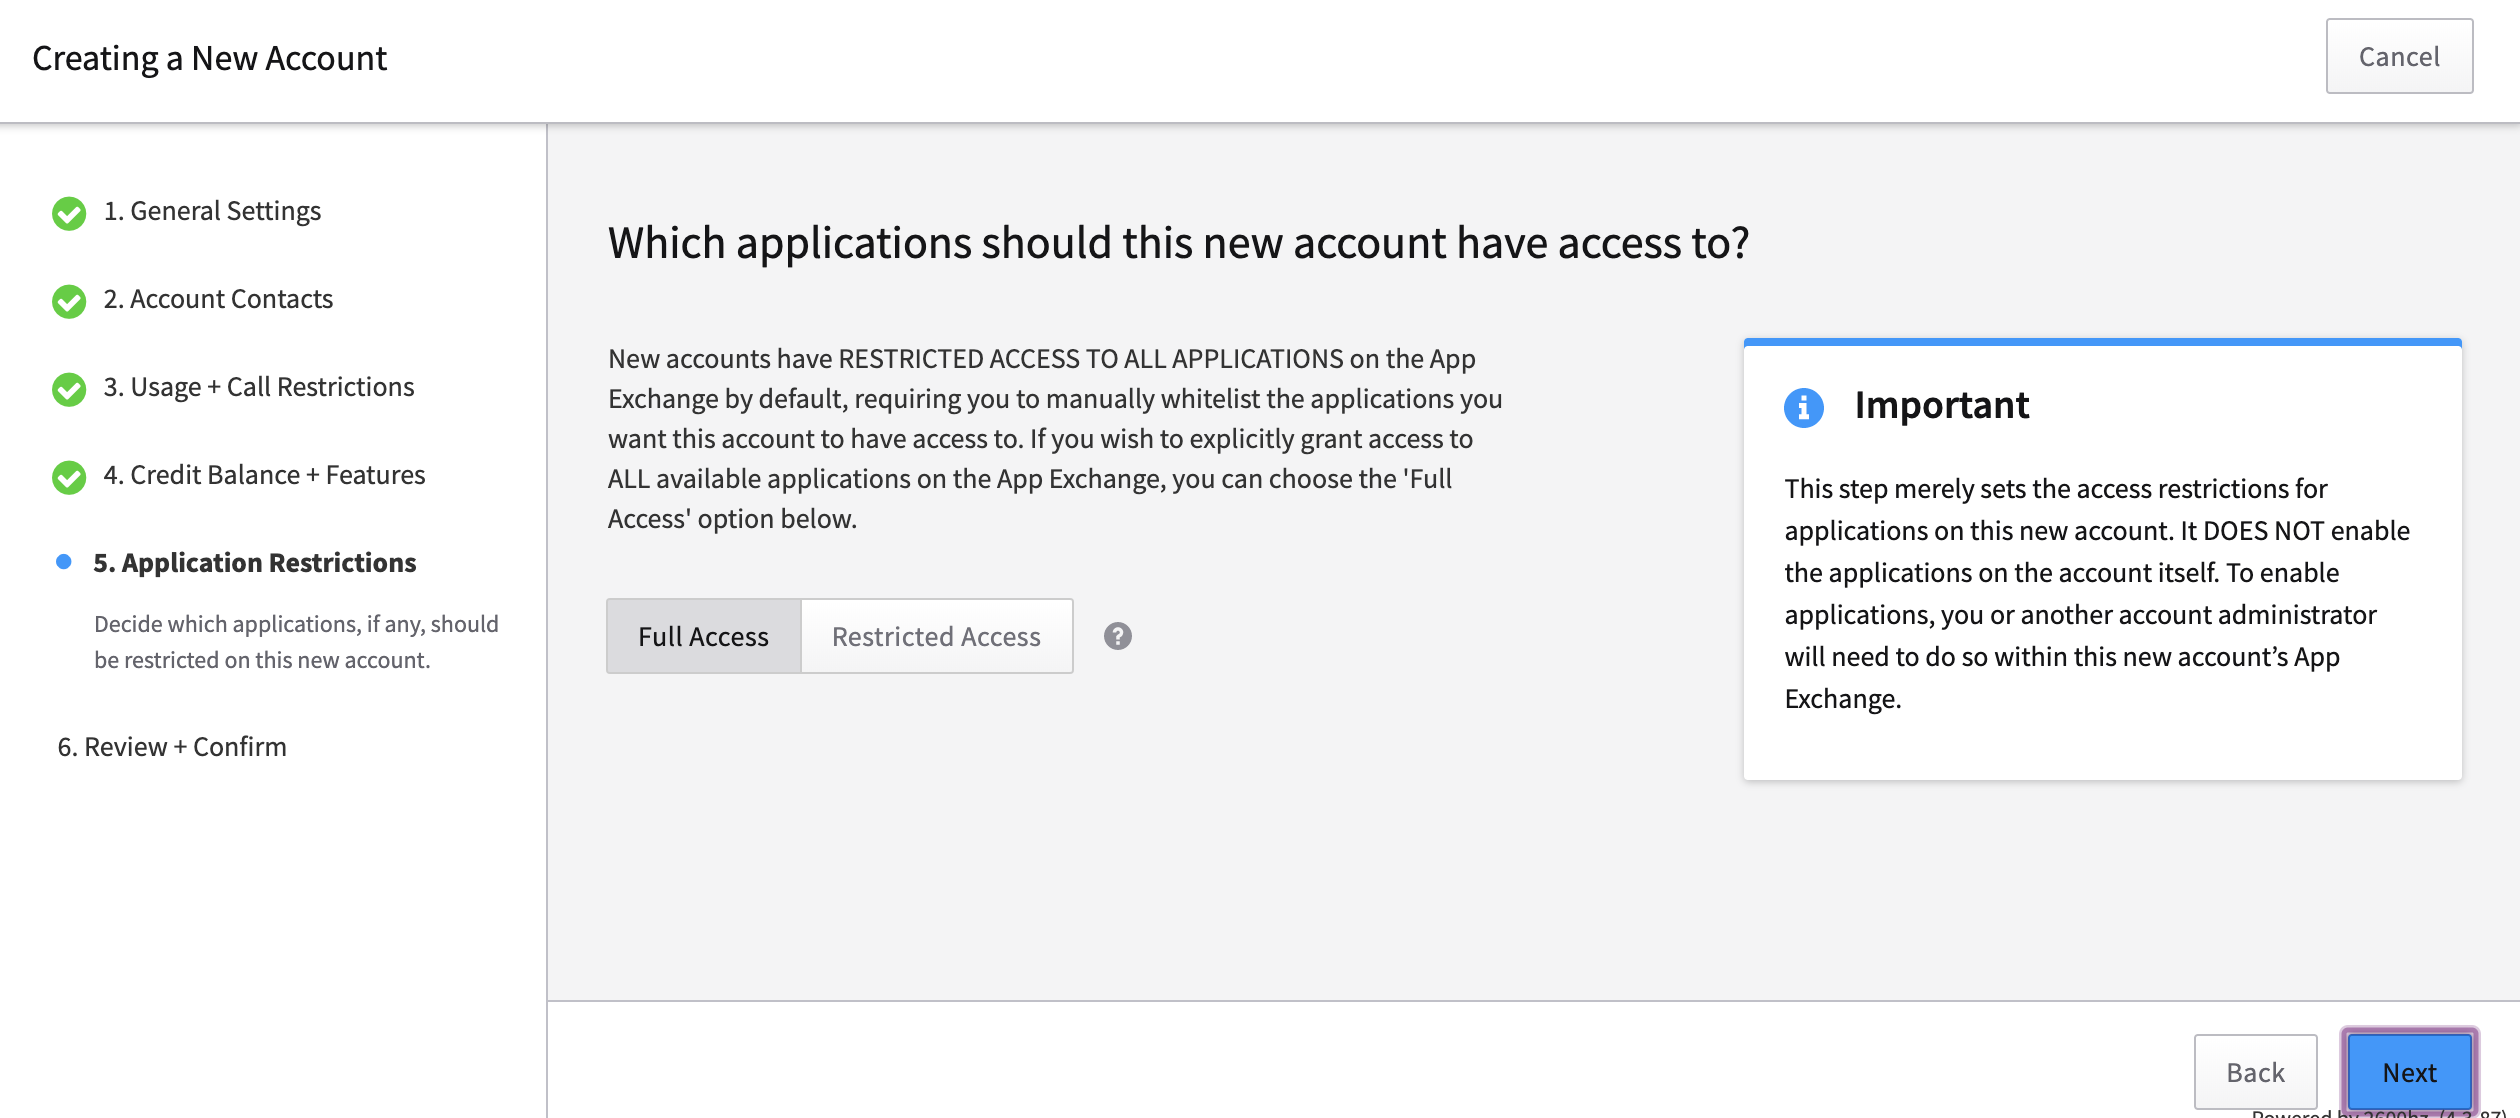
Full Access
-
Use this option if you want to allow access to everything on the Application Exchange.
NOTE:
Some applications are not included in the base pricing; once you enable these apps in the Application Exchange you will be subject to its pricing. Please contact sales to find out your price level for each application.
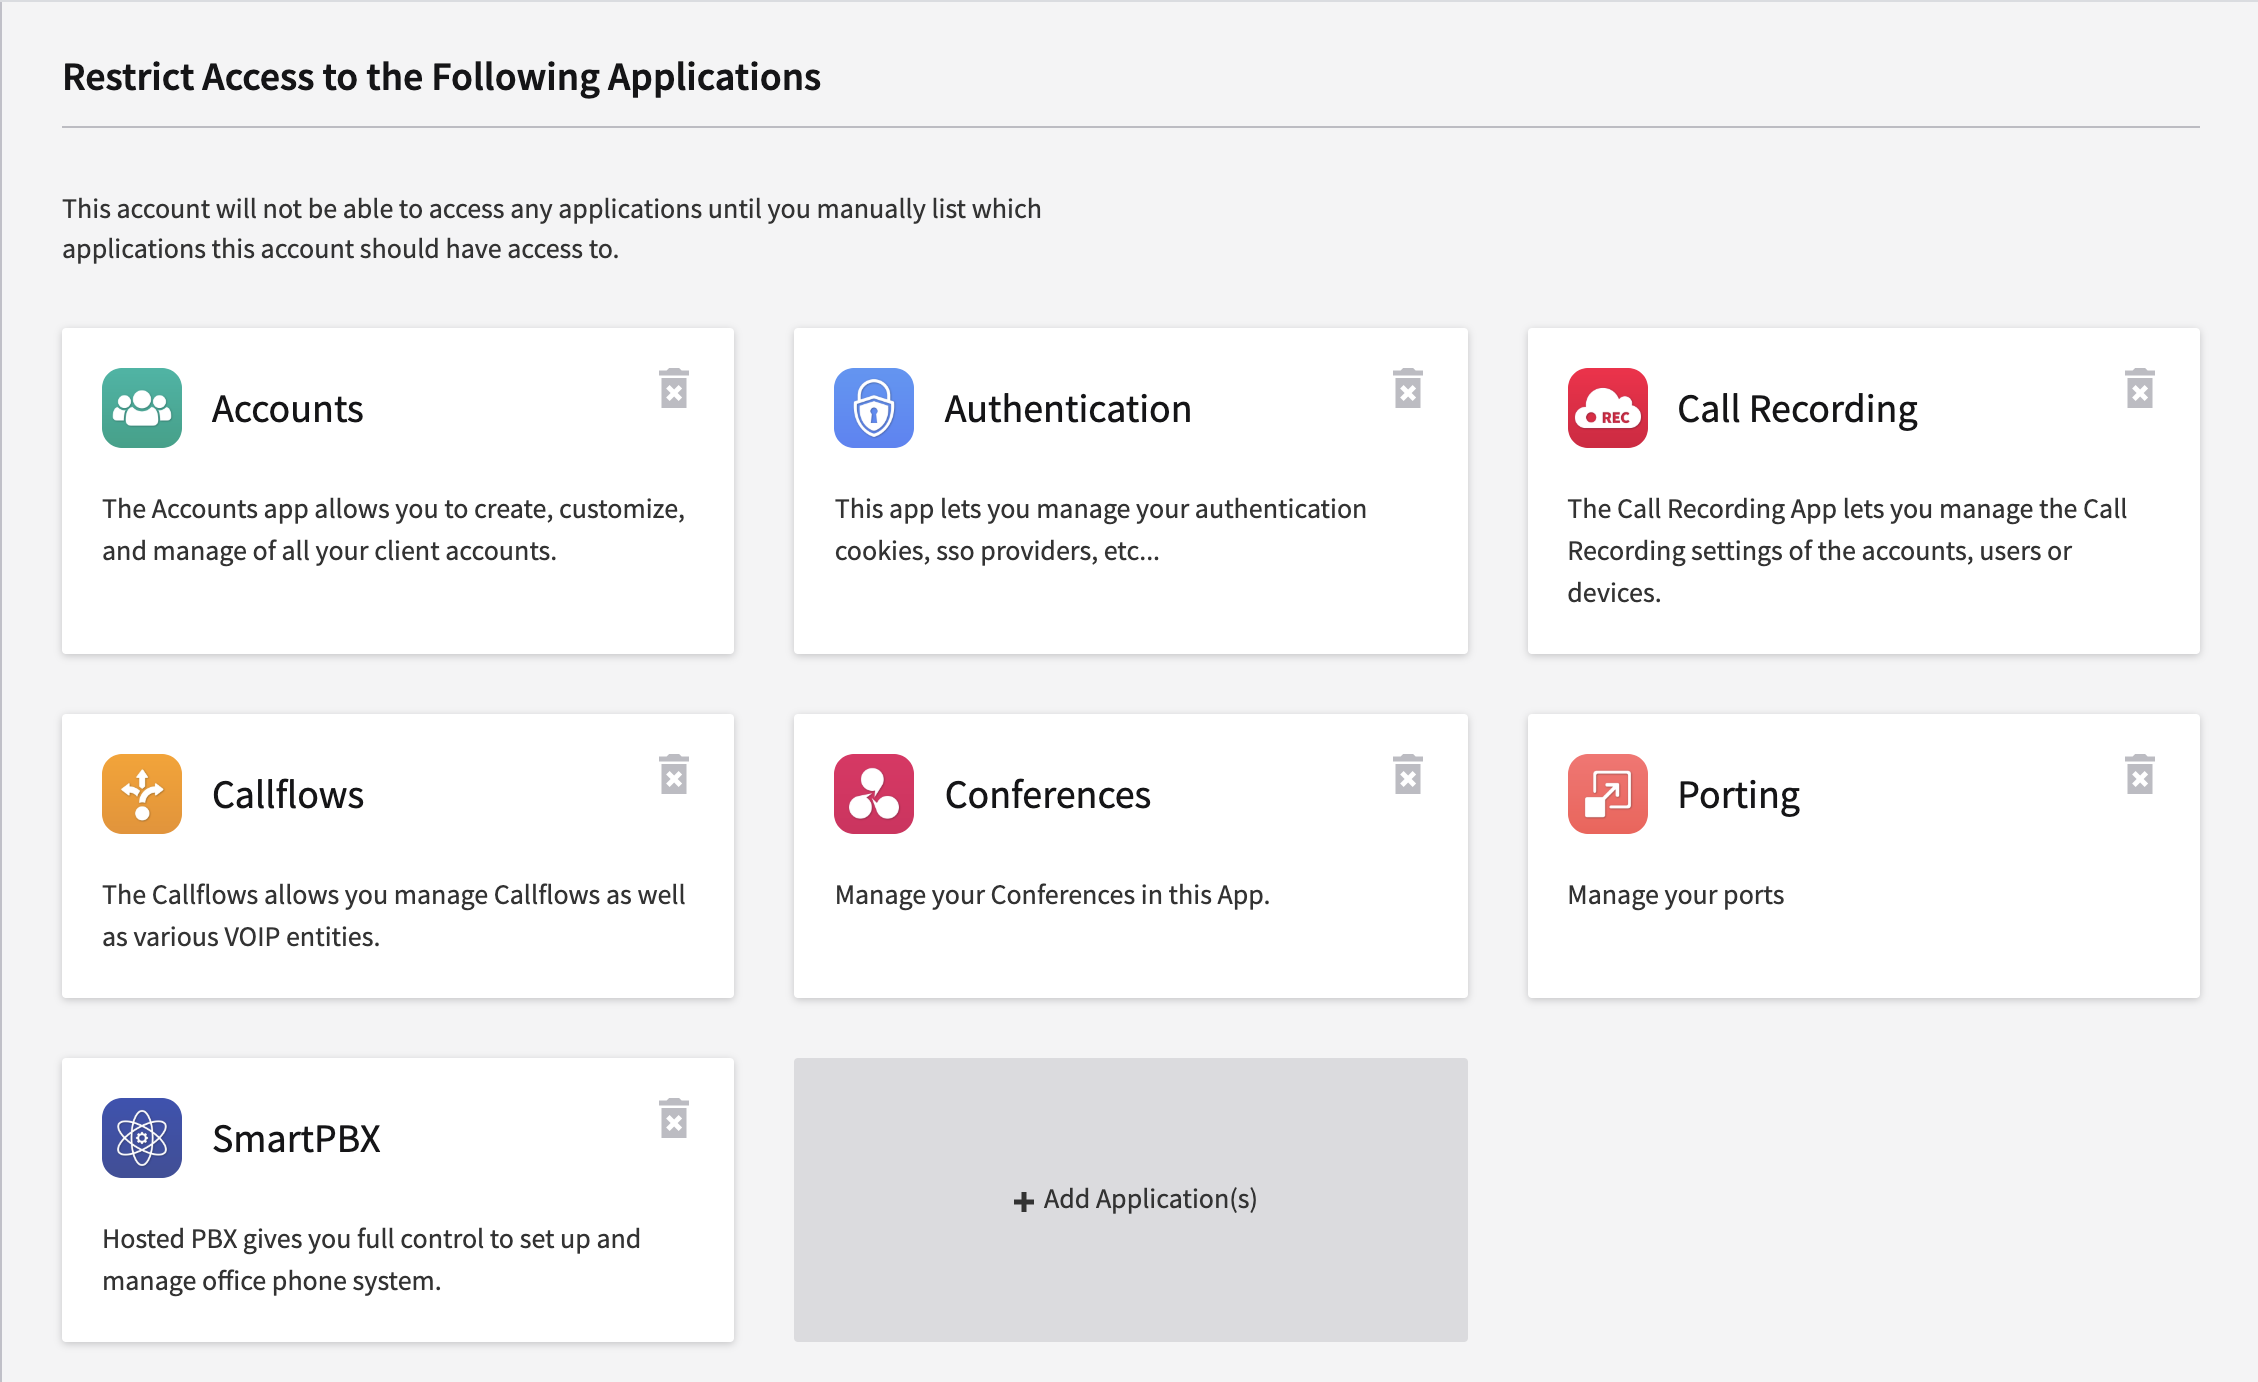
Restricted Access (default)
- This will restrict access to ALL
Enable Access to the Following Applications
If you have maintained the Restricted Access option for this account, you must manually choose which applications are enabled / accessible to this account. Pick "Add Applications" below, and then choose the applications you want to include.
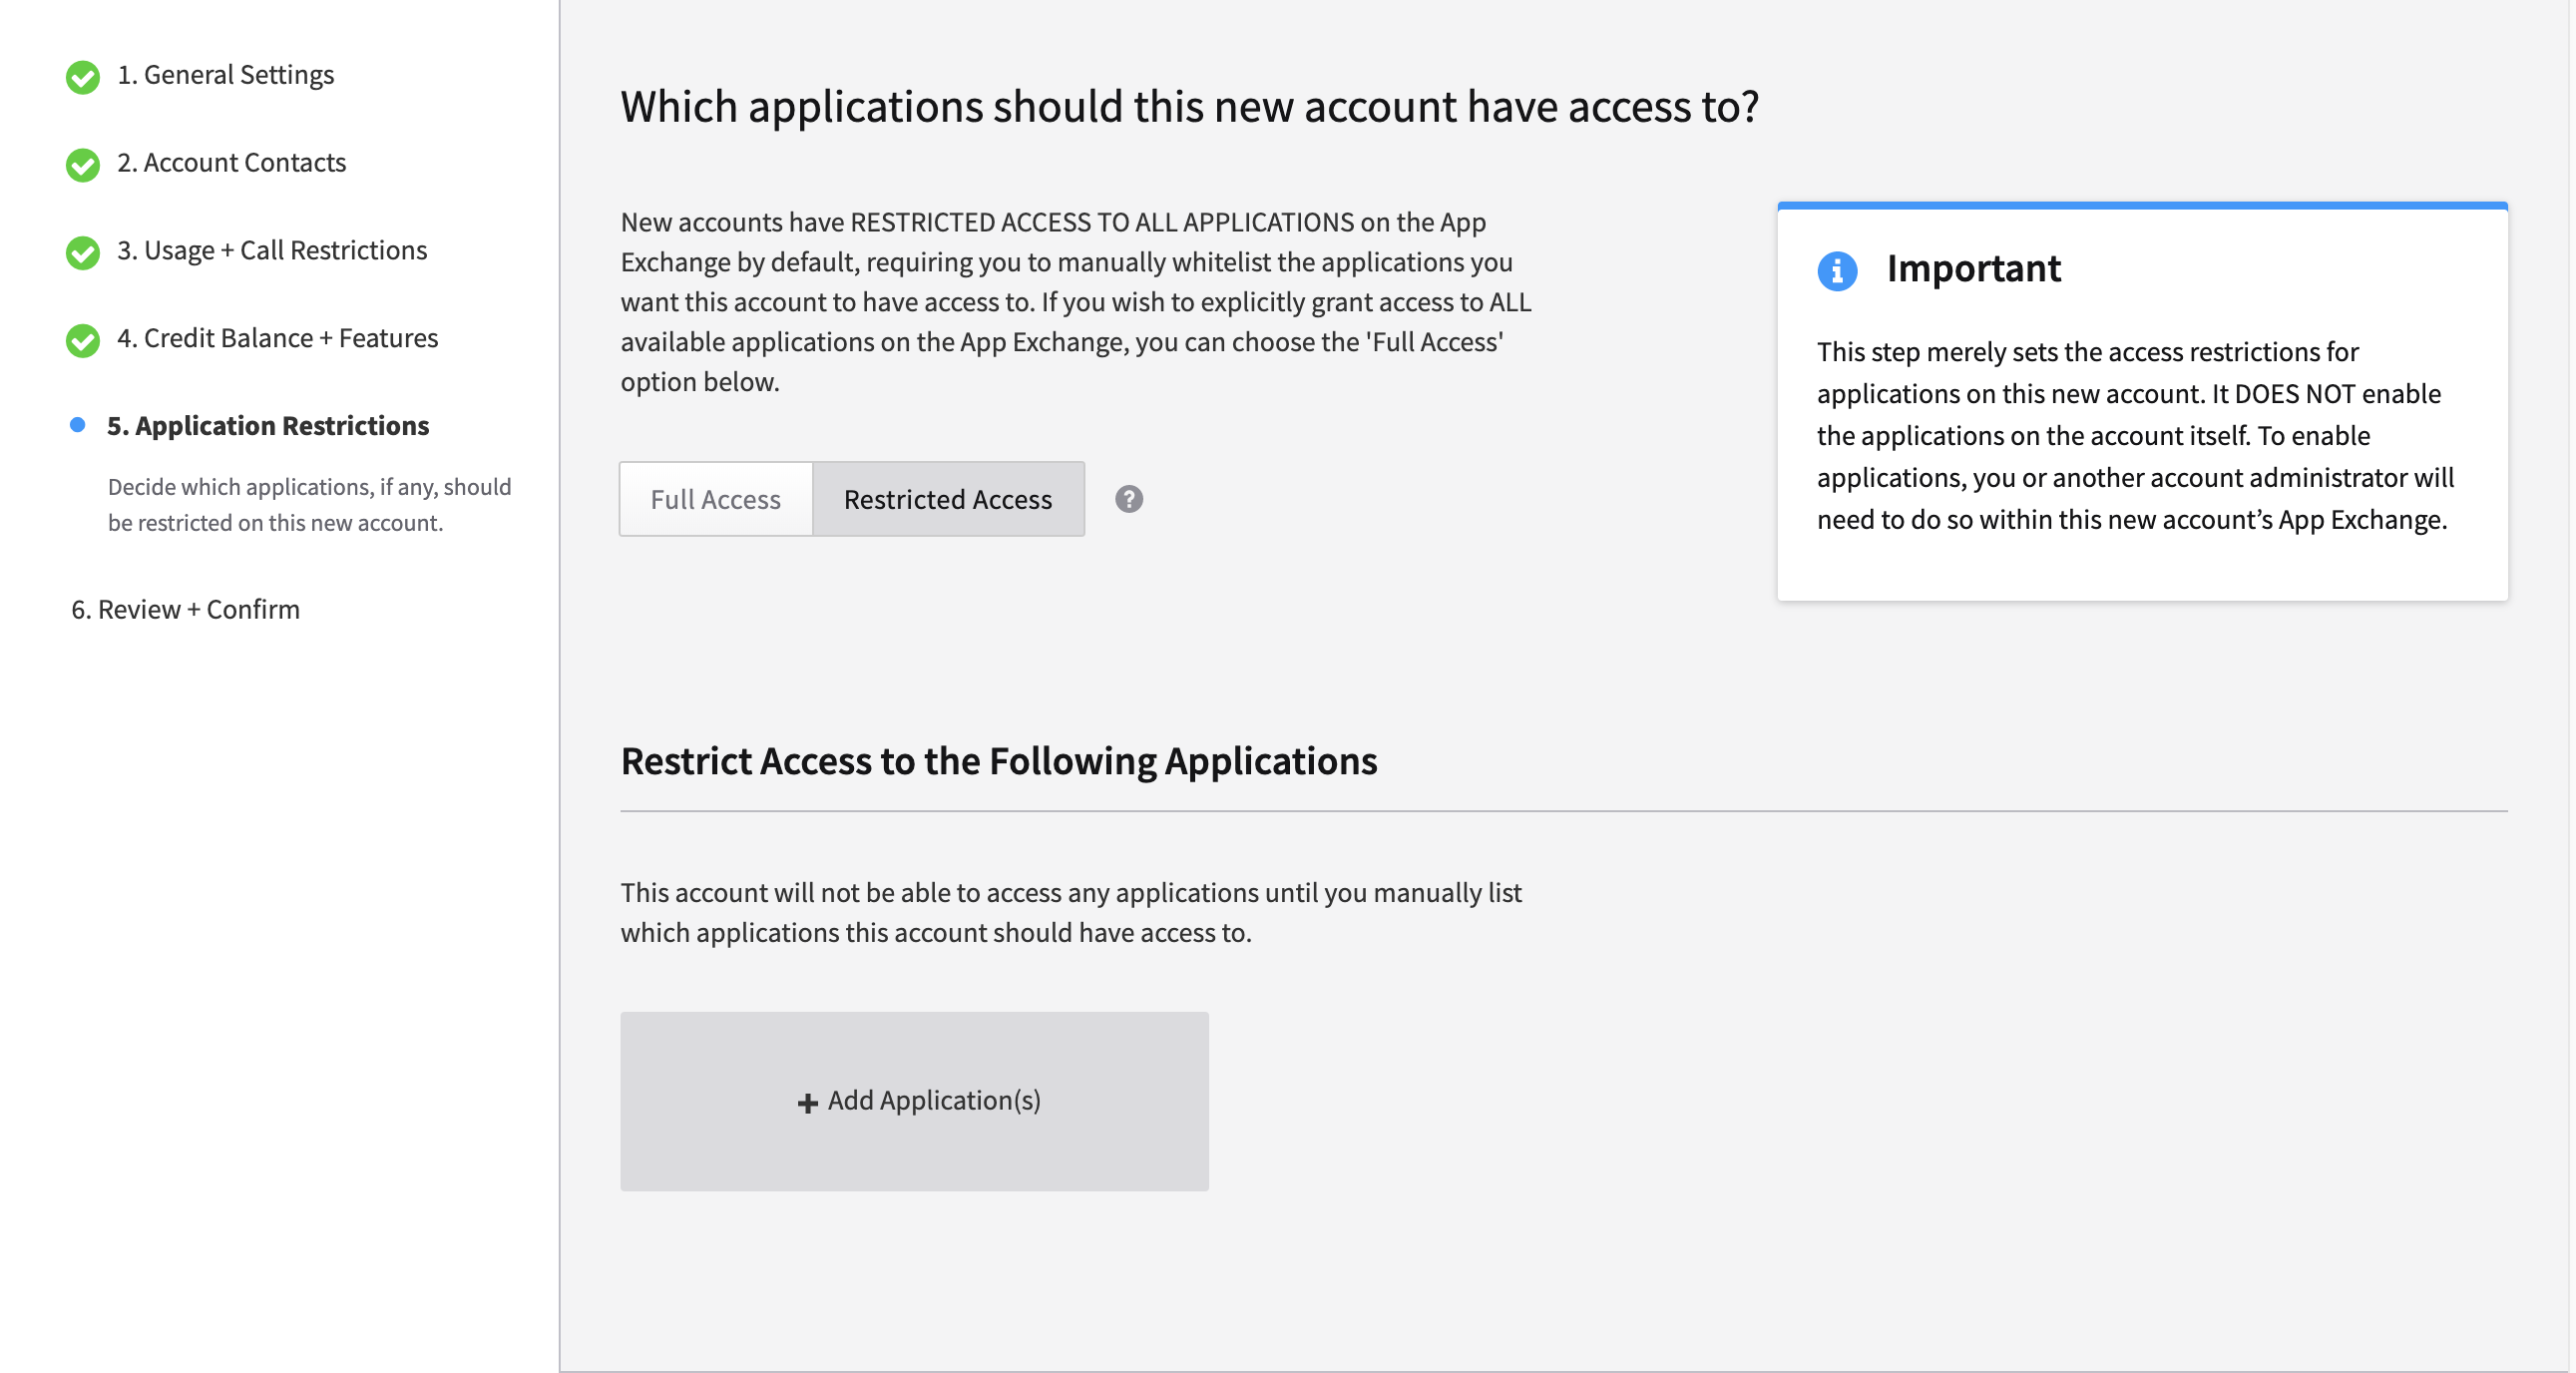
Pick "Add Applications" below, and then choose the applications you want to include.
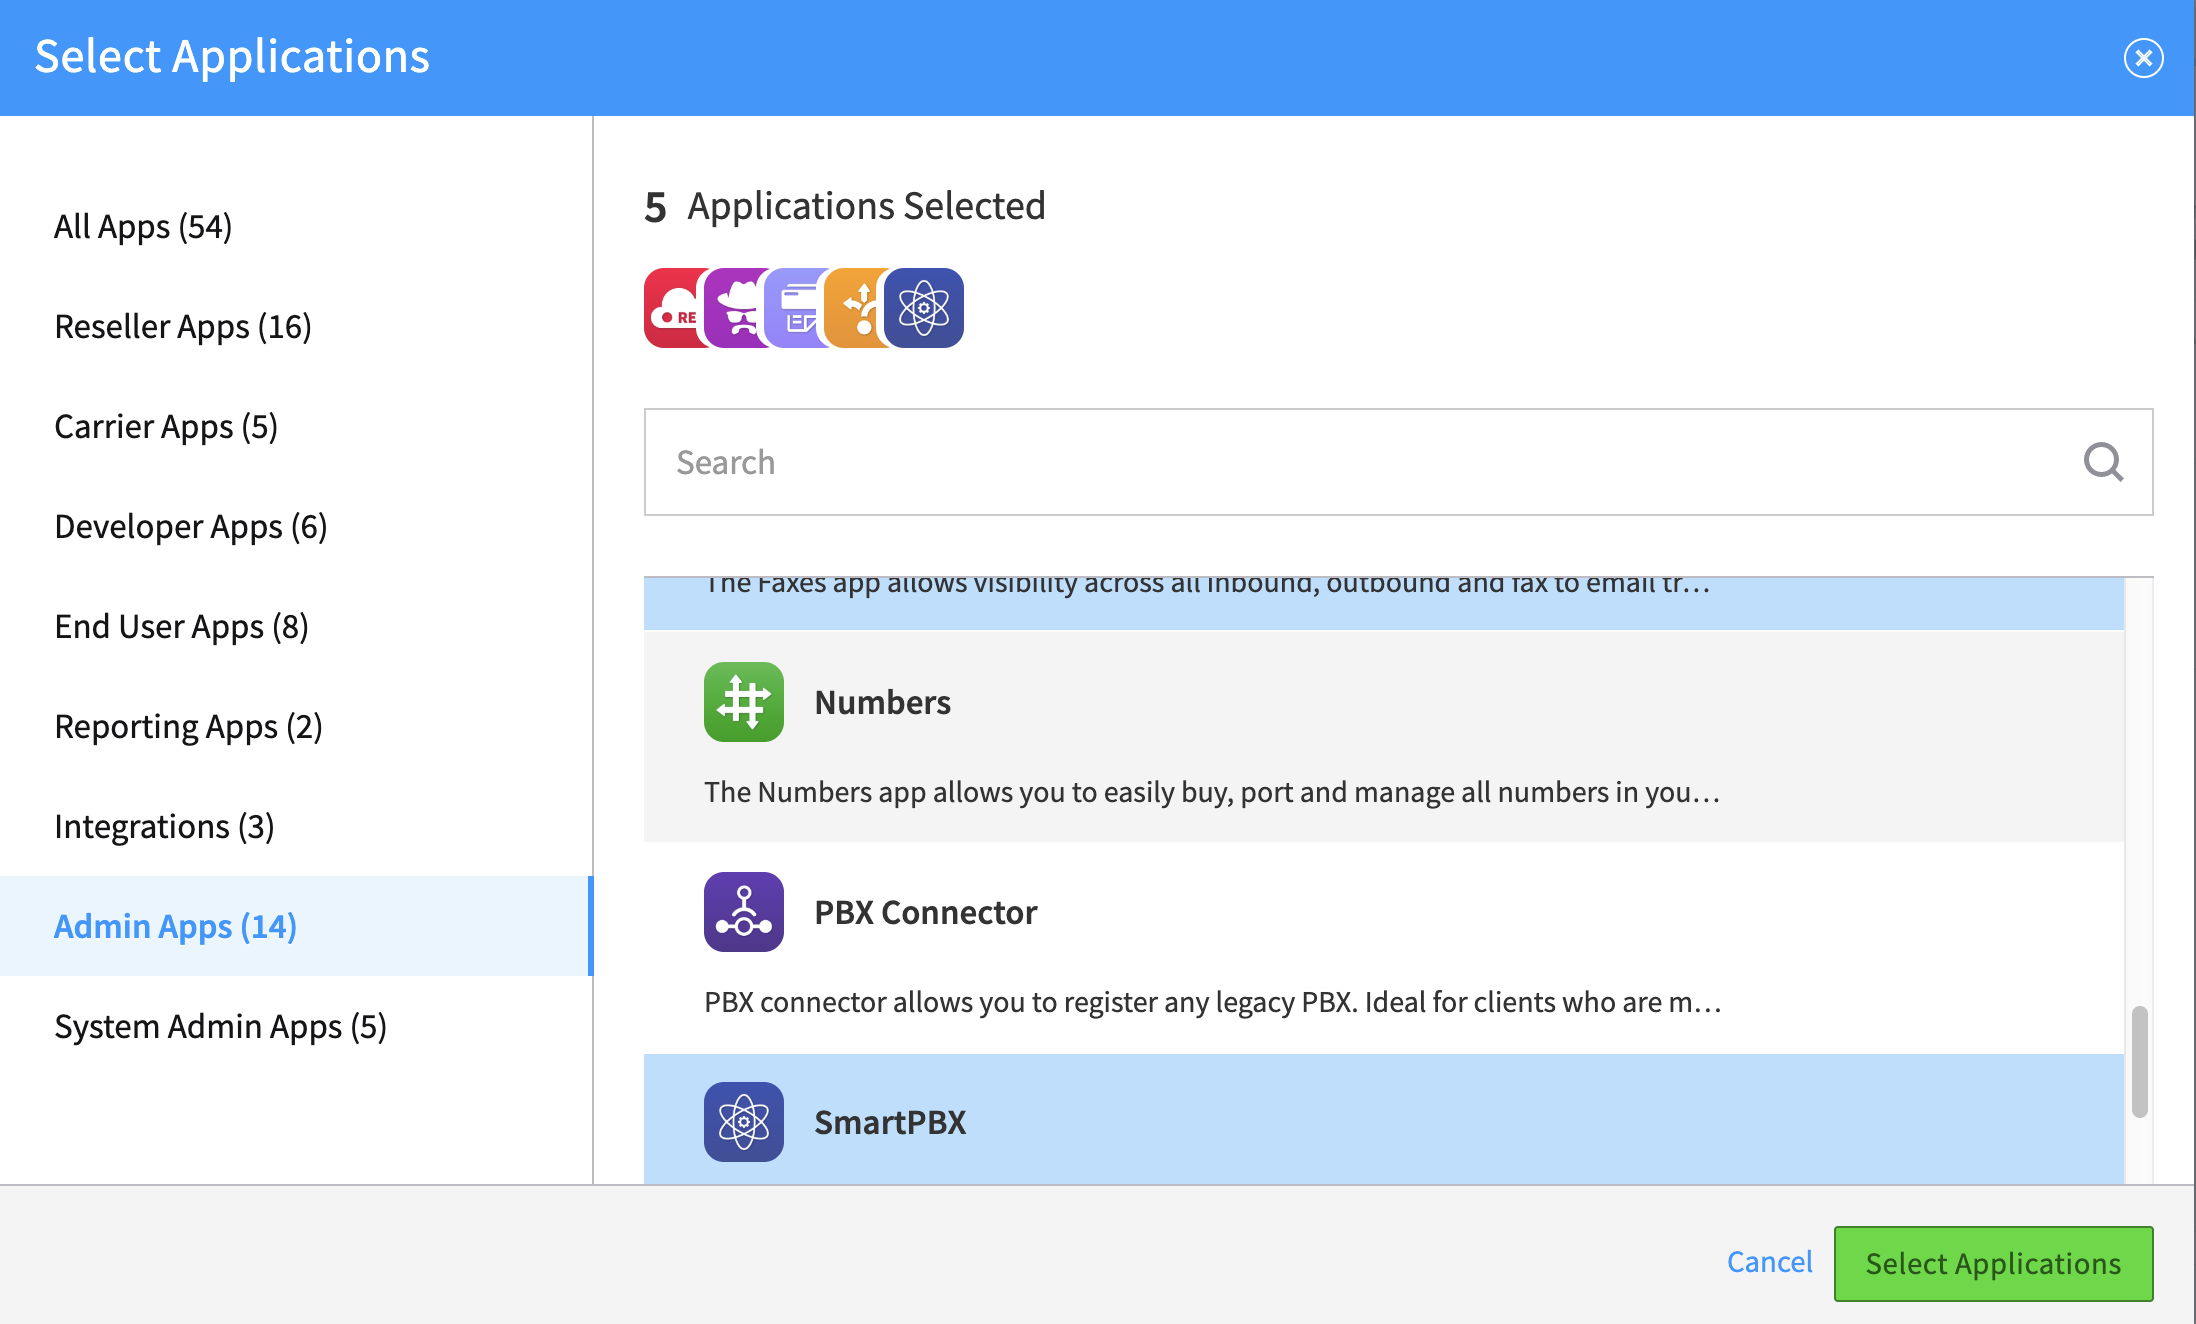
Once you have picked your apps and click on Select Applications, they will display as the applications you've allowed.
Review your additions, then pick.
at the bottom right to continue.
Review and Confirm
Review your new account configuration before finalizing the creation of your new account.
You will see a screen that summarizes your configuration. If you want to make changes to any section, click on the pencil next to the category header. This will take you back to the original screen for that section and you can edit the entries.
- You can skip the NEXT button and click directly back to Review and Confirm using the menu on the left.
When you confirm your settings are correct, click on
 . at the bottom right of your screen.
2600HZ SETUP GUIDE – EDITING EXISTING ACCOUNT
Below is an overview of creating a new account in the Accounts app.
Editing Existing Accounts
Once the account is created you will see a dashboard that looks like below. This is how you will access / edit your new account.
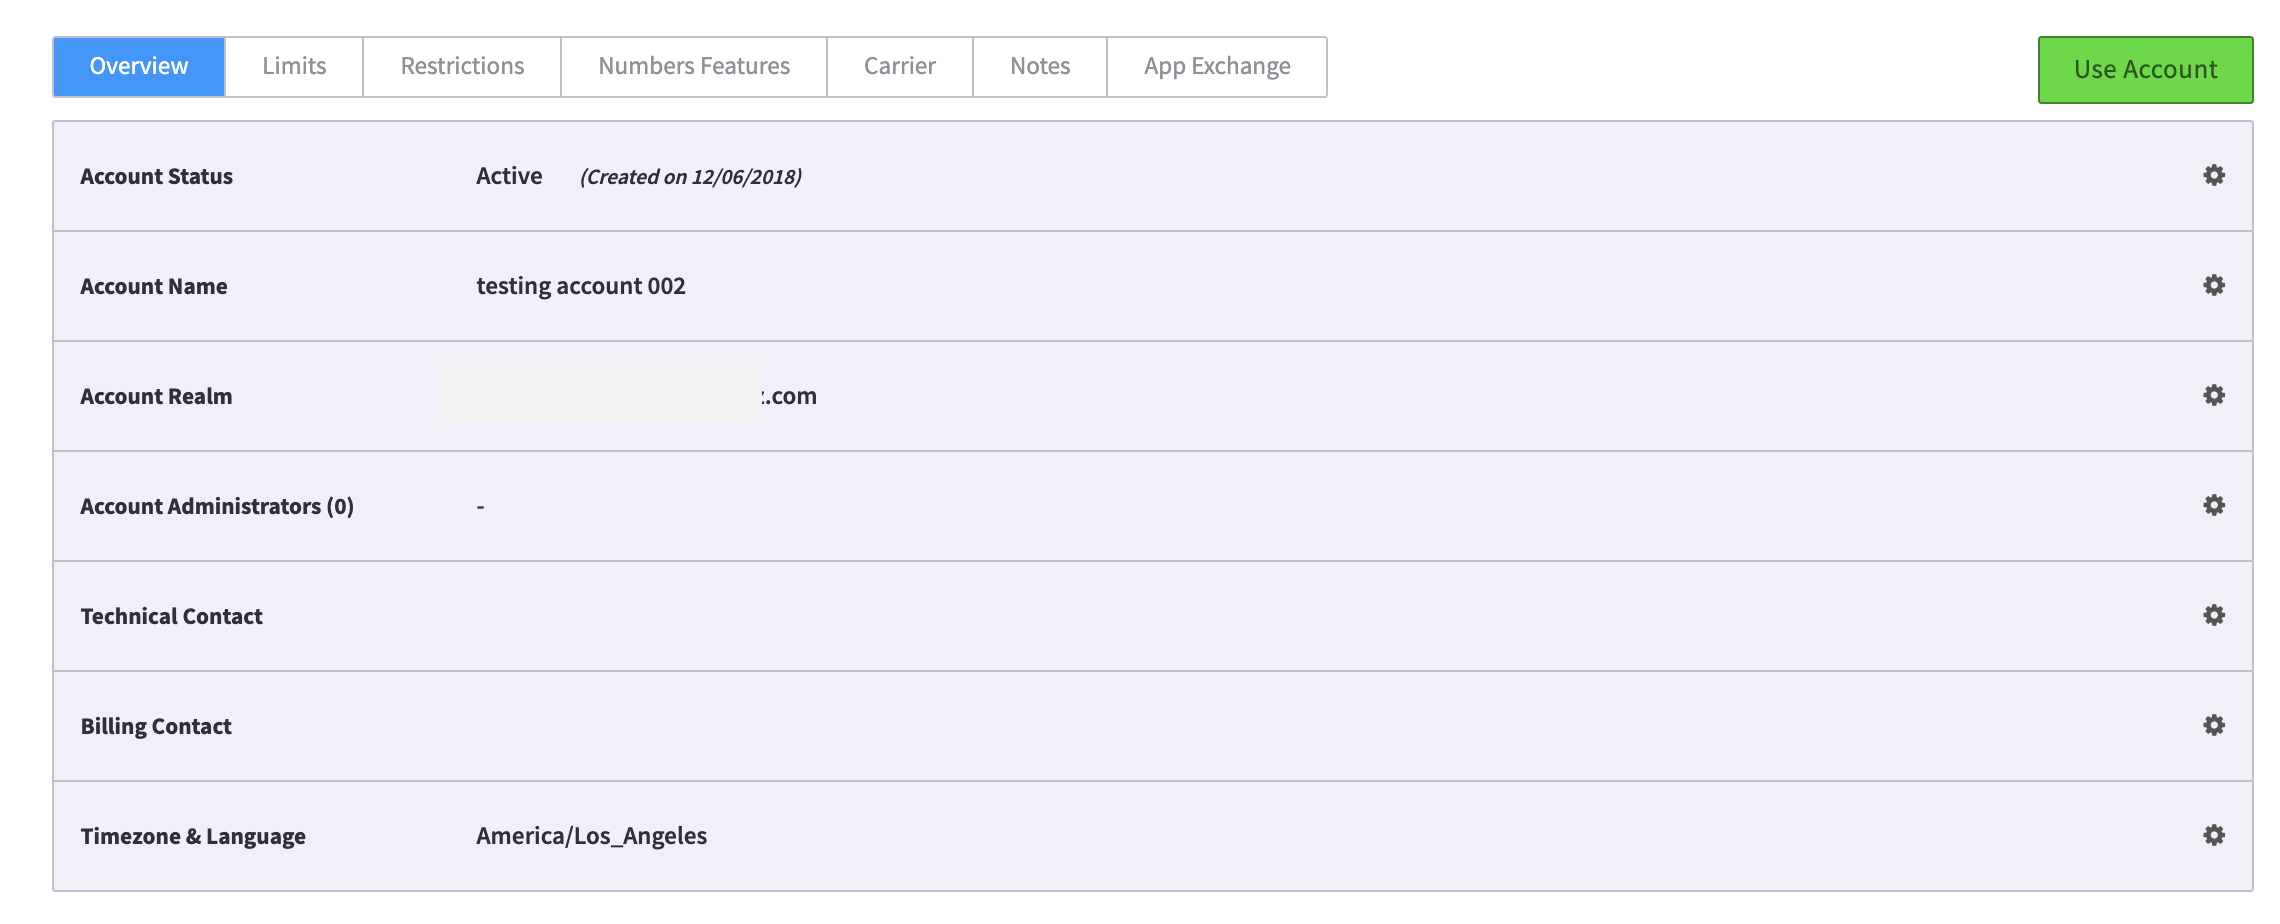
For the Overview tab, choose the gear to the right to make any edits.
Numbers Features
This is where to enable both the E911 and CNAM features for your account.
NOTE: The E911 feature MUST BE ENABLED in order to comply with the newly enacted Kari's Law. See this page. here for details.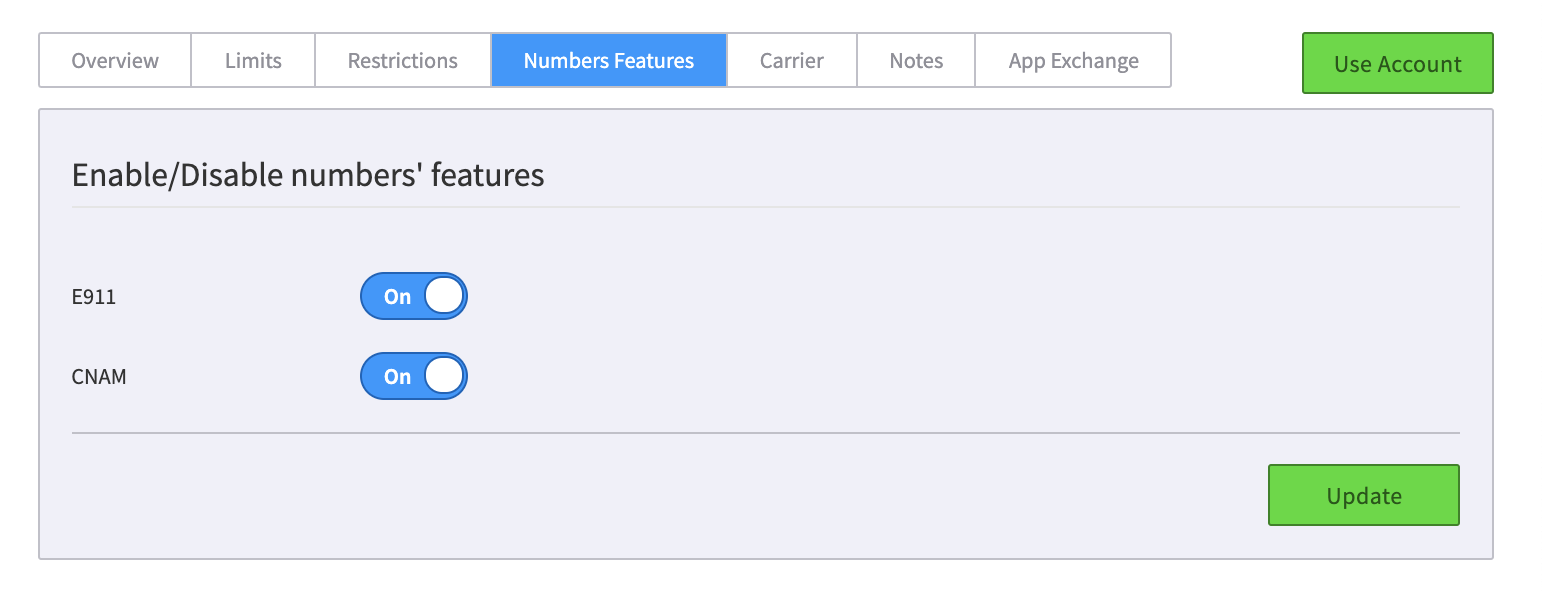
Carrier Tab
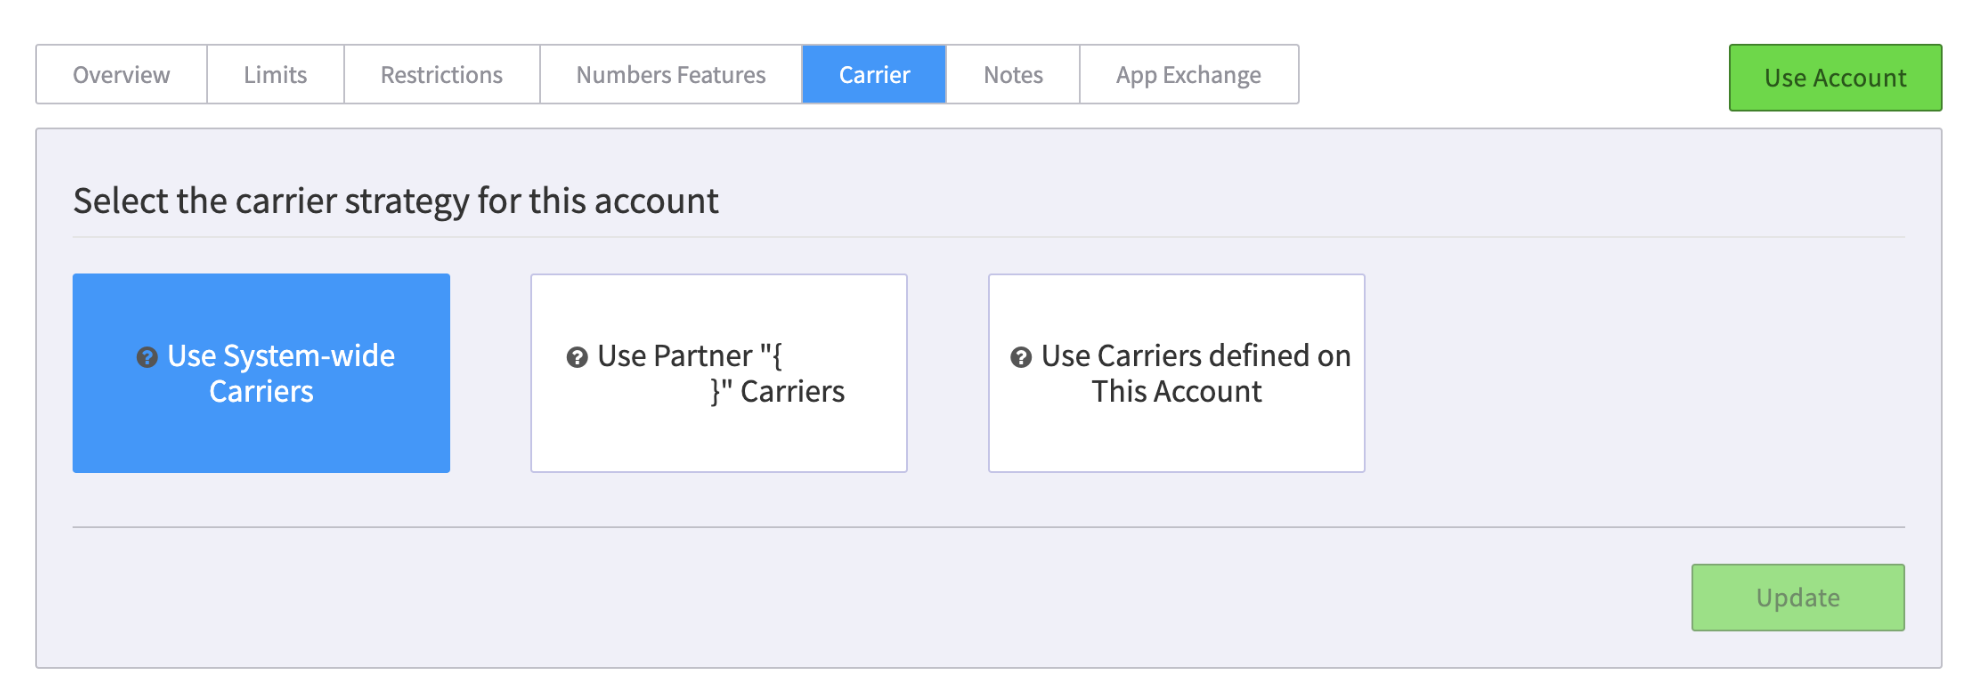
Use System-wide Carriers
- This will route calls to the global carriers set up on the master account.
Use Partner Carriers
- This will route calls to the noted partner carrier set up on the master account.
Use Carriers defined on this account
- This will route calls to the carriers set up for this account using the Carriers app.
Notes Tab
This WYSIWYG editor in this tab allows you to create an Announcement Page that displays when a user logs into this account.
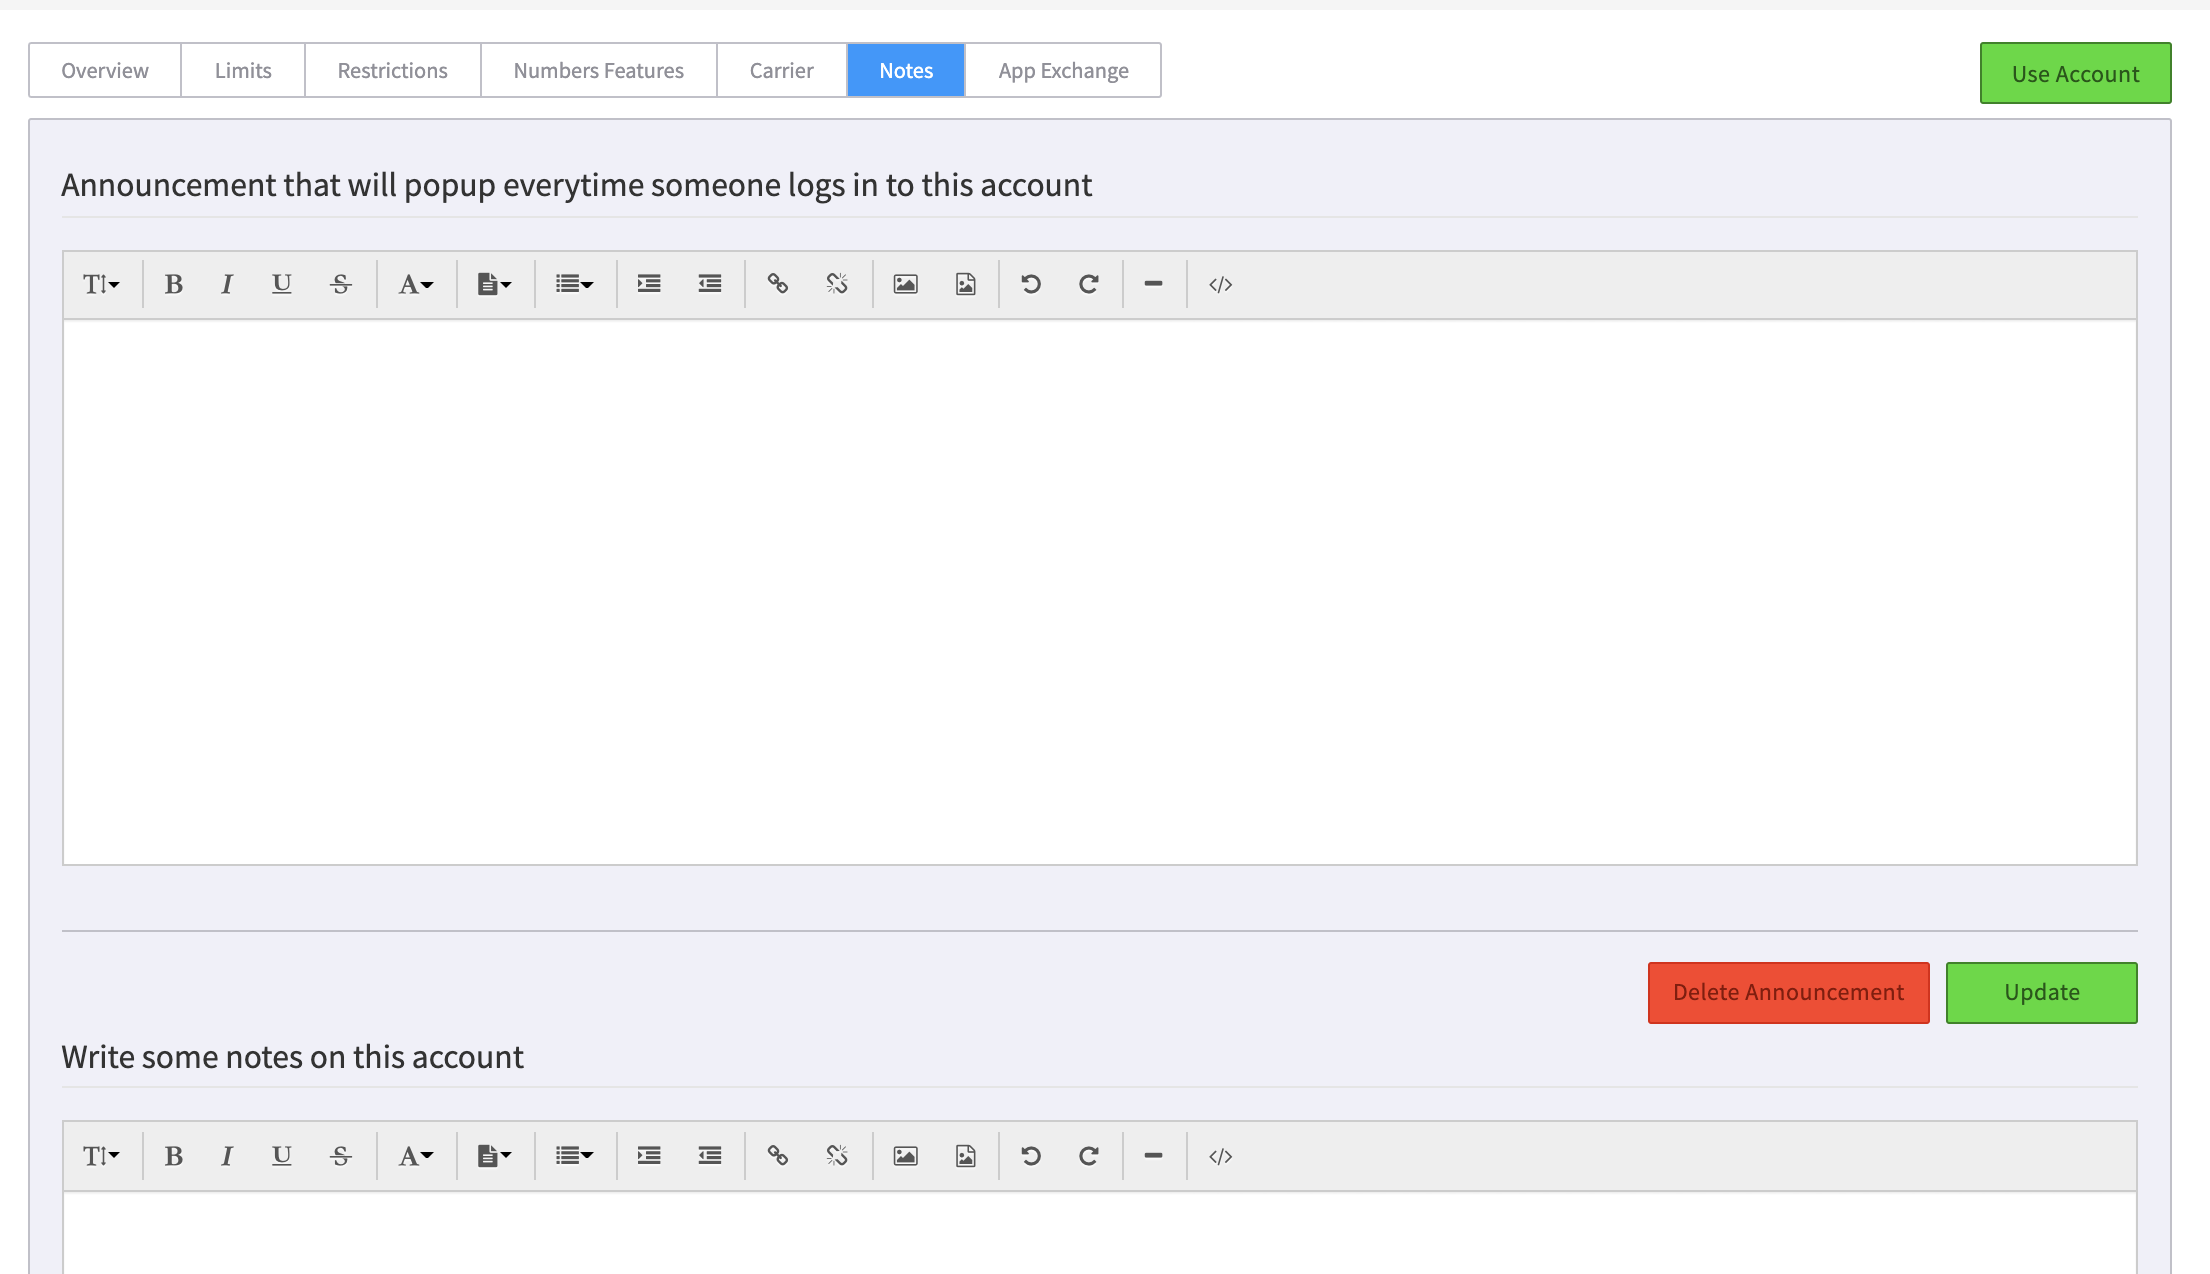
Common announcements include:
- Your branding and support information
- Notes on available new applications
- Notes on upgrade timing and possible outages
A notes page that allows you to make internal notes about this account.
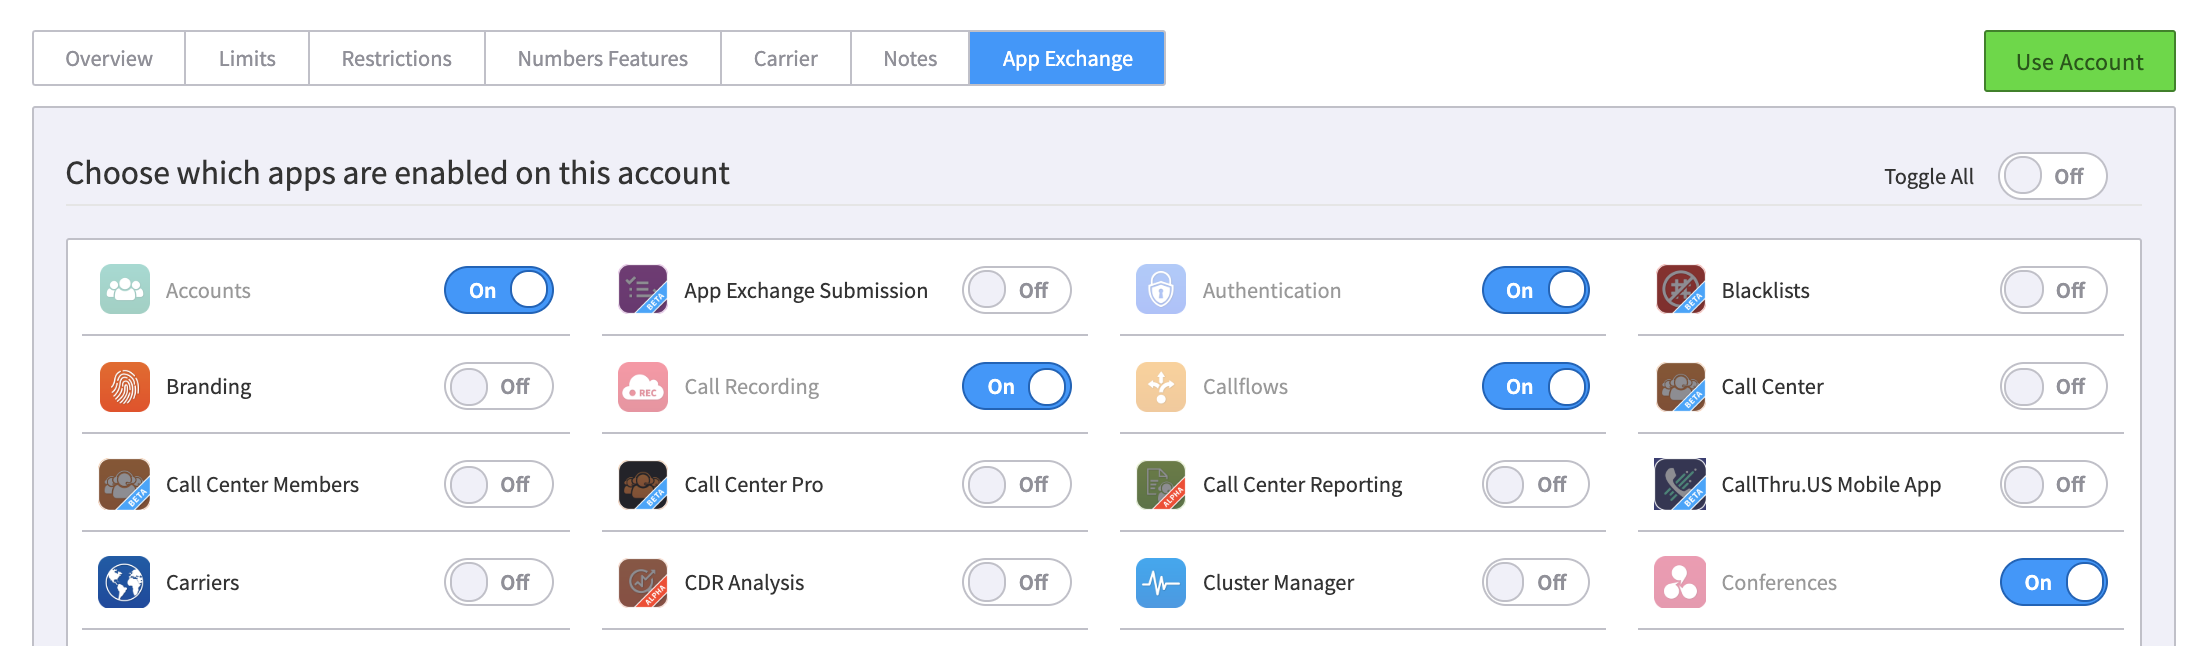
App Exchange Tab
This displays the applications enabled for this account, and allows you to change the settings.
####

-
Account Name (i.e.; ABC Company)
-
Accounts FAQ
Below are Frequently Asked Questions for the Accounts app. If you do not see an answer to your question here, please submit it in the comments at the end of this file.
General Information
What is the Accounts app?
Answer question here.Is there a tutorial to help me get started with Accounts?
Yes! You can find our setup guide and other help documents [add link HERE].How many accounts can I set up?
There is no limit.Can I set up sub-accounts?
Yes! To set up a sub-account for one of your existing accounts, make sure you are first in the account you want to create a sub-account for. To do this,- Enter the Account application.
-
Select the account you want to create a sub account for on the left navigation list of accounts.
-
When the account overview page is displayed, pick the Use Account button to the right
OR -
Use the "Jump" icon to jump to the account you want to create a sub account for.
-
-
You will see a message indicating you are "Masquerading" into that account.
-
Once you are in the account, you can create the sub account using the navigation bar to the left. You will be walked through the create account wizard. Once your new account is saved the navigation menu to the left will look like the images below: -->
-
Once you have registered a CallThru.us device, it will display as a device option in a number of companion applications that use the Monster UI. Below is an overview of how and where it will appear.
CallThru.us in SmartPBX
Once a CallThru.us is added to a specific User, that user should "find" it in SmartPBX in the following places:
Users List
- Search for your user name
-
Click on the Devices column, and it will display the device in the drop down
-
Click on the User Name tab, and you will see additional settings that apply to the user for all calls and devices.
- NOTE: The setting for Caller-ID privacy MUST be set to either "Default" or "Hide Nothing." If it is not, then the caller ID will show "Blocked" or "Anonymous." This can cause problems with land lines, as many carriers are allowing settings where a call will not be connected if the Caller ID is not real. This is due to new laws protecting consumers from SPAM and robo-calls.
Notes:
- You can "Un-assign" the CallThru.us device from the dropdown shown by picking the devices tab. If you do unassign it, it will be considered a "Spare Device" and can be reassigned.
- You cannot add a new CallThru.us device from SmartPBX; this must be accomplished using the User Portal Mobile tab to scan the code.
Devices List
-
The CallThru.us device is shown in the device list using this icon:
Call Logs
-
Your call log will display the CallThru.us device and its user if you click on the actual call.
Callflows
The CallThru device will display in each user's device list as shown below.
-
NOTE: At this time you will not be able to add a CallThru.us device in this application. The device must be added using the User Portal application.
The CallThru device will also display as a separate device in the device list, here:
-
SmartPBX FAQ
General Information
What is Smart PBX?
Standard Text Answer. Copy these lines and then paste into a new file and overwrite them with your words.- Add bullets if it helps keep things clean
How do Smart PBX settings work with and/or override Callflows settings?
The data settings for your office can be managed from either Smart PBX or Callflows, and so the last setting you change will be the "current".We strongly recommend you use SmartPBX for your initial setup and engage with callflows app only if SmartPBX does not support your needs. Here's why:
-
Smart PBX has been more recently updated; its User Interface is more friendly for use by your agents, and it makes sense to be familiar with how they will interact with the settings.
-
SmartPBX's setup includes fields and settings not required in Callflows. This can cause issues later on. An example of this is the main extension field assigned to each user. This is required for comm.io to load properly and not required in callflows.
- SmartPBX is the primary app. our support team will use and interact with while working with you. If an issue can be managed from SmartPBX they will use that first.
Greeting Setting
I uploaded a greeting in the SmartPBX for the the virtual receptionist, and it seems to be just dead air.
Can you dial an extension during the "dead air?"
If so, this suggests there is something amiss with the actual music file. Sometimes an .mp3 recording format is not recognized by SmartPBX's Linux server. Please try using a website like https://online-audio-converter.com/ to convert from mp3 to mp3 and retry uploading the converted file.I am trying to record a greeting during lunch hours, but it does not ask me for my PIN so I can change the recording
(first answered in our forum by TJ Forsman, Thank You!)
Do you have time of day conditions set? The system has to be in the mode that you want to record for that method to work.
For example the system would need to be in lunch mode and then calling the main number and using the pin should work. This is also true if you want to set up two separate auto attendants setup for day and after hours. You will want to be in day mode to record day and night to record night. We ended up just setting up a vm box a user could call into and leave the greeting in and have it email is the wav file and upload to the auto attendant in the GUI to make it easier for changes.
Ring Groups Settings
Can I prepend incoming calls with a tag to identify its source, for example with a caller ID name?
Yes. You can add a prepend to a ring group you define. Here's the steps:- Open SmartPBX
-
Click on the Groups Tab on the left menu bar
- Select the Features box (tab to the far right)
- Select Caller ID Prepend
- Toggle the enable switch and type in a Name and Number prefix to identify the call.
Voicemail Settings
Can my voicemails be transcribed to an email for me?
Yes! There are two ways to update this setting and turn it on (note there is an added charge of $0.05/minute for this feature as it requires significant storage and a transcription service)
- From your user settings, under User / User Features / Voicemail box / Transcribe
- From your voicemail boxes menu, select Advanced and check "Transcribe Messages".
You can view these steps with screen shots in our SmartPBX STEP Guide, here
Can I enable / disable Voicemail Transcription globally / system wide for an account?
If you want to set a default setting for your accounts, send a support request 2600Hz. They can run a script to globally change the default setting.What voice transcription engine do you use?
Our initial implementation for voice transcription uses the Google API. Our system is designed to allow support for multiple services however, and we are considering adding Watson and others if demand justifies the investment to add it and QA its addition.I can't seem to retrieve my voicemail messages; it is hanging up after the announcement.
This behavior can happen if your voicemailbox is set to "Announcement Only." This setting can be found in SmartPBX under the Voicemail Boxes menu:- Select Voicemail boxes,
- Select your voicemail box, then click on the wrench icon
- Click on the Advanced button at the top right, and select Options
- Make sure the "Announce only-mode" is unchecked, both for your mailbox and the main mailbox.
NOTE: This can also be accessed in the Advanced Callflows menu.
[callflows → voicemail → select voicemail box → advanced options]
-
To download a .pdf, click the link below:
Language Pack Editor - Step Guide.pdf 911.46 kB · 1 download2600HZ STEP GUIDE – LANGUAGE PACK EDITOR
What is this?
Language packs provide localization for Kazoo apps. The Language Pack Editor allows you to view, edit, and create language packs of your own in order to support your language of choice. This guide contains step-by-step instructions for using the Language Pack Editor.
English to German Translation, Underway!
The Language Pack Editor provides you with the terms to translate on the left and a field to enter your translation on the right:
For simple menu items and titles, this is relatively straightforward. But for other items, such as the following error messages, things get tricky:
How would you know what to enter for "noMatchingNumbers"? We'll dive into this more deeply later, but the short answer is that you can use the existing English translations as your guide. In fact, the Language Pack Editor supplies "reference files" just for this purpose. Here's a sample from an English reference file:
Quick Steps
We'll be covering the following topics:
- Accessing the Language Pack Editor
- Creating a new language pack
- Modifying your new language pack
- Cloning an existing language pack
- Submitting your completed language pack
- Reference File shortcuts
- Downloading all language packs
1. Accessing the Language Pack Editor
From your Kazoo home page, select the Apps icon in the application bar.
Search for "Languages" using the search tool. Open the app by clicking on the Languages icon.
You should see the following screen:
Each application can have one or more language packs. You may use the search tool on this page to filter the applications based on your search criteria.
2. Creating a new language pack
There are a few ways of creating a new language pack. We're going to start with the simplest way; starting from scratch.
Click on the app icon that you wish to localize:
On the next page, select [ + New Language Pack ]:
This will bring you to the main language pack editing screen:
The language pack editor consists of three columns.
- The left-most column contains the Content Structure, which is useful for locating the page elements that you wish to add or edit. You can click on any element in the Content Structure to jump to the corresponding value in the editor.
- The middle column contains the main editor. Here's where you'll be entering your translations.
- The top of the middle column contains default working filename and a download button. Ignore the filename and download button for now. We'll cover those in just a moment.
Selecting a Reference File
The right-most column is reserved for displaying reference files. Reference files provide existing translations which can be helpful when adding new translations in the main editor.
Reference Files might sound fancy, but they're really just exiting language packs that are displayed side-by-side with the language packs that you're creating or editing.
It's likely that you'll want to use a reference file while creating your first language pack. At the top of the right-most column, select a reference file from the drop-down menu:
Once selected, the reference file will appear to the right of the main language pack editor:
Adding Translations
At this point, you're ready to start adding your own translations to the form fields displayed in the middle column. Go for it! Any fields left blank will default to English in the application.
It's a good idea to frequently download your language pack while you work to avoid any loss of work due to power outages, authentication timeous, etc. See "Downloading Your Work" in the next section.
Downloading Your Work
At the top of the middle column in the Language Pack Editor, you'll see the default working filename and a download button. We ignored these up until now.
In order to save your work, you must download the active language pack to your computer. Rename the working file name to something like "japanese-user-portal.json", ensuring that the filename ends in .json , then click the Download button. You'll be able to upload this file later if you need to make updates.
Next Steps
Now that you've completed entering all of your translations and have downloaded a local copy of the language file to your computer, you're ready to deliver that file to our staff for installation. Continue to the section below titled "Submitting your completed language pack" for further instructions.
3. Modifying your new language pack
If you haven't already, please complete the tutorial above titled "Creating a new language pack". That tutorial covers essential information about using the language pack editor and saving your work.
Open the Languages app and select the app associated with the language pack that you'd like to edit:
On the next page, click on the browse button to locate your previously downloaded language pack:
Select your previously saved language definition file. The file selection dialog box may look different depending on your operating system:
Click on Open to continue.
The previously saved language pack should now open and be editable in the language pack editor.
(Please be aware that we do not currently provide a Japanese language pack.
The Japanese shown is for illustration purposes only.)It may be helpful to open a reference file while editing your language pack.
For more information about reference files, please refer to the instructions under the section titled "Creating a new language pack" above where reference files are introduced.
Once you have completed making updates to your language pack, download your language pack.
4. Cloning an existing language pack
This section assumes that you've completed the "Creating a new language pack" tutorial above. If you haven't already, please complete that tutorial before proceeding.
This tutorial teaches you how to clone an existing language pack. This may be useful if you wish to implement British English as opposed to American English, or customize an existing language pack to your own liking.
Open the Languages app and select the app associated with the language pack that you'd like to clone:
On the next page, select [ + Clone Exiting Language Pack ]:
You will be prompted to select an existing language pack to clone.
Select a language pack and click on Clone Language Pack. The language pack will load in the language pack editor to allow you to make changes:
It may be helpful to open a reference file while editing your language pack.
For more information about reference files, please refer to the instructions under the section titled "Creating a new language pack" above where reference files are introduced.
Once you have completed making updates to your language pack, download the modified language pack.
5. Submitting your completed language pack
Once you've completed editing your language pack, the next step is simple. Contact us! Our staff will be happy to review your language pack and add it to Kazoo.
6. Reference File shortcuts
On the Language Packs APP home page, you may have noticed a column called "Languages". These buttons are shortcuts that:
- Create a new language pack
- Automatically open a reference file based on the button you select
7. Downloading all language packs
Each app displayed on the Language Packs APP home page has a corresponding download button. These buttons can be used to download all language packs associated with an app at once:
Languages App - Step Guide (Emily Ransford).docx
-
2600HZ STEP GUIDE – CSV Onboarding
CSV Onboarding is a tool that allows you to enter an exported list (.csv file) of users and (optionally) phone data into the KAZOO environment. This replaces the process of entering the most common data manually when you are first setting up your users.
Before you Start
-
Create a .CSV (Comma-Separated Values) export file from your existing phone list.
The following fields are used by KAZOO; you can create the same fields or if there are existing field names, map what is imported to the KAZOO names.
first_name, last_name, password, email, extension, notification_email, mac_address, brand, family, model
-
NOTES
- If you want to upload User names only, the fields after extension are not required.
- Notification_email field is optional for either onboarding option.
- Double-check the field name and spelling of your phone model. It must match the syntax and capitalization exactly for the import to be successful.
Quick Steps
- Open the CSV Onboarding app.
- Choose if you want to Add Users only, or Add Users & Devices
- Drag the .csv file you created into the box and pick Proceed.
- You will see your imported file. The top row above the drop down fields displays the fields in your .csv file.
- Using the drop-down fields, select the KAZOO field you want the .csv field to map to.
- If you have advanced programming knowledge, enter your json payload information for
- Pick Proceed. The screen will follow your progress.
-
If you want to cancel, close the window.
Activate and open the CSV Onboarding app.
Choose whether to onboard Users Only or Users and Devices
Adding Users Only
You will see the screen below. Check your .csv file to make sure it includes a header row with the fields mentioned.- NOTE: If the header is different, you will be able to match/change that in the next step, but the values for the columns must match.
Preview your imported fields and its data
Once you upload the file, the CSV app will map the fields it recognizes to the account fields and provide you with an account of what is still missing. You will see a preview of the result.
What to look for as you review this page:
- The information box will let you know how many fields are recognized,
- The "required records mapped" counter to the right will indicate if you have additional records to map before a successful import.
- The fields displayed above the drop down field options are the fields that were imported from your .csv file.
- The field names in the drop down are the proposed match to your import file. You will need to verify this is correct.
- If the field is empty and should map to a required field in the drop down options, you must assign it a value.
- All required fields must be mapped to one of the columns you have imported so the system will be able to place them in the correct instance.
- If some fields are empty they will transfer as empty.
- Make sure to scroll to the right to see all the fields.
Map any remaining "missing" fields
Your next step is to map the fields you've imported with the fields required by the Account. In this case,
- the "Contact" field can be mapped to the required "email" field, and
- the "pwd" field can be mapped to Password.
Click on the field to remap, and then click on the account field to match it with in the drop down. Once these are defined, you should see the "Required records mapped" indicator turn to green and all the Required Columns/Headers in the drop down display a green checkmark.
The JSON Checkbox
At the bottom of the screen near the Proceed button, you will see a checkbox asking if you want to add a JSON config.
This is available for advanced programmers who may want to add some custom settings for voicemail boxes, call parking and other feature codes using JSON. If you check the box at the bottom of the screen you will be prompted to add your code into one of 3 different fields: User Settings, Device Settings, or Voicemail Box Settings. Some reference information about these settings is included at the end of this document.
You're ready for the Import! Click Proceed
You will see a screen like this:
If the import process finds an error and cannot import some of your records, you will see a screen similar to below:In this case the error, "email is not unique for this account likely means you already have a user imported that has the same email. If you want to add devices to the already existing user, you will need to go to SmartPBX and add them there.
If the import is complete without errors, your screen will look more like this:
Importing both Users and Devices
If you have a more robust .csv file that includes device details, you can also include them in your import. At the first step, select "Add Users and Devices." At a minimum, you will need the following fields:
first_name, last_name, password, email, extension, notification_email, mac_address, brand, family, model
The email, extension and mac_address values must be unique, and not already added in the database. The notification field is optional.
NOTE: Once imported, you are not able to adjust a device's brand, family, or model information without deleting and recreating a device, so please ensure your information is accurate.From here the process is the same as importing just users. Note you may have to use the scroll button an the bottom of your screen to view all the fields you've submitted for import.
Sample .csv file
Sample CSV File with Device list added
Spreadsheet First
Then saved as a .csv file, will look like something like this, commas separating the fields.
MAKE SURE THERE ARE NO SPACES! This will block the import.first_name,last_name,login,email,extension,notification_email,mac_address,Phone,Family,Type
AUser,One,userone,auser@test.com,101,test@test.com,00-15-E9-2B-99-3C,111-22-1231,aaa,111
BUser,Two,usertwo,buser@test.com,102,,00-15-E9-2B-99-3D,111-22-1232,bbb,222
CUser,Three,userthree,cuser@test.com,103,,00-15-E9-2B-99-3E,111-22-1233,aaa,111
DUser,Four,userfour,duser@test.com,104,,00-15-E9-2B-99-3F,111-22-1234,bbb,222
EUser,Five,userfive,euser@test.com,105,test@test.com,00-15-E9-2B-99-3G,111-22-1235,aaa,111
FUser,Six,usersix,fuser@test.com,106,,00-15-E9-2B-99-3H,111-22-1236,bbb,222
GUser,Seven,userseven,guser@test.com,107,test@test.com,00-15-E9-2B-99-3I,111-22-1237,aaa,111Starter Template .csv file
For starters, you can use this file as a template, provided in our community forums.
Frequently Asked Questions
Check out our CSV Onboarding FAQ document HERE.
JSON Reference links
To add your custom JSON payloads, check the box that says "add JSON", and you will see this screen. It shows an added script to assign a voicemail box. For additional reference to the syntax for JSON scripts, check the links below.
Devices: https://docs.2600hz.com/supported/applications/crossbar/doc/devices/
Users: https://docs.2600hz.com/supported/applications/crossbar/doc/users/
VoiceMail: https://docs.2600hz.com/supported/applications/crossbar/doc/voicemail/API Reference Links
docs.2600hz.com
REST API Reference for Kazoo Crossbar API#####
-
Create a .CSV (Comma-Separated Values) export file from your existing phone list.
-
What is CSV Onboarding?
CSV Onboarding is a tool that allows you to enter an exported list (.csv file) of users and phone data into the KAZOO environment. This replaces the process of entering the most common data manually when you are first setting up your users.
What should my .csv file look like?
The CSV Onboarding app looks for a file with the following header fields:
first_name, last_name, password, email, extension, notification_email, mac_address, brand, family, model
- You can choose whether to import Users Only or Users and Devices. If you choose Users Only, your .csv file does not need to include the mac_address, brand, family, and model fields as these describe the device details.
- If you can control the output of your .csv file, this is the ideal order and syntax. If you cannot edit the headers, you will be given a chance to map your existing headers with the fields used by our app. You must however include header data for the first five fields if you're transferring user data only, and all but the notification_email if you're transferring users and devices.
Where do I get / create a .csv file?
If you are using an existing PBX system or internal database storing phone numbers some will provide you with a “.csv export” or “export as csv” option for your username listings. If not, it’s best to create one using a spreadsheet and assigning the headers shown above. Once created, you can save the file as a .csv. Once saved, you can import it into the app by simply dragging the file name to the import window.What happens if my .csv file includes names I’ve already entered?
If the importing process encounters a duplicate user name, you will see the following error:????
You will be given the choice to continue or cancel and restart your import. If you continue, the name will not be added, and will be listed in an error document at the end.
I've selected my .csv file and picked Proceed, but nothing happens. How do I troubleshoot this?
Where is the new user information imported to?
The user information will be imported to the account you have logged into when you launched the .CSV app.Can I leave some of the entries blank?
Yes. As long as you have a header assigned to the field, empty fields under that header will be imported as blank.What is the JSON Checkbox for?
The JSON checkbox enables access to advanced programming tools to add voice mailboxes, additional user information and devices to the bulk transfer. Some common uses include transferring BLF, Call Parking, and Call Restriction attributes for an extension.Where can I get references to the JSON constructs?
Devices: https://docs.2600hz.com/supported/applications/crossbar/doc/devices/
Users: https://docs.2600hz.com/supported/applications/crossbar/doc/users/
VoiceMail: https://docs.2600hz.com/supported/applications/crossbar/doc/voicemail/docs.2600hz.com
REST API Reference for Kazoo Crossbar API
-
Carrier Manager Overview
2600Hz has made carrier management easy by enabling you to add and store multiple carrier templates on the interface. Setup and deployment is extremely easy, requiring minimal time and effort. Select your outbound calling priority settings for each service. When setting up a carrier for your users, you can select the carrier options through prebuilt or your custom-built templates. Once you have added providers for outbound calling services, you can immediately begin prioritizing them.
Getting IPs
- Login to Your Account
- Open the Carriers App
-
You will be asked to select at least one IP address from two different zones. Please click on the “Central”/”East”/”West”.
-
Once you click on each box an IP address will appear.
- Click on the Green button labeled “Select these IPs”
Add Carriers for outbound calls
Now that you have selected your IPs you can add a carrier to your account. You can add a service provider from a prebuilt template or create a new one and customize settings based on your needs. You can even set rules for each carrier. Once added, the list of configured services providers will be listed in the interface.
- Within the Carrier click on the “Service Providers” tab
- Make sure that the “Set Locally” tab is also highlighted
-
Under the “Add a provider by select its template first:” click the box with the “+”
-
Create your custom carrier
Brand
Select one of the already pre configured carrier templates or select “Other” if using a different carrier not listed.Name
Enter a description of a carrier. For example, International Only, Fax Only, All Traffic, etc.Server
This is where your carrier’s IP will be listed for outbound calls. This is where Kazoo will send calls to your carrier.Authentication Method
This is how your carrier will authenticate calls sent to them. You must check with your carrier on how this will be doneNOTES:
-
If you select "Other", you can define your own template for a carrier. The dialog will show a dropdown of choices that are pre-configured.
-
If you want to add a different carrier, create a new "Brand" and Name.
- If your administrator has already added your carriers, your screen will look like this.
-
If you select "Other", you can define your own template for a carrier. The dialog will show a dropdown of choices that are pre-configured.
-
Create Rules
IMPORTANT STEP - Rules: You must add at least 1 rule (US DID, or if you want to support everything, Unknown) before making any outbound calls. Not setting any rules will result in not being able to make calls.
To add rules simply click on the green circle with the “+ and select one of the options.
Rules:
- US Toll Free: Allows 8xx toll free calls
- Us Toll: Allows 9xx Calls
- Emergency Dispatcher: Allows 911
- Caribbean: Allows calls to countries in Caribbean
- US DID: Allows calls within the United States
- International: Allows calls to International
- *Unknown: Matches ANYTHING and sends to carrier. You should never use the “Unknown” rule. Unknown literally means “ANYTHING” and the problem with that is our system then thinks that a 7-digit number is supposed to go to your carrier instead of being converted into a 11-digit number.
NOTES:
- You must move the slider to ON to enable the Rule
- To the right of each drop down option you will see a gear icon. Make sure to click on that to choose your settings.
-
In each Rule, you have an option to enter a custom RegEx Expression. This is an advanced setting that further defines the type of number the rule applies to.
- For more information on how to create or edit a RegEx Expression, see this page.
- To test your RegEx formula, go here.
Advanced Settings
The advanced settings provide added features for your carrier account.Audio Settings
-
THIS IS AN IMPORTANT STEP
Select Audio
This section allows you to specify the CODECs to use for outbound calls. In our experience most carriers will support PCMU/PCMA. Check with your carrier to ensure which CODECs they will be using/accept.
Once you select a CODEC, simply drag it to the box labeled “Selected”
Click Save
At this point in the process your account is ready to make outbound calls using your carriers.
NOTE: Our system uses Short Dial Correction: The system will scan your carriers rules to see if the dialed number matches any rules. If no rules match, the system takes the first five characters of the caller ID, prepends them to the dialed number and retries the match before cancelling the call. Example: +17195556666 dials 5559999, the system will not find a match at first for 5559999. It will then scan your rules and try to match +17195559999 and send the call to the carrier
Advanced Settings for Adding Carriers
Below is an overview of the additional advanced settings found in the Advanced tab. These are not required for initial outbound calls but may be useful tools as you learn more of the system.
Flags Manager
- If ignore flags is checked, placing an outbound call from a device with flags set on its configuration should use this carrier regardless of matching flags.
- If require flags is checked the carrier is ignored if the request does not specify outbound flags.
Video Settings
-
DO NOT SELECT A VIDEO SETTING UNLESS YOU HAVE ACTIVATED VIDEO
Adding a Video codec in an account that doesn't use video could incur additional costs that are unecessary.
For more information on this process, see our Configure Video in KAZOO document HERE.
Gateway Settings
Use this to add a Gateway to your Carrier settings. These settings should be added by an administrator.Notes
This is a placeholder area to save notes about your setup. This is handy if you have multiple administrators accessing your account.Setting up Carriers for Inbound
NOTE: Kazoo only supports an RTP SDP ptime of 20. Most carriers use a value of 30 by default. You MUST request that your trunks through your carrier will ONLY use a ptime of 20. If this is not done, then your clients will experience audio delay issues.
2600Hz will need the IP(s) from which your carrier will be sending calls. These IP(s) will need to be added to our ACLs by our engineers. There is a three business day minimum turnaround. For Hosted clients, you must submit a support ticket to get this information added. For Private Cloud, you can actually add the IPs to the carrier app, however, our engineers will need to rest the ACLs manually, so we would still need a support ticket. Our system assumes that if the IP address of a carrier is known, it will allow inbound calls. It assumes that calls are coming in using E.164 format (+1XXXXXXXXXX)
Calling Priorities
Once you have added providers for all of your outbound calling services, prioritize them via drag and drop in the interface. You can change users outbound calling priorities for services such as US Toll Emergency Dispatcher, US DID, International, etc. To start setting this up please do the following:
Select the Calling Priorities tab. This will bring the Outbound calling priorities settings.
- Choose same priorities for all outbound services. (Choose this option if your carriers are handling the same traffic and you only want to select the order in which carriers get selected.)
- You can order the priority of your carriers by simply clicking and dragging the carriers. You can order them in any order you wish.
-
Choose different priorities for all outbound services. (Choose this option if you want certain carriers to carry certain types of calling service/traffic but not others.)
- When selecting this option you will notice two boxes appear. One with calling services and one with carriers.
- To specify or tie a service to a carrier simply click on a service type
- Once service type is highlighted, select which of your carriers will be used for that specific service.
- You can turn carriers on and off to use a service by clicking the blue “On” button. Once you have customized this to fit your needs, click on the green “Save” button.
Congratulations, you have now completed setting up your carriers. You are ready to start setting up your sub accounts, correct?
CAUTION
All accounts default to using 2600Hz System carriers. This default cannot be changed at this time. For each new account you create, you MUST make sure the account is changed to use partner carriers. In some cases you will find that you “test” your account and calls “work” and stop working all of a sudden. If you don’t set the account to use partner carriers and you have a positive credit balance the calls will use 2600Hz carriers and will work because the account has a positive credit balance. Once the credit is depleted, the calls will stop working.
Creating and configuring sub accounts to use partner carriers
Now that you have your carriers set up and have set up calling service priorities you are ready to create an account and configure it to use partner carriers.
- Login to Account
- Open Account Manager app
-
Click on “Add New Account”
- Account Name: Enter Account Name
- Account Realm: You can leave as “auto-generated”
- Timezone: Select correct timezone
- Click Next
- Set limits for included simultaneous inbound and outbound calls*
- Set Call Restrictions
- US Toll Free
- US Toll
- Emergency Dispatcher
- Caribbean
- US DID
- International
- Other than above (Unknown)
- Set Call Restrictions
Click Next
-
See What Customers Can View
-
Settings
- User
- Account
-
Billing
- Credit Card
- PerMinute
- Service Plan
- Transactions
-
Trunking
- Inbound
- Outbound
- Two-way
-
Settings
Click Next
The account is now created and you are taken to the Account Overview Screen
Click on the Carrier Tab
- By default you will notice the account is set to use “Use System-wide Carriers”. This MUST be changed to “Use Partner Carriers” (the middle box) in order for this account to use your carriers.
- Simply click on the box to select this option.
Click on the Update button.
Congratulations, you have now set up your account to use your own carriers. If you already have accounts created, all you need to do is the following:
- Login to your account
- Open the Account Manager App
- Select the Account you wish to modify
- Click on the Carrier Tab
- By default you will notice the account is set to use “Use System-wide Carriers”. This MUST be change to “Use Partner Carriers” (the middle box) in order for this account to use your carriers. Simply click on the box to select this option.
- Click on the Update button.
*NOTE: Limits do not work in BYOC, nor do credits. We expect that since you will be using your own gateway, you can provision limits on a per-phone number basis.
E911 and Caller ID
Some customers mix and match 2600Hz services with their own carriers. This is OK, but because we don’t know who is doing inbound-only, outbound-only or a mix, by default, E911 features and Caller ID CNAM “dips” and Caller ID Name Outbound features will show in the GUI. When you are using BYOC, you should disable these features. To disable E911 and Caller ID features you must do the following:
- Login to your account
- Open the Account Manager App
- Select the Account you wish to modify
- Click the Numbers Features tab
- E911 : Click on the On button to turn off the feature
- CNAM : Click on the On button to turn off the feature
Click Update
Within the 2600Hz, we track closely which numbers have E911 on them and which don’t. To avoid surcharges, we default to the configured E911 on the account when a particular device hasn’t been configured properly for E911. With BYOC, everything is external to us. We don’t know if E911 has been set or not. The client is responsible for setting up 911 with their provider and testing with their provider. Usually providers provide a number 933 to test that will read back the address. It is the client’s responsibility to test and ensure that whatever gets transmitted is what they intend for the Caller ID for that phone. You must also set a default Caller ID Number on every account!
NOTES:
Considerations and FAQs
- No fraud management/detection. Must not rely on our tools in our UI as fail proof method. Must have restrictions on customer side.
- Not a full LCR. You can route to a couple of carriers as a failover/backup but no intelligent routing based on dialed digits/number
How do I setup trunking to my provider?
We can define that via IP addresses in the Carrier AppHow do I ensure my inbound calls are accepted for Client A from Carrier B Vs Client C from Carrier D?
As long as you have provided us the inbound IP address to add to our ACLs and the phone number is 11 digits, we’ll route it to the account with that numberHow do I know or set specific settings on a per-carrier basis on inbound calls?
You can’t. However, we accept most major defaults. Our only big requirement is that DTMF MUST be RFC2833. Otherwise, we encourage T.38 for faxing. We support Caller ID in the P-Asserted-Identity, Remote-Party-ID or From header (in that order). We accept PCMU/PCMA/G722/OPUS/G729 on inbound. No licenses required.Kazoo only supports an RTP SDP ptime of 20. Most carriers use a value of 30 by default. You MUST request that your trunks through your carrier will ONLY use a ptime of 20. If this is not done, then your clients will experience audio delay issues.
I want to see the realm or Account ID of whomever is making the call in my SIP header
We don’t do this yet. Please use the Caller-ID/Phone number for billing-
IPs for outbound calls can be selected within the Carrier App as outline in the steps above
IPs for inbound must be provided to 2600Hz via support ticket to be added to ACLs. There is a three day turnaround
- We never need media IPs - We don’t use them
API References
docs.2600hz.com
REST API Reference for Kazoo Crossbar APIdocs.2600hz.com
REST API Reference for Kazoo Crossbar API
-
Welcome to the comm.land setup guide!
What is comm.land?
The comm.land application is a desktop window into your PBX phone system. Once installed, users can access their call history, view/listen/download voicemails, view and send faxes, enable call forwarding and also toggle on/off Do Not Disturb without logging directly into KAZOO.
Before you start- Confirm you have access to the Monster UI User Portal app.
- Confirm your account has enabled in the comm.land Integration application. Note, each user account must be enabled separately.
- Confirm your user profile includes an assigned extension number in SmartPBX. (See Step 6, Sign in error)
- Know the operating system you are using at your desktop; you will be downloading an application to use and copying it to your applications directory on your local computer.
For administrators, enabling the comm.land account
Once your order has been confirmed, your administrator will need to "turn on" the account so it is accessible to you. Below are the instructions for this:-
Sign in to your account as an administrator
-
Access the "Apps" menu in the upper right of your screen
-
Click on the "comm.land Integration" app icon
-
When the screen opens, Click on the "User Access" tab
-
Enable your users.
This will open a list of your users. Click the toggle to Enable each person's account you want to give access to the comm.land app.
NOTE: There are two toggles available for each user
-
Enable
Provides access to the comm.land app -
Webphone
This enables the webphone feature to make calls within comm.land. For more details on the webphone setup and use, go HERE.
For users; how to download comm.land application:
-
Sign in to your account.
Go to your application screen by picking the grid at the top right of your screen, as below
-
Access the User Portal from your list of applications.
NOTE: If you do not see this icon, check with your administrator to make sure it has been added from the App Exchange.
-
Click on the "comm.land" tab.
NOTE: If this tab is not visible as shown below it is likely your administrator has not enabled your account. Please check with them and make sure he/she completes the steps above. -
Choose a download platform.
You will see a choice of Operating system platforms to download files for. Choose the icon showing the desktop operating system you will be using this app on.
You will be prompted with a choice where to save it.
NOTE on downloading using Windows- If you are downloading a file using Microsoft Windows, you may encounter a warning that "Microsoft Defender Smartscreen prevented an unrecognized app." This is a default warning they issue. Select "Run Anyway" to continue the install.
-
Depending on your browser, you may see a notification that the application you are downloading is "not safe." This is an automated precaution that displays until the browser recognizes the download file source; you can continue on by choosing the "More Info" button and select "Run Anyway."
-
Open the downloaded file
Once your download is complete, open the file and follow the instructions shown for moving the file to your application folder and opening it.
- Sign in! Use the same sign-in credentials you use for your KAZOO account
NOTE: If you created user profiles using the Callflows application instead of SmartPBX, you will not have an associated "Main Extension" to your user names. This is required for comm.land to work correctly; without a main extension you will see an error message that says:
'Cannot read properties "numbers" of undefined'. and looks like below:
If you get this error message, follow these steps to solve this:- Launch your SmartPBX application (or ask your administrator to)
- Click on Users tab in the left menu bar
-
Find the name you want to use comm.land with. It will likely show "None" in the Extensions field, as below:
-
Add your extension
-
SAVE Once this has saved, you should be able to log in to comm.land from your desktop successfully.
Launch your new comm.land app! You should see a home screen something like this
And you're ready to roll!
The information on this screen will display the information in SmartPBX; both apps access the same database for your phone system.Find our User Guide here.
Once you have successfully signed in you're ready for our next document! You can access it using the link above or from the applications page.####
docs.2600hz.com
-
comm.land 2.1 User Guide
(5.0 only)
NOTE:
To install your comm.land application, please review the separate comm.land guide called Installation & Setup, HERE.Once you launch your application, you will see an opening dashboard similar to the screen shot below:
Home Pages
- Without a webphone enabled (side menu minimized)
- With a webphone enabled (side menu expanded)
NOTES:
- If you are using CallThru.us, this should be very similar to your phone screen.
The Top row will display a summary of your missed calls, voicemails and faxes. When you have a webphone enabled, you will see a phone icon to the top right, as shown in the second screen shot.
The next quadrants will show as follows:
Today's Calls
- List of both incoming and outgoing calls for the day, including the Caller ID, phone #, time and length of call
Numbers
The Numbers quadrant breaks down your calls based on the phone numbers assigned to you for sending / receiving calls.Devices
This quadrant displays the device types that are associated with your login name and credentials.- If there are more devices registered than fit in the window, look for the > arrow to scroll or use the scroll bar.
- In the upper right corner of each box you will see an icon indicating the answer setting that has been assigned by you in your PBX.
- An unregistered device will display as a red icon. If your device is displaying as unregistered, talk with your administrator. The comm.land features will still work if your device is unregistered.
Today's Faxes
The faxes quadrant shows a list of faxes received and sent for the day.
NOTE: If you are not seeing today's faxes listed, check with your date range settings under the Faxes tab. This at times does not update to the current date, it is on our list to resolve.
Webphone access
If your administrator has enabled webphone access for you, you will see the phone icon to the top right of your screen, and it will also show as a device in the devices area (see image above). For a detailed overview of how to use the webphone we have created a separate support document HERE.
Additionally you can access it from the tray icon at the top right of your browser window header, here:
If you do not see either of these access points, it's most likely because you are not logged in and if you are logged in and still don't see these access points, please contact your administrator.
Voicemails
The voicemail page previews your voicemails, shows who called, to what number (if you have more than one number registered) the date and time, and the length of the message. You can filter the list, listen to the voicemails, and/or download its media file to your computer.Top Summary, Total Voicemails
- Is a quick reference to total voicemails still saved in your list.
Voicemail Status
The voicemail status column shows if the call is New or Listened.- Once you delete a voice mail, you cannot undelete it from within comm.land. You can move a deleted voicemail back to Listened or New status from within Monster UI Voicemails App or by contacting your admin.
Filter drop downs
You can use the filter dropdown under the New Voicemail block to bulk-manage files. For example, you can ask it to select "All New", then click on "Mark as Listened"
. Play Voicemail
To play your voicemail, select the voicemail you want to hear, then from the drop down, select the Play button to the far right.- Once a voicemail is played, the status button will change from New to Listened.
-
Using the icons below the play option, you can:
- Ring your device
- Download that specific voice mail
-
Delete the voicemail
NOTE: By choosing "Delete" you are actually marking the VM to be deleted. It can be recovered by your admin if requested.
Call History
This page displays a chronological list of calls sent and received, the associated phone number, the time, date and duration of the call.
- Filter these calls by entering a date range and the top and selecting the Filter button.
- Search for specific calls using the search field.
-
You can also select the row in call history, it will ring your devices and call the received caller back.
Devices and Numbers
This page displays the devices assigned to your account.NOTES:
-
If the phone icon is red, this indicates that phone is currently set as "unregistered."
This is currently expected for Call-Thru devices, and will not affect its behavior. To re-register a different kind of device, contact your administrator.
Faxes
The fax page provides information on fax activity associated with your account.The following options are available from this page:
Send a fax
Click on the blue Send Fax button at the top right of the screen to send a fax. A dialog box like the one below will display.
NOTES:
- You MUST include the country code in ALL outbound faxes.
- Select the "Choose File" button to upload files from your computer.
- Currently faxes support .pdf and .tiff file formats as attachments.
- There is a maximum file size limit of 15mb per fax.
- The fax "Send From" field is automatically populated based on settings defined by your administrator.
Download the fax
To download a fax, select the download icon to the right of the fax you want to review.Filter your list of faxes
You can filter your listing of faxes using the Filter option to the left of the Search window. It will show a dialog box like the one below:Bulk Delete your faxes
If you want to delete list of faxes such as "Delete all Failed Faxes" you can use the filter button above the status column. Click on the arrow, and you will see the options below. Once they are selected, pick the Trash button.
Video Conferencing
Video conferences are implemented for use only among members in your account. Quick steps for using this feature are below; a more detailed user guide is available HERE.Before You Start
Check to make sure a conference call ID has been created by your administrator in the Conferences app. If you have already used the conferencing app in Monster UI, these conferences will display. If not, a quick reference to how to set this up is available at the end of the video conferencing user guide.Quick Overview / Steps
- Confirm there is a conference ID available in the Conferences tab in comm.land
-
Join your conference! You should see a screen something like this:
- Adjust settings as needed. Details are provided HERE.
Settings Page
To access the settings page, click on your user name at the bottom left corner of the left menu, OR from the tray icon listing.Call Handling
Enable Call Forwarding
This allows you to forward your calls to another phone number, and to retain the Caller ID.Voice Mails
This will send a message to the email you define that you have received a voice mailDo Not Disturb
Use this toggle to turn OFF your ringer if you do not wish to receive calls to these devices. This is often where users manage when they do not want to be reached for office related calls.Software Access + Info
Here you can choose whether or not to automatically launch comm.land when you start your computer.Version #
This will indicate the version number of comm.land you are using. This can be helpful if you need to troubleshoot an issue.comm.land Application Updates
Once you have downloaded comm.land to your desktop, you will receive automatic application updates. When this happens you will see a notification asking if you want to restart comm.land and launch the update immediately or later.
######


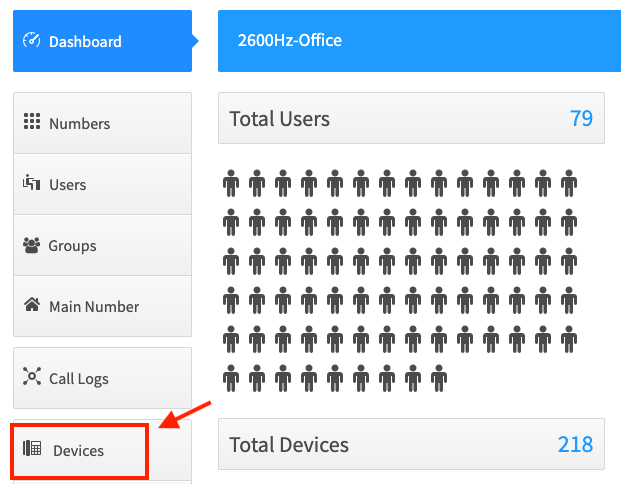

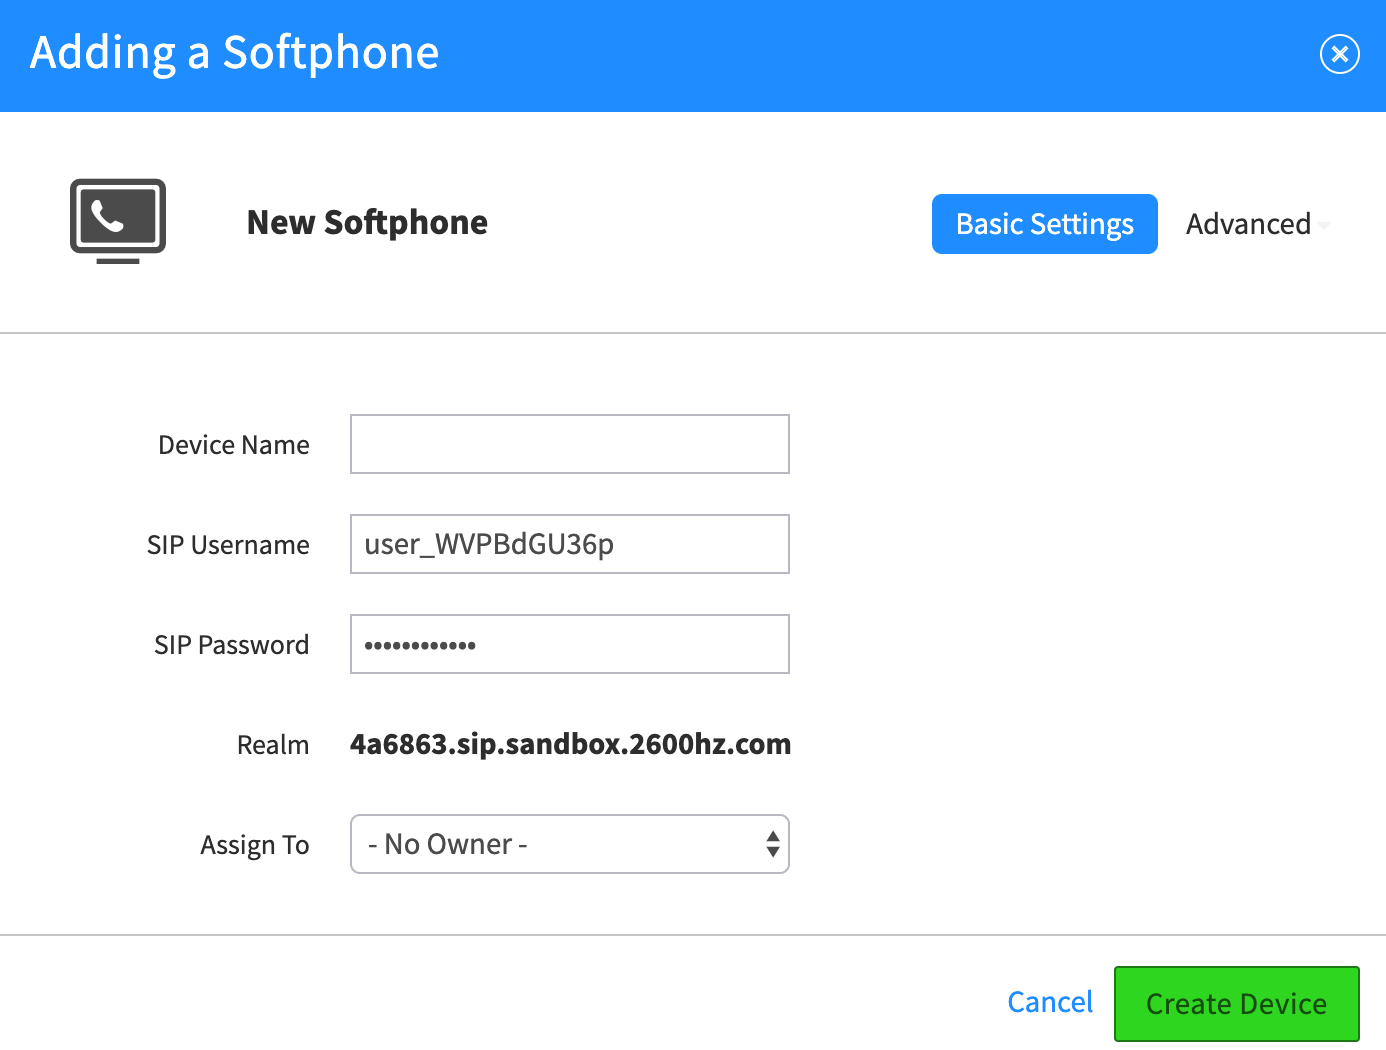
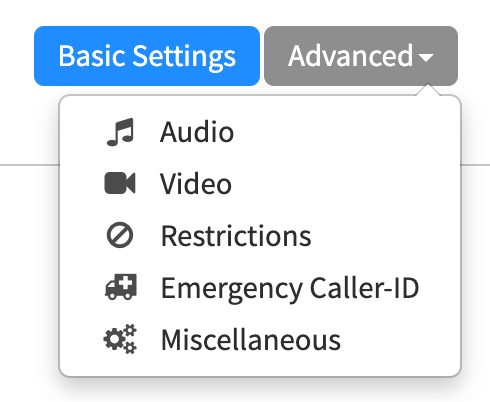
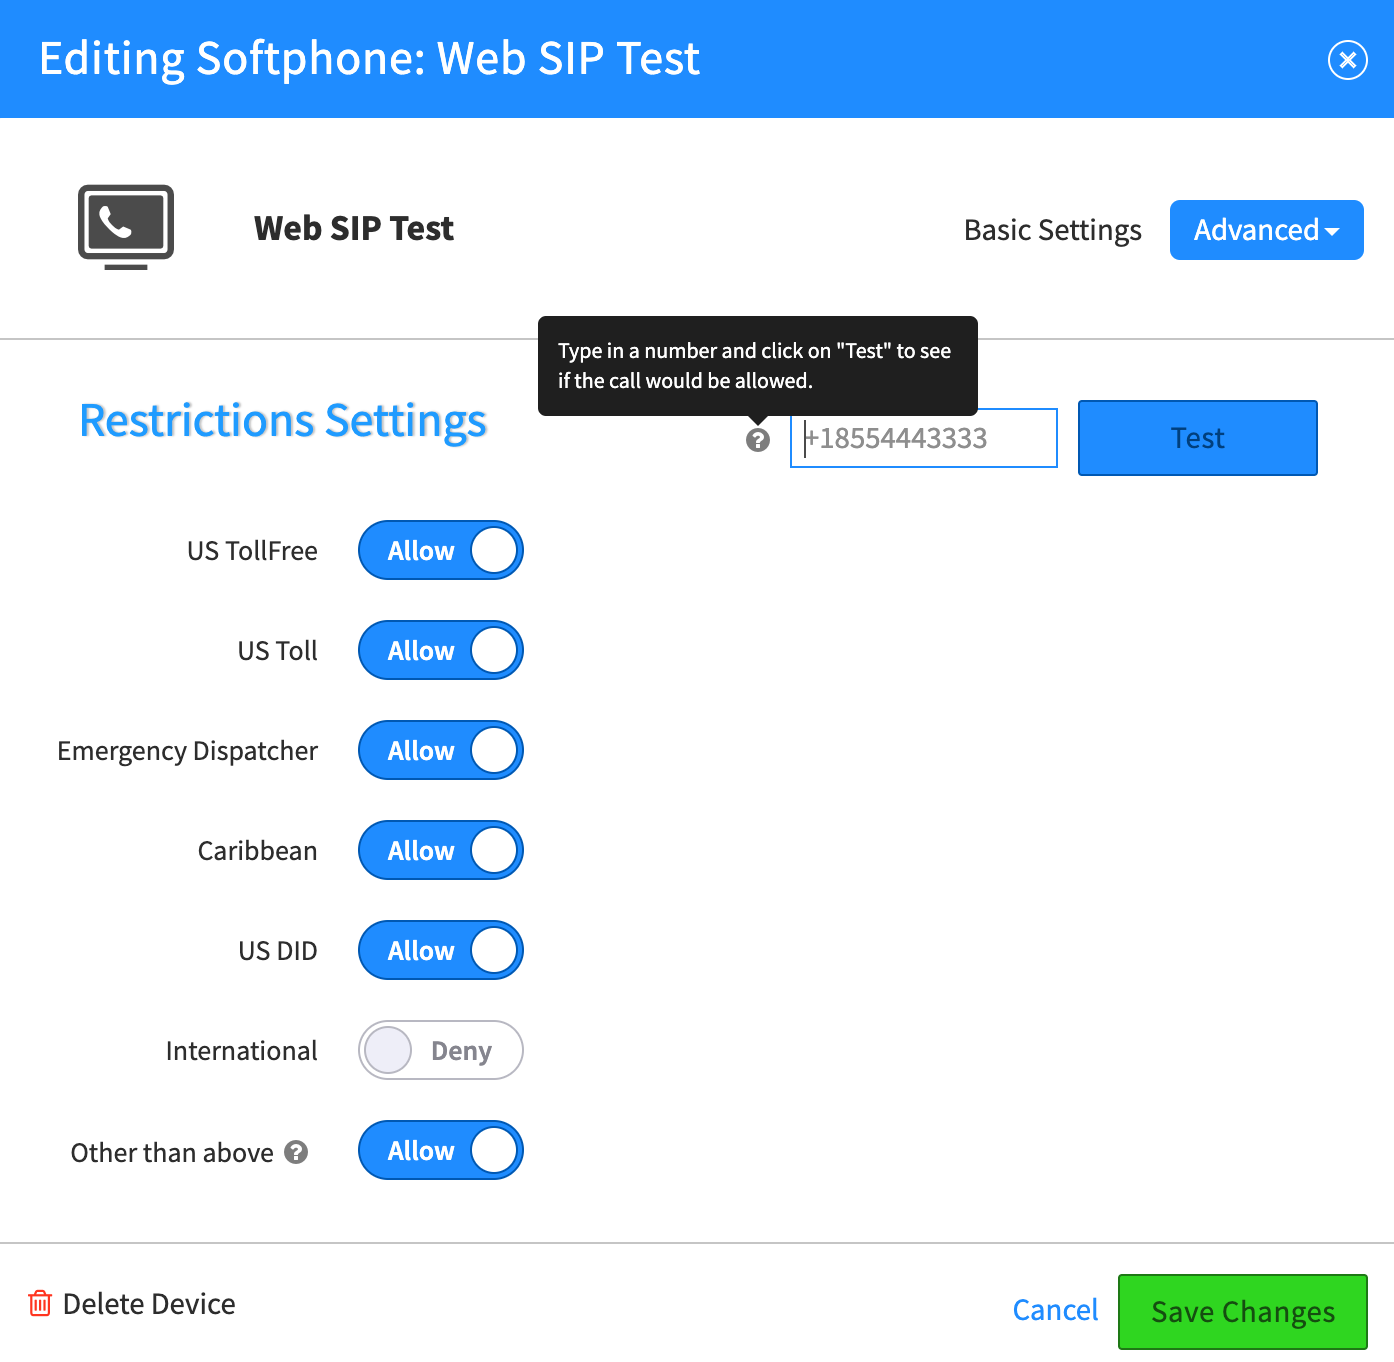
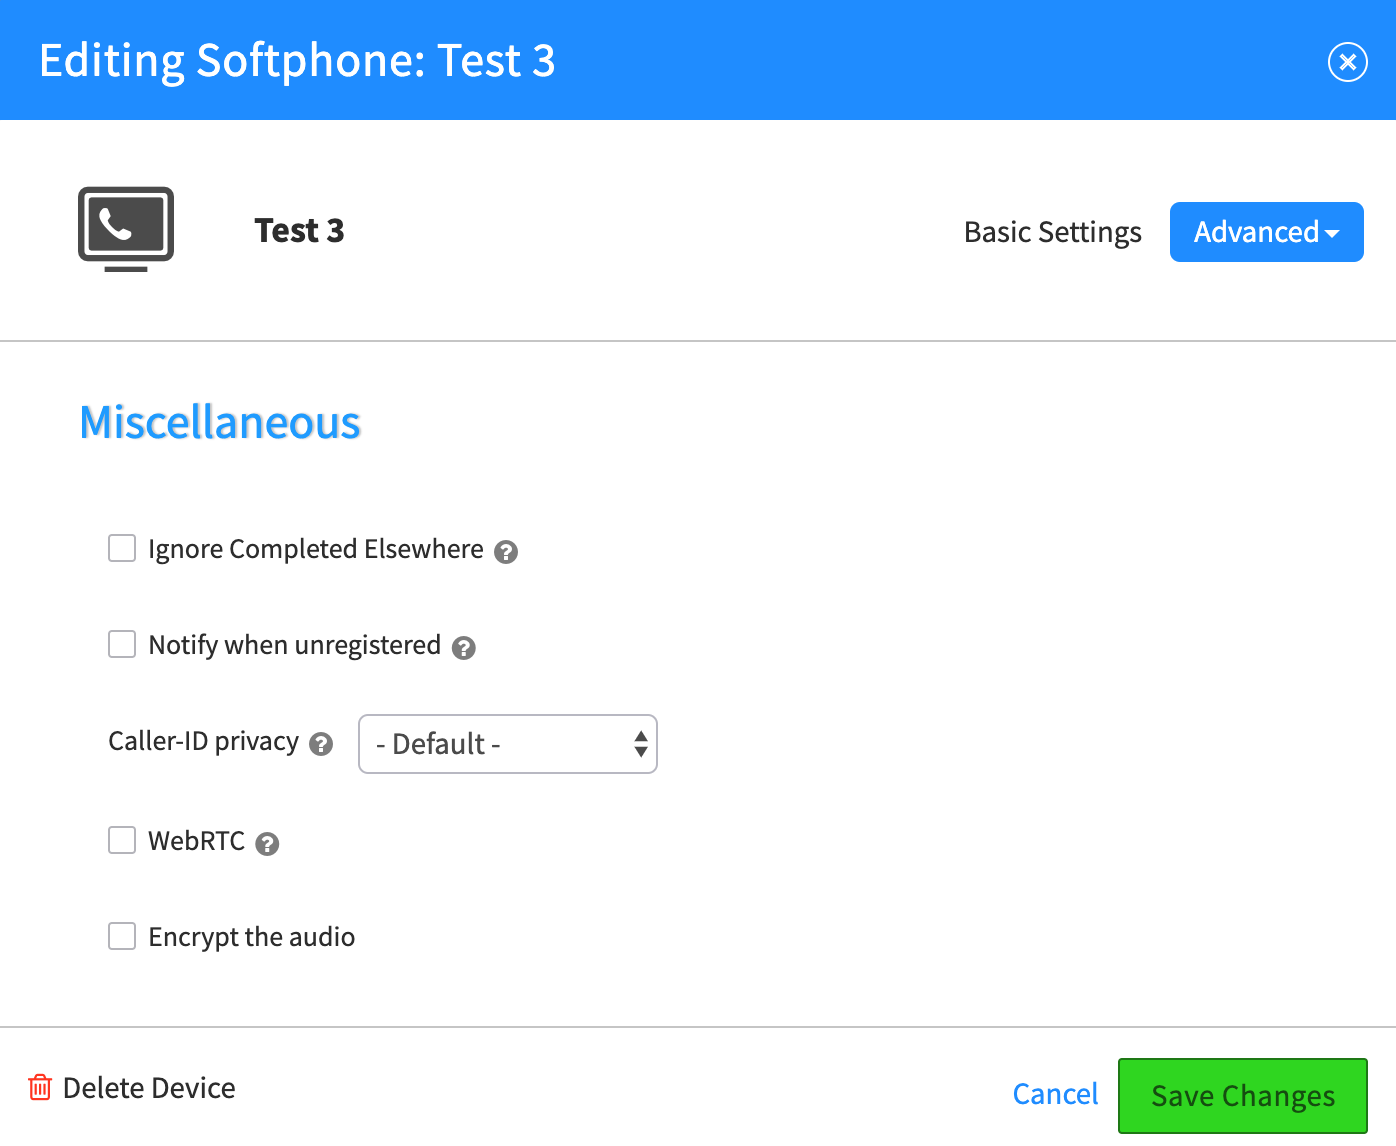

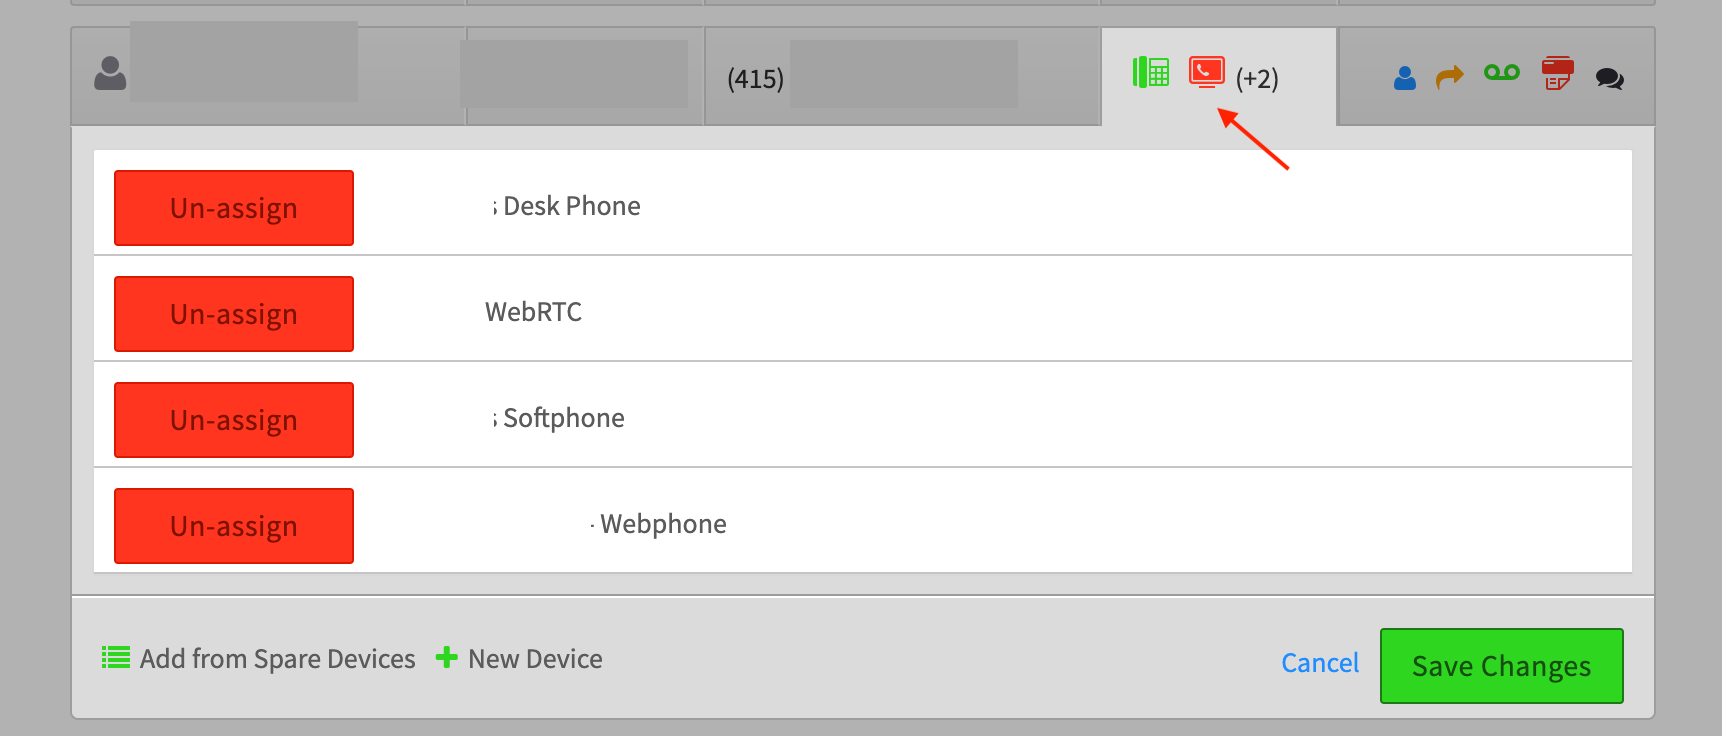
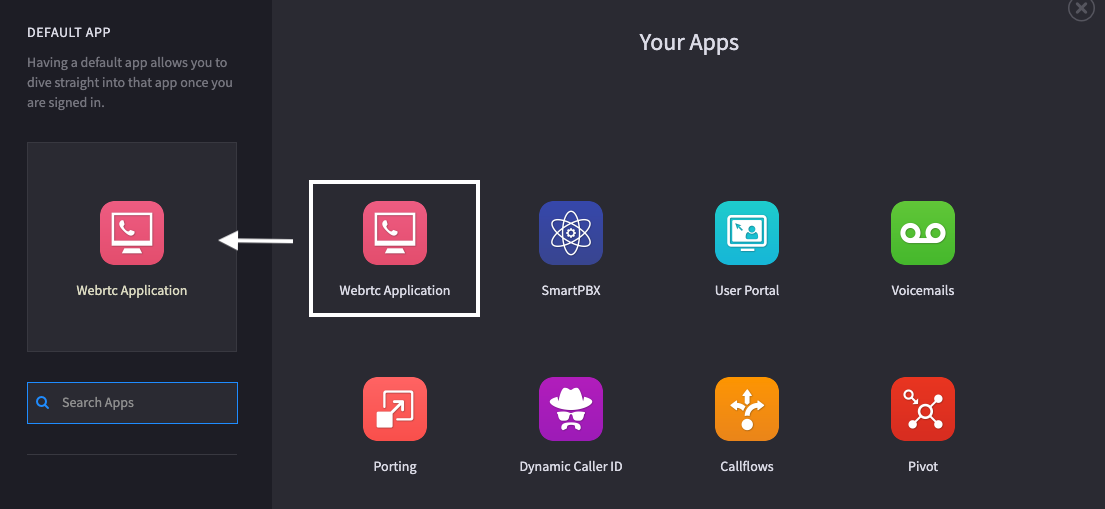


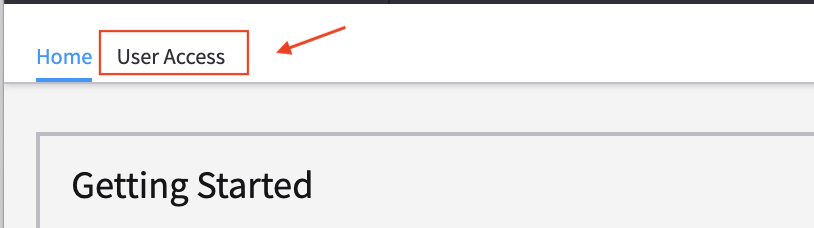
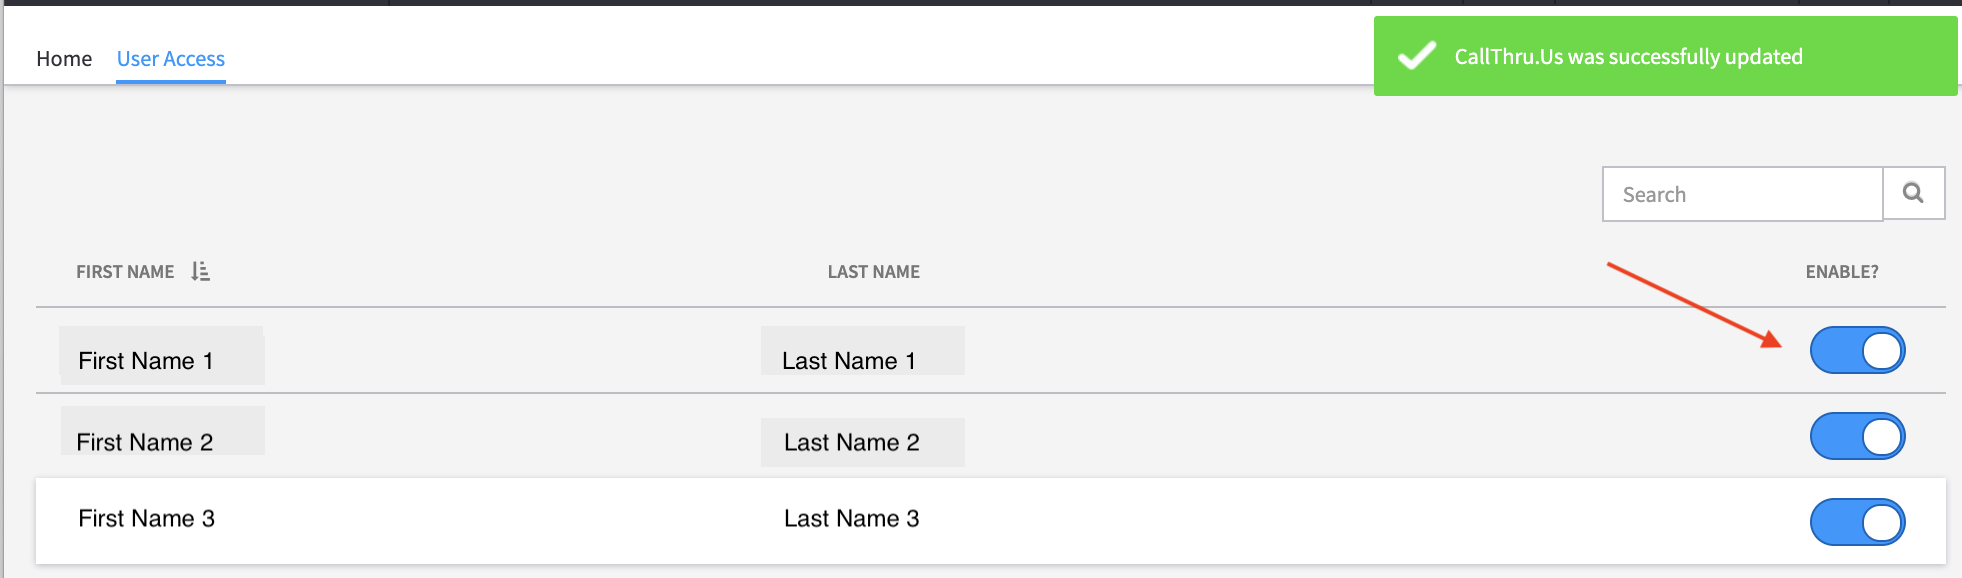


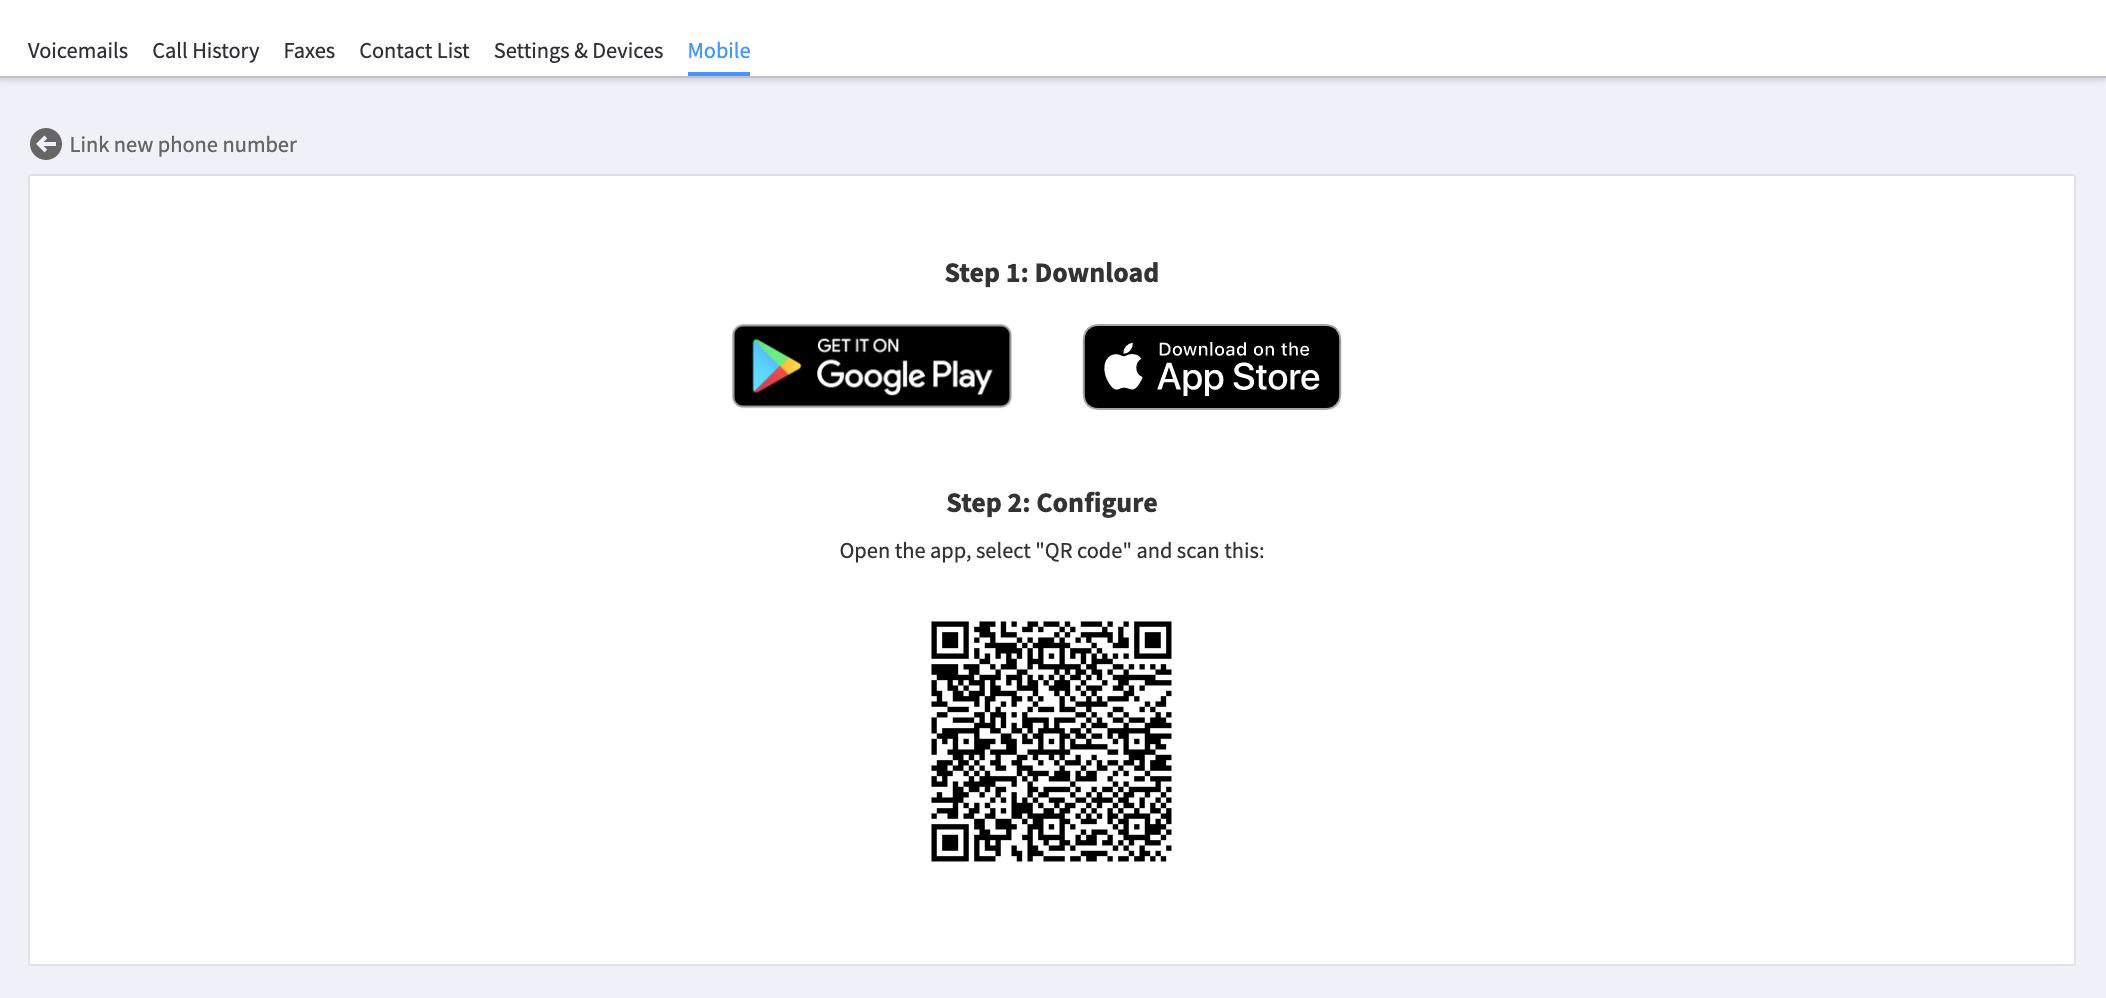

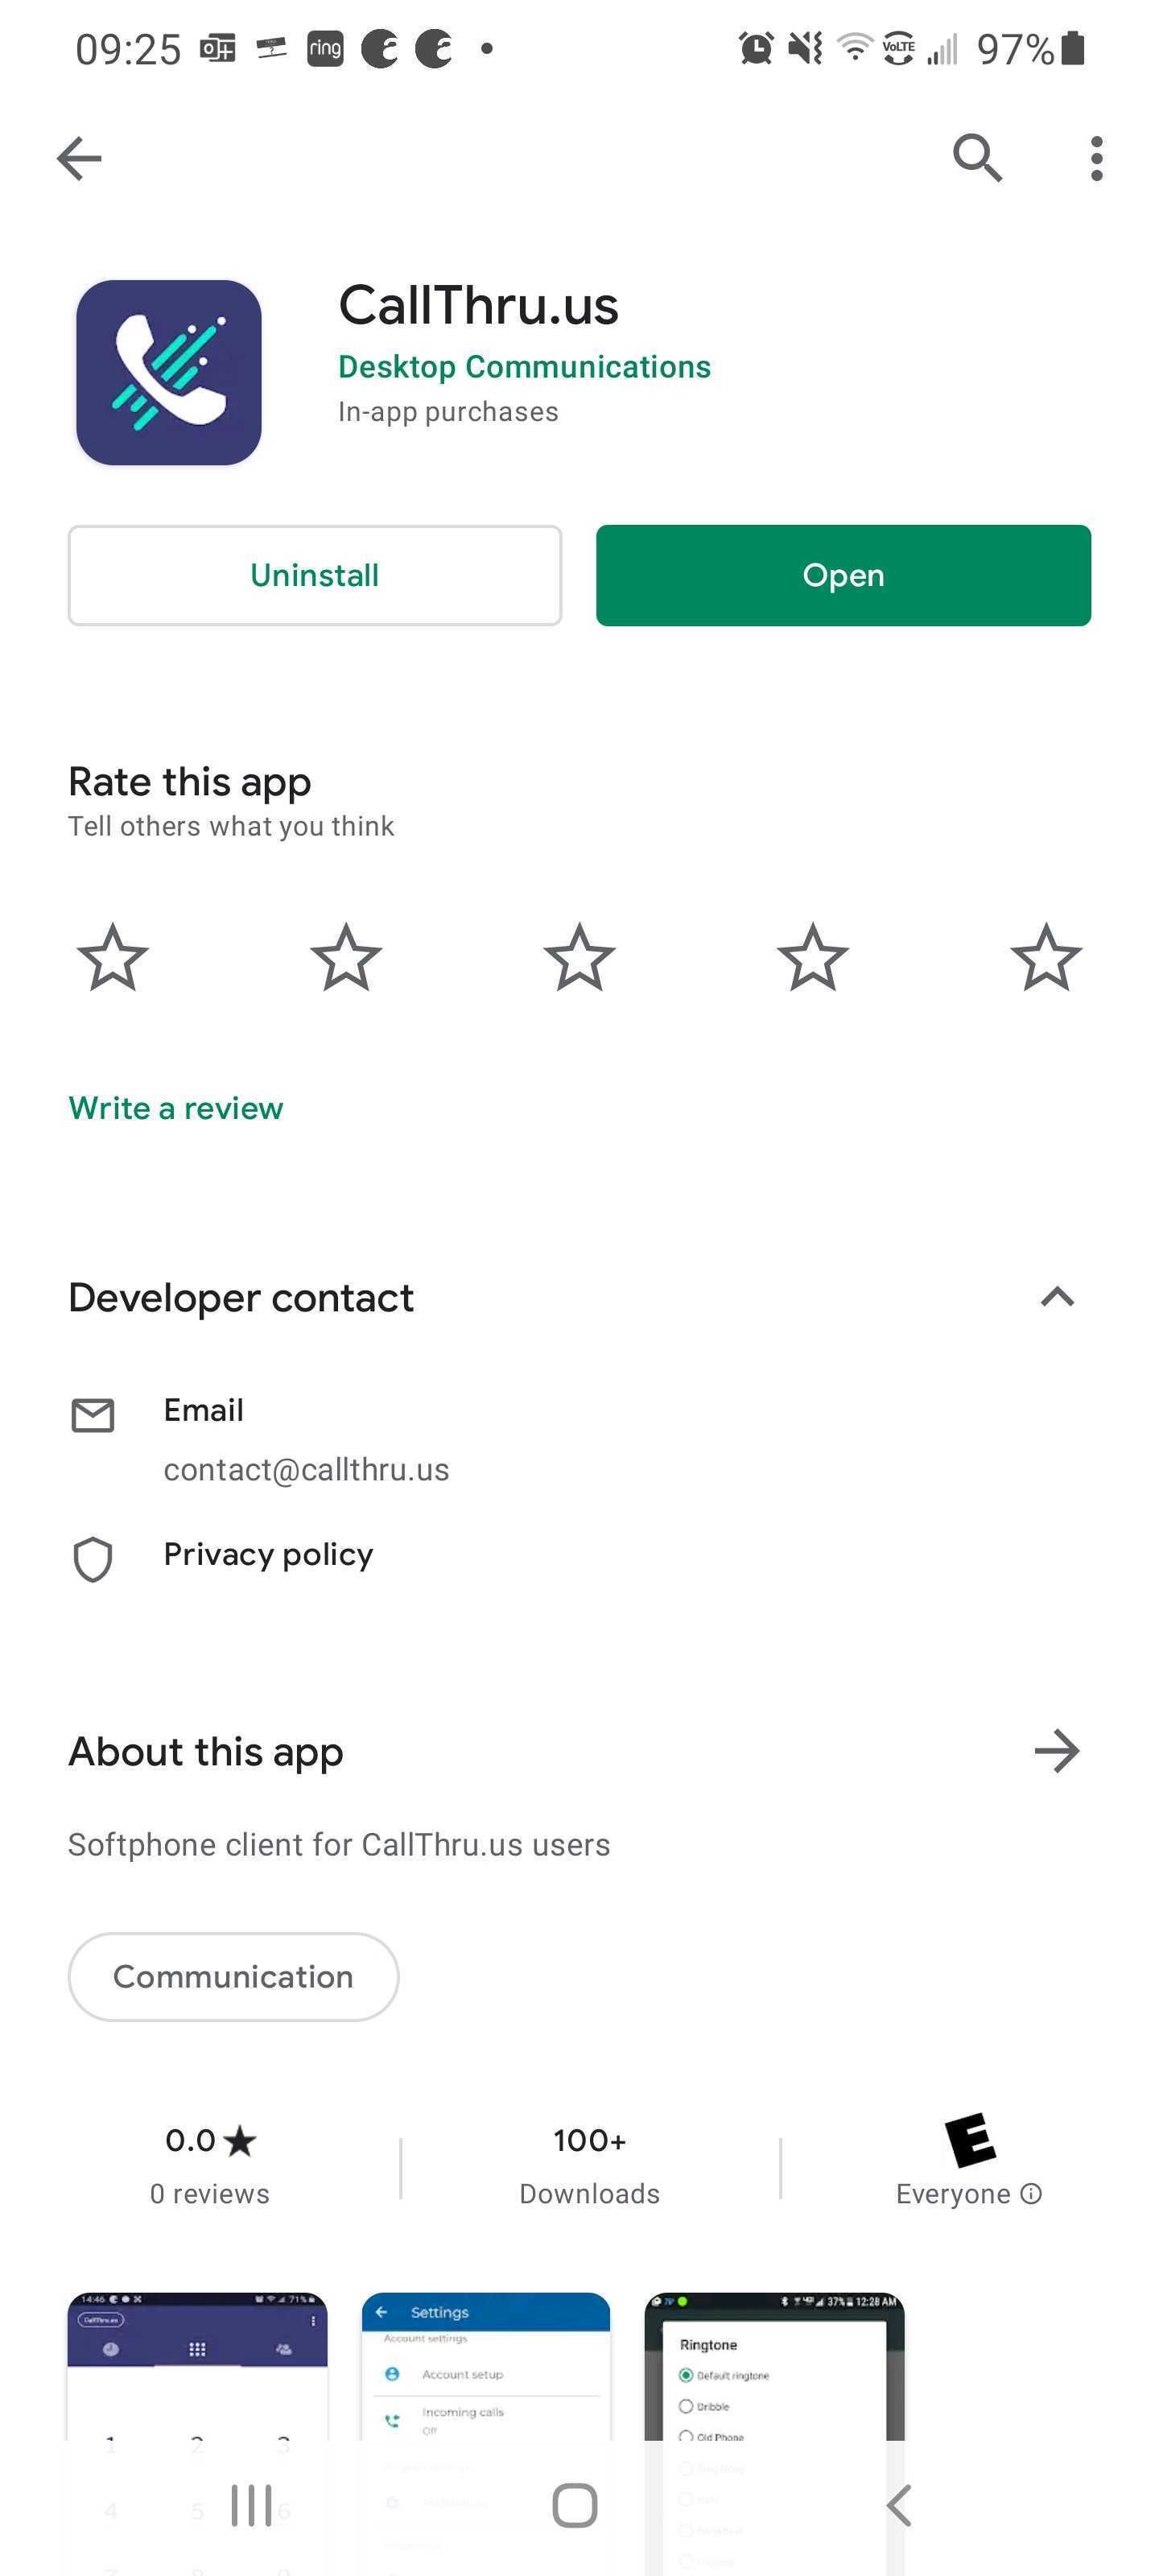
 .
. 


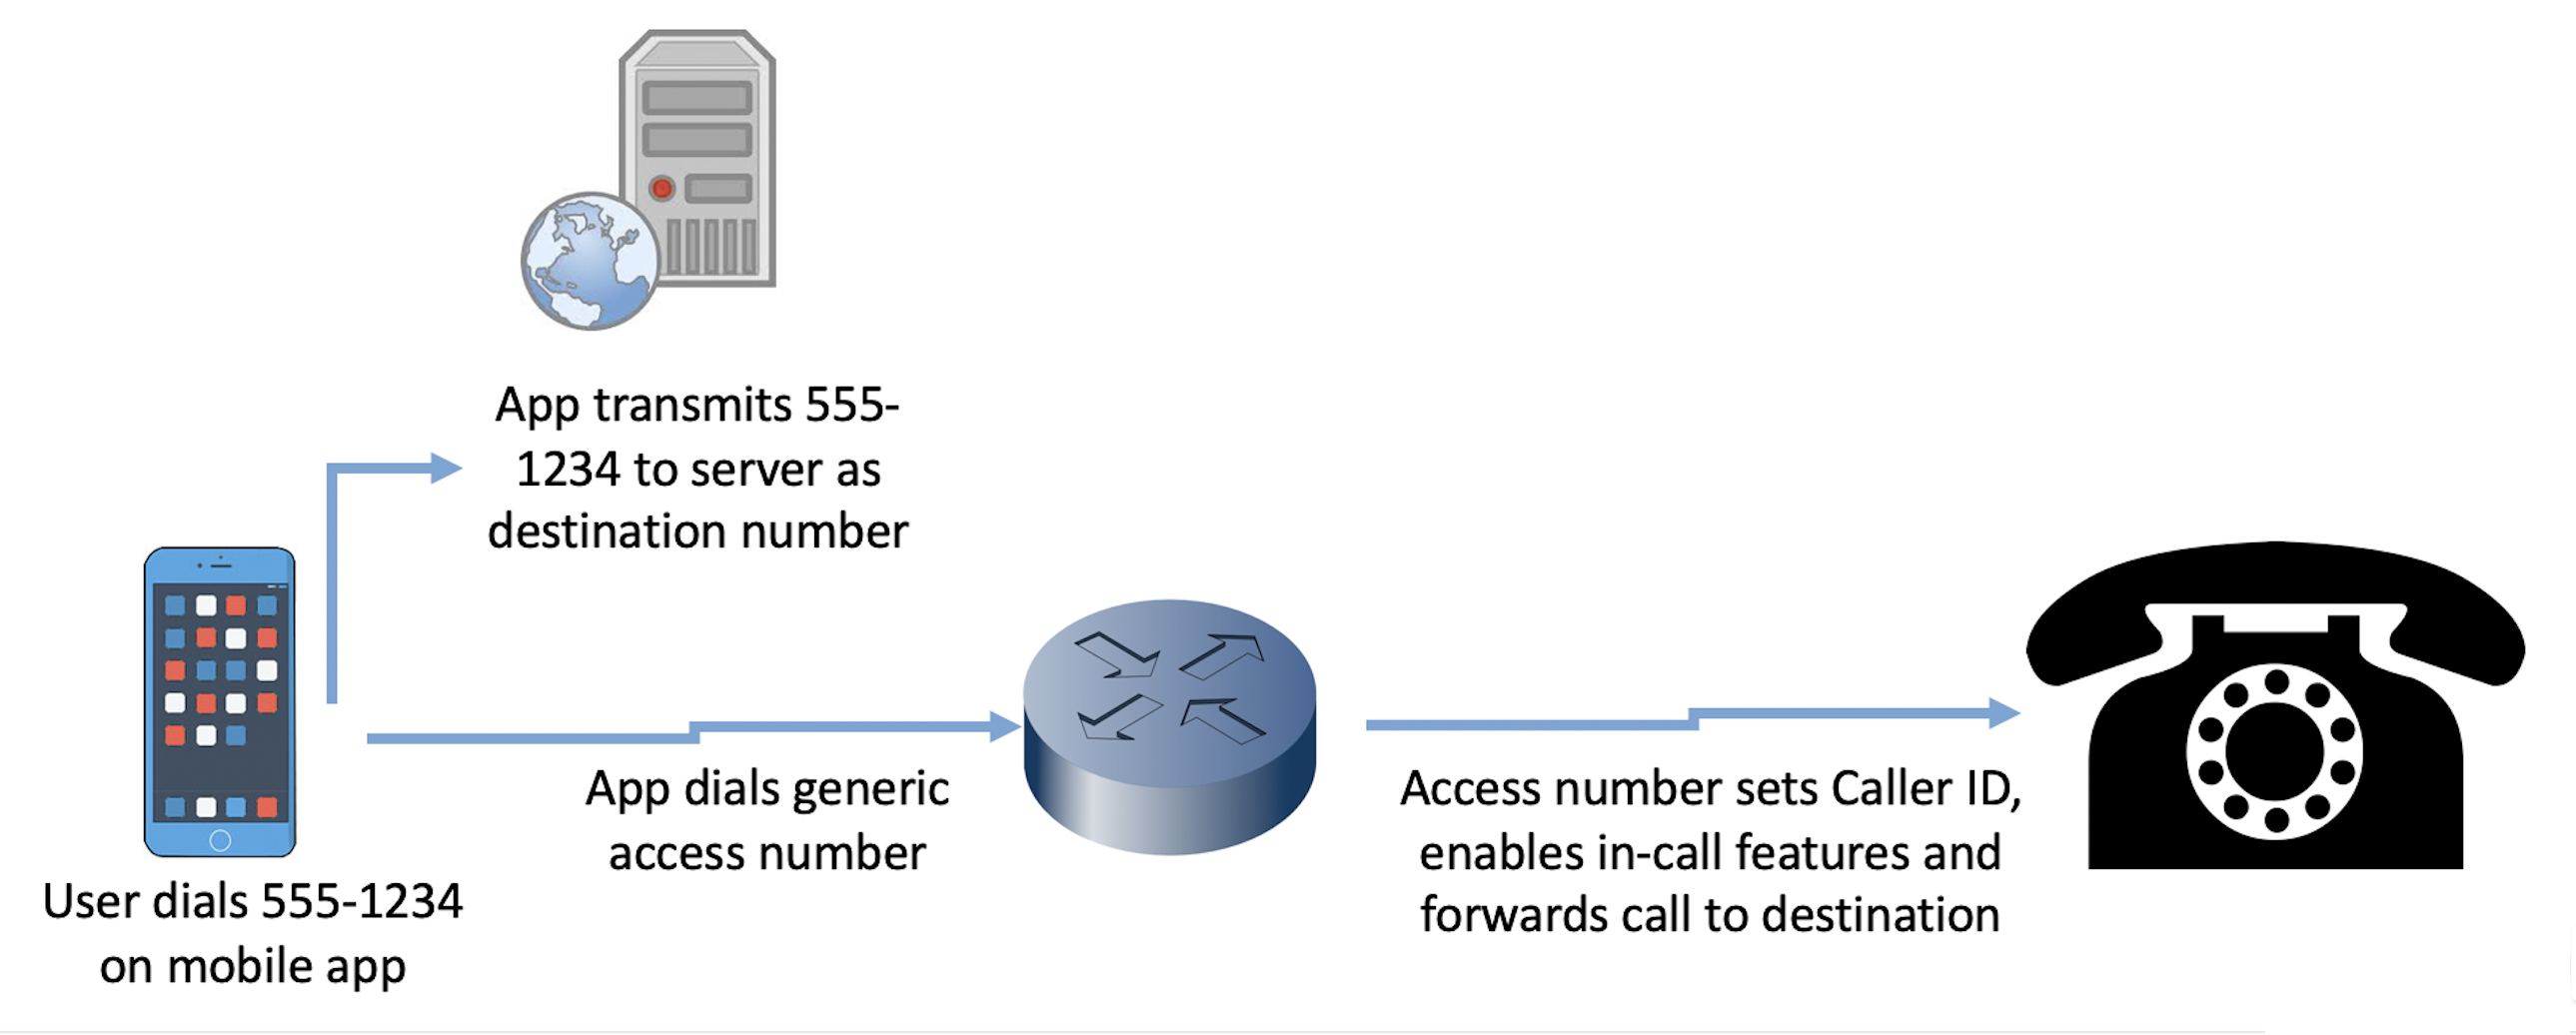
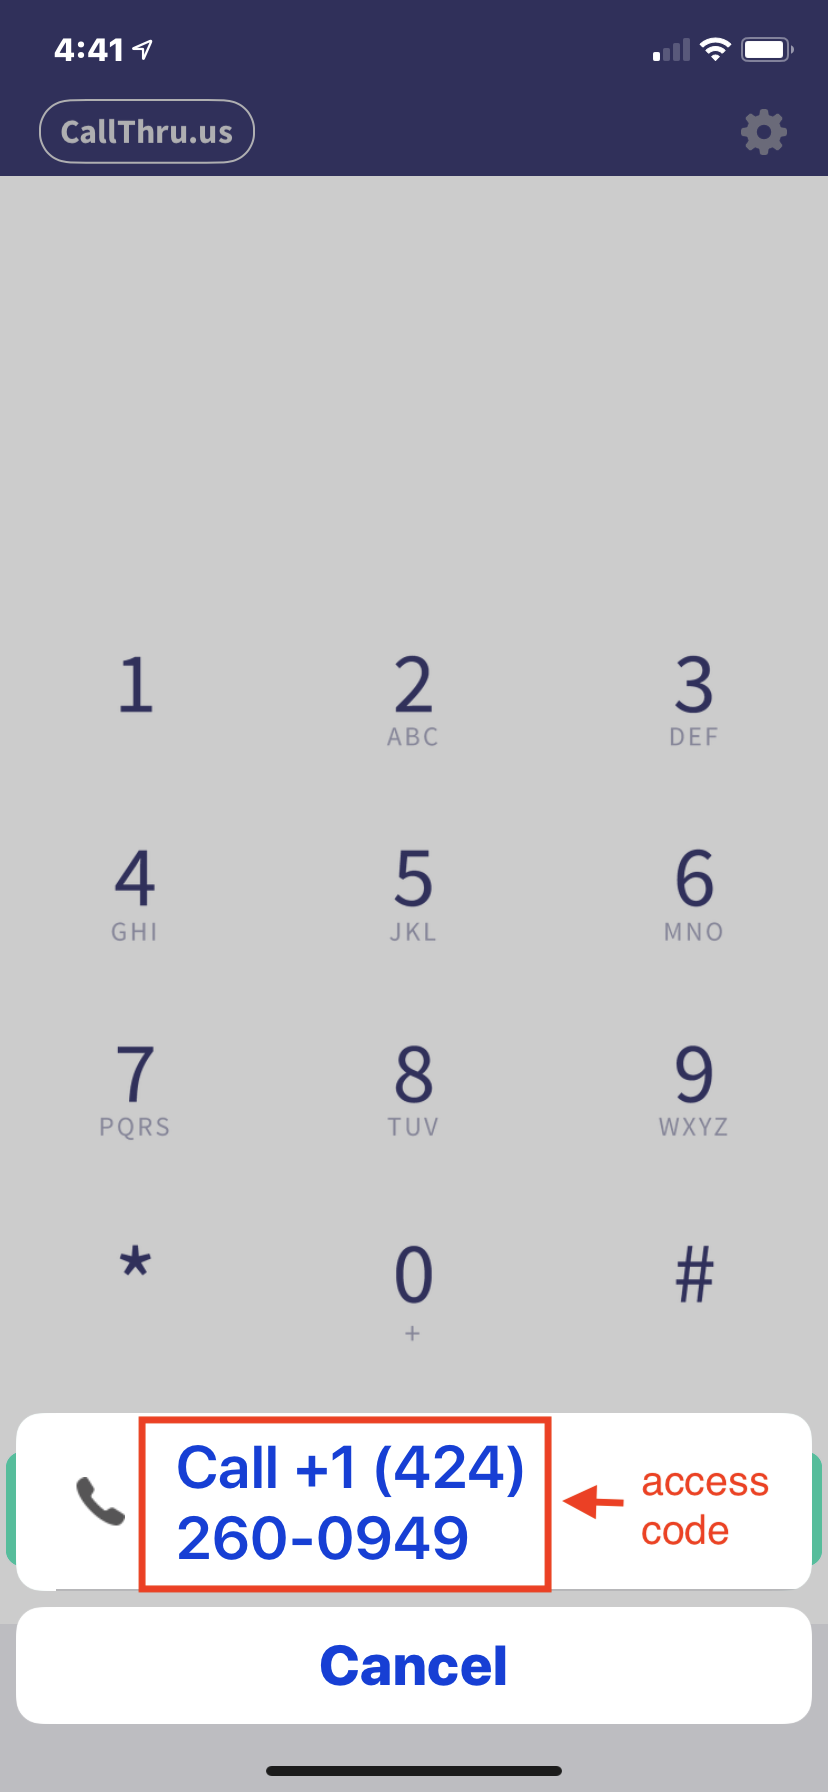
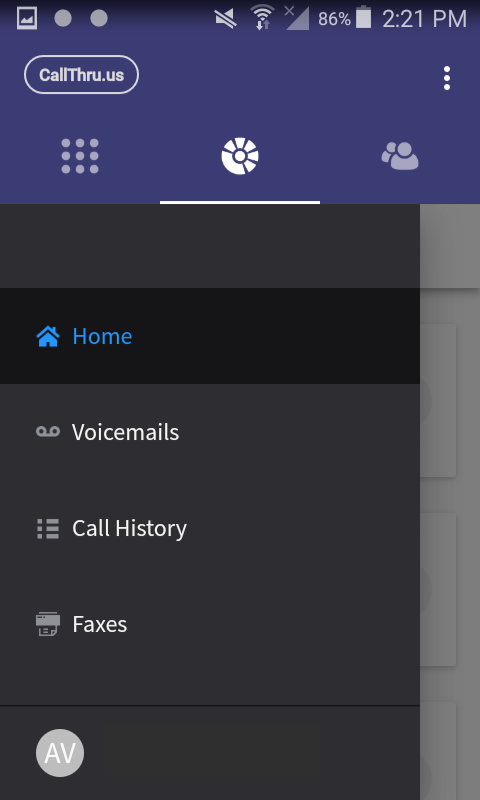
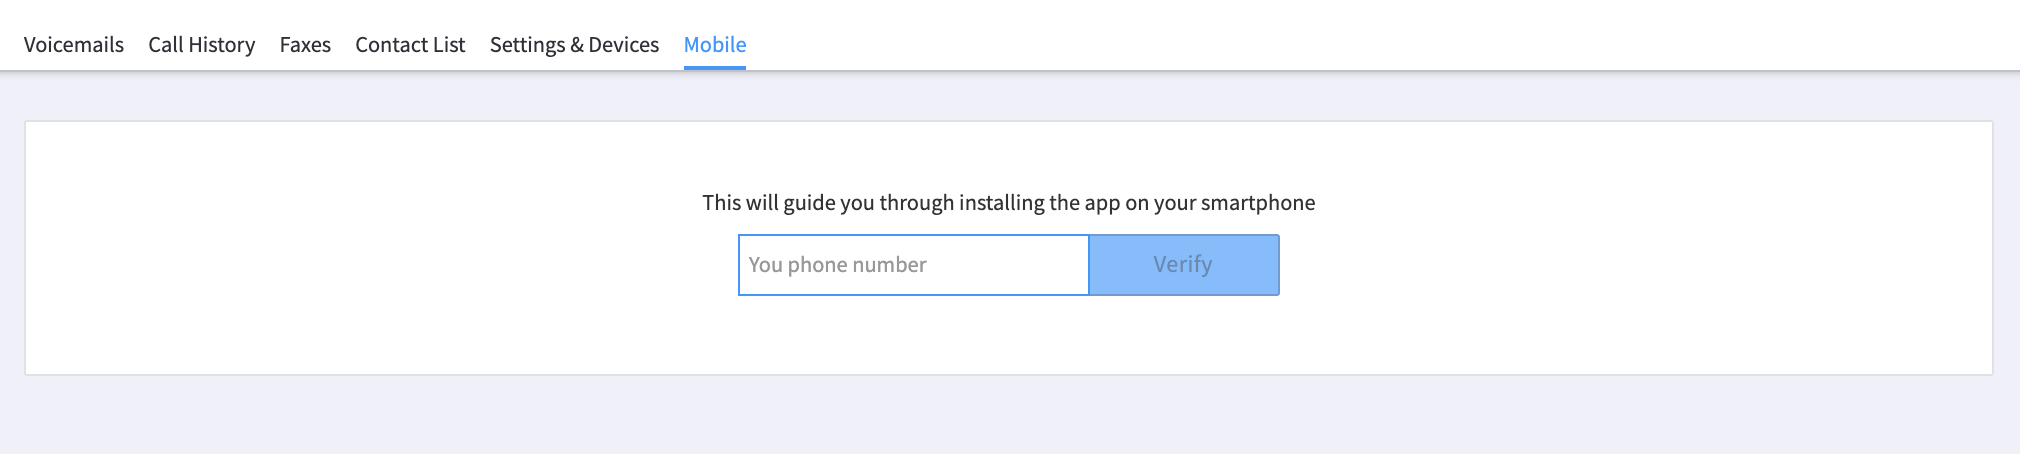
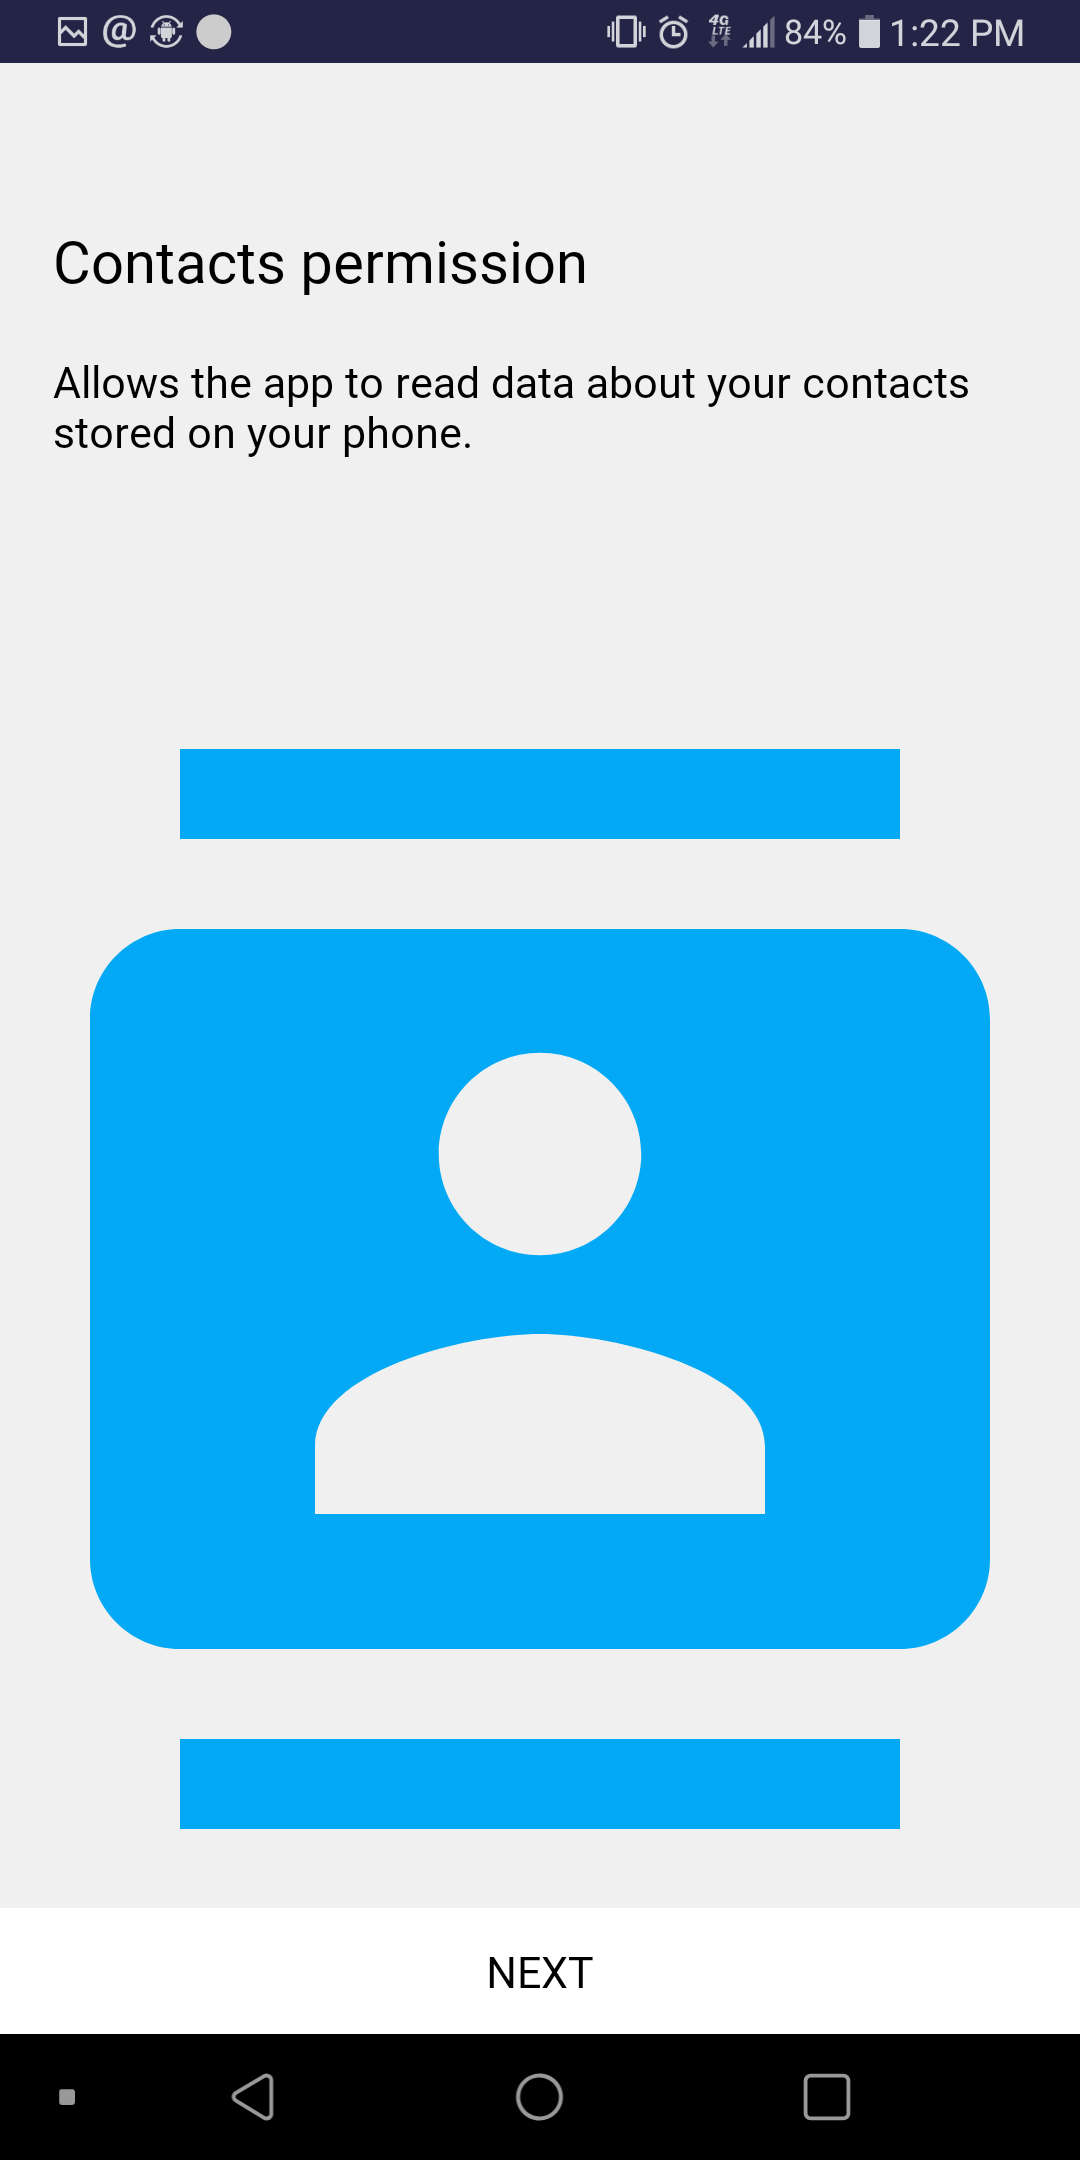
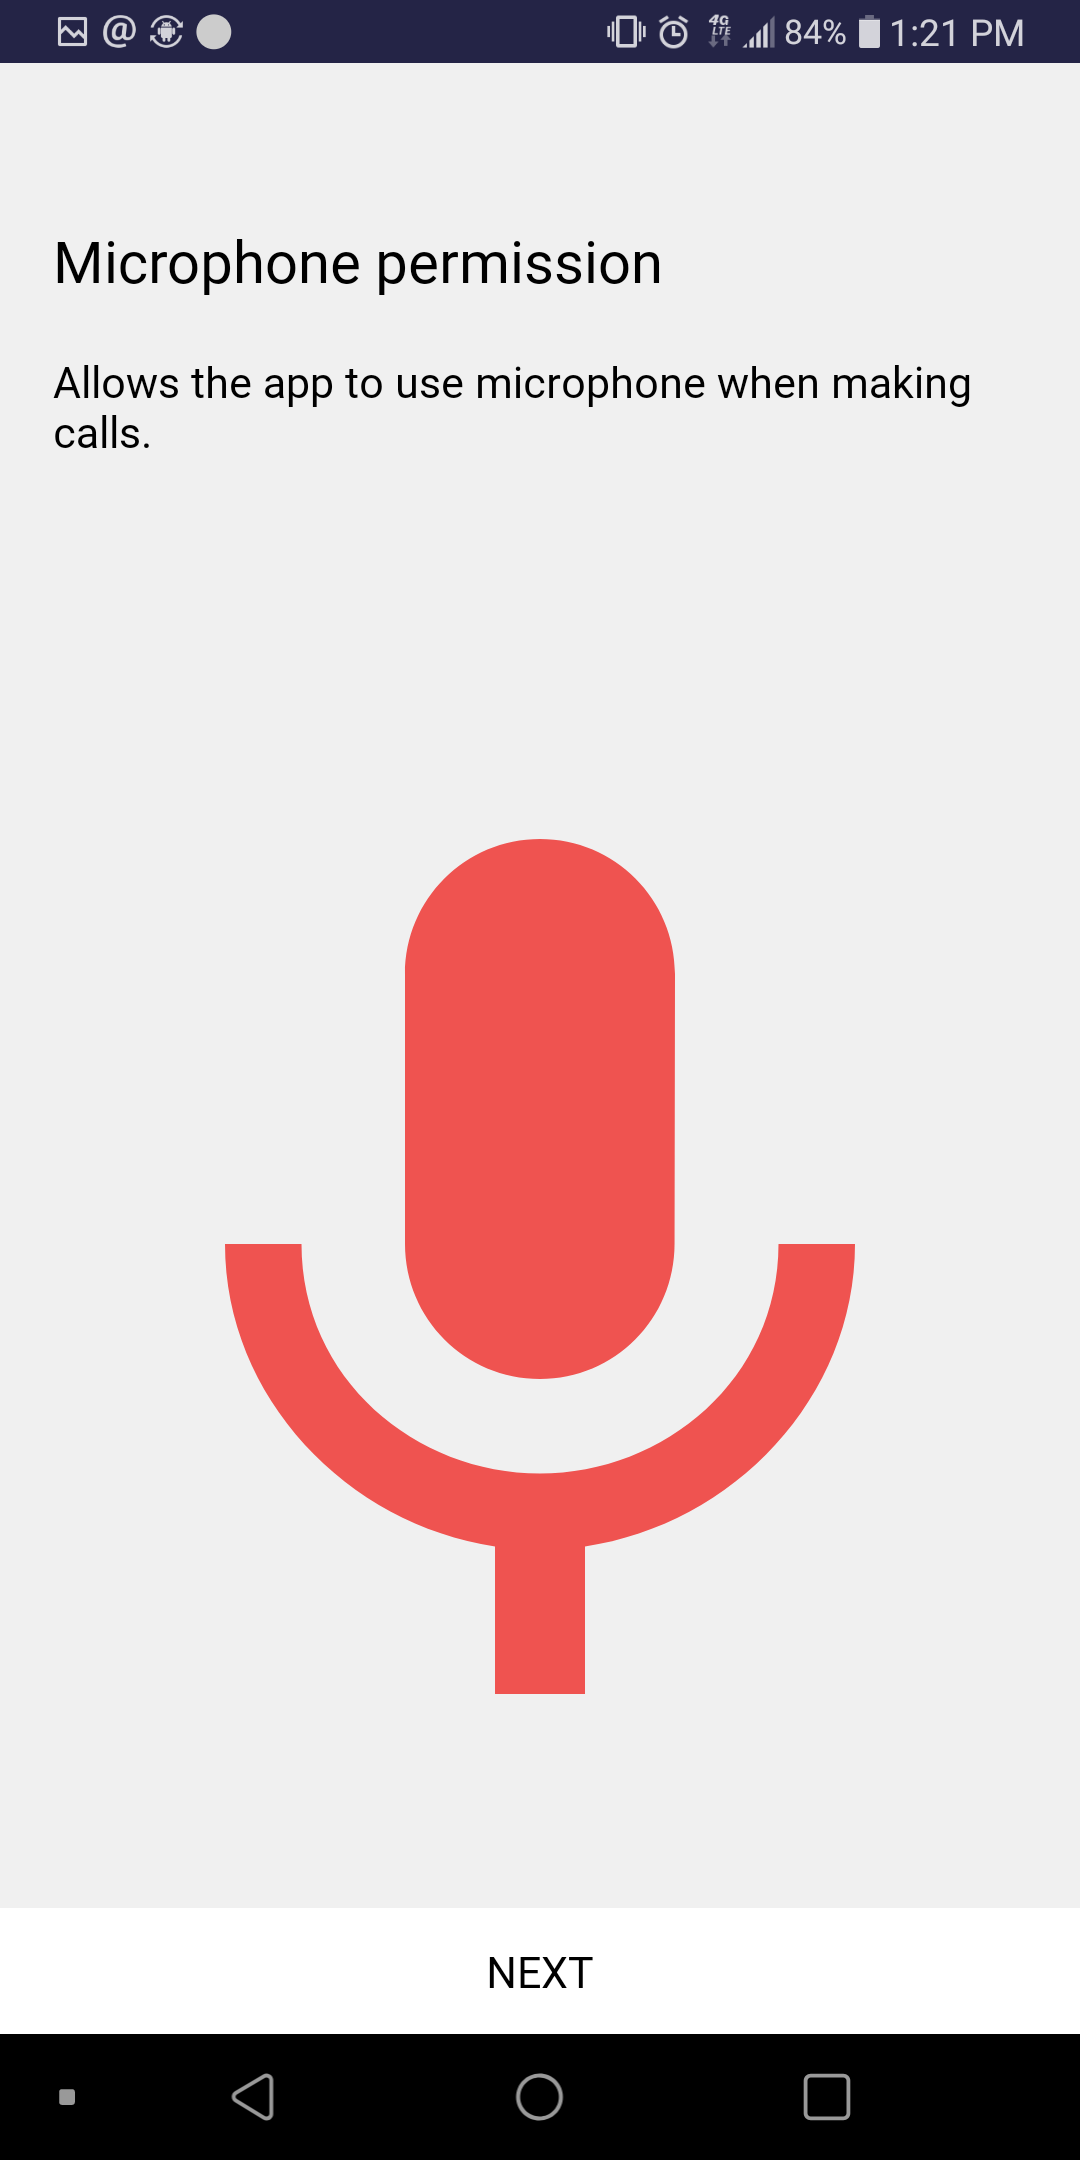
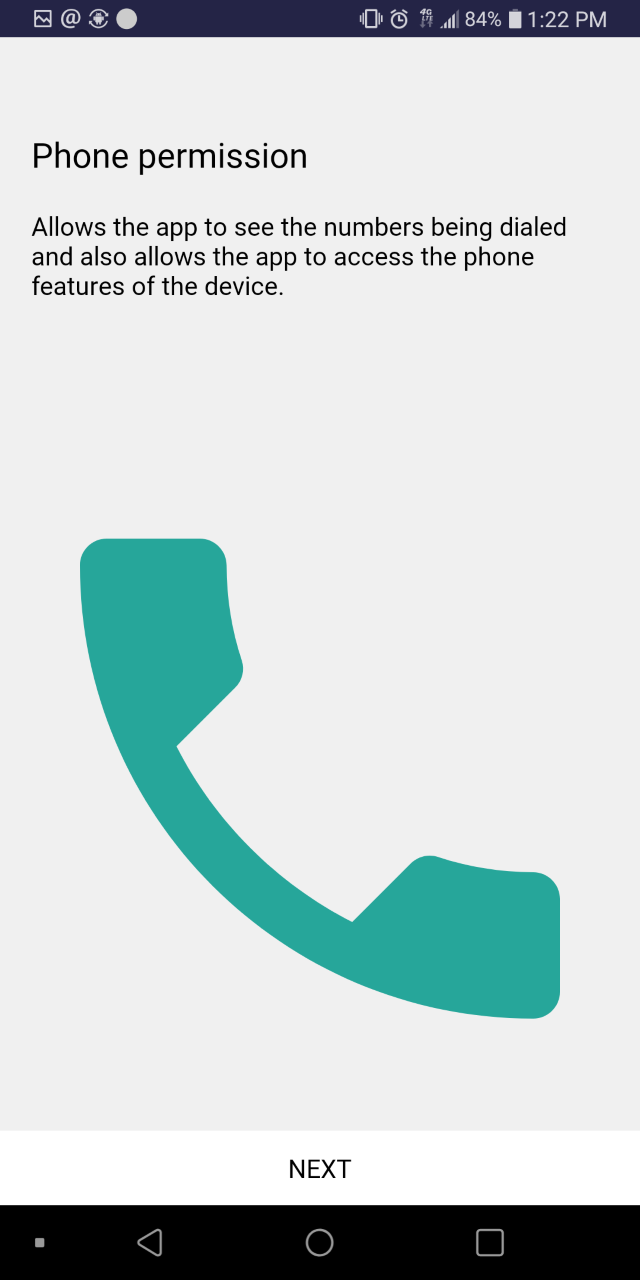
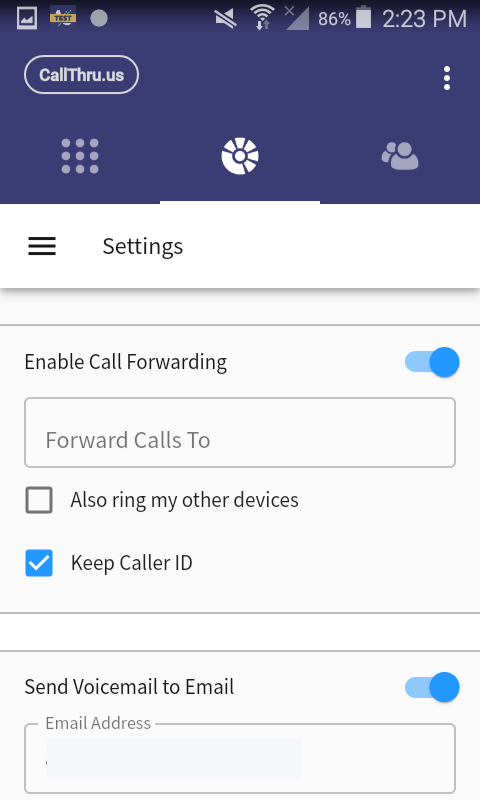
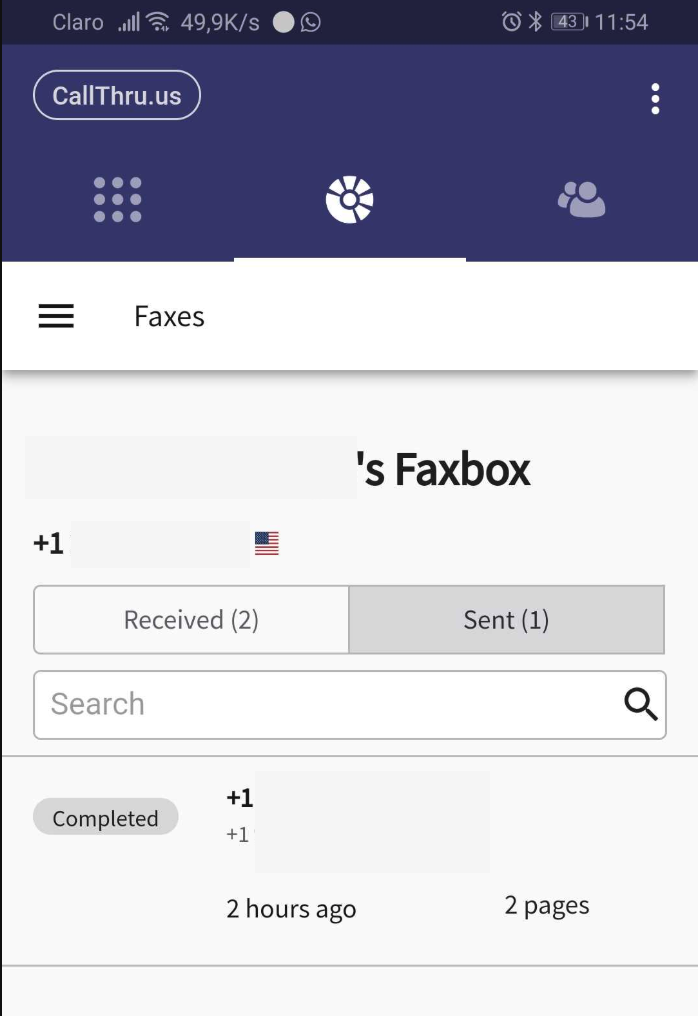
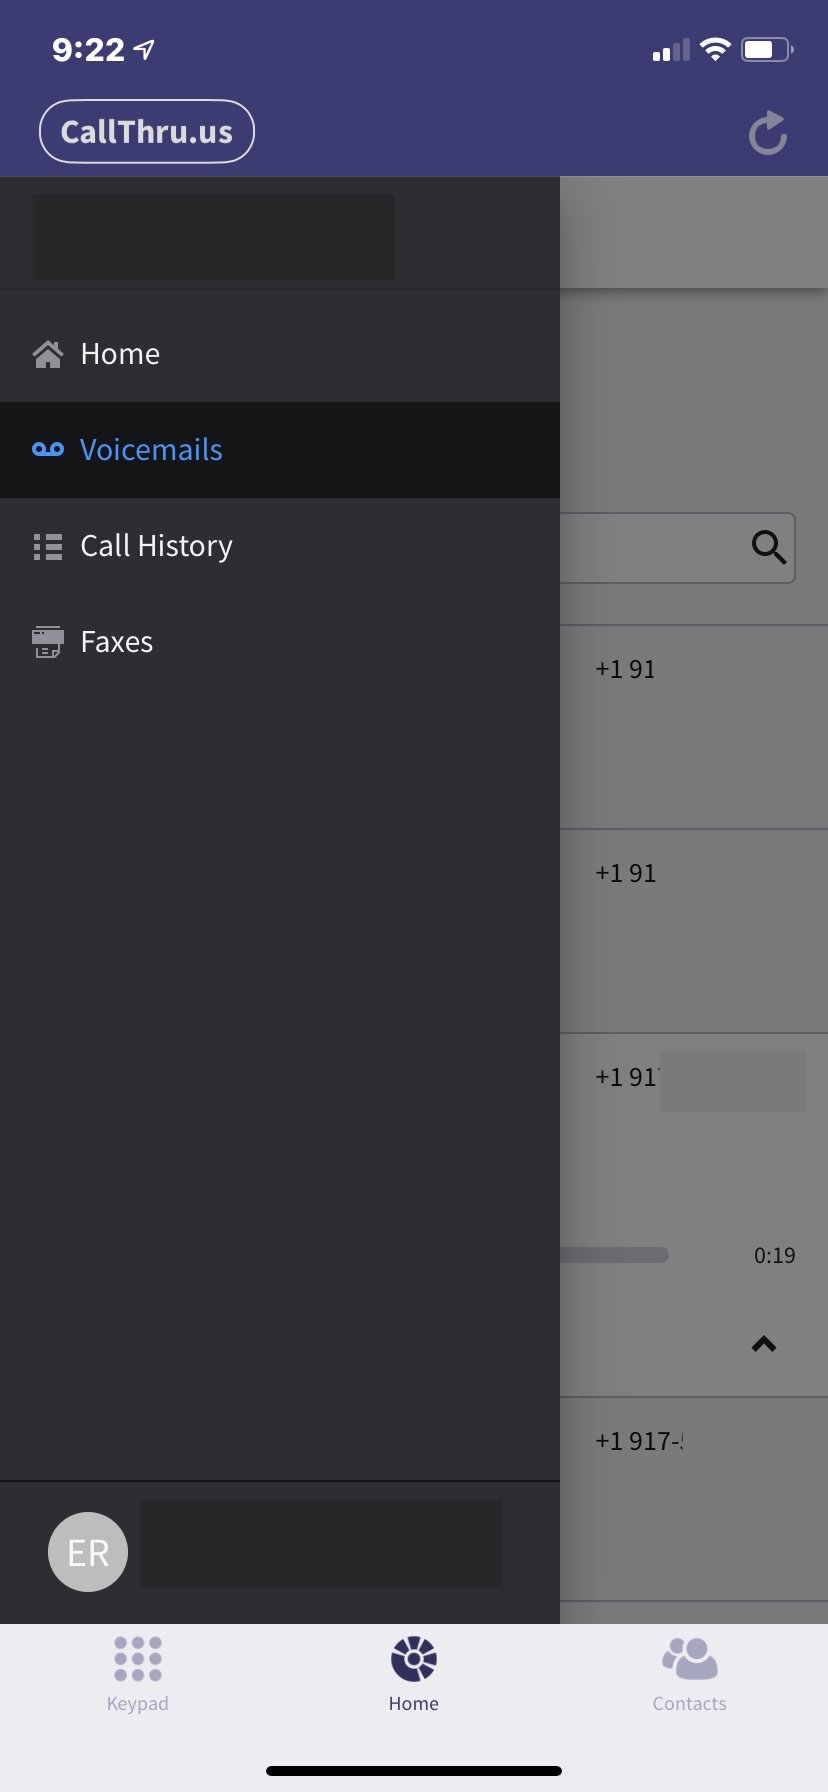
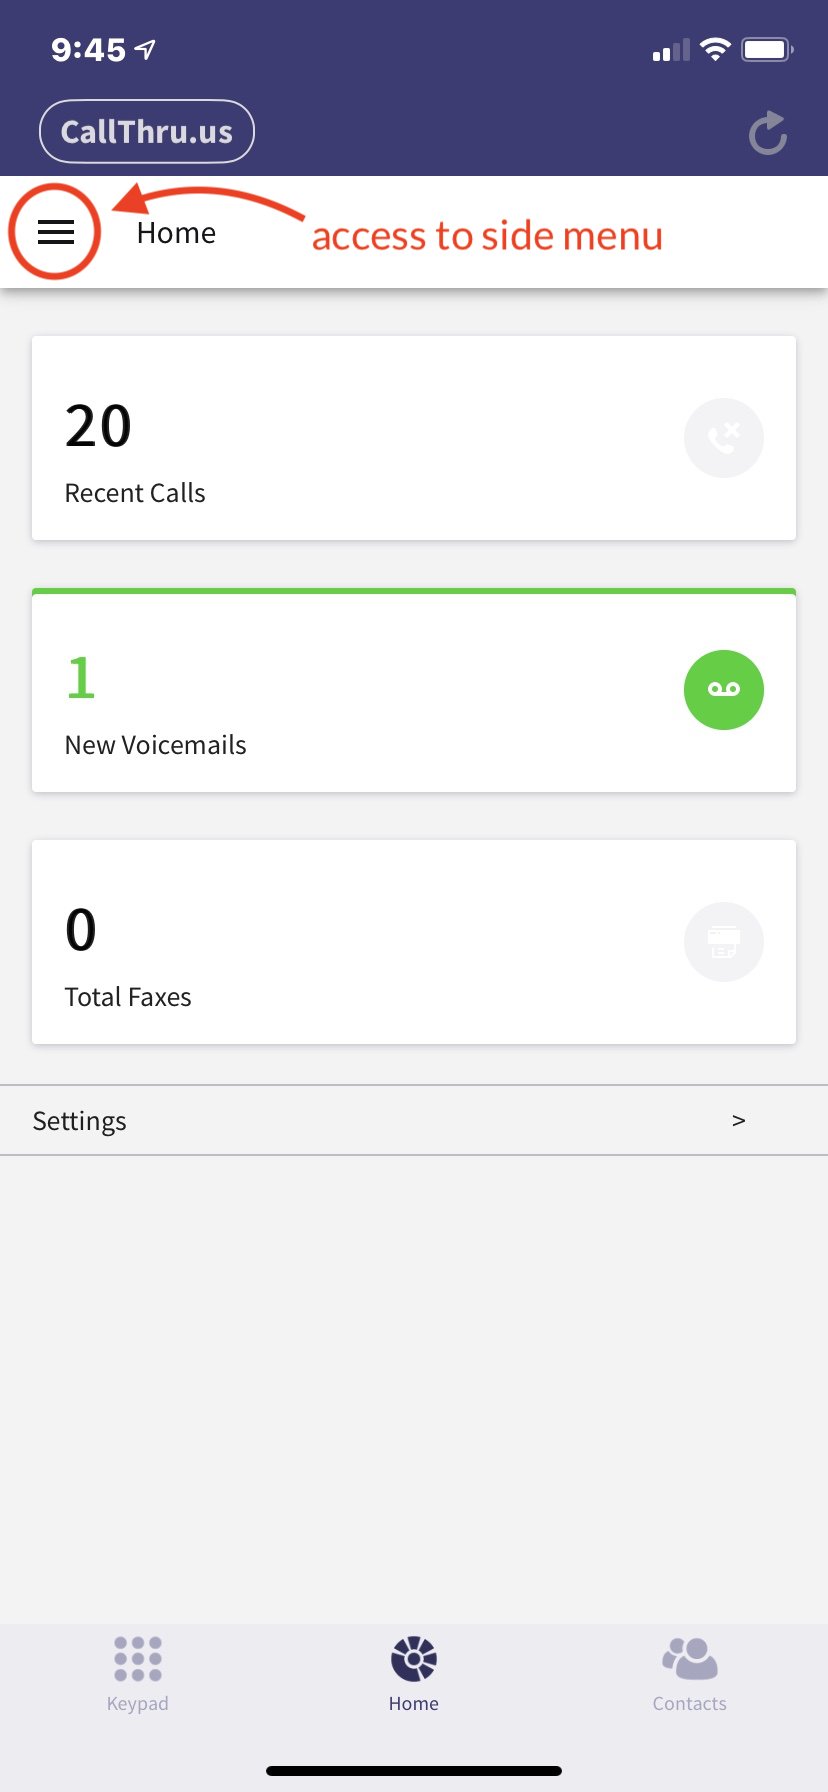
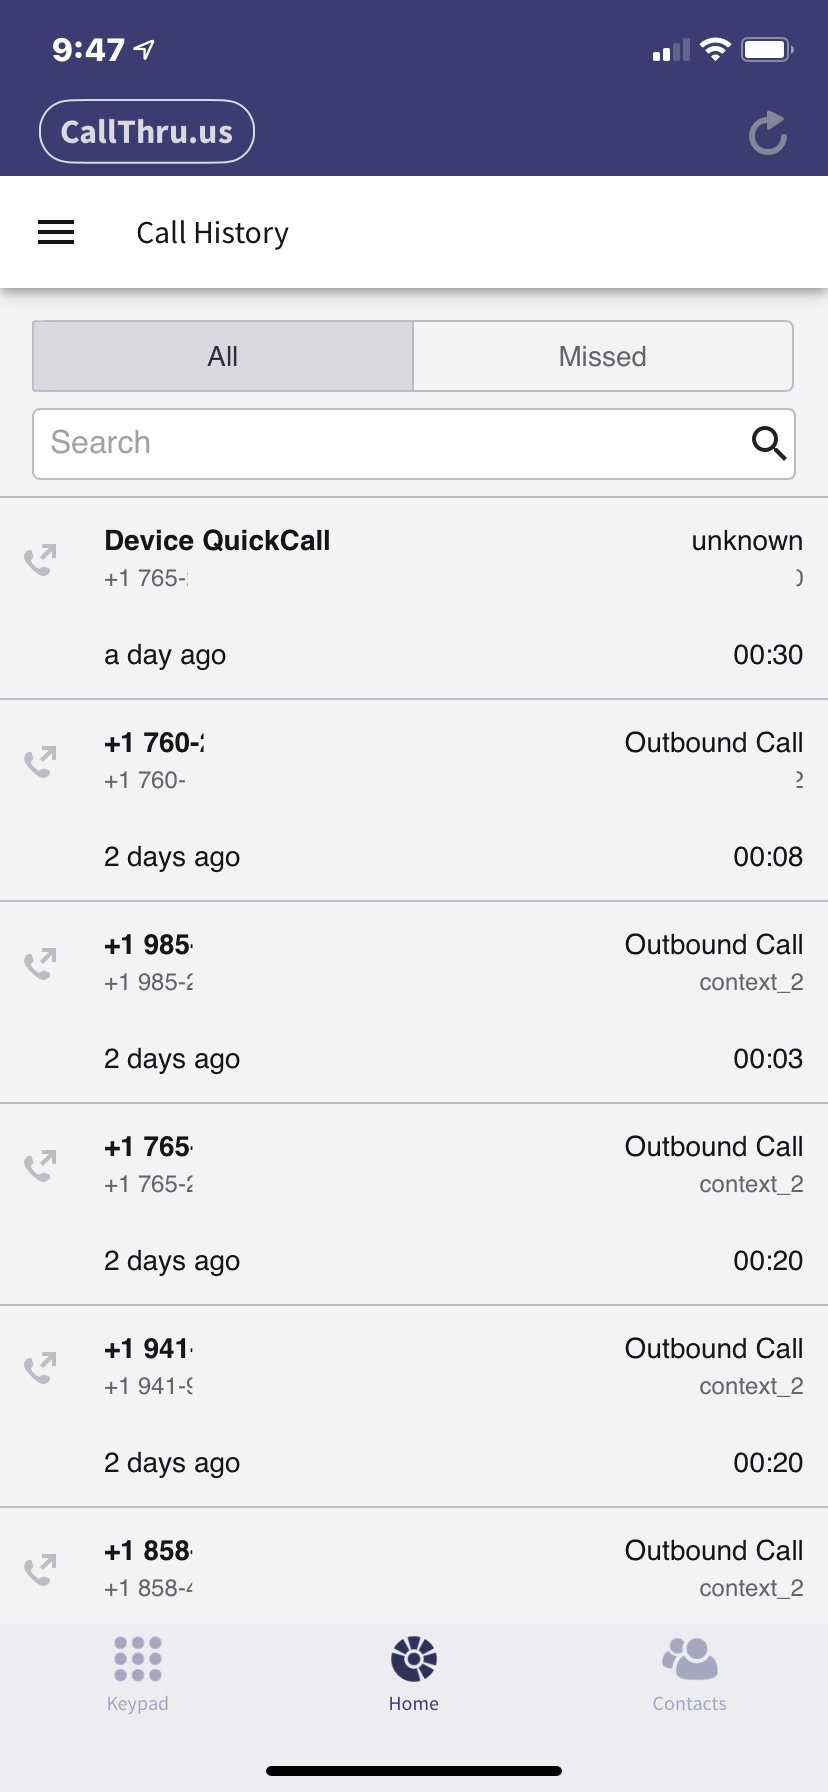
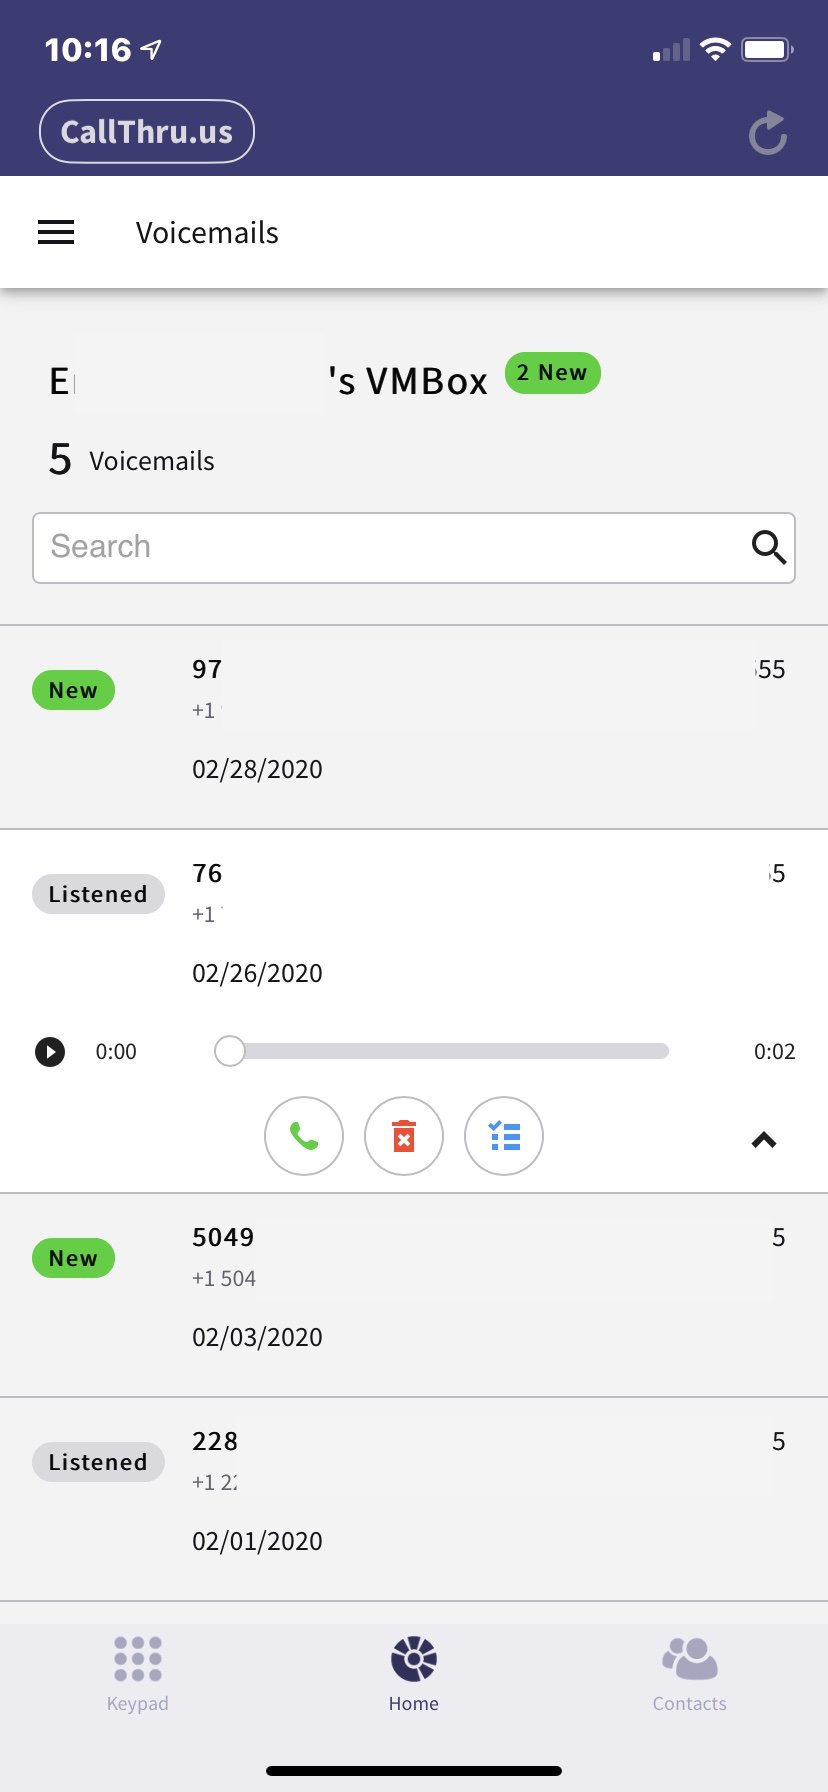
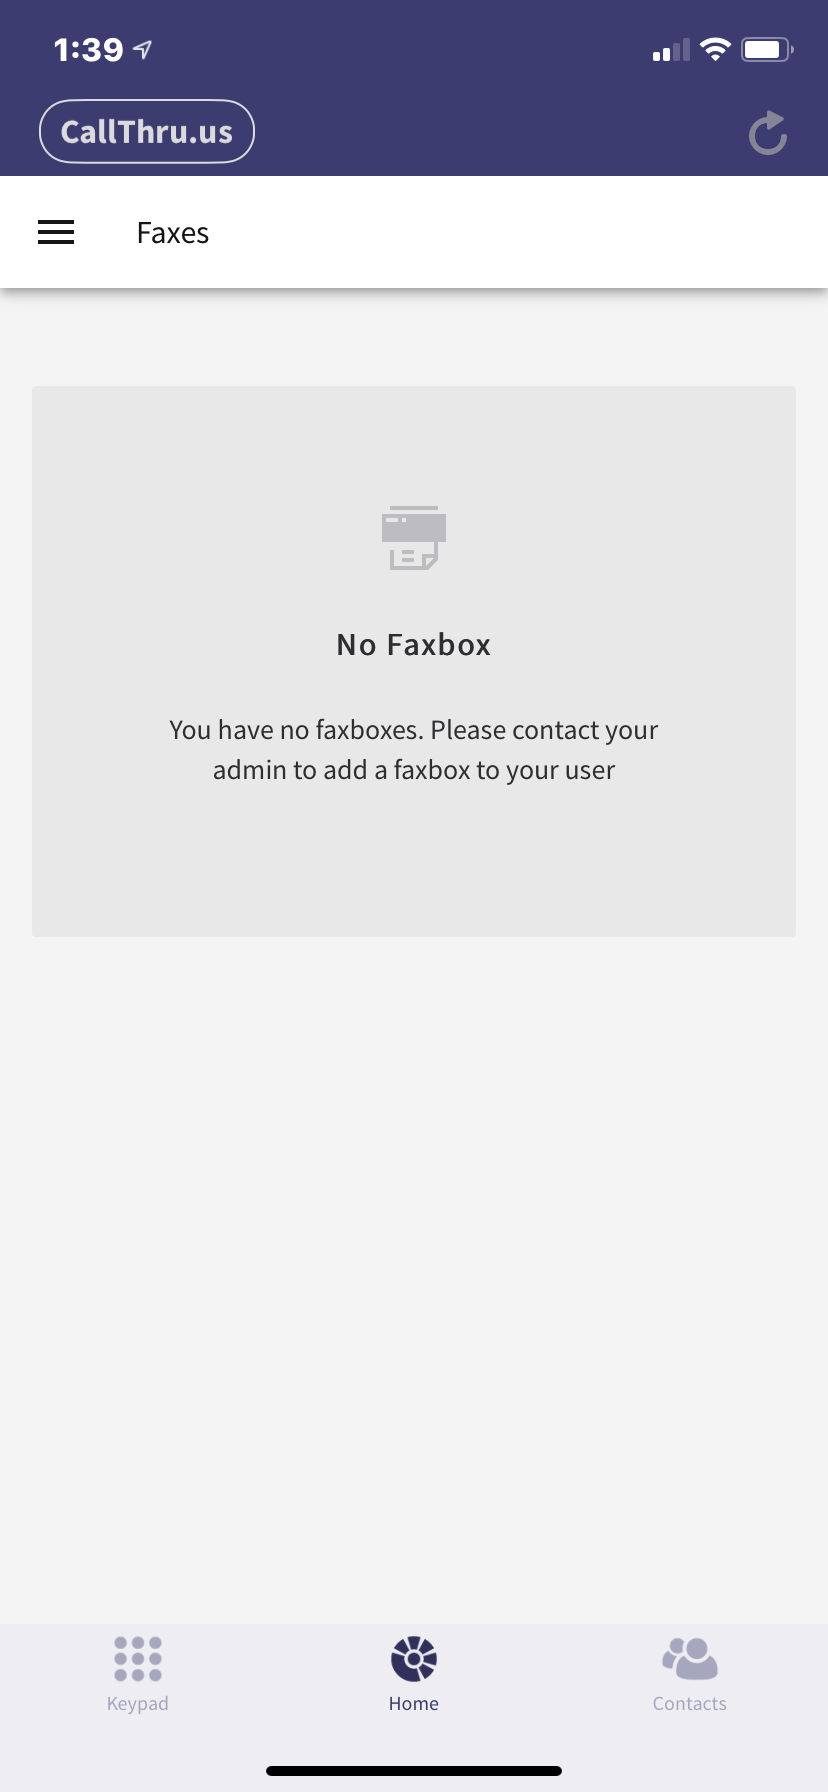

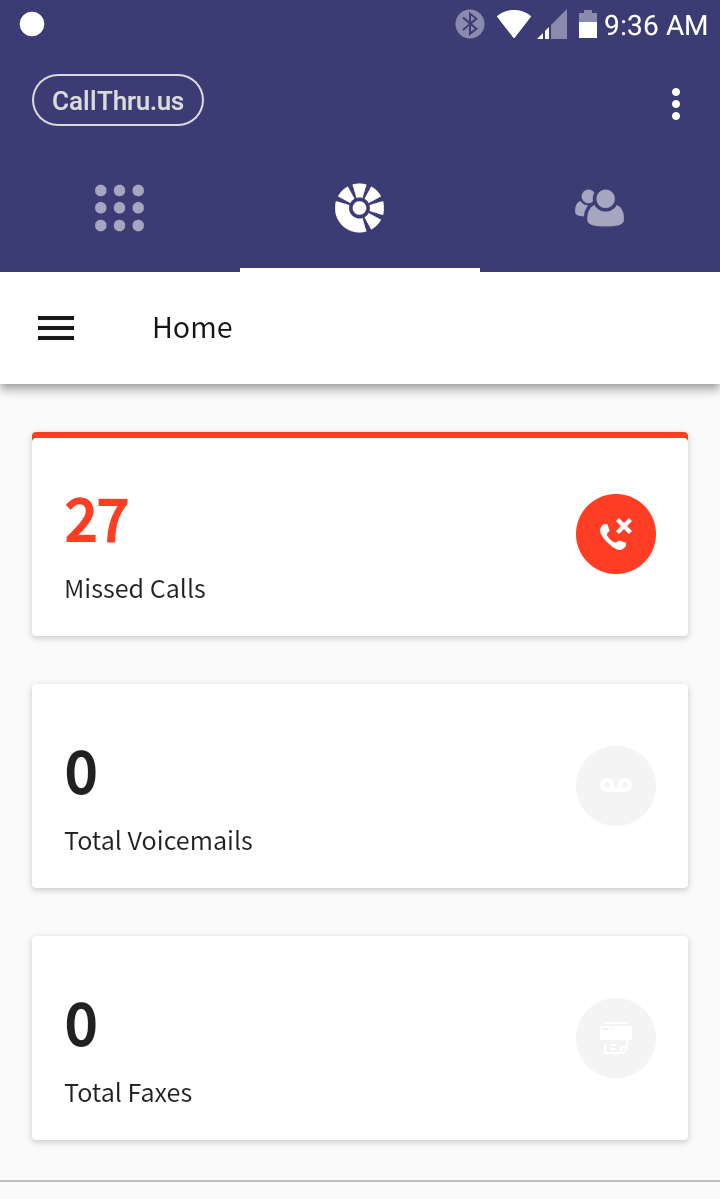
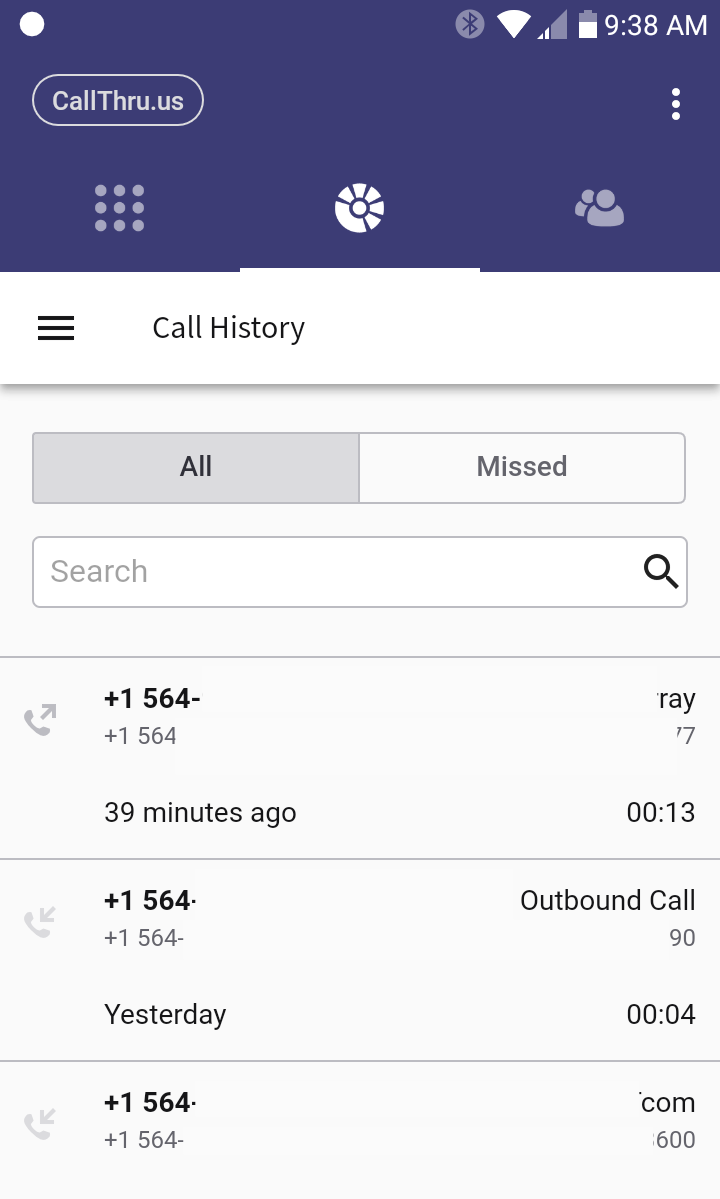
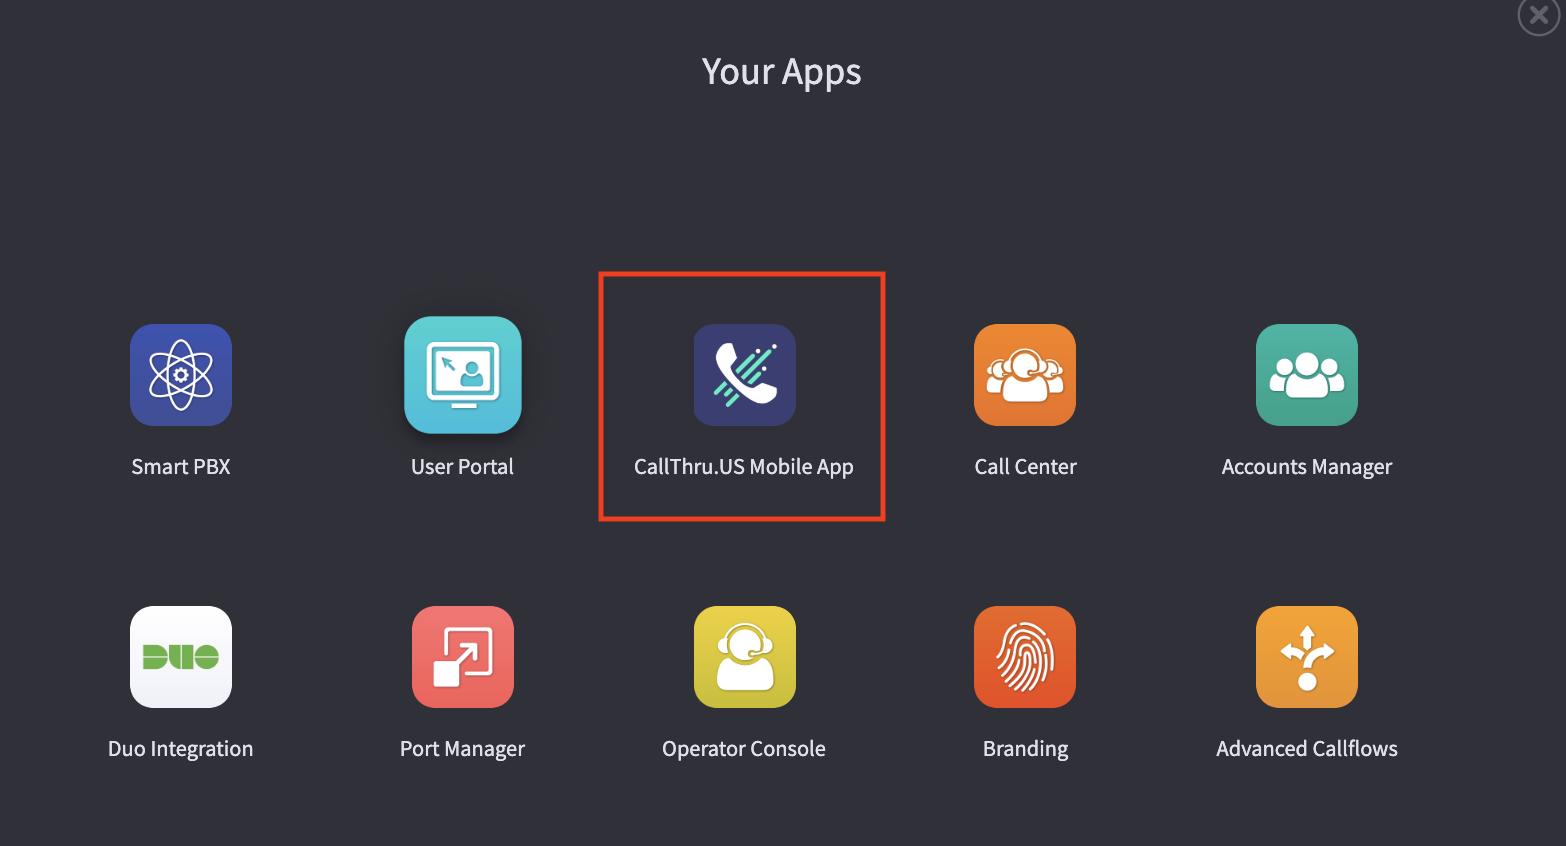
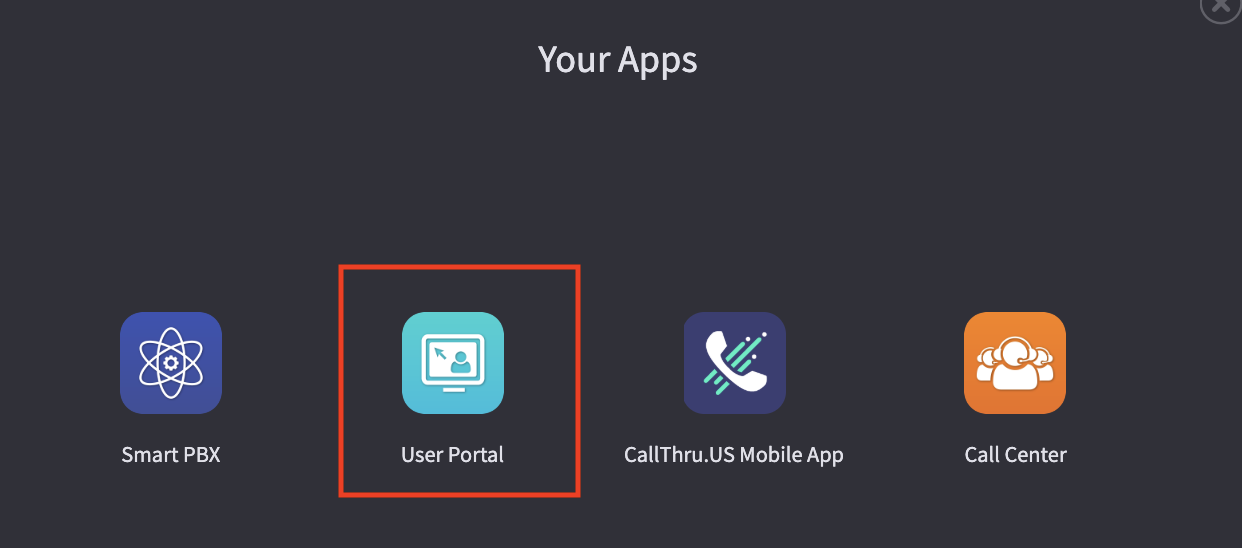

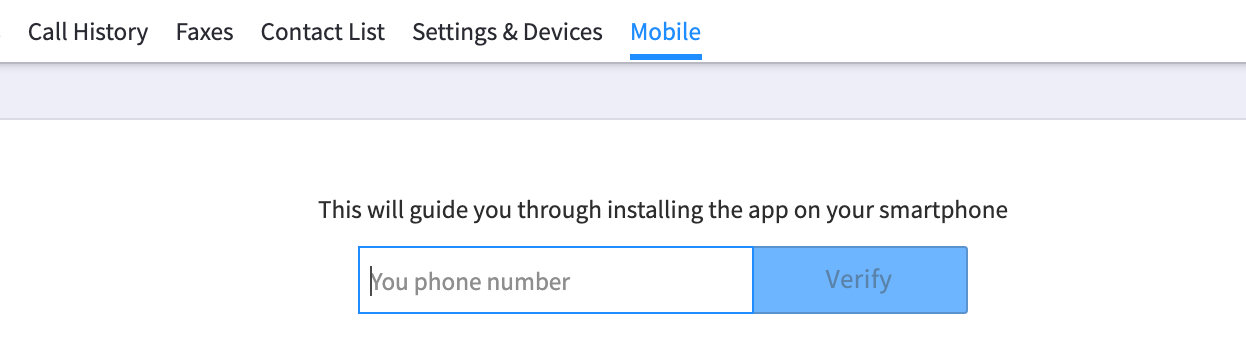


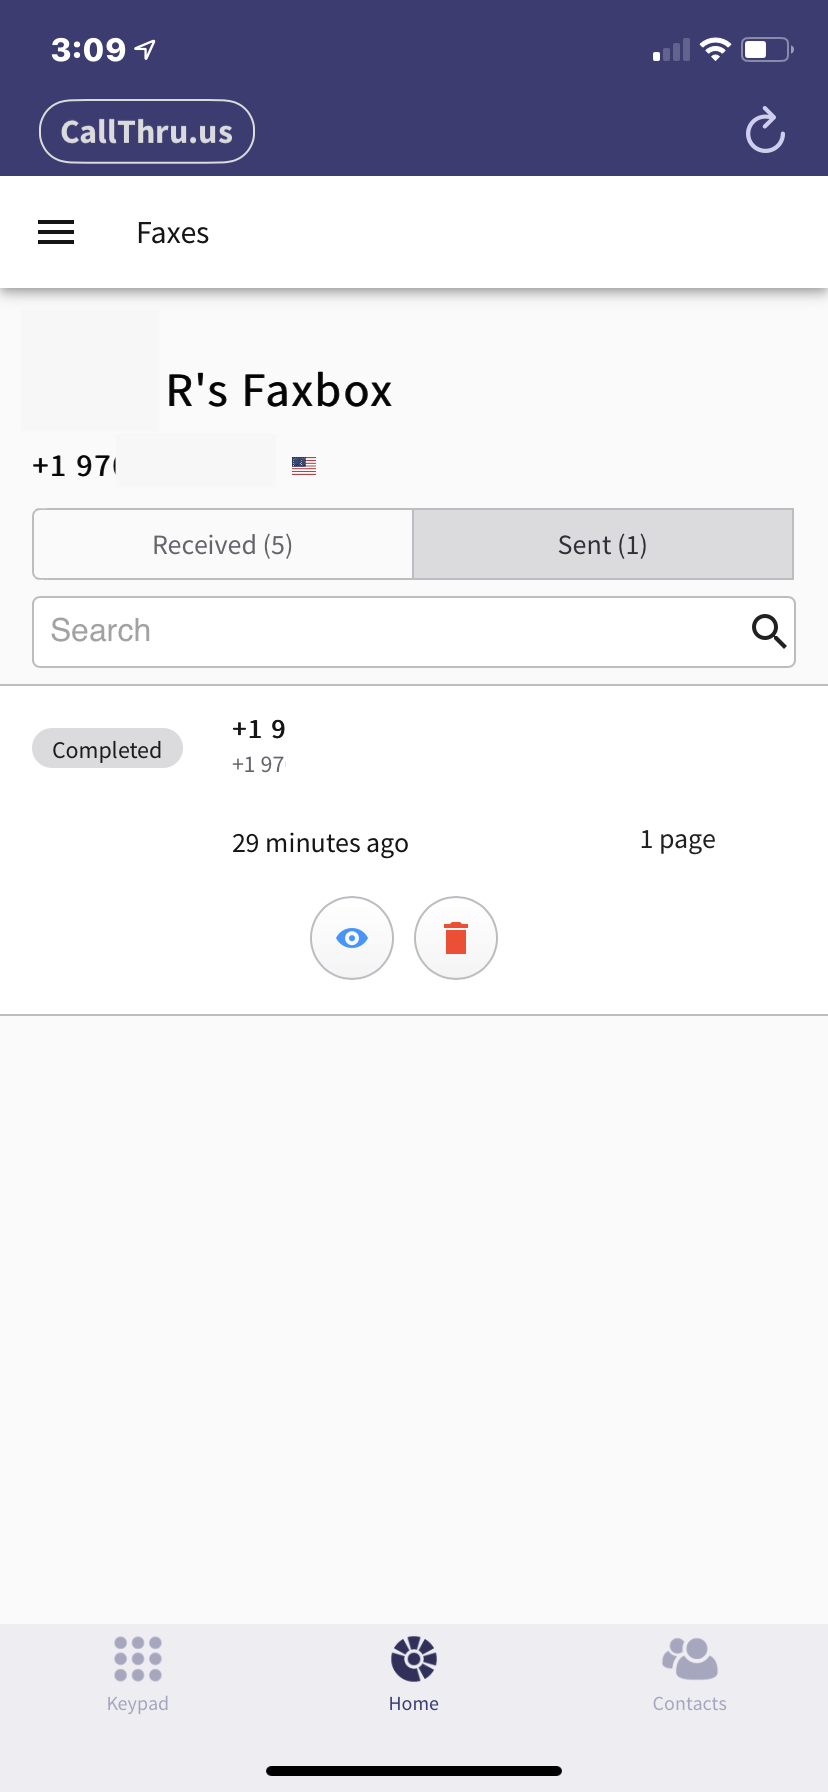


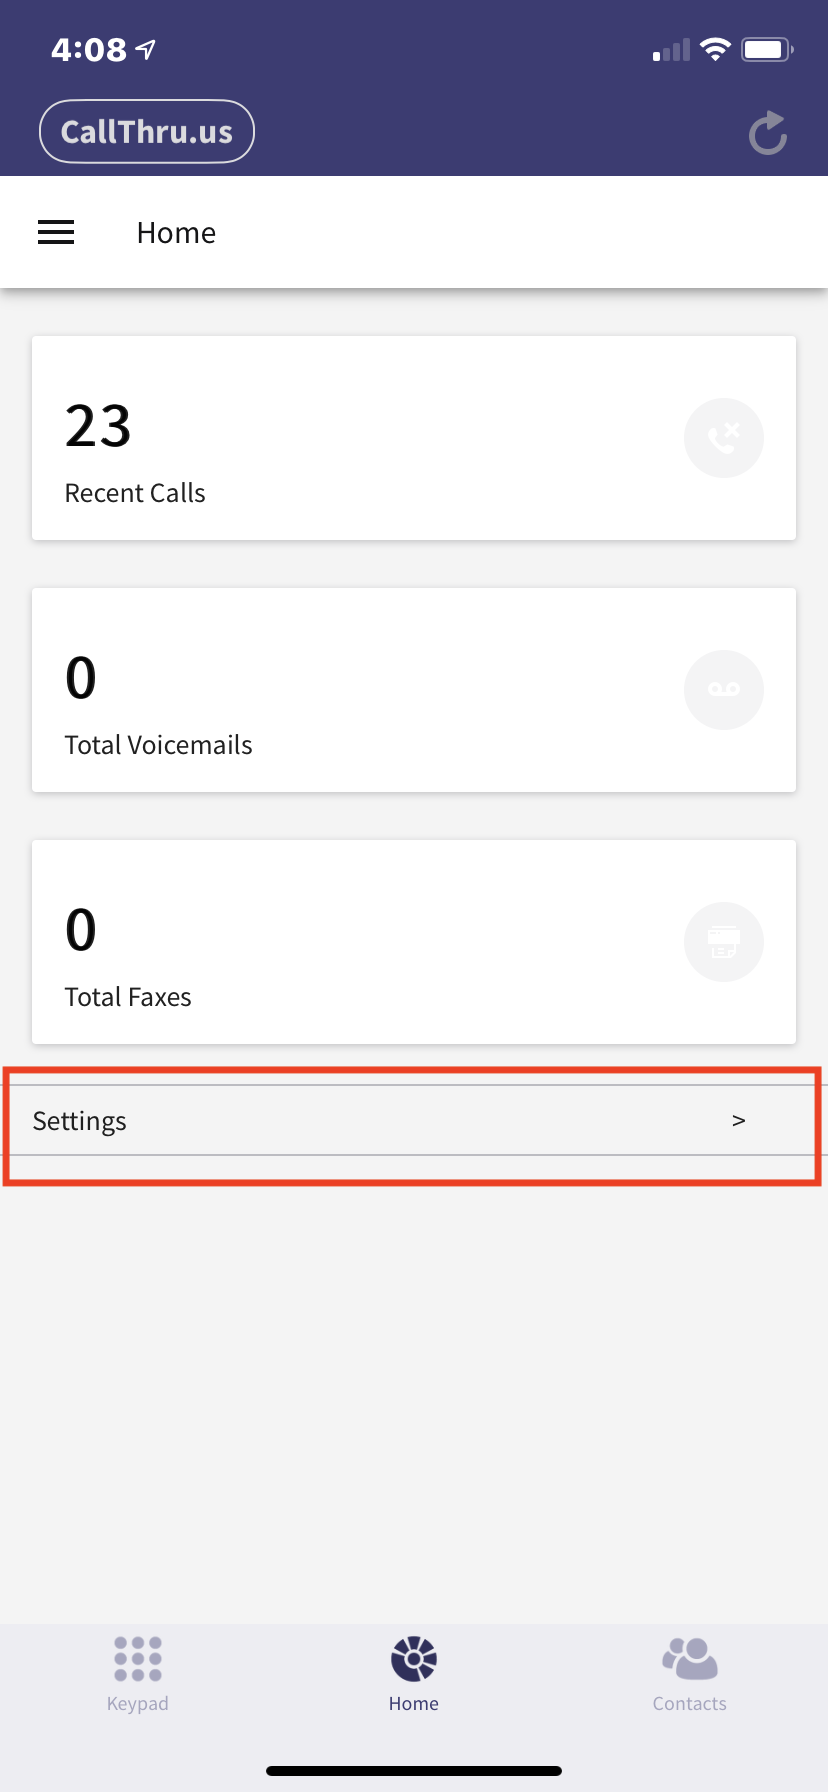

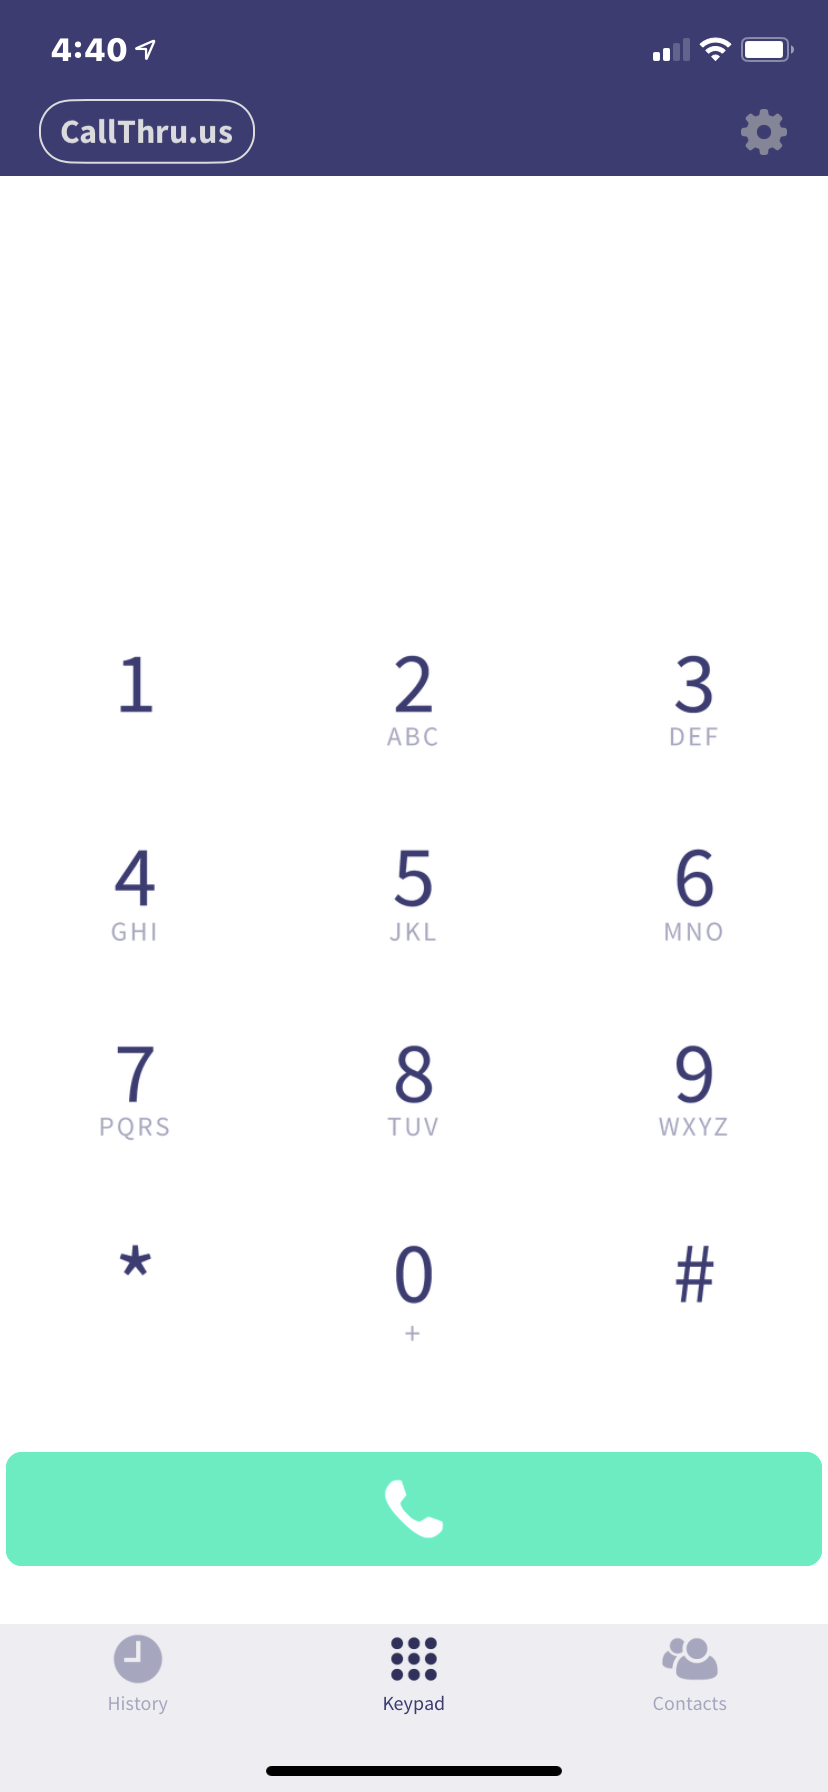
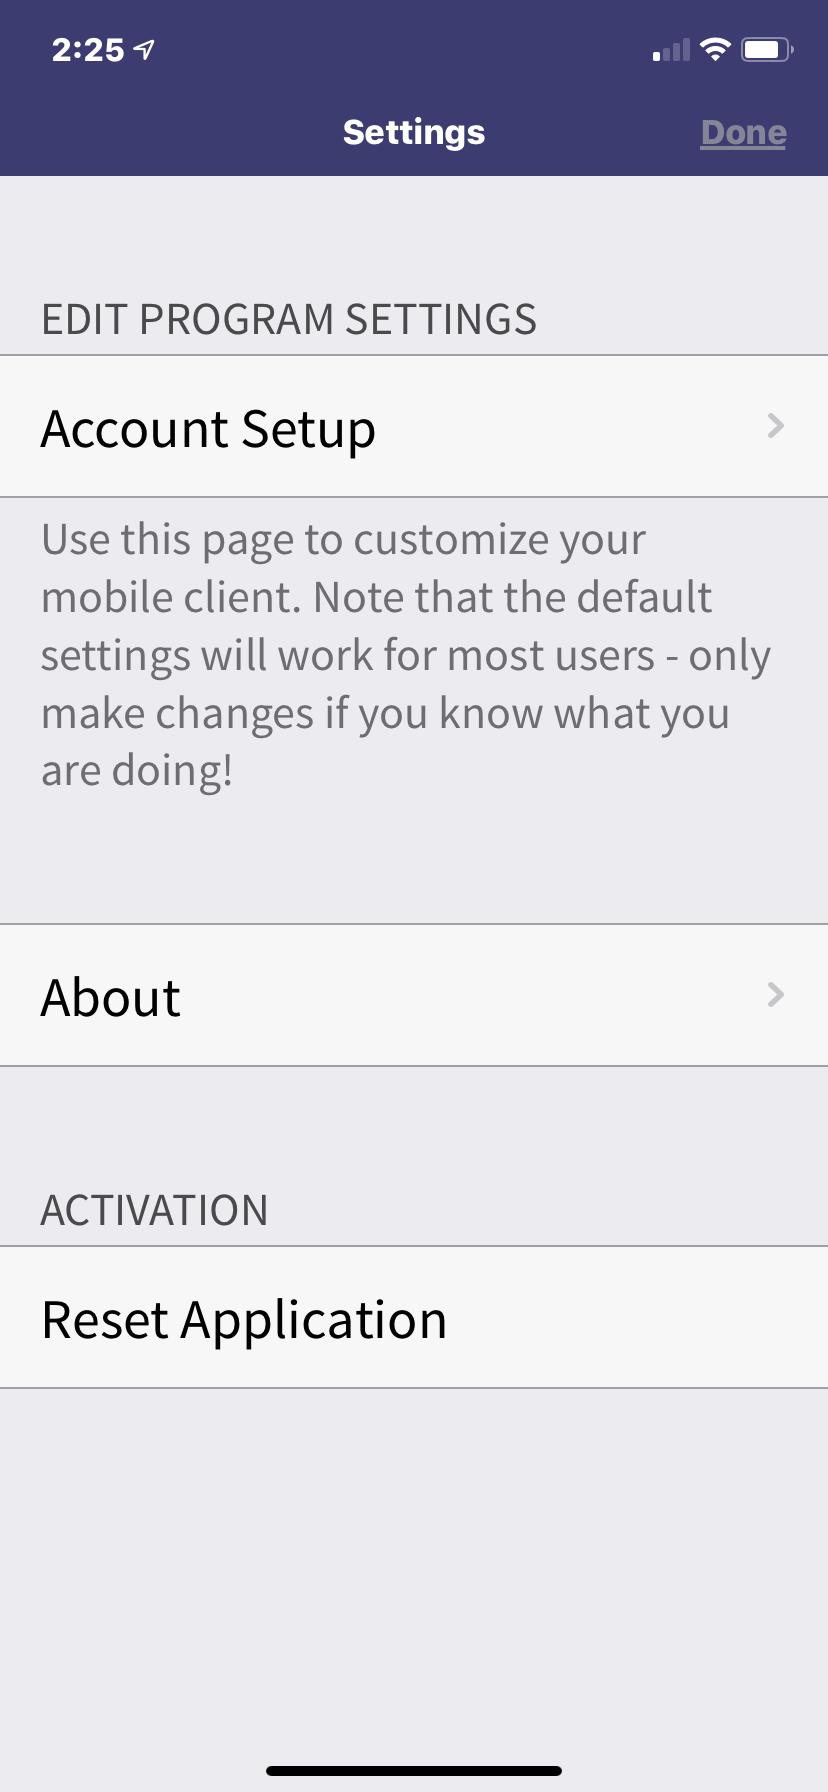
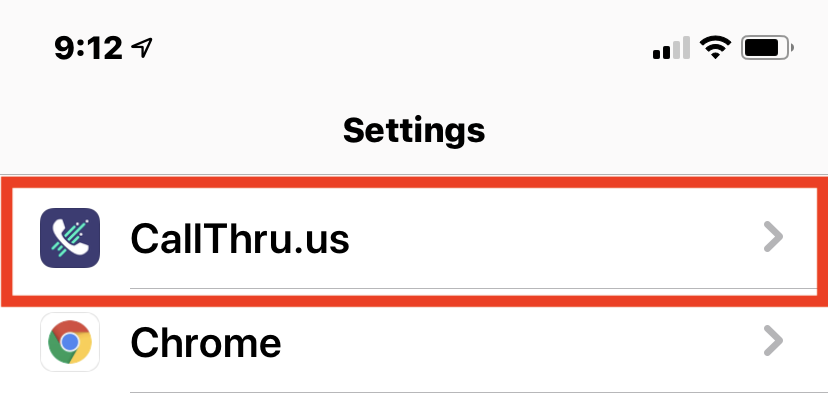
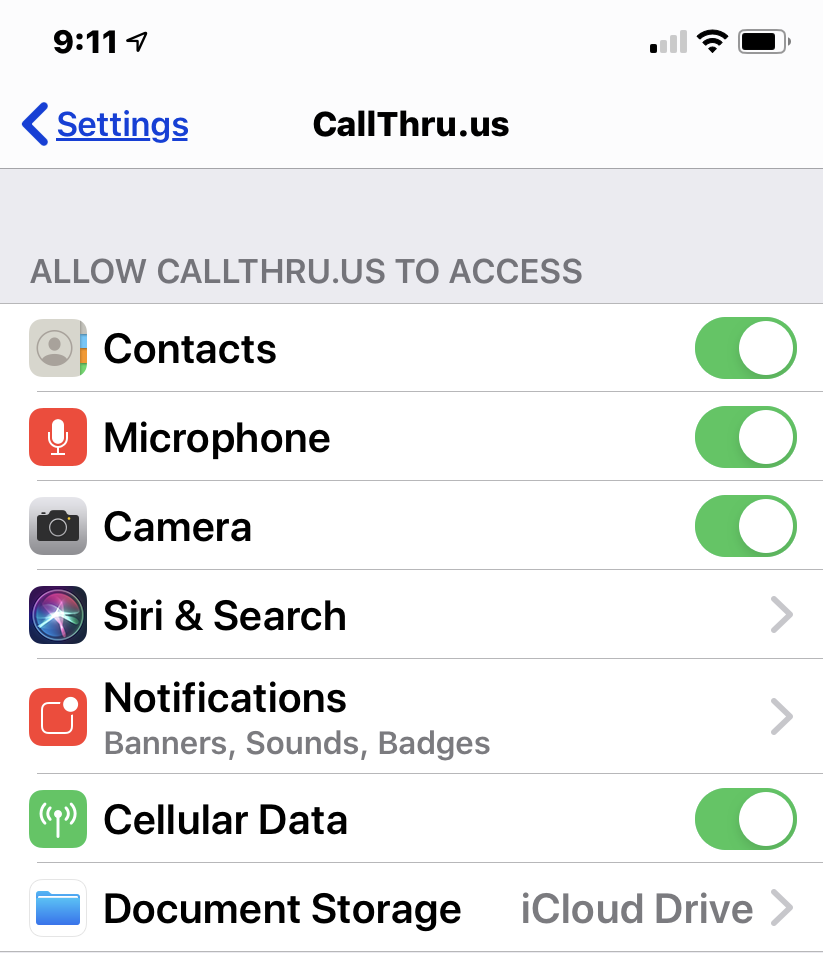
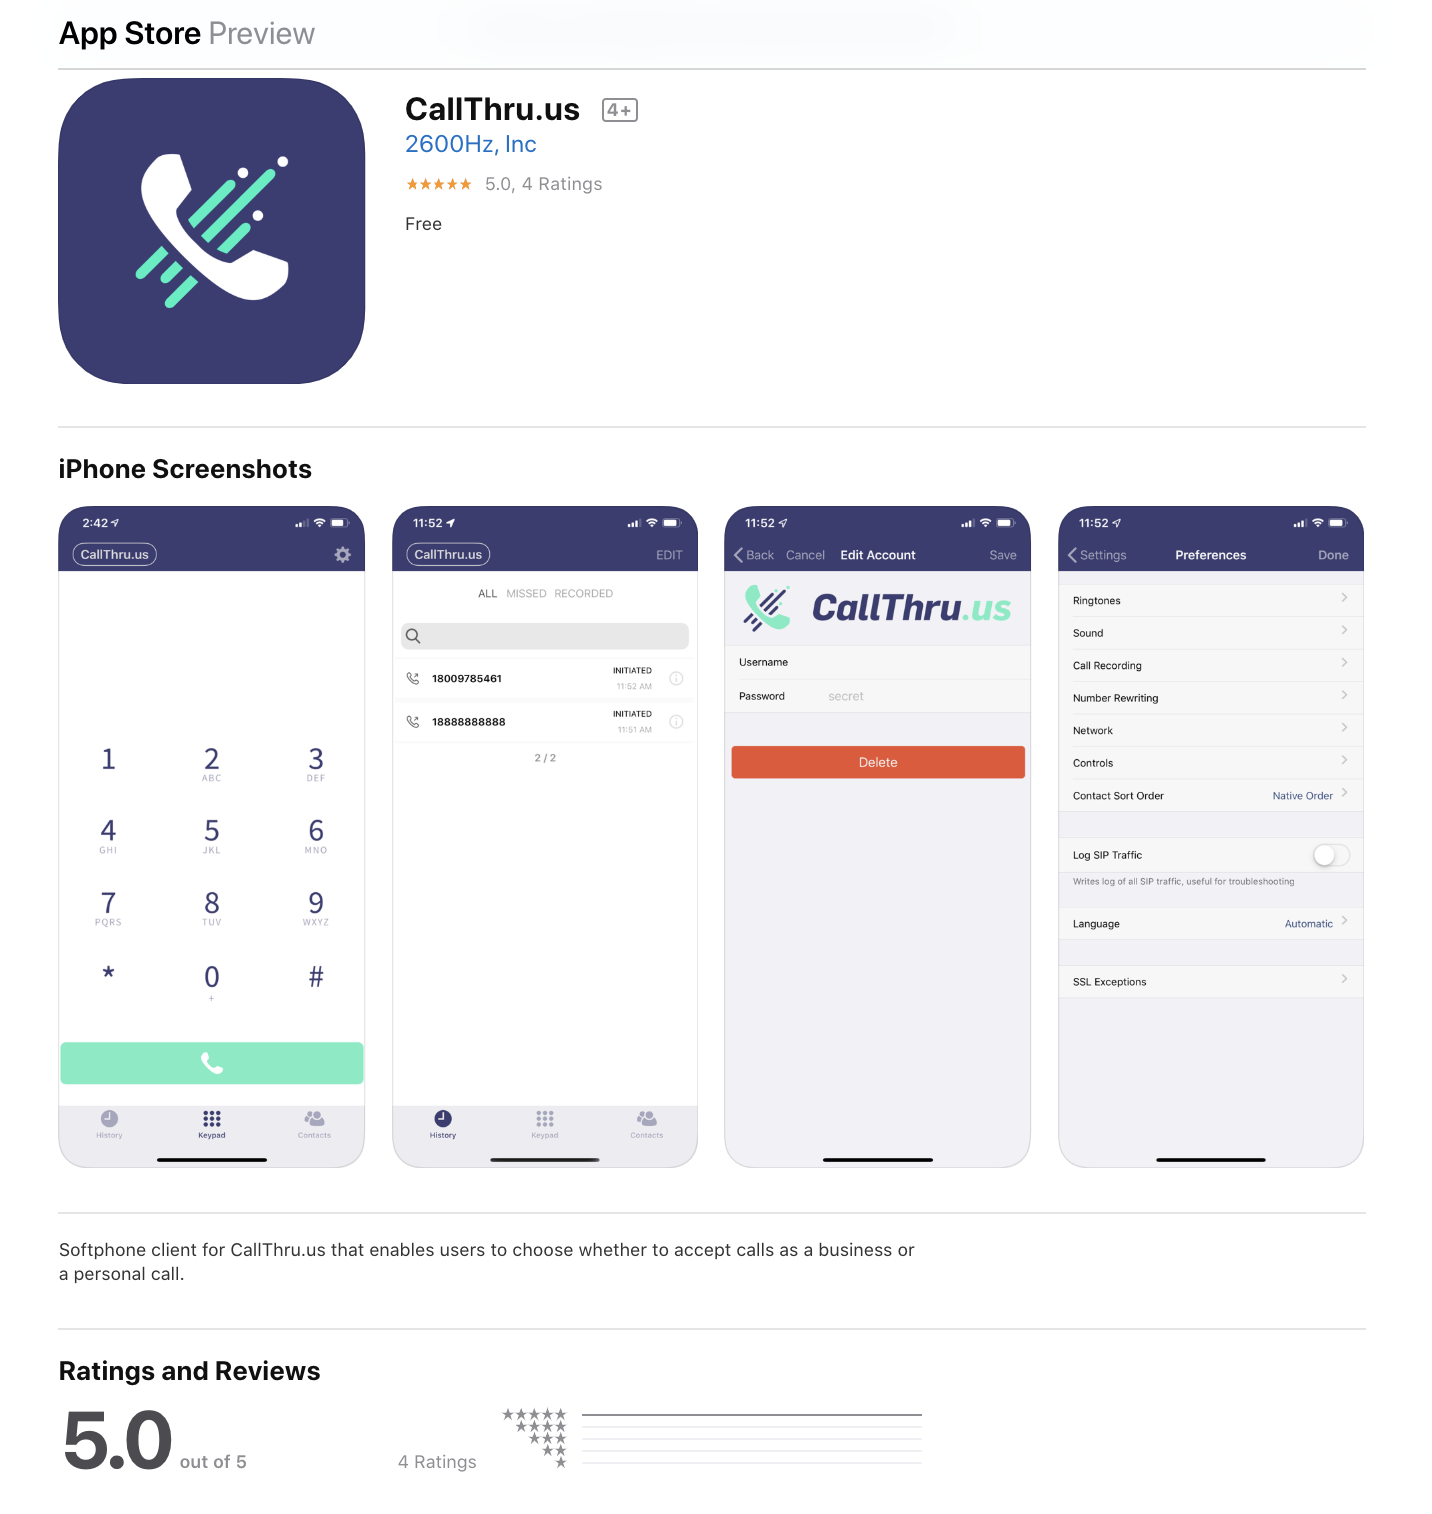
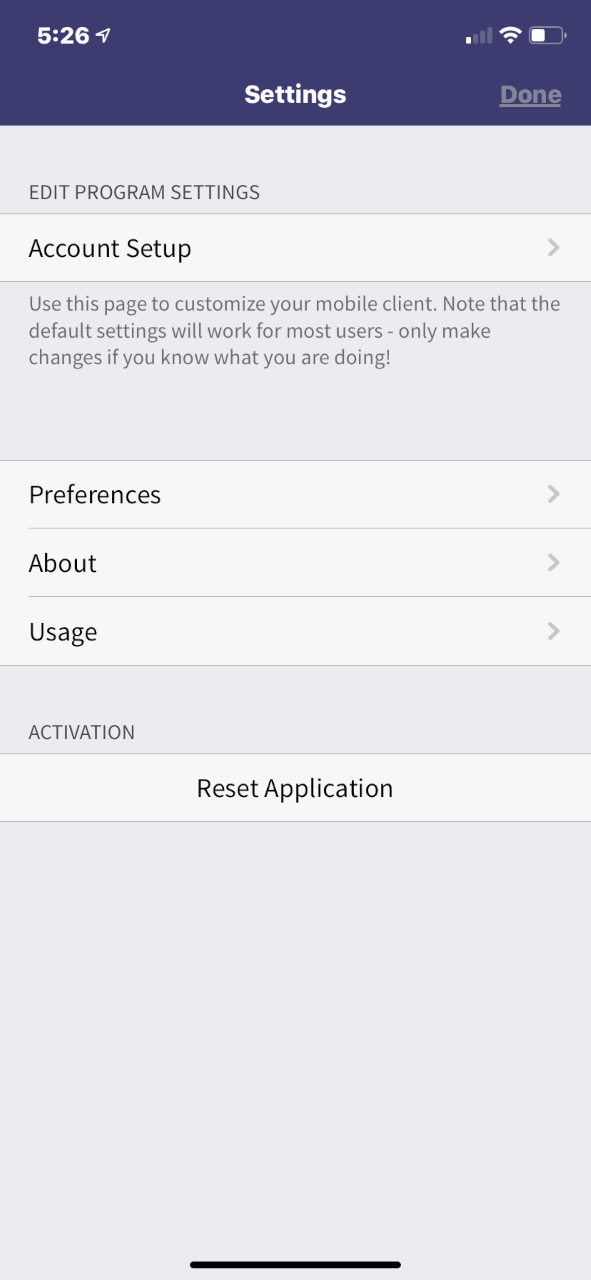
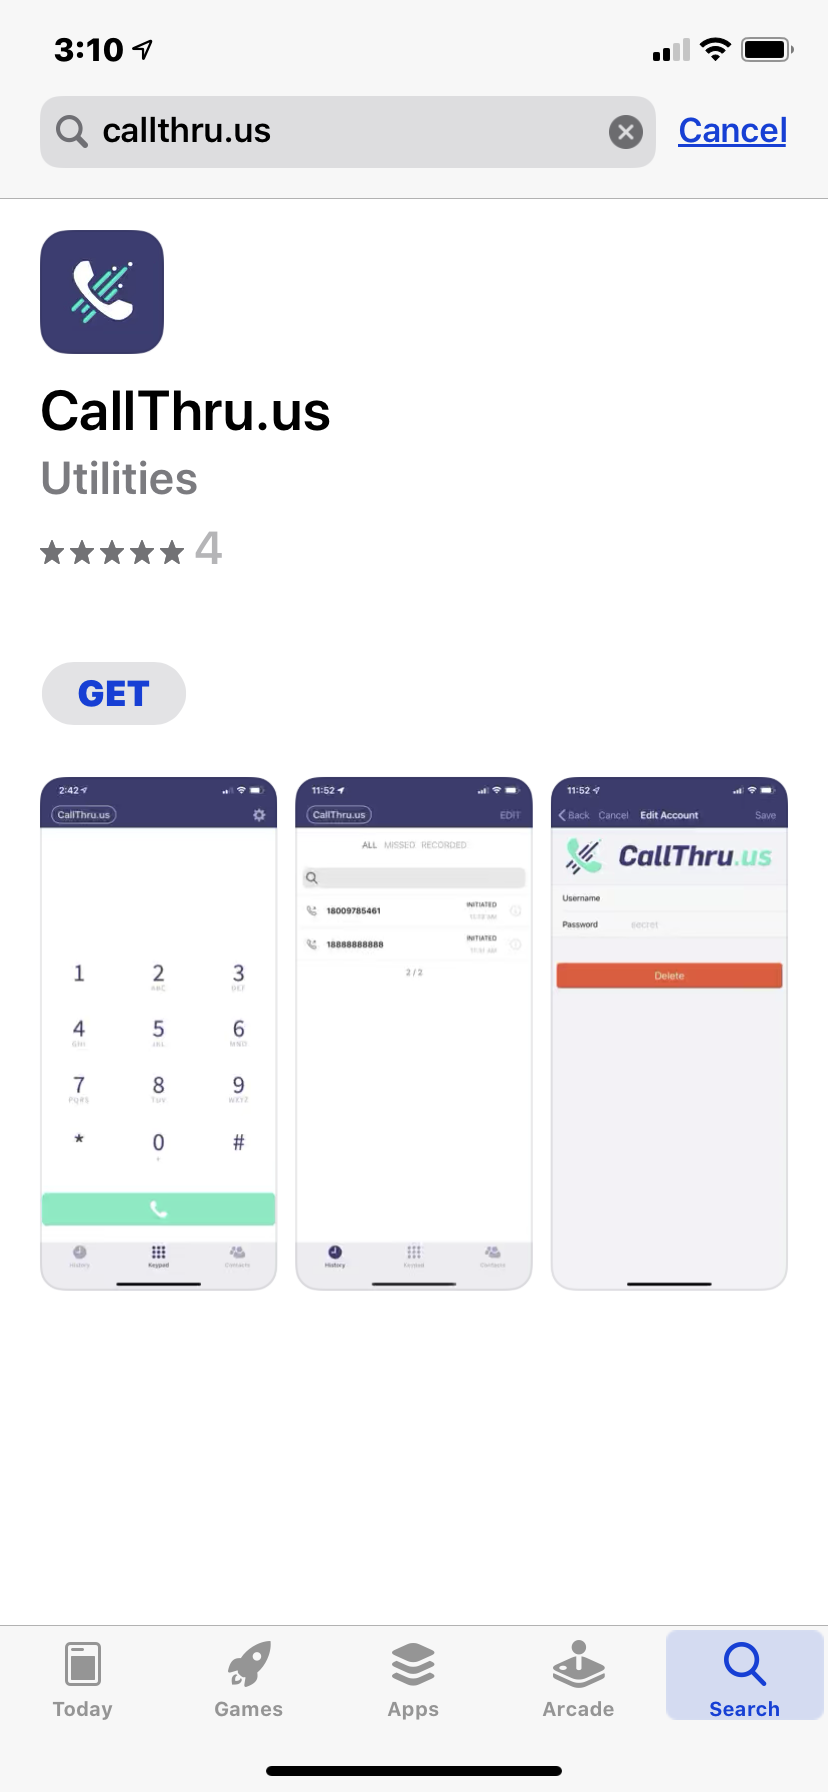


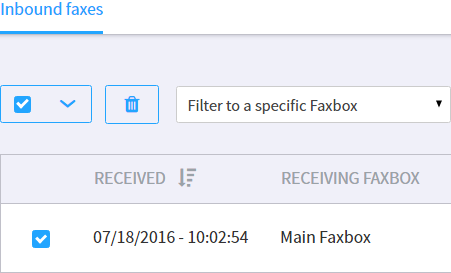


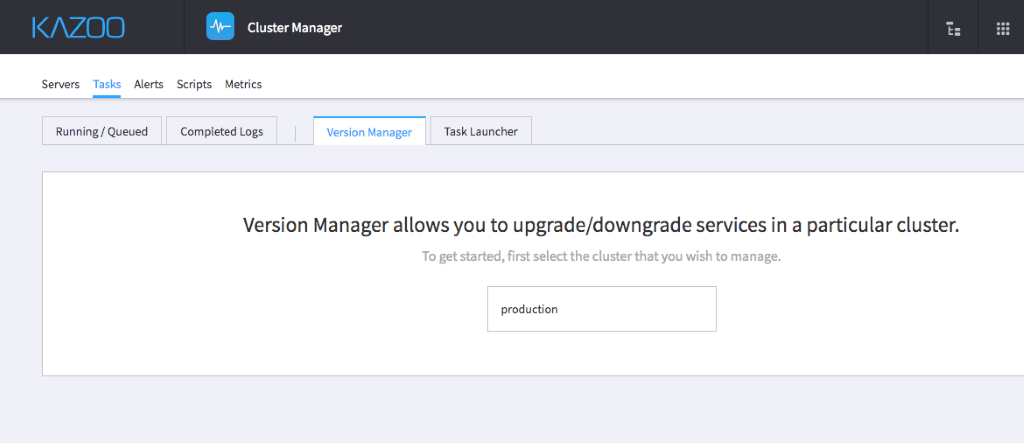
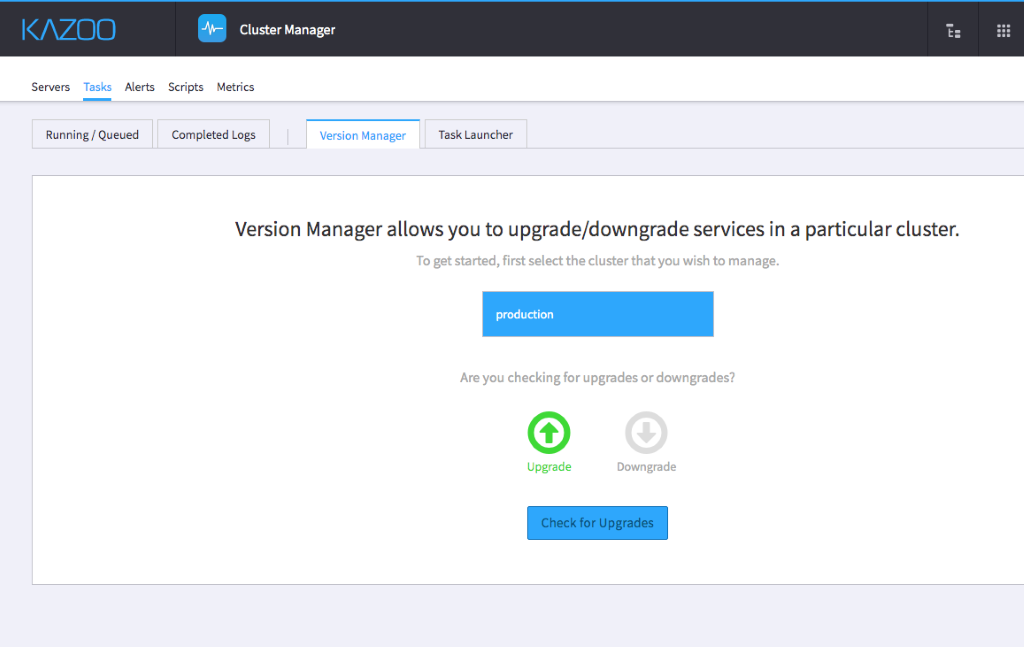
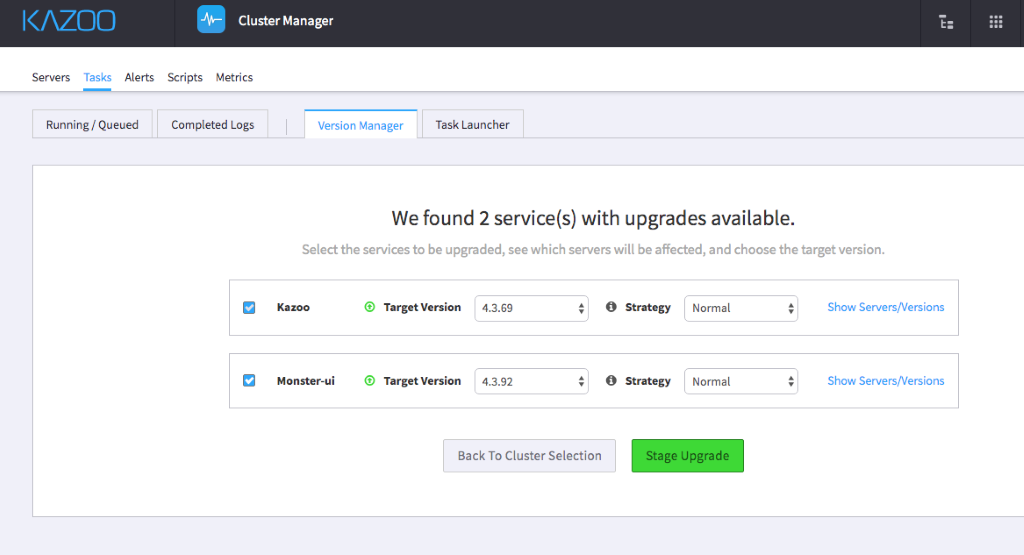
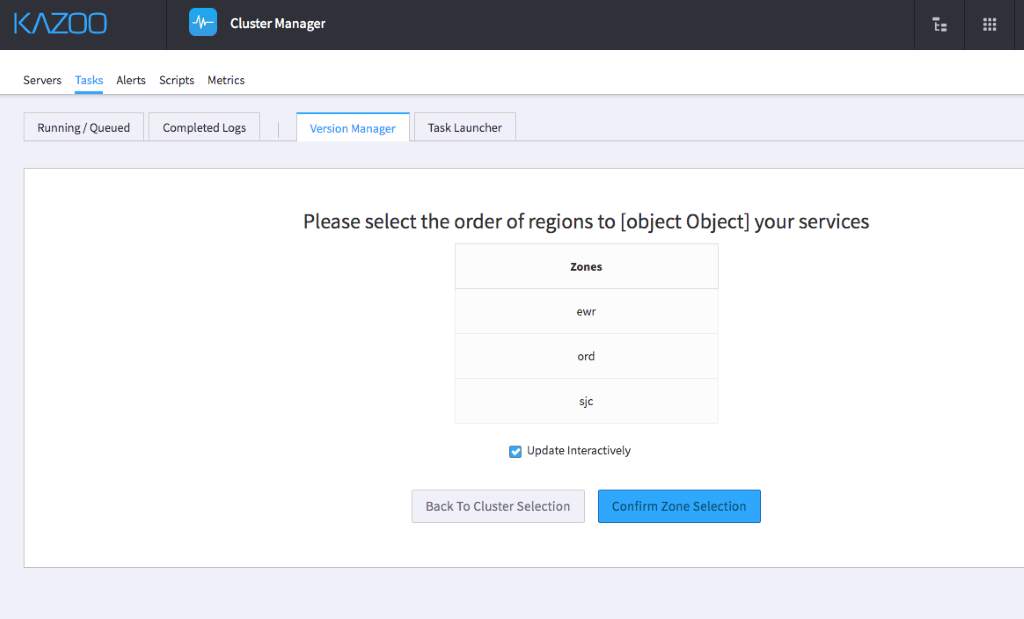
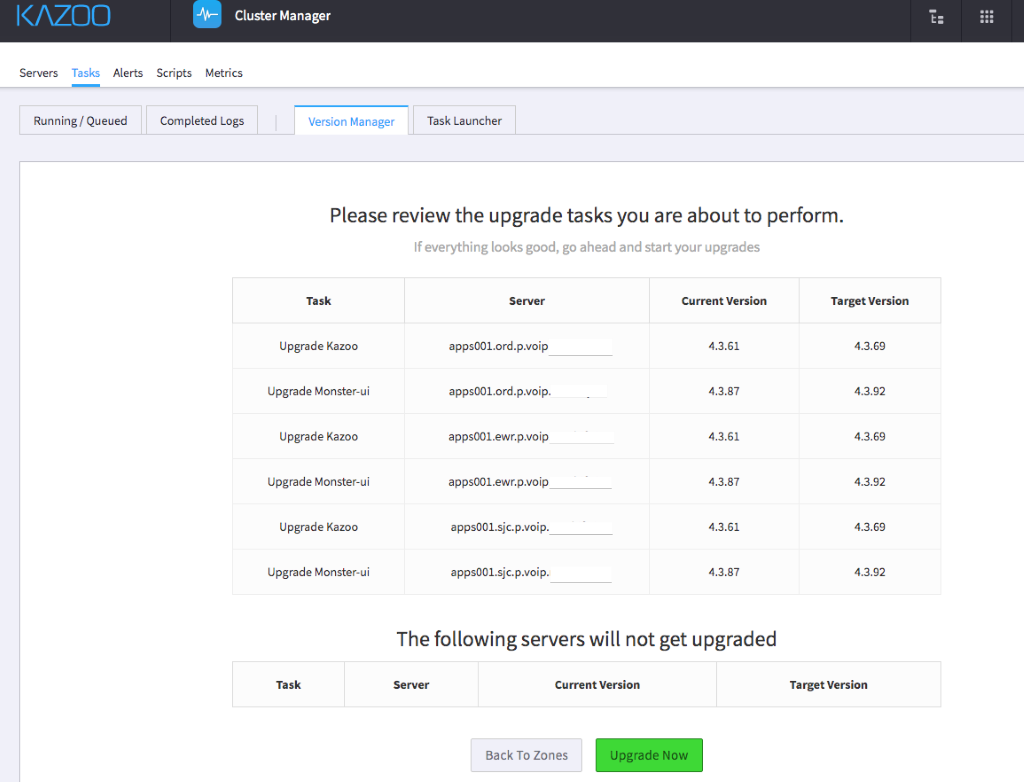

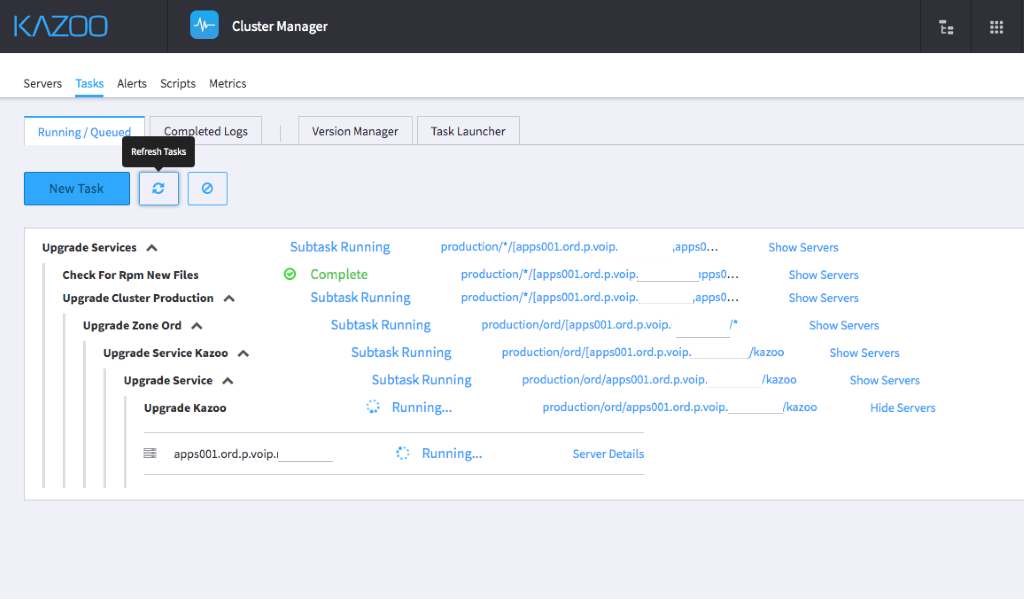
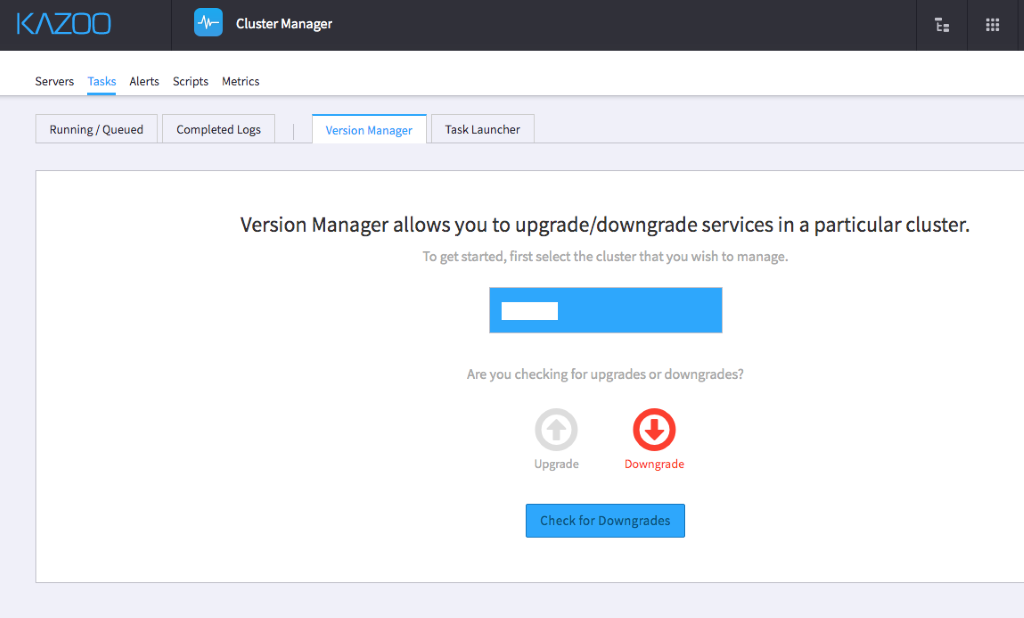
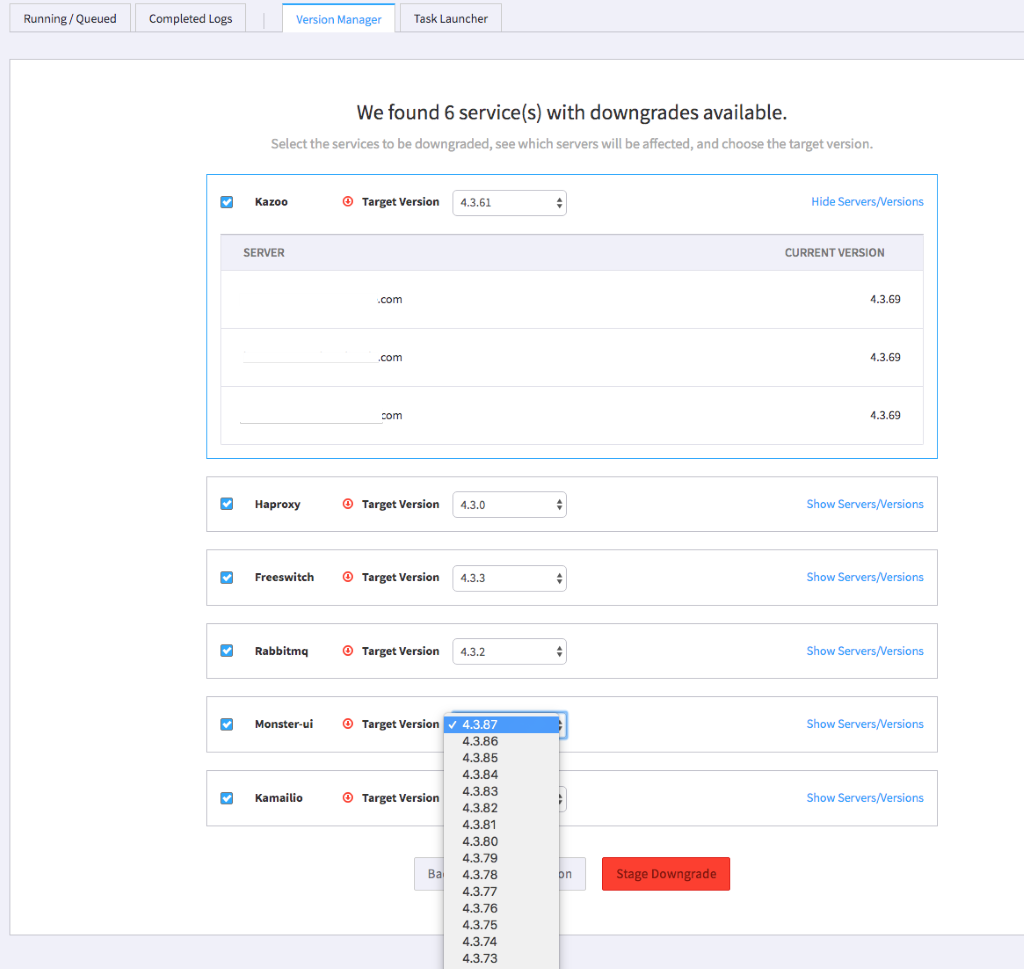
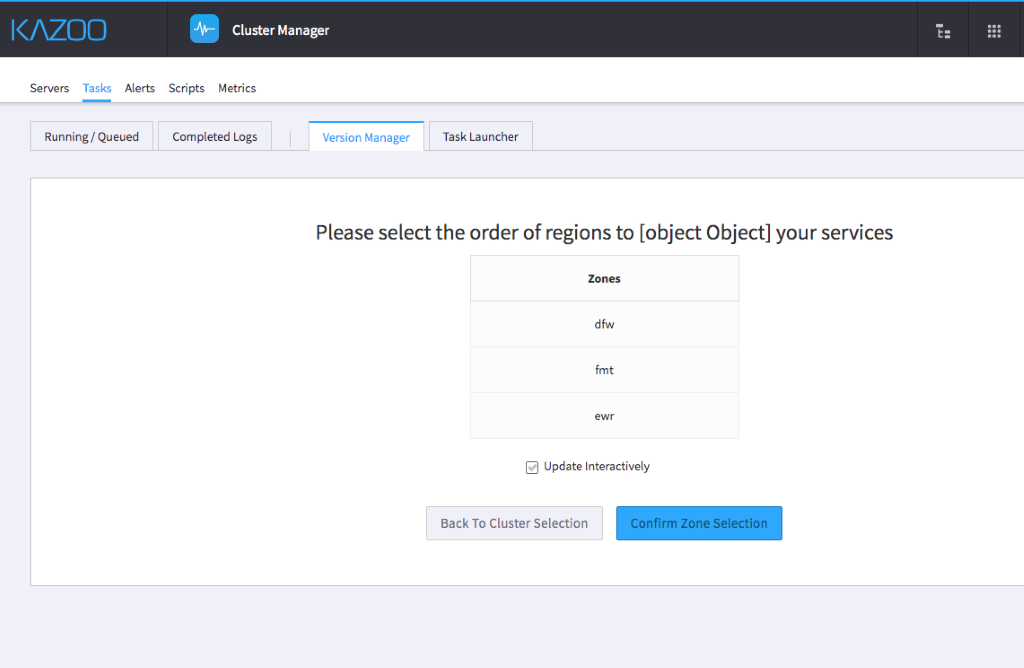
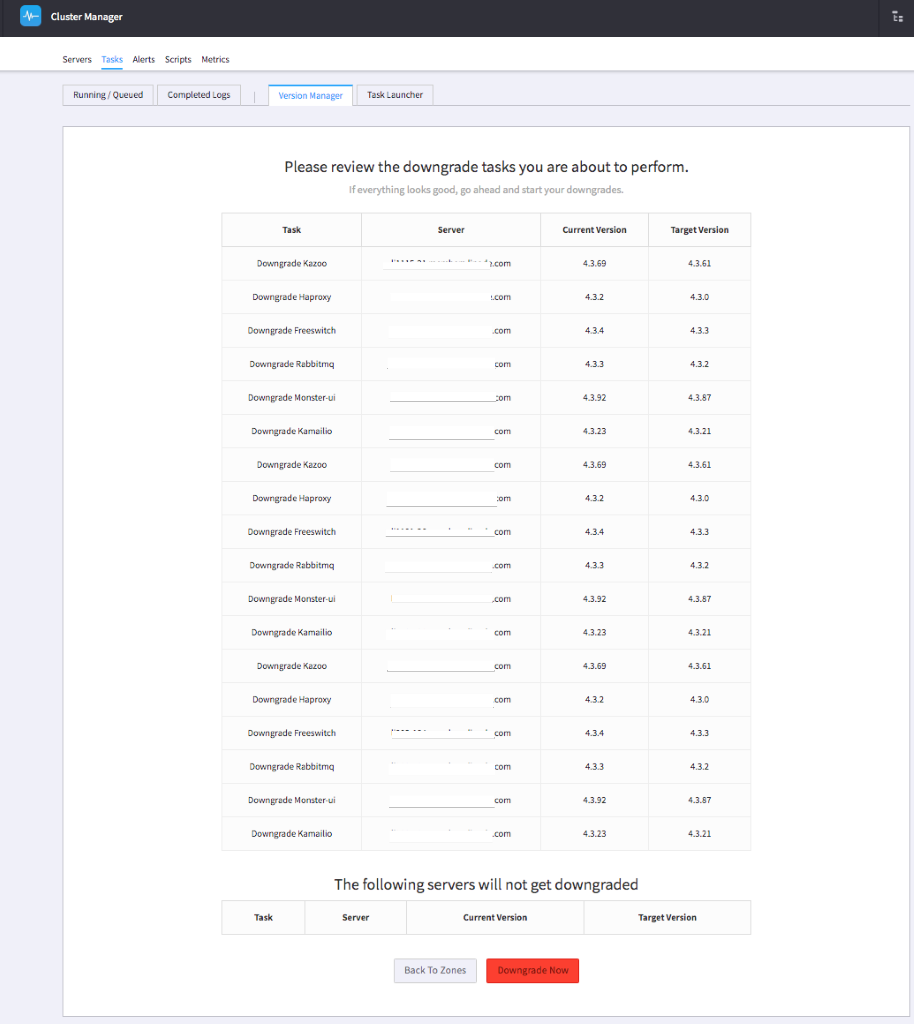
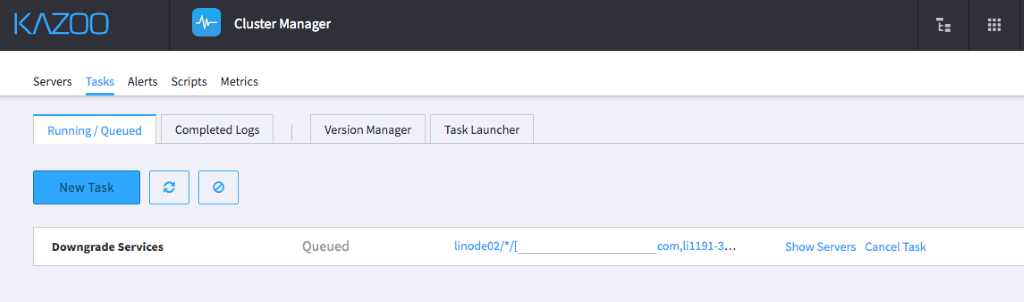

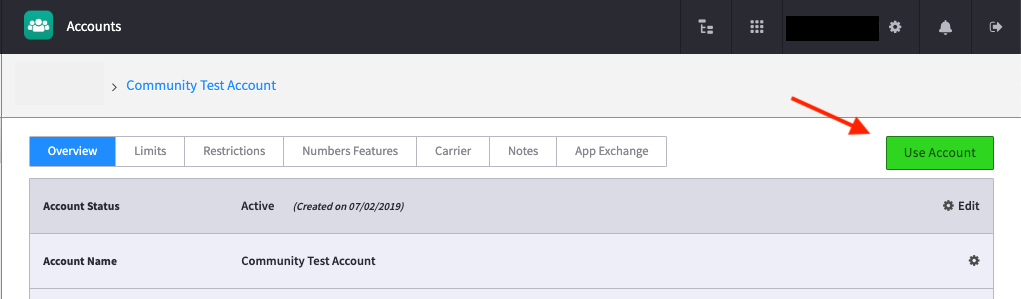
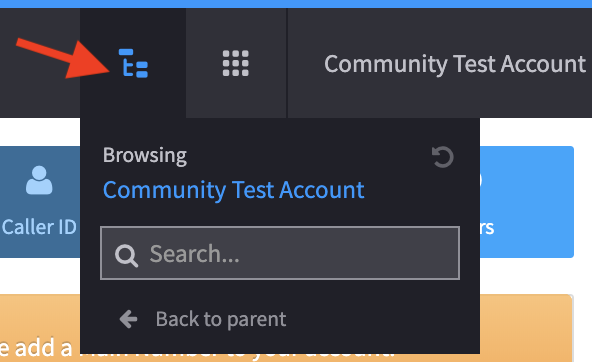
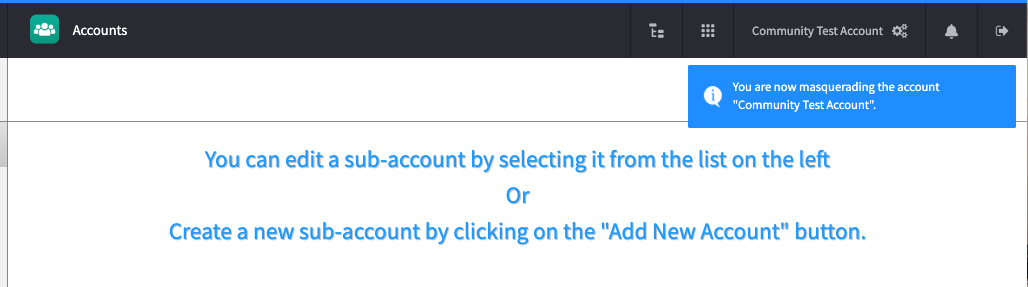
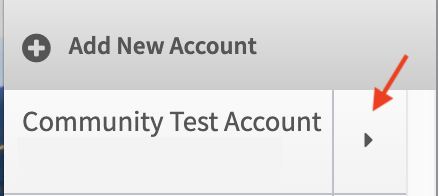
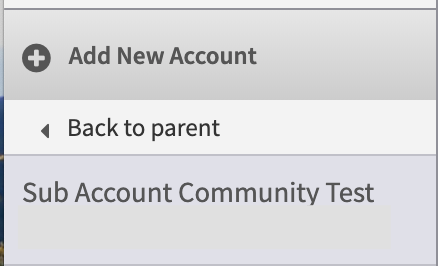


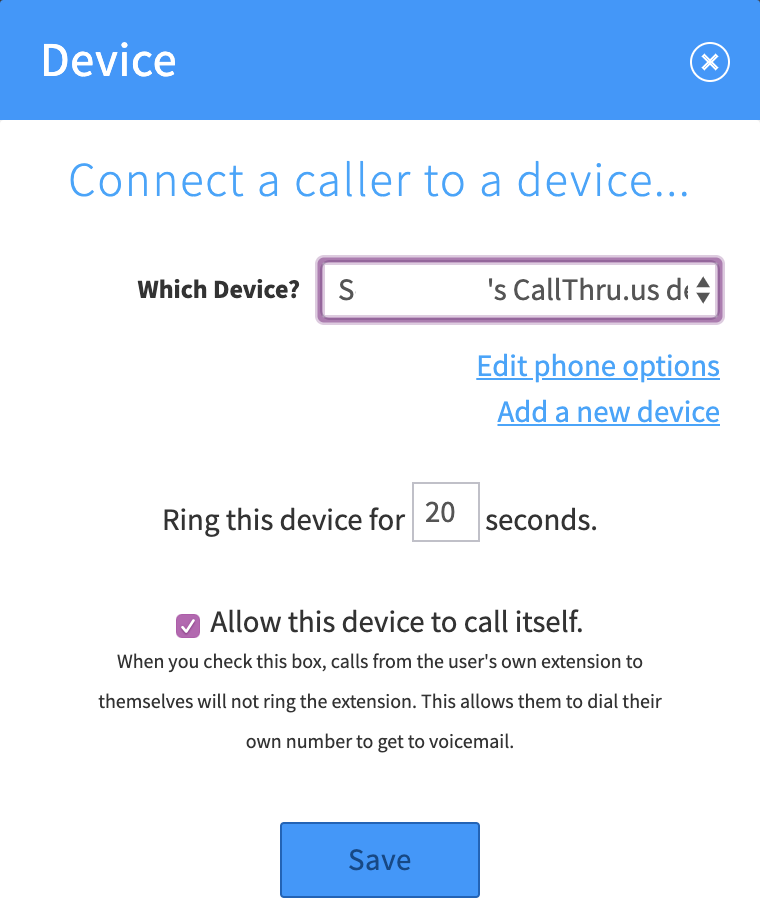

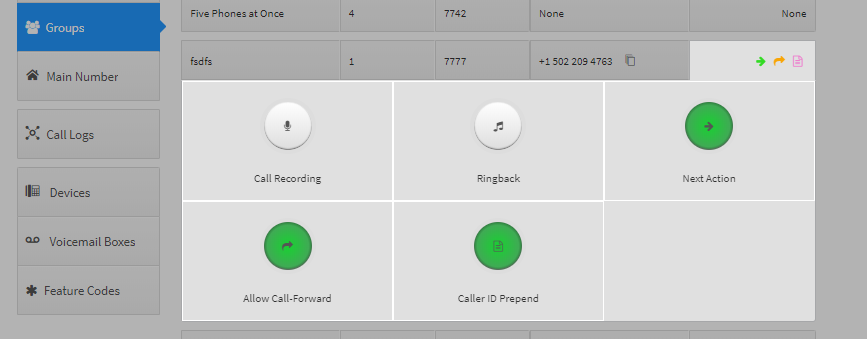
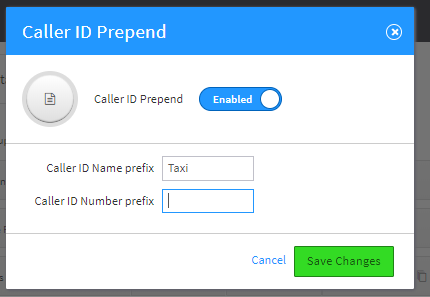
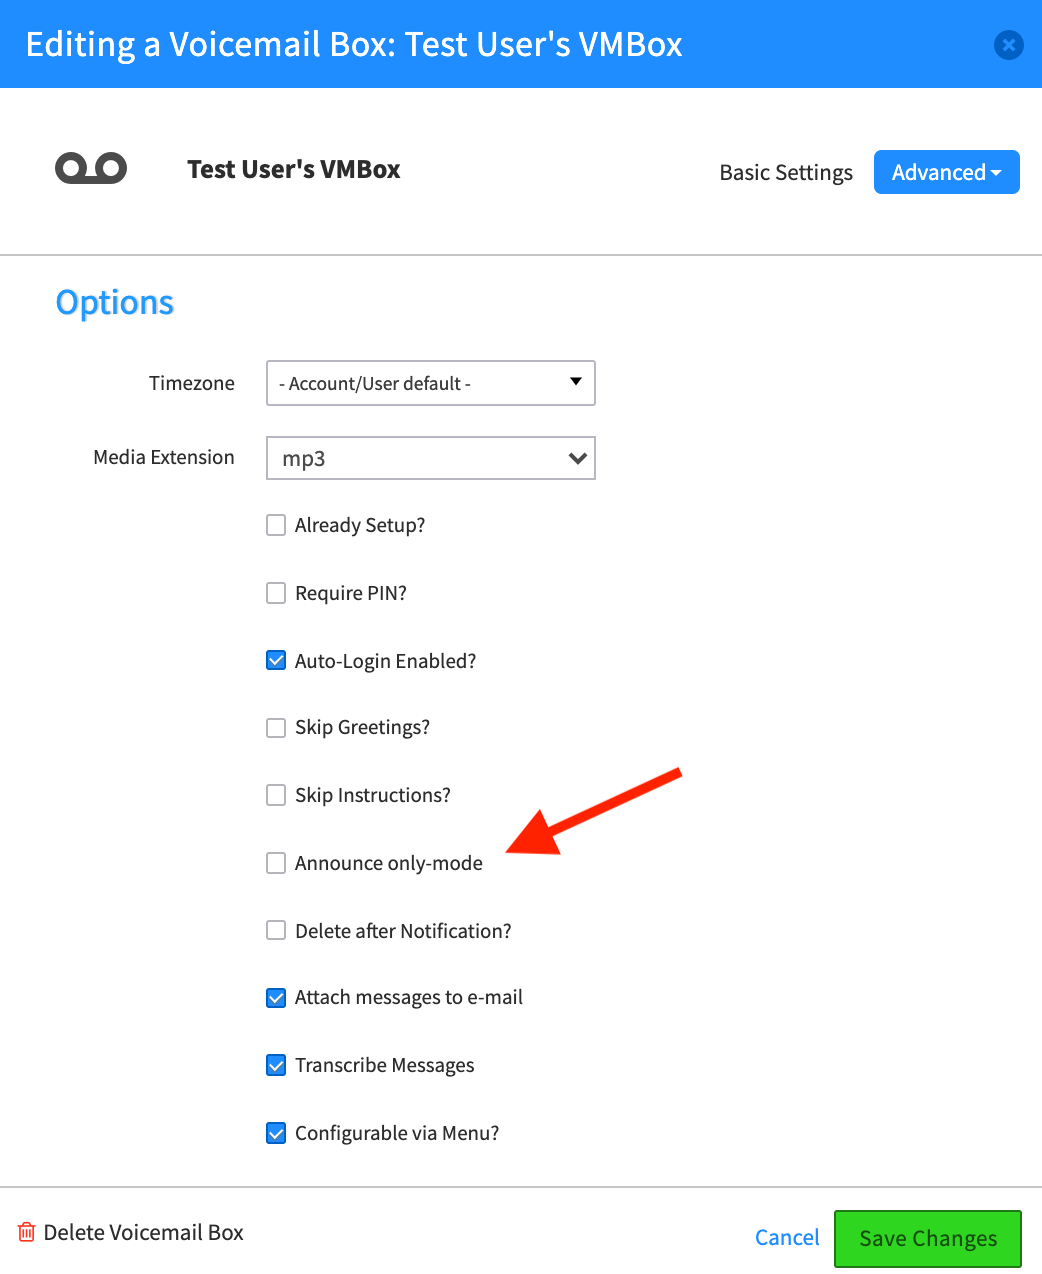


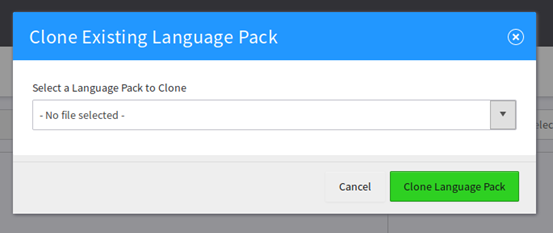


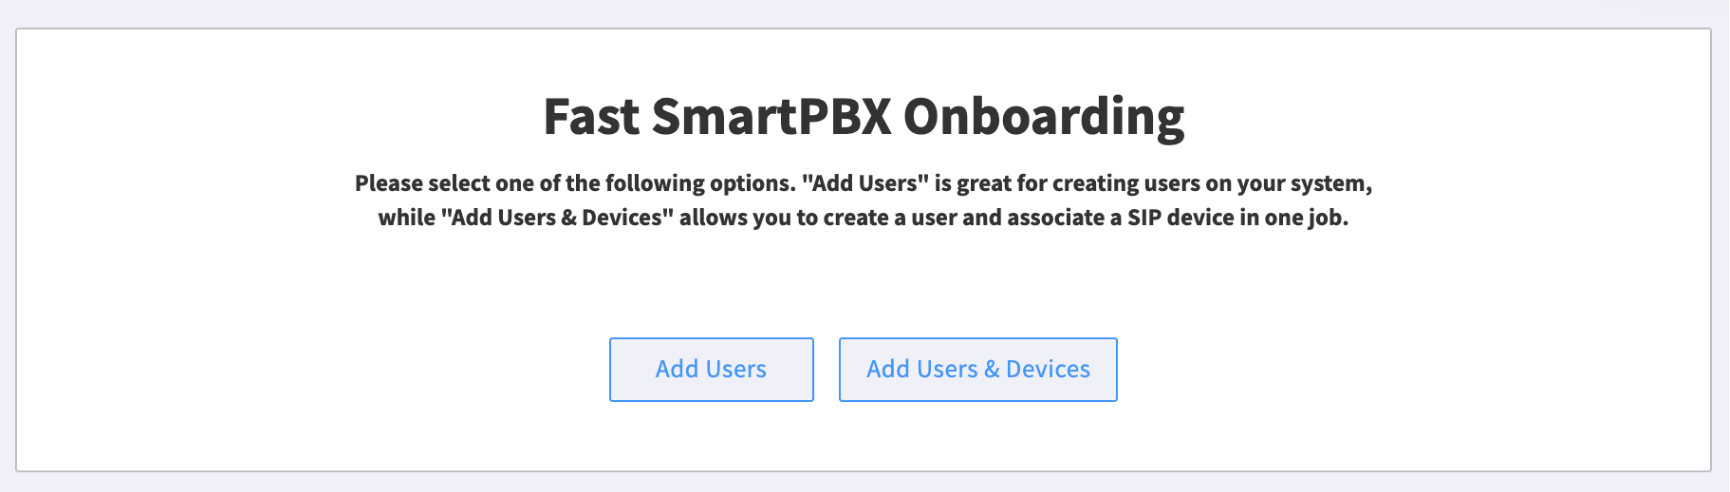
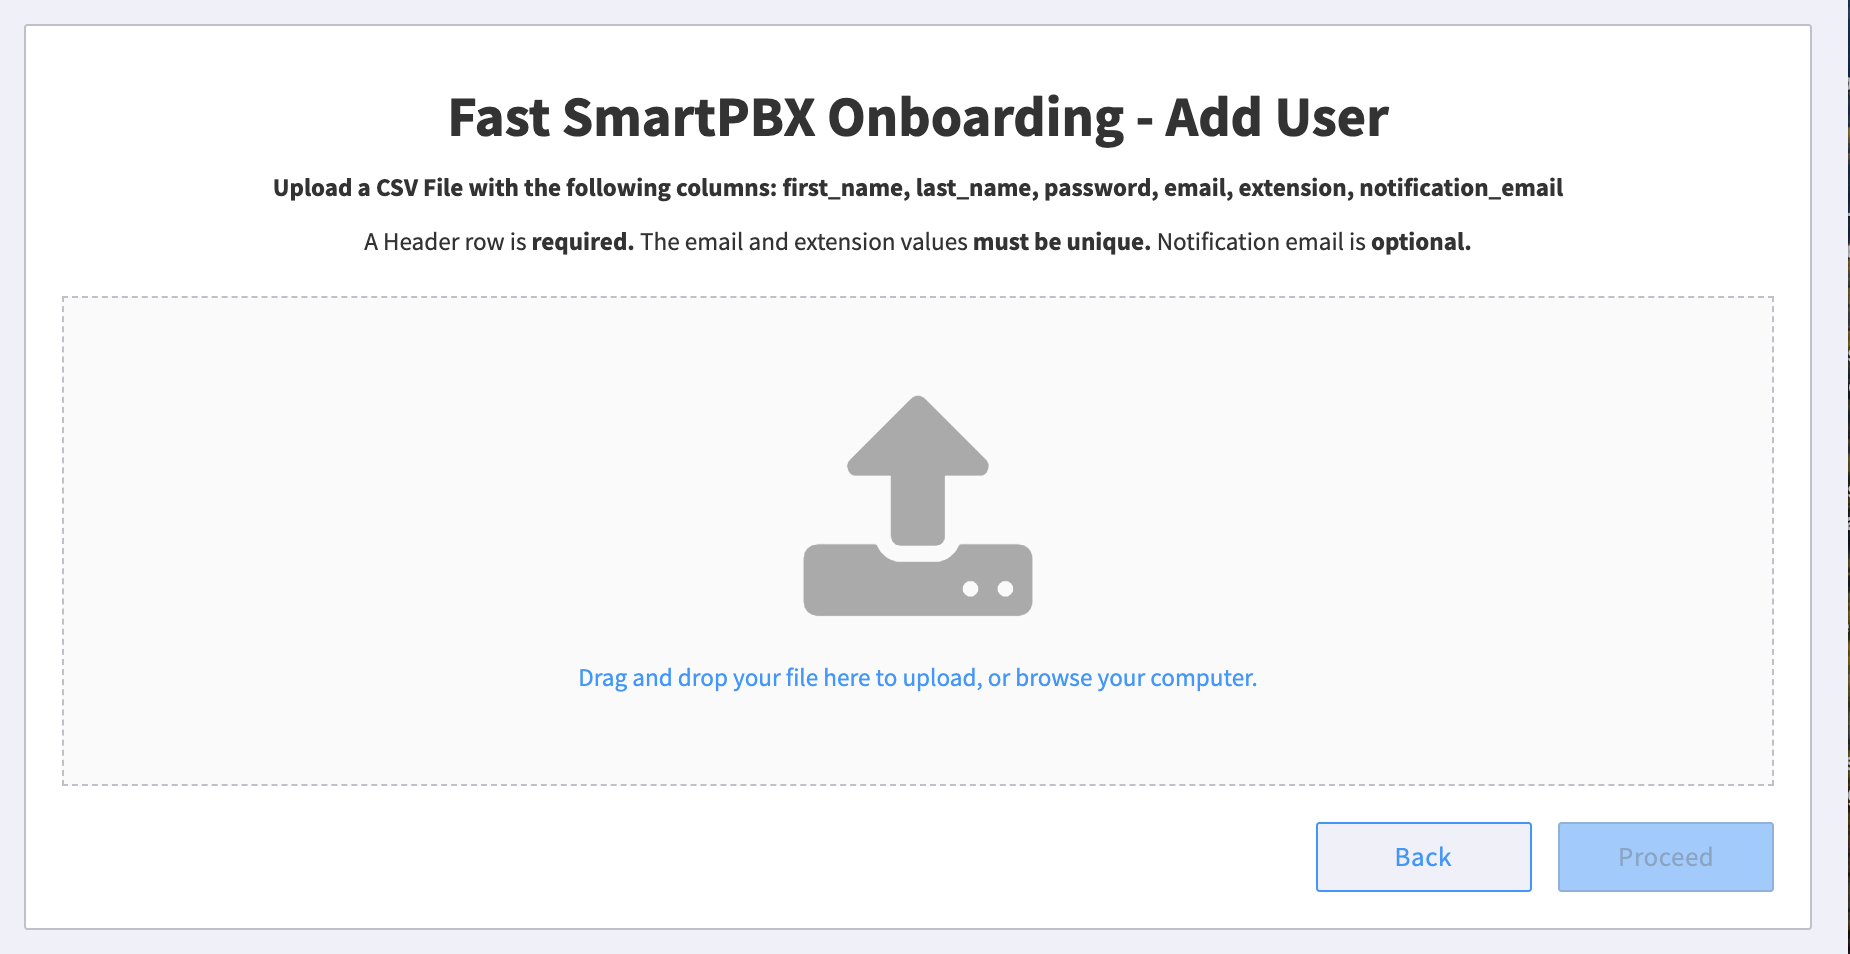
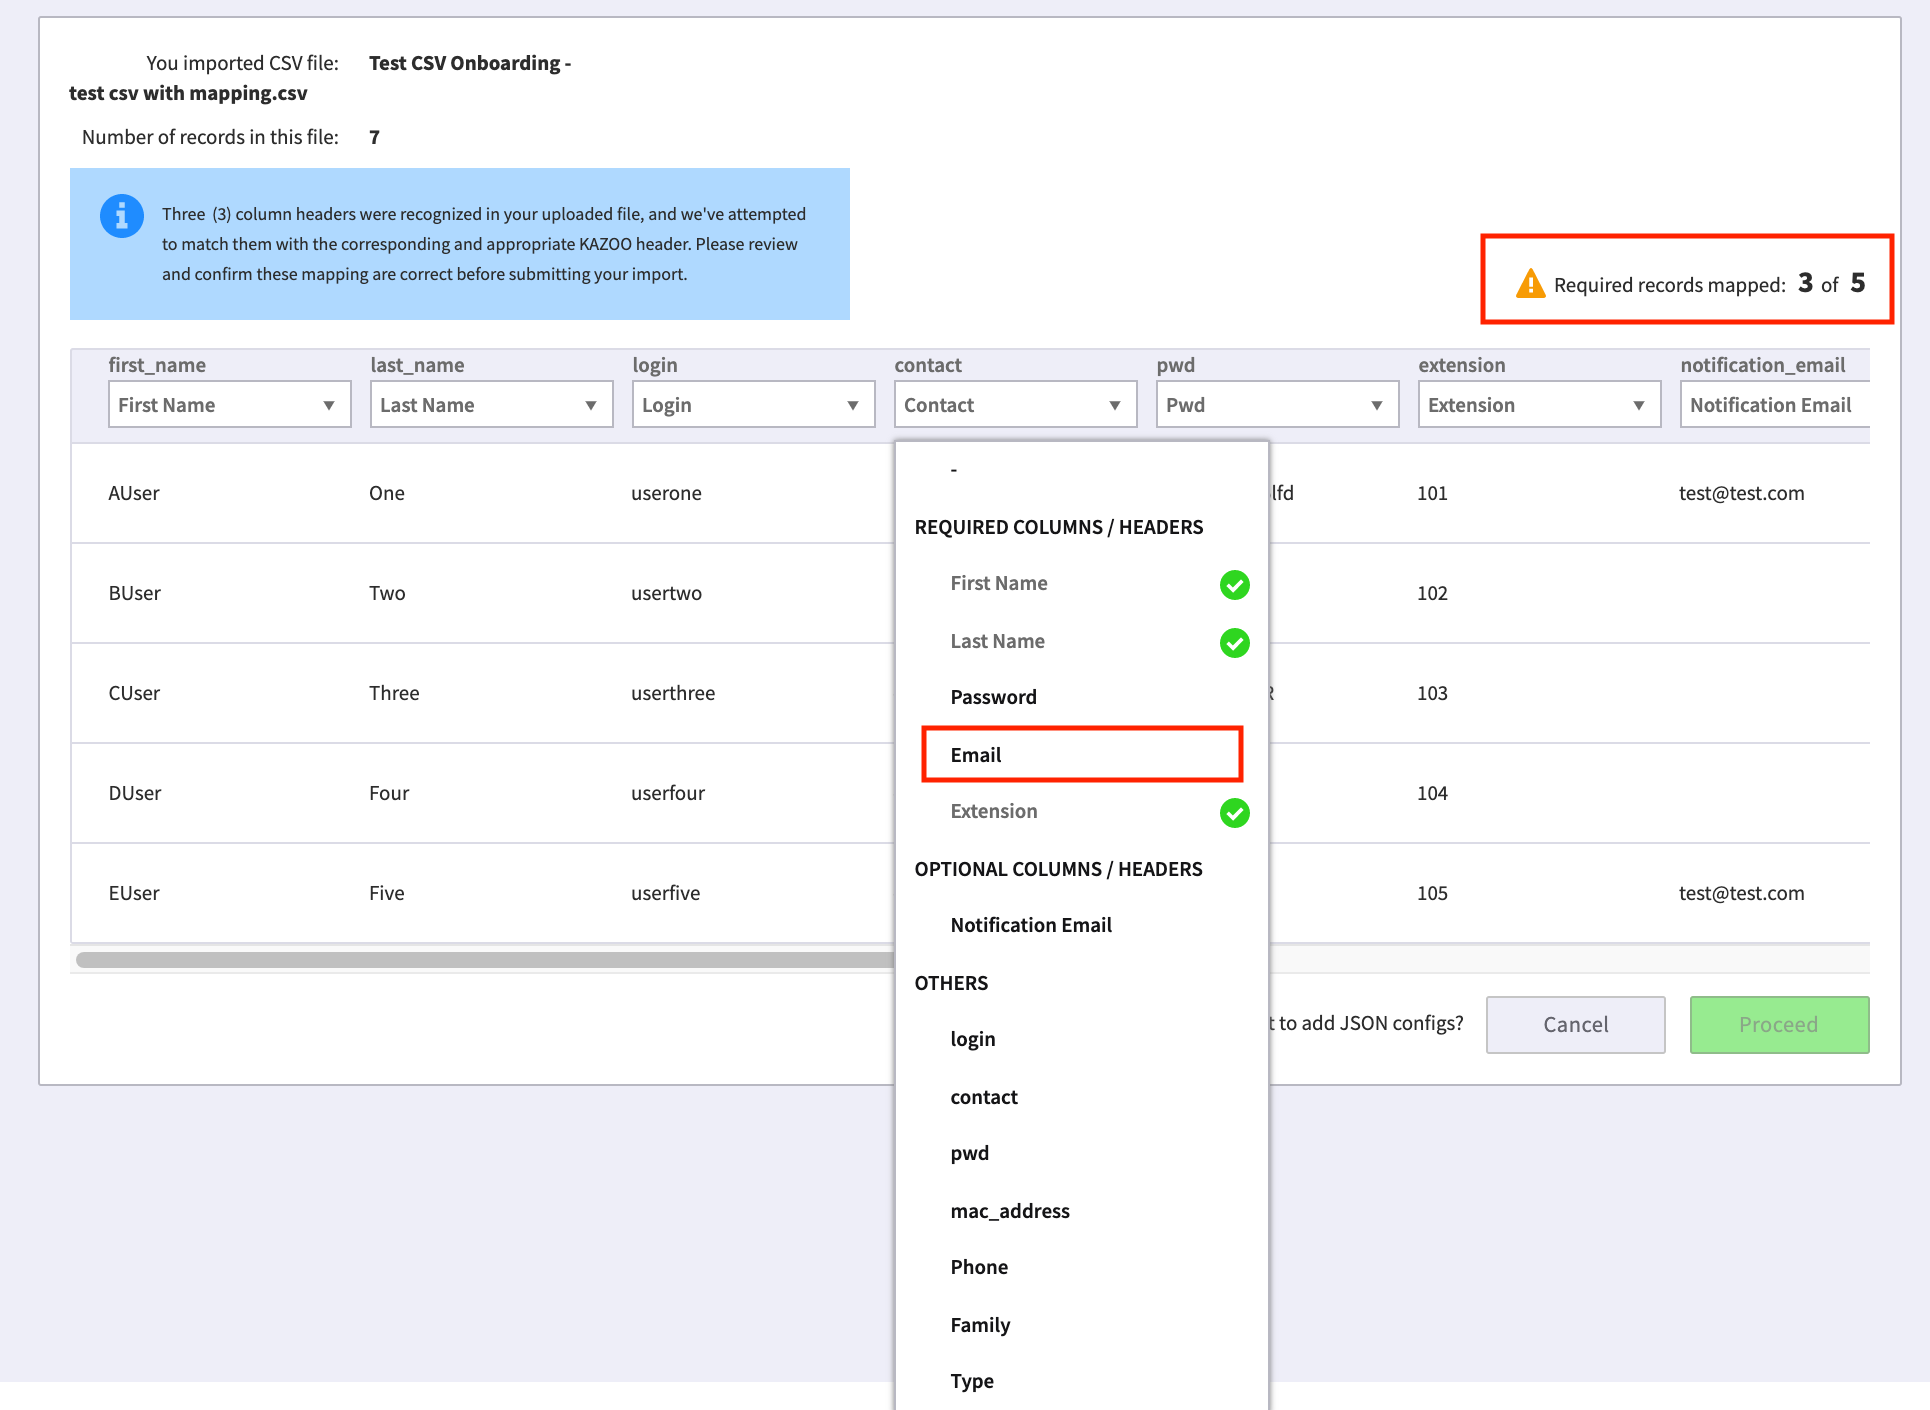

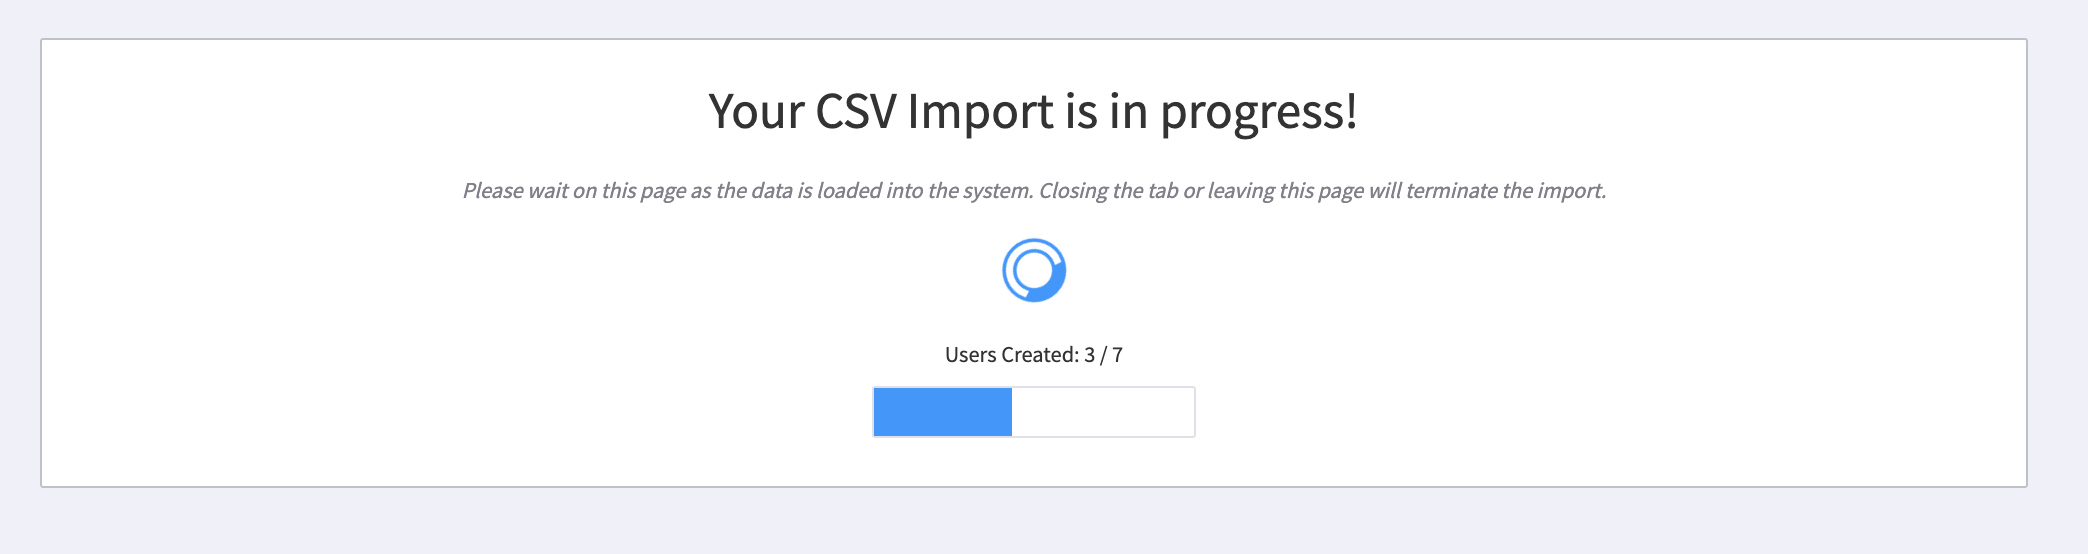
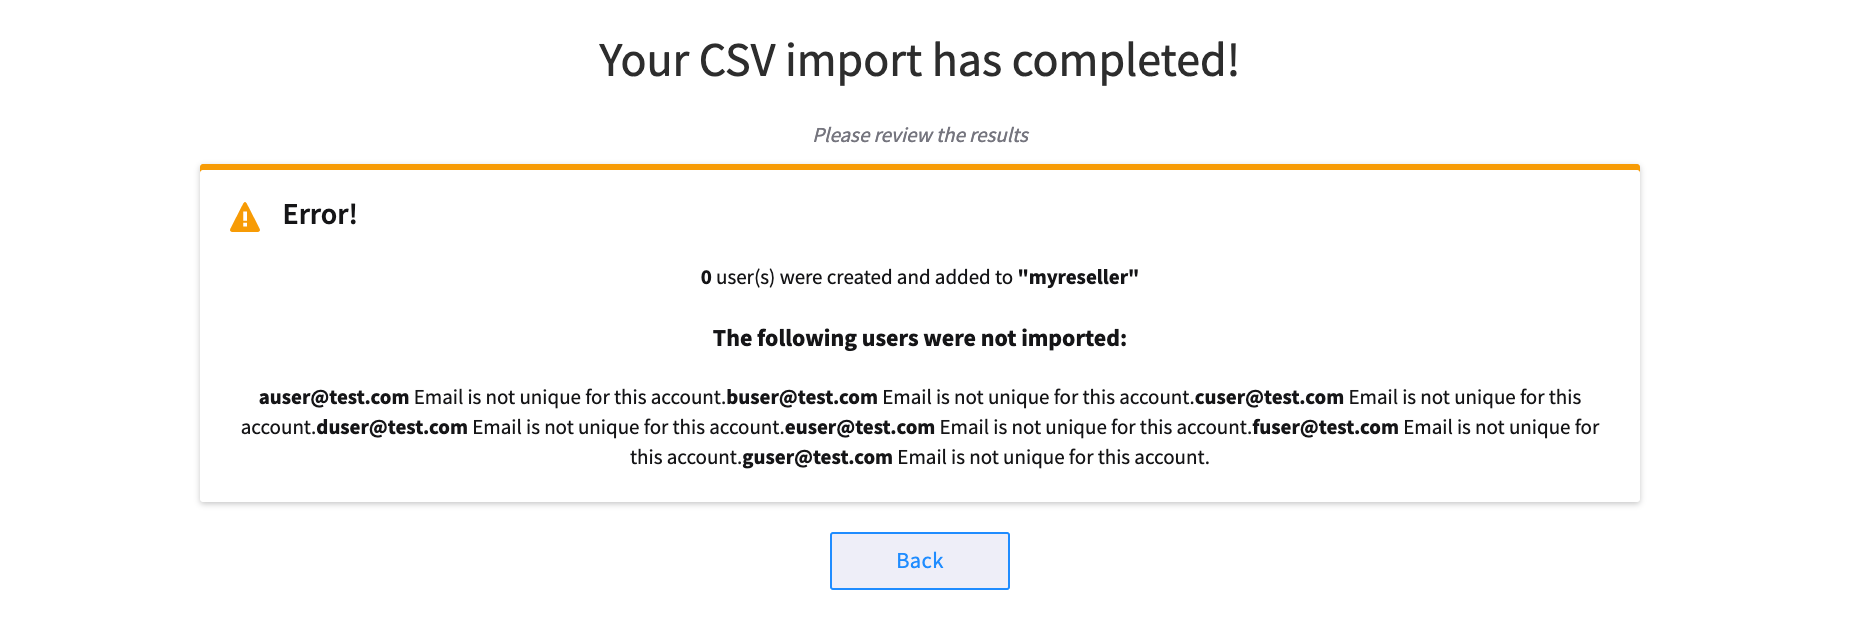
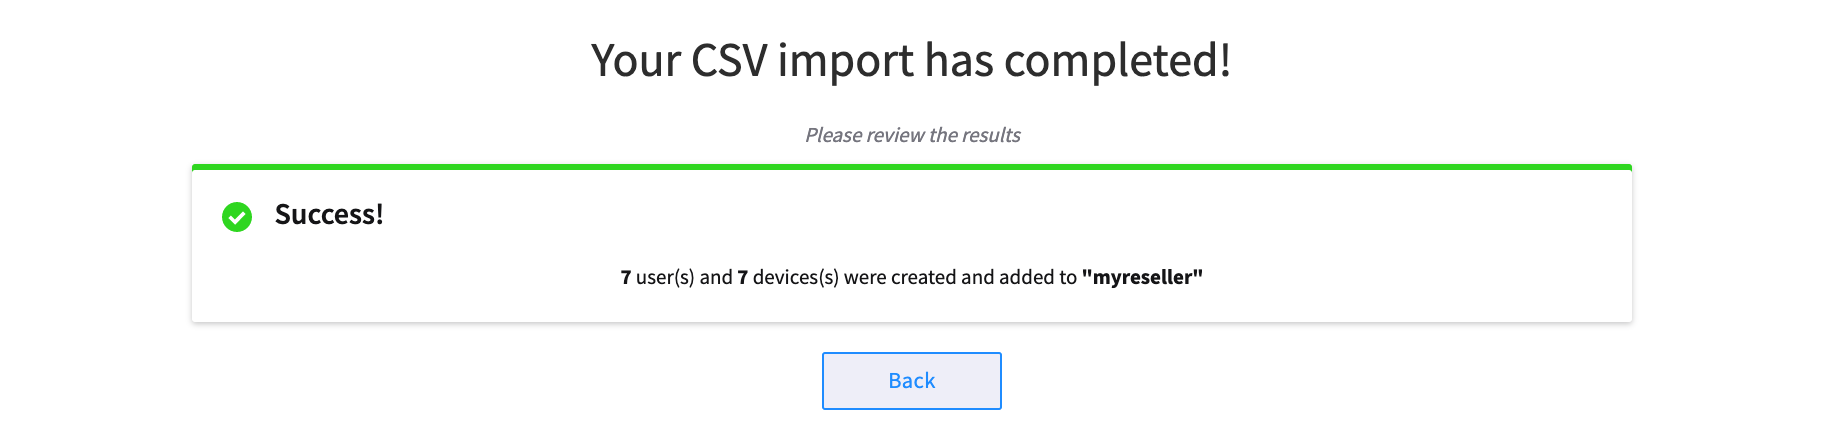

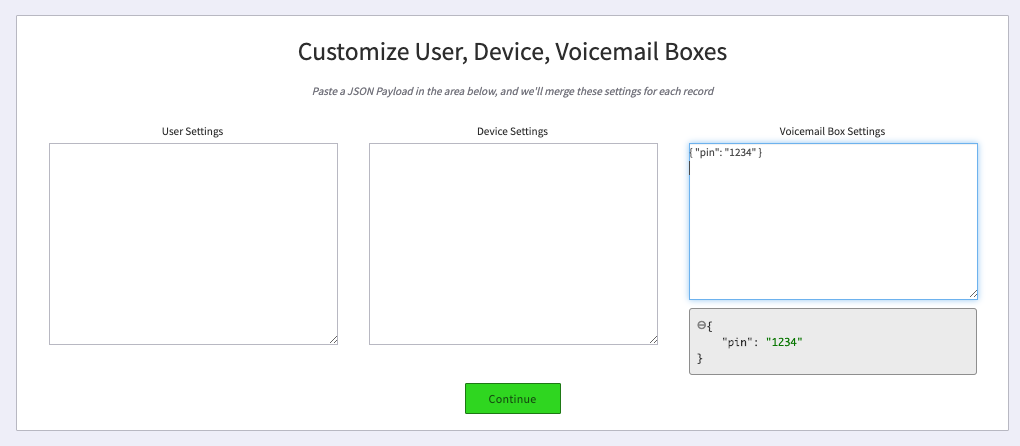
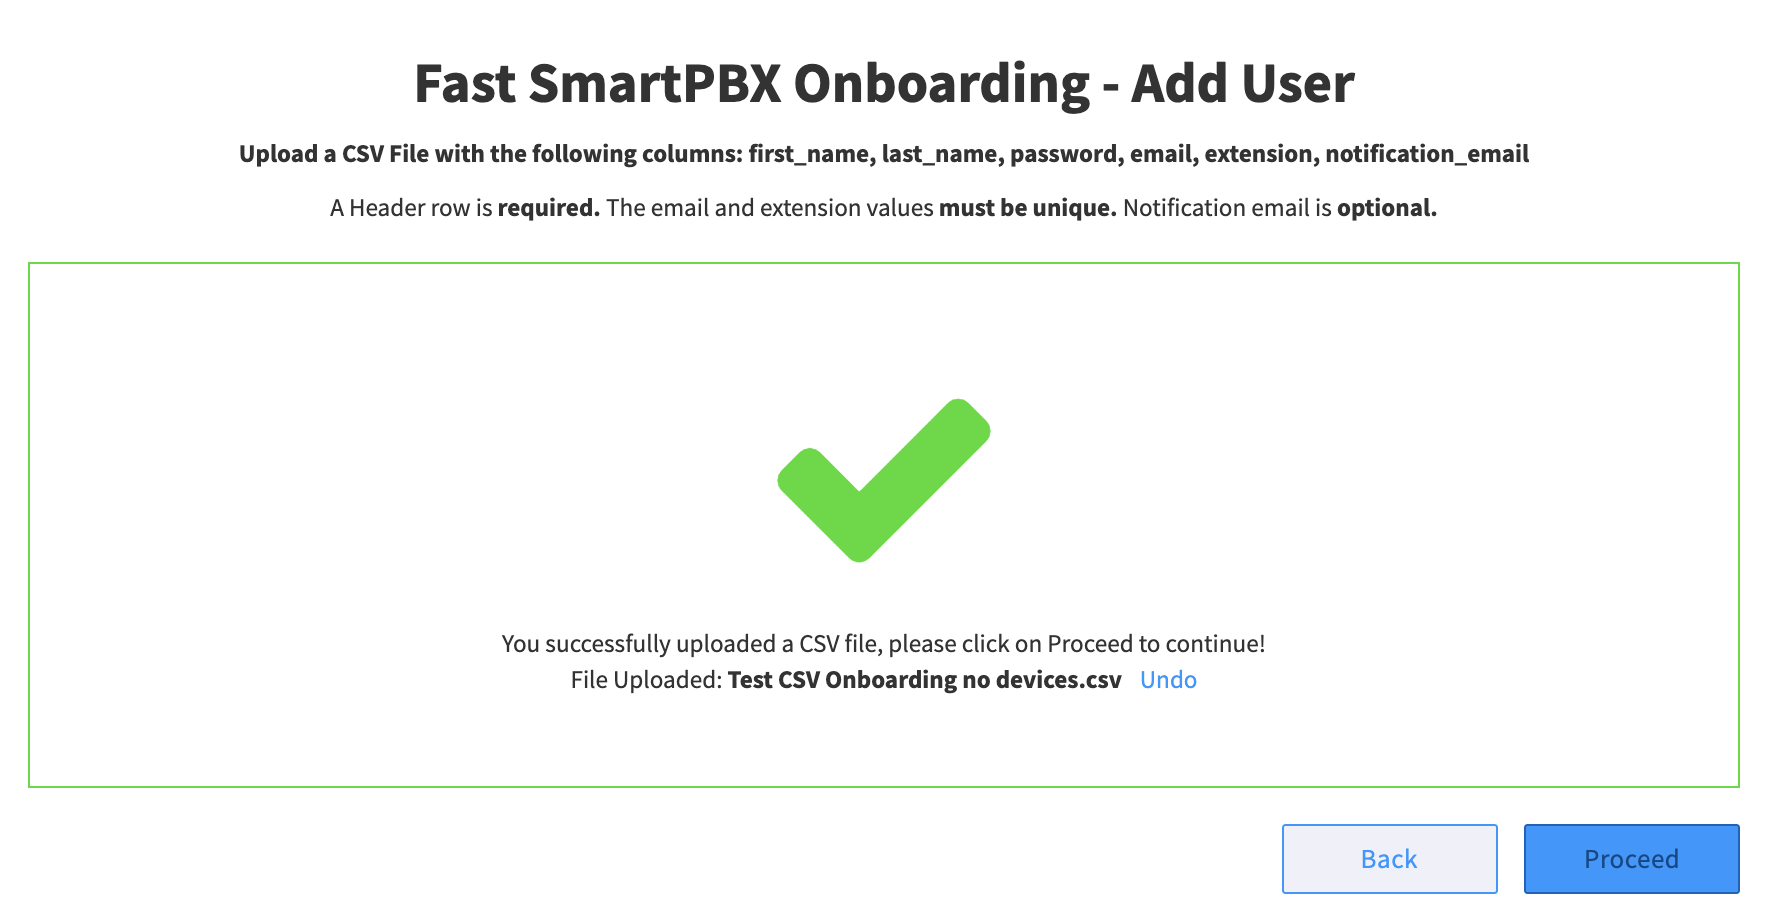
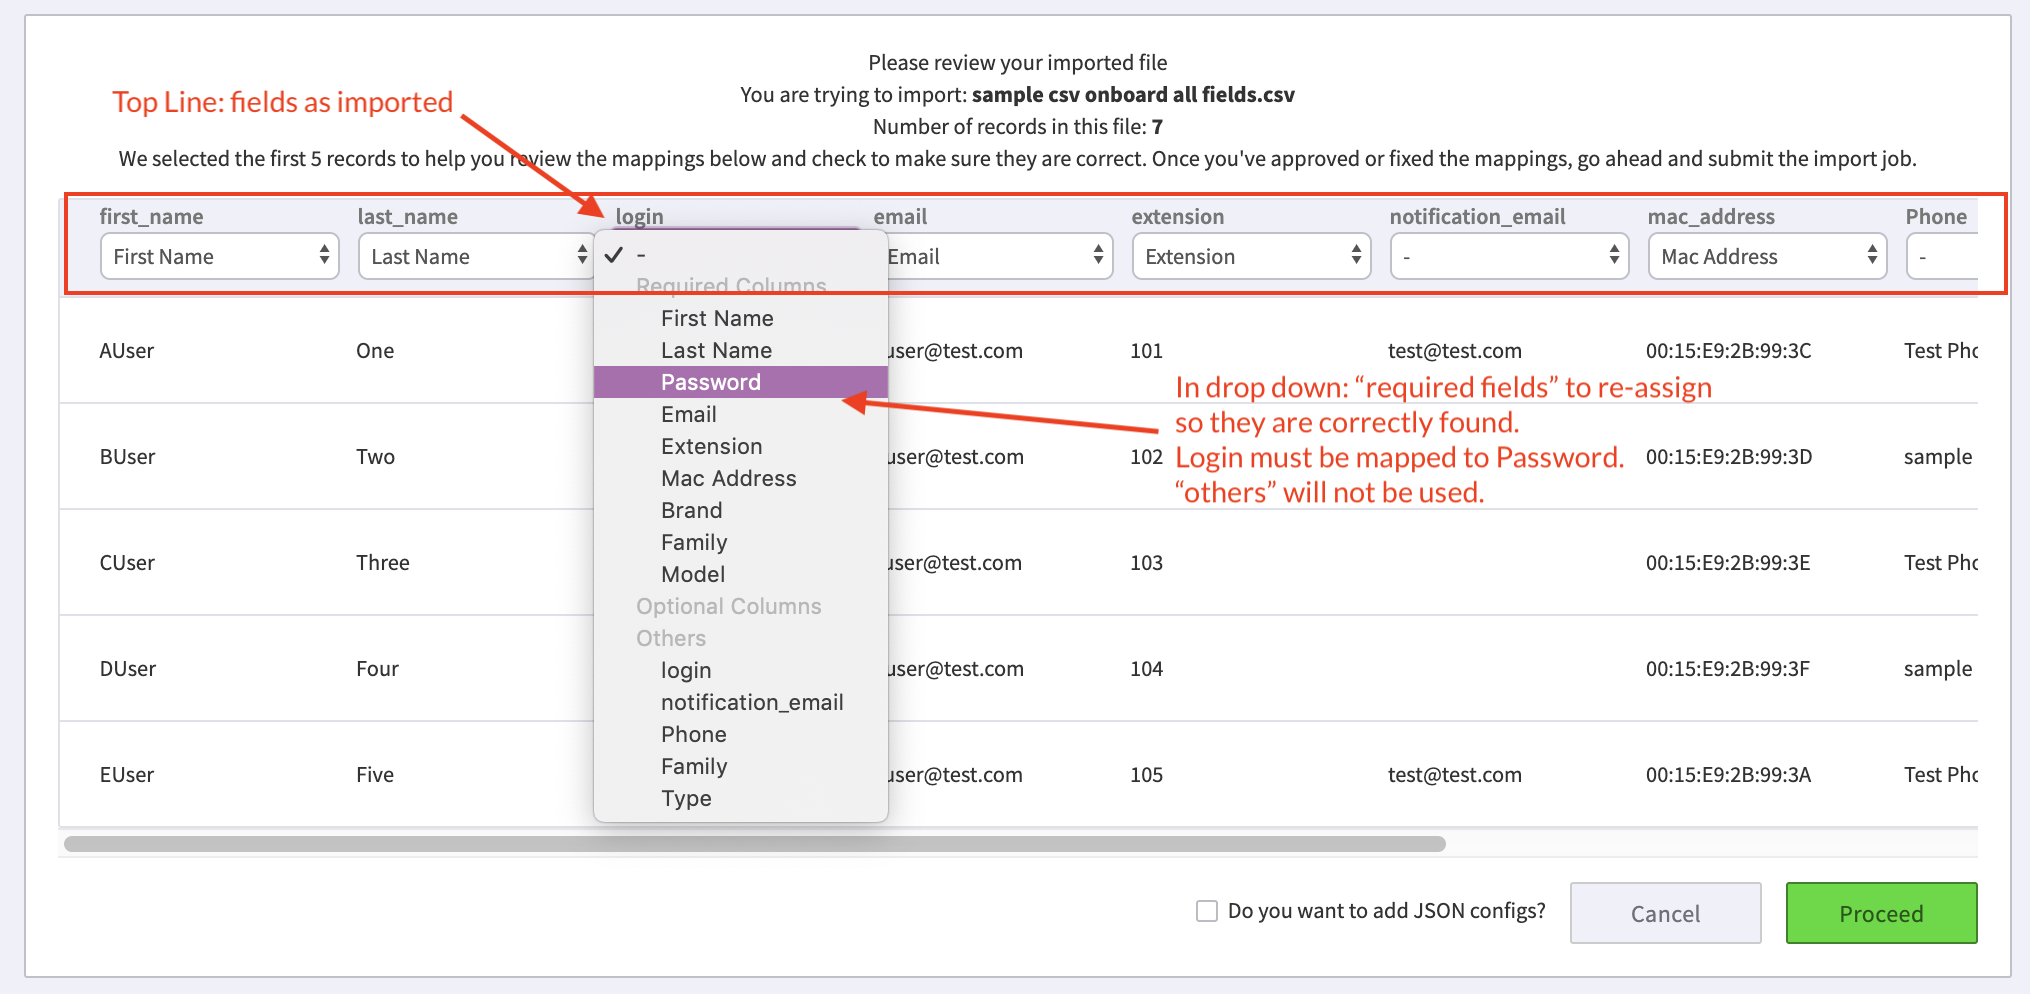
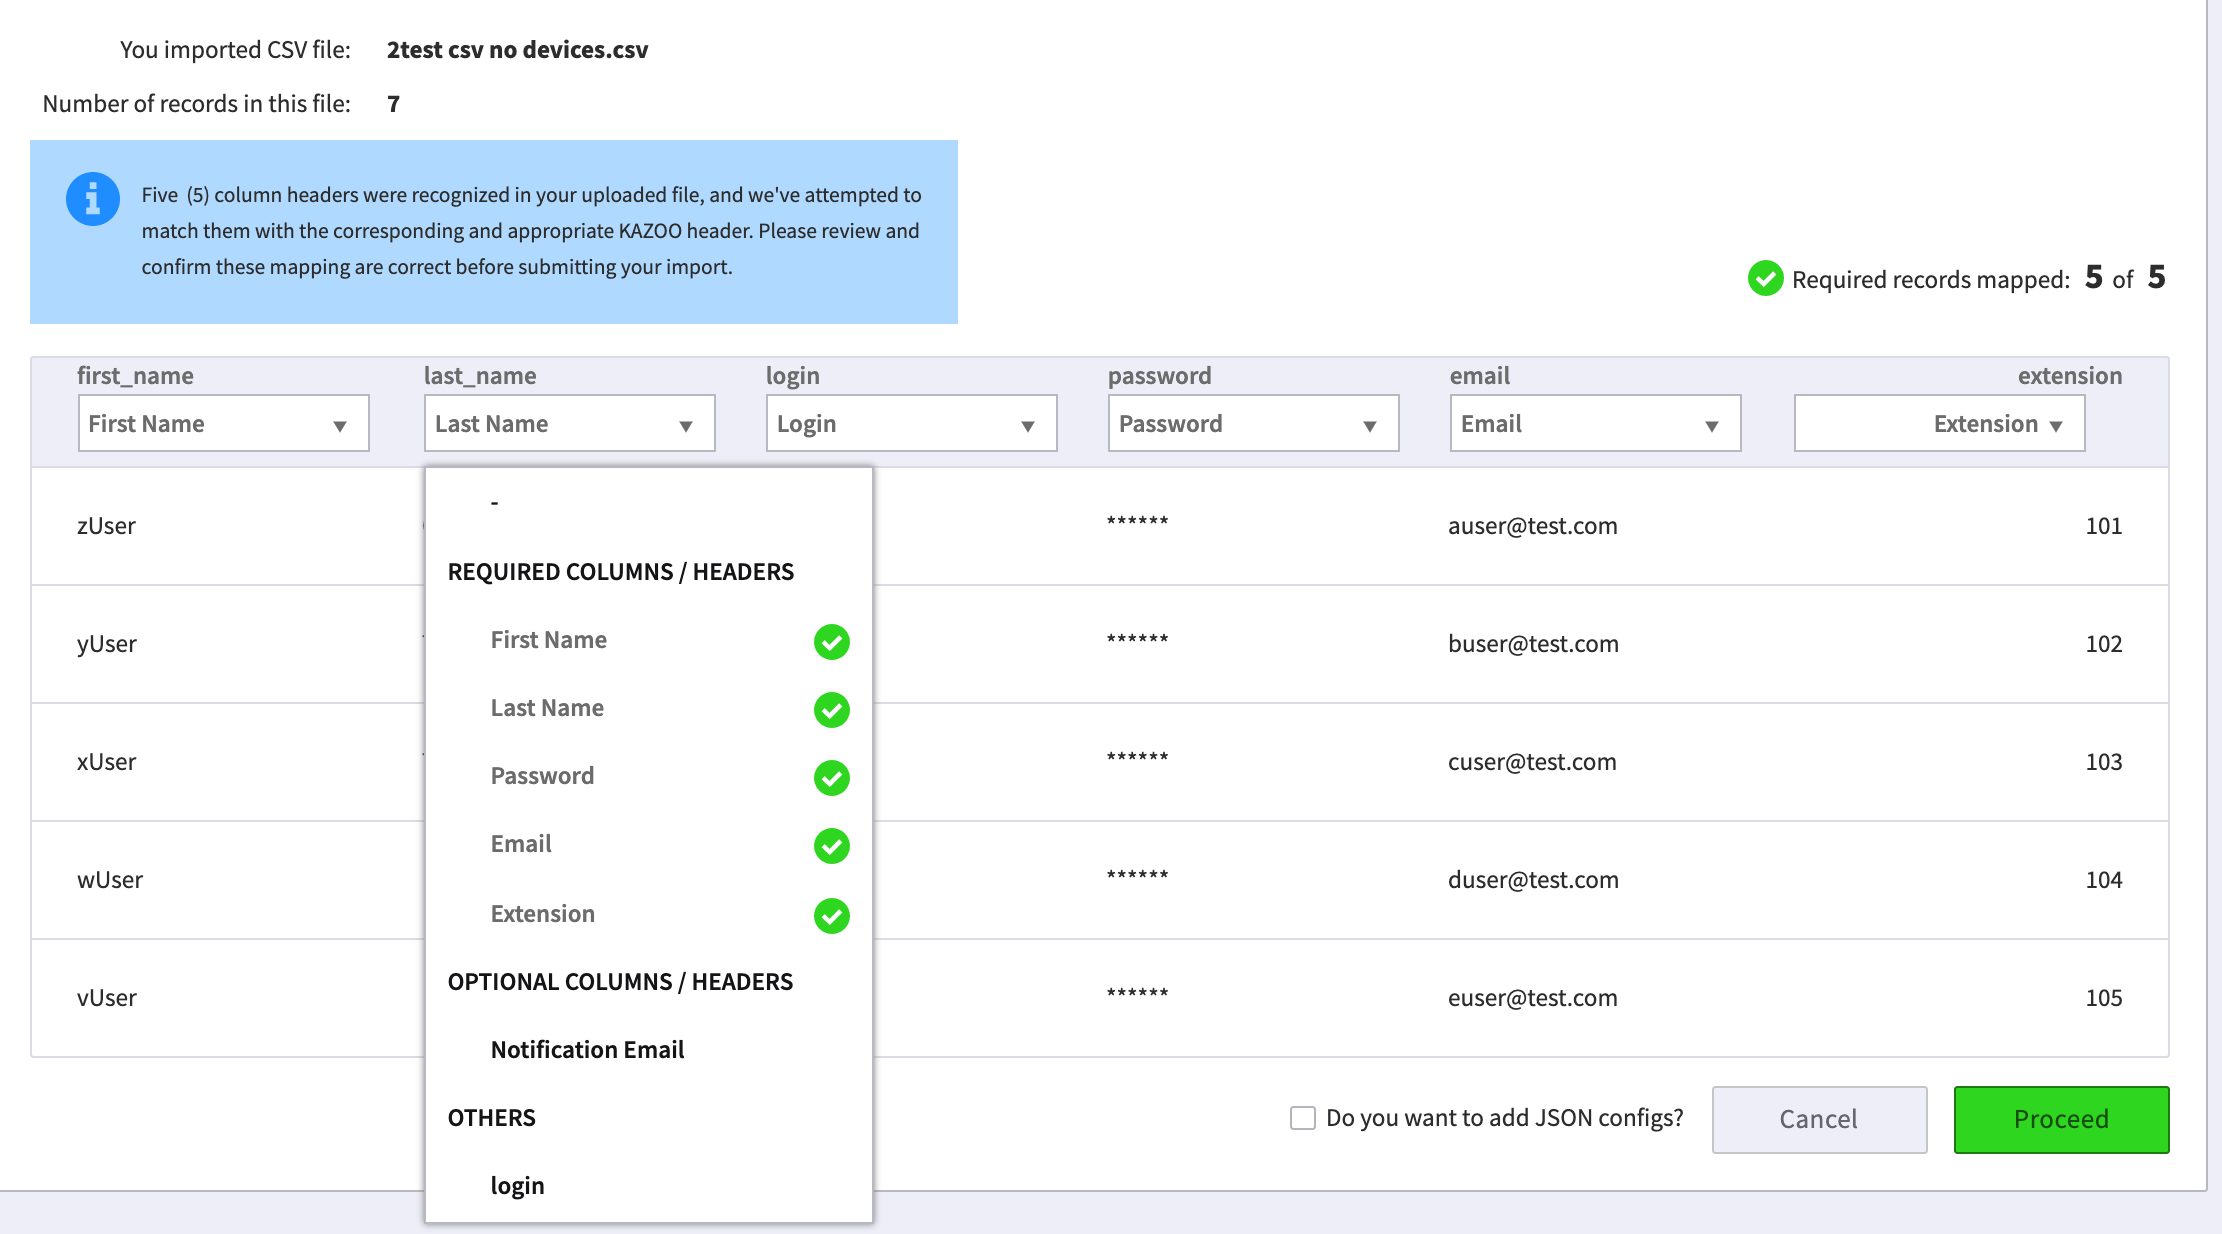

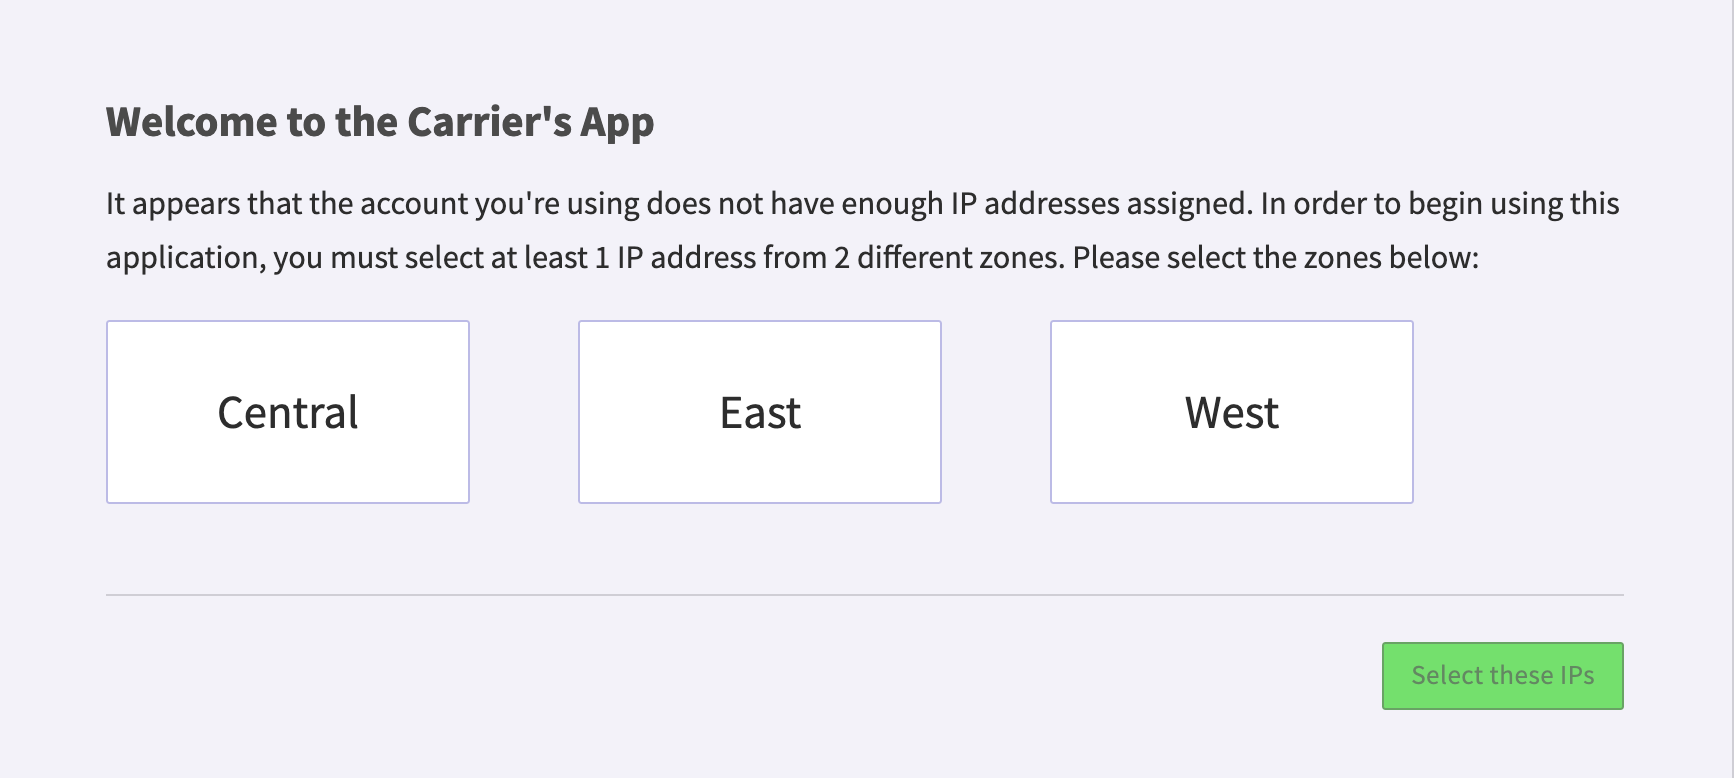
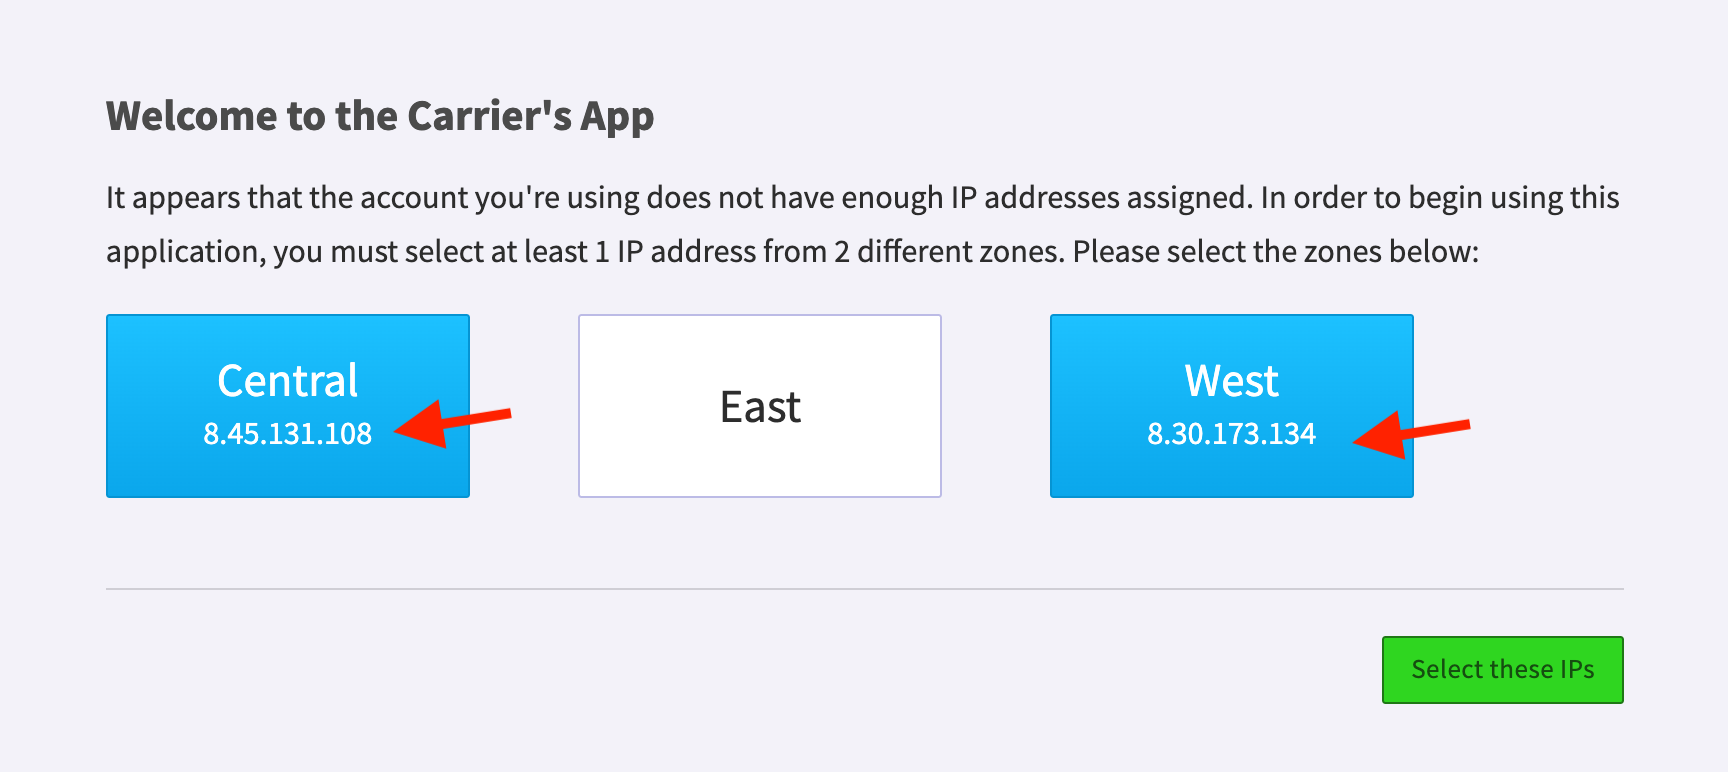
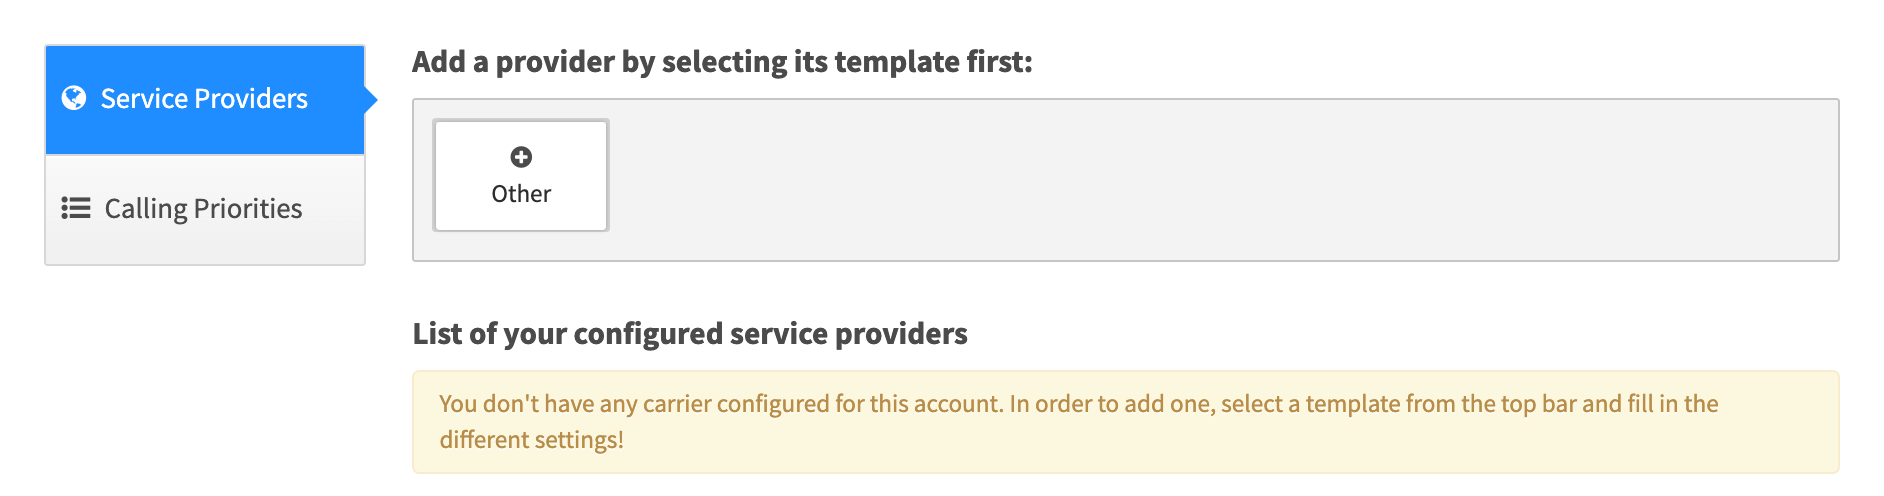
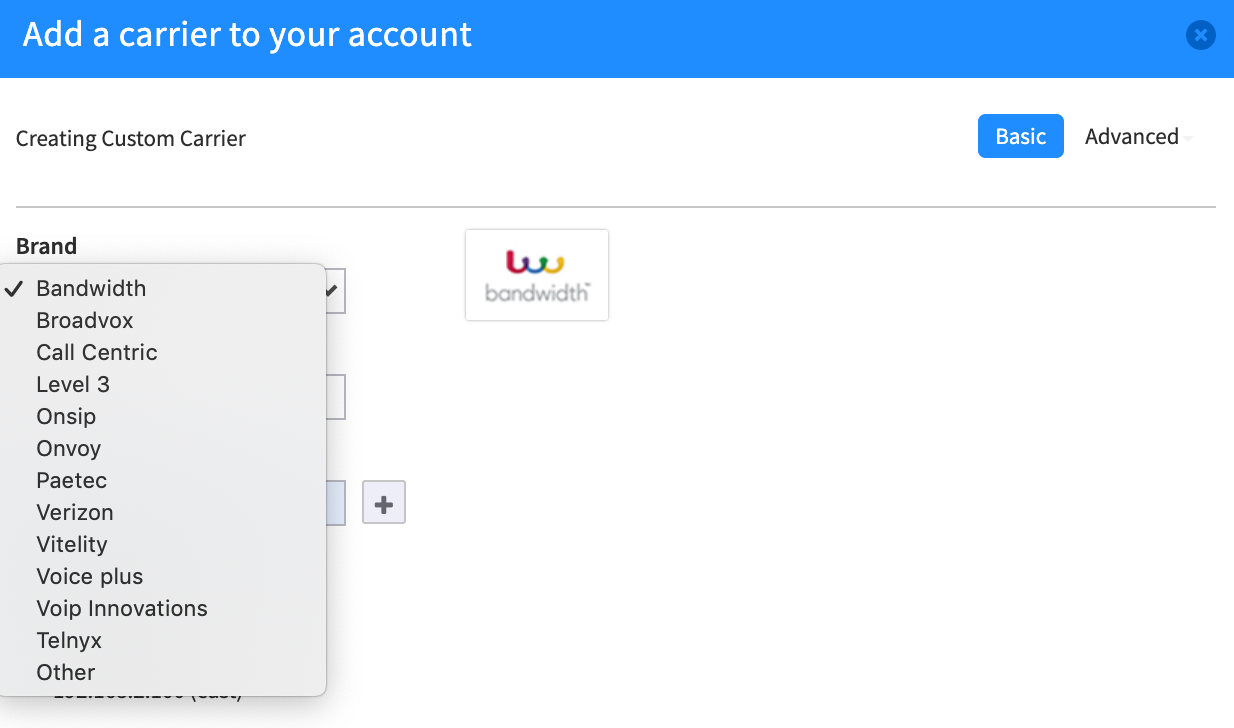
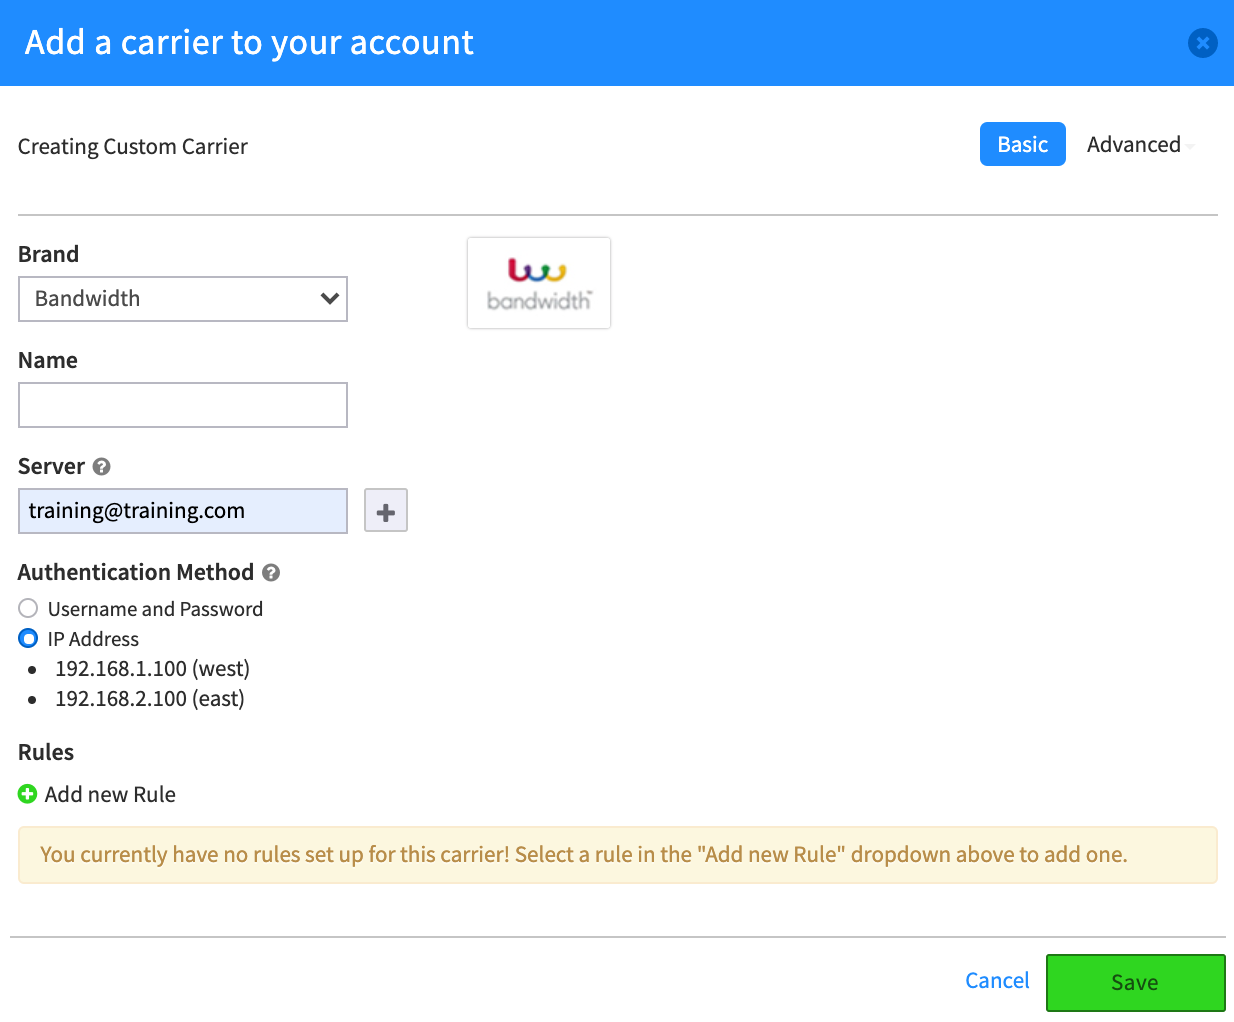
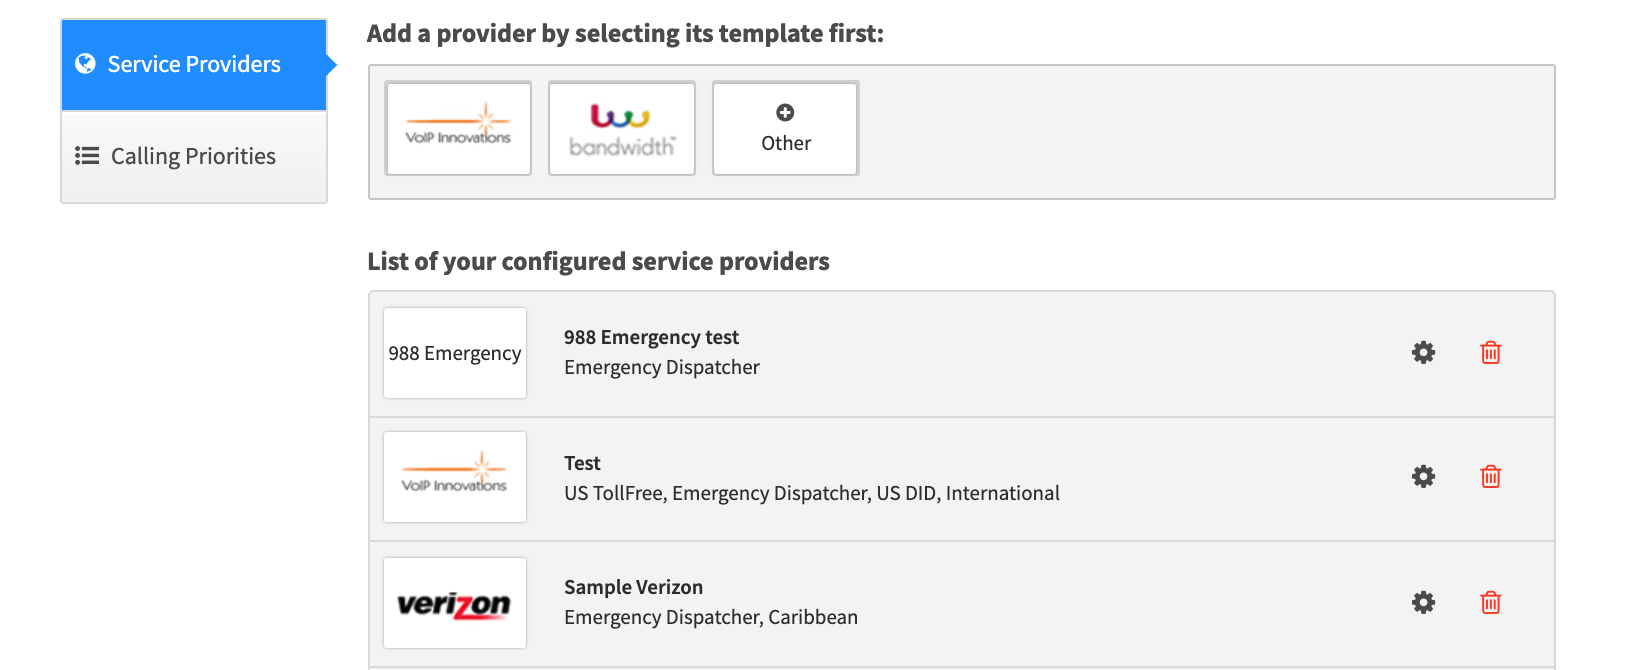
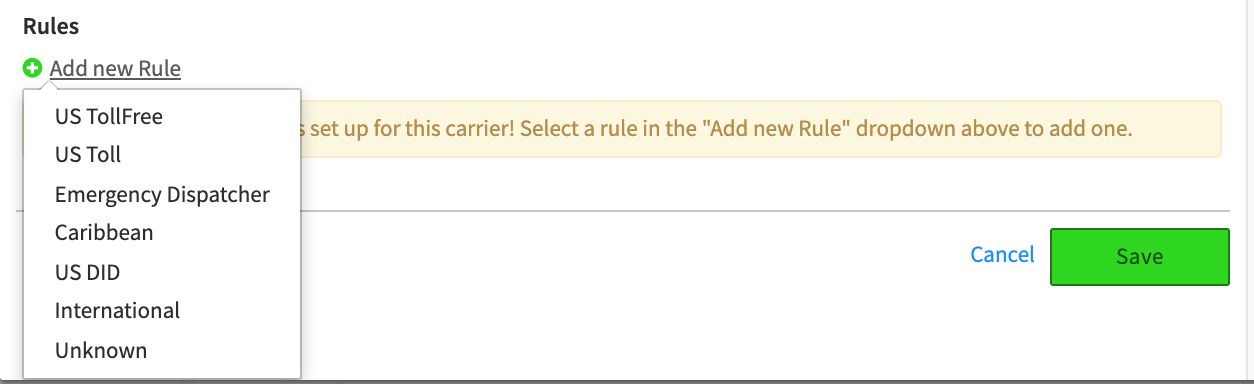
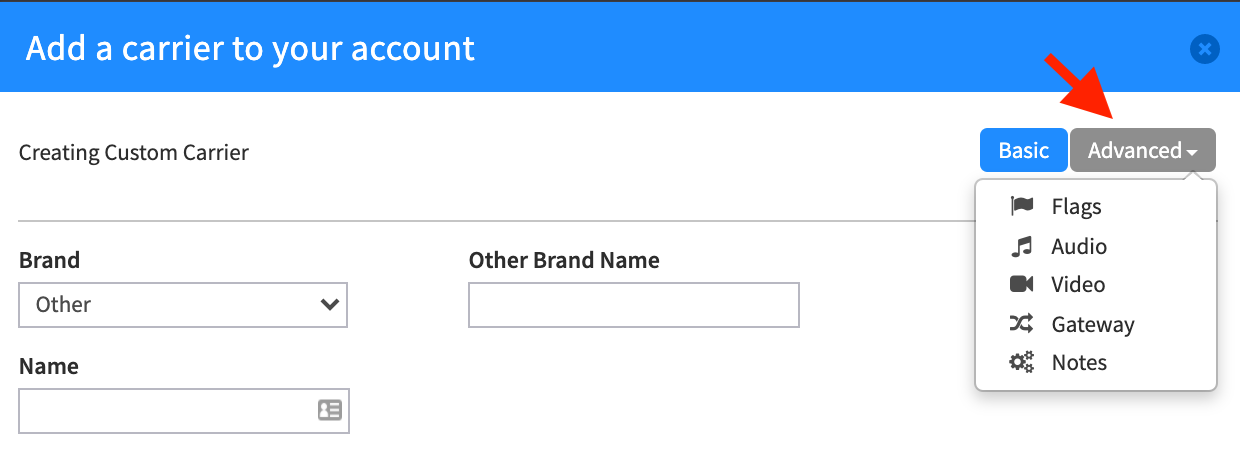
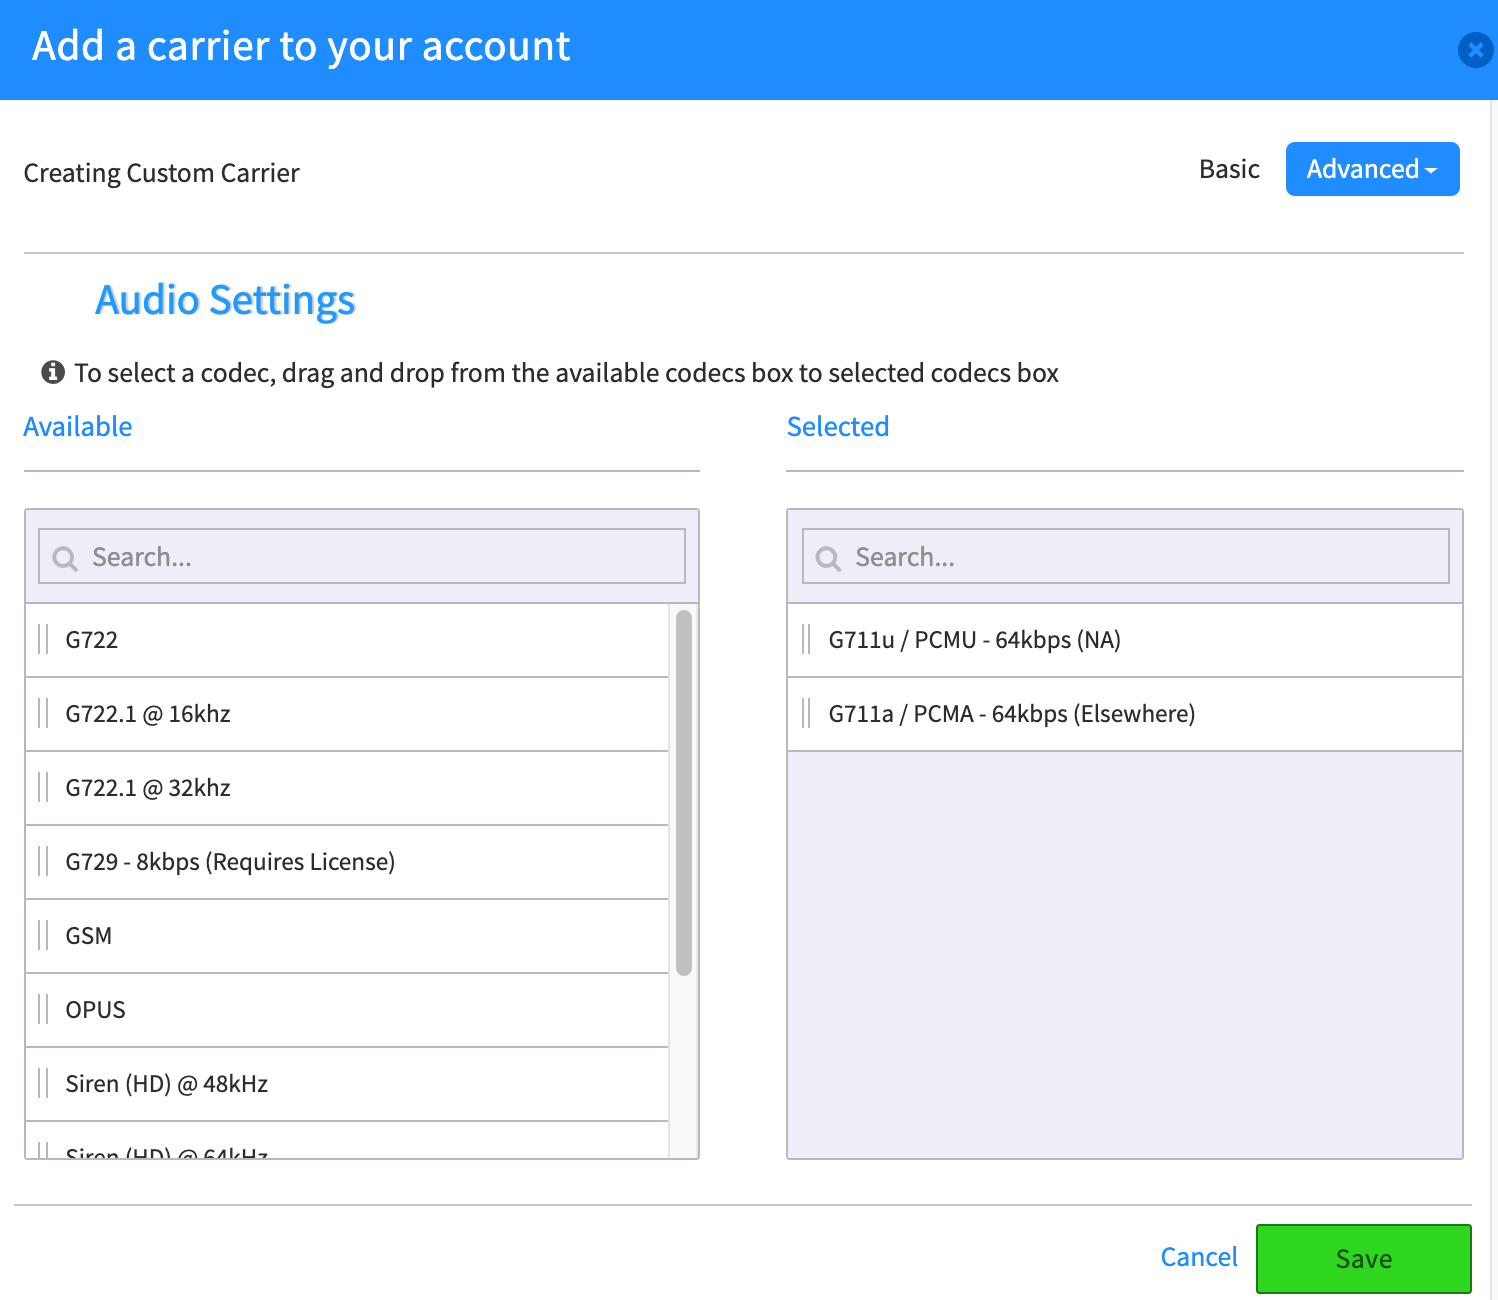
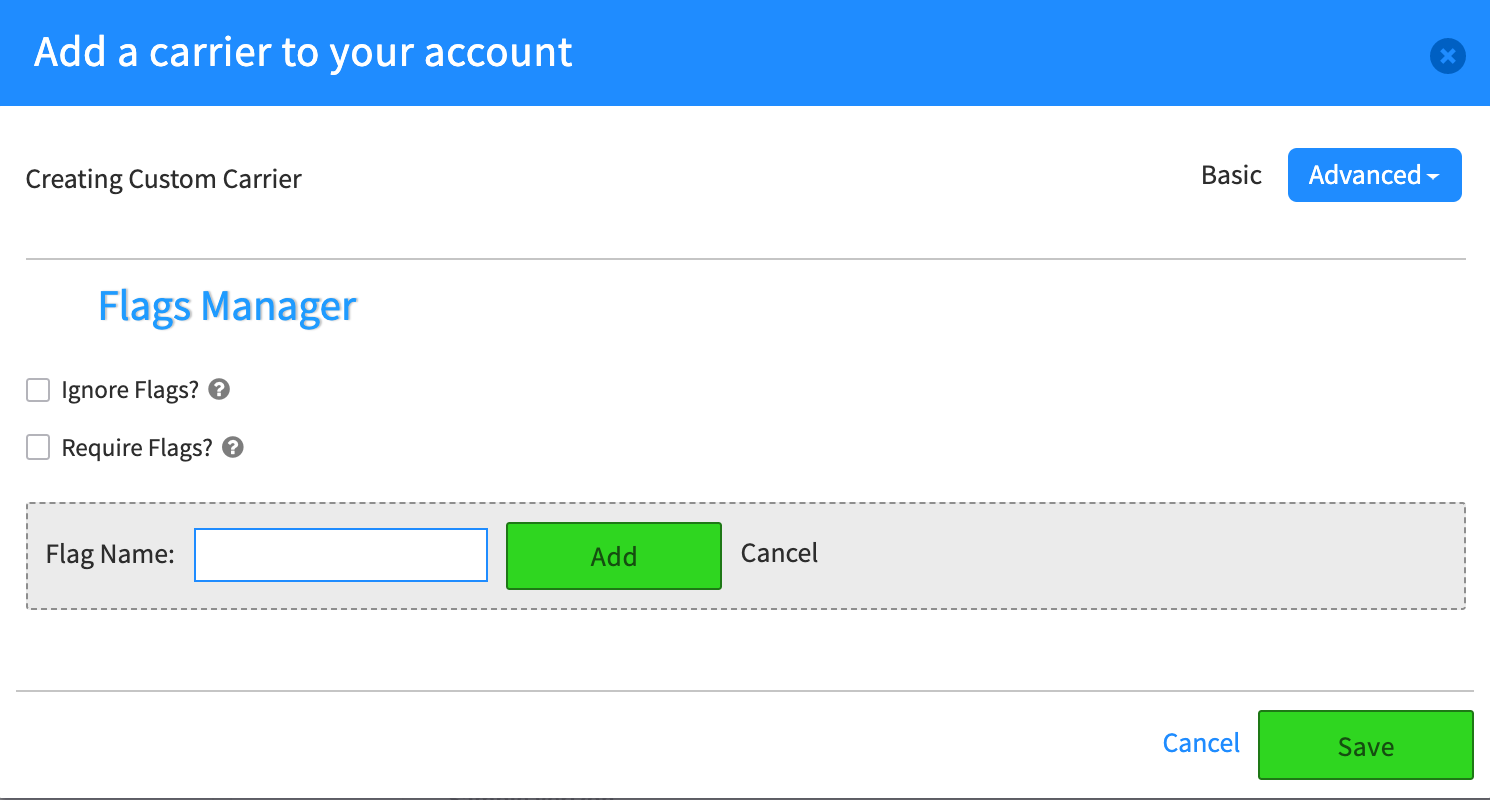
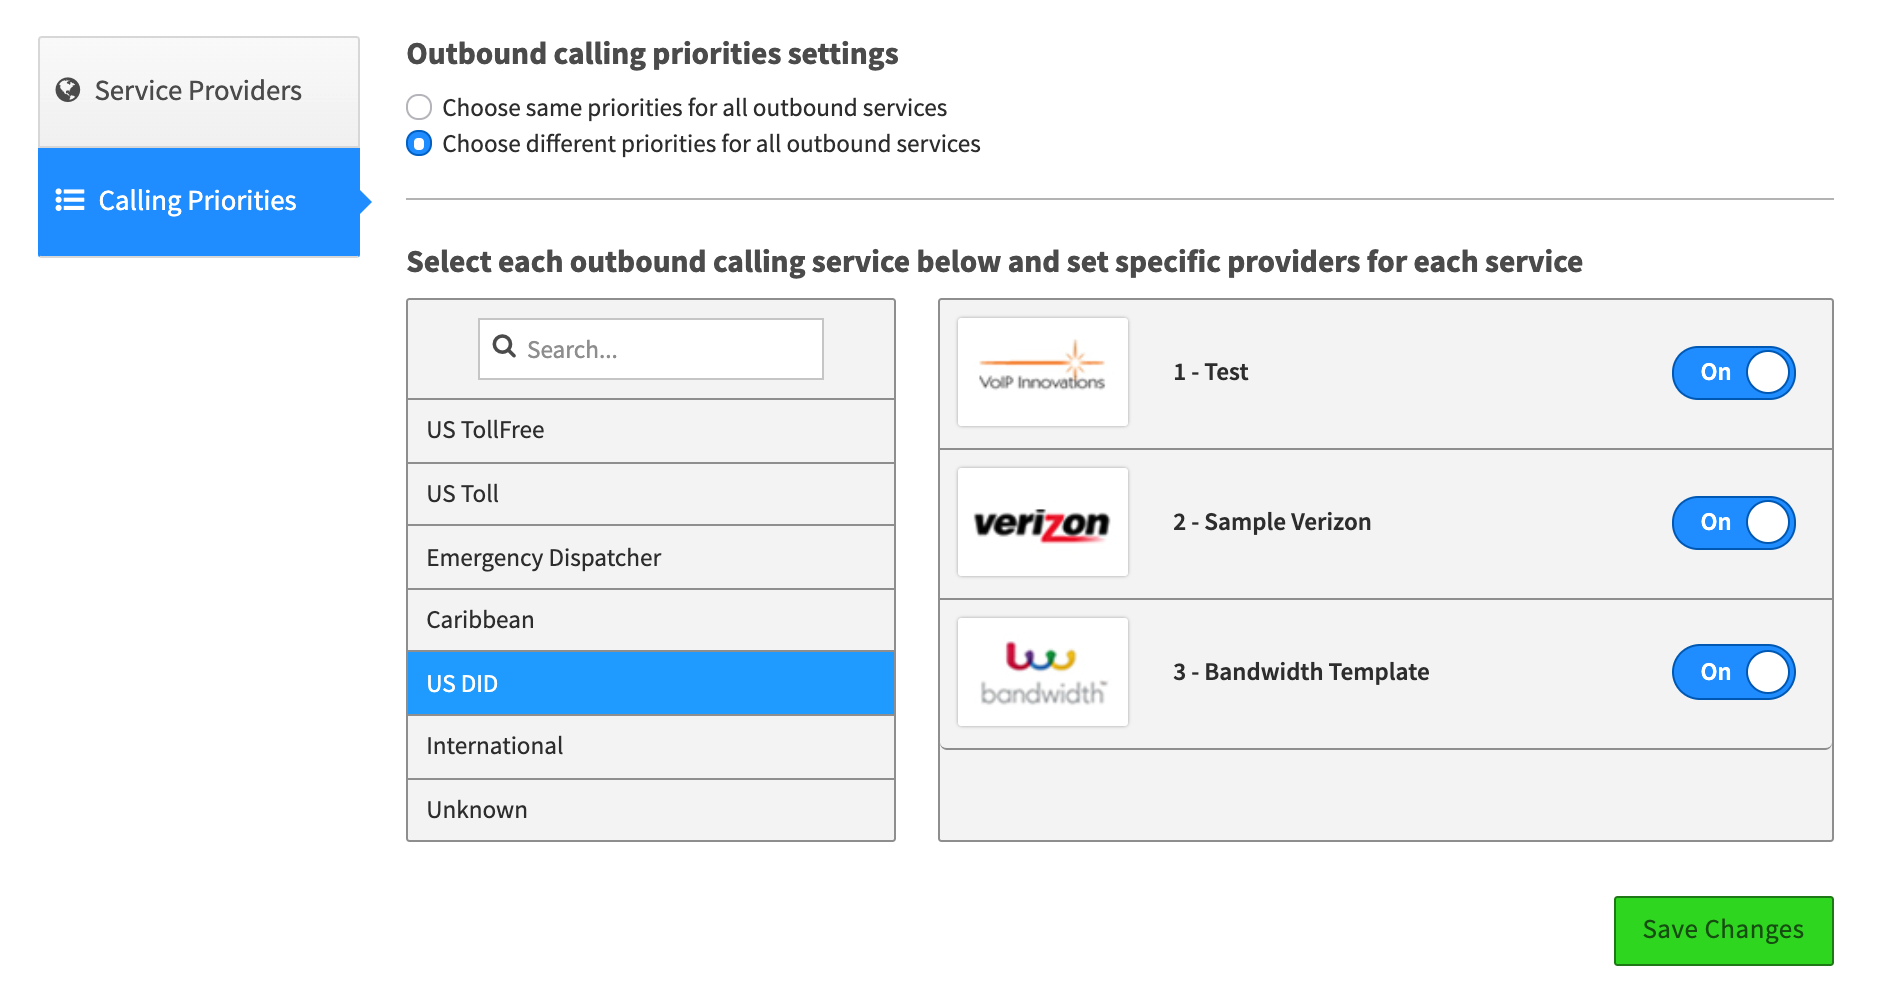


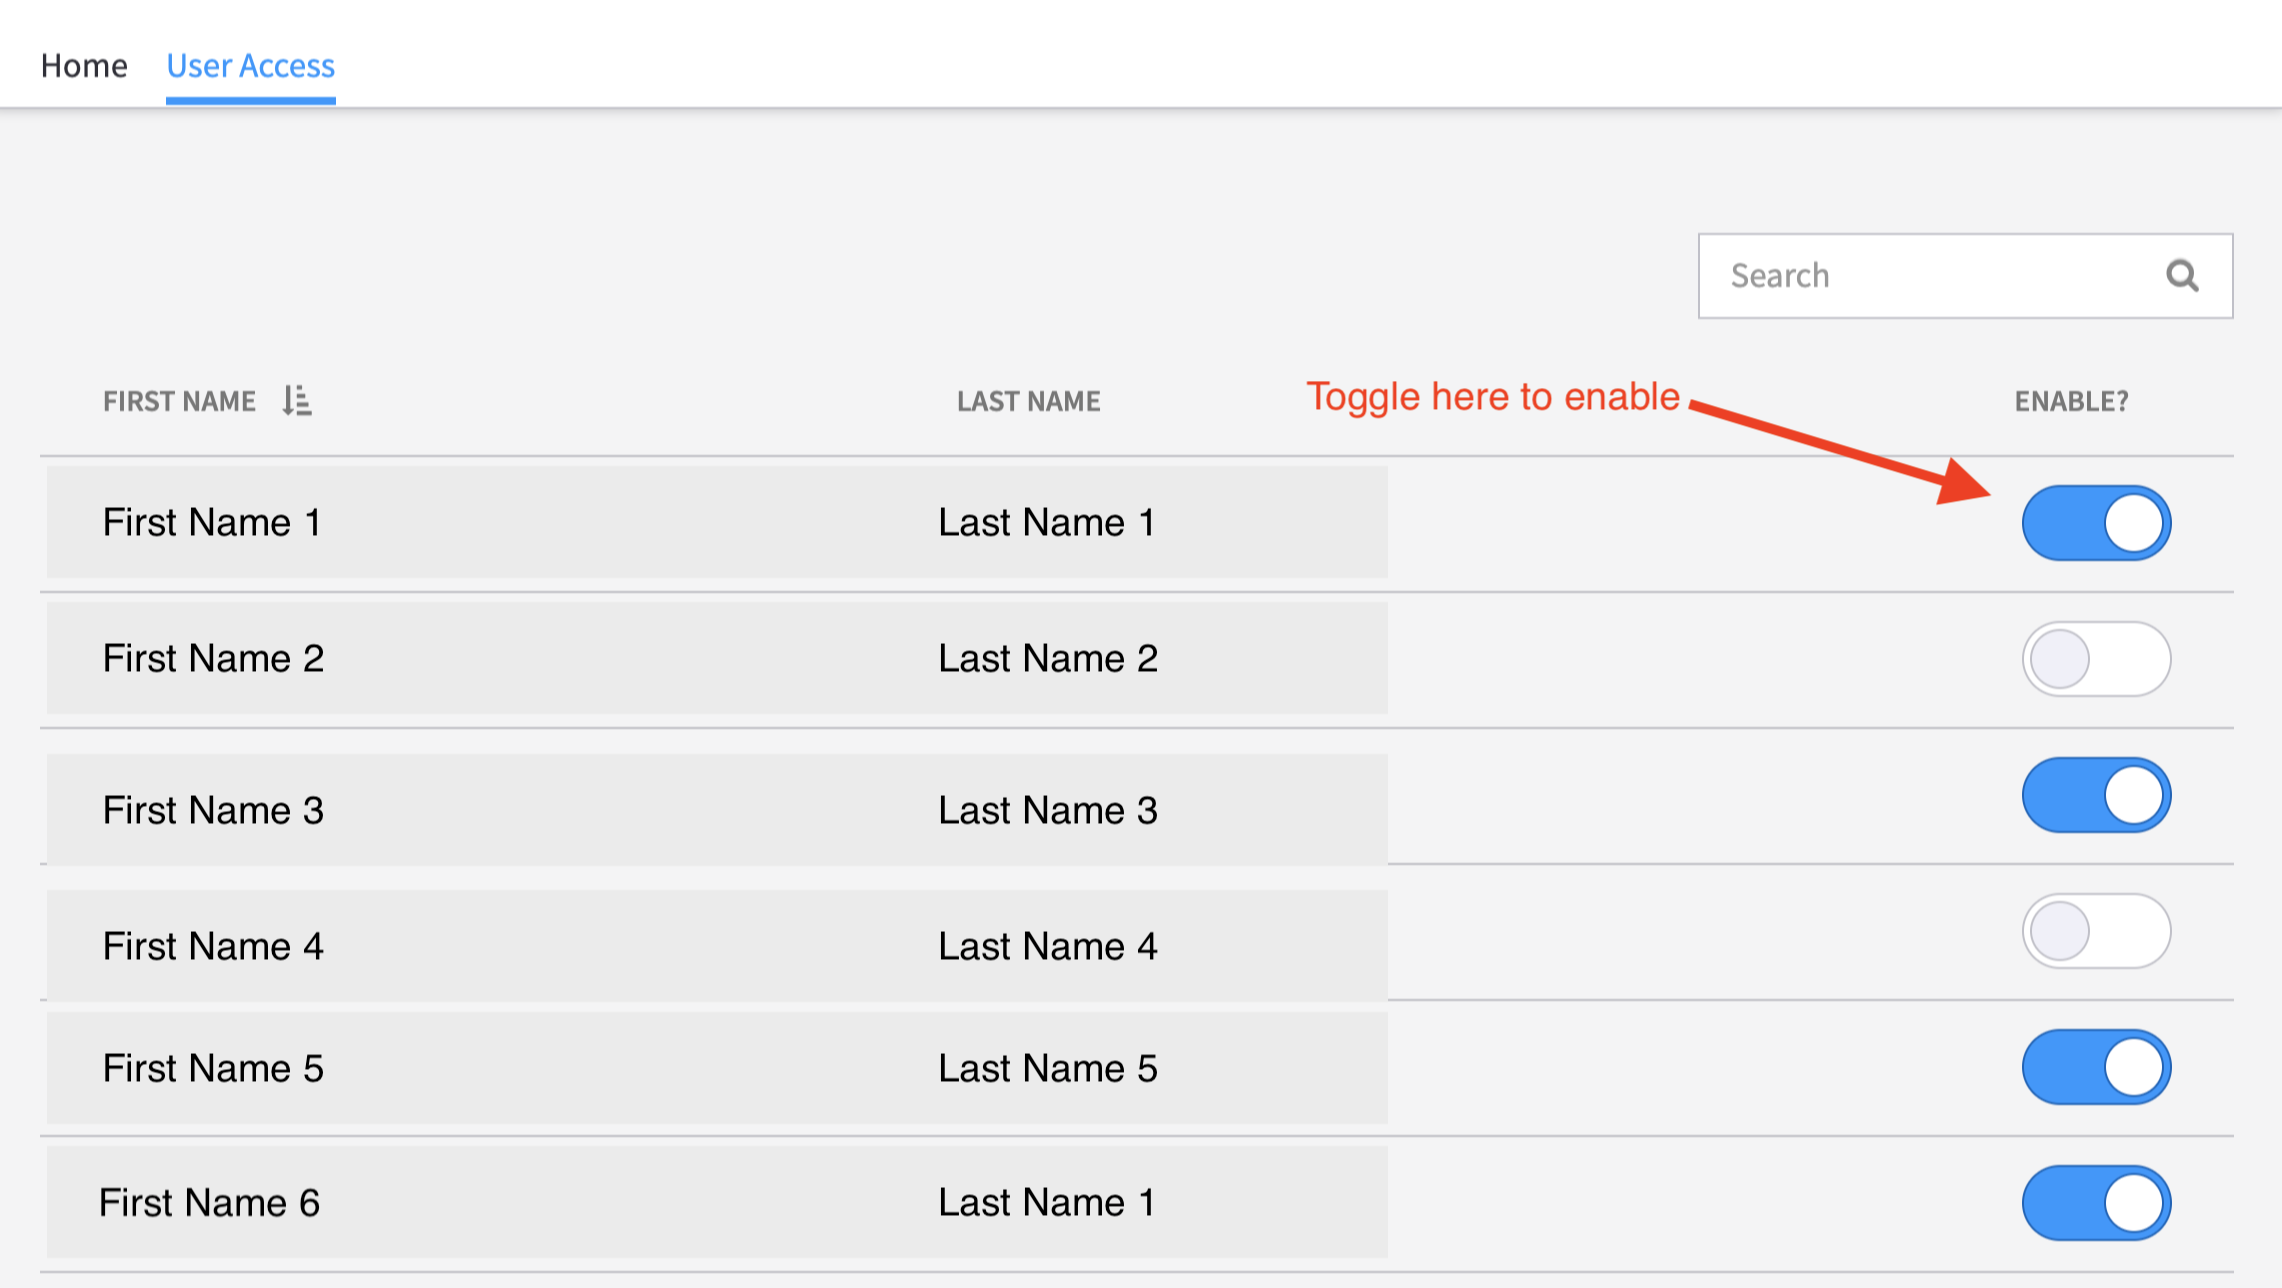
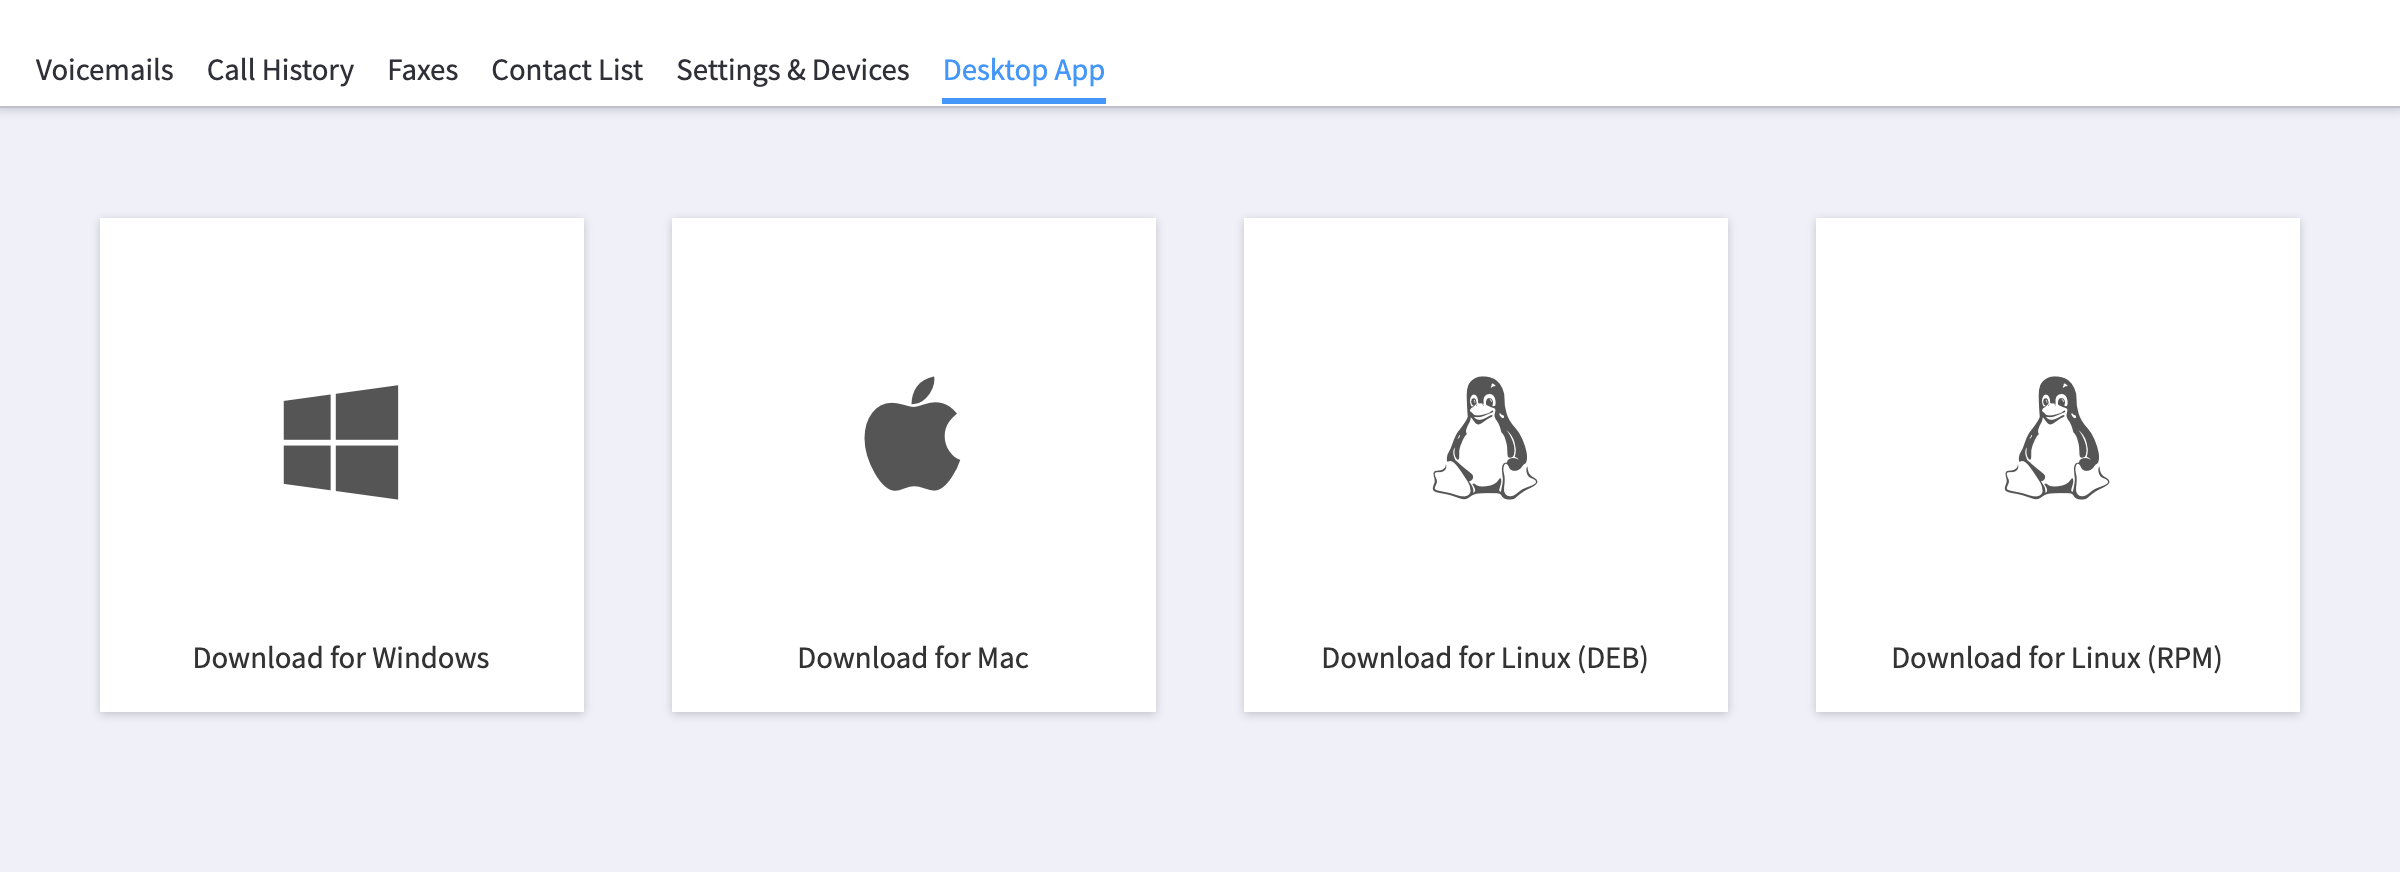
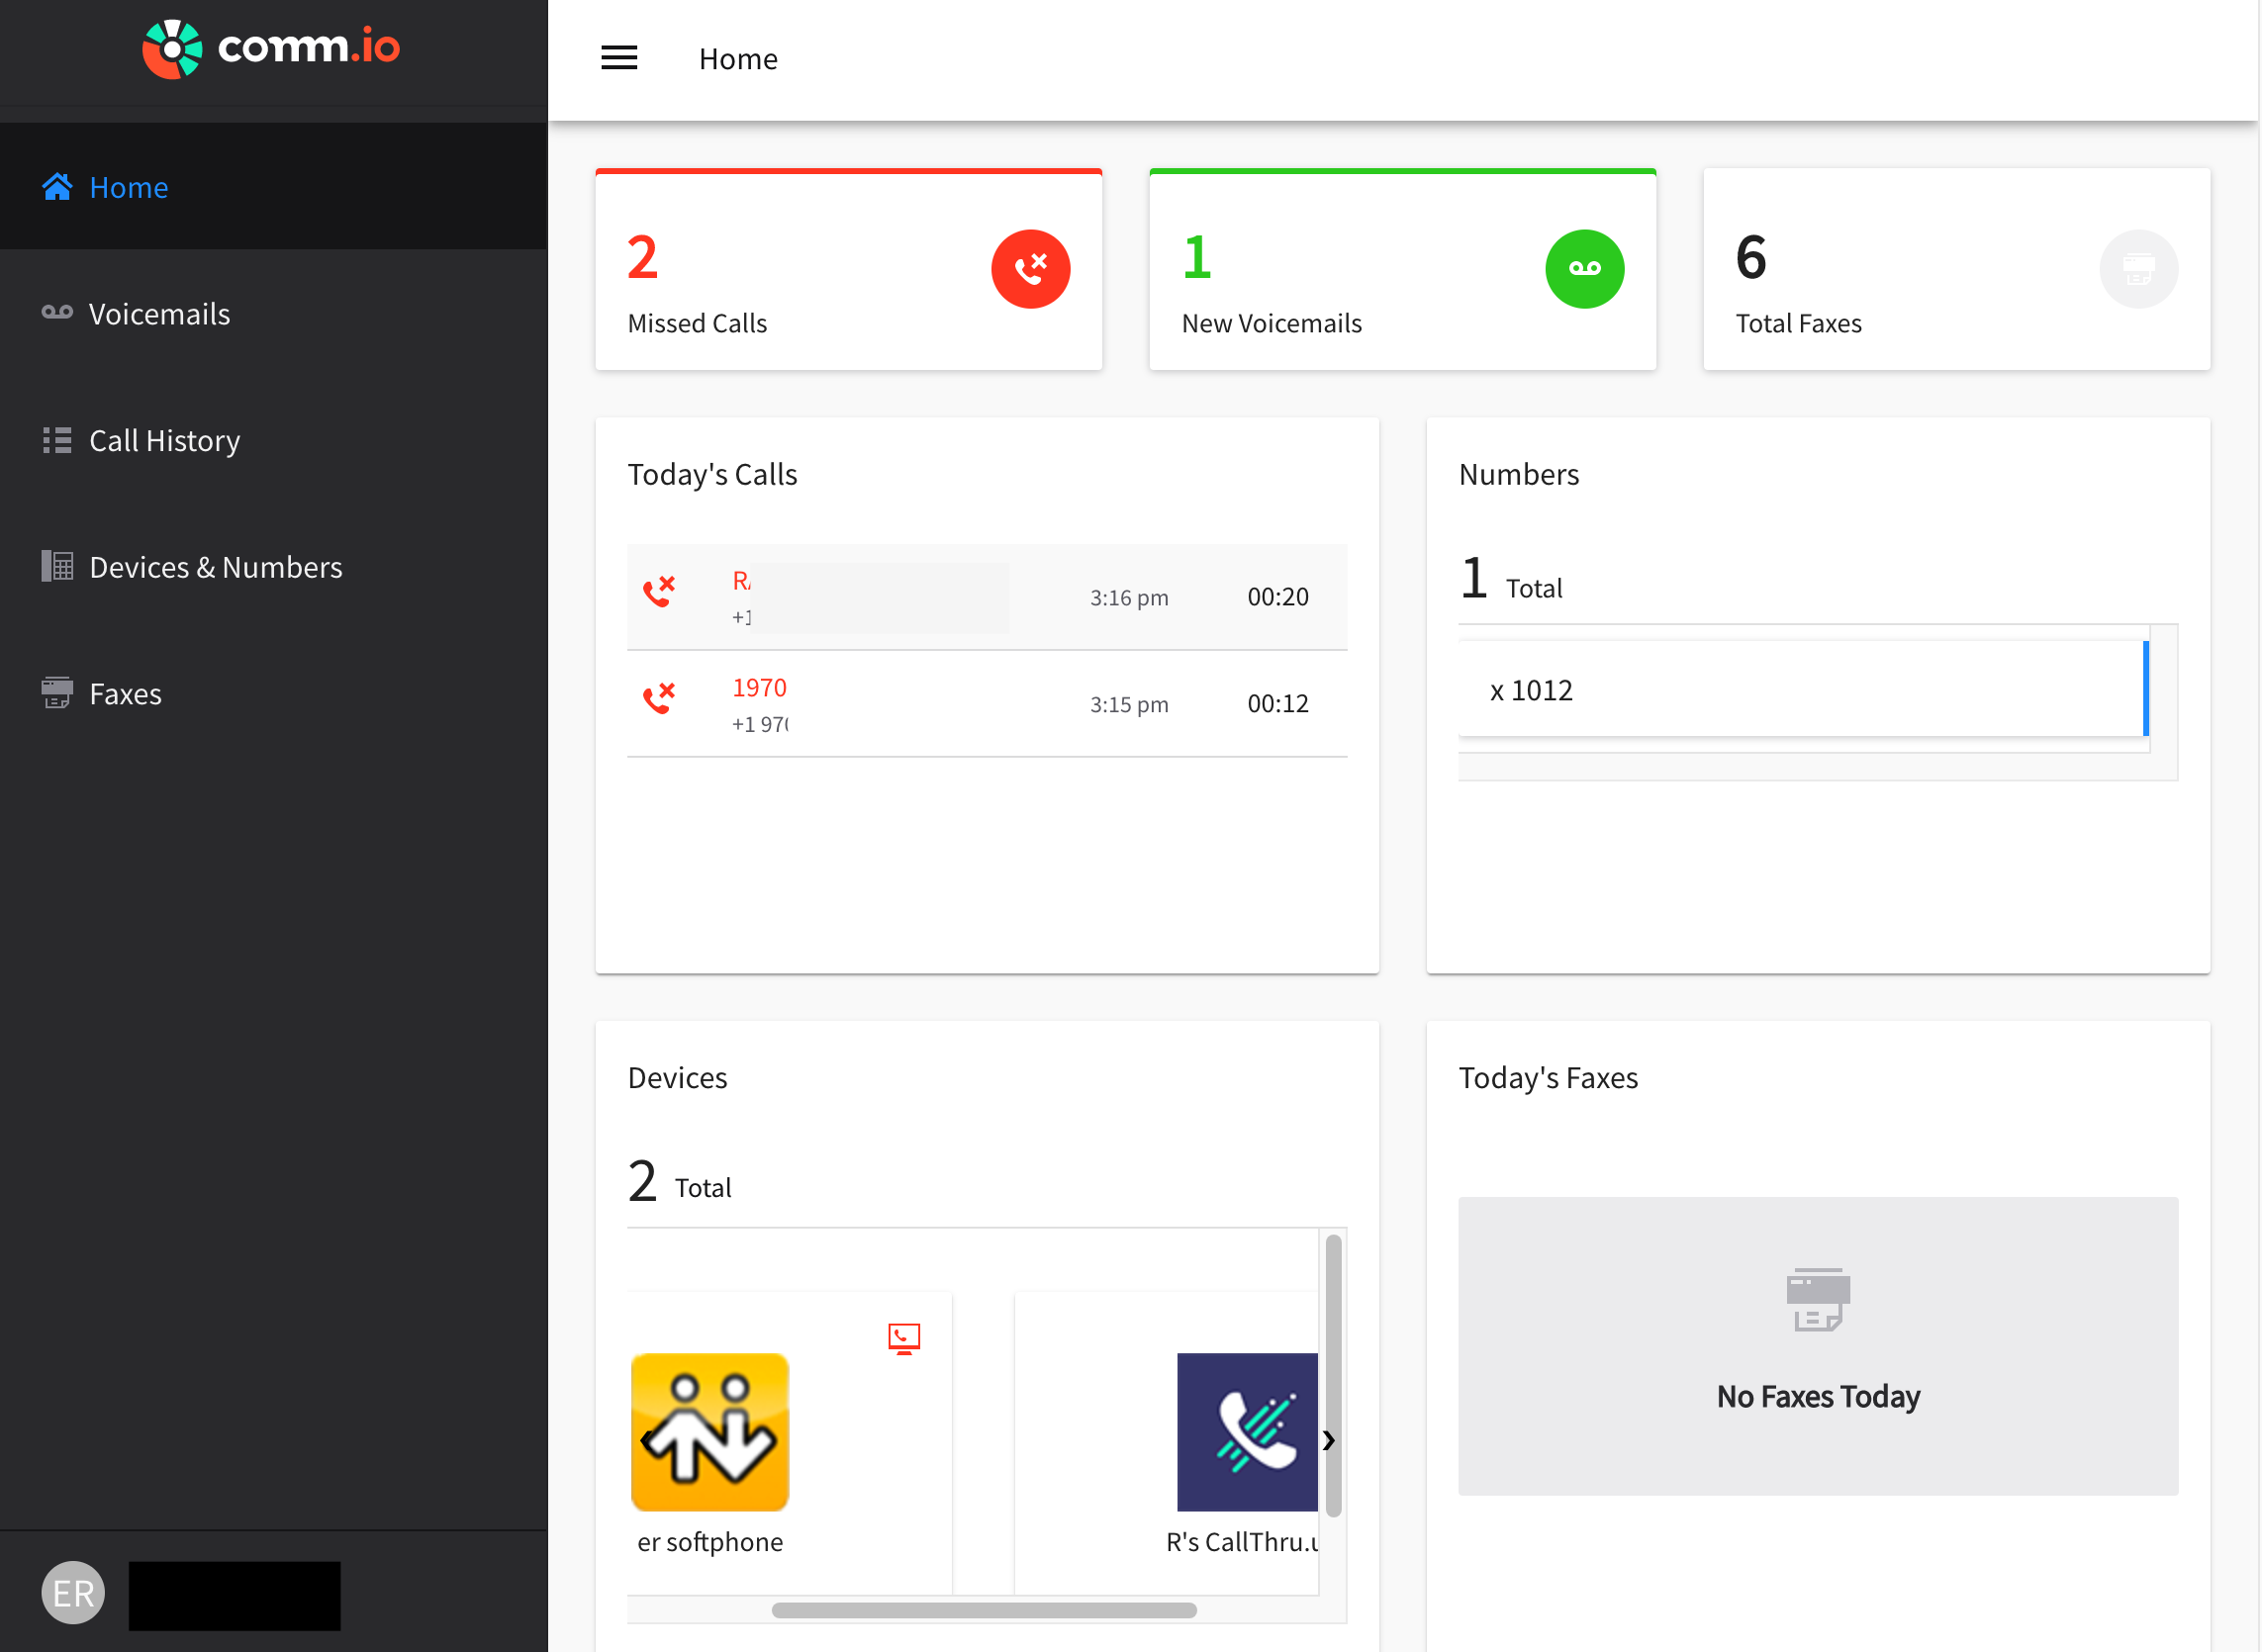
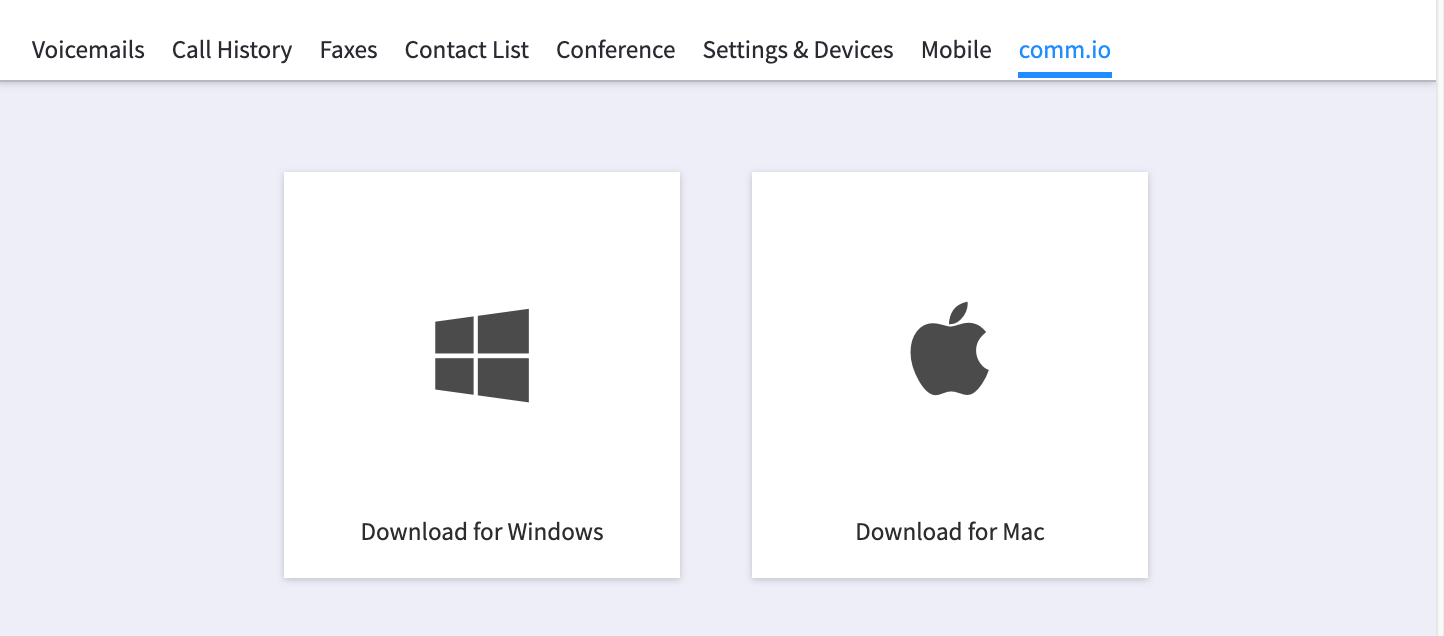
.png.d90d2aa5b66d9c5065dceee7aa7fb5d9.png)
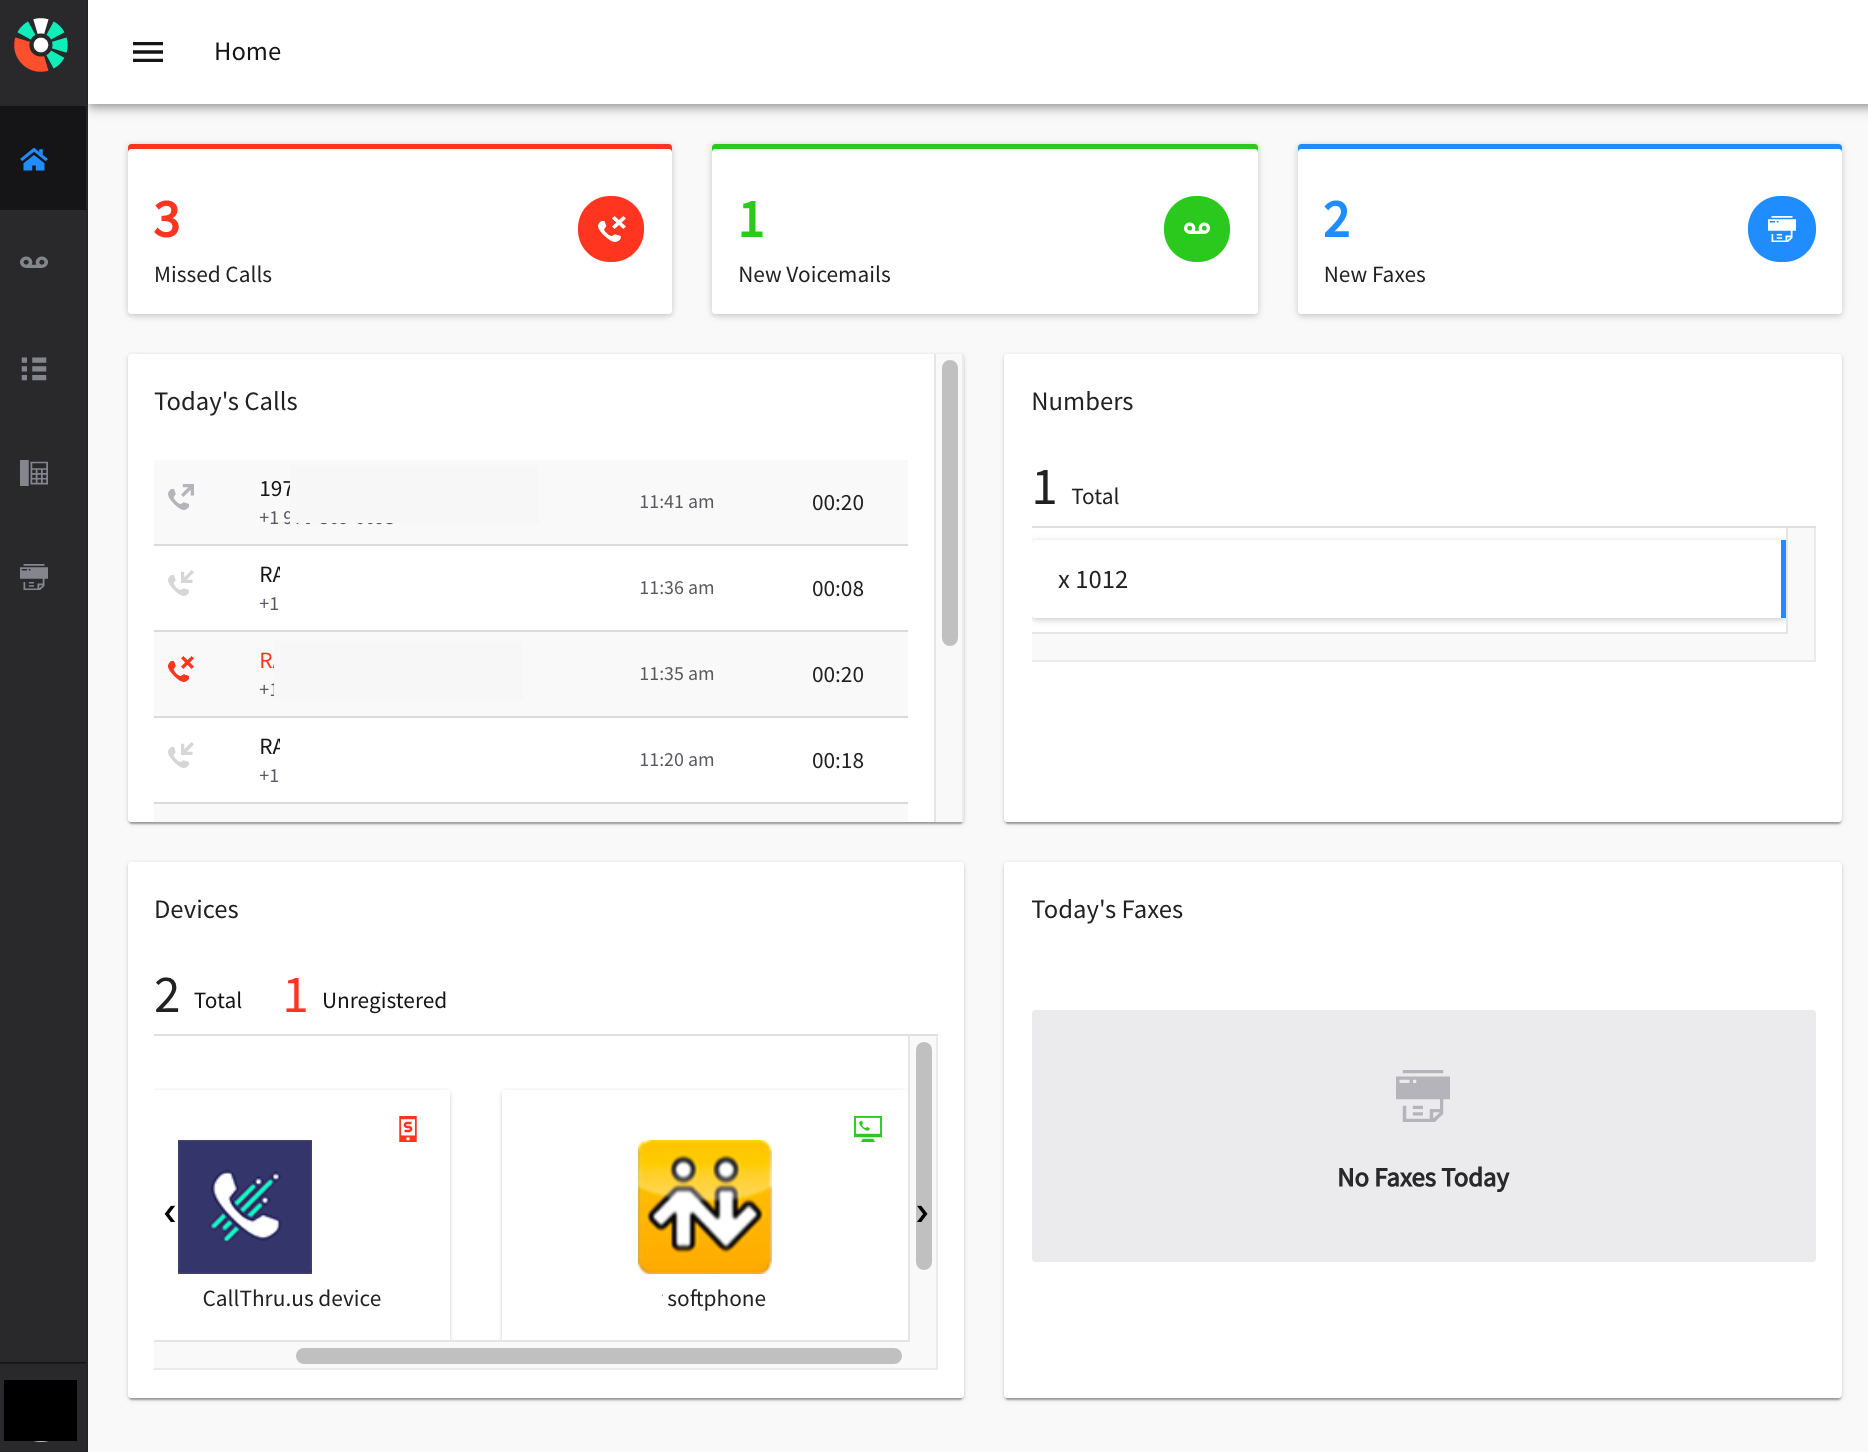

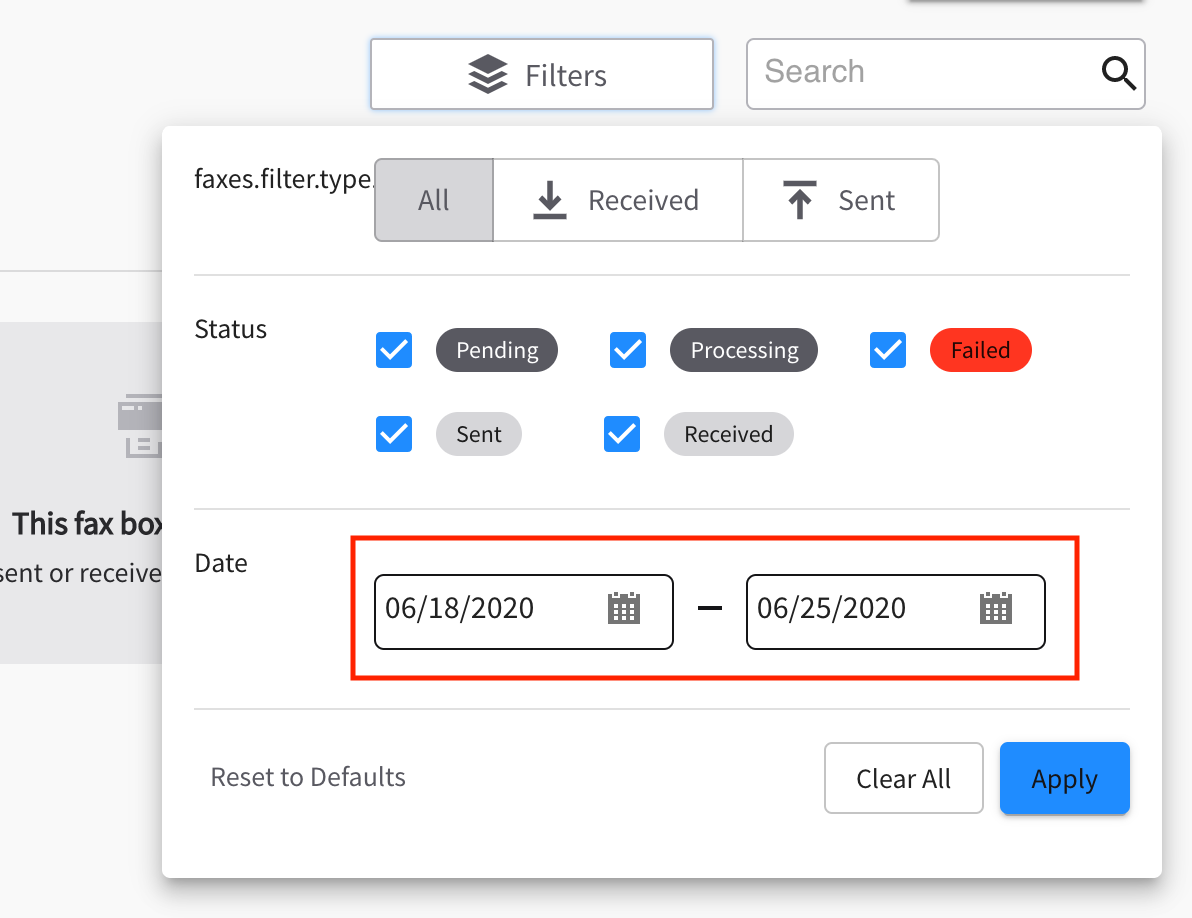

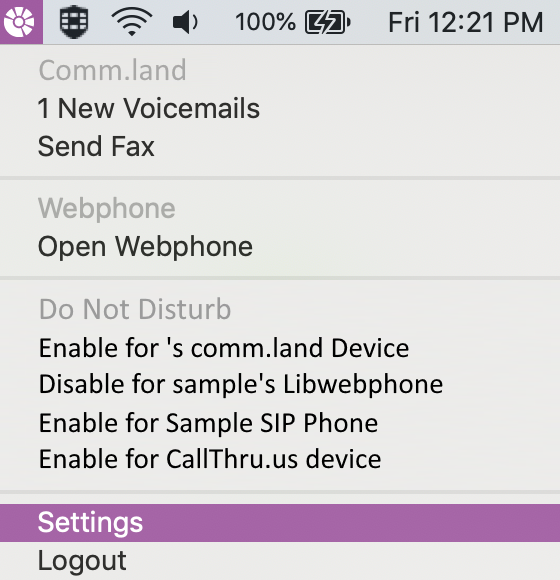
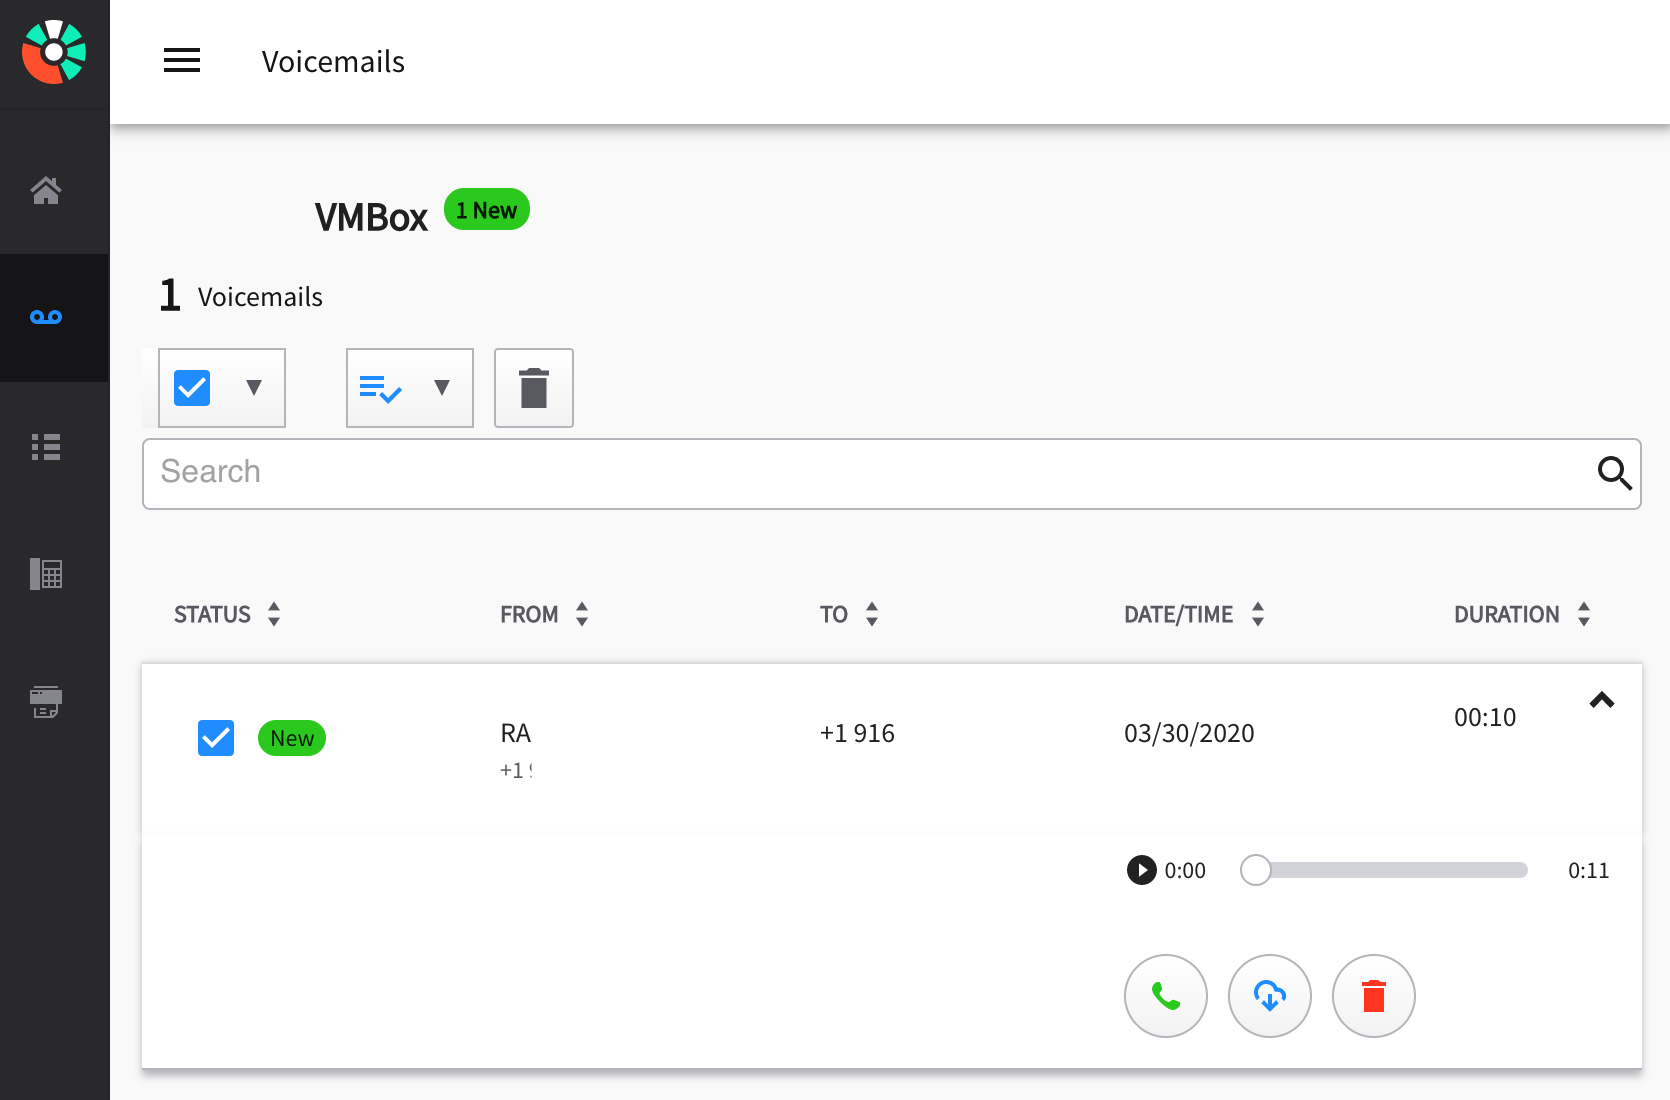
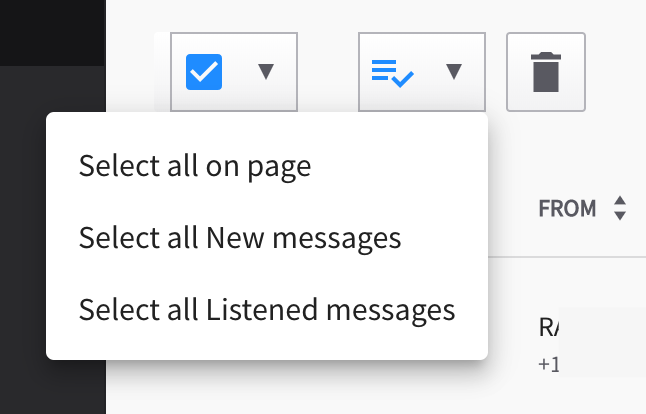 .
. 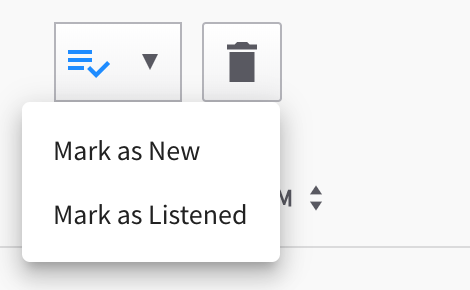
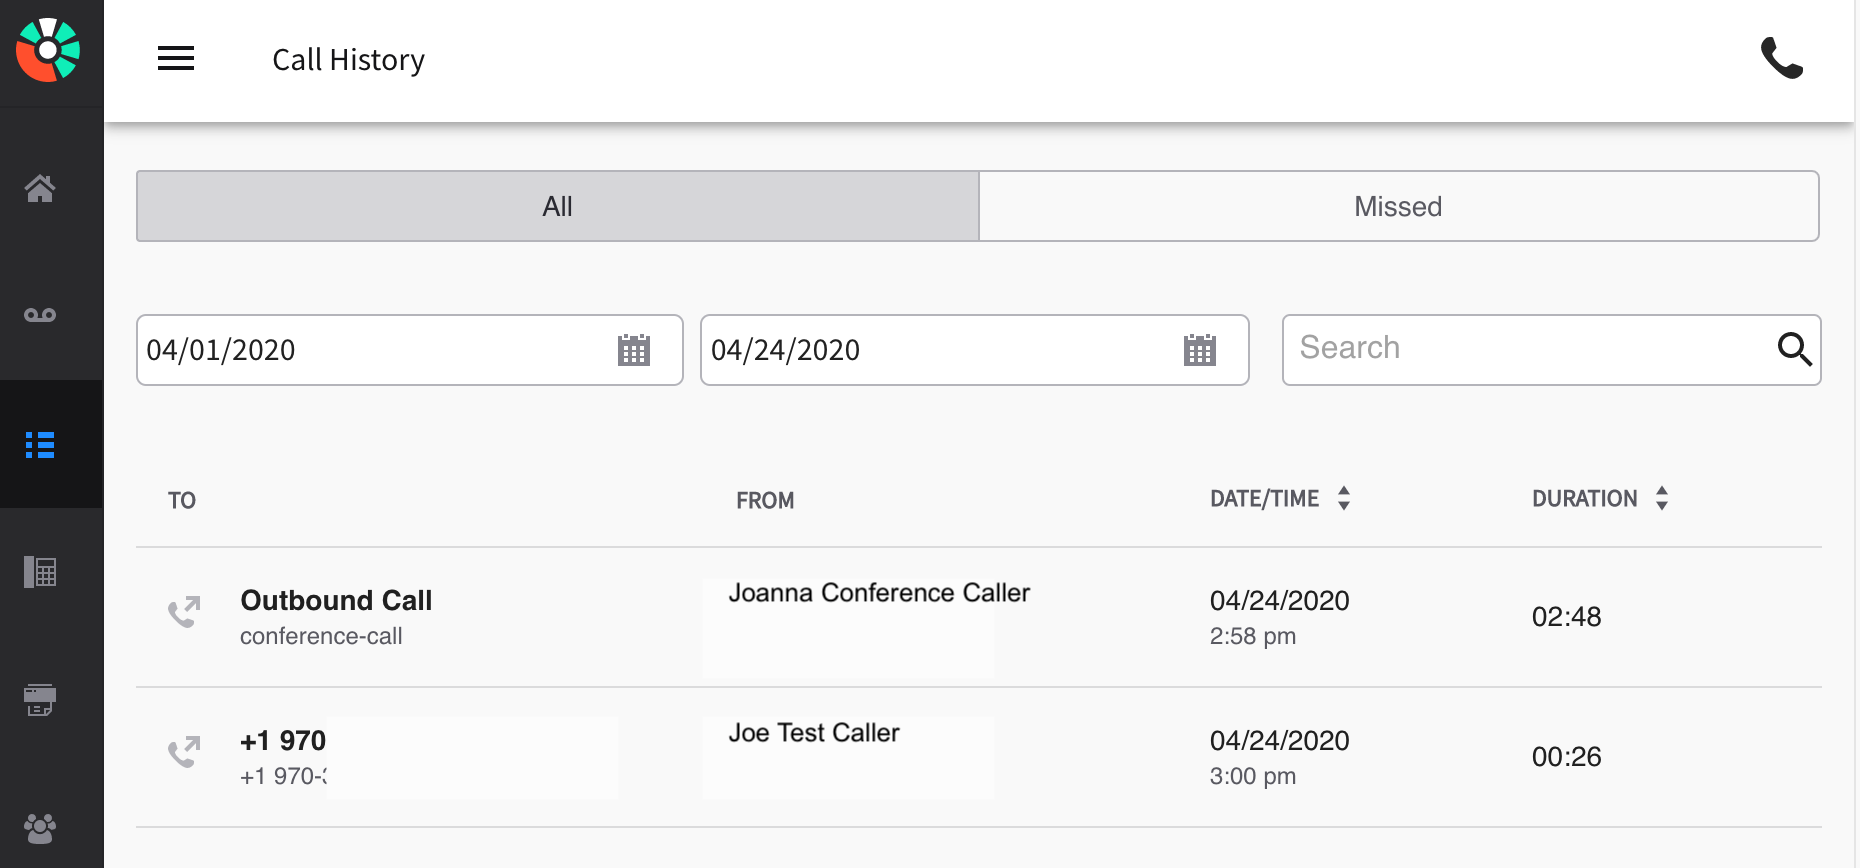
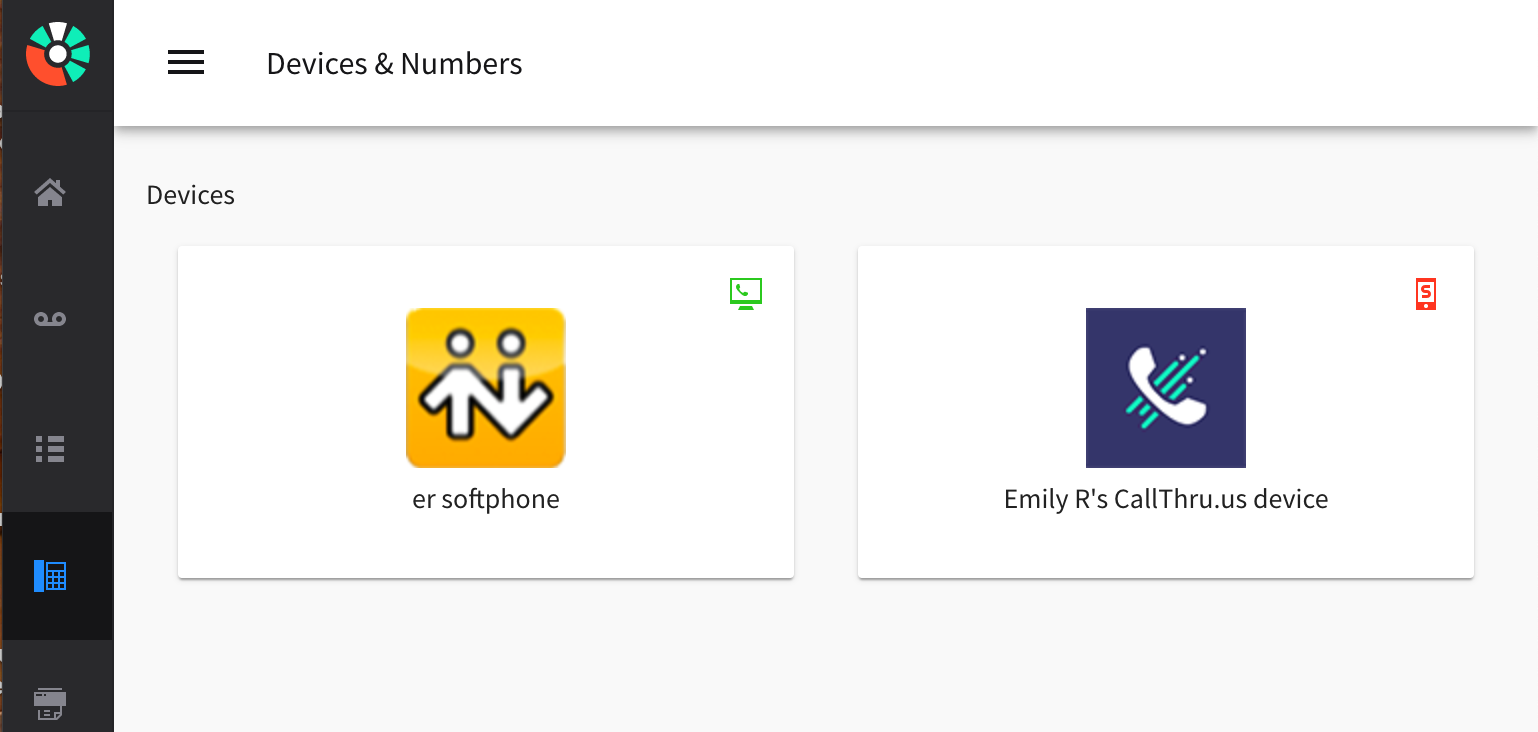

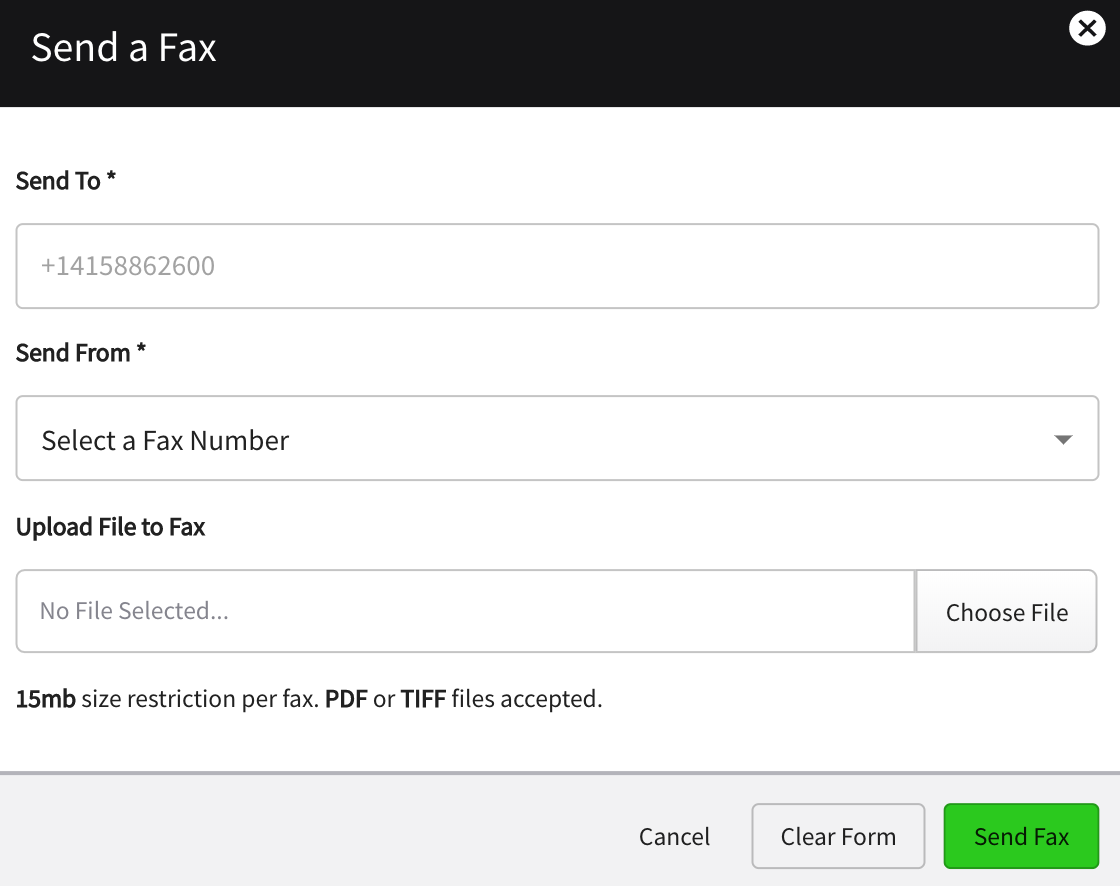
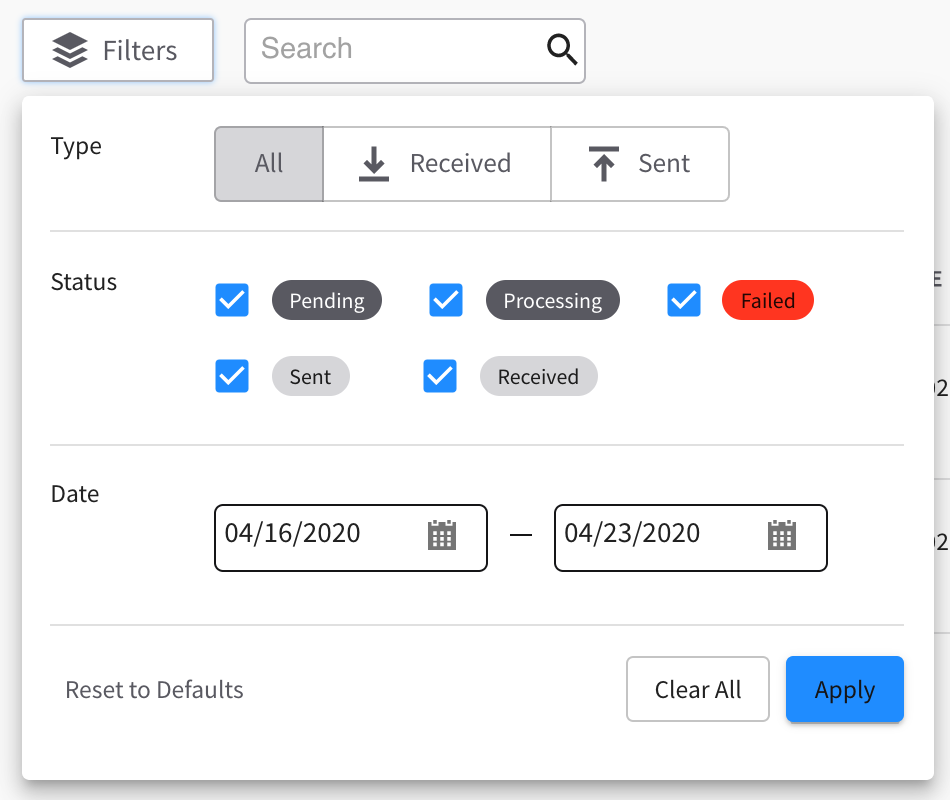


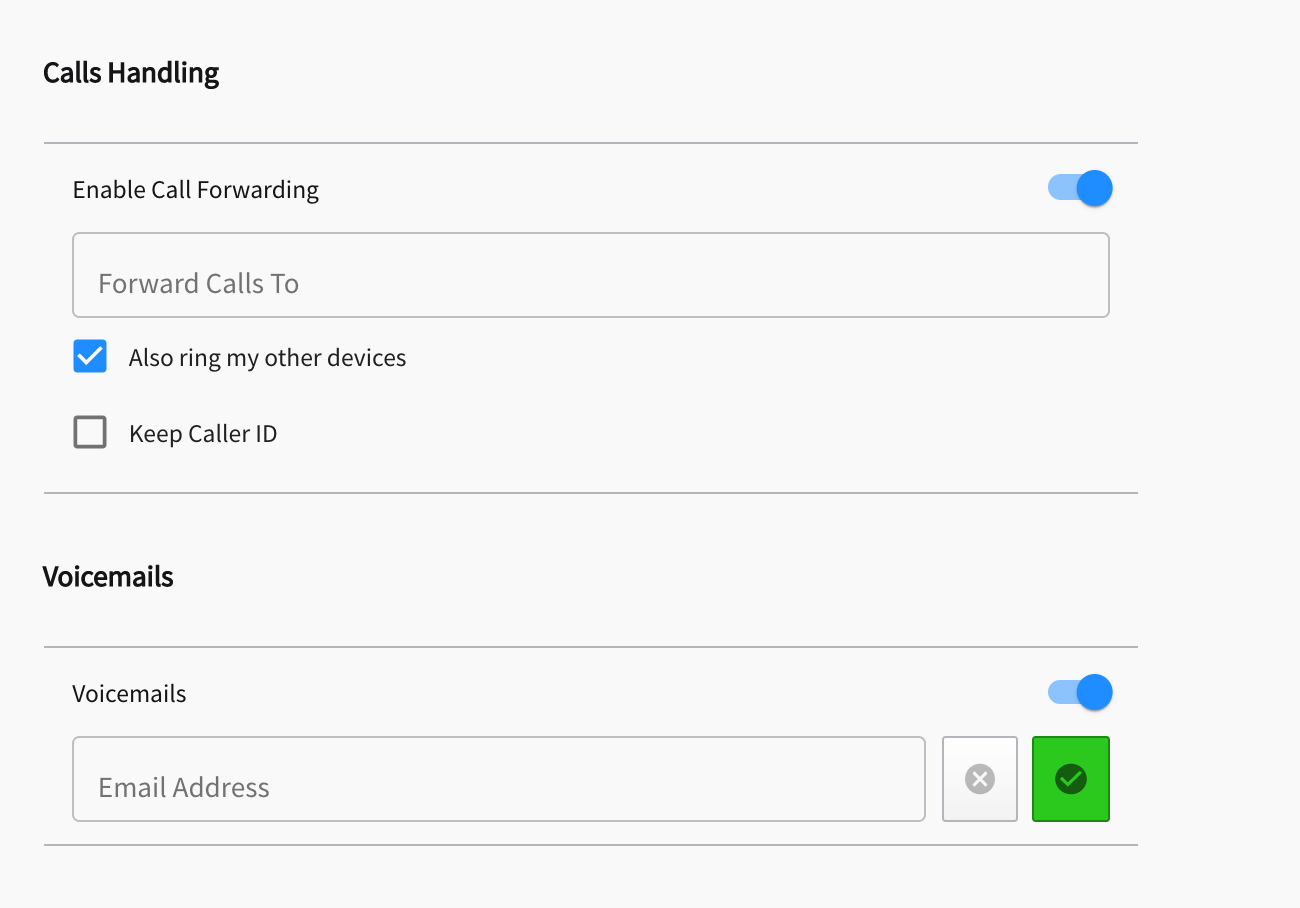


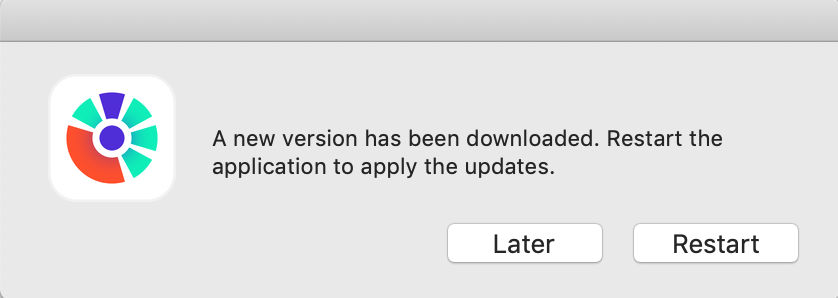
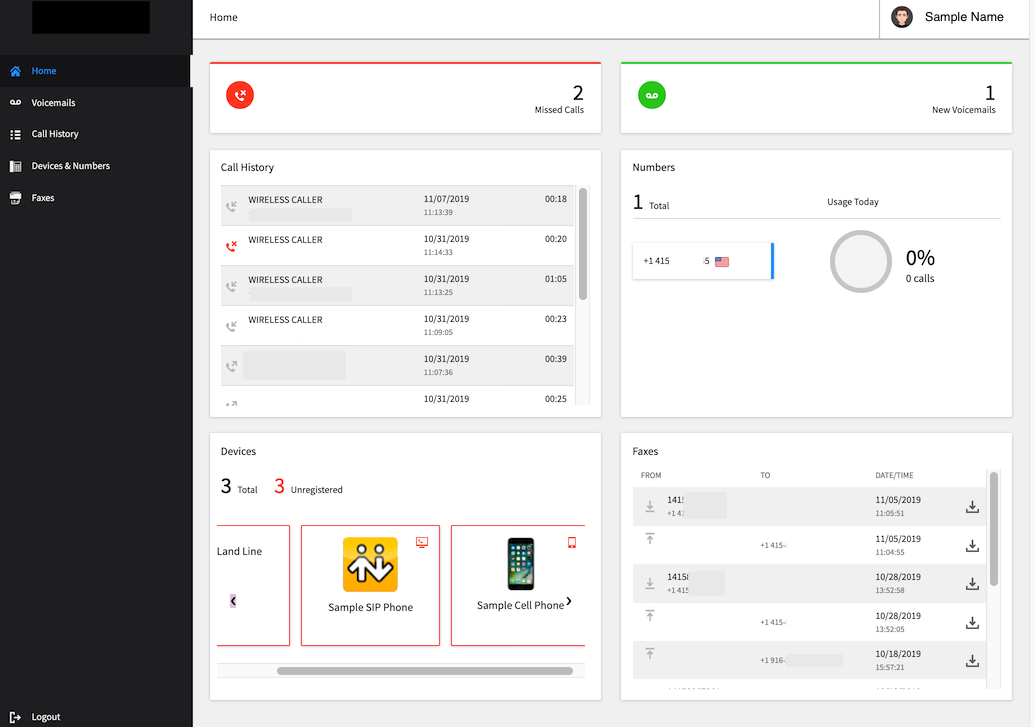
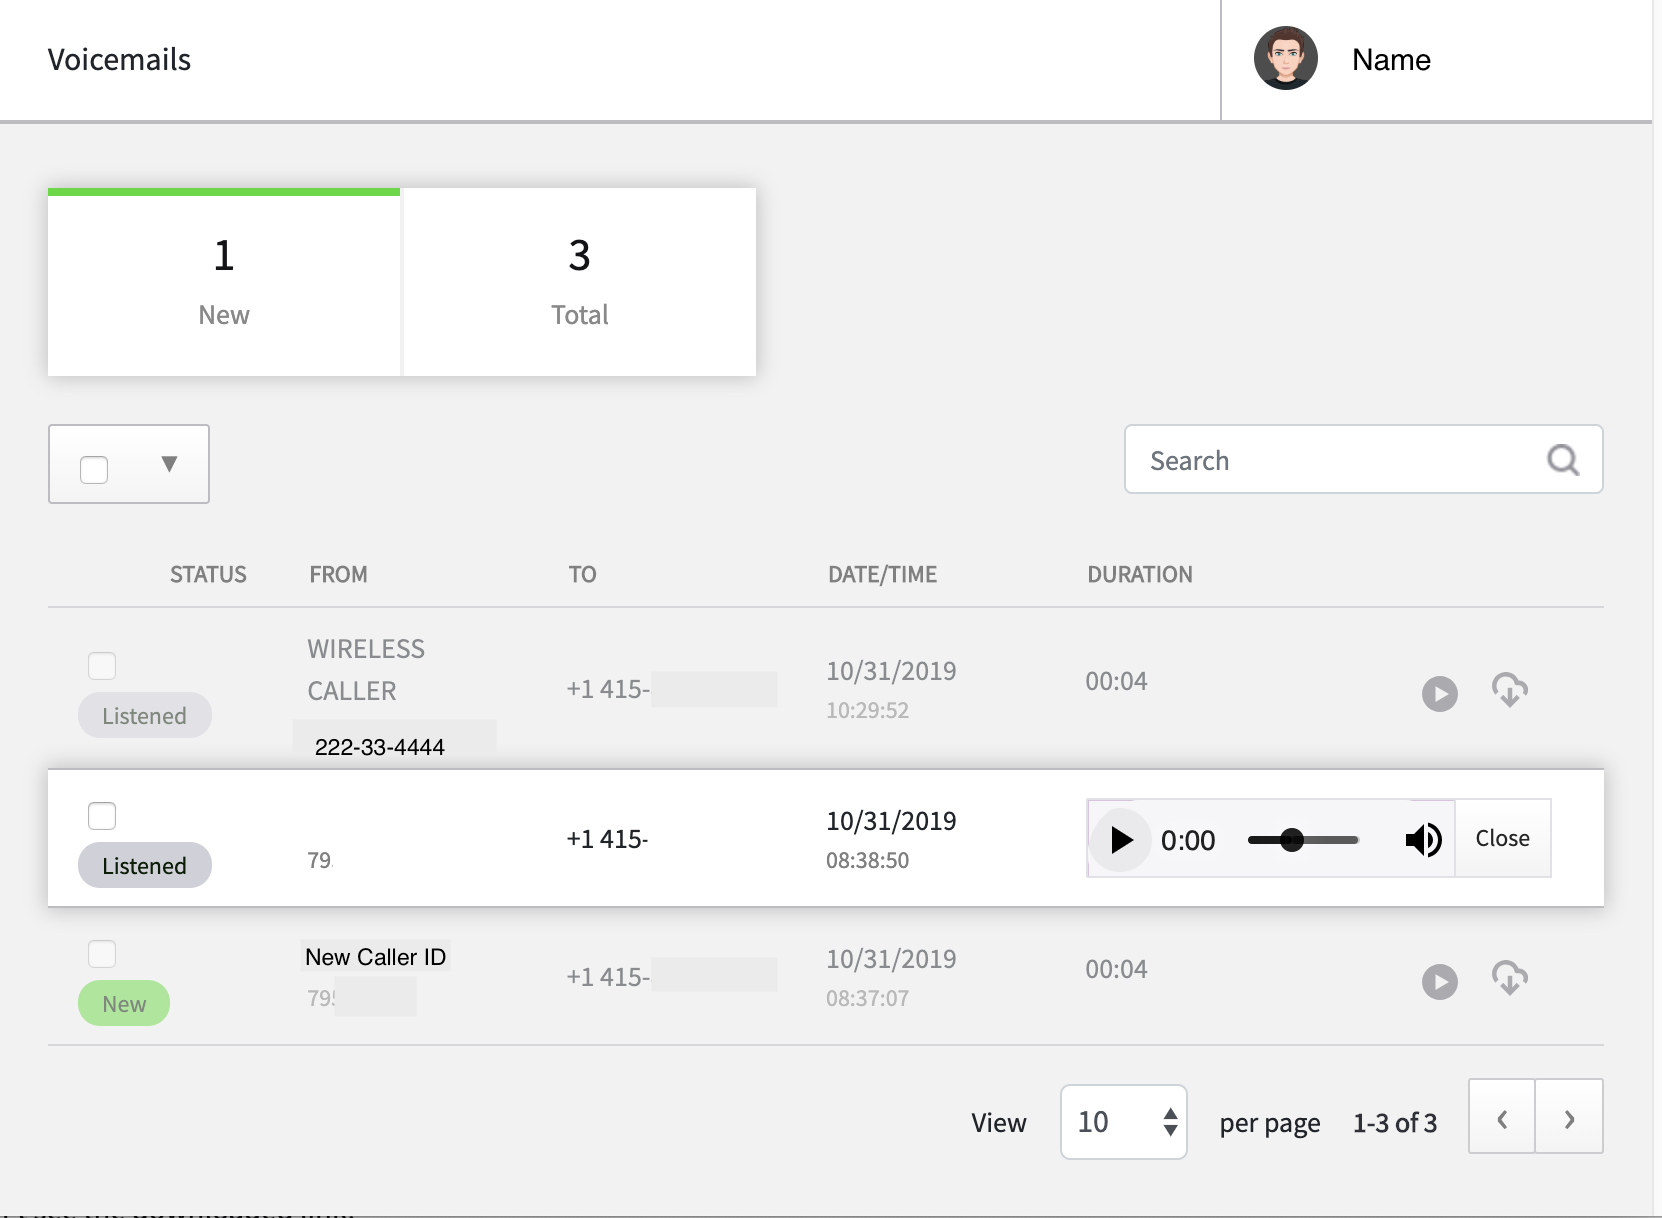
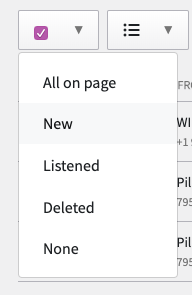


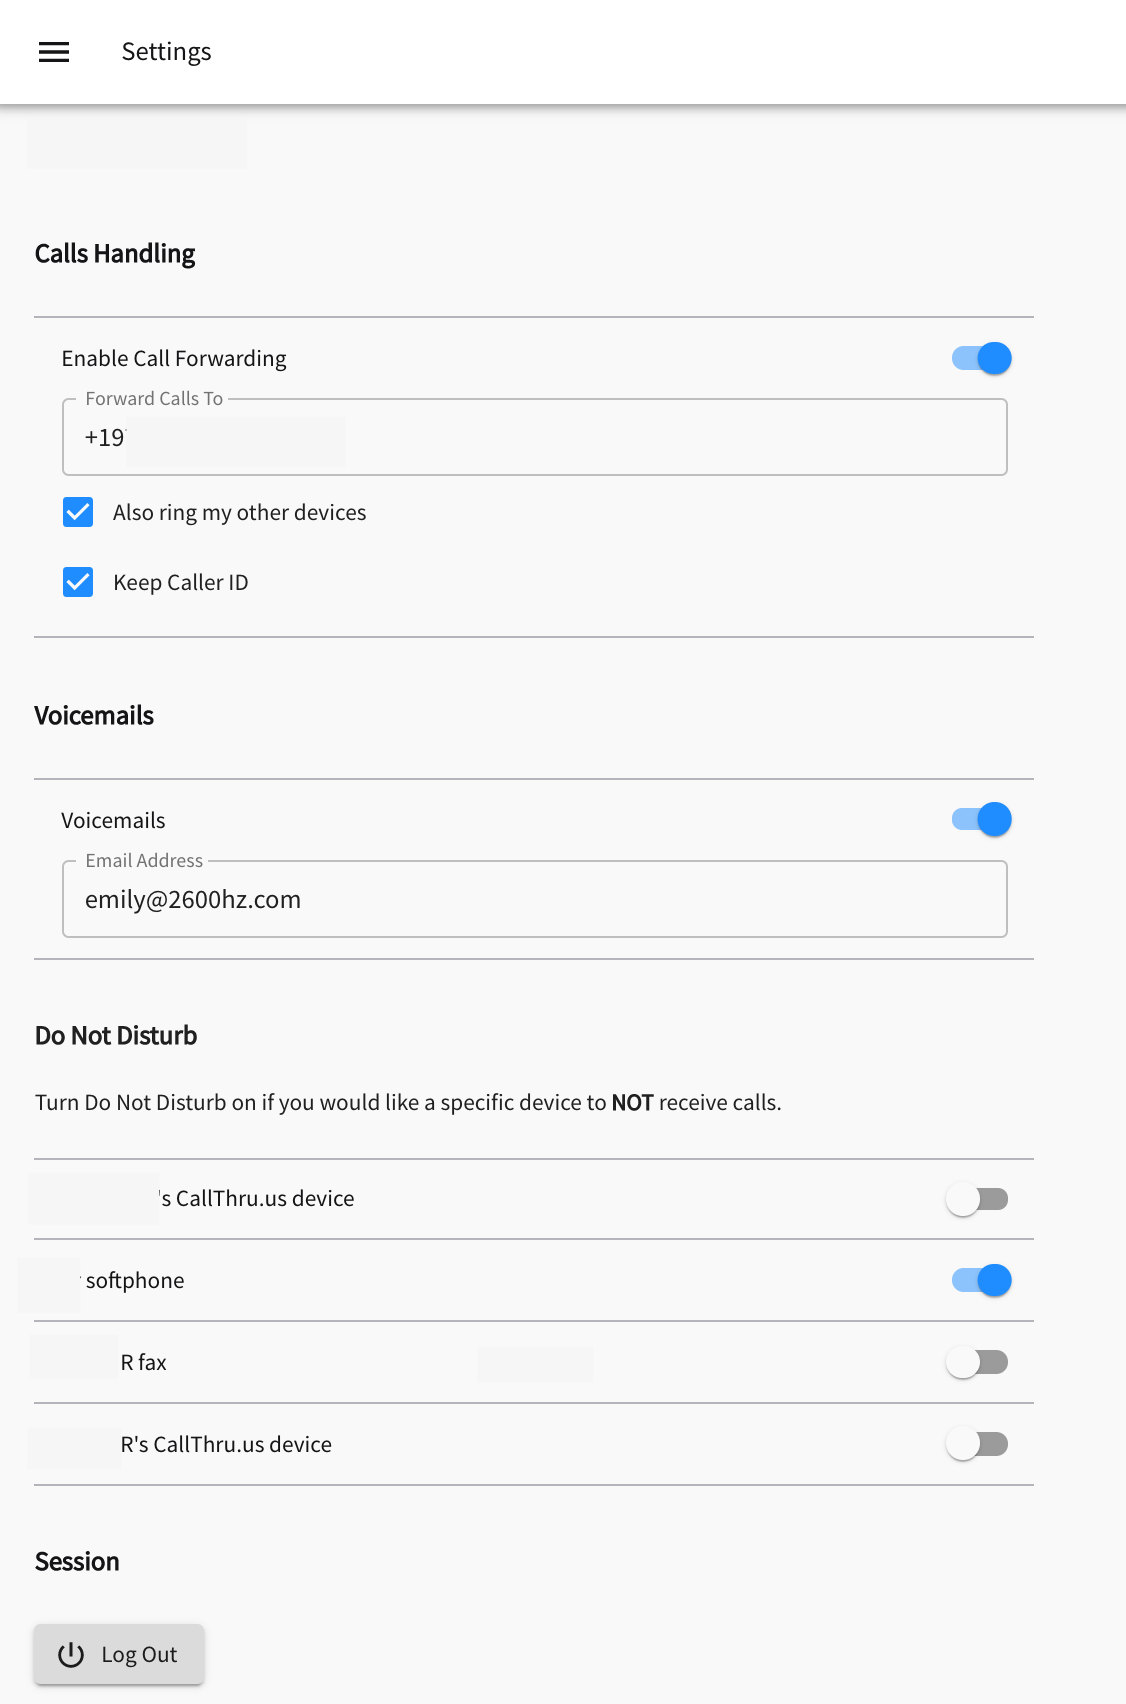


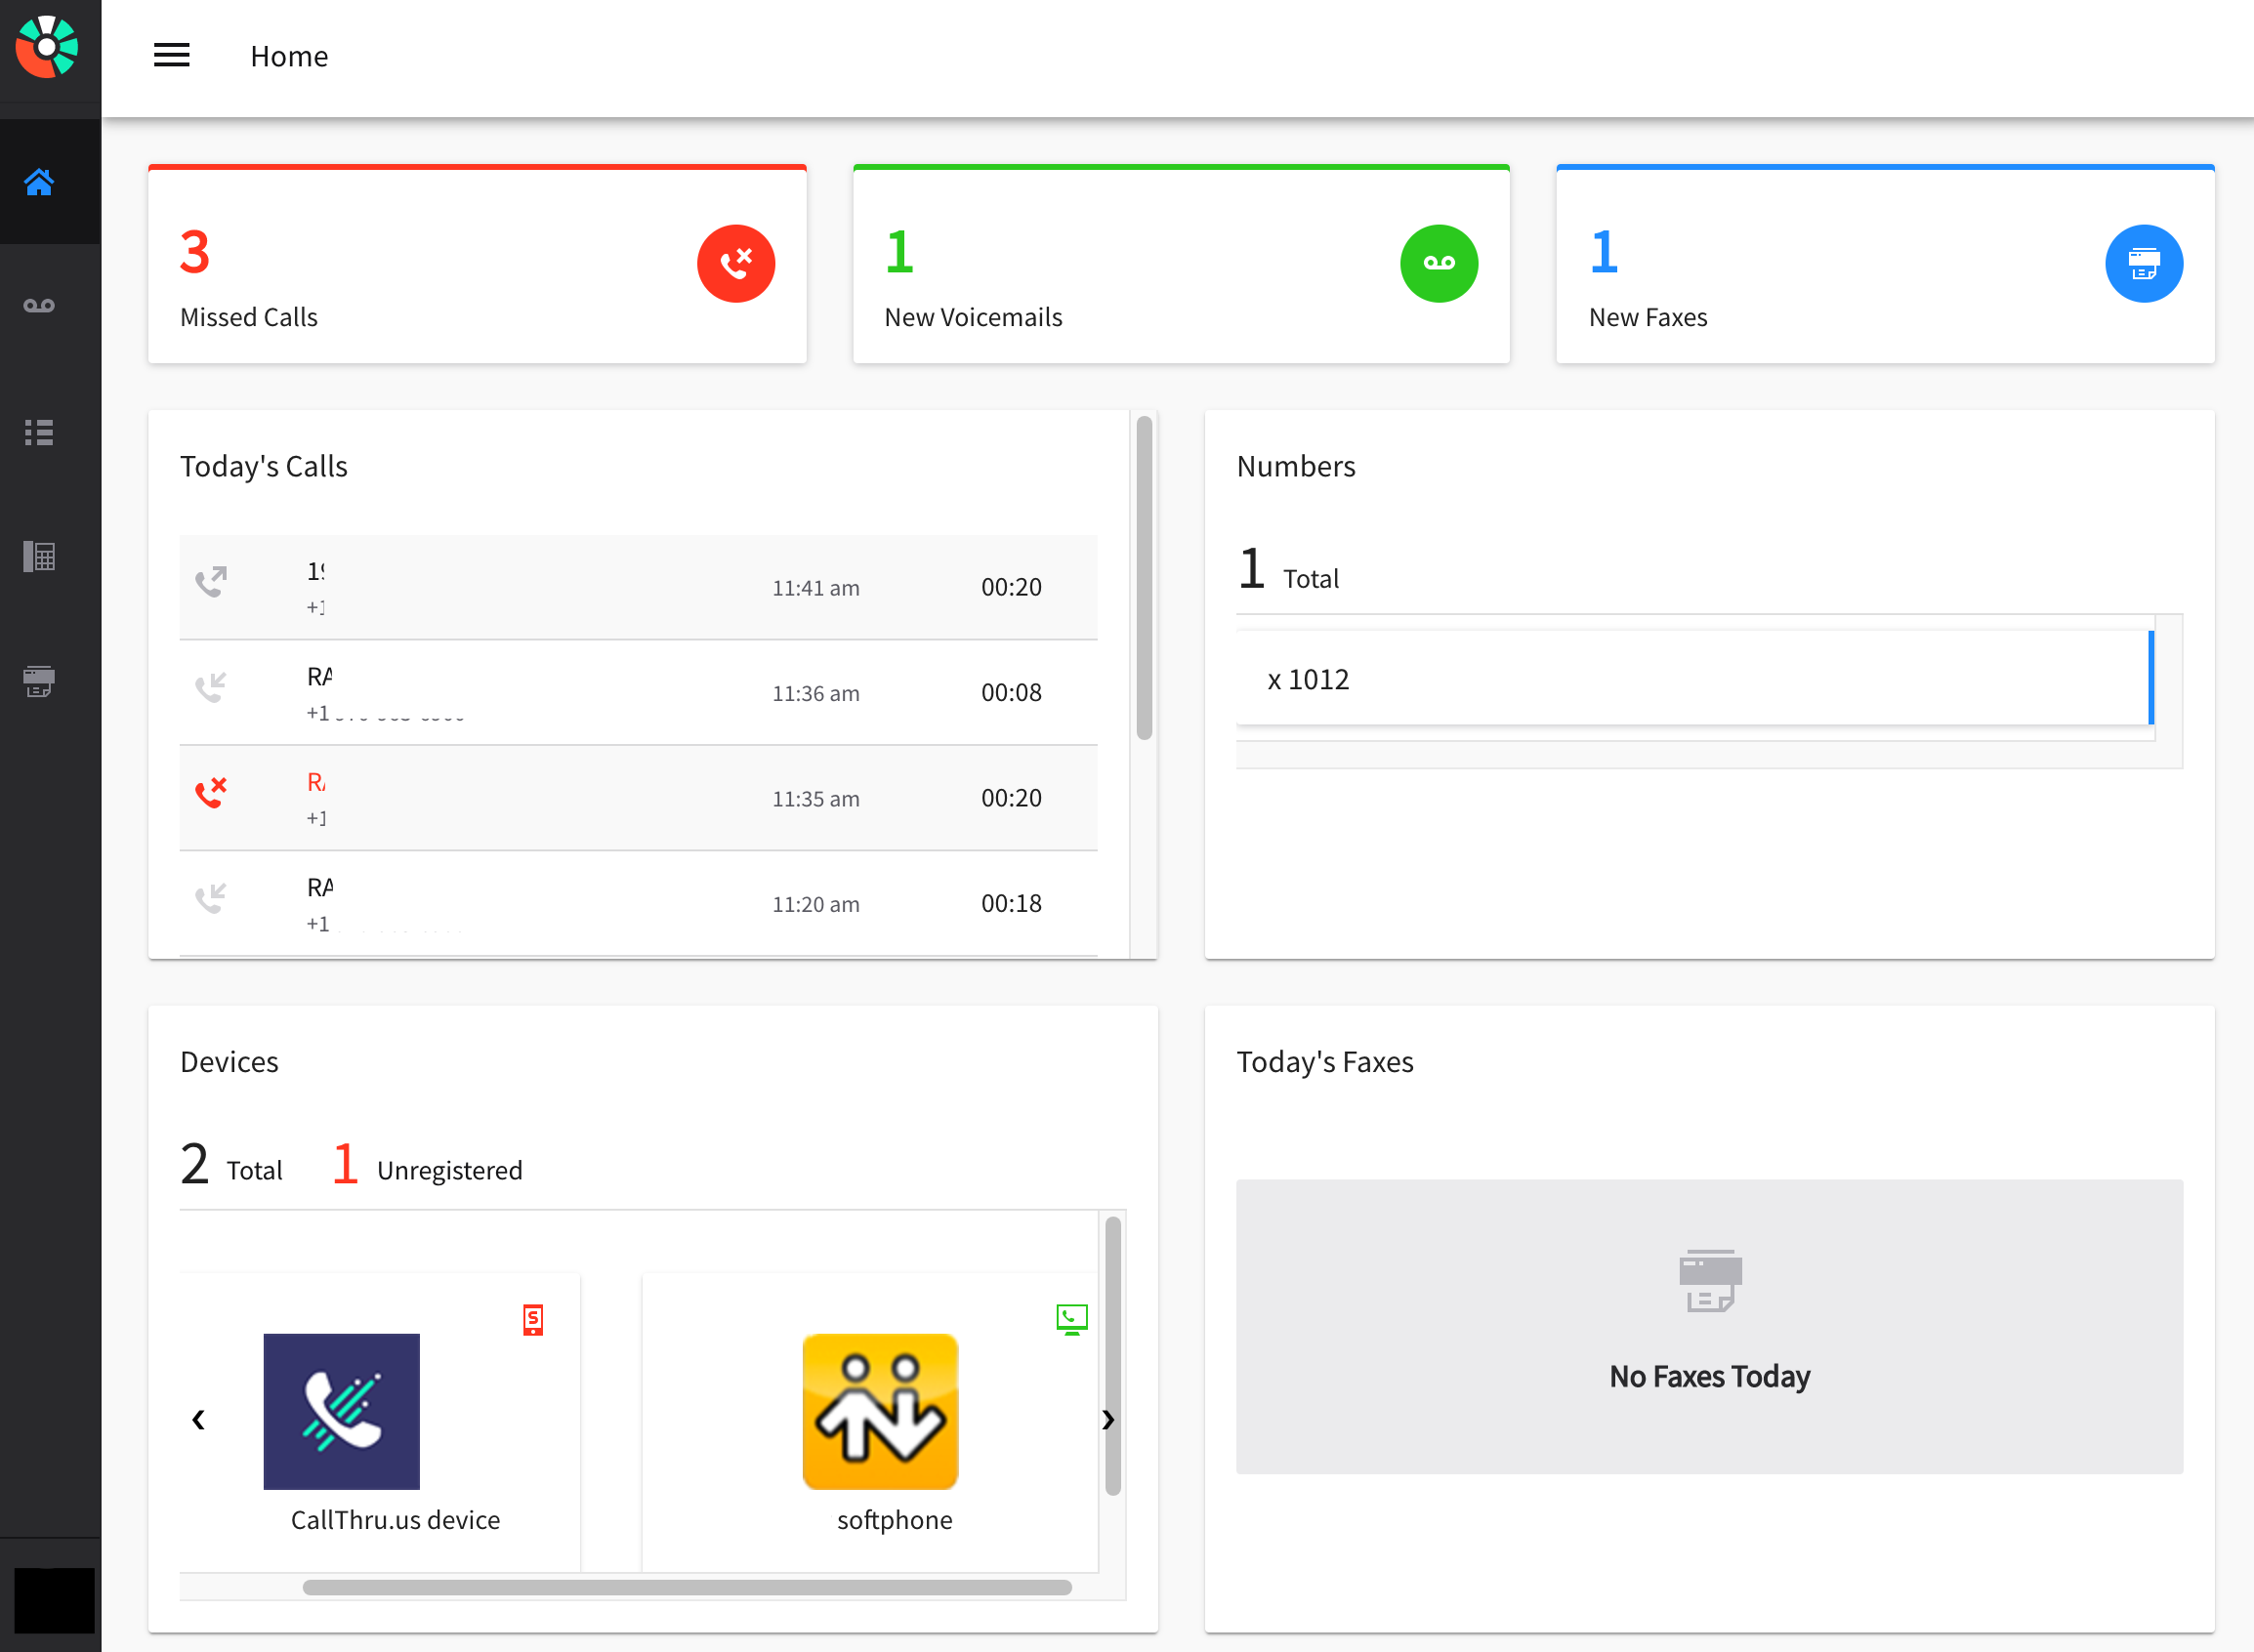
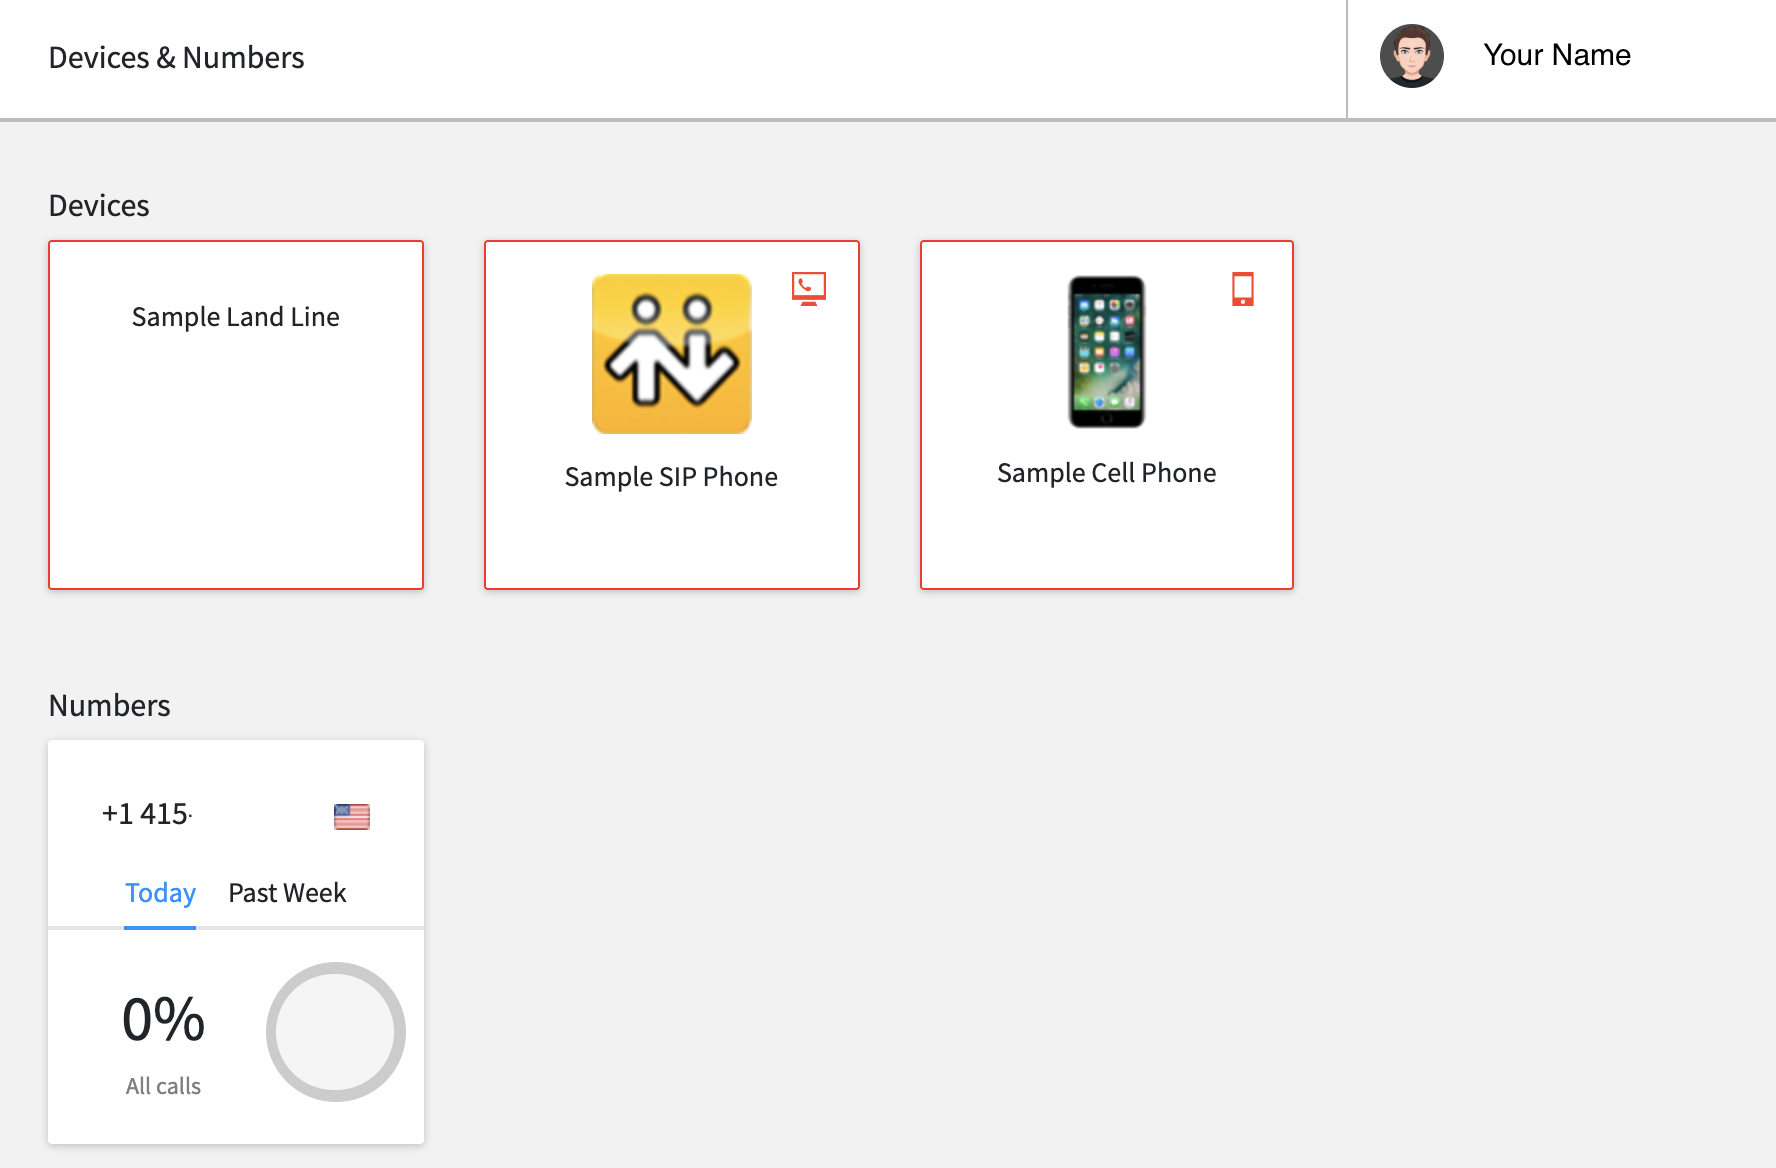

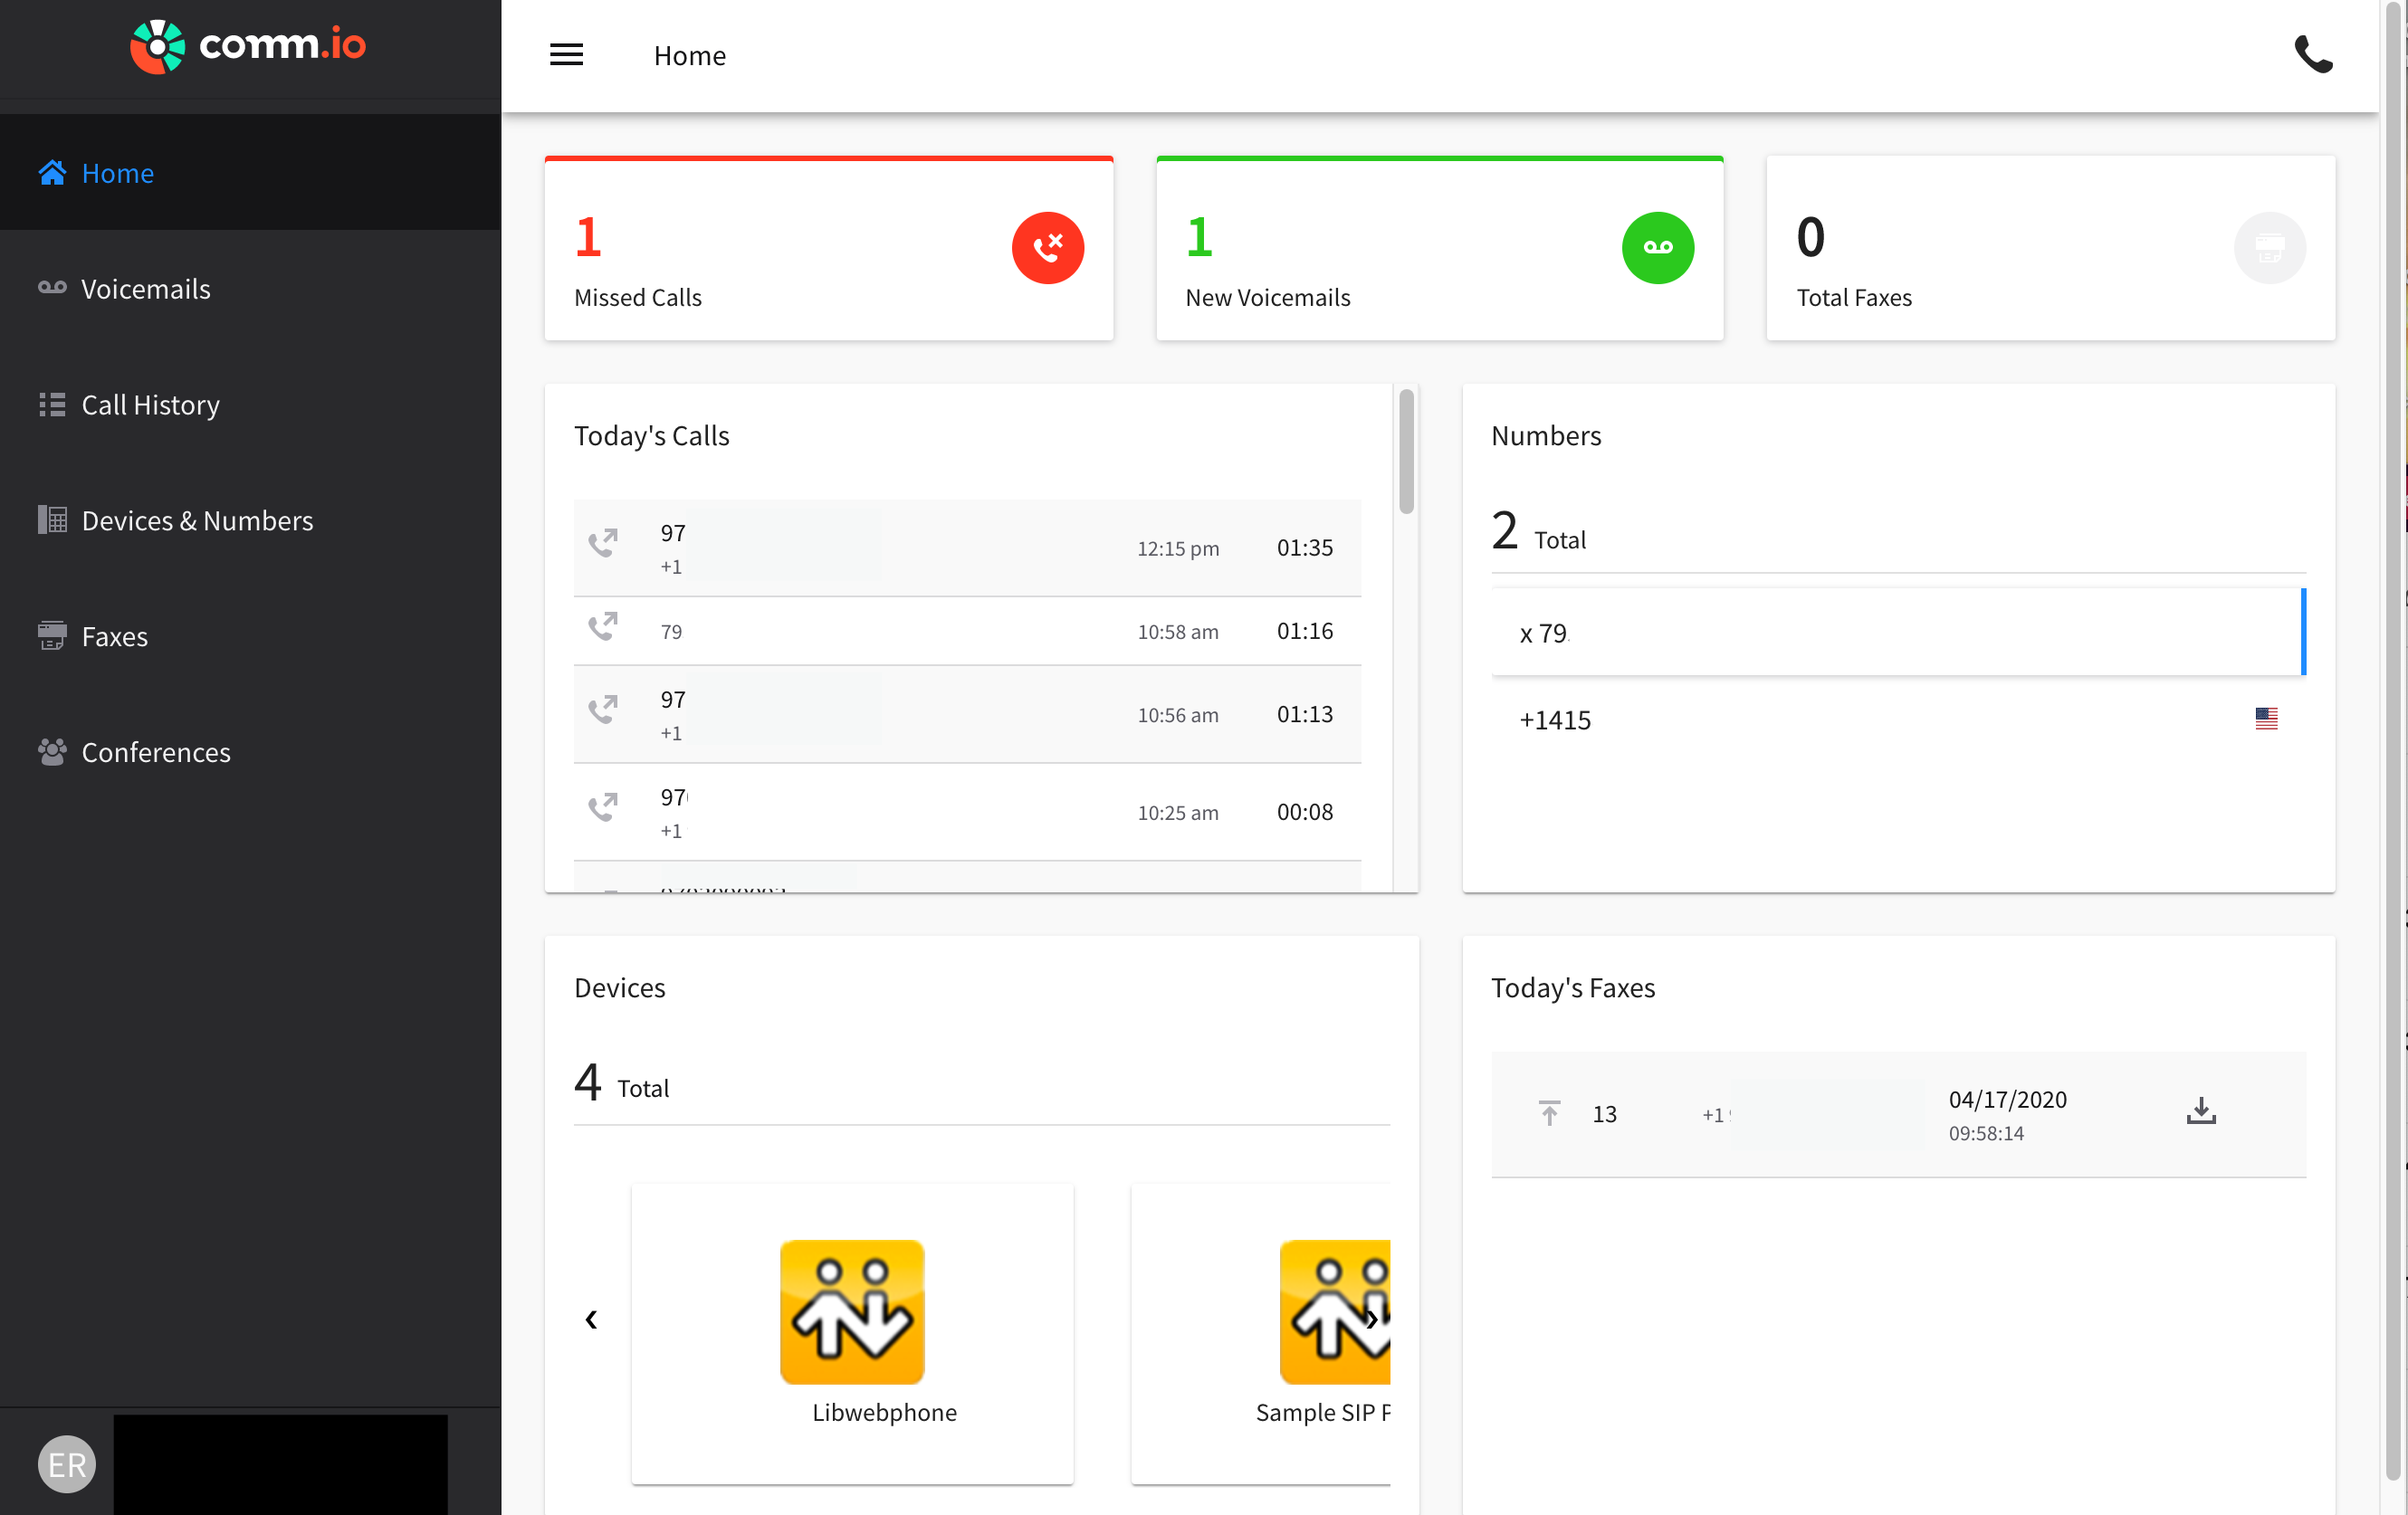

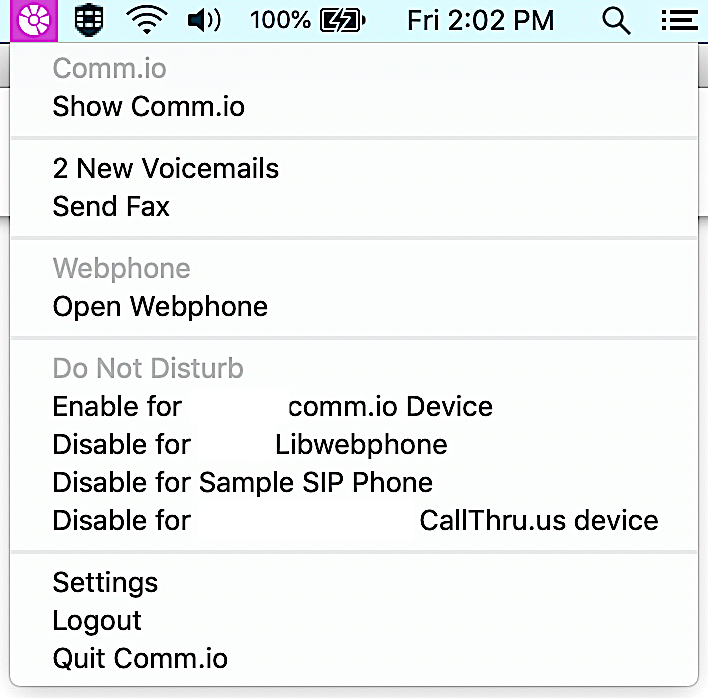
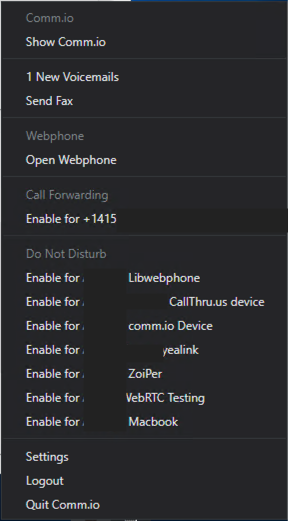
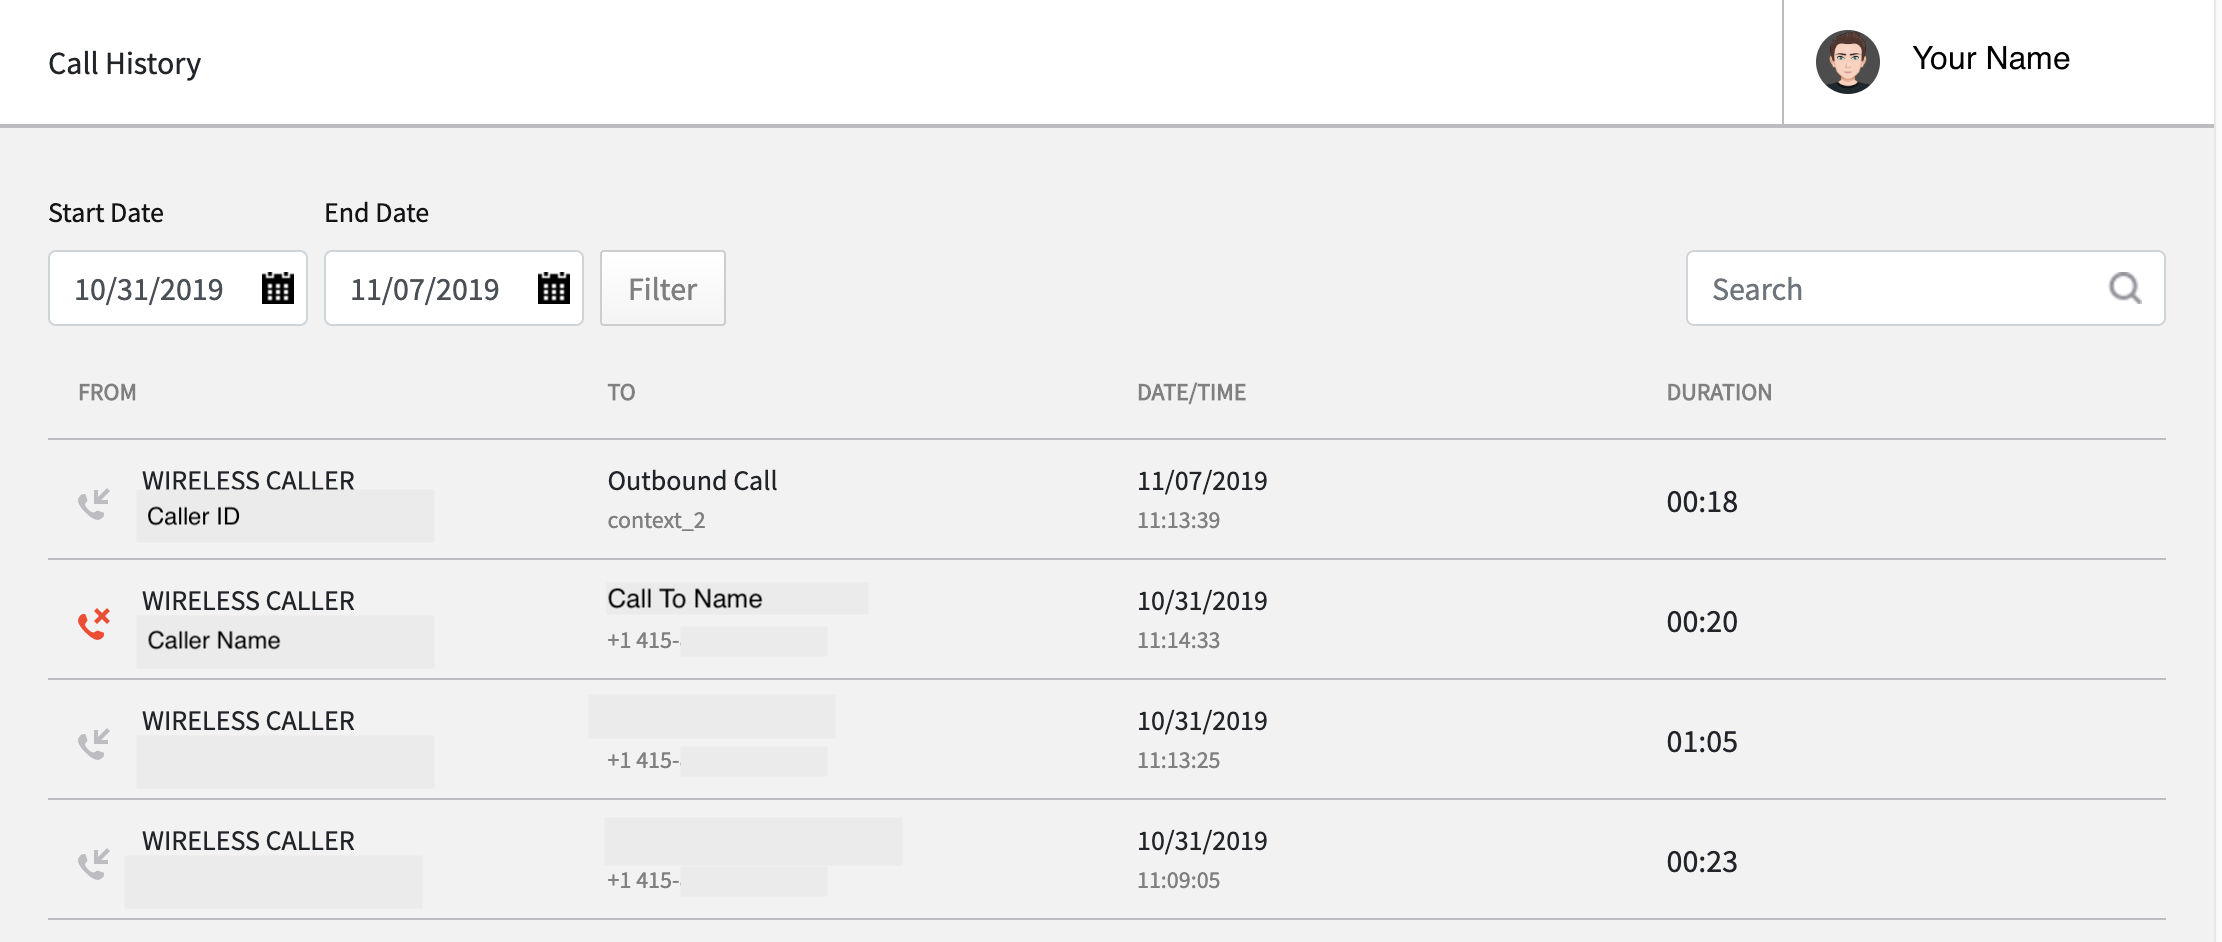

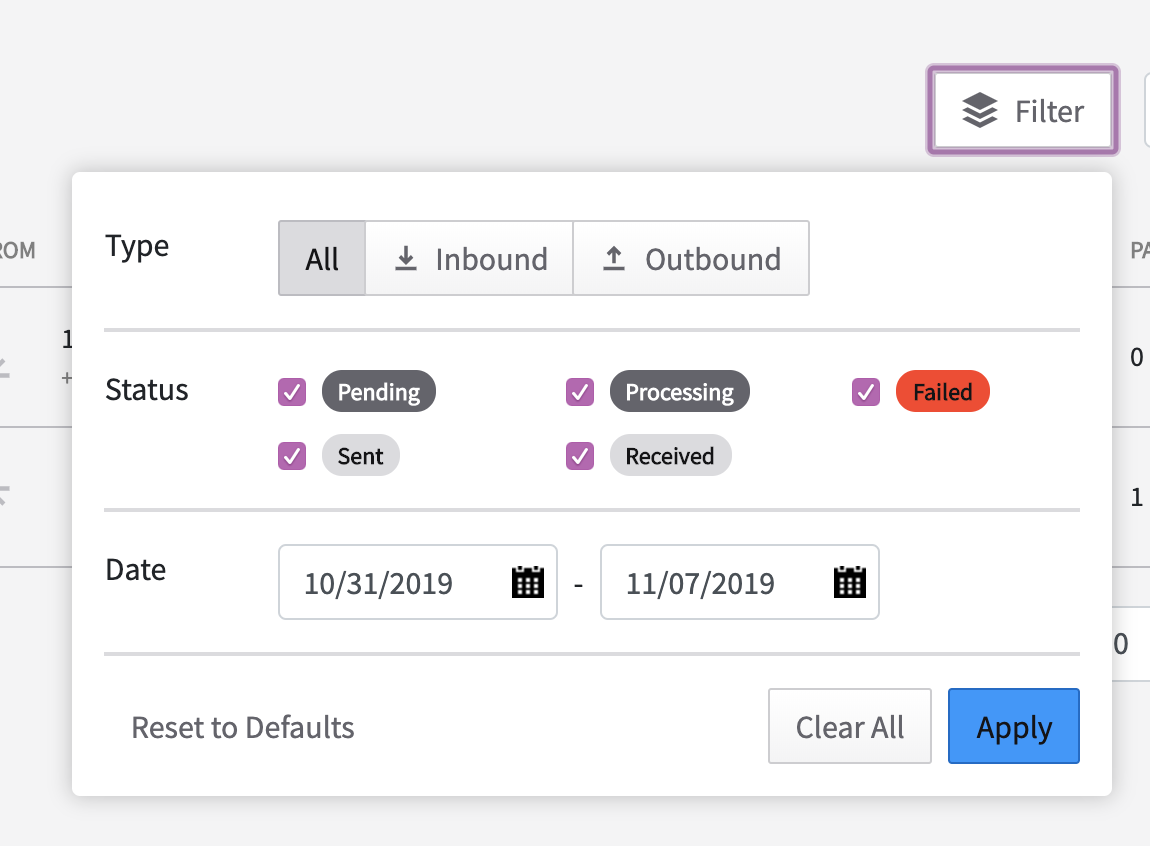

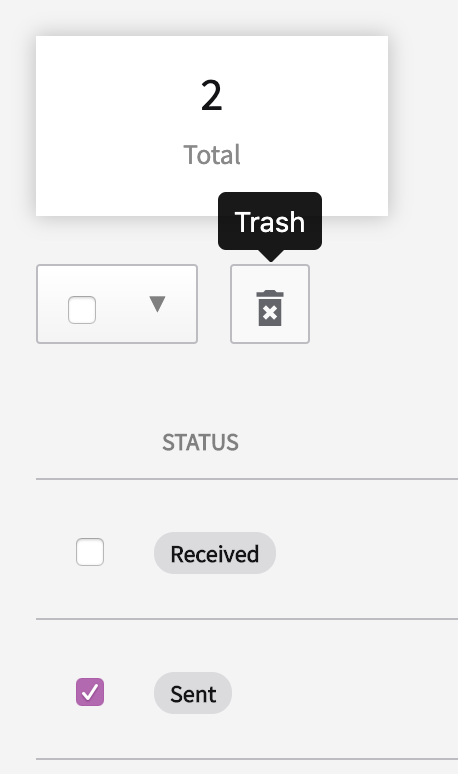
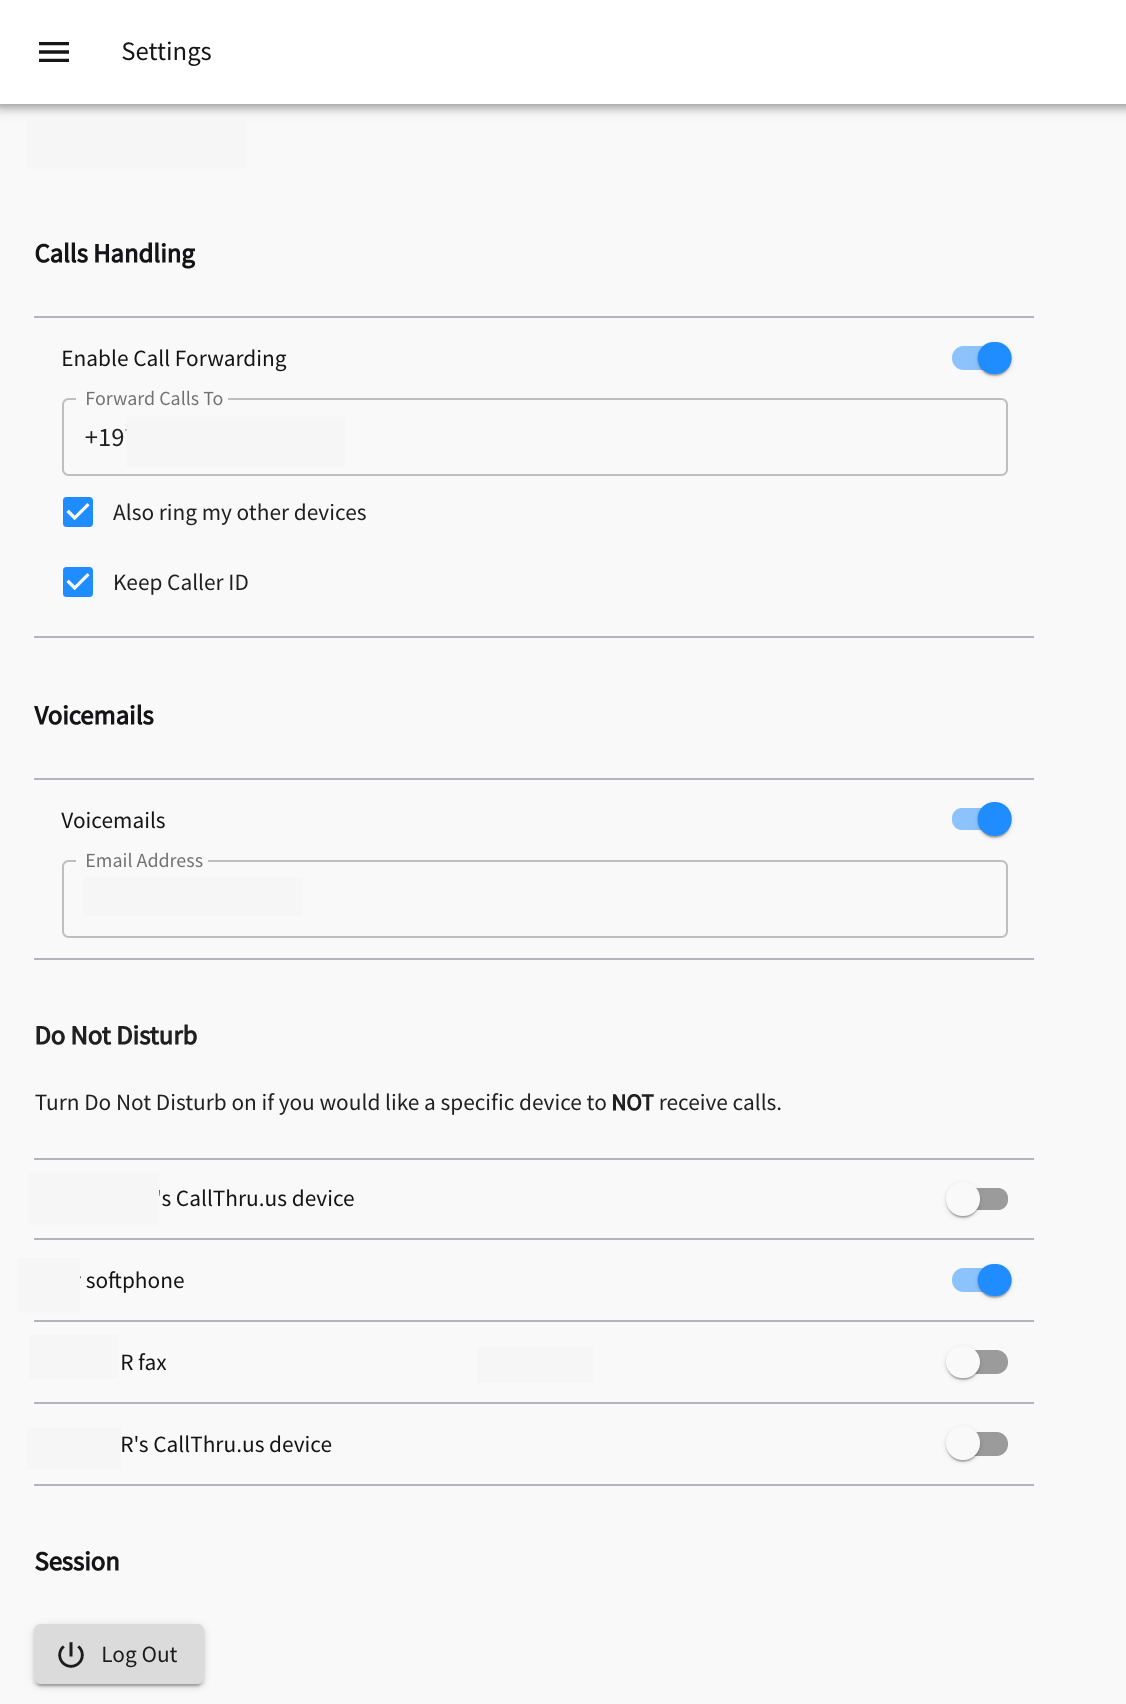

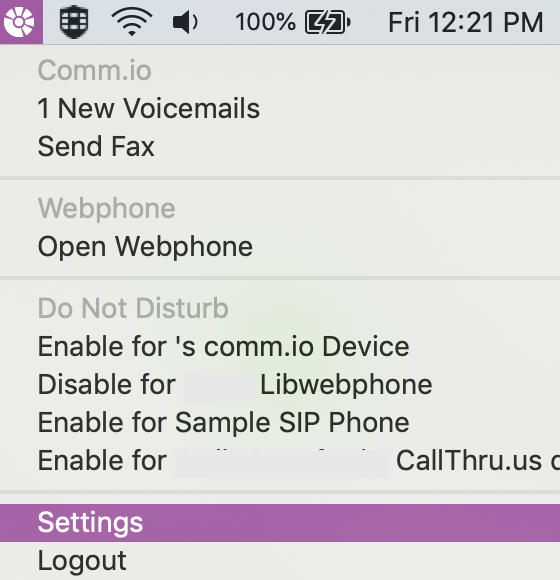
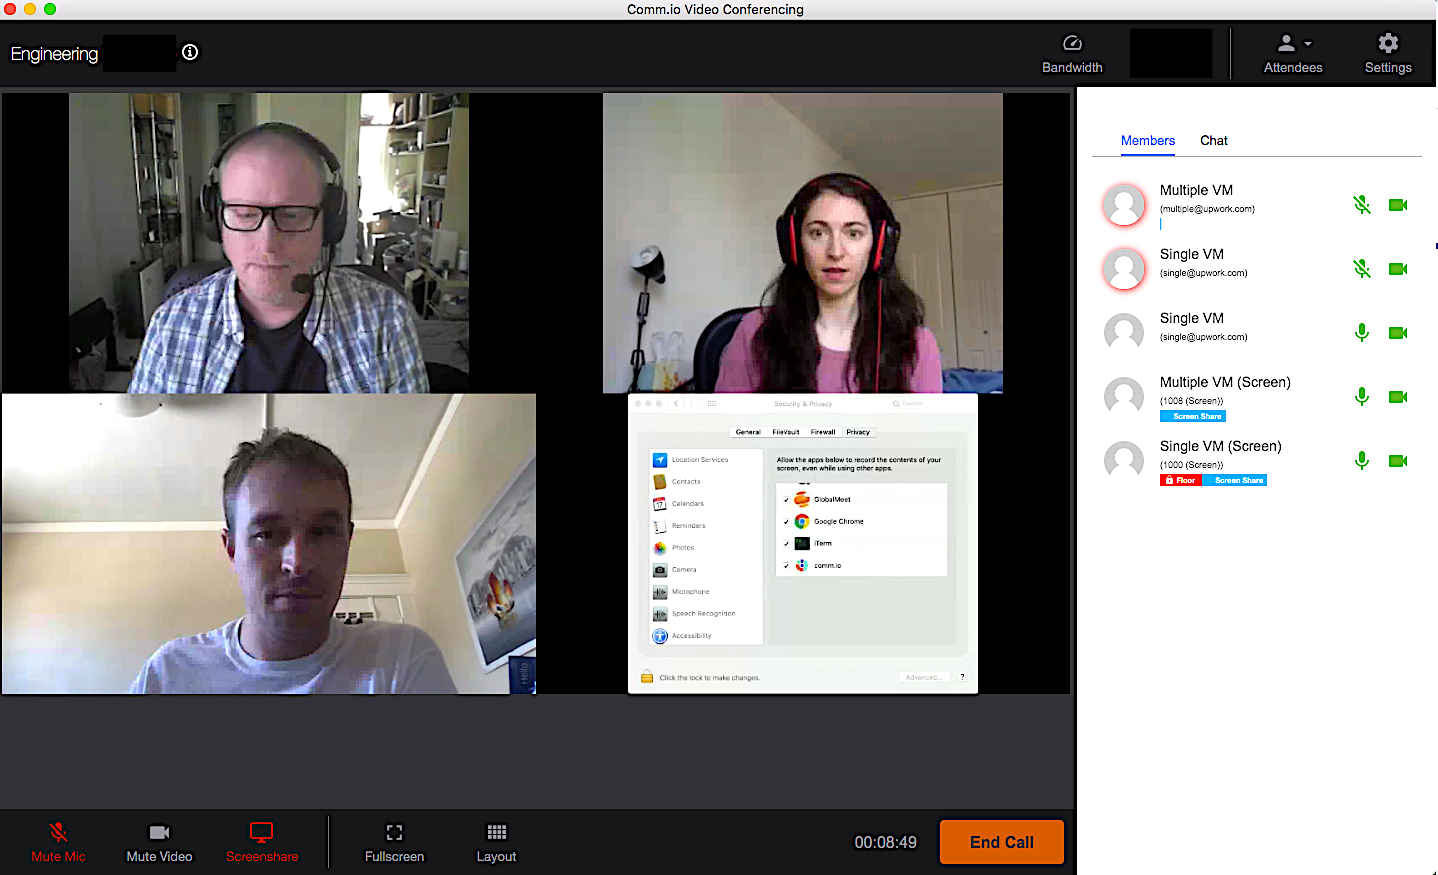
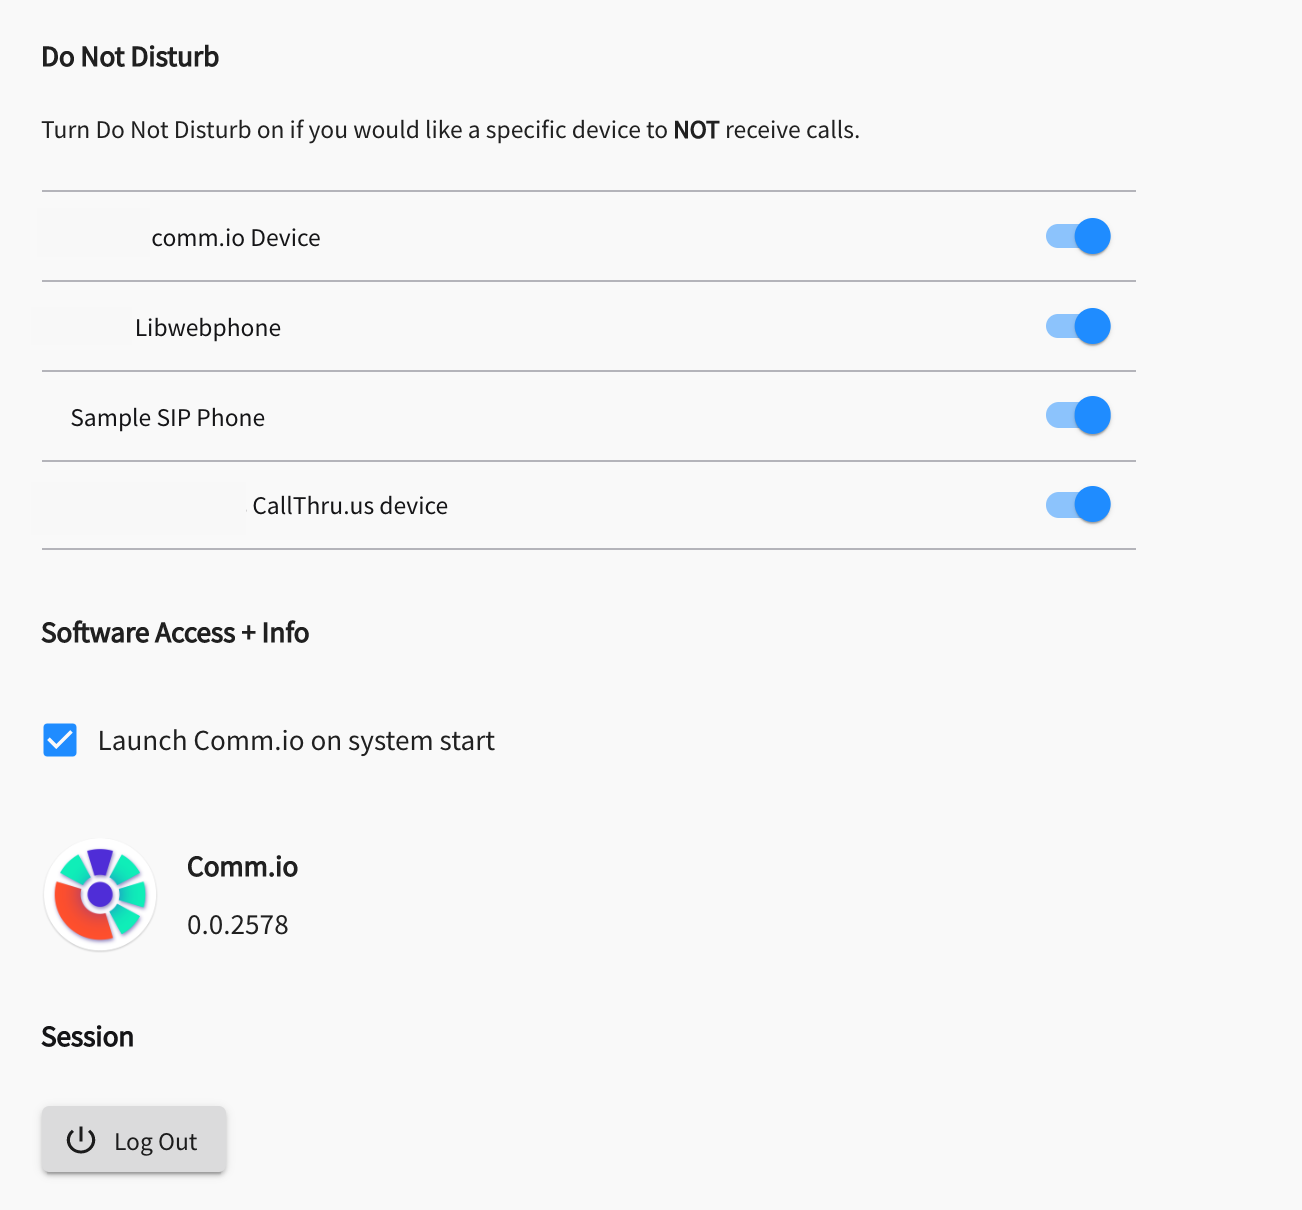
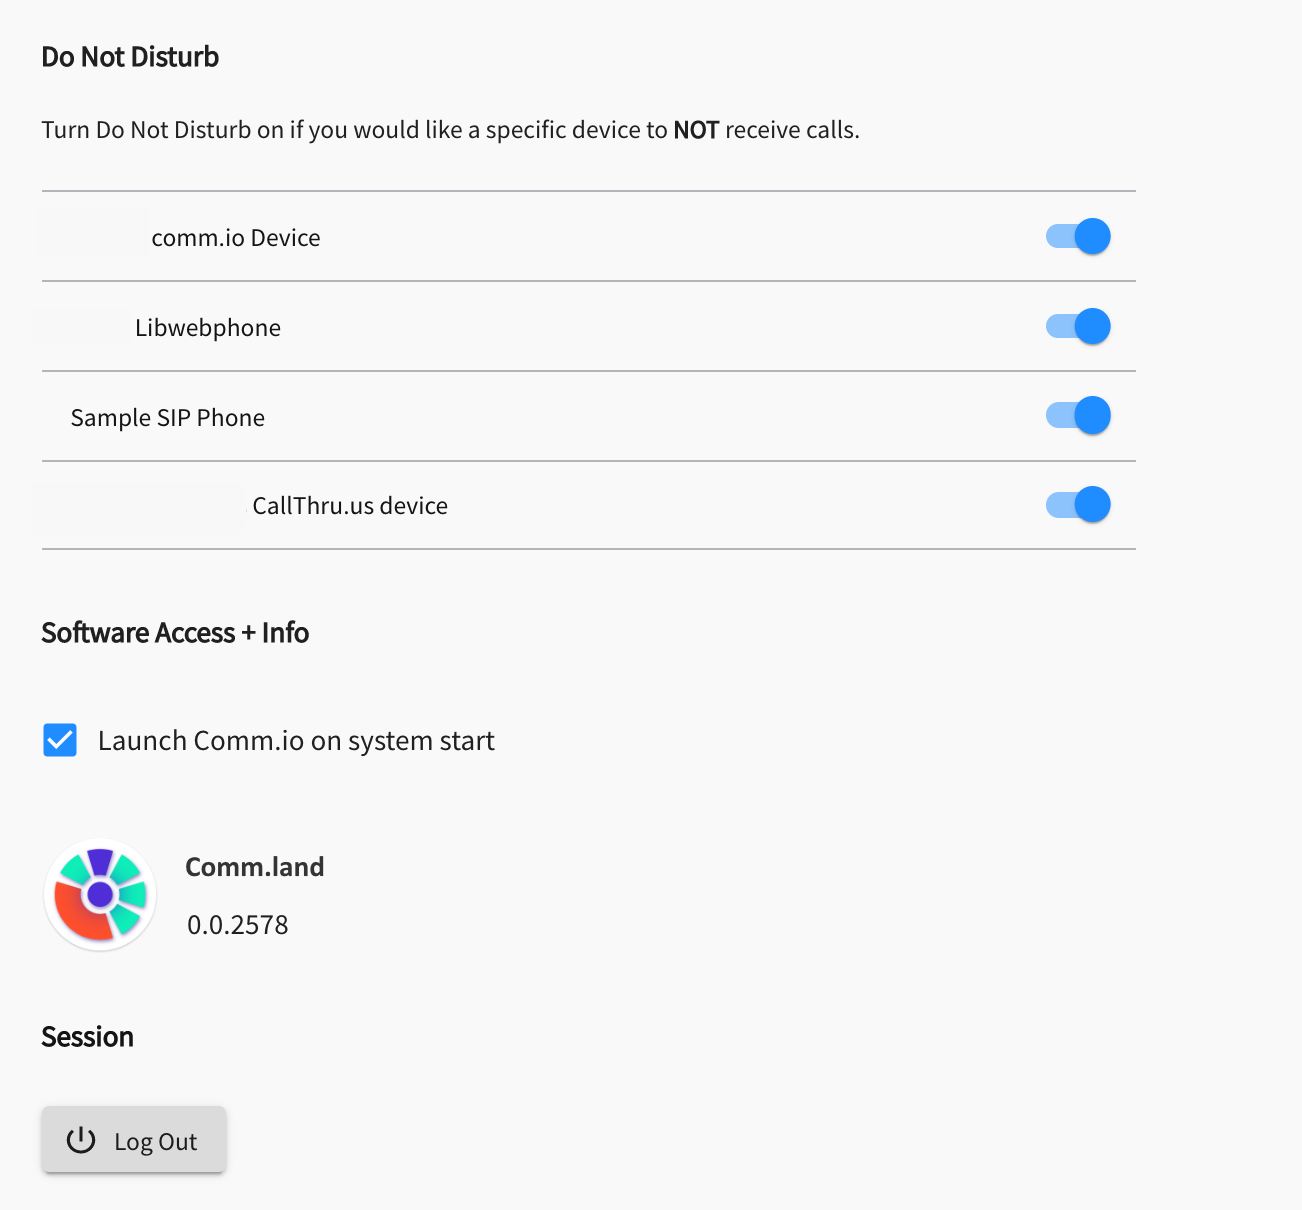
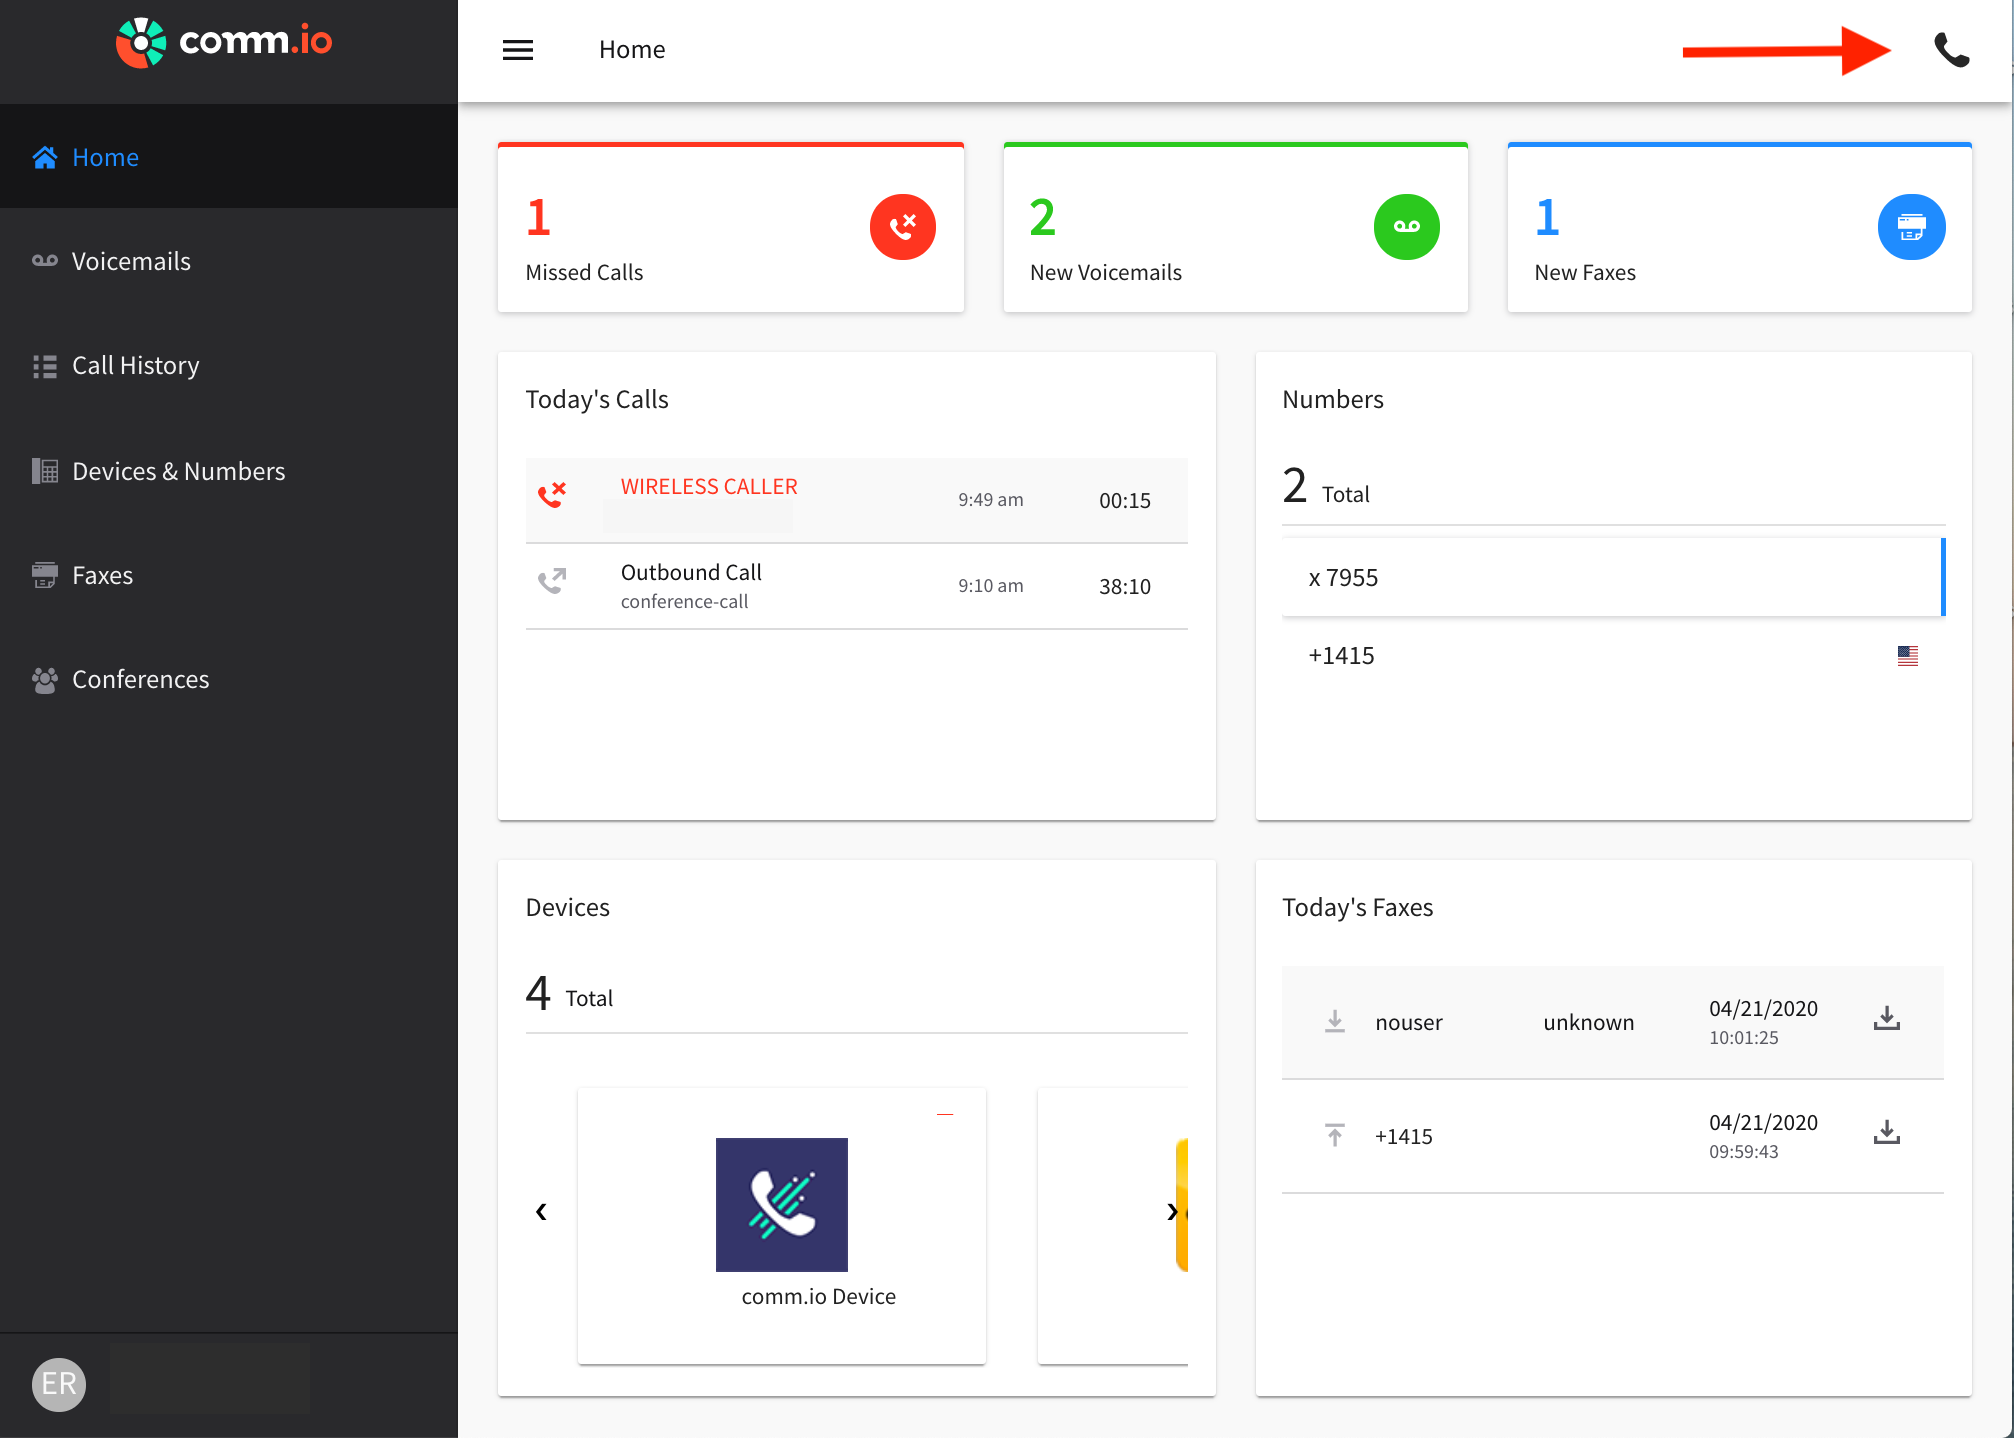
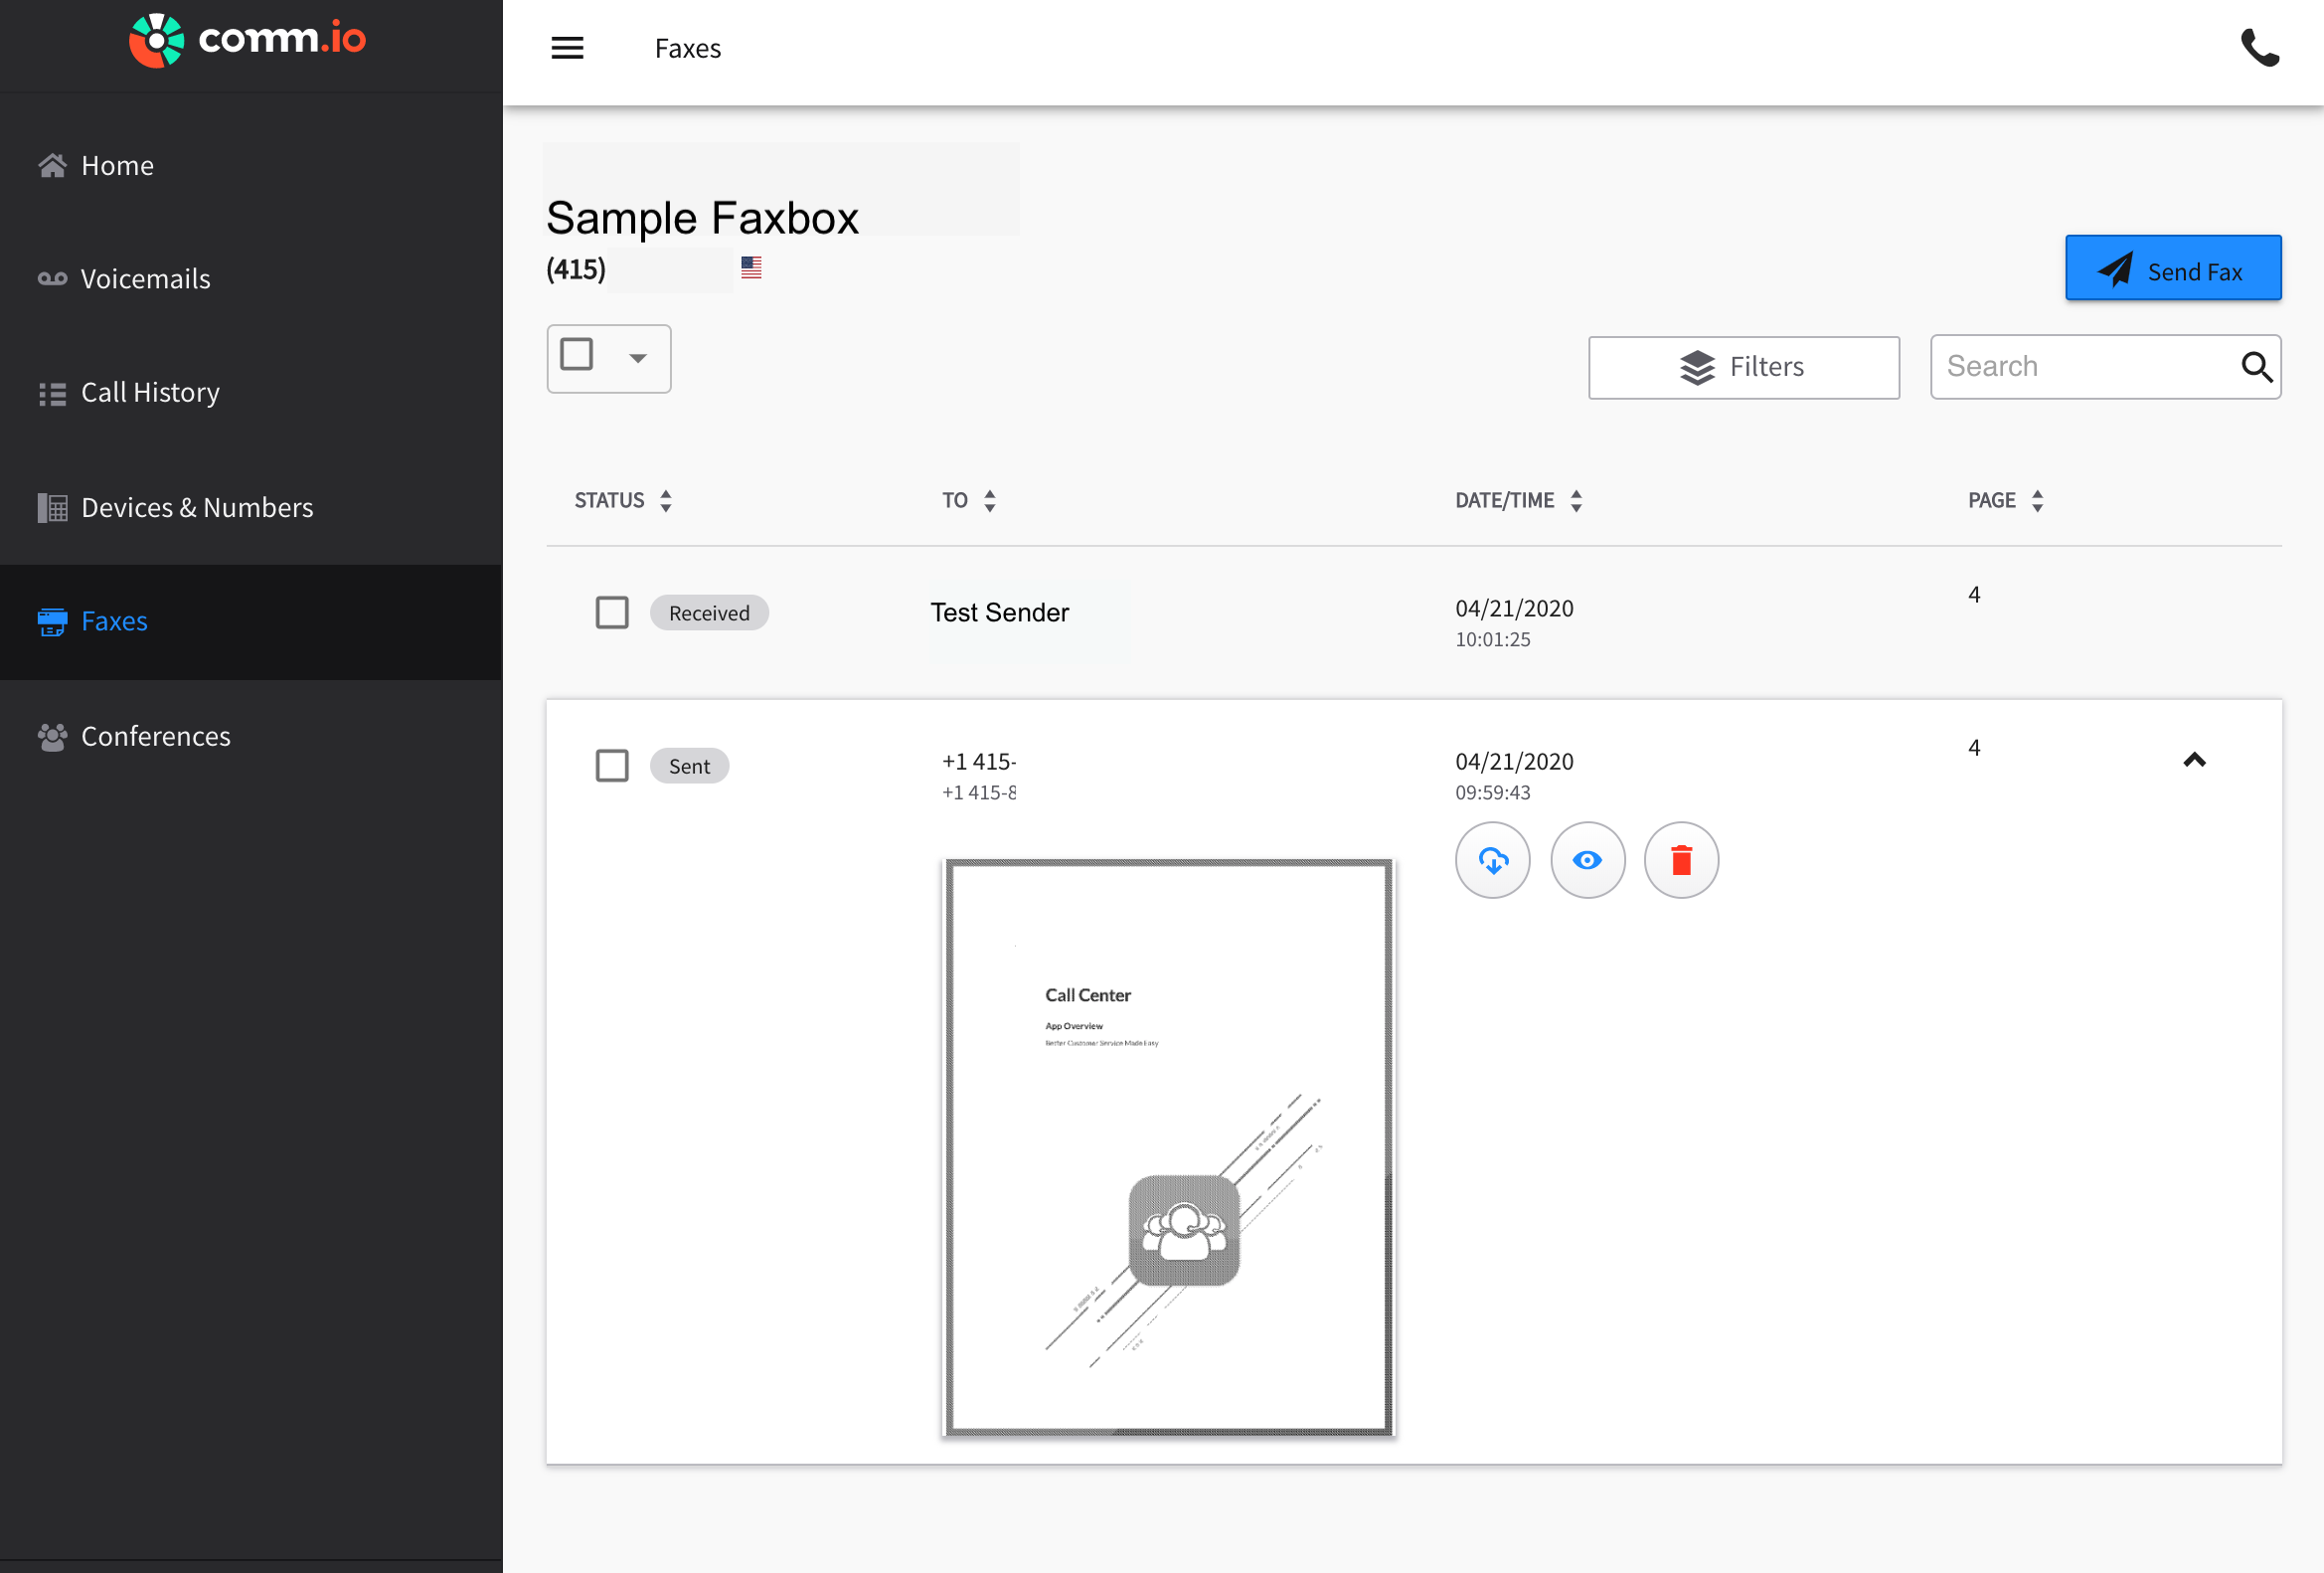
Test file for stuff
in Product Discussion
Posted
Related Articles
Advanced Callflow configurations and setup
API Reference Docs
Add LINK here
Add description here
View full File