

Emily R
-
Posts
591 -
Joined
Content Type
Profiles
Forums
Resource Library: Monster UI Apps for KAZOO
Events
Downloads
Posts posted by Emily R
-
-
Hey Johnathan --
Your feedback is awesome, FYI we are planning to have a place where everyone can share and vote on updates soon!
Have you read the FAQ for CCPro? It talks about where the Recorded calls go, let us know if this isn't the case for you.Here's an excerpt related to the call recordings:
If I set the Record all calls on, where are these recorded and saved, and for how long?
To set up call recording you need to
- Enable the Call Recording app
- Configure google drive connector
These recordings are available for viewed/downloaded in the call recording app.
NOTE: By default the maximum recording time is 1 hr.There is also a Call Recording FAQ to help you set that up, Check here and scroll to Call Recording.
The link to the full doc is here,
-
Ouch, so sorry -- please try again? There was a hiccup in a website upgrade that changed permissions.
If you have registered and are logged in you should be able to access these files now, please let me know if it's still an issue!
emily
here's the links again....
-
New E-911 Compliance Requirements Took Effect As of February 16th, 2020
Requirement
All Businesses must offer the ability to dial 911 without dialing 9 first to access external calls. At the bottom of this article you can review the details of this law and access links to its history.
How to comply using KAZOO
KAZOO has always had this option. By default, 911 is available without dialing 9 first.
NOTES
-
It the reseller is using 2600Hz carriers, you must configure 911. If you don't have an address and no number is provisioned with an address a 911 will not complete.
-
To test your configuration within the 2600Hz carriers, you can dial 933. Please do NOT test the system by calling 911.
When called, you will hear back your callerID and address for confirmation.
-
If you are using a different carrier, then ask them what their test call number is.
- If your customers have moved their phones from the office to their home due to COVID-19 recommendations, they must change their e911 address.
If the test does not confirm a configuration, check the settings below. If they have changed, the access could be disabled.
 Accounts
- Usage and Call Restrictions: Make sure the toggle is ON for e911 calls
- Credit Balance + Features: Initial Credit Balance is not at $0.00
- Numbers Features: Make sure the E911 feature is enabled (it is by default)
Additional Settings to Review
In addition, you may want to review the settings below to make sure the addresses are correctly assigned to the numbers Smart PBX
-
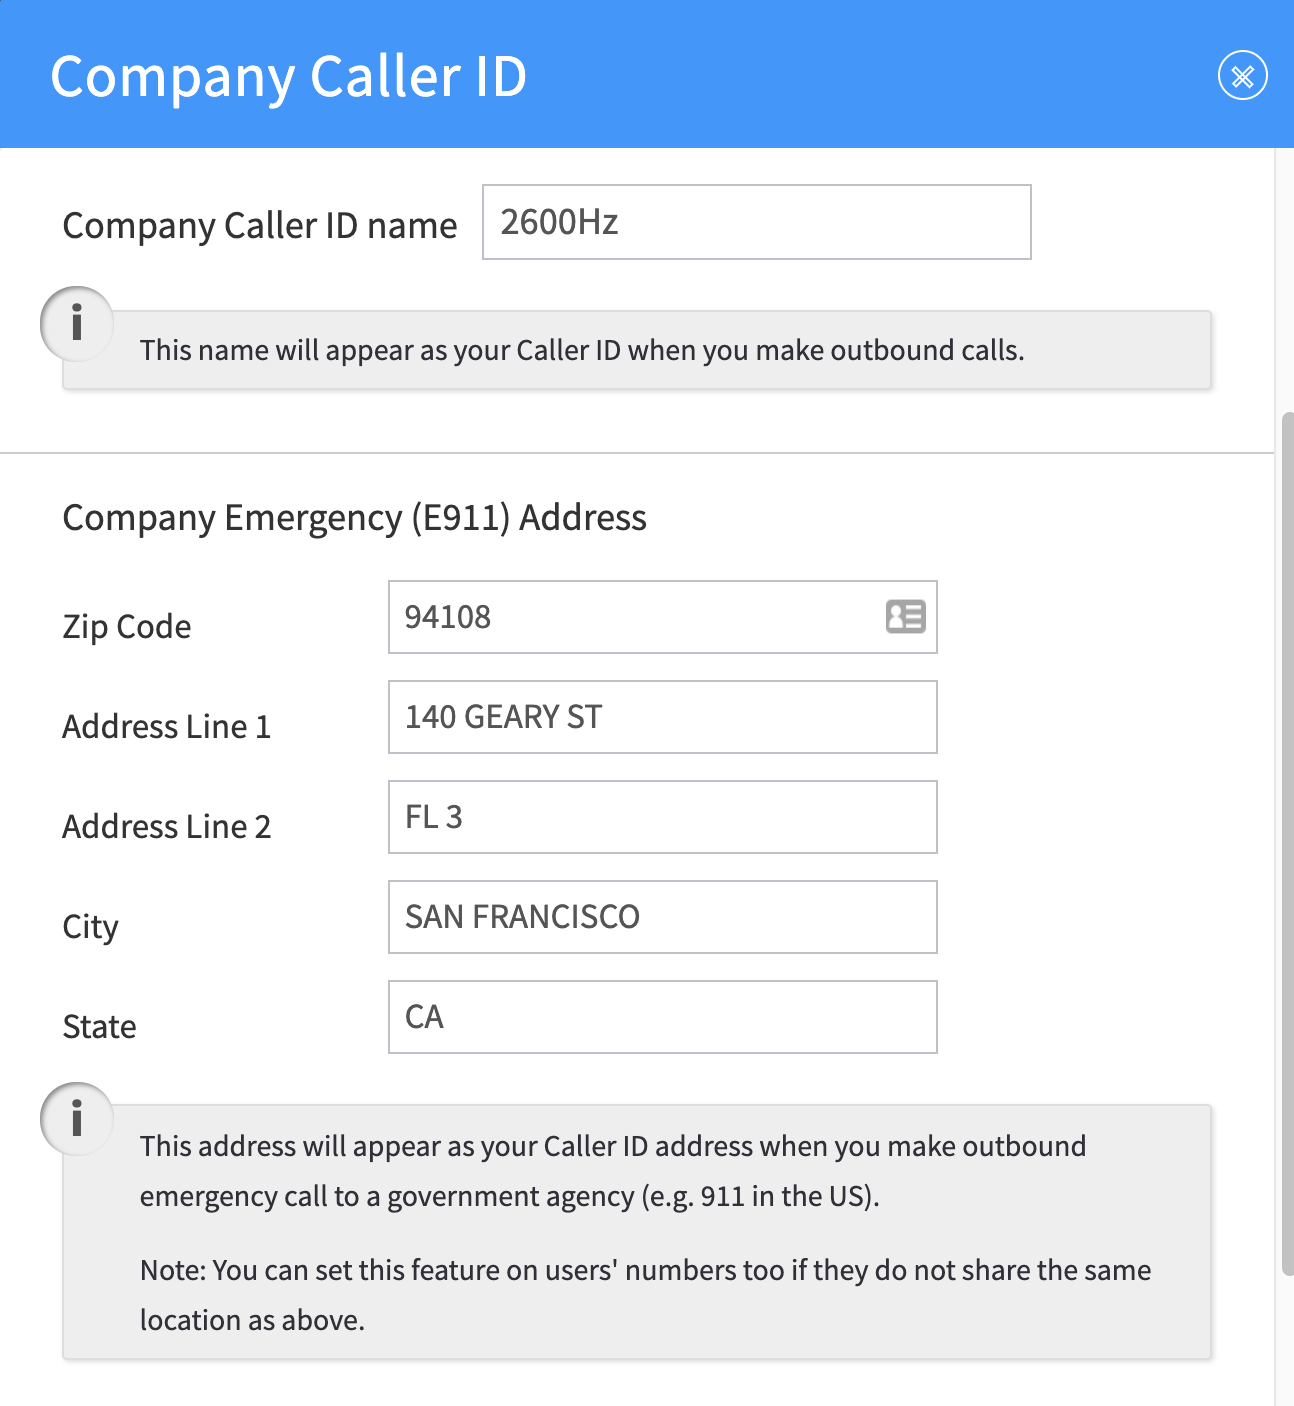
Caller ID:
Your company caller ID as shown when you click on "Caller ID" in the top right blue header
This shows your Company Emergency (E911) address. Confirm this is correct.
-
Individual Number Settings for e911 addresses:
You can assign a different address for e911 for each number you list/assign.
Once you have assigned an address in any of the applications, it will propagate and display throughout the account.
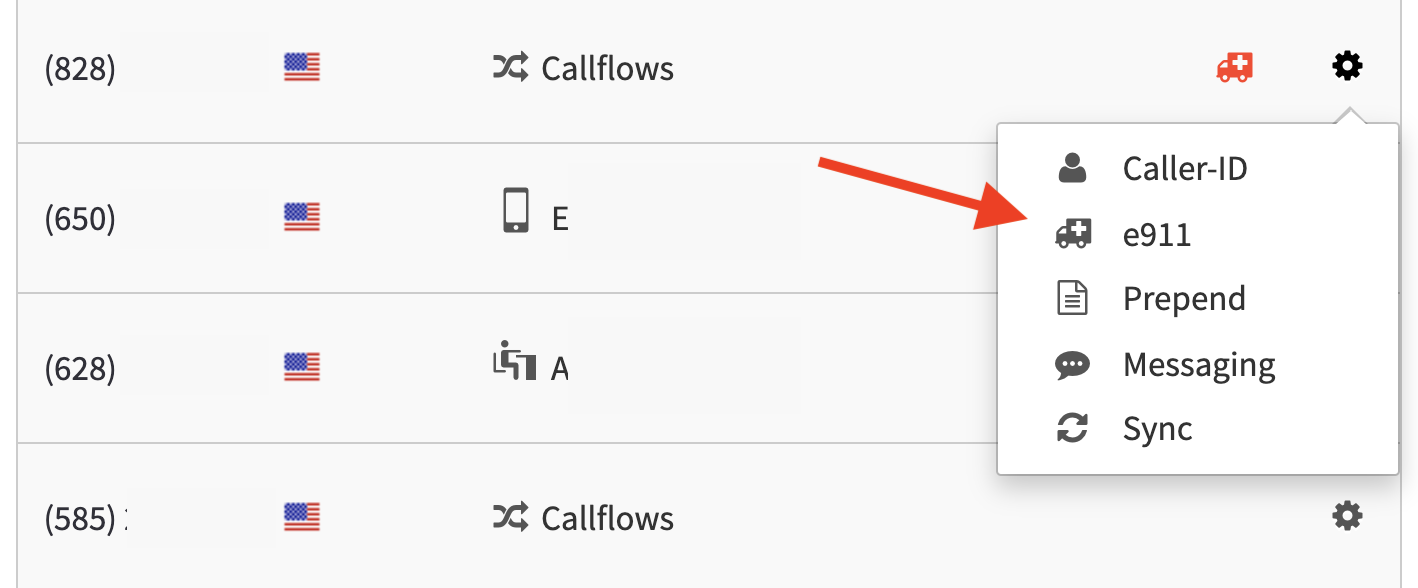
Numbers
Note you can manage the e911 addresses in the Numbers application also by selecting the gear/settings to the right of each number. You will see the same dialog box as above. Once you have assigned an address in any of the applications, it will propagate and display throughout the account.
Background
You may or may not have heard about the changes that were signed into effect in 2018 that would require companies to be compliant with E-911 revisions. These changes, otherwise known as “Kari’s Law” were implemented based off a truly unfortunate experience where an individual in need was unable to reach 911 immediately, sadly, resulting in a tragic outcome.
After this occurrence the President recognized the need for any person, in need of reaching 911 to be able to do so without the limitations of the phone system (for example having to dial 9 before dialing the emergency line). Although this was introduced almost 2 years ago, the changes for any communications company offering phone services, will take effect come February 16th 2020.
To ensure your business is protected we wanted to offer a few key resources that will provide more detailed information on the matter and help ensure your business is protected.
Legal Article:
https://www.bhfs.com/insights/alerts-articles/2020/new-enterprise-e911-rules-take-effect-on-feb-16-are-you-ready- Author - Michael Pryor - Brownstein Hyatt Farber Schreck - mpryor@bhfs.comNG911 Details:
http://www.ng911now.org/about-ng911Karl’s Law page at FCC:
https://www.fcc.gov/mlts-911-requirements#:~:text=Kari's Law requires direct 911,buildings%2C campuses%2C and hotels.&text=The fact that a 911,A valid callback number%3B and
-
It the reseller is using 2600Hz carriers, you must configure 911. If you don't have an address and no number is provisioned with an address a 911 will not complete.
-
2600HZ STEP GUIDE –CALLFLOWS -- CREATING CONFERENCE BRIDGES
Within the Call Flows App, you have the ability to create, edit or delete Conference bridges. The SmartPBX App should be used to set the conference number as well as provide conference bridges for users, but certain advanced options can be provisioned here.
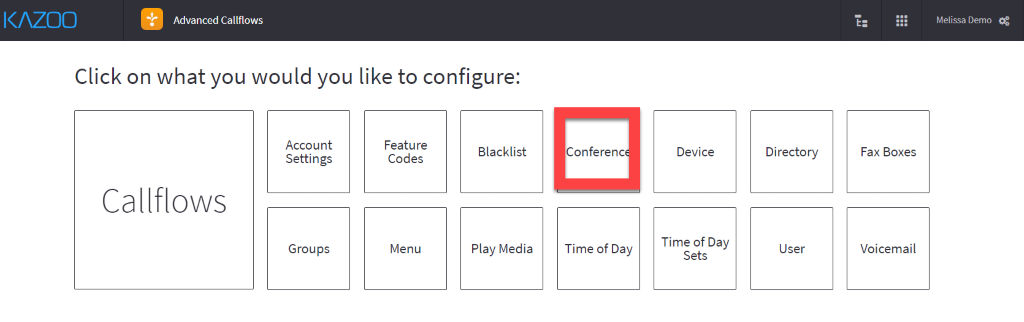
- Click into the Advanced Callflows App and select Conference
-
As noted above, bridges should be created in the SmartPBX App. (If necessary, once in the Conference submenu, click the +Add button to add a conference bridge.)
-
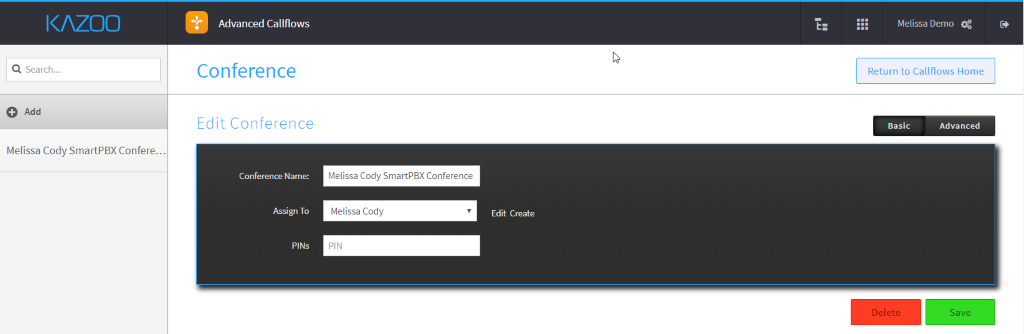
Once the conference bridges have been created in SmartPBX, you will see the list on the left side in the Conference submenu. Click on the one you want to edit, and the details will pre-populate. This is the information created in SmartPBX. A pin can be created on this page if needed.
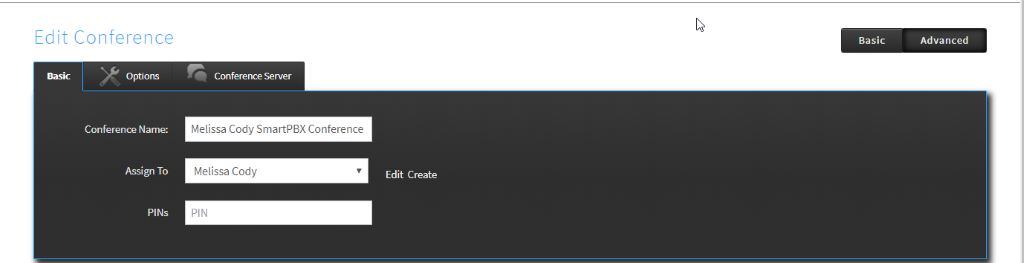
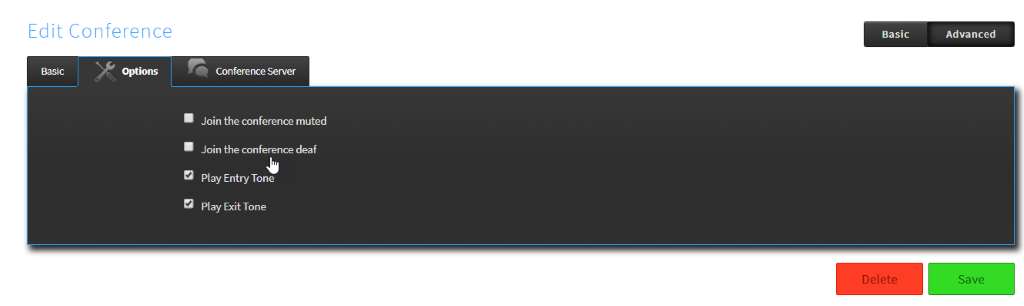
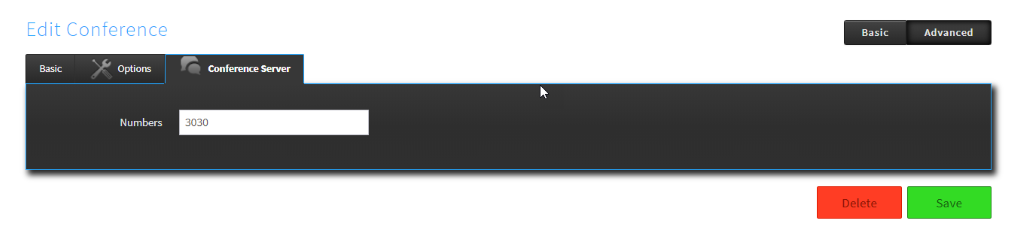
- Click the Advanced tab in the upper right corner. Three tabs will appear.
- Basic – the information entered in SmartPBX
- Options – these must be added here (not available to provision in SmartPBX)
- Conference Server – the bridge number
- Click Save when changes have been made.
-
2600HZ USER GUIDE - BLOCK LISTING NUMBERS
Within the Call Flows App, you will find the Blocklist set up. The Blocklist is used to block calls from a particular number. Note this does not blocklist outgoing calls.
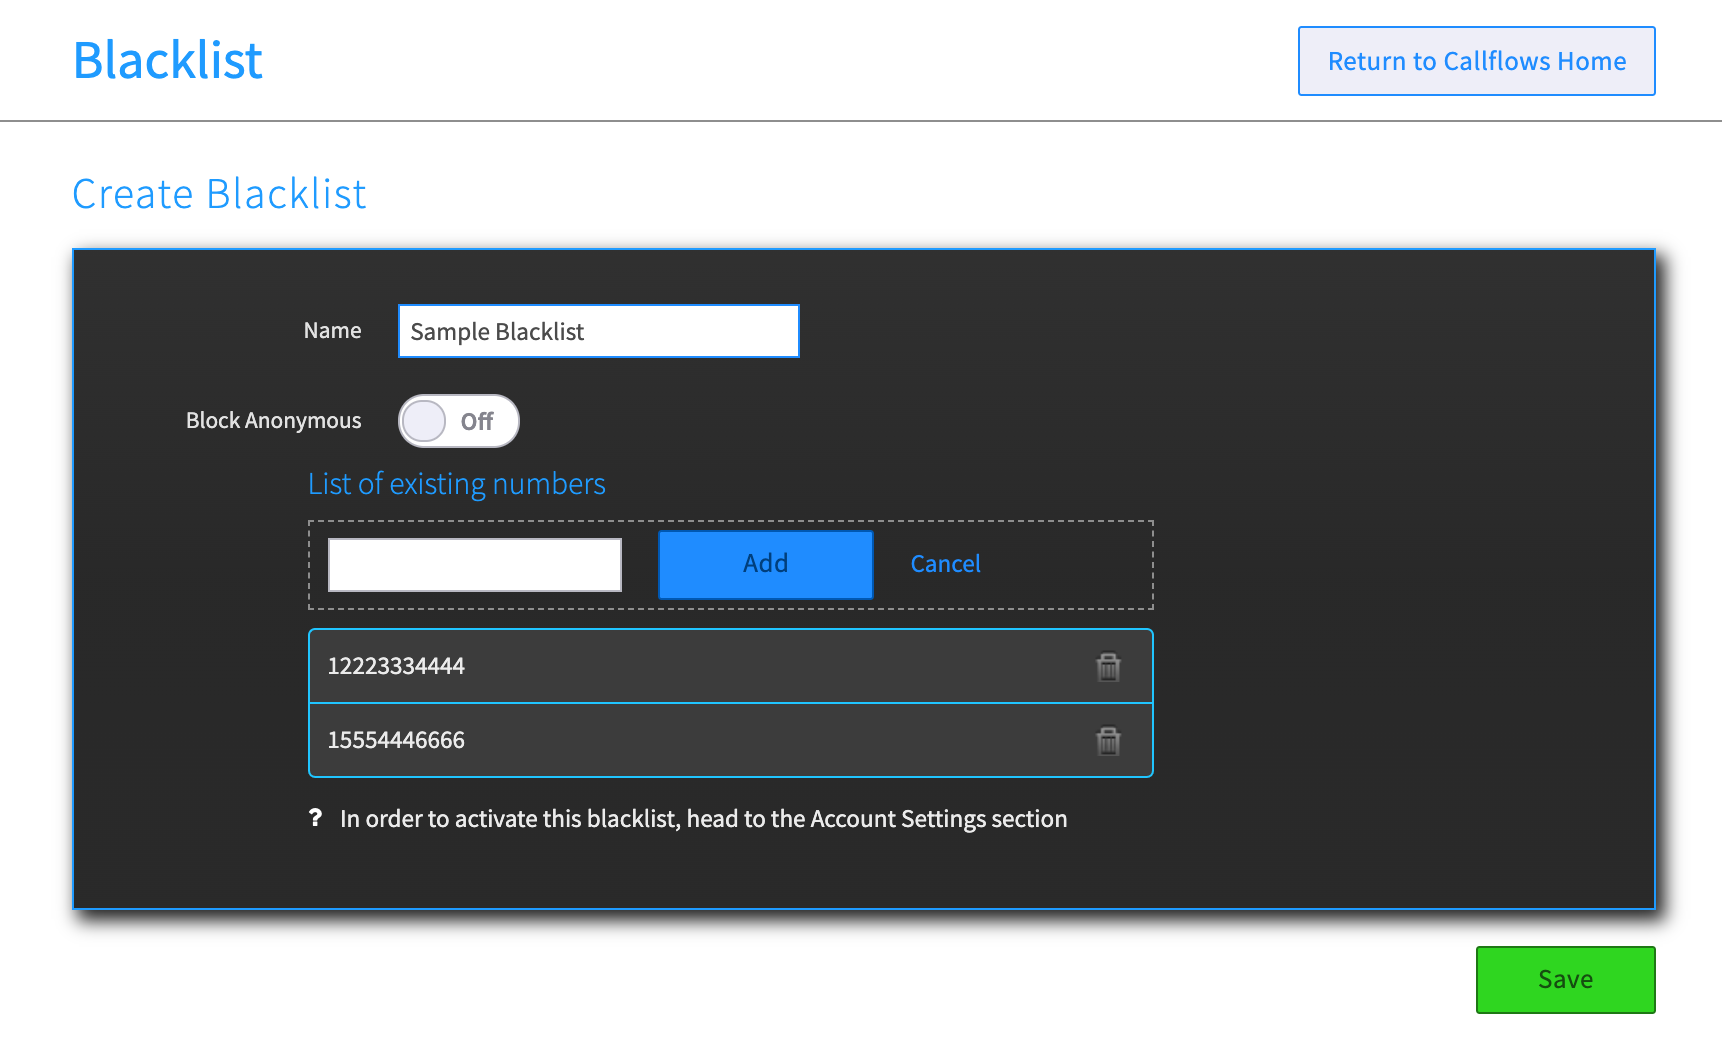
Create your Blocklist List of Numbers
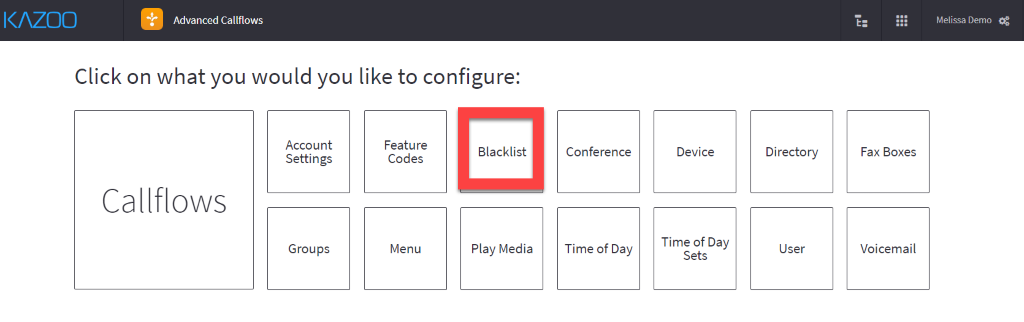
Click into the Advanced Callflows App and select Blocklist
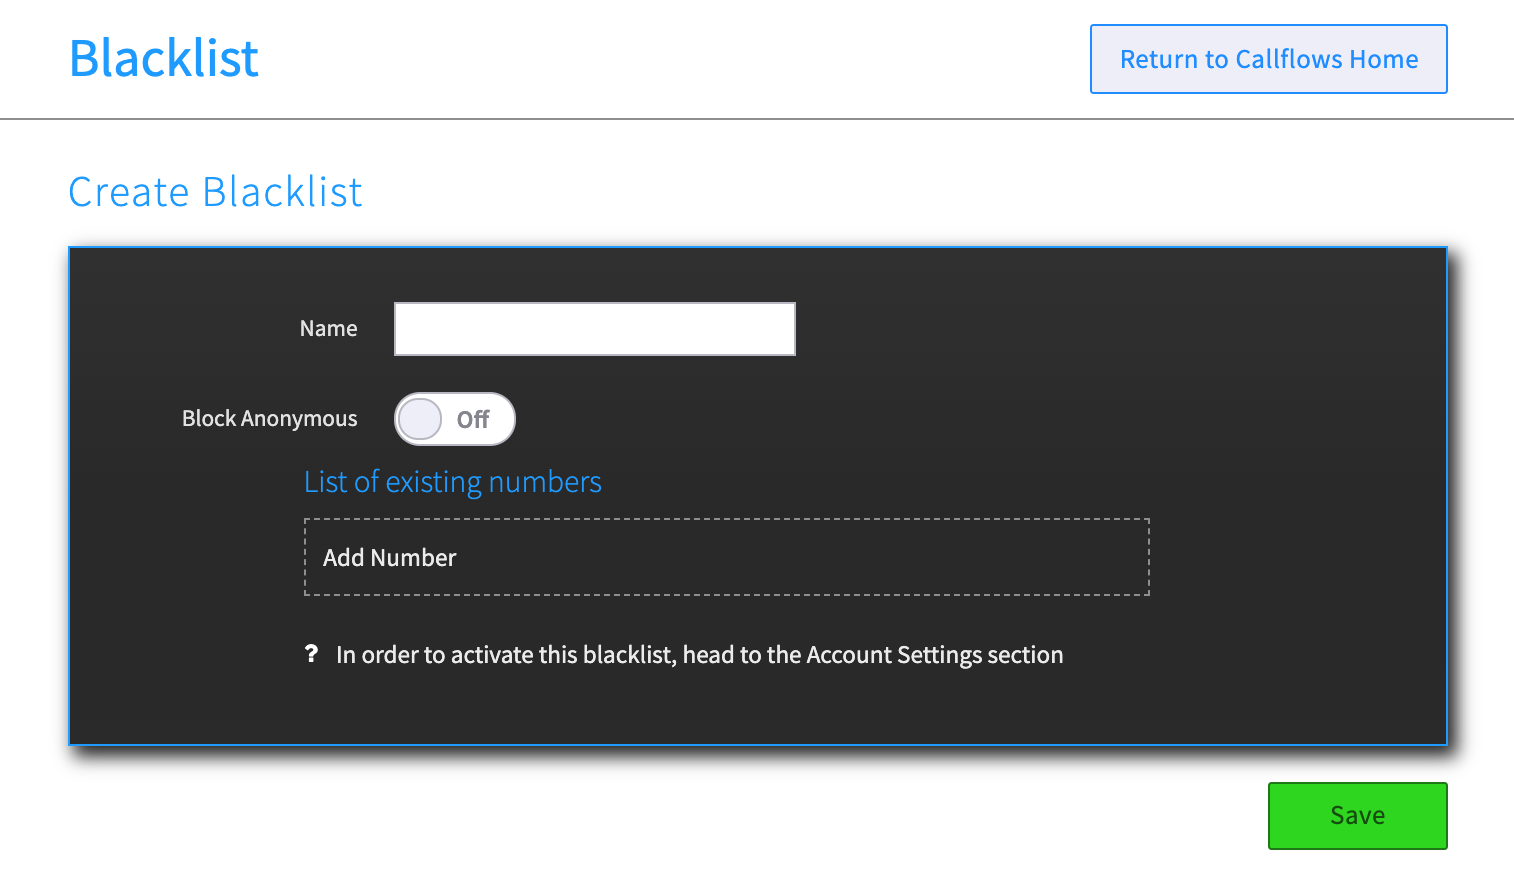
2. Once in the Blocklist submenu, click
3. add a Name (for reference), and add the number.
NOTES:
- You can also block all Anonymous calls by switching the “Block Anonymous” to On.
- It is important you add the exact number sequence you want to block, which in most cases includes a country code. (including the US +1). To verify the number(s) match, you can view your call log in SmartPBX. See the section below for details.
Activate your list
Once you've created the set of numbers, you will need to Activate that list for your specific account.
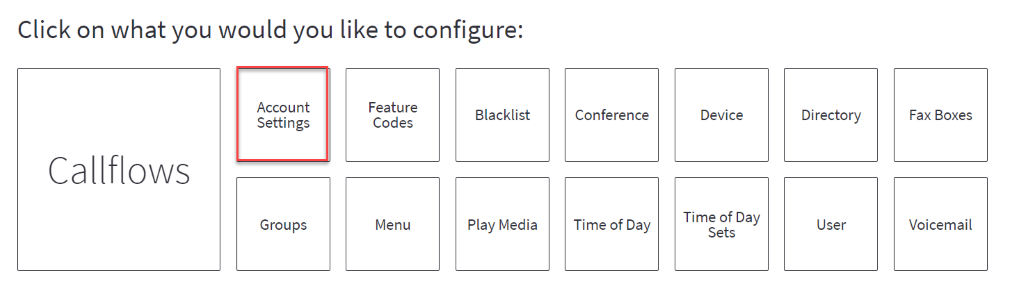
- Select the Return to Callflows Home button at the top right of your screen
- Go to the Account Settings block
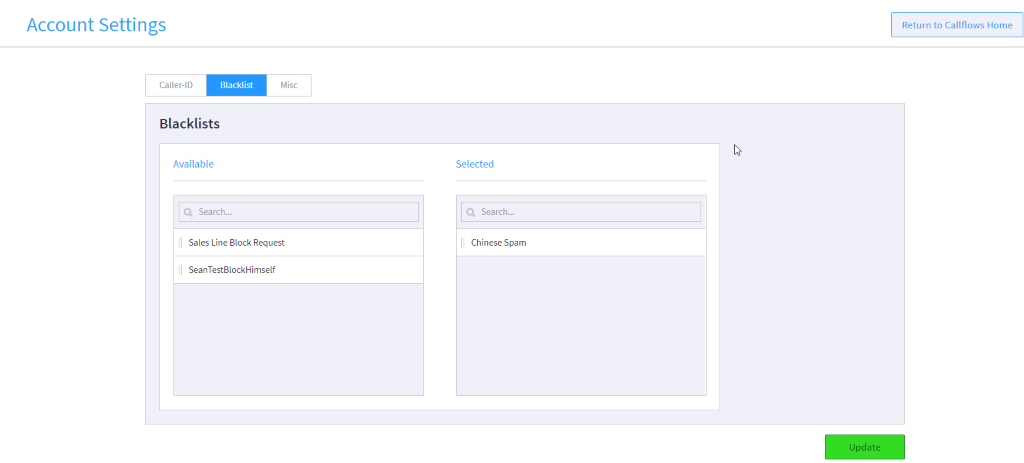
- Select the Blocklist tab
- Drag your newly named Blocklist list from "Available" to "Selected and select the green UPDATE button at the bottom.
To confirm the correct Number entry
If you want to make sure you are including the exact number as the blocklist routine will see it, you can view your call log and retrieve it there. Follow these steps
Access SmartPBX
- Go to the Call Logs menu item
-
Search for the call you've identified, and expand its listing.
-
Select the gear to the right for a detail of the call routing and number. You will see something like below:
- Use the "caller_id_number" as displayed here on your blocklist entry.
Frequently Asked Questions
How do I block / blocklist Anonymous calls?
To blocklist Anonymous calls you will need to follow these steps:- Create a blocklist and name it (e.g. Block Anonymous)
-
Toggle the switch saying "Block Anonymous" on
-
Return to Callflows / Account Settings and assign that blocklist file to the list
- Select the green Update button to Save.
NOTES:
This provides a first-level screening for calls where caller-IDs are tagged as anonymous. If this is not filtering calls as expected, it's likely some added layers of configuration settings need to be reviewed:-
The caller may have added a layer of deception about the call, using techie-geeky strategies such as using a zero phone number 000000000 to a marking a SIP flag as "privacy=true". If these kinds of calls persist, follow the steps above for "to confirm the correct number" from your SmartPBX log and manually blocklist the specific number.
- If you are a Private Cloud or Global Infrastructure client and use your own carrier, your carrier may have a unique strategy for dealing with anonymous calls that KAZOO doesn't anticipate. Check with support to help review your call logs.
If your blocklist assignment is still letting calls come through, you may need to contact support so they can analyze your SIP call logs and Carrier settings at a more detailed level.
Related Articles
API Reference Docs
#####
-
Below is a summary of the commands available in Call Center, and the added commands available in Call Center Pro.
NOTE: This will be updated as the two applications evolve.Click here to download a PDF of this file
Call CenterCall Center ProBasic Info
- Name
- Ext. / # / Buy
- Name
- Ext. / # / Buy
Configuration
- 4 Queue Routing
- Hold Treatment audio file
- Timeout
- Queue Call Limit
- Timeout if empty
- Escalation queue
- Escalation callflow after timeout
- Zero out to callflow
- Dropout options
- Additional options for Hold
- (see below)
- 6 Queue Routing
- Hold Treatment audio file
- Timeout
- Queue Call Limit
- Timeout if empty
- Escalation queue
- Escalation callflow after timeout
- Zero out to callflow
- Dropout options
- Additional options for Hold
- (see below)
- Record all calls in queue
Routing Strategy
- Most Idle
- Least Calls Handled
- Least Offered made
- Round Robin
- Most Idle
- Least Calls Handled
- Least Offered made
- Round Robin
- Skill based (Loose)
- Skill based (Strict)
Hold Treatment
- Media file
- Announce Position
- Announce Wait
- Pause
- Build your own order
- Media File
- Announce Position
- Announce Wait
- Pause
- Build your own order
Agent Behavior
- Agent Connect Timeout
- Force Away on Rejected/Missed
- Agent Recovery Time
- Allow Recovery Time Extension
- Allow Unlimited Recovery Time Extensions
- Agent Connect Timeout
- Force Away on Rejected/Missed
- Agent Recovery Time
- Allow Recovery Time Extension
- Allow Unlimited Recovery Time Extensions
List of queues page status preview
- Agents Active
- Longest Wait
- Calls in Queue
- Missed Calls
- Abandoned Calls
- Paused / Activate button
- Agents Ready
- Agents Busy
- Agents Away
- Agents Active
- Longest Wait
- Calls in Queue
- Missed Calls
- Abandoned Calls
- Paused / Activate button
- Agents Ready
- Agents Busy
- Agents Away
Queue Reporting -
Activity Logs
- Shows all events in queue
- Search by agent, event, phone #
- Filter by Activity
- Sort by single agent or all agents
- Shows all events in queue
- Search by agent, event, phone #
- Filter by Activity
- Sort by single agent or all agents
Queue Reporting -
Member List
- Name
- Role
- Status
- Handling
- Session length
- Time Marked as away
- Assign Skills
- Sort hi to low on any variable
- Name
- Role
- Status
- Handling
- Session length
- Time Marked as away
- Assign Skills
- Sort hi to low on any variable
Queue Reporting -
Calls in queueN/A
- Review calls in list
-
Admins and Managers can
- Eavesdrop
- Whisper
- Barge
Call Center Members Summary
- Display list of members
- Add available users as member
-
Summary shows
- Member
- Session Duration
- Assigned Queues (# + name)
- Display list of members
- Add available users as member
-
Summary shows
- Member
- Session Duration
- Assigned Queues (# + name)
- Call Recording on / off
- Skills Tags
-
Manage / Edit Skills
- Use 1 or more rules
- Assign multiple skill tags per agent
- Set loose / strict criteria in routing strategy
CS-CallCentervCallCenterpro-081121-1951.pdf
-
Hi Jack:
First, in the Call Center Pro app (not sure what you are using,) under the General Settings section there is a toggle you can set to
"Timeout immediately if Empty" (see below) . If turned on the and the queue is empty (meaning no agents are logged in) the call will immediately be routed to the callflow process. This could be your escalation queue or voicemail.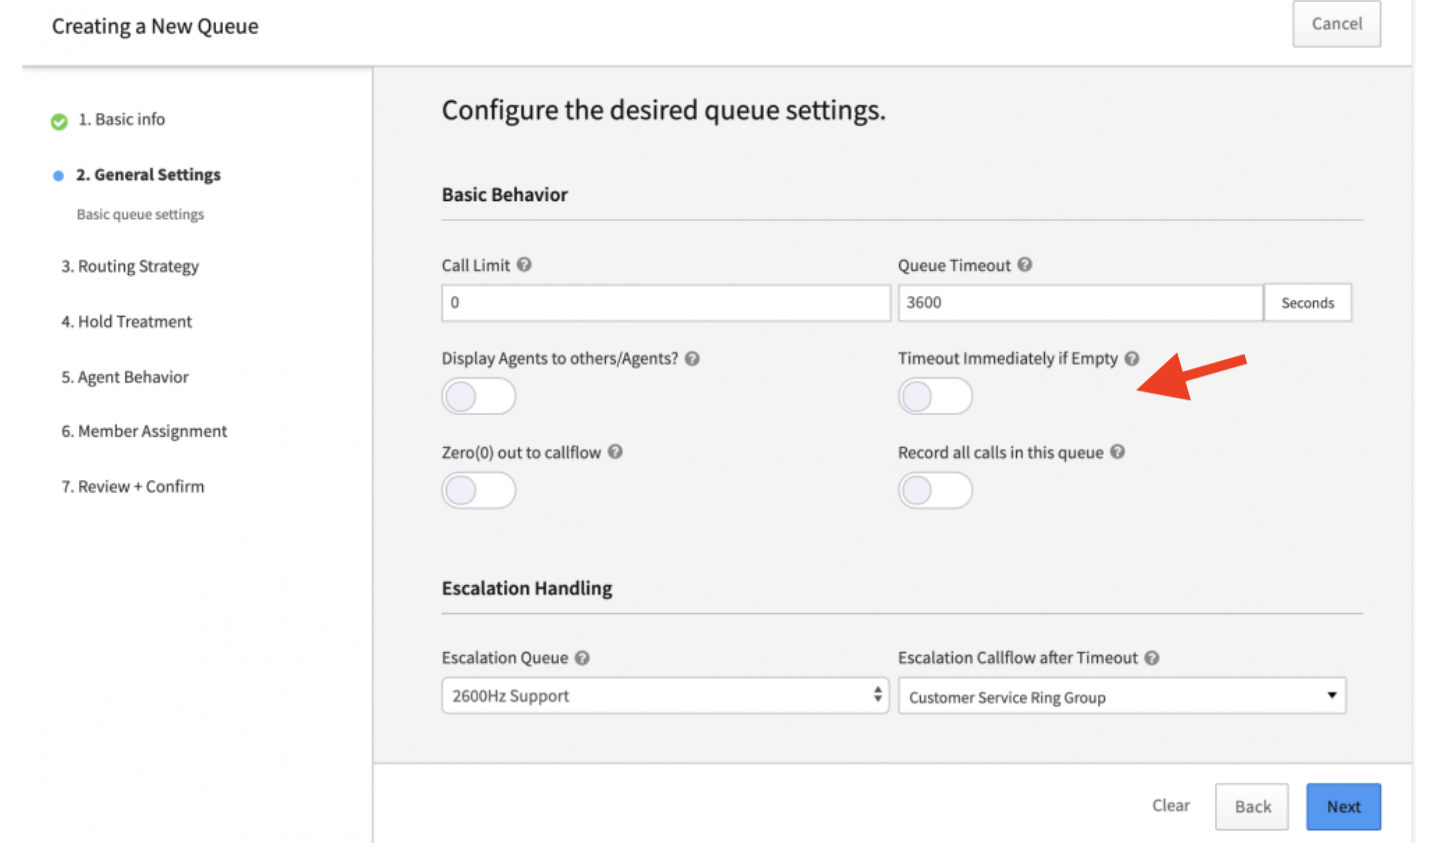
NOTE: The queue is not considered Empty if an agent in a queue is Globally in an Away state or on a call
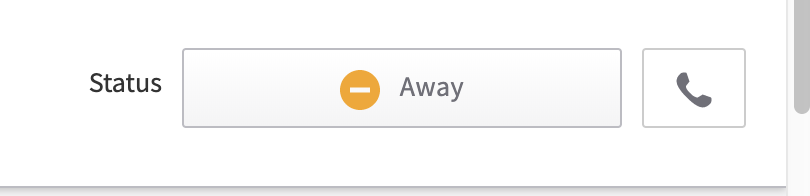
Second, Not sure what you mean by "manual presence", but
- An agent's global status is always displayed at the top right of the screen in the CCPro application.
Not sure if you've seen the CCPro STEP Guide here, these features (and lots others!) are described there. Take a peek!
emily
-
can't help you there, connect with sales...
-
Yes, on the this page, at the top it gives you the option to download a .pdf.
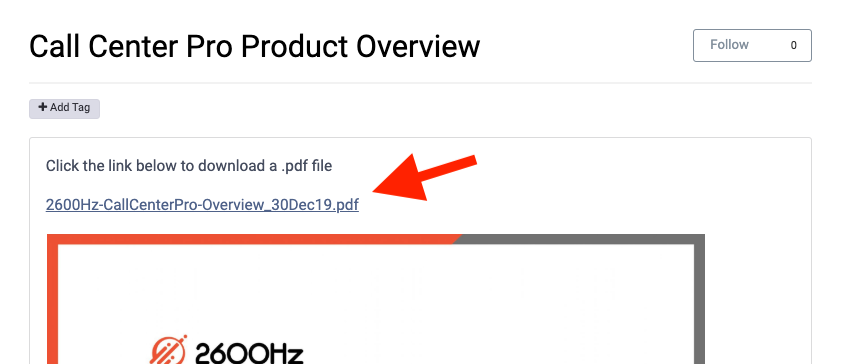
Let me know if it isn't working for you.
-
 Hi all:
In case you missed the Business Partner Call and/or our email announcements yesterday, Darren announced that Call Center Pro is officially available for Hosted Clients!
YAYYY!!!
Contact Sales to get access, and go to our Monster UI Apps page HERE to read up. Scroll down to the Call Center Pro listing and you'll find:- Product overview
- FAQs about what it does and how it compares to Call Center Basic
- STEP Guide for getting started
As always, we love to hear from you about updating, clarifying or enhancing any snippets of our documentation -- please add your comments and questions in the fields at the end and we'll continue to polish it up!
emily
-
What is Call Recording?
Call recording allow you to establish criteria for what calls you want to record. You can make these settings automatic, and also set a feature code to initiate recording a call once it's connected.
For automatic settings, a three level hierarchy gives granular support for which users and which devices you want to ensure are being recorded. You can choose to set permissions for entire accounts, or for specific users and devices – ultimately allowing any level of call recording customization desired.
What is required to set up Call Recording?
Before you can implement the call recording app, you must establish a storage service where the recordings will be archived. For Hosted clients, AWS Connector is your best solution; This can be AWS or Google; the setup is enabled through our connector apps.
AWS Connector
NOTES:
- Google Drive is available for Global Infrastructure or Private Cloud users on request only.
- Developers can set up direct connections to local servers as well. Refer to our doc here: https://docs.2600hz.com/dev/doc/blog/storage/
How do I set up On-demand (in-Call) call recording?
There is a toggle switch in the Call Recording app that enables you to start recording a call once the connection is made using a pre-defined feature code.
This can be found here under the Configuration Tab at the bottom of the screen as shown below.NOTES:
- You must connect your call before entering the code.
- Once the call has a confirmed connection, you can enter the feature code and begin recording.
- You must use a new feature code that is not a default setting for your phone system
Does the record_call module in callflow accept ftp and ftps?
Yes, the API module supports http, https, ftp, and ftps.API Reference
Where can I get more details on how to configure Call Recording as a developer?
For more advanced discussion of the Call Recording code structure and implementation, refer to the developer notes here:
https://docs.2600hz.com/dev/doc/user_guides/call_recording/#account-user-or-device######
-
What is Pivot?
Pivot enables you to generate real-time KAZOO callflows via a REST API. This means your web application can tell phone calls what to do, during the call!Some examples use cases:
- Checking an external account balance before allowing a call
- Routing an incoming call based on custom logic
- Present menu items and respond to selections based on information in your database
How does it work?
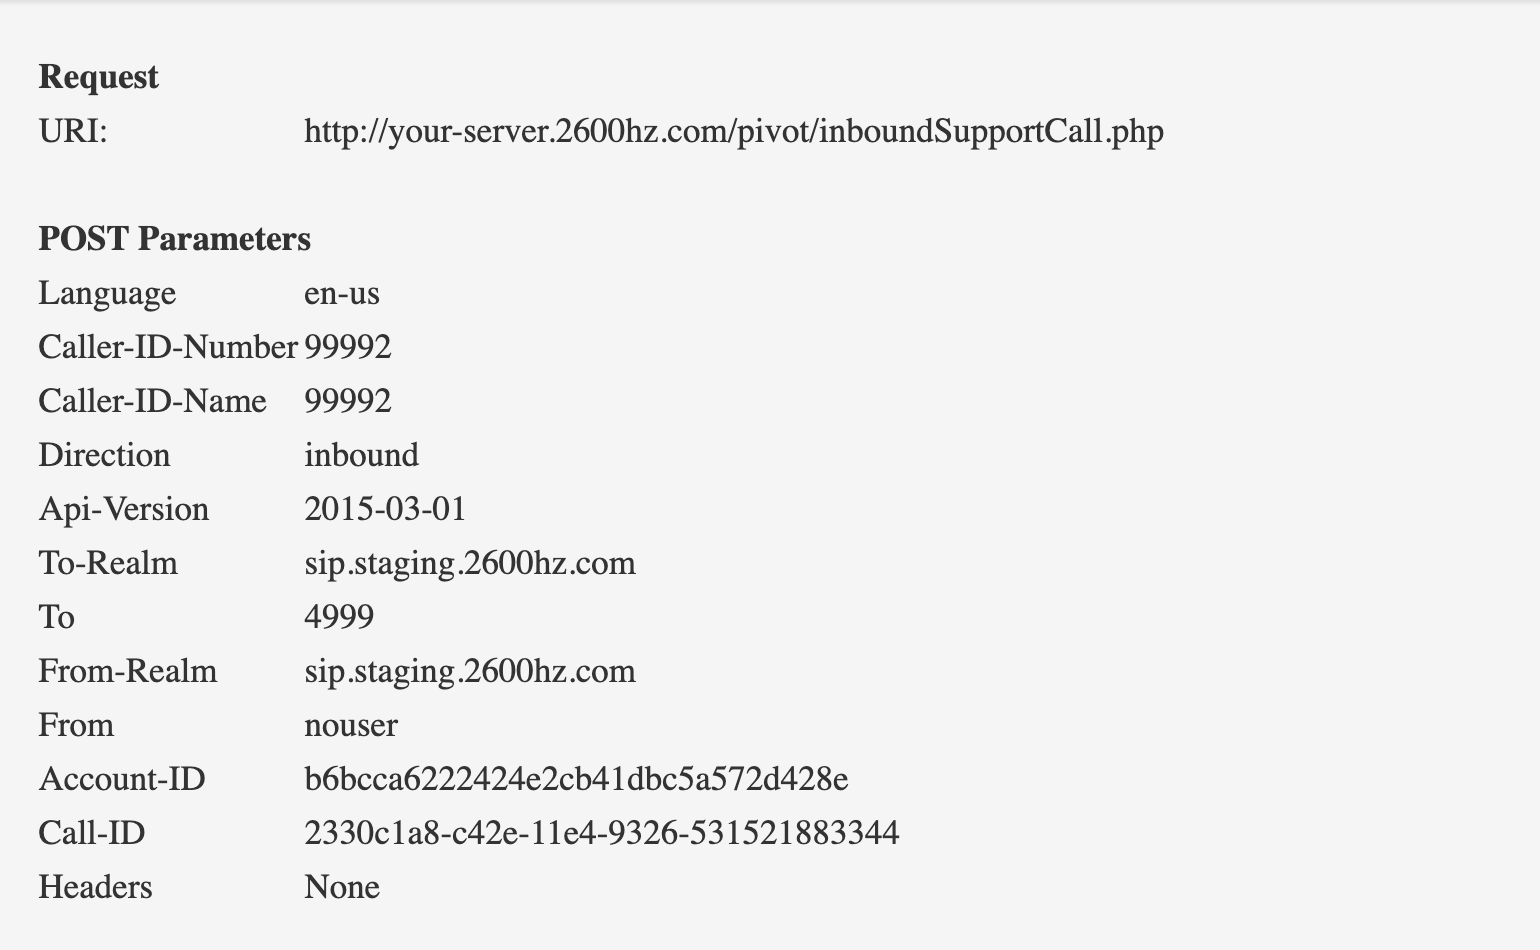
When you add the Pivot module to your call flow, you provide Pivot with a callback URL to your webserver. From then on, when KAZOO receives a phone call for a Pivot-enabled phone number, KAZOO sends an HTTP request to your webserver asking it for a new callflow. Along with the request, KAZOO passes information about the call, such as the originating number. Your web application will then generate a new callflow, which KAZOO will run. Since your new callflow can itself contain another Pivot, you have the ability to make completely dynamic callflows.What does a request look like?
When a call comes in to a configured Pivot number, we'll make a request to your web script with the following information:What does a response look like?
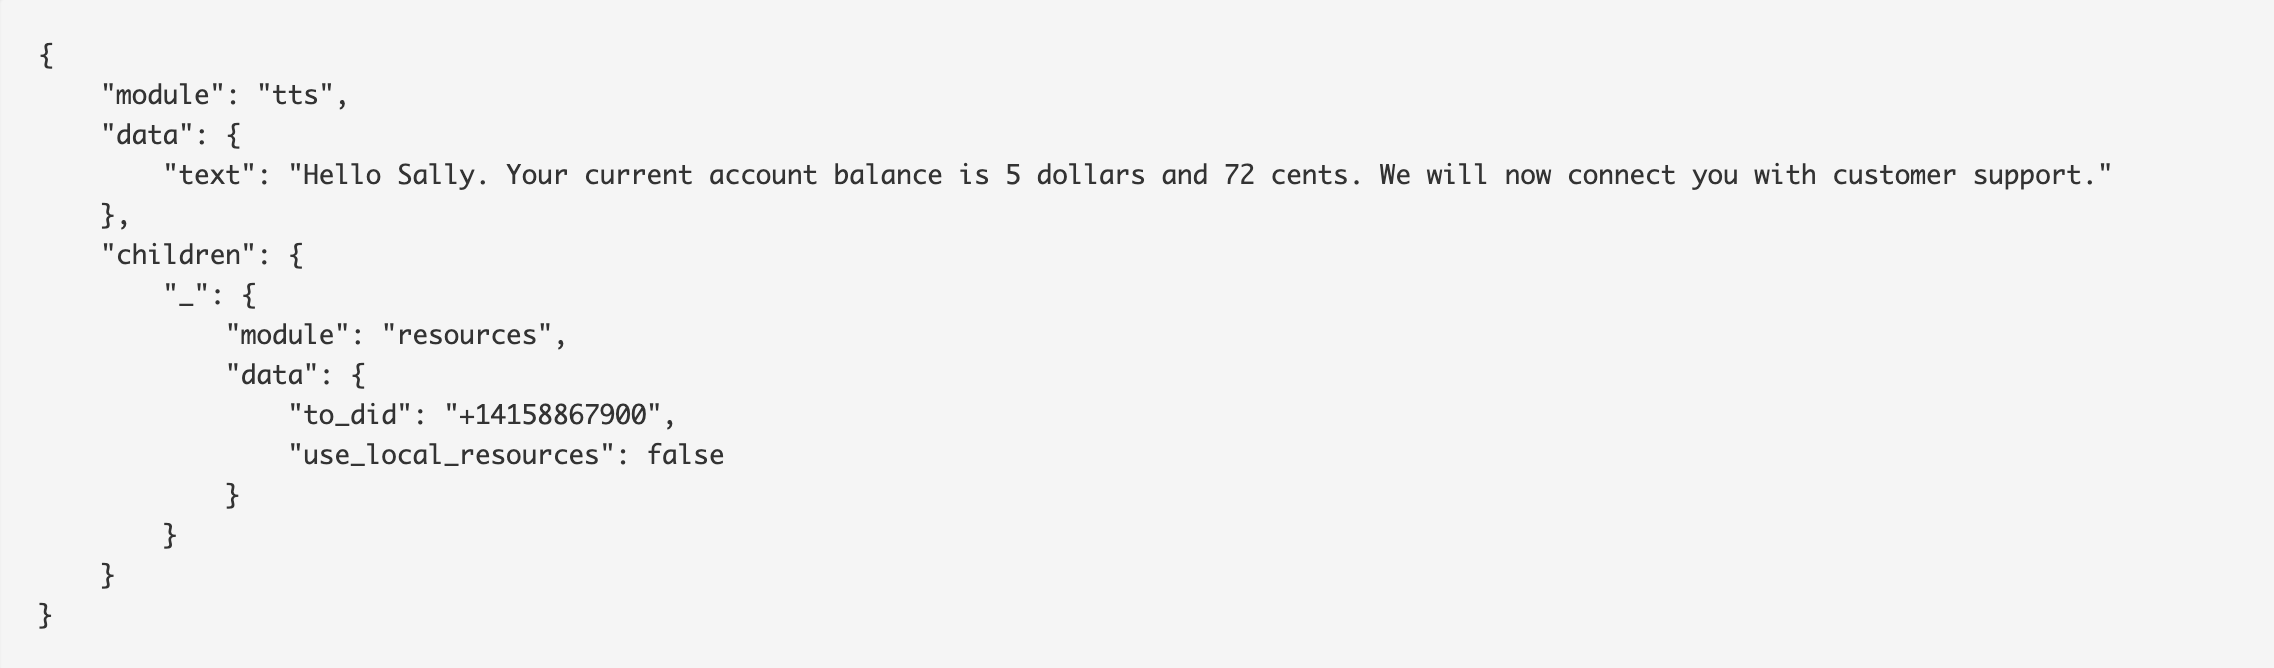
When responding to the above request, your script might analyze the Caller ID of the caller and decide to identify the caller automatically and play their account balance, then connect them to customer support.
Returned body:
What are the variables for setting a Pivot Callflow?
The dialog box for editing a callflow in Pivot is shown below:
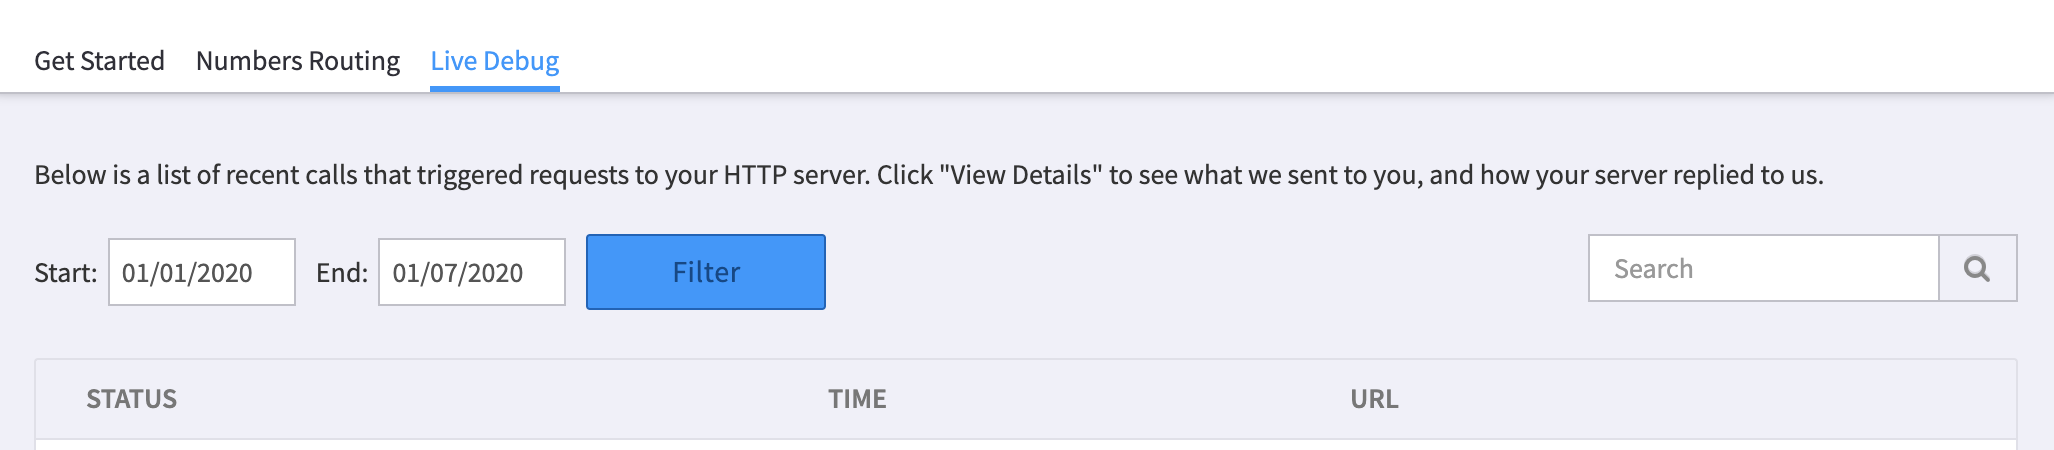
Is there a way to debug my Pivot routine?
Yes. in the application there is a tab called Live Debug. It will list all recent calls that trigger a request to your http servier. If you click on "View Details" you can see the code that was both sent and returned.Is there a way to chain multiple Pivot requests together?
Yes, it is possible to pass variables to multiple Pivot transactions. To do this you will want to use the set CAV (Custom Application Vars) option, and sent the results to a second Pivot. In the second Pivot add a query to see if a variable is set and access it that way.
-
2600HZ STEP GUIDE – PBX CONNECTOR
What is the PBX Connector?
PBX Connector attaches any PBX system to our SIP Trunks so that you can get rid of old and expensive analog or PRI lines. The App is extremely user-friendly, allowing you to move numbers from one PBX to another in minutes. Using the PBX’s own dial-plan tools, pick which phone you want to ring, which menu you would like the call to go to, and how you would like the phone number to act.
-
Assign, Add or Port Numbers
Use spare numbers that you purchased in SmartPBX and assign it in the PBX Connector. You can assign and configure numbers before or after you configure your PBX system. These numbers will be mapped back to the PBX. In real time, it will purchase or port a number and map back to the PBX. -
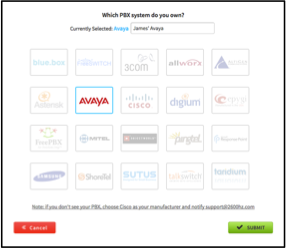
Configure your PBX System
Simply select which PBX system you are using from the dropdown, and create a name. 2600Hz has preloaded the most popular PBX manufacturers for your ease-of-use. If you do not see your PBX manufacturer, choose Cisco and notify 2600Hz support. -
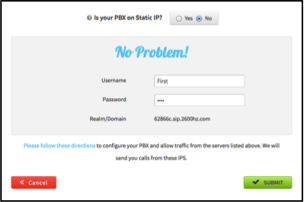
Authentication
Create a username, password, enter the realm/domain and determine if your PBX is on a static IP address.
-
-
What is Operator Console?
Operator Console is a VIEW ONLY tool which offers you live call data, allows you to view all current active calls, call durations and call direction (inbound or outbound) in one simple glance. Additionally, it makes it easy to view office activity, such as who is currently on a call or available to take one.
Once the Operator Console App has been added to your KAZOO environment, it will populate with the Employees and Devices associated with the account and look like the image above.
You can toggle between Employees or Devices then decide to view them All, Available (not on a call) or Busy (on a call). Additionally, you can use the Search tool to quickly find a coworker, no need to know their extension.
Once you receive a call, the screen will look similar to the one above, with the left side displaying your Active/Incoming Calls and Parked Calls.
Feature Keys:While you cannot interact with the interface of Operator Console, you can use Feature Keys to do things like call forwarding and parking calls, directly from your phone’s keyboard. To learn more about Feature Keys please review the SmartPBX app.
Operator Console Definitions
Operator Console has two separate views: Employees and Devices.
- Employees: This view shows all unique users on your KAZOO account.
- Devices: This view shows all unique, registered devices on your KAZOO account.
Available Call Tile:
- User – Extension: This line shows the user name, and the user extension in parenthesis.
Active Call Tile:
- User: This line shows the user name and the user’s extension in parenthesis
- Call Information: This shows both call status, call direction and call duration
- From: This shows the caller ID or Device Name
- To: This displays the callee ID or Device Name
An INbound call is one that someone else originates to the user and will have the icon above.An OUTbound call originates from the user and will have the icon above.
The images below show that you can toggle between Employees/Devices that are All/Available/Busy. We have screenshotted all of the Employee combinations but the same can also be done with Devices.
To view all your employees, select Employees and All (above)
To view only employees not on an active call select Employees and Available (above)To view only employees on active calls select Employees and Busy (above)
-
User Story
- An account manager wants to add, update or delete a phone number related to an agent within an existing account.
- An account manager wants to move a phone number from one sub-account to another.
- An account manager wants to manage the e911 emergency call feature.
The Number Manager Application
The Number Manager App is an essential component of any VoIP service, unifying sourcing, activation and management of DID resources across multiple providers. Purchase and manage a base set of phone numbers in a master account. From there, numbers can be distributed to accounts. When the numbers are no longer needed, they can be reclaimed easily and re-assigned to accounts at any time.
Before you start
-
Know your source for acquiring numbers.
As an account manager you will have identified whether you are using the Hosted version of KAZOO and the 2600Hz supported carriers and phone numbers or you have chosen the BYOC (Bring Your Own Carrier) path.
Notes:- BYOC customers cannot use he Number Manger to buy new numbers. You will buy your numbers from your carrier portal, and then add the DID to KAZOO using the Number Manager app.
-
BYOC customers will see the "Add" option in addition to buy, port, and Sync. in some dialog boxes.
-
Complete the number porting process if you plan to use existing numbers from a different system.
If you are just setting up your office and plan to use existing phone numbers, use the Porting Manager application to move the bulk of your numbers to KAZOO. The application allows you to port numbers into the system. It pre-validates number portability and splits numbers into appropriate orders as needed. Support for managing CNAM Database Updates, Inbound Caller ID Name lookups and Emergency 911 services are also provided.
Getting Started
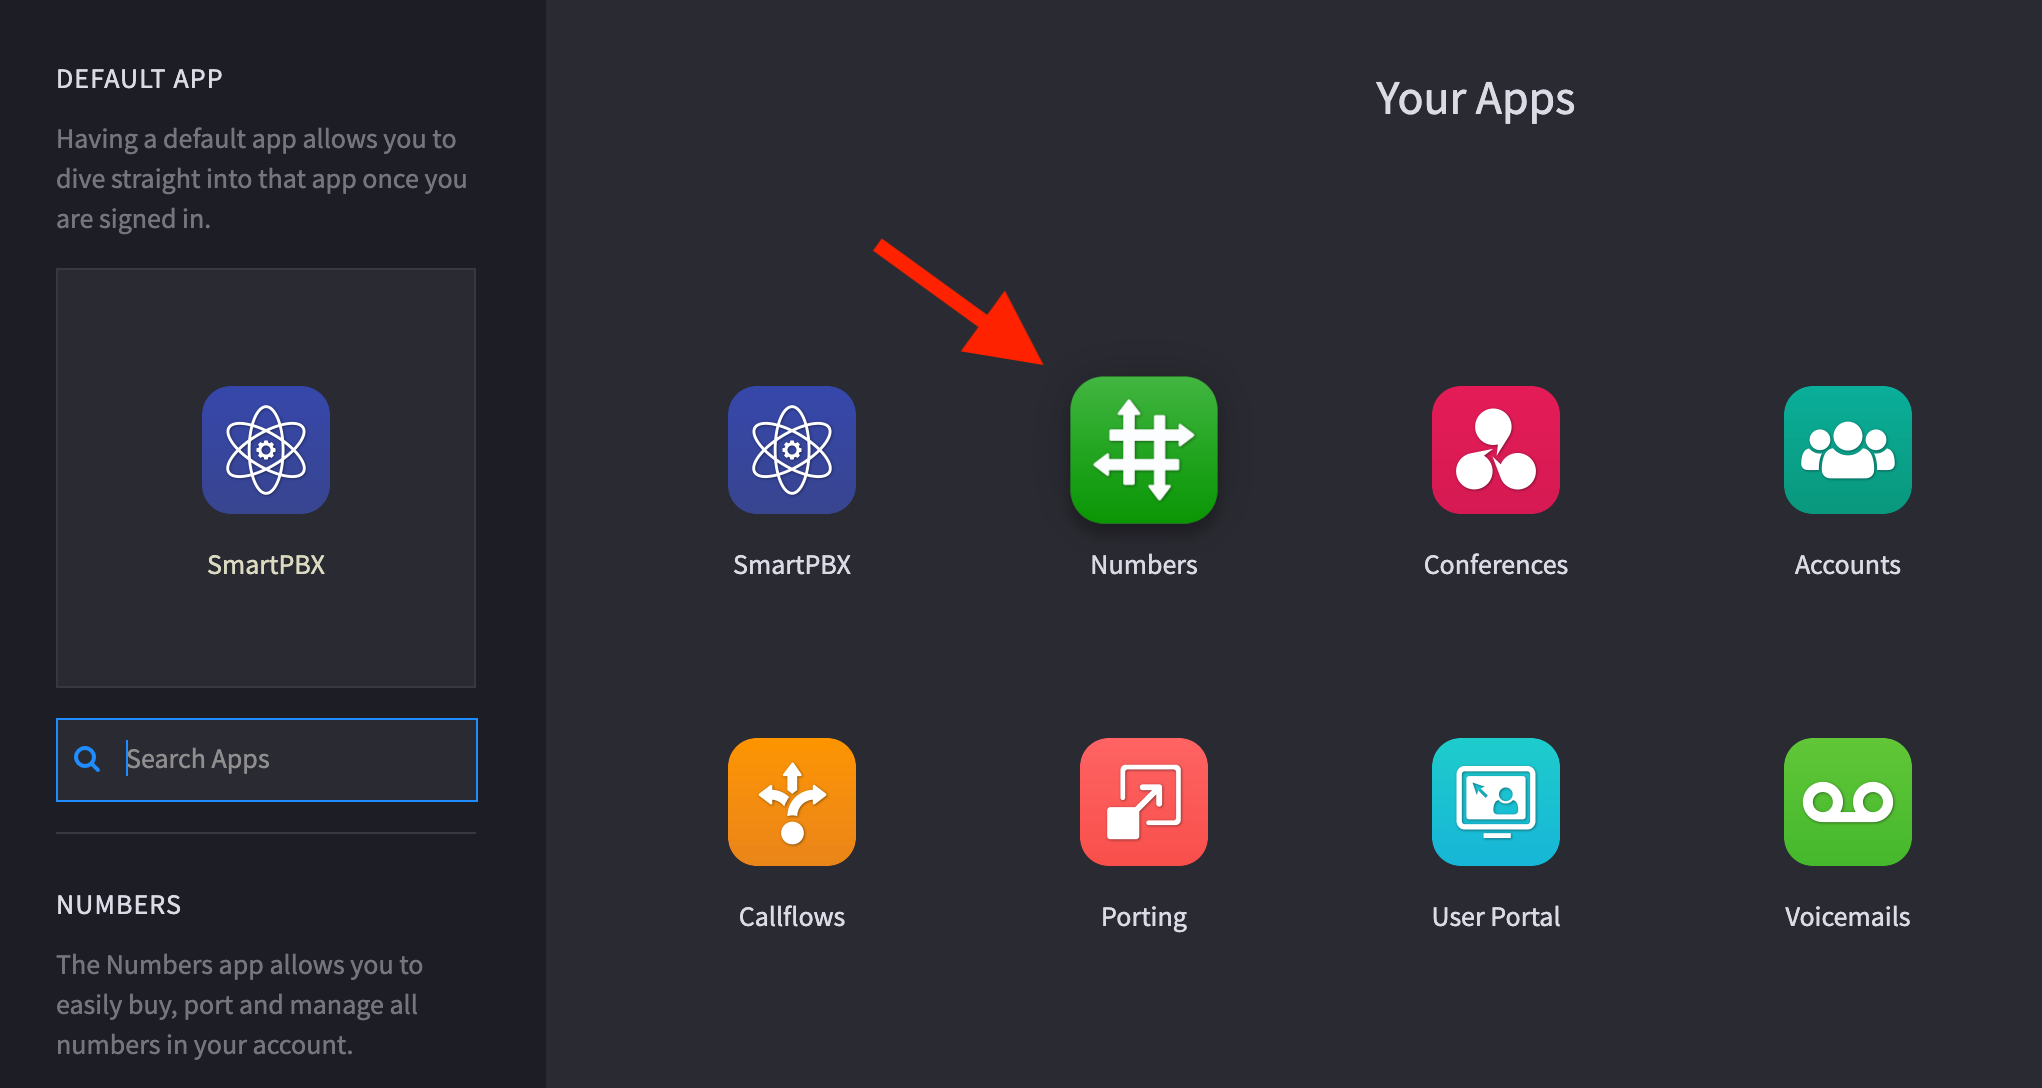
Access the Number Manager app from your application desktop. If you don't see it, ask your admin to enable it.
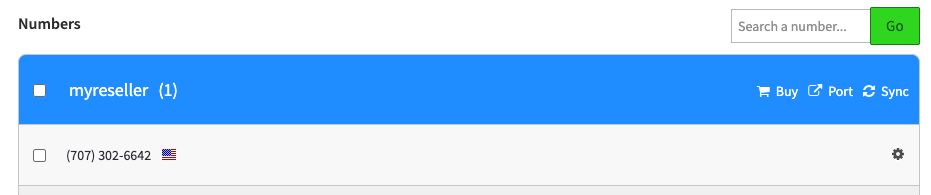
When you open the app, you will see the Numbers home screen as below.
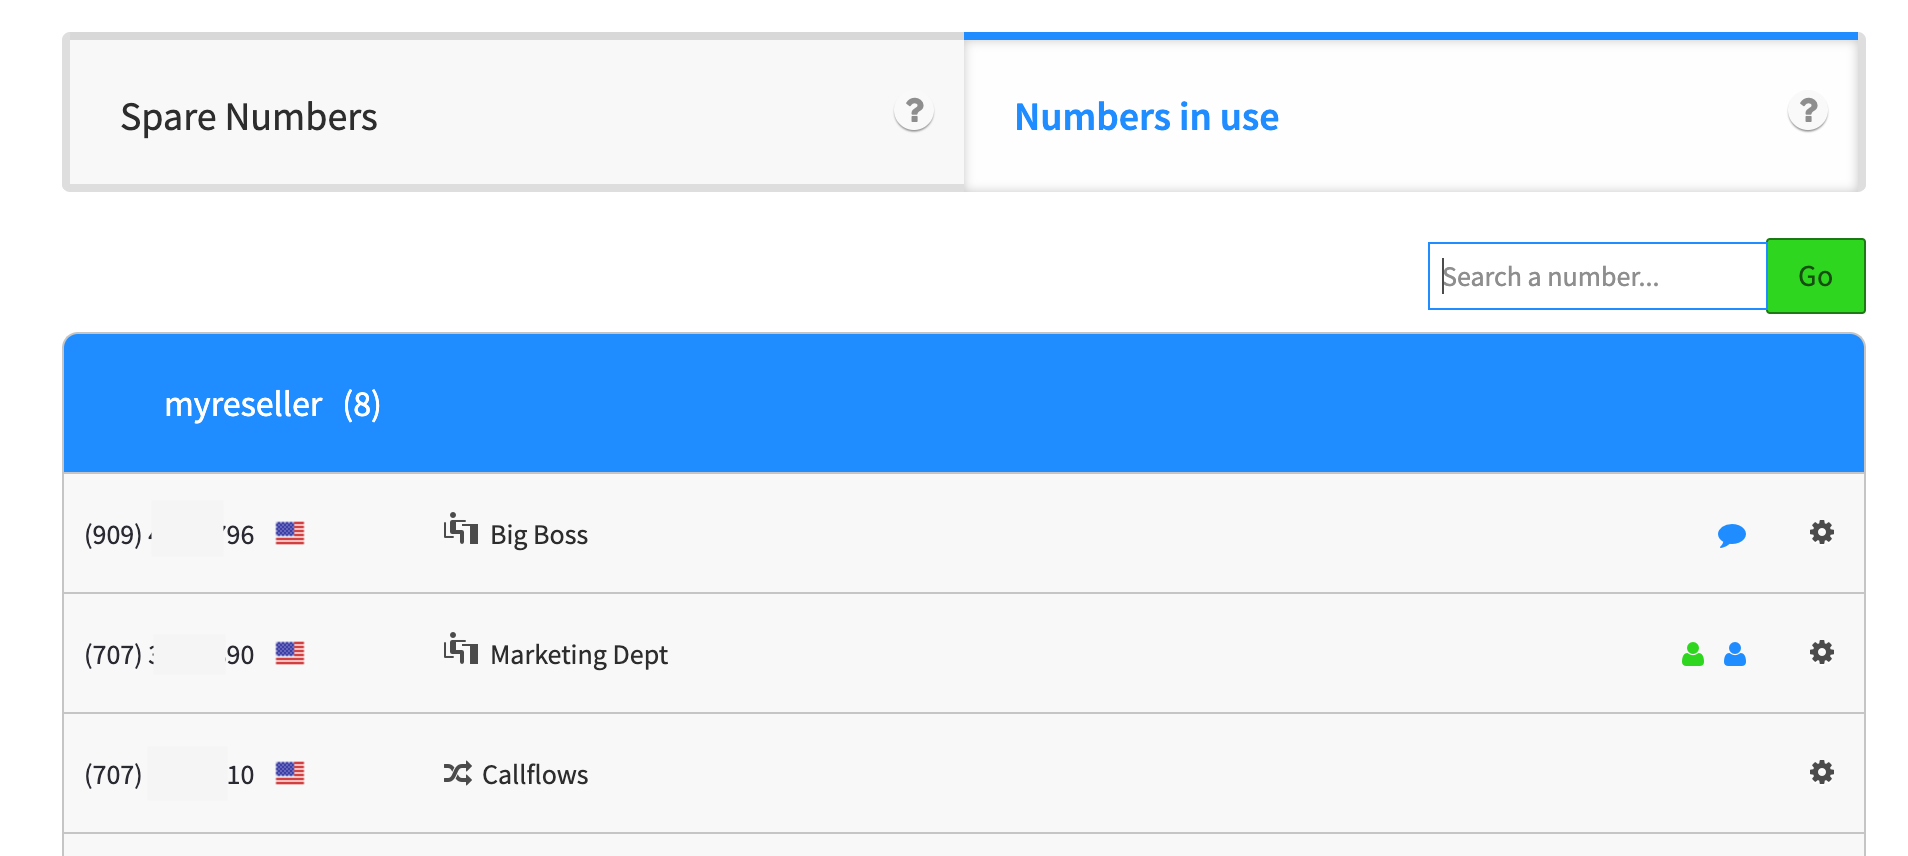
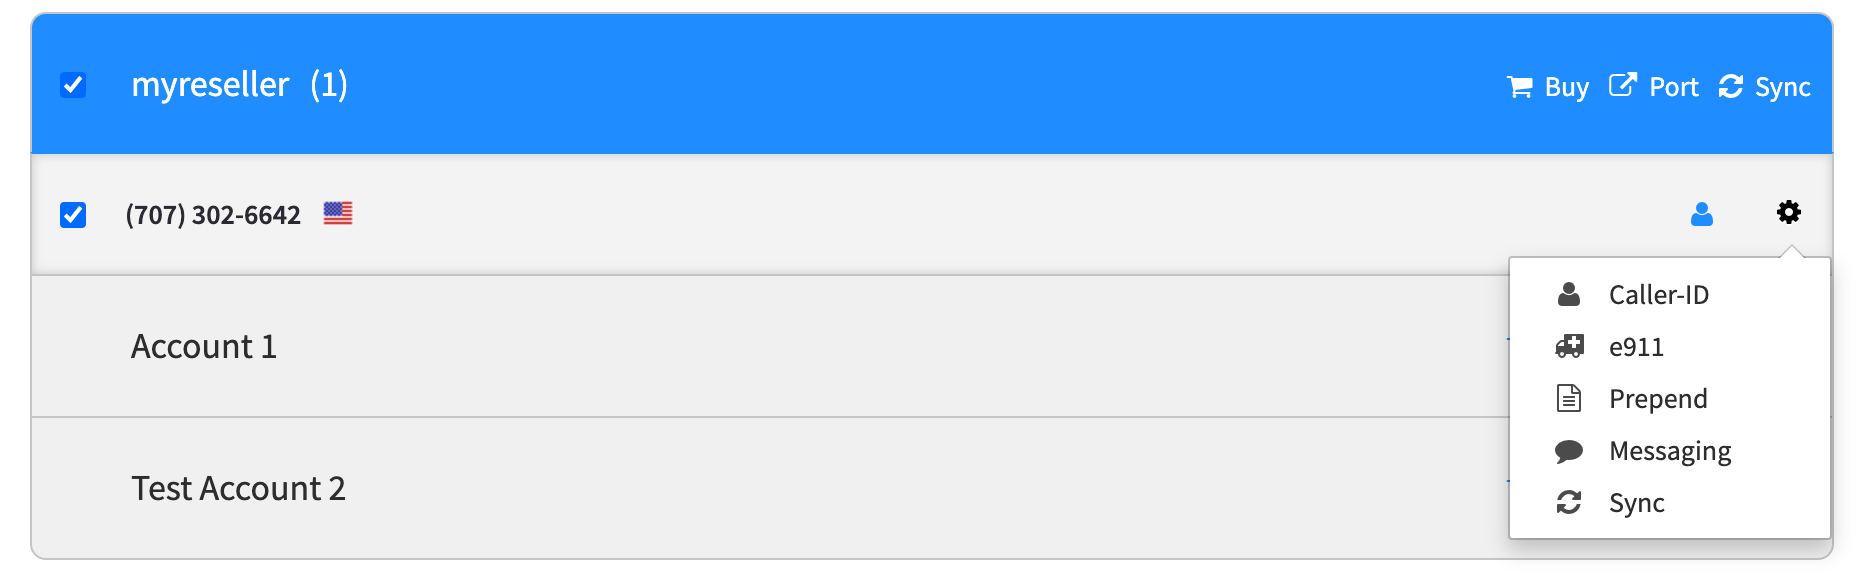
Numbers in Use
If you have already imported any numbers using the CSV uploader or through SmartPBX It will show a list of numbers in your main account and a list of sub accounts if you have any set up. If you have already added some settings to the number, you'll see an icon displayed for that setting. If not, select the gear icon and step through the settings you want to update.
NOTE:
For details on how to set these variables, refer to our SmartPBX user guide.
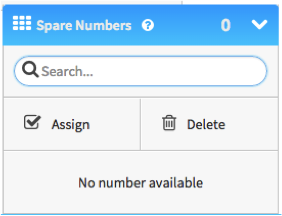
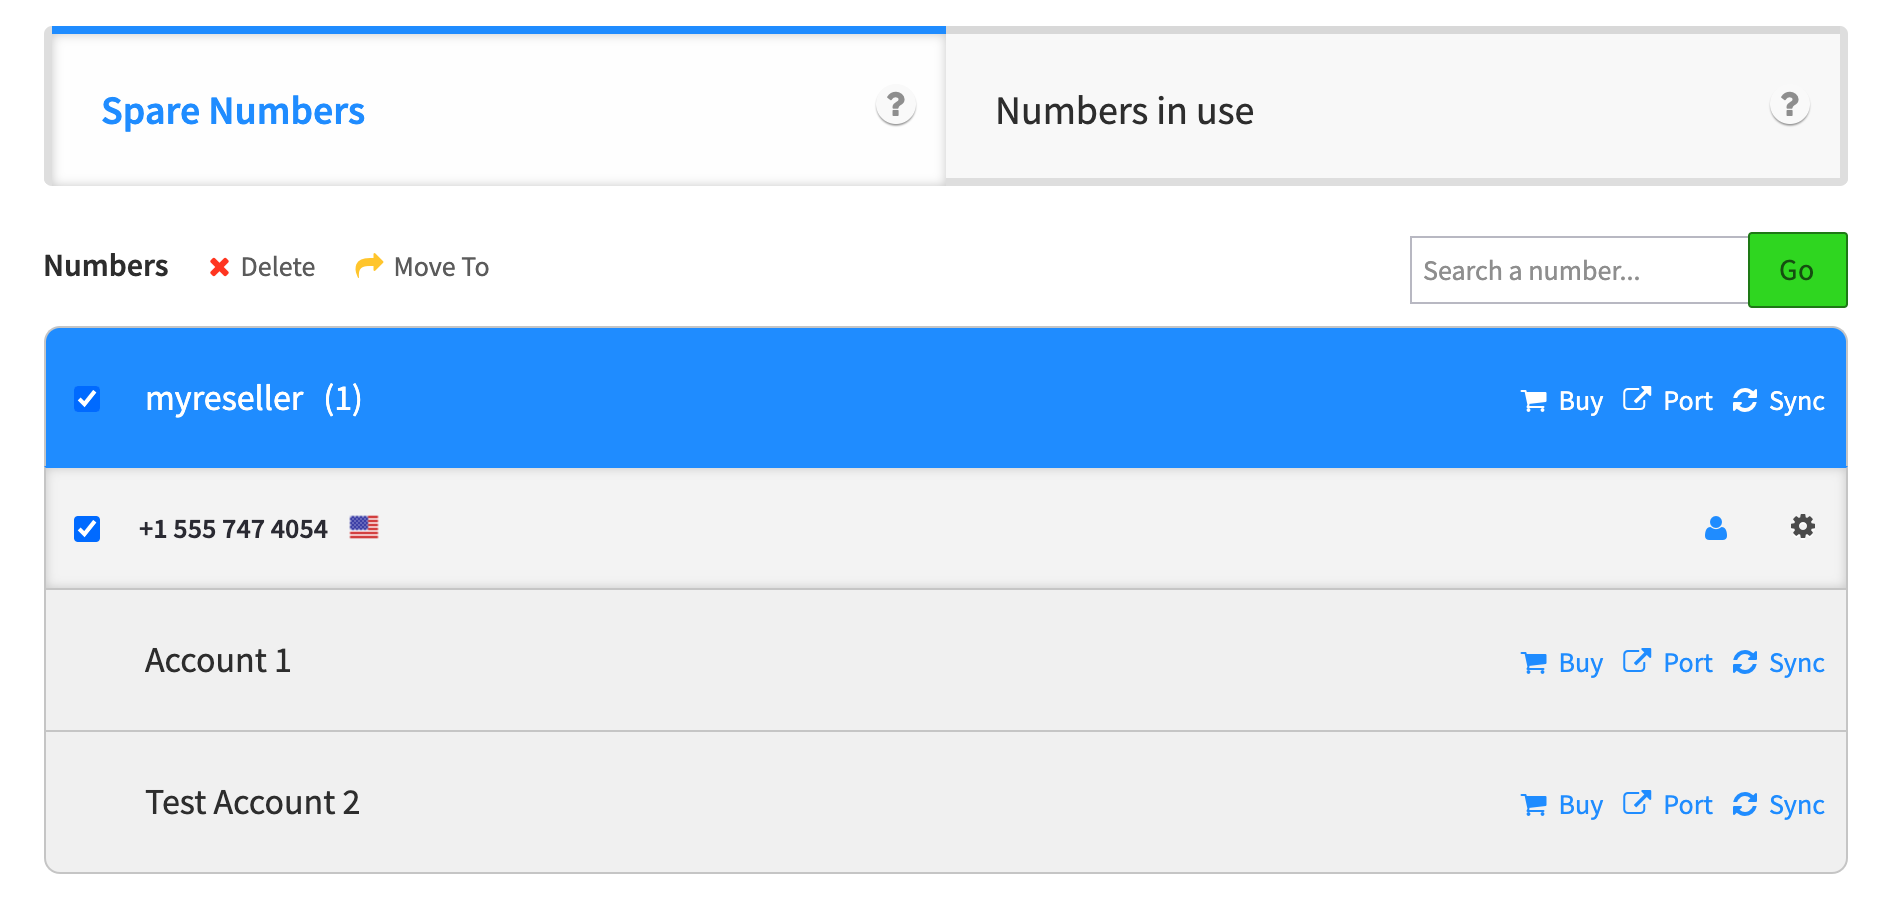
Assign Spare Numbers
The Spare Numbers tab will show any numbers you have already purchased and are available to assign to a account and agent.
- To move use the selection box to identify the number(s) and then select the Move To icon at the top of the list. Once it is moved to the correct account, you can view it in the account list and assign a user to it.
- To delete use the selection box to identify the number(s) and then select the Move To icon at the top of the list.
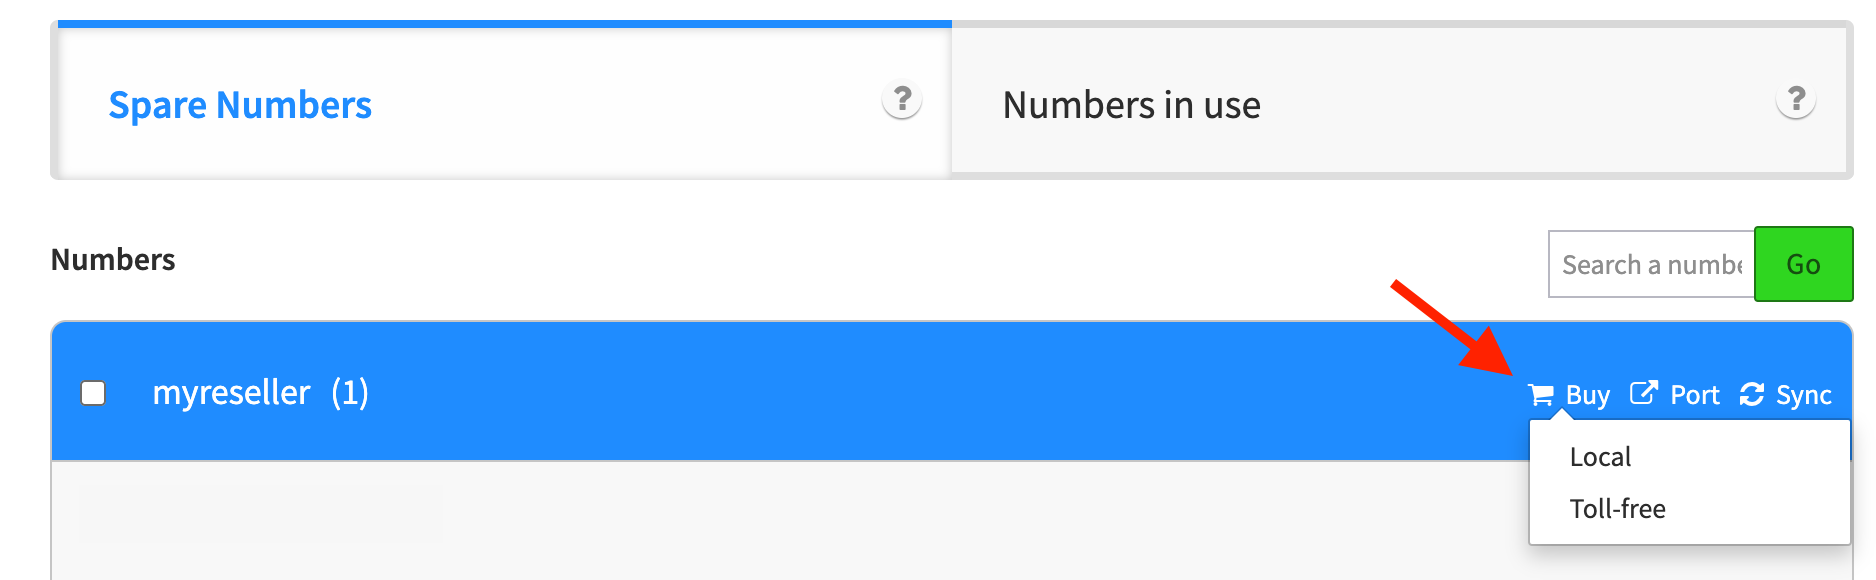
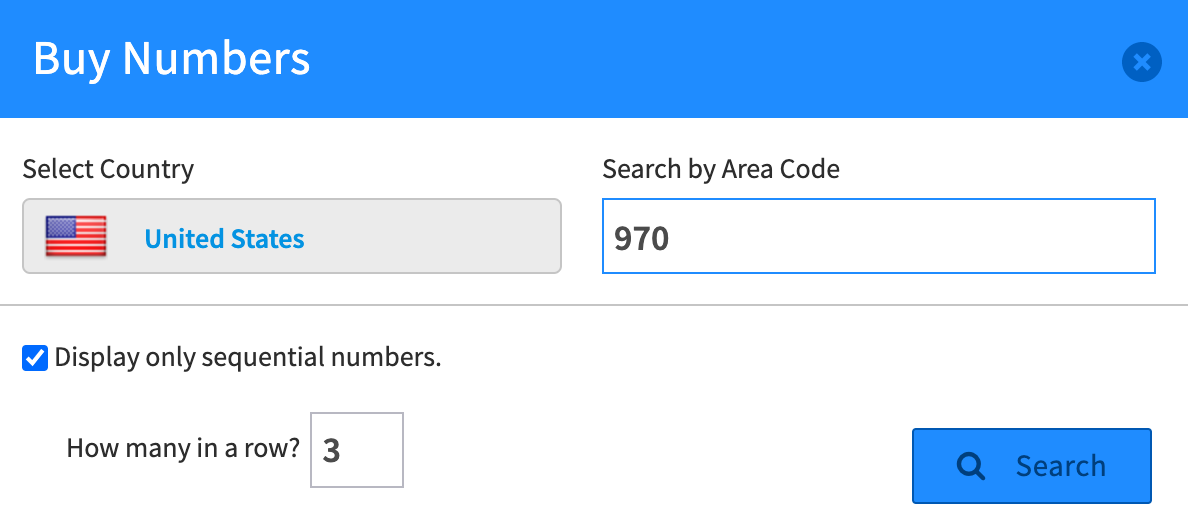
To Purchase a Phone Number
Hosted Customers
If you are a hosted customer and need to buy a new number or series of numbers, you can select the Buy icon to the right of your account name, and select Local or Toll Free.
Then select:
- Your country
- An area code you wish the number to use
- If you are looking for sequential numbers, and how many
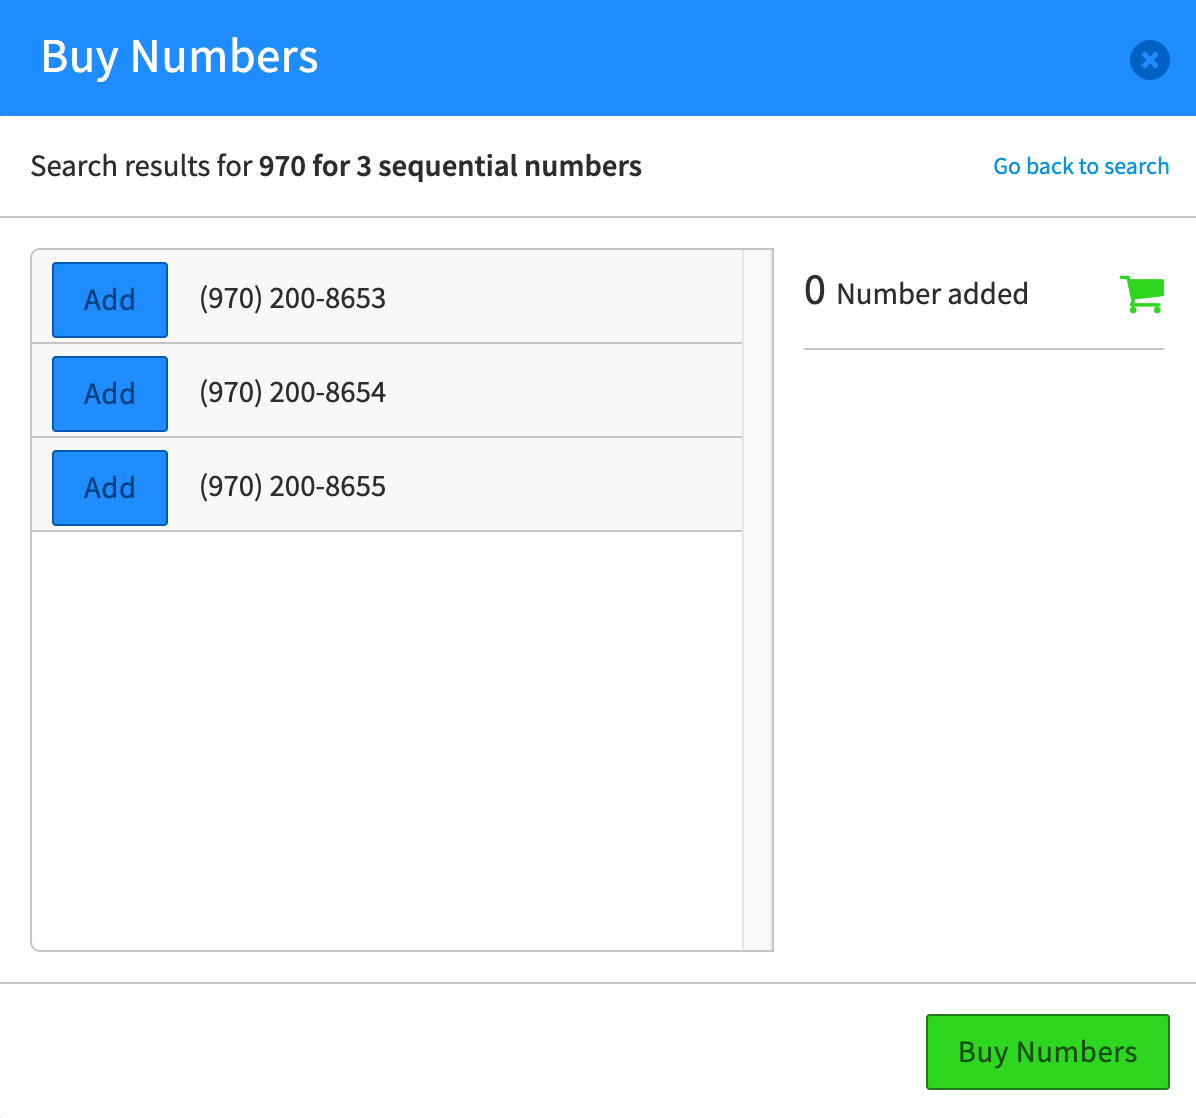
The app will search for appropriate numbers that our platform can provide. You can select them and add them, or return to the search and modify your request.
NOTE: In popular area code regions it is almost impossible to find a sequential phone numbers. There are services you can use to search outside of the KAZOO platform on a daily basis and see if new options become available. If you do this, then you will need to purchase the number from that service and then go through the porting process using Porting Manager.Your screen should now display the numbers you have selected.
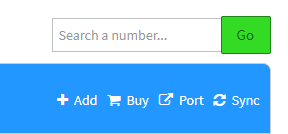
NOTE to BYOC Customers
BYOC customers cannot use he Number Manger to buy numbers. You will buy your numbers from your carrier portal, and then add the DID to KAZOO using the Number Manger app. BYOC customers will see the "Add" option in addition to buy, port, and Sync. in some dialog boxes as shown below.
You will then see a dialog box where you can enter the phone numbers to be imported from your BYOC inventory.
Caller ID Name Selection CNAM Line Information Database (LIDB) Update Tool
Allow users to update the United States LIDB using an intuitive, graphical interface. This sets the Caller ID Name for landline services.
To port an existing number to your new account
The port icon provided in the Numbers application is a link to the Porting Manager application.
For details on how to submit a port request, refer to our Port Manager User Guide.
Assign Spare Numbers and Numbers in Use
Provide each user with their unique direct-dial phone and extension numbers. You can find unassigned numbers within the Interface, or buy or port numbers in. Assign to any user purchased and unused numbers within the Spare Numbers tab.
Assign Numbers to a User:
- Click on the "Spare Numbers Tab" tab of Number Manager, just above the dashboard.
- Within the "Spare Numbers Tab" tab, click on the Numbers checkbox within for the specific user. Select "Move To."
- A drop down will appear with a search bar at the top. Select the account you’d like to move the number to.
- Go to the account, and assign the settings to your number, including the Caller-ID name
- Confirm "Move Number" and you are all set.
To Move Numbers Across Accounts:
- From the Number Manager homepage, click on a number in your current account that you would like to move.
- Click on the Move To link
- A Search Bar should appear with a drop down. Click on the Account in the dropdown or enter the Account name.
- Click on the "Move Number(s)" button
- In the Number Manager homepage, look for the number you just moved under the account you previously selected.
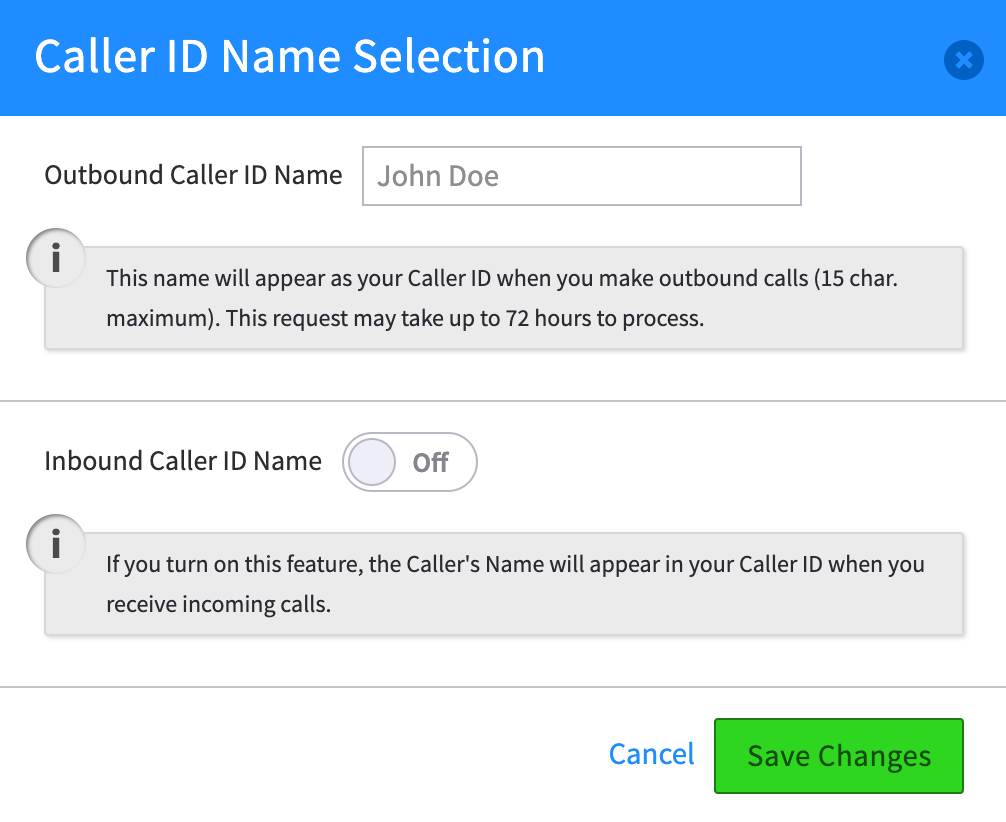
To Manage Inbound & Outbound Caller ID:
- Click on the "Numbers in use" tab in Number Manager, then click on the cog icon and the Caller-ID option will drop down.
- Click on the Caller-ID option.
- Type in a name for the Outbound Caller ID and toggle on the Inbound caller ID, then click on "Save Changes".
- Click "OK" on the confirmation popup.
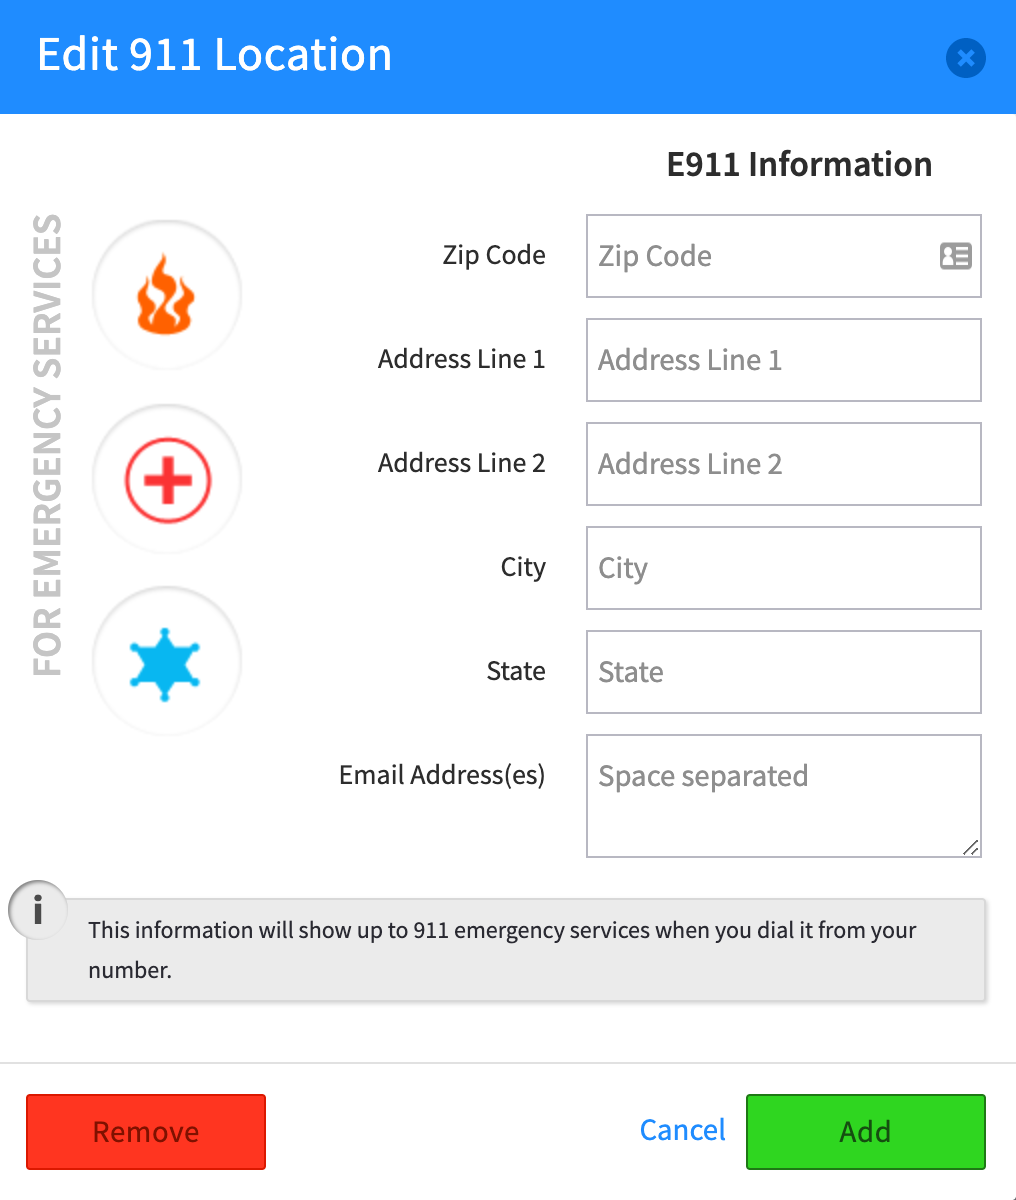
To Manage E911:
NOTE: Please review our document describing the new Kari's Law and its 911 compliance requirements HERE.- Click on the "Numbers in use" tab in Number Manager, and then click on the cog icon and the E911 option will drop down.
- Click on the "E911" option.
- Fill in the Zip Code and the Street address (line 2 is optional), then click on "ADD".
- Click "OK" on the confirmation popup.
Related Articles
Porting Manager User Guide
API Reference Docsdocs.2600hz.com
REST API Reference for Kazoo Crossbar API####
-
2600HZ STEP GUIDE –
What is This?
Add brief overview of the app here. This is helpful for search engine results.Before you start
- Add requirements for getting the app loaded, admin access
- Add information that would be good to have
Quick Steps
- Add an overview of the steps for super - users to review.
- They may not need to go further!
@@@@@@@@@@@
Related Articles
White Labeling your DNS API Reference Docs
docs.2600hz.com
REST API Reference for Kazoo Crossbar API@@@@@@@
Related Articles
SmartPBX Frequently Asked Questions (FAQs)
Accounts Manager Wizard User Guide API Reference Docs
docs.2600hz.com
REST API Reference for Kazoo Crossbar APIdocs.2600hz.com
REST API Reference for Kazoo Crossbar APIRelated Articles
SmartPBX Frequently Asked Questions (FAQs) Accounts Manager Wizard User Guide API Reference Docs
docs.2600hz.com
REST API Reference for Kazoo Crossbar APIdocs.2600hz.com
REST API Reference for Kazoo Crossbar API
-
-
General Information and Features
What is the CallThru.us app?
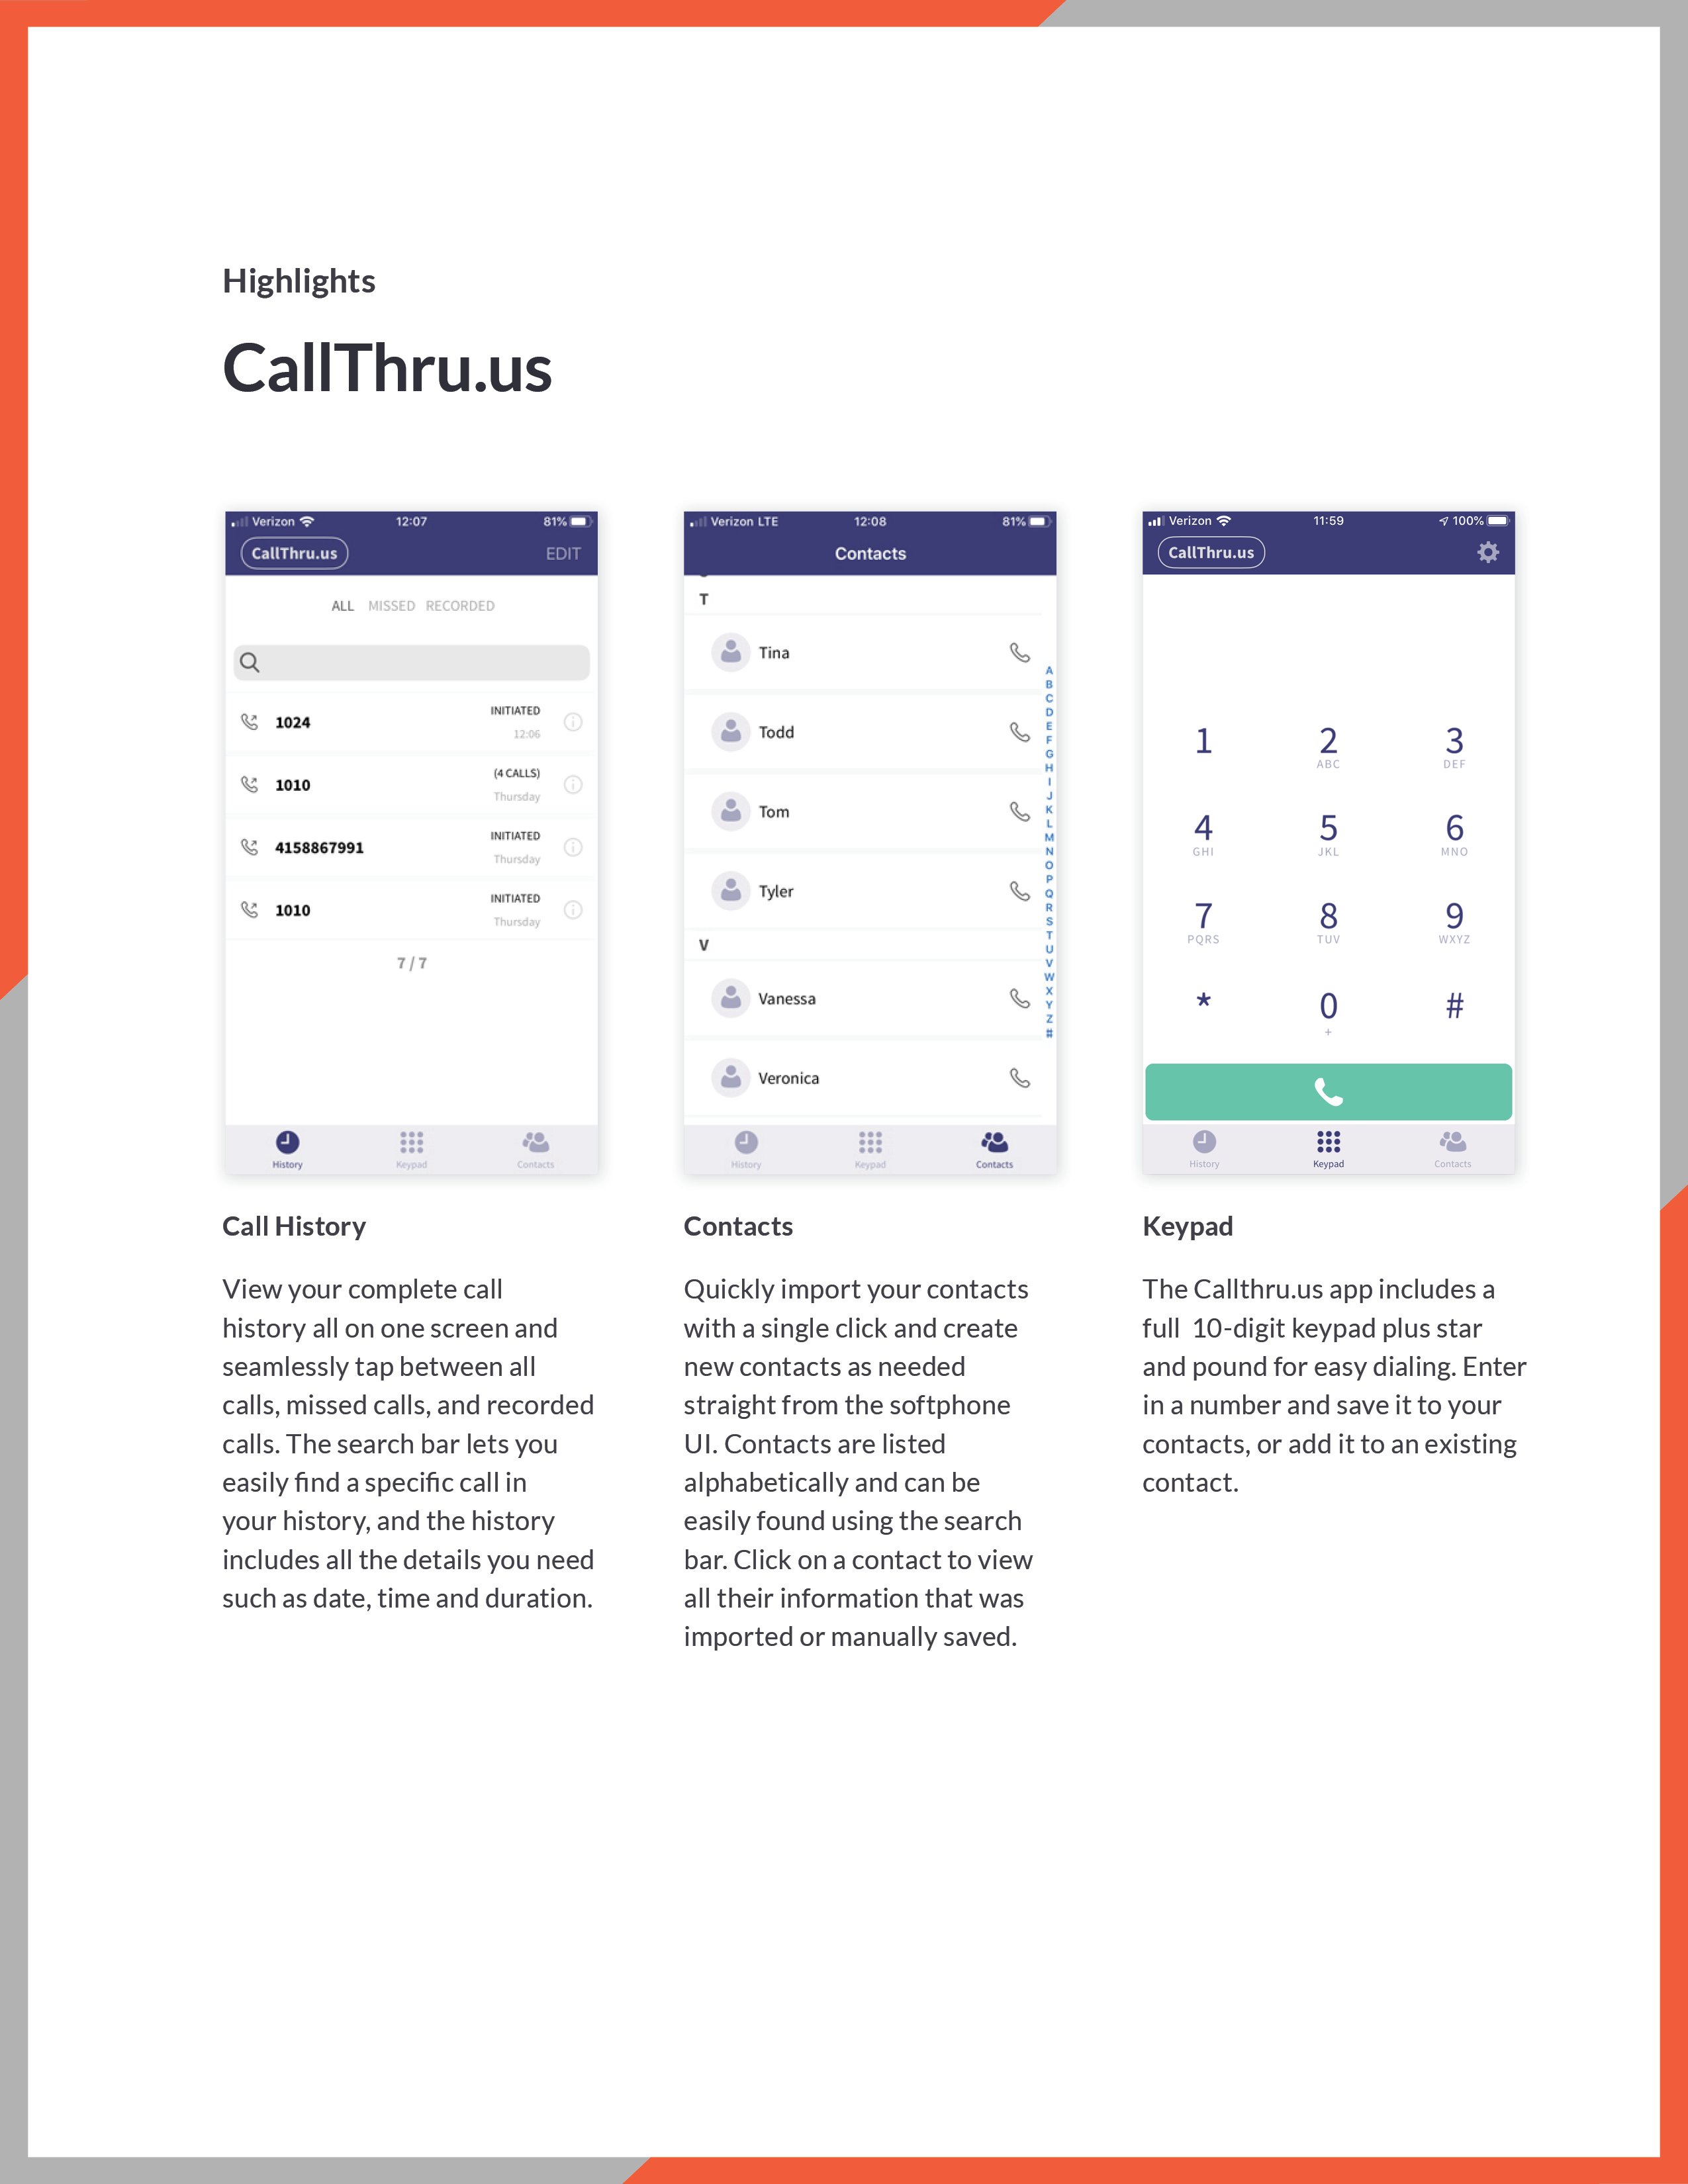
The CallThru.us app enables users to access their office PBX system using their Android or iOS devices. Incoming and outgoing calls can be routed through their office system and are included in the PBX system reports. Locally users can access Call histories, contacts, voice mail and recordings without needing to log in from a desktop.
Can we white label CallThru.us?
We have provided the option to add your branding information to the desktop version of CallThru.us.
The listing agreements with Apple and Google however do not let us “white label” the mobile application and branding – each instance would require a new listing and fee. Aside from the license notes we have made minimal reference to 2600hz in the actual app to keep it as agnostic as possible for our resellers.
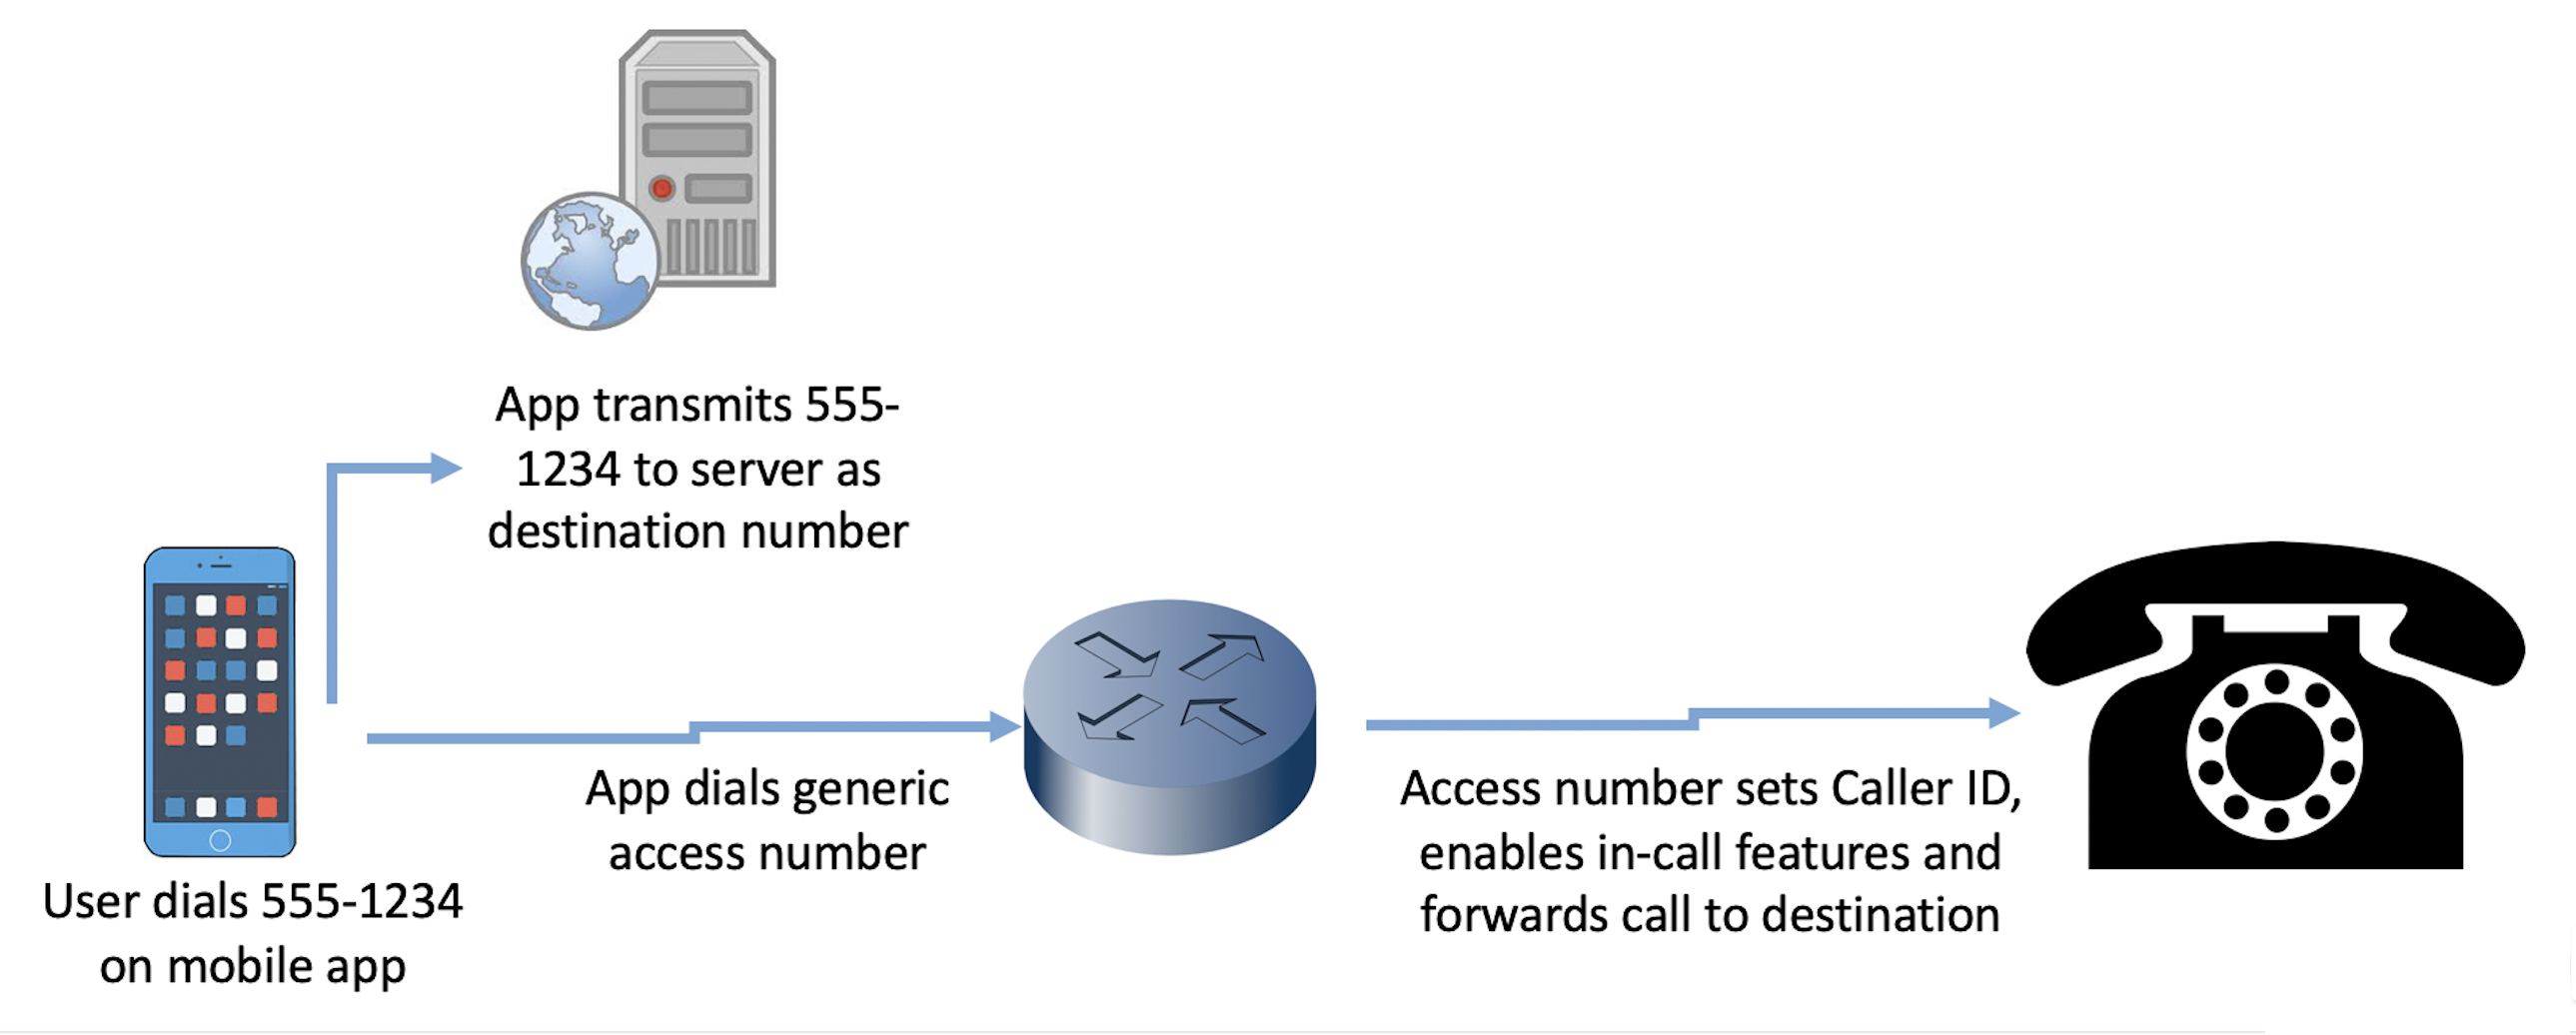
How does the call routing work?
See the diagram below for an overview of how a call is routed.
Can I use this app to send and receive text messages?
This is not available in the current release. We are working on this feature and hope to provide it in our next update.
Is there a STEP reference guide for CallThru.us?
Yes! We are working on several support documents for this application. A STEP guide has been posted for configuring both Android and iOS devices, here.
Configuring devices from your desktop User Portal app.I don’t have a mobile phone associated with my App Store/Play Store to download from the link in the app. Do I need one?
No, you can simply go directly into the App Store/Play Store directly on your phone to download.
If I say “no” during the original setup to accessing my phone contacts, can I change my mind and allow this later?
Yes, the settings are accessible from your device OS.
-
Android devices will prompt you to allow access and change that setting anytime you try to access your address book.
- iOS devices If you have an iOS device, you can change the permissions under the phone settings screen. Look for the CallThru.us app in your list, and toggle Contacts on.
My Call Thru device shows as “unregistered” in my User Portal currently – is this a problem?
No, since your device is not a device on the account, the lack of registration on the system is not a problem. This appearance may be change in future revisions
My Call Thru device does not show as a device in SmartPBX – Will my app still work?
The device is listed under devices in the SmartPBX portal, however there is not yet an icon for it. Look for a blank listing under the devices column. When you click on that you will see it is tagged as a callthru.us device.
Making and receiving calls with your device
When I dial a phone # the app shows a different number than I am dialing. What is this?
When you make a call, CallThru.us routes your call through a series of access numbers managed by your PBX. It then forwards to the number you called.
So the number you see on your phone is the access number.
-
Your call history will display the actual phone number you called.
-
The recipient of your call will see a caller ID based on your settings in your PBX system
- If there is no setting then it will display as Anonymous
- If you have assigned a caller ID to your originating phone number that will display
I can make outgoing calls but for some reason I’m not seeing incoming calls
To set up incoming call routing, add a device in the Callthru.us app that is assigned to you as a user. It will ring all your devices including forwarding the call to your cell. If you are not receiving calls, check the following settings in your SmartPBX account
- Make sure the setting is assigned to ring the user, not the device.
- Check the Find Me Follow Me settings for the device. It should show the ringer unchecked.
- View the STEP guides for more information and troubleshooting for this.
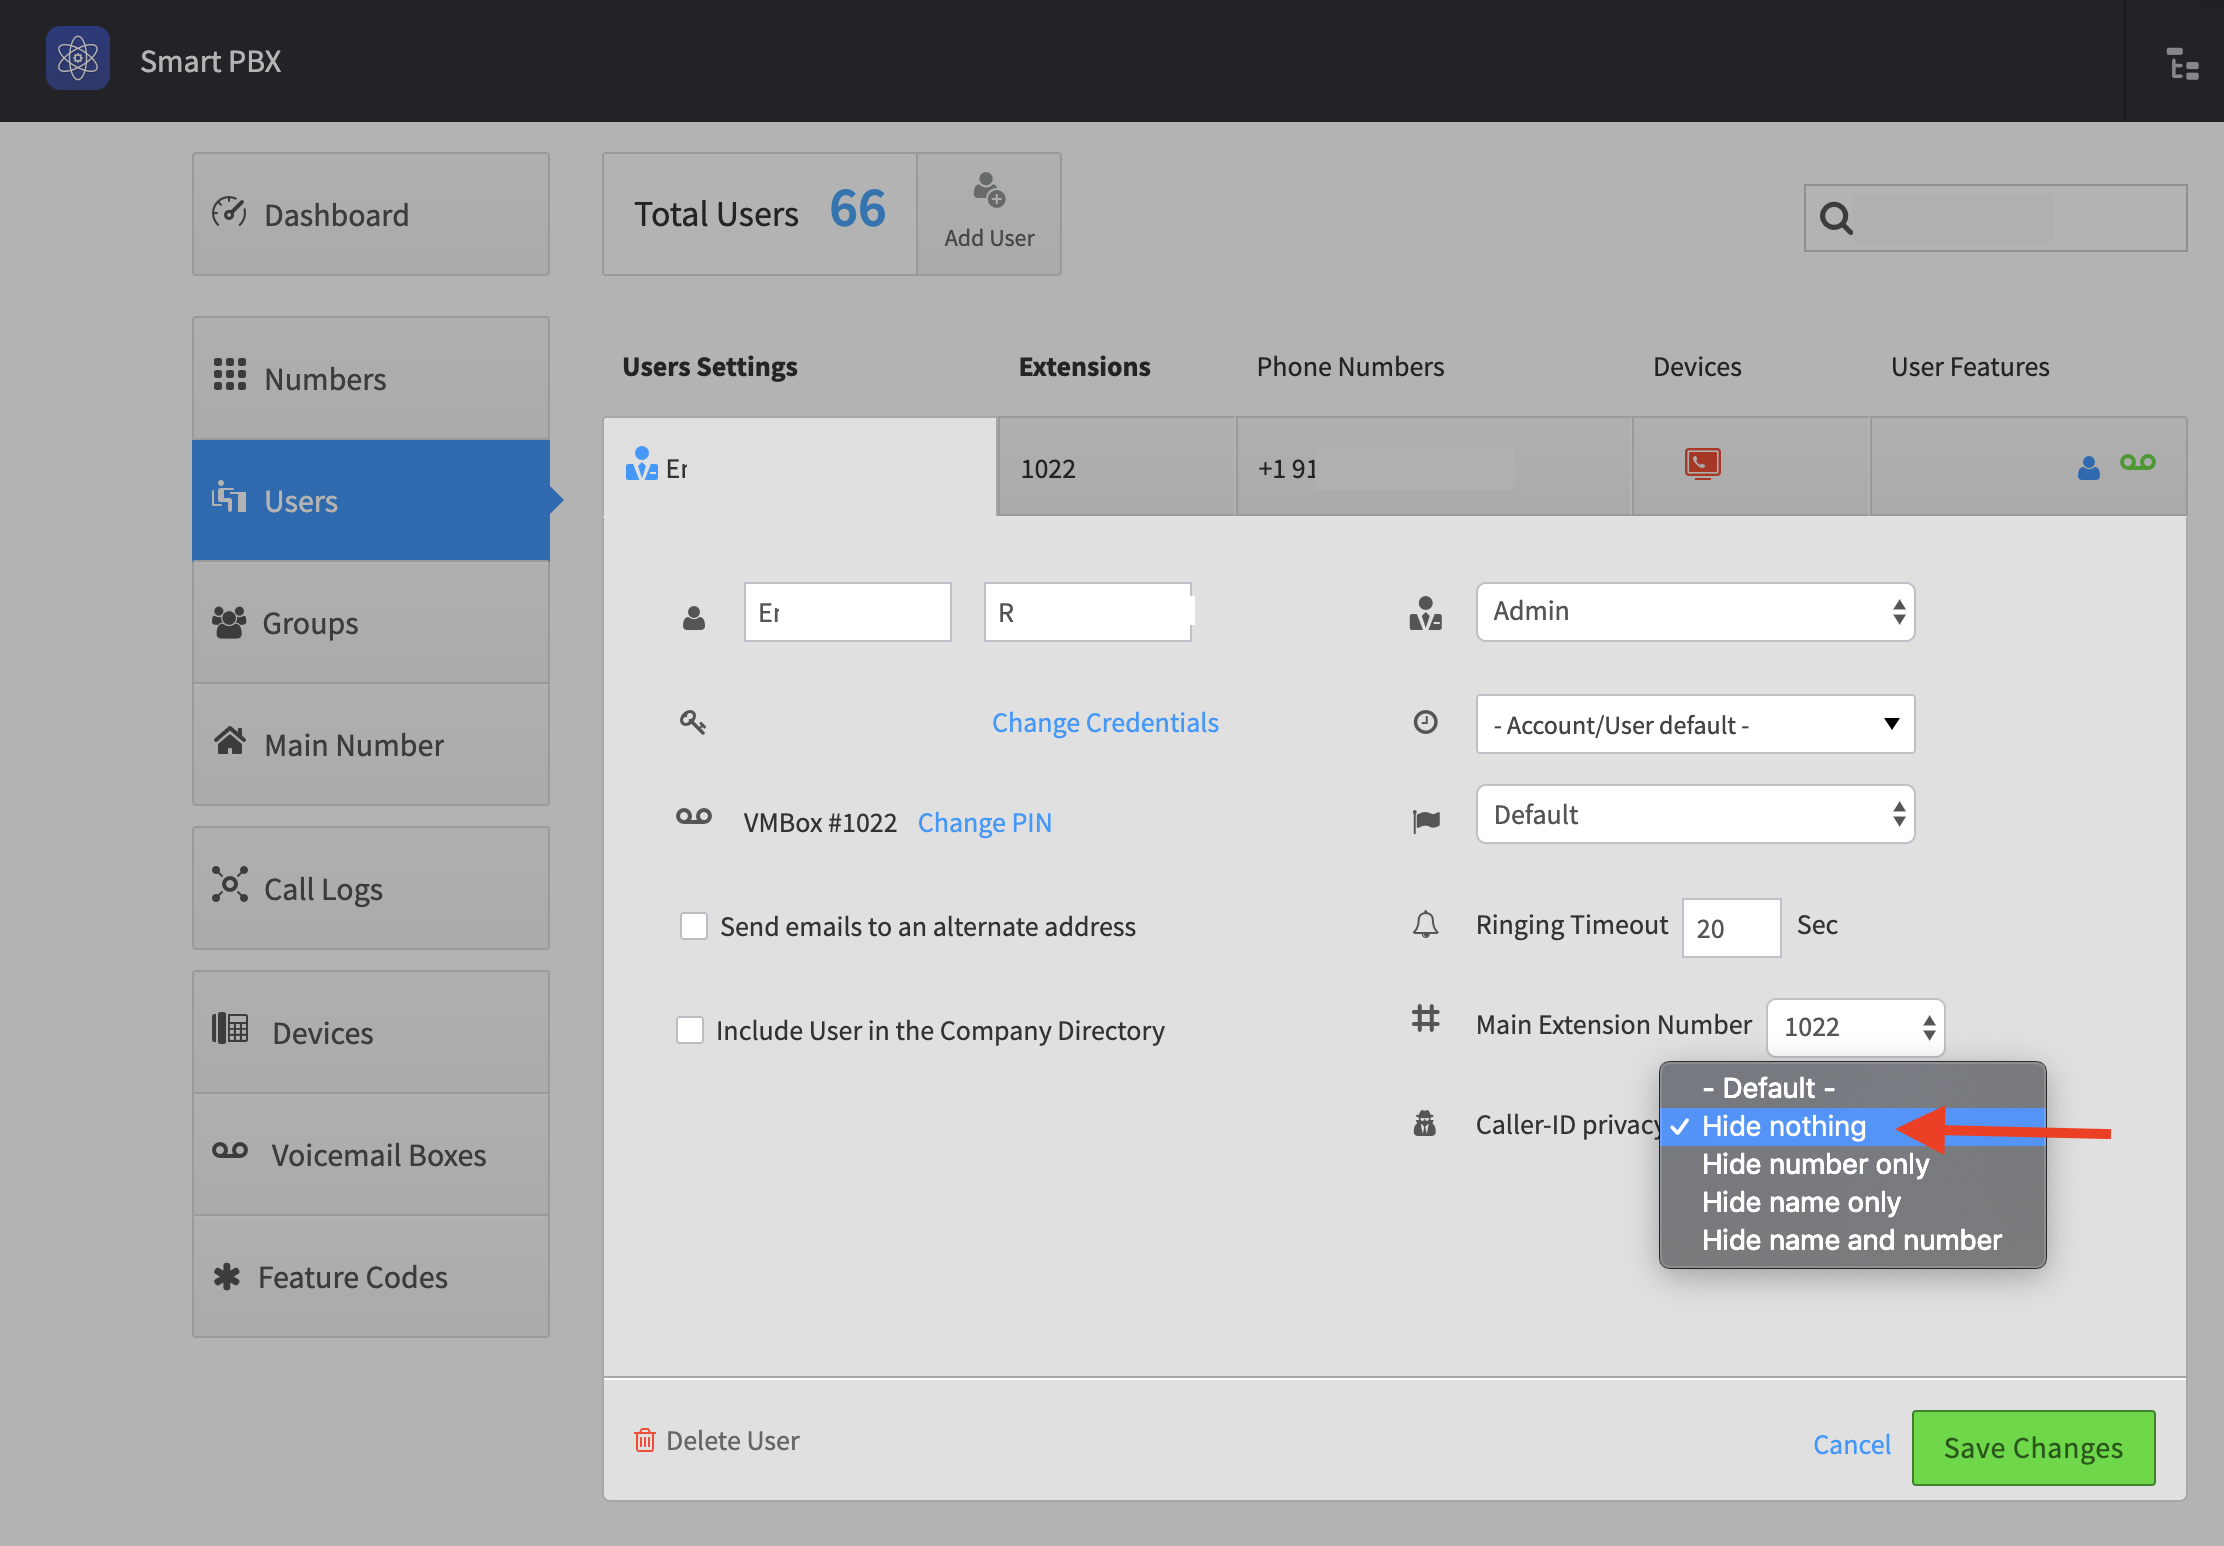
When I call a landline I get a message that the "callee is not accepting calls from numbers with Caller ID blocked"
This type of message has become more common now with the SPAM filters phone carriers have implemented for land lines due to new laws protecting consumers. If you receive this message, it's likely your user Caller-ID privacy setting in SmartPBX includes a "HIDE" selection, either "Hide Number Only, Name Only, or Name and Number". To ensure your calls will be accepted by landlines, go to your SmartPBX User settings and set the privacy option to either "Default" or "Hide Nothing." See the screen shot below.
Settings features on your device
What settings can I control with CallThru.us from my device?
This version of CallThru.us app supports the following settings:
-
Enable Call Forwarding
This allows you to identify a different phone number to forward calls to. Additionally, you can request the originating caller ID is maintained. -
Send Voicemail to email
Here you can choose to send your voicemail notification to an email address. NOTE: Since the "from" field will show a cryptic string, your email filter may forward it automatically to Junk. If you don't receive any notices, check your Junk mailbox. -
Do Not Disturb
If turned on, the device listed will not ring. Note all the devices listed under your user name in SmartPBX will be listed and allow being turned off. -
Reset Application
Use this if you want to reset the application. It will delete all your data related to the app, including the associated phone number. If you are having trouble receiving incoming calls, it's possible the phone number you entered was not paired correctly with your phone. As noted below, this is a last effort to resolve this.
Your CallThru.us Faxbox
I am not receiving fax notices on my phone
In order to receive faxes and notifications on your phone, you must have a fax box assigned to your user setting in SmartPBX. Ask your administrator to set this up and verify the fax number you wish to be a receiver for.
You can check the following settings on your phone to confirm your phone is configured correctly:
- On the faxes page, review the phone number listed under your Faxbox Heading.
- Under settings, make sure the toggle for Do Not Disturb is OFF for your fax listing
- Check in the User Portal Faxes (on your desktop, if you don't have access ask your admin) to see if the faxes have registered there.
- Check your email inbox (and junk mailbox). If your settings enable the "copy to email" option, you should get a copy there. This will confirm if the system is receiving the faxes.
How can I send faxes from my phone?
Currently there is no option to send a fax from your phone. The "sent" tab on your phone displays information and images of faxes you may have sent from your office desktop in SmartPBX.
How do I save an incoming fax on my phone?
Currently there is no option to "Save Fax" on your phone. We anticipate this will be one of our pending updates. In the interim, some users are taking screen shots of the fax and saving that to their phone documents.
If I delete a fax from my phone is it deleted also from Smart PBX and vice-versa?
Yes.
-
Android devices will prompt you to allow access and change that setting anytime you try to access your address book.
-
CARRIERS - STEP GUIDE
2600Hz has made carrier management easy by enabling you to add and store multiple carrier templates on the interface. Setup and deployment is extremely easy, requiring minimal time and effort. Select your outbound calling priority settings for each service. When setting up a carrier for your users, you can select the carrier options through prebuilt or your custom-built templates. Once you have added providers for outbound calling services, you can immediately begin prioritizing them.
Adding Providers
Once you have purchased your IPs you can add a carrier to your account. Add a service provider from a prebuilt template or create a new one from scratch and customize settings based on your needs.
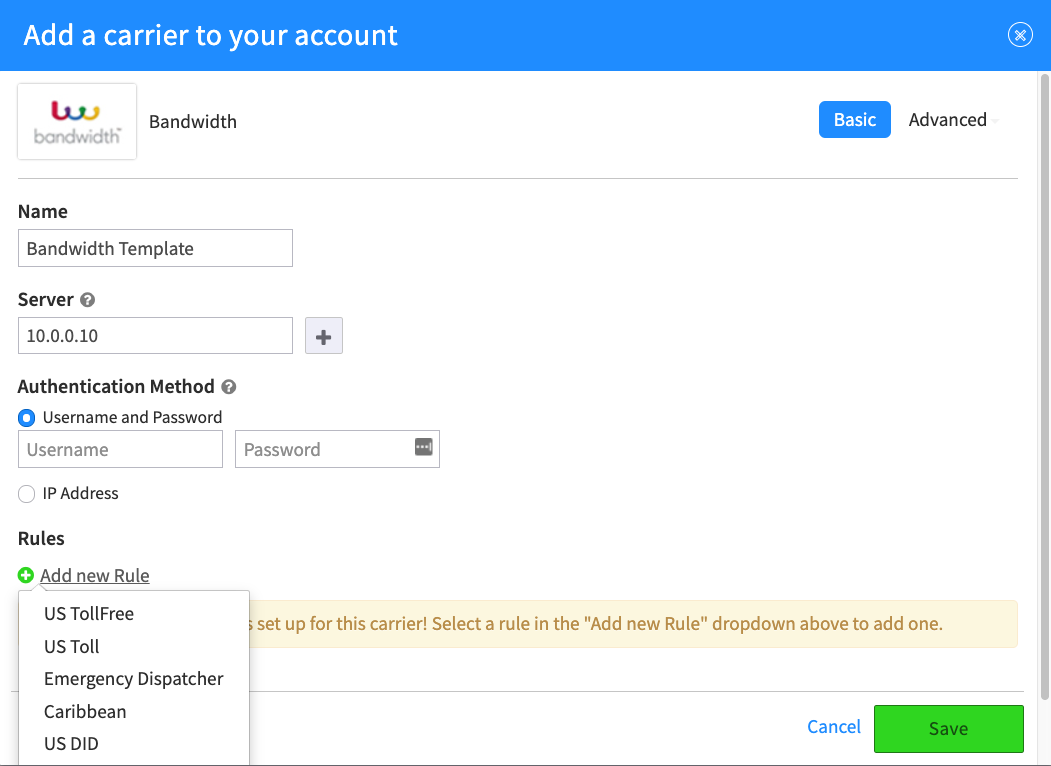
Adding Carriers
Once you have purchased your IPs you can add a carrier to your account. Add a service provider from a prebuilt template or create a new one from scratch and customize settings based on your needs.
You can set rules for each carrier. Once added, the list of configured services providers will be listed in the interface.
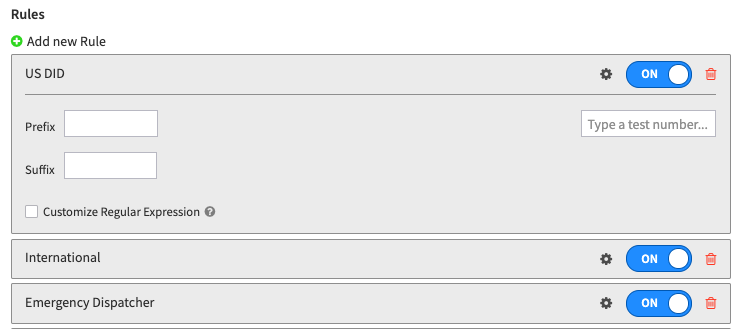
Adding Rules for each carrier
If you use more than one carrier, you must add rules that assign specific call types and provide prefix and suffix information. Once assigned you can enable or disable a carrier as needed.
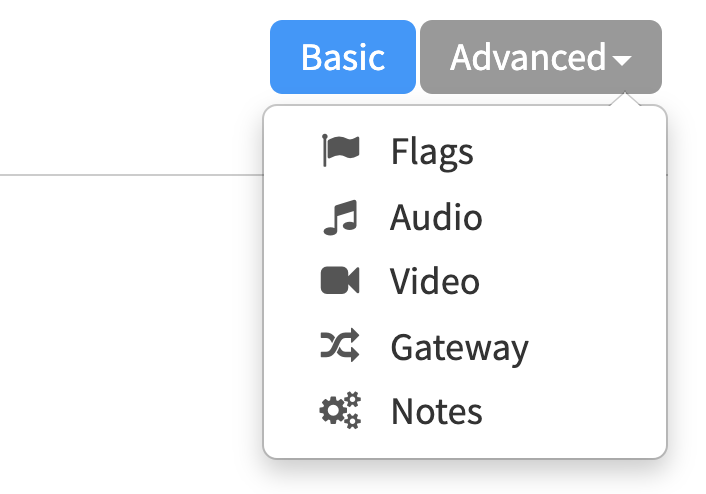
Advanced Carrier Settings
Within the Carrier Settings, there are several Advanced settings to consider. They are accessed from the Advanced button on the top right of the screen:
Flags Manager
-
Ignore Flags
- If this is checked, placing an outbound call from a device with flags set on its configuration should use this carrier regardless of matching flags.
-
Require Flags
- When checked, this carrier is ignored if the request does not specify outgoing flags
-
Create Flag
- Allows you to name a flag and add it to the list for this carrier.
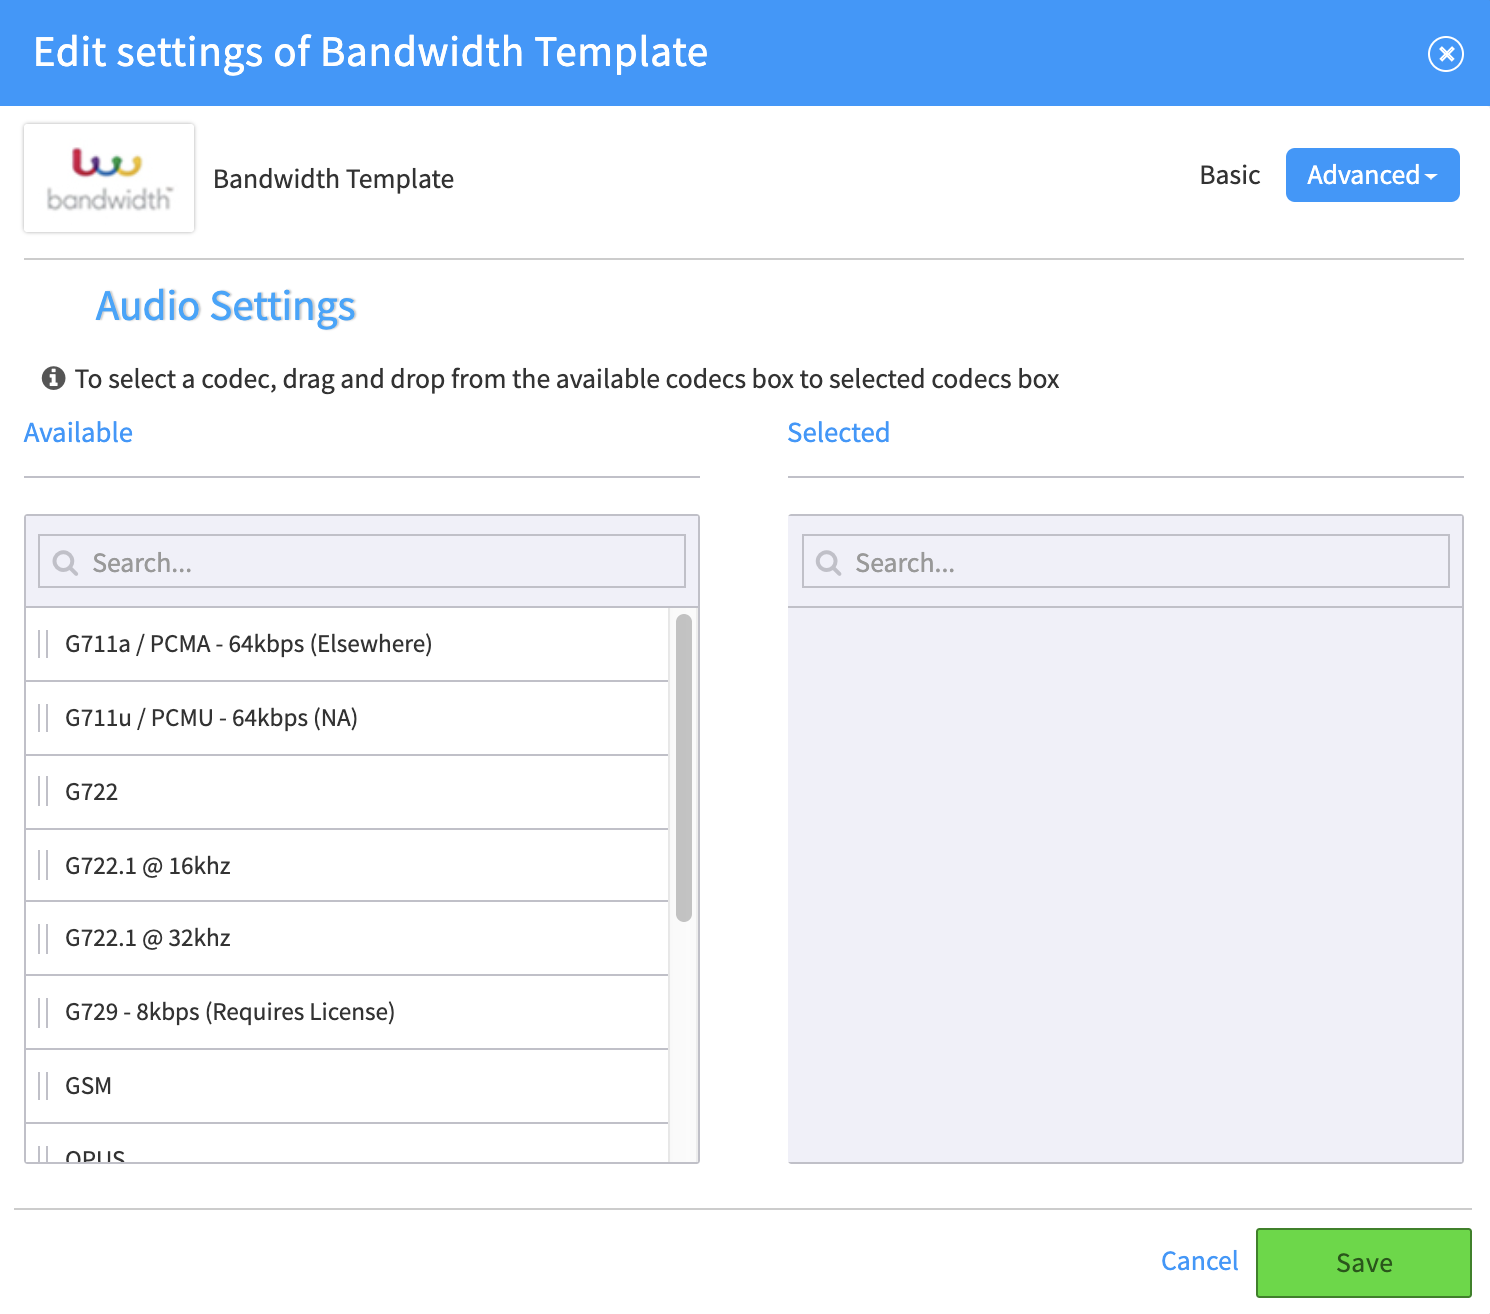
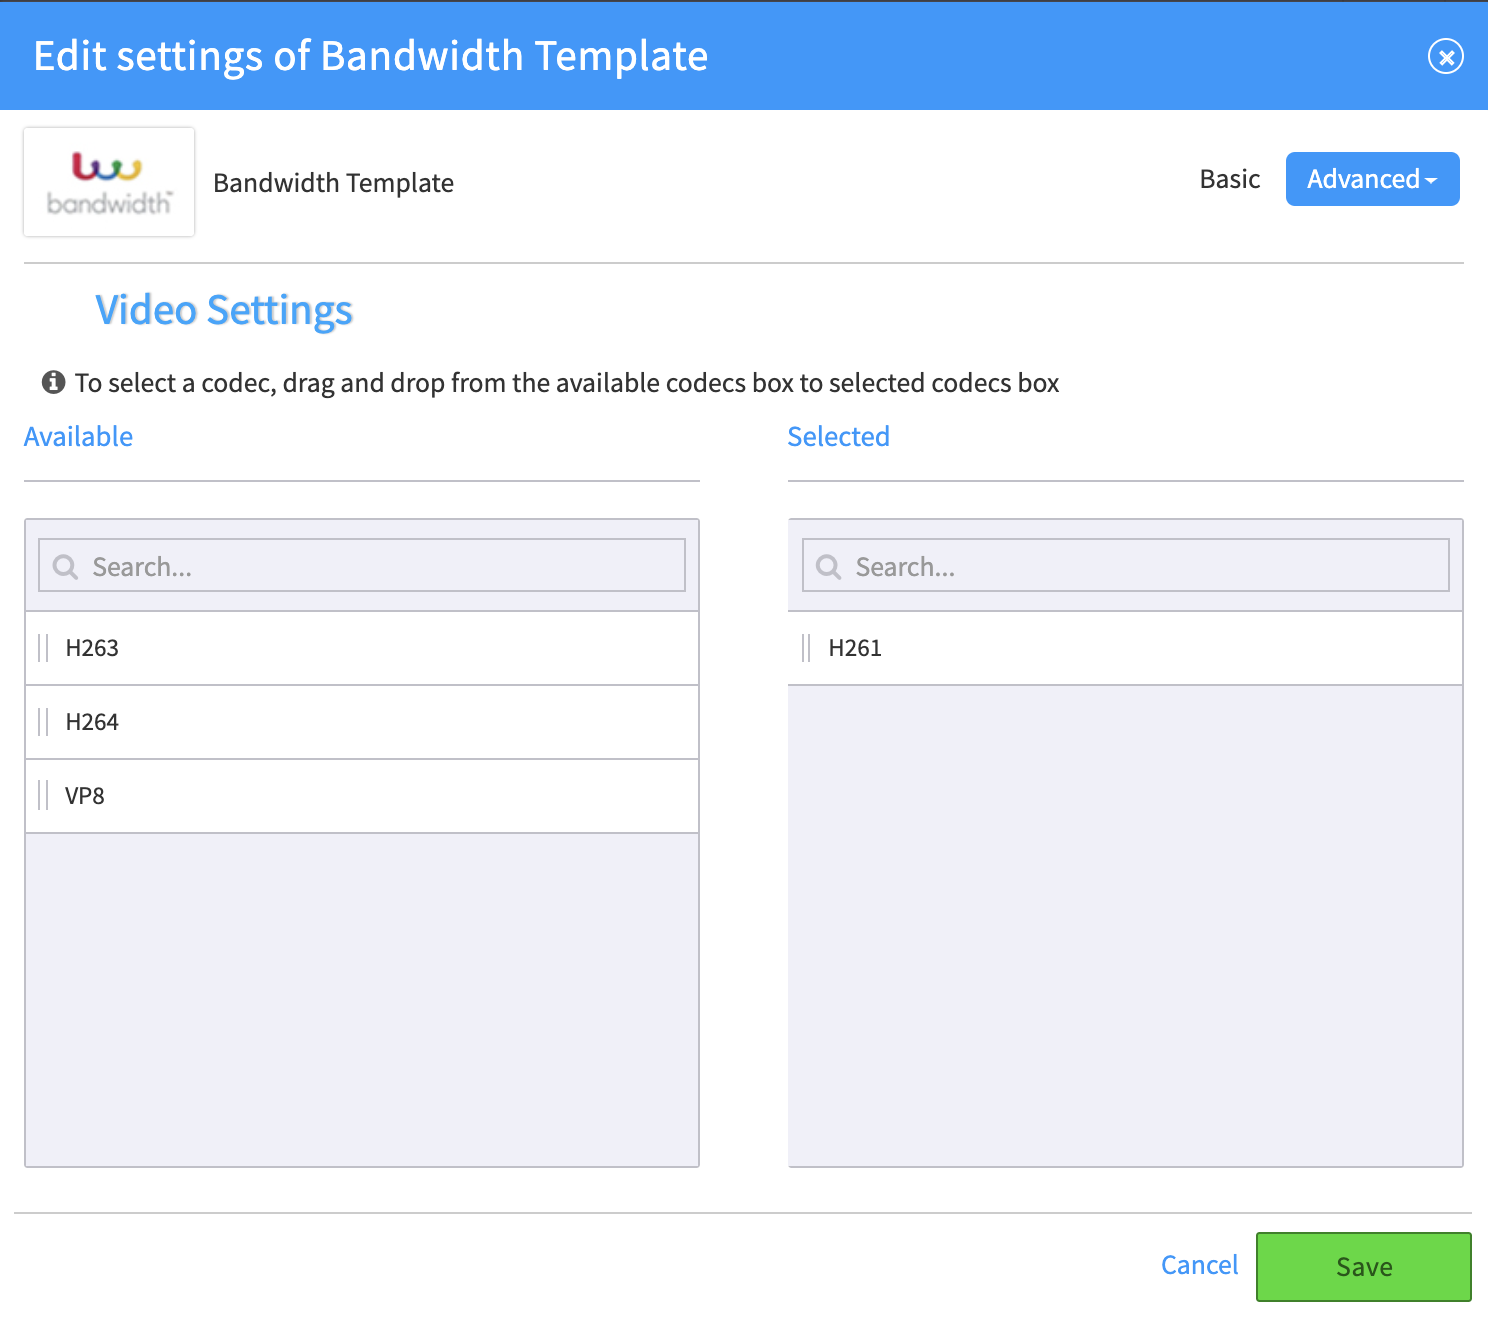
Audio & Video
This provides your customization of the audio and video settings. Drag the available codecs to the "Selected" box.
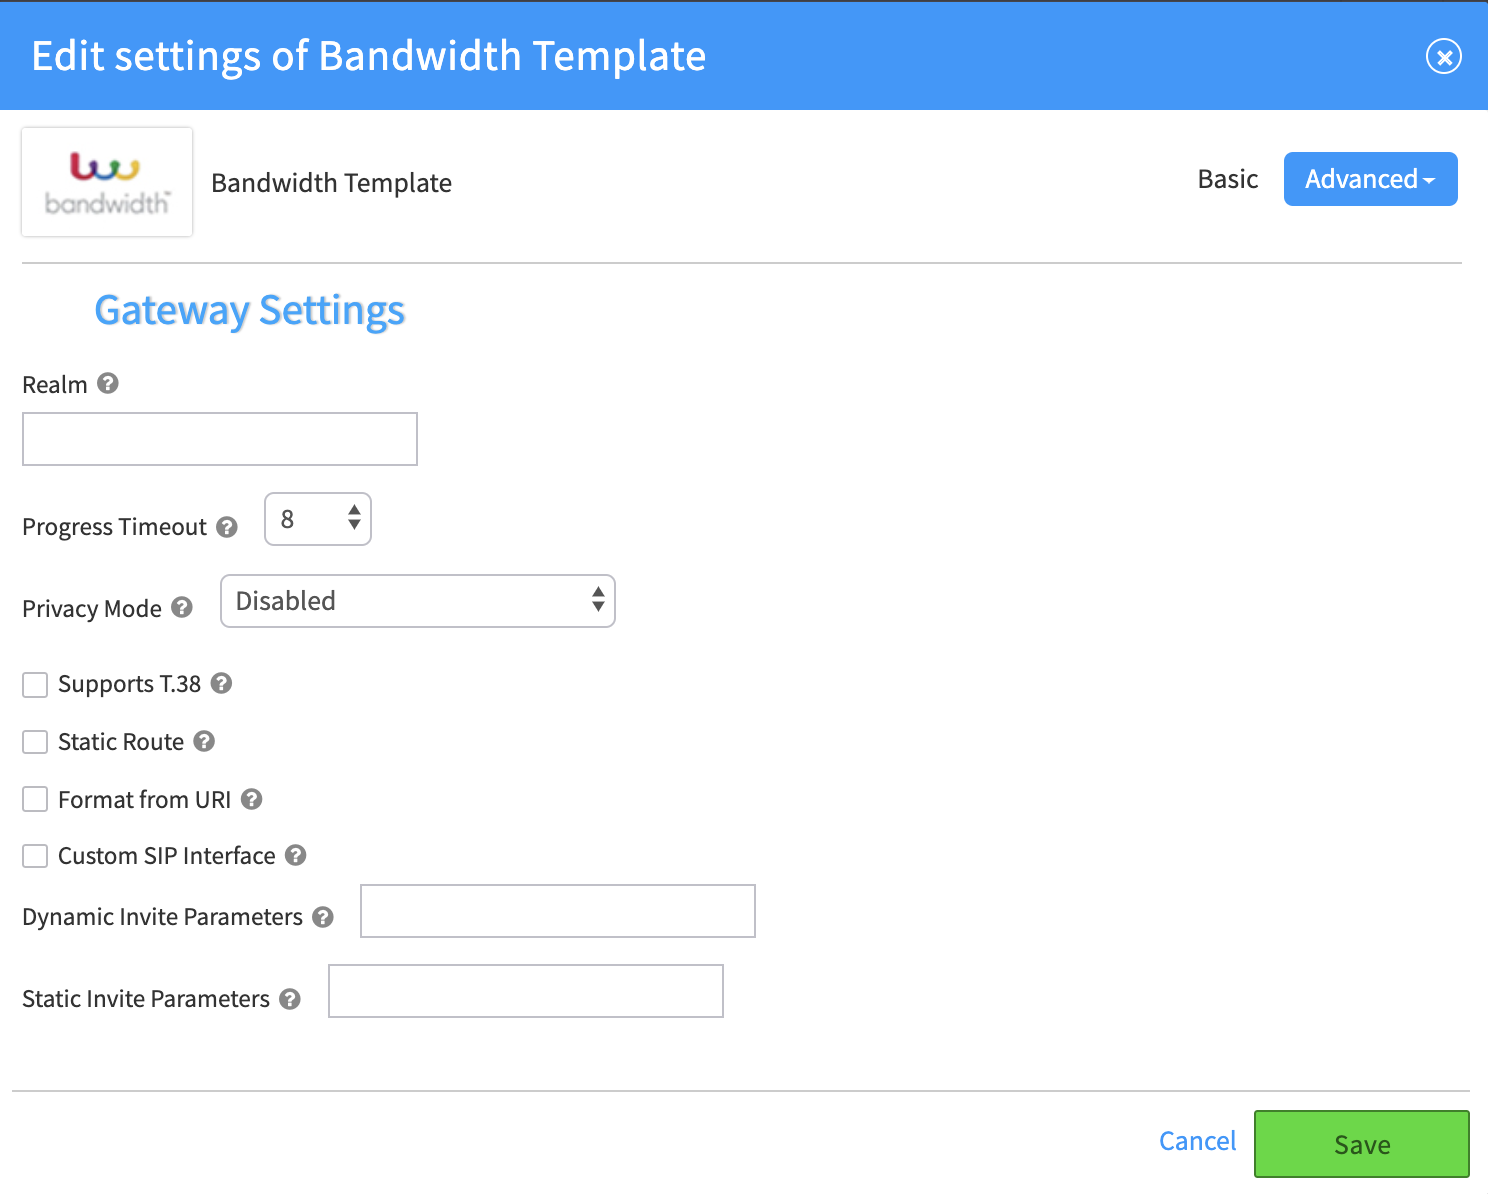
Gateway Settings
-
Realm
- If the SIP realm provided by this carrier is different from the server and you're using password authentication the you MUST set this field for outbound calls to work.
-
Progress Timeout
- How long should calls wait for them to begin ringing? Sometimes calls such as international take longer, however if the carrier is down large values will delay failover
-
Privacy Mode
- Restricts the presentation of Caller ID on calls. If a call has privacy flags, "Anonymous" and "0000000000" would be shown as caller ID name and caller ID number, respectively.
-
Supports T.38
- When using fax devices check this to attempt to switch to T.38. If the carrier doesn't support this codec, the call will be dropped.
-
Static Route
- If the call needs to be sent to the same URI regardless of what was dialed, configure the destination here.
-
Format from URI
- Check this to replace the SIP FROM header (often used for Caller-ID) with the following Realm
-
Custom SIP Interface
- If your system has been configured with multiple SIP interfaces, check this option to display the interface name used to route outbound calls.
-
Dynamic Invite Parameters
- Enter comma separated values
-
Static Invite Parameters
- Enter comma separated values
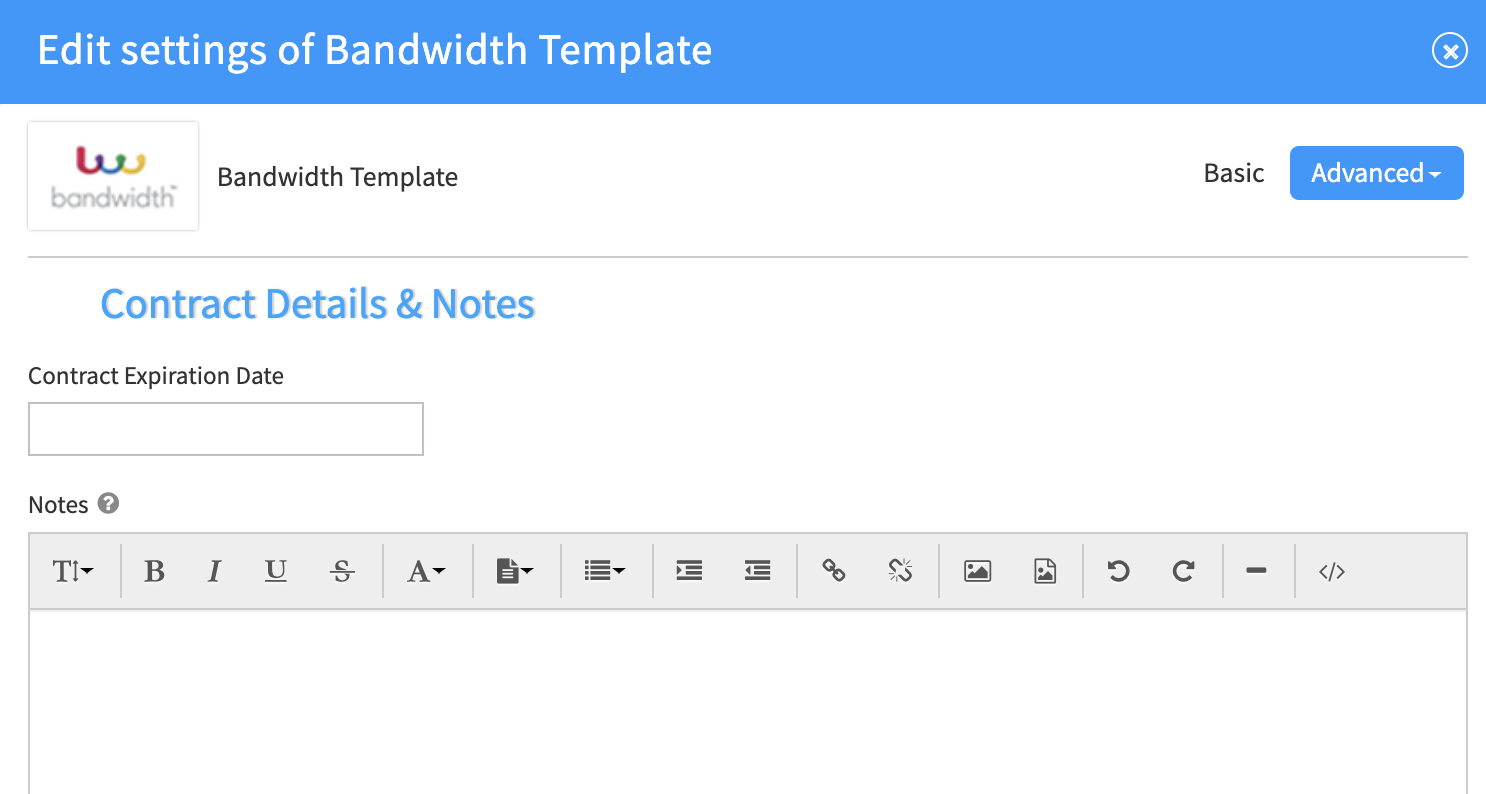
Notes
This is a handy area for you to add notes about your settings, including the expiration date and other details of your carrier contract.
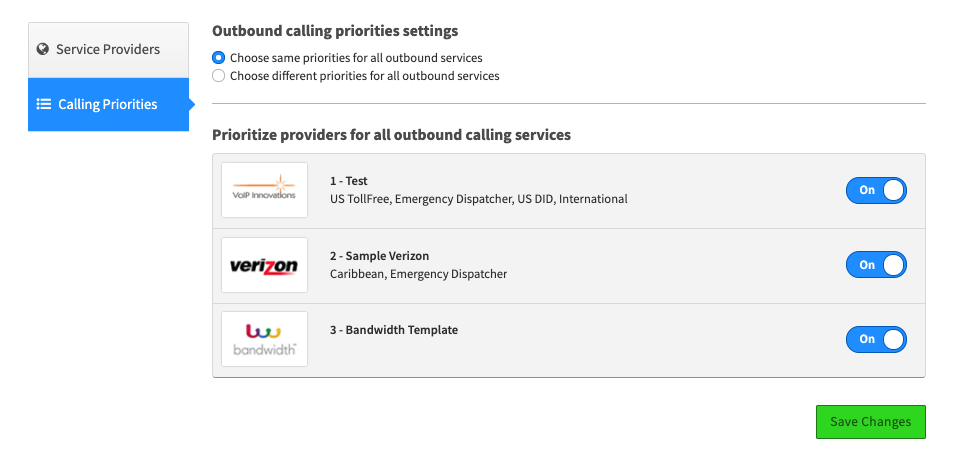
Set Outbound Calling Priorities
Within the Calling Priorities screen you can set priorities for your carriers.
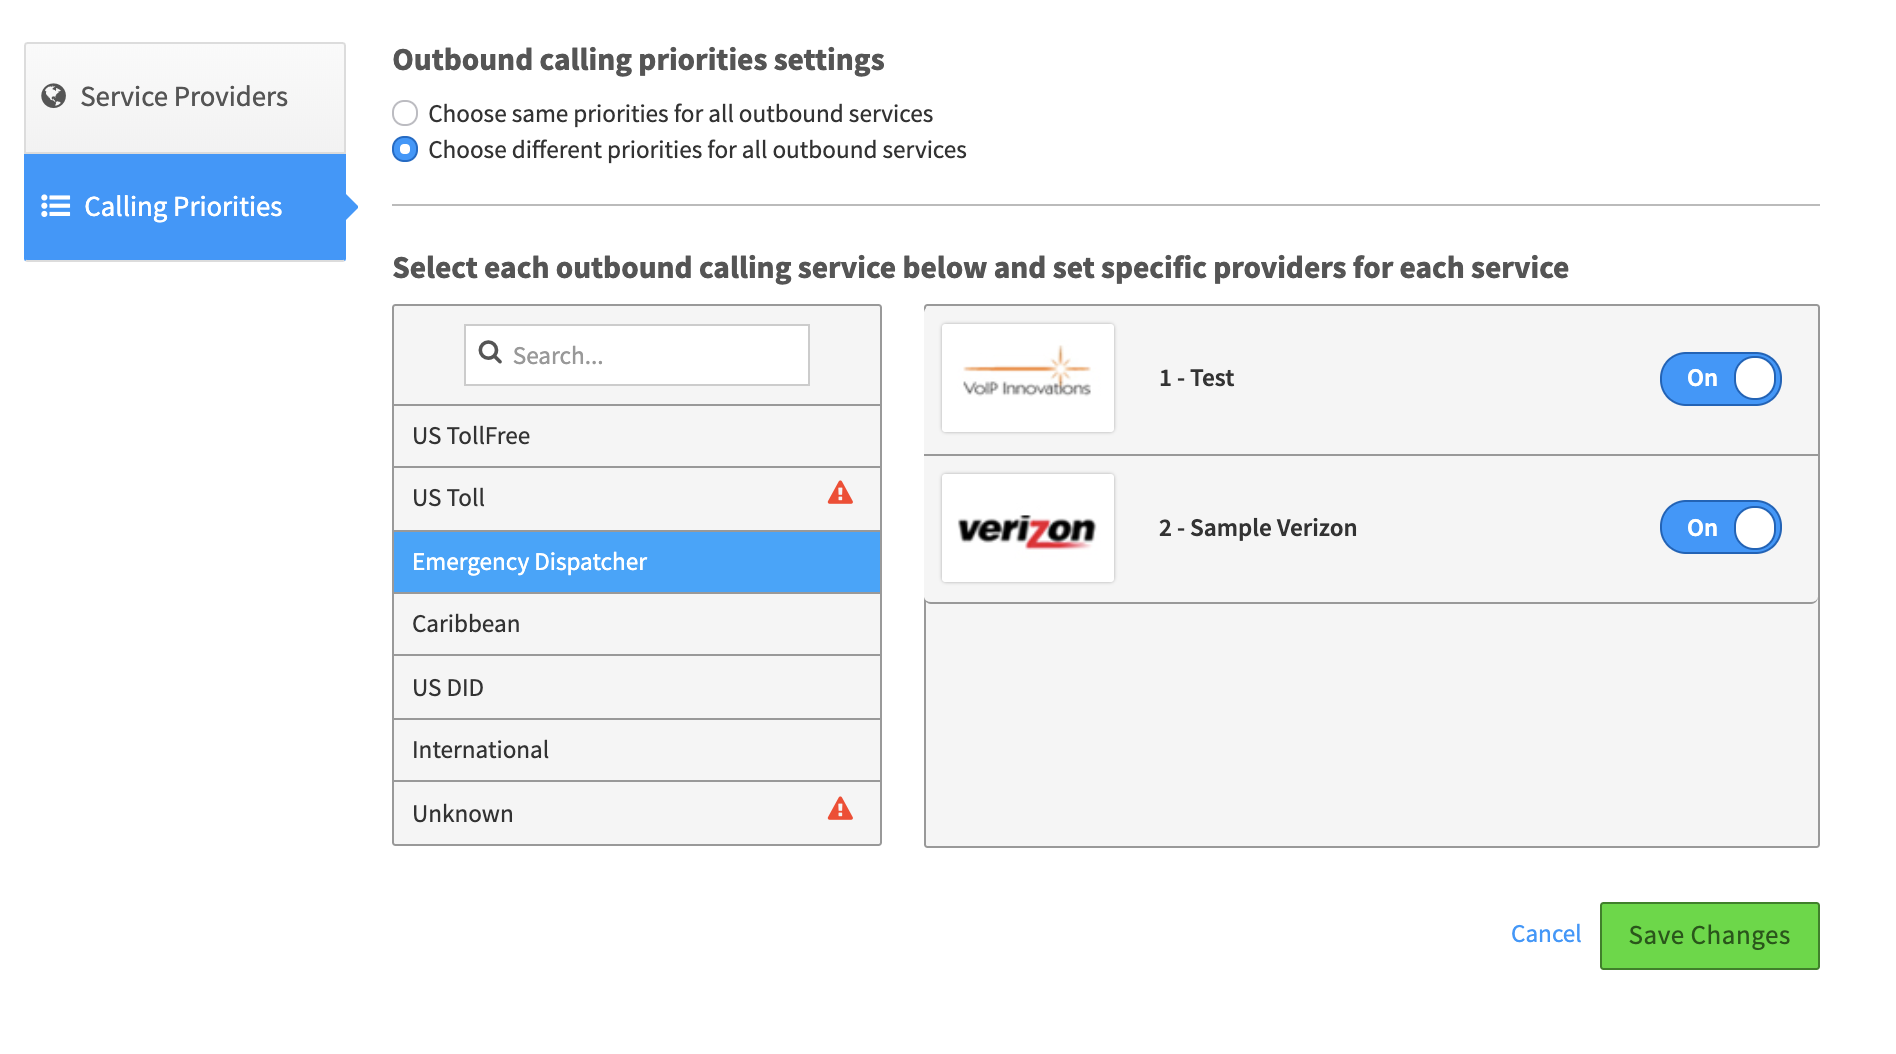
You can choose a global carrier to always be the priority, or set priorities based on the type of call. If you select the same priorities for all, simply drag the carrier listing up or down to set your preference.If you select "choose different priorities" then you will see the screen below. Each type of call will display the carriers you've selected; drag the order you prefer into place. If you have not selected a carrier for some of the outgoing call services, you will see a red triangle. You must return to the Service Providers tab and assign a carrier from there.
Once you select Save Changes, you will get a confirmation you have completed your assignments!
-
Ignore Flags
-
-
-
-
-
Click the link below to download a .pdf
Cluster Manager Product Overview 2019-09-26.pdf
Carrier Manager Product Overview 2019-09-26.pdf


 For details on how to submit a port request, refer to our
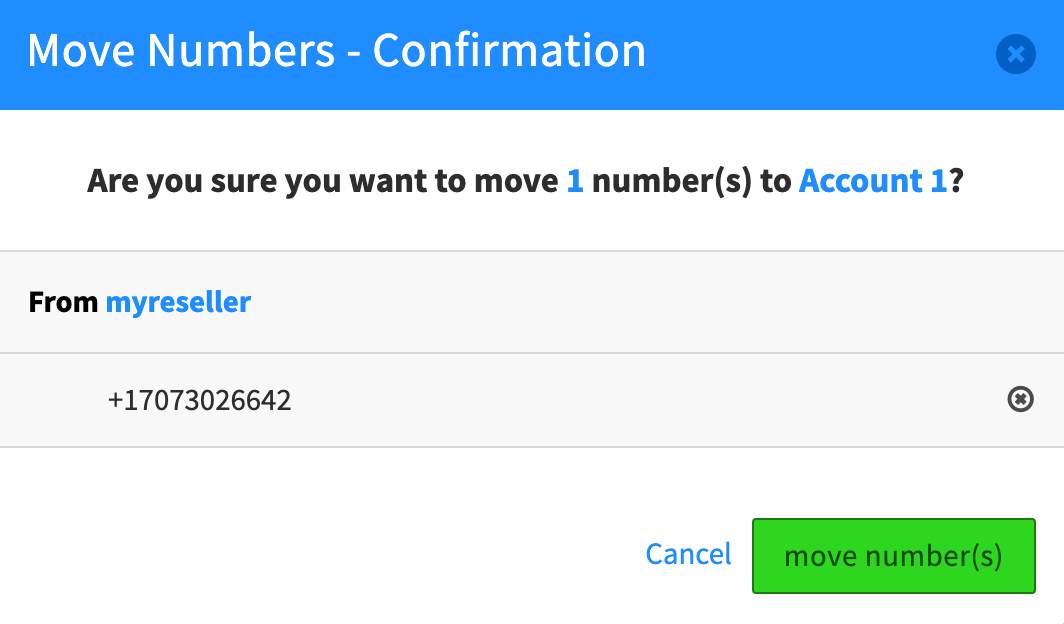


comm.land FAQ
in Product Discussion
Posted
comm.land FAQ
Below are Frequently Asked Questions for comm.land If you do not see an answer to your question here, please submit it in the comments at the end of this file.
General Information
What is the comm.land App?
comm.land is an application that gives you access your office phone system from any desktop. Once comm.land is downloaded users can log in to view their registered devices, review their office call history, listen to and delete voicemails, and send faxes, all as if from their office.
How do I access it?
If your account has invested in the desktop app, you will be able to download its file from your User Portal account in KAZOO. For detailed guide on this process, see the “Installation and Setup Guide” at our website, HERE.
How do I download it?
To download the app you will need help of your platform administrator. They will need to set you up as a registered user.
Once the application is installed how do I access it?
You can find the application in your Application directory, under comm.land
If your desktop settings allowed it, the application is set to automatically launch at your startup, and will show in your status bar.
Installation
Please refer to our Installation and Setup Guide HERE for questions related to installing comm.land
Home Page
The home status screen is showing I have an unregistered device. How/where do I register it?
Your devices can be activated by your administrator. Please contact them for details. Note this will not affect basic behavior in this application.
Can I force a refresh on my home page?
When you launch comm.land, a comm.land menu should display at the top left of your screen. In the drop-down menu under View there is a Reload option. You can use that or simply select ⌘R
How do I access the Settings screen?
There are two ways to access settings:
If I change a setting on my desktop will it change automatically on my CallThru.us app?
Yes. You may have to refresh your phone screen to see the change.
Voicemail Page
When I see the voicemail summary, is it a total of all voicemails I’ve received? Does it include any deleted or is the total the remaining in my list?
Yes, you will see all voicemails received. It will not count those that have been deleted and marked for deletion.
Can I set a date range for viewing my list of voicemails?
Not at this time. They will be listed from most recent to least recent for the duration of your registered number. You can however filter voicemails to display only new or only listened.
If I delete a voicemail from CallThru.us or from comm.land is it permanently deleted or can it be recovered by my administrator in SmartPBX?
If you delete a voicemail from either callthru.us or comm.land you or your administrator can retrieve any Deleted voicemails from the Voicemails App. There it will show "Marked" as Deleted, but is accessible.
If I want to turn on the "Convert Voicemails to email" setting in comm.land, is it also updated in my other apps, such as SmartPBX and CallThru.us?
Yes. These settings are using the same API calls to a common database. Once it is changed by one application, all applications will reflect the change.
Call History Page
Can I filter the listing of calls based on date?
Yes. Select the date range you want to view in the calendar fields, and then pick the Filter button. You can also choose to view only Missed calls by selecting that option at the top of the page.
Can I sort these calls based on the “From” and “To” columns?
Not currently. That feature is scheduled for a future release.
Devices and Numbers
How can I change the devices and phone numbers that I’m following?
The device information on this screen is pulled from the devices assigned to you. To make changes, contact your administrator.
Can I view the calls from different numbers for longer than a week?
Currently we analyze percentages for the current day and the current week in this application. We may add longer durations in future releases. In the interim, additional monitoring options are available with applications such as Smart PBX and Call Center Pro.
Faxes
How do I send faxes?
To send a fax, go to the fax page and click on the blue Send Fax button. A dialog box will display with fields to complete, including a button to upload files from your computer. You have the option of sending faxes from your own FaxBox or any FaxBox that is unassigned in your account.
Where do I set the “Send From” field that displays in the Fax Dialog box?
If you have set up a personal fax box, then it should display in the dialog box. See the "Where are faxboxes set?" FAQ below. NOTE: Unassigned faxboxes will not display here due to security considerations.
My faxes keep giving me "failed" message when I try to send them
Check to see if you have included the country code as part of your number. You MUST do this even if sending a fax within the US.
Where are the faxboxes set?
and/or in
What types of files can I send by fax?
Currently the fax supports .tiff and .pdf files and a maximum of 15mb per fax.
What is the maximum file size I can send?
Currently the fax supports files up to 15mb per fax.
How do I download faxes?
You can download your received and sent faxes by clicking on the fax listing. It will show a preview of the fax. You can then select the download icon (a cloud with an arrow) to the right of each fax listing.
How do I delete faxes?
To delete a single fax, simply check the box at the left side of the listing and pick the trash can icon above. To bulk delete a category of faxes, such as all Processing, all Pending, all Sent, all Failed, all Received, select the filter box to the left of the trash can, and pick the category. All will be selected, and you can then select the trash can.
Can I view faxes within a date range?
Yes! Select the Filter button near the Search window. You can filter based on a variety of conditions. To apply, click on the apply button, to reset to the original, click Reset.
I am not seeing "New Faxes" display on my home screen
If your home screen is not displaying new faxes, go to the faxes page and check your filters. The home screen display honors the filter setting, so if your filter range does not include "today" it will not display.
WebPhone
How do I set up my webphone?
To add a webphone within comm.land, you must enable it within the comm.land integration app. Ask your administrator to help you with this.
If you have already downloaded the comm.land app, in short the added steps are:
If you are just getting started and need to download comm.land as well,
How do I access my webphone dialpad?
You can access your webphone dialpad several ways:
What features are available on my webphone during a call?
Once you place a call, you can:
Once my webphone is set up do I need to also set up voicemail and call forwarding, etc. for that phone?
No, the webphone will adopt the settings from your device/phone number as defined in SmartPBX.
Can I use my keyboard to enter phone numbers?
For this release phone numbers must be entered on-screen with your mouse. We anticipate adding that feature shortly.
Can I use my headset for these calls?
Yes, you can define both your speaker and microphone sources. To access these settings, you can:
How does the “blind transfer” work?
The blind transfer forwards a call to a different number while maintaining the original caller ID.
Where do I define / manage my caller ID information for this phone?
This is controlled in SmartPBX, navigate to your Users screen and selecting User Features for your devices. If you are using a callThru.us device, some of those settings are defined on your phone.
#####
View full File