

Emily R
-
Posts
592 -
Joined
Content Type
Profiles
Forums
Resource Library: Monster UI Apps for KAZOO
Events
Downloads
Posts posted by Emily R
-
-
HI all, somehow I never posted this when I intended to .... Please answer these short questions about integrating CRM with Kazoo.....
-
Hey Kazoo community:
Please help us and our partners identify priority integrations for your CRMs and Kazoo. Answer a quick 4 questions for us! -
Hello KAZOO community!
Master KAZOO Pivoters, please join our survey at this link:
https://www.surveymonkey.com/r/PLFWLVRYour feedback is gold. 🥇
Our team is moving the Pivot application that is inside Monster UI to the comm.land desktop UI and we need your help!Our initial goal is to provide the same functionality that is available in Monster within the beautiful new comm.land framework. We may have some resources to update your experience and add a select few new features, if not for the initial release, shortly afterward.
And so we’re looking for your votes on how to prioritize updates. Please take some time to answer this survey, and to add comments at the end – your input is always our best resource.
Additionally, we would love to meet with some of you “master Pivot users” so you can demonstrate how you use it now … this always helps inform us for our design updates and short and long term roadmap. Contact me if you wish to help us out this way!
Thank you!
Emily Ransford, CPaaS project team lead
emily@2600hz.com -
This app is being developed for use within the comm.land framework, and we're designing it for both Hosted and Gi | PC.
Our first phase will be to move the features of this app to commland, and if we can, add some top requests to its functionality.
(does that answer your question?)
-
Hi all:
We're working on updating the Accounts app as we integrate it into comm.land. Here's some notes I'm tracking from the Product Board on update requests, any other ideas we can work on to make it work even better for you? Now's your chance!-
Provide some means for BYOC customer to disable the ability for user accounts to purchase numbers, either through SPBX or elsewhere, to prevent issues.
-
Please create an EMERGENCY PHONE NUMBER field, in the Billing Contact Information section of the Accounts. We should all have a location to find all the important info in one place. We are, inserting the primary email address in all the accounts now ( as well as the other contact info).
-
allow us to specify which cluster receives inbound calls (DID Number Pinning)
-
-
Hi awesome KAZOO folks:
2600Hz is in the middle of porting the Webhooks app to commland! The UI will be familiar, with a nod to the cleaner comm.land look, and we just wanted to check in to see if there's any annoying parts to the Monster app you wish we'd change. Note, we'll be reviewing webhooks functionality in phase 2, this is mostly a UI feature request!
Some quick questions come to mind:
- How many webhooks do you have configured for your account(s) ?
- Do you use the "grouping" feature in the Monster UI app?
- Do you "add custom data" to your webhook configuration?
Any feedback is welcome!
emily
-
We have both a Private Cloud and Global Infrastructure customers beta testing this now!; if you want to also test it, please click here.
-
Welcome to the 2600Hz Guide to Getting Started with MS Teams!
We’ve partnered with TeamMate Technology to provide MS Teams direct routing integration to our Hosted, Private, and Global customers. This article will provide you with all the information that you need to get started.
Rather than reinventing the wheel, we will be providing you links to TeamMate Technology’s extensive documentation on setting up TeamMate connector along with some tips and tricks of our own.
Pricing
Once you Integrate MSTeams using TeamMate technology you will see additional charges to your account. This will be based on the number of users you sign up for the integration:-
Your KAZOO user/device license plus $2.50 for each Teams integration
- Includes the costs of TeamMate
-
Does NOT include Microsoft Phone system licenses for end users
- A Microsoft Phone System license or comparable add-on license is needed. Get more info on that here.
- If you can commit to a volume of 1,000 Teams integrated users/devices, please contact sales@2600Hz.com for a volume discount.
Onboarding
Resellers - Onboarding is required to enable your account to manage your own Enterprises. To initiate your Reseller onboarding, please complete the Microsoft Teams Reseller Onboarding Form and email it to ps@2600hz.com:Microsoft Teams Reseller Onboarding Form.docx
Once we receive the completed form and process your request, you will receive an invitation email from us containing a link and pin number for registering to the TeamMate reseller portal.
Resellers can then guide Enterprise MS Office administrators in the following configurations. There are a few preliminary steps we suggest you and your customers take before beginning the registration process, please visit the following link.
Enterprises/Customers - Your Reseller is responsible for creating your Enterprise in the TeamMate portal. Once completed, you’re ready to begin the Enterprise registration process. A great starting point is the following TeamMate’s step-by-step guide:
 TeamMate PBX Connector Installation Step-by-Step Guide
A few tips:
-
When selecting the PBX Type, you may see both an option for “Kazoo” and an option for “2600Hz-Freeswitch”. Please select “Kazoo”.
-
You may need to restart Teams in order for the dialpad to show up. Closing MS Teams may minimize Teams in your system tray and not completely exit the application. (This threw me for a loop!) Be sure to completely exit and restart Teams.
Additional Resources
TeamMate Technology provides extensive documentation on the MS Teams integration. Here are a few that we found most helpful:
-
An excellent walkthrough of the process:
TeamMate Provisioning
-
All reseller documentation: https://connecttoteams.elevio.help/en/categories/3-reseller
-
Documentation on the reseller portal: https://connecttoteams.elevio.help/en/articles/3
-
Knowledge base: https://connecttoteams.elevio.help/en
-
Branding tutorial:
TeamMate Reseller Branding Settings
-
Step-by-step guide: https://connecttoteams.elevio.help/en/articles/4
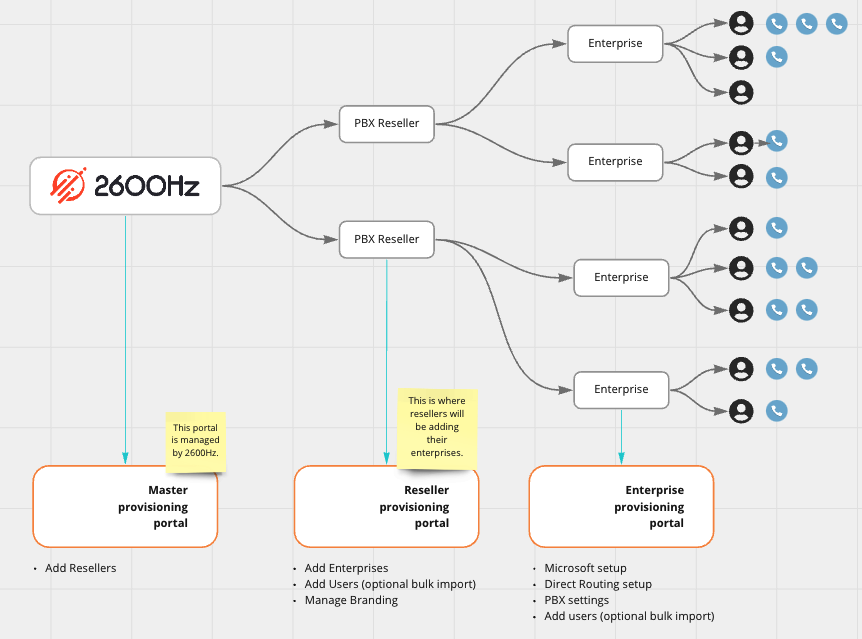
Understanding the Portals
For additional information about the roles of the various portals, see: https://connecttoteams.elevio.help/en/articles/8-reseller-login-vs-enterprise-login
Thank You!
If you have any feedback, please let us know!
-
Your KAZOO user/device license plus $2.50 for each Teams integration
-
Thanks for your feedback folks! Totally agree we owe you some market opportunity data ... I'm reaching out to our sales team for that.
Do you have a Marketplace experience you are partial to? We will be rolling ours out in several phases, and would love to know your sense of the Holy Grail.Shoot for the stars...
emily
-
You tell us ... as we finalize a build-out for our KAZOO App Exchange,
- What will you look for?
- What would you buy tomorrow?
- Have you developed an app you want to sell?
Let us know, we always love to hear your ideas and wish list.
-
ICYMI, the latest KAZOO release now includes our first iteration of the Contact List Import feature in Advanced Provisioner.
NOTES:
- This release supports Poly VVX 400 Series devices only. Check our our documentation for it HERE.
- As always we'd love your feedback so we can continue to enhance the feature in future releases. Please add any update requests to our Product Board.
-
Fax User Stories
- An account wants to set up several fax stations within the office for their users to access and send faxes from.
- A user wants to receive faxes by email.
- An account wants to include a fax to email option where all faxes are send to a single email address.
Overview of Fax applications and Settings
There are several applications in KAZOO that can access the set up and manageent of virtual “Fax Boxes”. Fax boxes can be assigned to each user and/or to a Main phone number. They can be sent and received via email addresses.
SmartPBX provides settings to create fax boxes, including
- Assign fax numbers to your main number and/or an individual user.
- Assign virtual fax boxes to users.
- Assign email addresses for incoming and outgoing faxes.
- Add a physical fax device to your account.
Callflows enables some advanced features for your fax setup including
- Integrating it into a callflow.
- Enabling a fax # and email tied to the Main number.
-
Defining multiple faxbox options for a single user.
Faxes is a portal for account managers to
- View the status of inbound and outbound faxes that are assigned to a particular account or user.
- Define a storage mechanism for all faxes in the account.
-
Check and identify fax completion and/or errors.
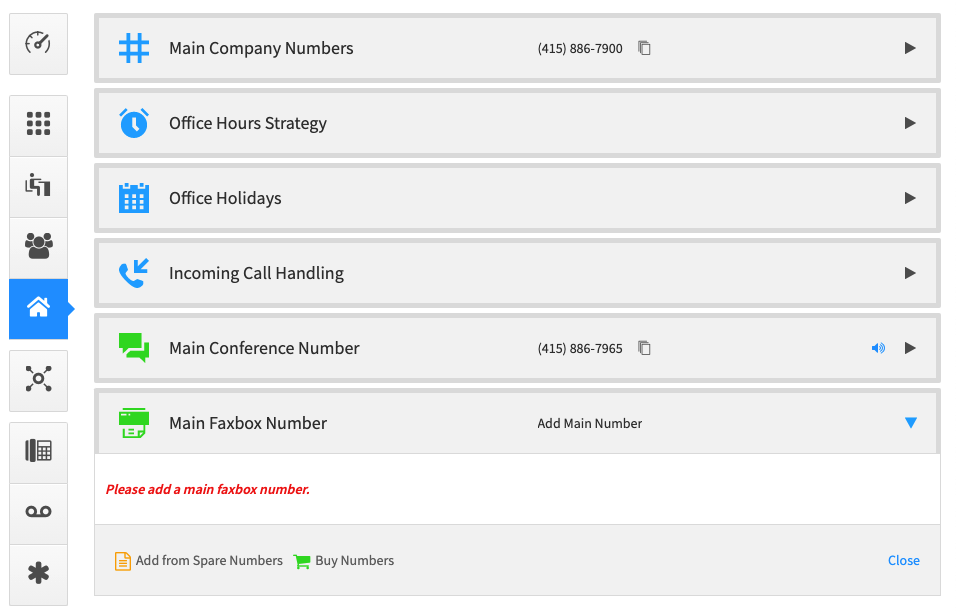
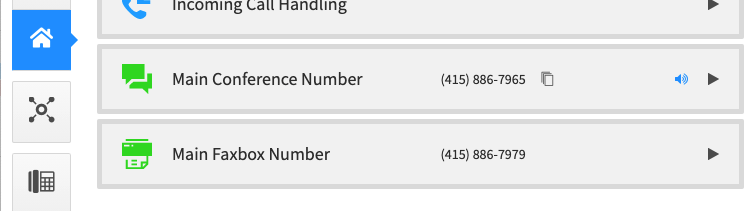
Setting up your Main Account Fax Box using SmartPBX
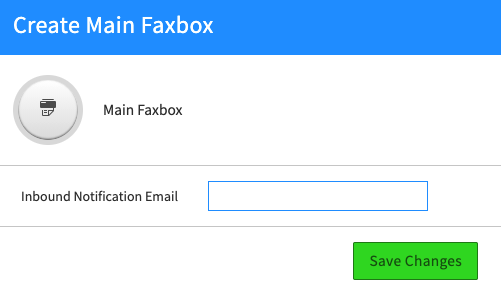
From the Main Number menu in SmartPBX, you are given the option to set a Main Faxbox Number. You can assign a number from your inventory or buy a new one.Once a Fax Number is assigned, it will ask for a Main Faxbox email to send all fax notifications to.
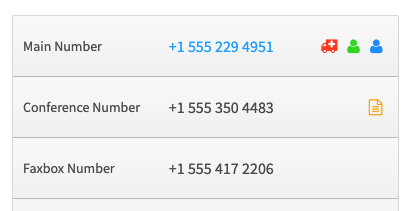
Make sure to save. You number will display both in this section, and on the home screen dashboard.Main Menu View
Dashboard View
NOTES:
- Once this is set up, incoming faxes to this main number will be forwarded to the email you defined.
- If you want to send a fax using the same main number, you will need to add some settings in Callflows. Check out the community forum post describing this, HERE. (Thank you community!)
Setting up your Personal User Fax Box
If you want to dedicate a fax number and box to a specific user (a “user” could be a person or “support line” or “sales department”), follow these steps.
- In SmartPBX, select the Users tab and find the user to add a faxbox to, or create a new user.
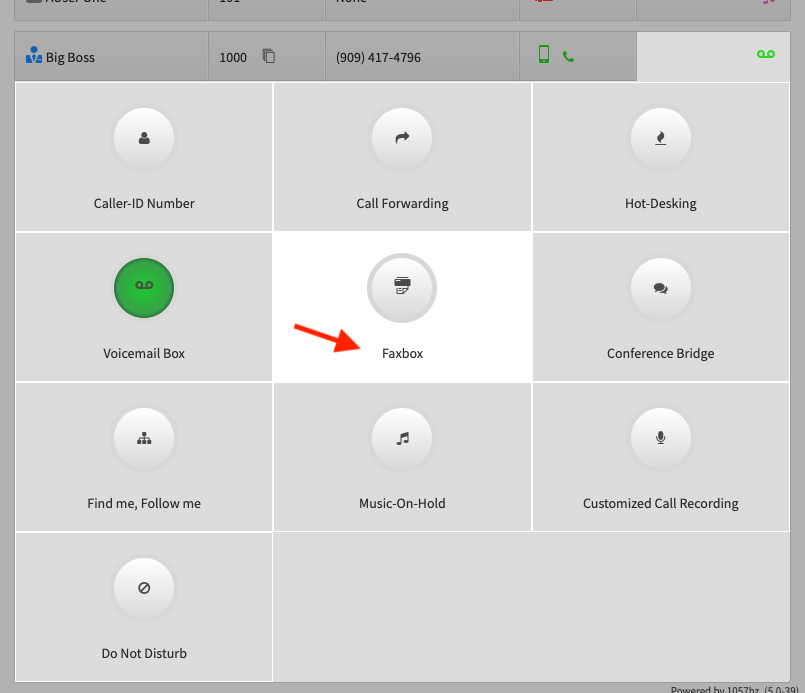
- Click In the field below “User Features” next to the User you want to edit.
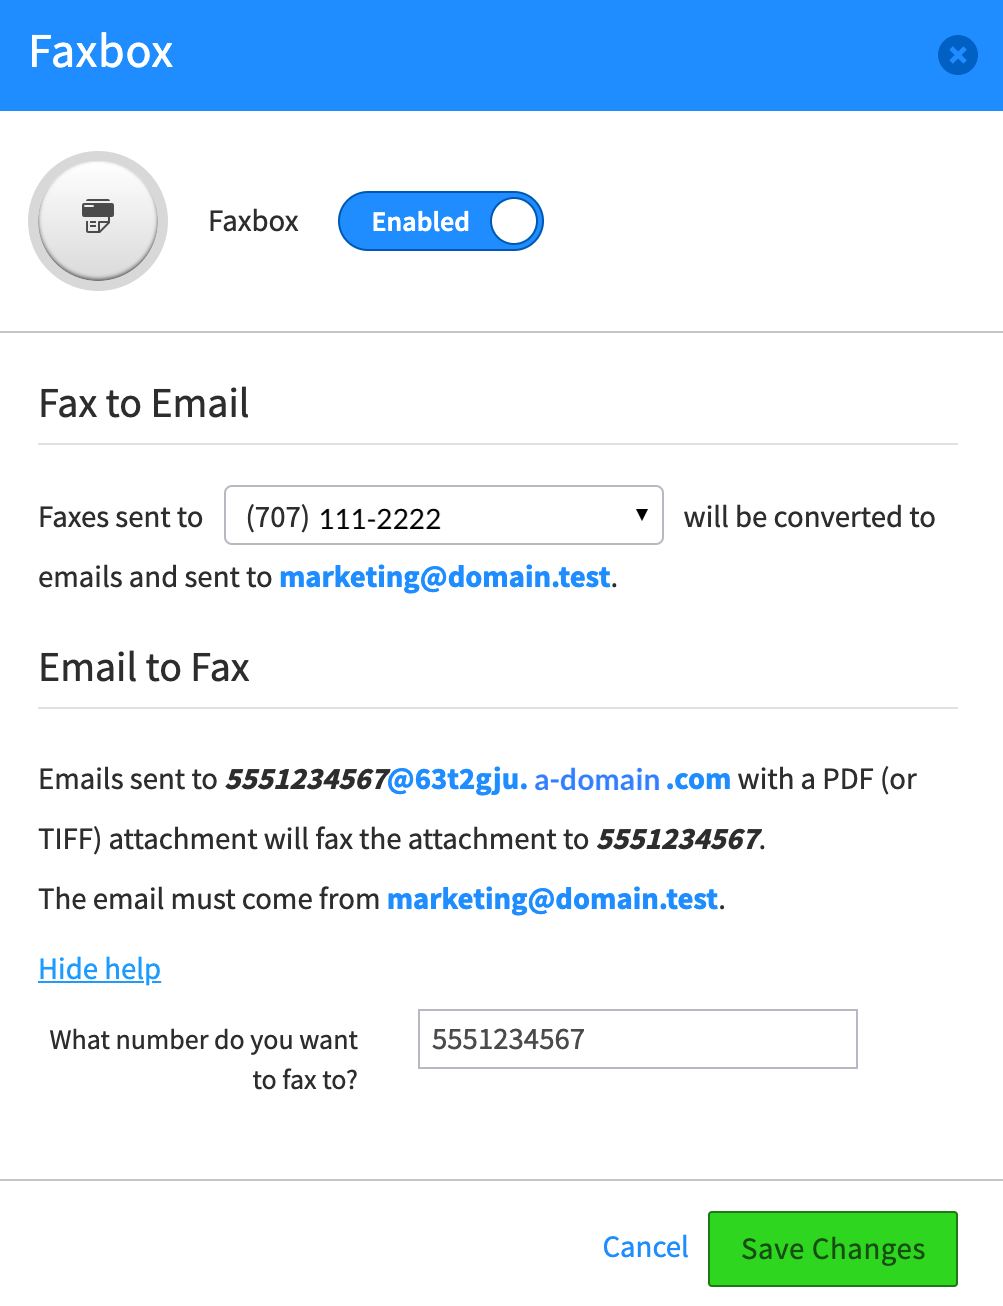
You will see a menu that includes Faxbox (a white button means not yet set up, a green button means there are settings applied).In the next screen, toggle to “Enable” the Faxbox. You will see a dialog box similar to this one.
INOTES:- The Fax to email number selected will send the email to your user email as set in SmartPBX.
- The email to Fax will show you the syntax for sending an email to a fax machine. You will need to cop this exactly. By selecting the “Show Help” link at the bottom, you can access a field to enter your destination number; it will populate in the emails sent to string. This is an easy way to copy and paste the whole “To” email address to your email window.
- To send a fax, your attachment must be in .pdf or .tiff format.
- Important if you manage carriers. Outbound fax calls are set with a "fax" flag and thus carriers that you want to be available for handling outbound fax calls must be configured with the "fax" flag. Caution, there is a "Require Flags" option which means that carrier will only handle calls with listed flags. This option you most likely do NOT want checked. If you see an error "no available resources" it is likely this flag is not configured on a carrier.
Make sure to SAVE those changes!
Once your changes have been saved, you should see a Fax icon displayed in your User Features field.
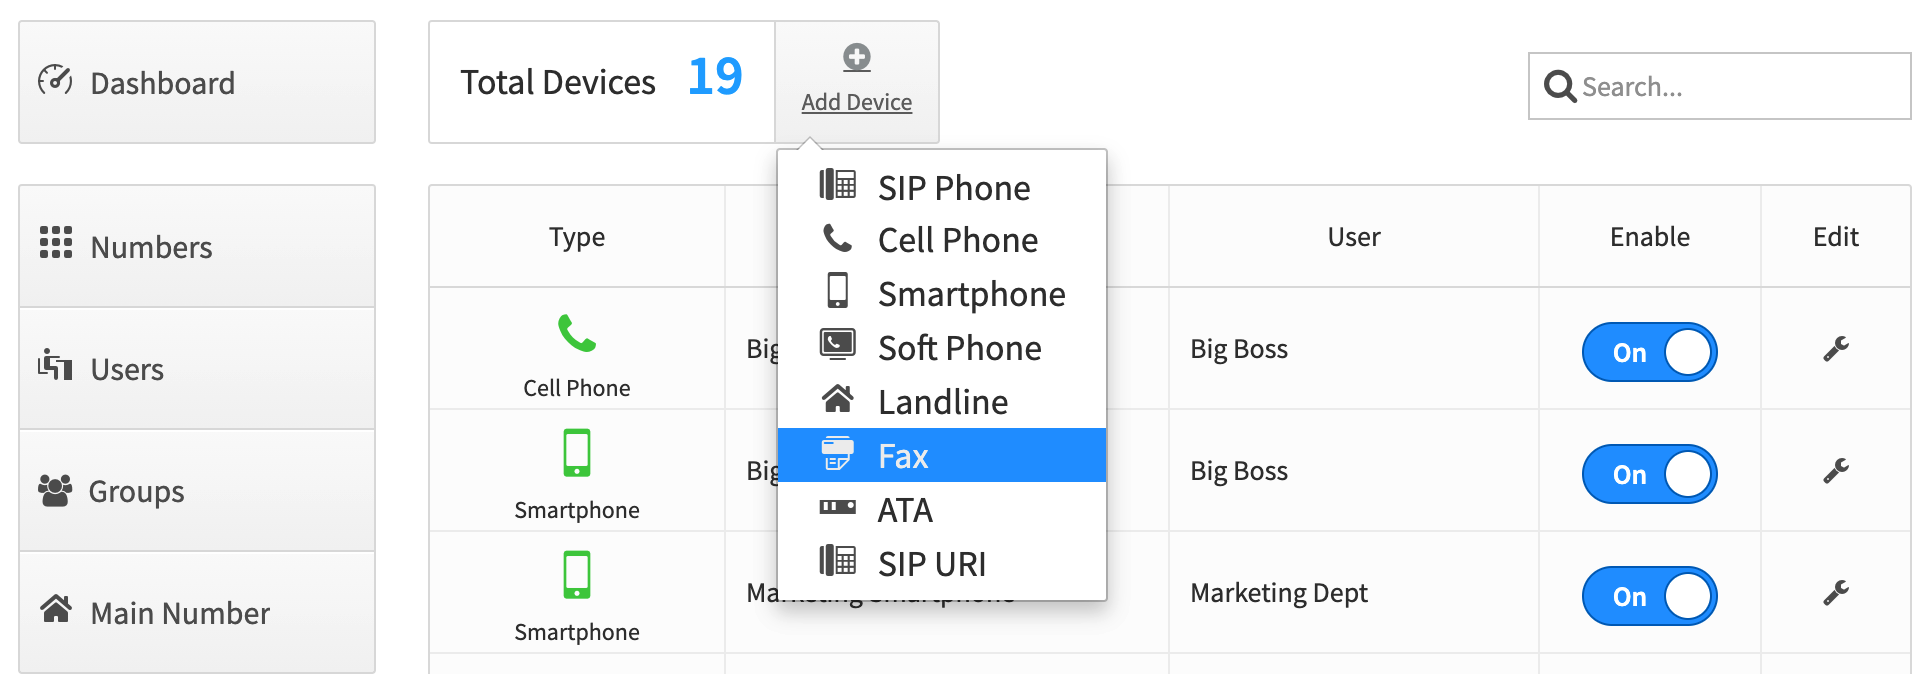
Setting up a Fax Device in SmartPBX.
In SmartPBX you can also add a physical fax machine to your account and manage its settings.
- Go to the Devices tab and select Add device.
- Select Fax
Basic Settings tab
- Device Name
-
The T38 mode your fax should be set at.
NOTE: T38 is a protocol for older fax machines to pair with newer fax protocols. It converts traditional analog fax data (PSTN or T.30) to digital data format.- Auto-detect will decide if the T-38 protocol is needed. This is helpful if you do not know whether the end device is analog or digital.
- Always force will automatically convert data to digital.
- Disabled means there will be no T-38 conversion.
- Enable (or not) a notification to the account manager if the fax becomes unregistered
- Assign a user.
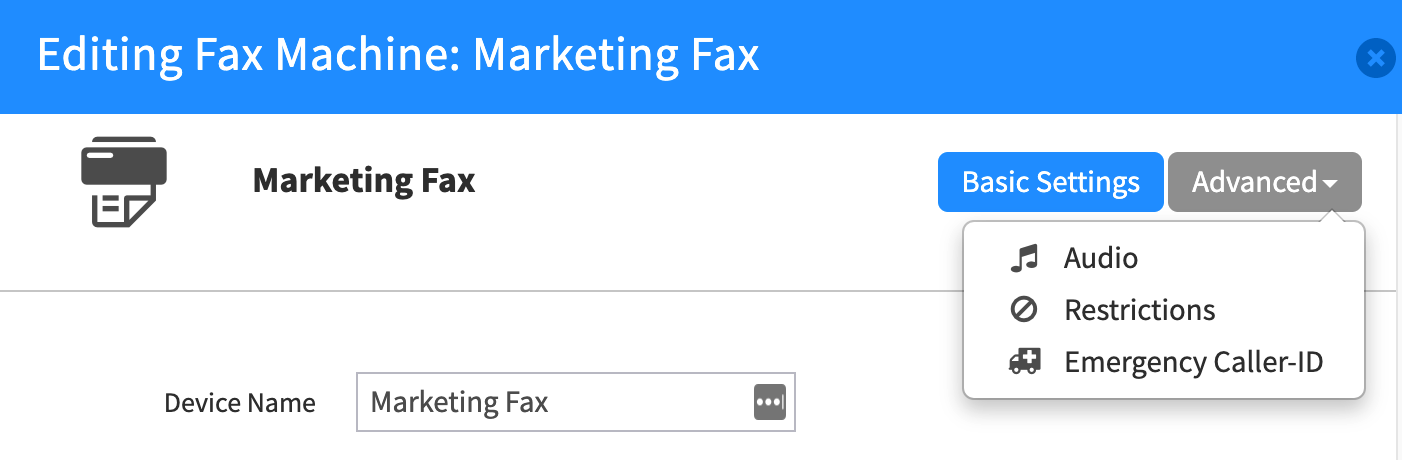
Advanced Settings tab
-
Audio:
If you are using a fax machine that also supports voice calls, you will want to set the codecs. You can get this information from your fax documentation. -
Restrictions
Set outbound fax calling restrictions for Toll / Tollfree / International / Emergency, etc. -
Emergency Caller ID
If the fax does not support voice calls, it’s unlikely you’ll need to set this. If it does, provide a local number that is at the same physical address as the machine.
Once you have set up your physical fax device, it will display in your Devices list in SmartPBX. You can temporarily disable it here with the toggle. You can also update its settings by selecting the wrench icon.
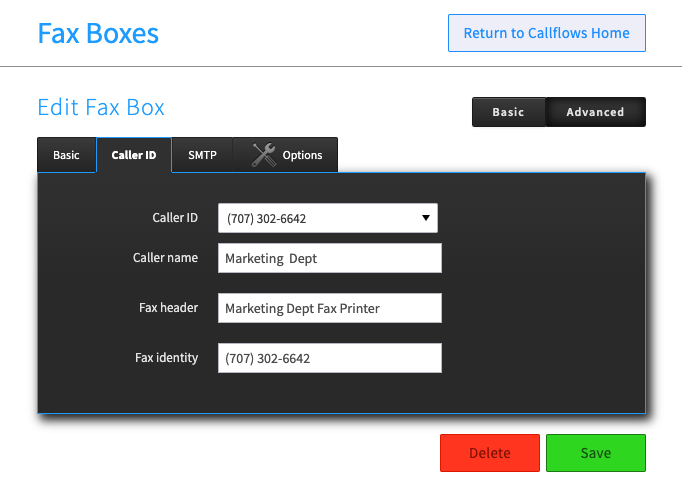
Additional Faxbox Settings in CallflowS
While the Basic settings you define in SmartPBX are saved in Callflows, there are some more advanced faxbox settings available in the Callflows application commonly used as part of a callflow configuration. These are found in the Fax Boxes Advanced Tab.
CallerID
This adds some fields
SMTP
-
Permissions List
This setting allows you to expand your permissions for outgoing fax domains.
-
Custom SMTP Address
By adding a custom SMTP address you can force the fax to be sent from an email address other than your user name or device name address. This is how you can set up a faxbox to be from a main email address.
-
Options
- The Retries option sets how many attempts outgoing faxes should make before failing
- The Fax Timezone allows you to set a single time stamp on your outgoing faxes.
Using Fax Manager to manage Fax Activity and documents
The Fax Manager application is a portal to view and manage your fax activity, including:
- Check fax logs to verify success / failure of fax transmissions
- Search for fax attachments
- Manage an external storage system for faxes. This is useful for large volume faxes and can also be a requirement for HIPAA privacy considerations.
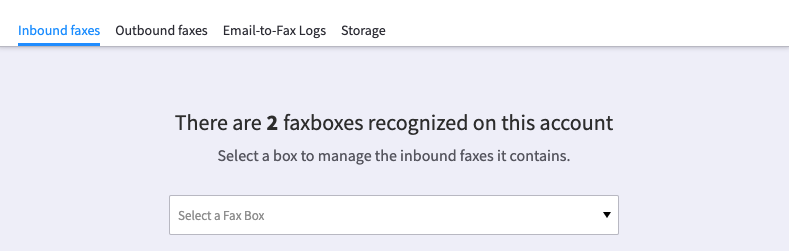
When you select the Faxes application you should see an opening screen similar to this one:
Inbound Faxes
This is the default screen. If you select a faxbox from the dropdown you should see a list of the inbound fax activity.Outbound Faxes
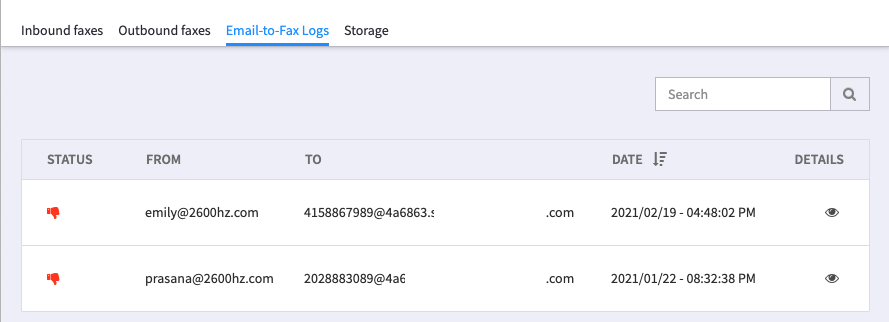
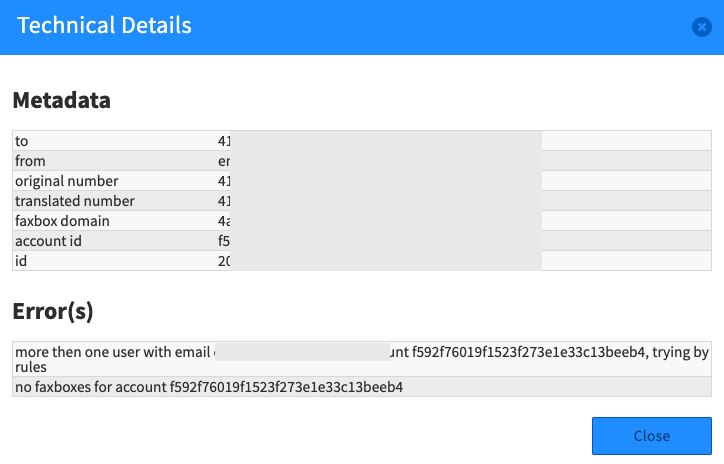
This will display the same interface, with a list of outbound fax activity.email to Fax logs
This will display any outgoing email to fax attempts. To troubleshoot any failed attemptsIt will indicate how many faxboxes are recognized in your account and, using the dropdown allow you to review the activity in each faxbox. If you need to review the detailed log of events, select the eye icon to the right and you should see a full log of the call:
Storing Faxes
If you have set up an external storage service such as Google Drive or AWS Connector, an overview of its settings would be displayed here. For more information on how to set up a storage system, you can review this document.
Frequently Asked Questions
If you are having trouble sending faxes, please consider the following questions:
- What is the size of your fax attachments? Current limits are set at 20mb on zswitch, if you have a private cloud or global infrastructure installation, this is configured locally and may have a different value.
- Are any other accounts/ faxboxes reporting similar issues?
- Approximately when was this first reported?
- Are the issues with both inbound and outbound faxes?
- Are the issues associated with a single number or all faxboxes?
- Are the outgoing attachments in .pdf or .tiff?
-
Does retrying the fax generate the same error?
- If yes, have they tried sending with a different file attachment?
- Does the fax machine send an “end of Fax” signal? In isolated cases the system will consider this a “failed call” even if it receives the full message.
Is there a maximum file size for sending faxes?
Currently Hosted customers are limited to attachments 20mb or less. The maximum file size is a setting that can be defined in Private Cloud and Global Infrastructure, please contact your site administrator for details on how this is set in your environment.My Faxbox is missing its outbound smtp information
OSticket # 260019813 I am getting a "Timed out waiting for the first message" notification when I try to fax.My fax setup is receiving faxes but not sending them. What should I look for?
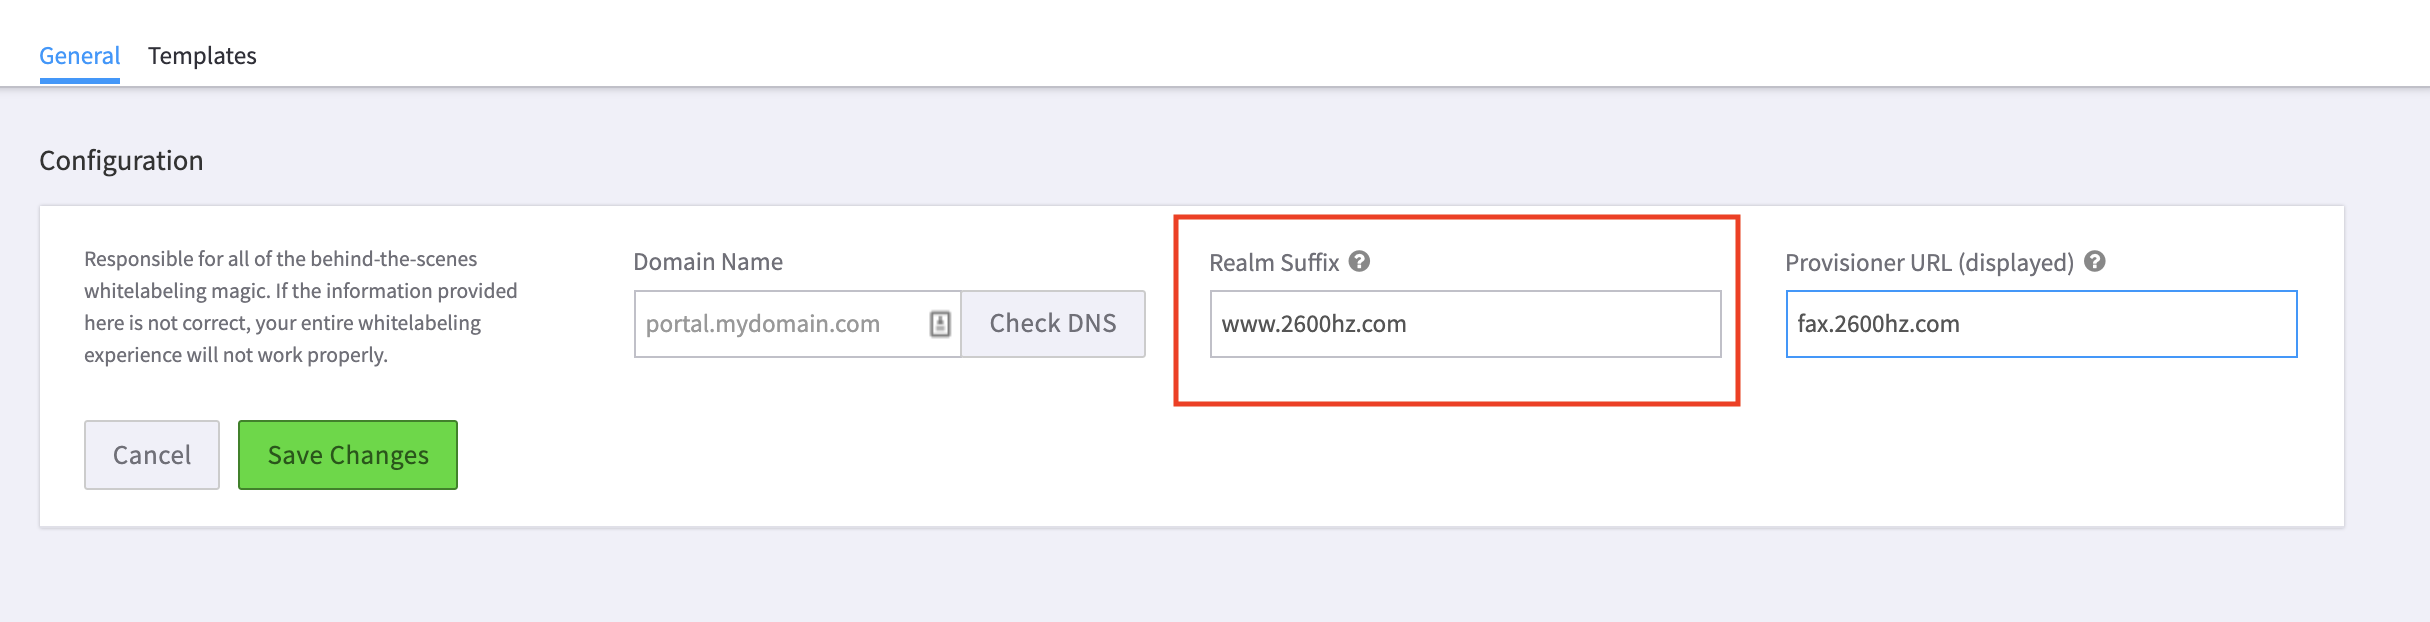
If you are using the Branding application for this account, check the setting in your branding configuration for "Realm Suffix." Make sure you have a complete xxxx.yyyy.com URL.
Do you need to assign a codec to your fax machine?
If your fax machine can also send and receive voice calls, you must assign a codec for the audio to work. Check the owner manual or the box to see which audio codec(s) it supports.
Where are fax documents typically stored?
If you use an external storage solution, and structure all of your outbound fax API requests to specifically only use your external storage solution, fax documents will not be stored anywhere on 2600hz systems.If an external storage solution is not utilized with the API calls for outbound faxes, or if a faxbox is used, copies of the documents being transmitted will be retained in the MODB, and we cannot guarantee secure deletion practices, even with using the API to submit DELETE requests, due to the nature of our database management systems.
Do outbound faxes ever get stored in a 2600hz MODB, even when fax box is configured?
Yes, the MODB is used to manage documents and metadata for logging and management purposes, as well as convenience to the user, specifically with faxbox usage and default API usage.If a fax is stored in the MODB and we send an API call to delete the outbound fax, is there a chance the fax is still retained in the 2600hz infrastructure in any backup of the MODB?
Yes, this is an inherent possibility due to the nature of our database management processes.When using a third party storage system like Amazon's S3, what do we store on couch for faxes (incoming/outgoing)?
We store from/to and fax statistics, not the document/content.
When FreeSwitch processes a fax transmission, does it store the file in 'tmp' or does it just stream it from fax_file_proxy?
These are stored in 'tmp'.
If FreeSwitch does store the file in 'tmp', does it remove it after transmitting or does it rely on tmpwatch to do that?
FreeSwitch removes the file after transmitting. Only the to/from and statistics metadata is stored in the database.
The means of bypassing the MODB and document storage on our systems is via the API and the external storage solution I mentioned previously; this is the only means to be assured that no documents are stored anywhere on 2600hz systems. Here is more information in our documentation in this area:
https://docs.2600hz.com/kazoo_dev/applications/fax/doc/README/#kazoo-fax-converter-and-attachment-storage-handling-and-configurationLink to documentation for how to set up external storage solutions for use with out platform:
https://docs.2600hz.com/kazoo_dev/doc/blog/storage/
If I use the API Fax calls, does this automatically connect to the KAZOO faxboxes?
If you use a direct API call, make sure your syntax for saving faxes is correct. An example is below:
/accounts/:account_id/faxboxes/:faxbox_id/faxes/outboxIf I use an external storage system, can I still view the logs for incoming and outgoing faxes in the Faxes app?
if a faxbox were utilized, it changes the original proposed implementation from this request. To clarify, if you use an external storage solution, and structure all of your outbound fax API requests to specifically only use your external storage solution, fax documents will not be stored anywhere on 2600hz systems.If an external storage solution is not utilized with the API calls for outbound faxes, or if a faxbox is used, copies of the documents being transmitted will be retained in the MODB, and we cannot guarantee secure deletion practices, even with using the API to submit DELETE requests, due to the nature of our database management systems.
·Do outbound faxes ever get stored in a 2600hz MODB, even when fax box is configured?
Yes, the MODB is used to manage documents and metadata for logging and management purposes, as well as convenience to the user, specifically with faxbox usage and default API usage.If a storage system is used, do you save any of the fax data in your database?
We store from/to and fax transmission statistics, not the document/content. During the transmission process documents are stored in a temporary file then deleted when the transmission is complete.There is a way to bypass the database and document storage eintirely on our systems via the API; this is the only means to be assured that no documents are stored anywhere on 2600hz systems. Here is more information in our documentation in this area:
Below are some links that further outline these considerations. Note, the 2600Hz support team does not provide support for these advanced features.
-
https://docs.2600hz.com/kazoo_dev/applications/fax/doc/README/#kazoo-fax-converter-and-attachment-storage-handling-and-configuration
- https://docs.2600hz.com/kazoo_dev/doc/blog/storage/
Related Articles
SmartPBX User Guide API References
docs.2600hz.com
REST API Reference for Kazoo Crossbar APIdocs.2600hz.com
REST API Reference for Kazoo Crossbar APIdocs.2600hz.com/user-guides
docs.2600hz.com
REST API Reference for Kazoo Crossbar APINotes on fax-specific call records
-
THIS THURSDAY, April 29, 11-12:30 Pacific Time
Register using the link below
https://attendee.gotowebinar.com/register/8844618183239542544Proposed agenda.
We hope to include some straw polls to gauge your priorities... and of course we invite ideas and comments on any other topics at the end.We invite ideas and comments on any other topics at the end,
-
Introductions
-
System Configuration - What system configuration settings do you use/access?
We're working on a solution to give Private Cloud and Global Infrastructure customers easier access to system configuration settings (for example, how long notifications are displayed, how long trial acconts last, text to speech settings, etc. We have some wireframes for updates we'd like your feedback on. -
SS certificate management:
What's your pain points with this? How can we make it less painful?
-
Holiday Management, revisited.
-
Sneak Peek of Something Exciting!! 👀
-
Open Discussion / Food Fight.
Also, make sure to REVIEW, ADD, and VOTE HERE for your personal priorities for updates in KAZOO.
-
-
About Callflows
Callflows is an application that exposes our APIs in a GUI format, enabling very complex and custom call routing plans when needed. It is used in addition to the SmartPBX app to supplement the basic call routing configurations available there. See the user stories below as examples:
User Stories
-
An account has multiple geographic locations and needs to create
- Unique office hours and holiday schedules
- Different language defaults
- Different answering notices depending on incoming call source and time of day
- A series of sub-menus and selections (press 1 for support, then 2 for apps and 3 for service issues)
- An account wants to set up multiple call center queues (for support and sales for example)
- An account wants to customize incoming call sequences based on unique variables, such as phone number, holidays, etc.
- An account wants to route incoming fax calls based on time of day or prepend number
Before You Start
Before you start to implement custom callflows, confirm your settings in SmartPBX.
This will ensure you have the newest fields and settings configured for your account.In addition the Callflows application accesses and writes settings data that can affect many other applications. It is important the manager working with Callflows has a strong knowledge of how these applications work together and what ripple effects can occur when working with and changing these settings.
Accessing Callflows
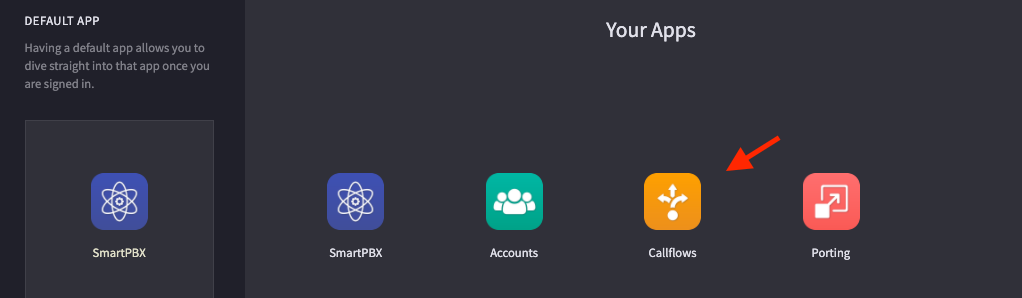
Once your account is created in SmartPBX, go to the applications menu and select Callflows.
If it’s not displayed,
- Try searching for it in the Search Apps field to your left.
- Select the App Exchange button, find Callflows there, and select it. Then use the toggle to enable it.
- If you still don’t see it, contact your system administrator.
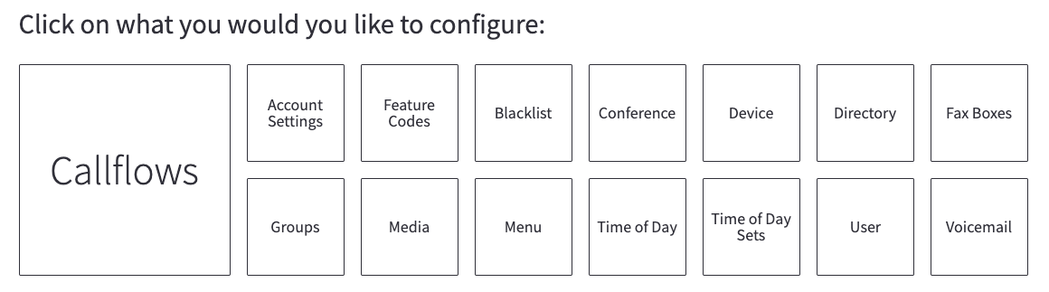
Your Callflows Dashboard
The “home page” to the Callflows dashboard will look like this. The large Callflows selection brings you to the home screen where you can build a callflow. The smaller selections help define attributes for each “flow.” You can access them here, or when you select one of these actions, by picking Edit / Advanced options.
Building a Callflow
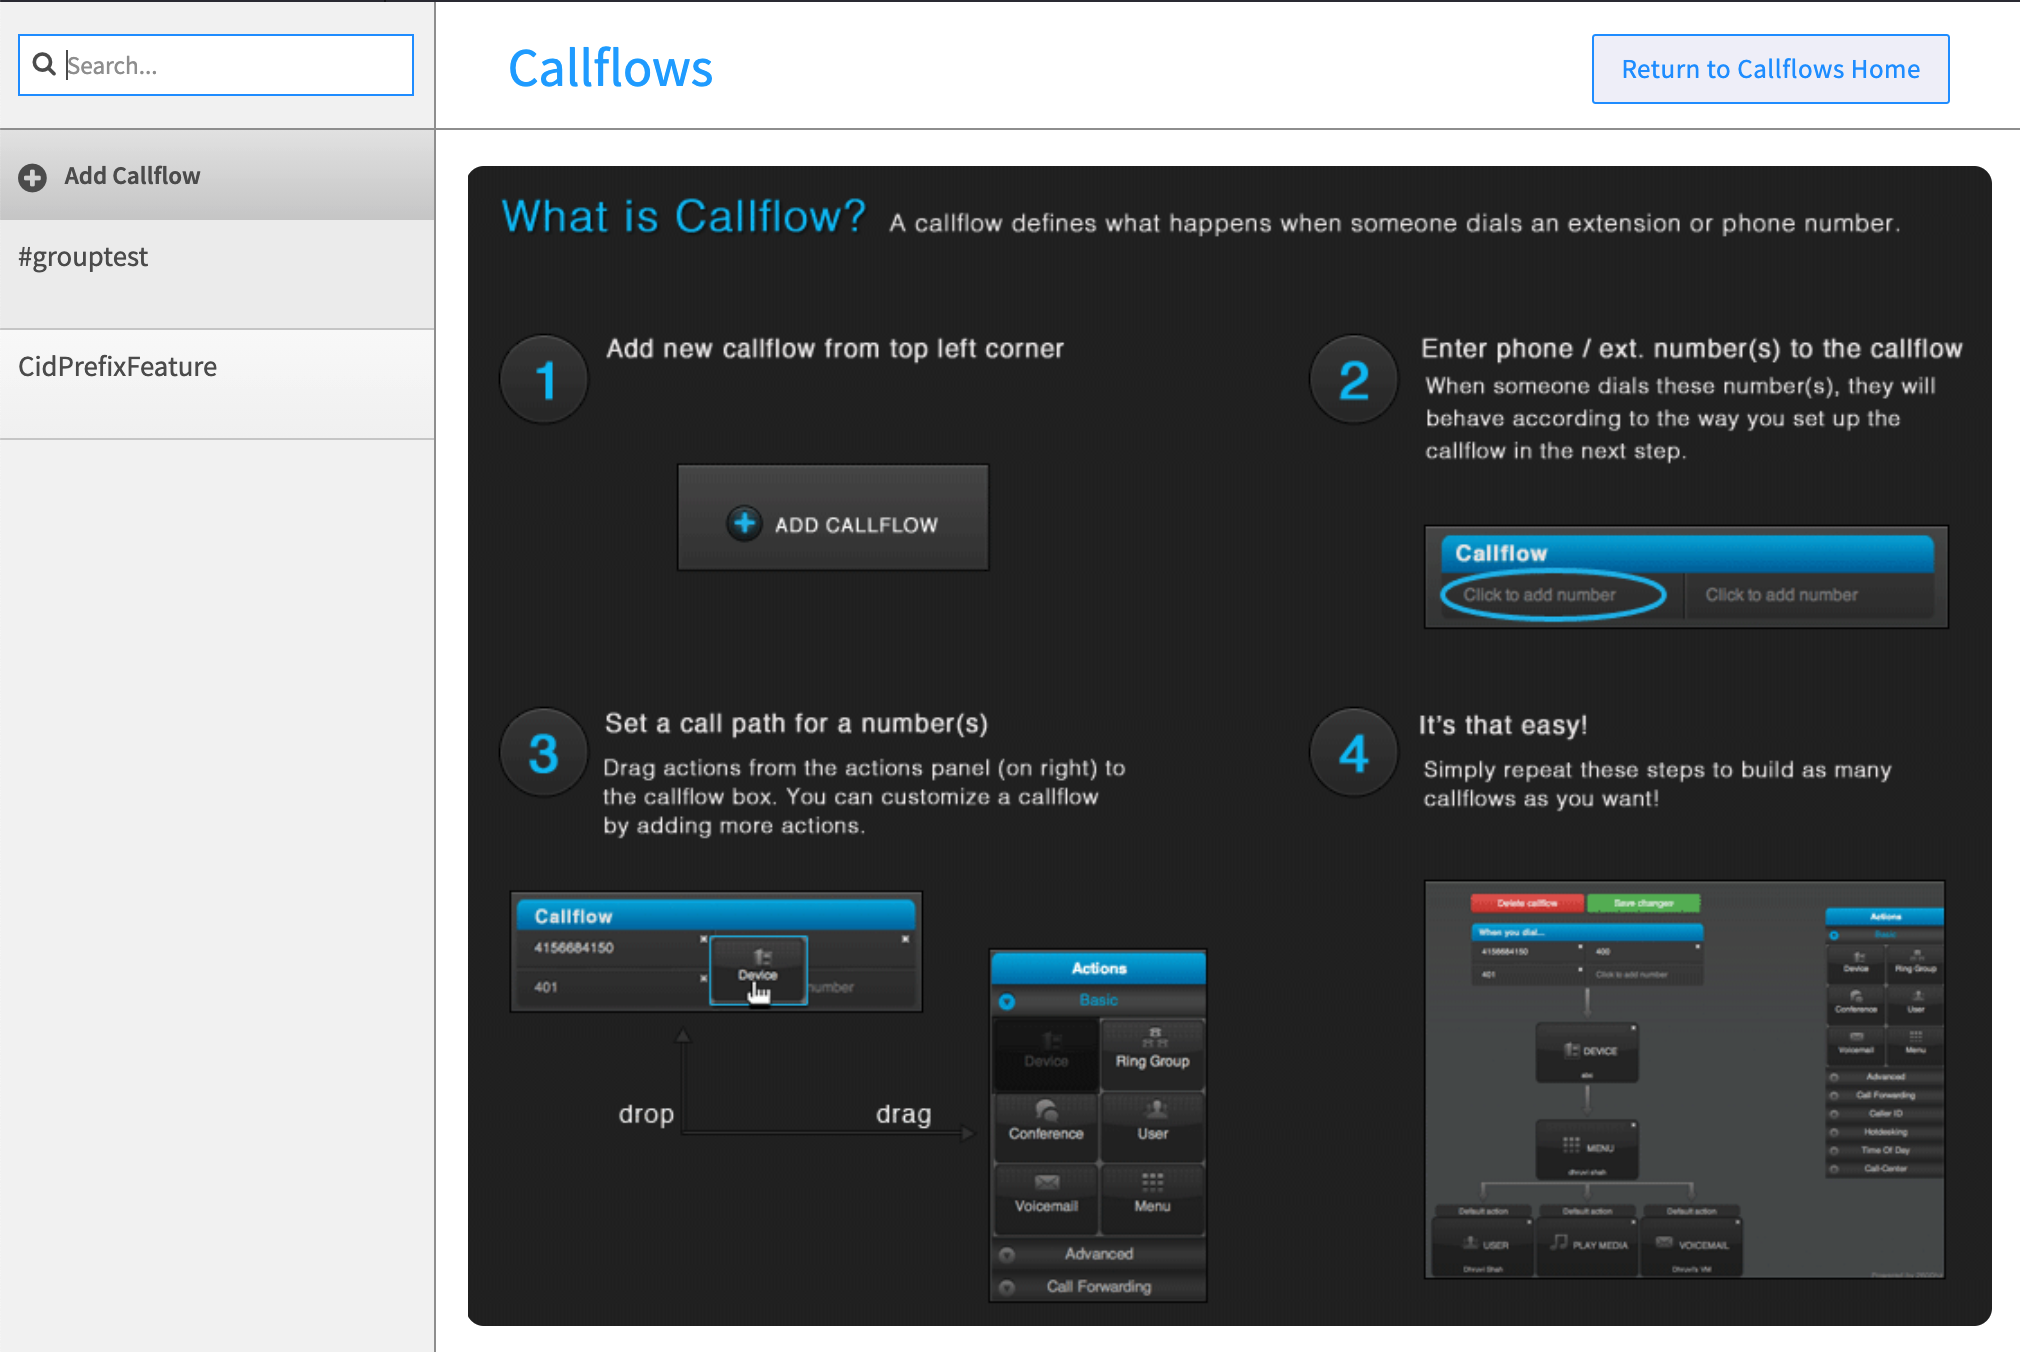
When you click on Callflows you will see a brief tutorial for creating a new process and to the left a list of existing callflows assigned to your account and the option to add a new one.
It outlines the following steps:
- Add a Callflow (create new)
- Enter phone number / extension(s) tied to this process
- Drag your action into the diagram
- Save your changes
A more detailed look at these steps is outlined below:
Add a Callflow
-
Select the Add callflow button in the left menu bar. You will see a “blank screen” waiting to be filled, and the Actions menu to the right.
-
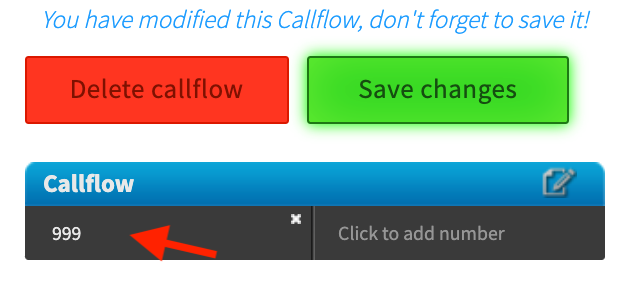
Click the black bar to assign a number to your callflow.
NOTE: if you want to edit an existing callflow, select the edit pencil in the blue bar, upper right.
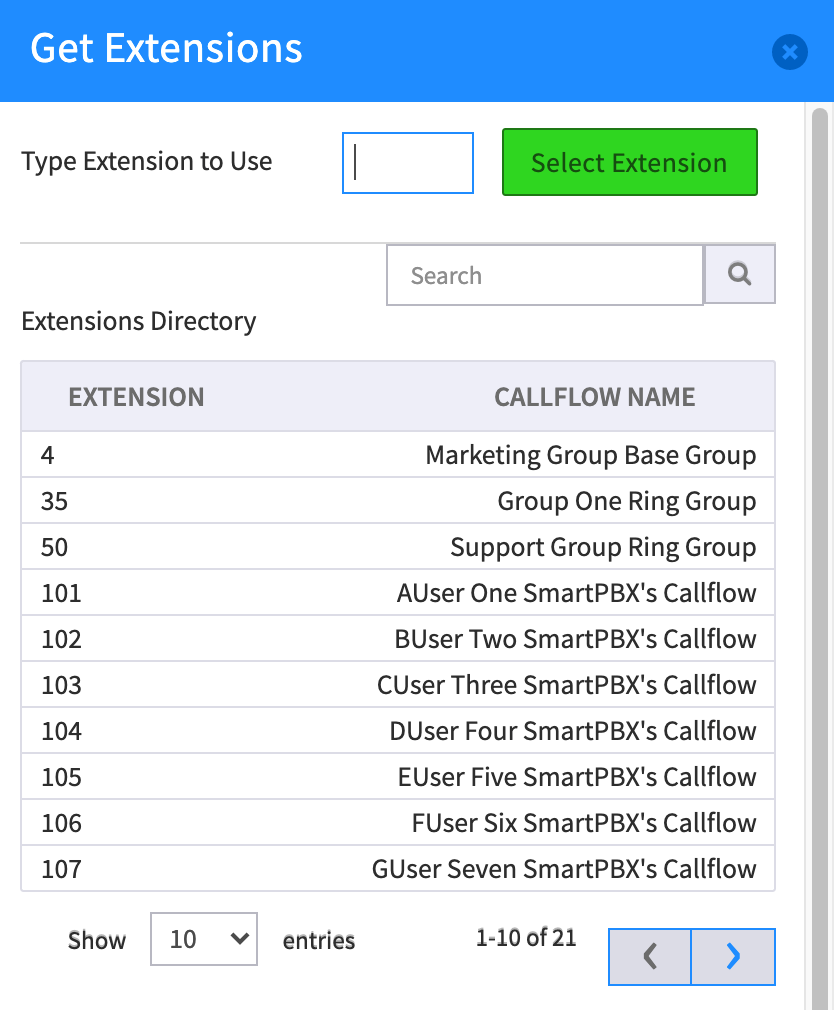
-
Select either
- a phone number in your account (you can buy one also)
- an existing extension shown in the dropdown
- enter a new extension
Your selection(s) will display in the black title bar and you are ready to add your actions!
NOTES:
-
Your callflow cannot be saved until you add at least one action.
-
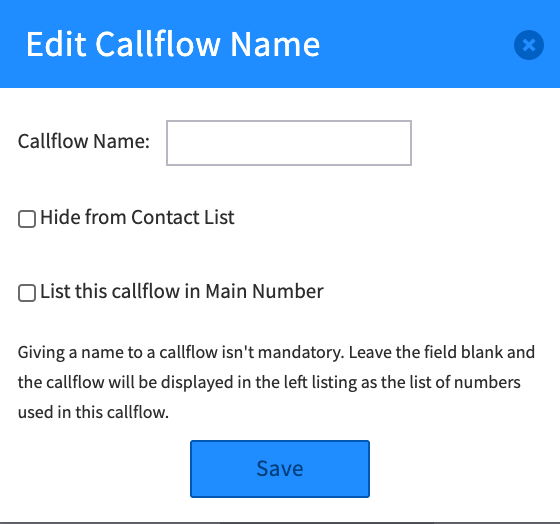
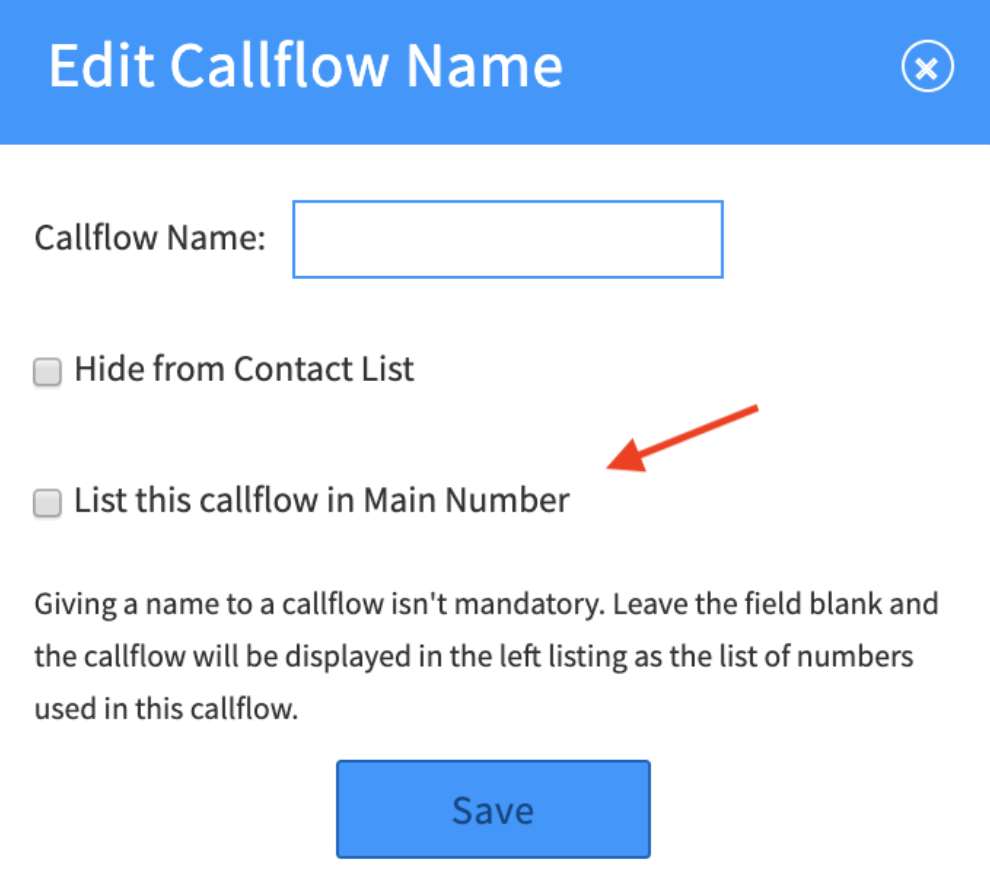
When first saved, your callflow will display its name as the first extension number you have entered. If you want to change the name, select the edit icon at the top right of the blue callflow bar.
Enter a unique name, and decide if you want it displayed as a “contact” and in SmartPBX’s main number list options.
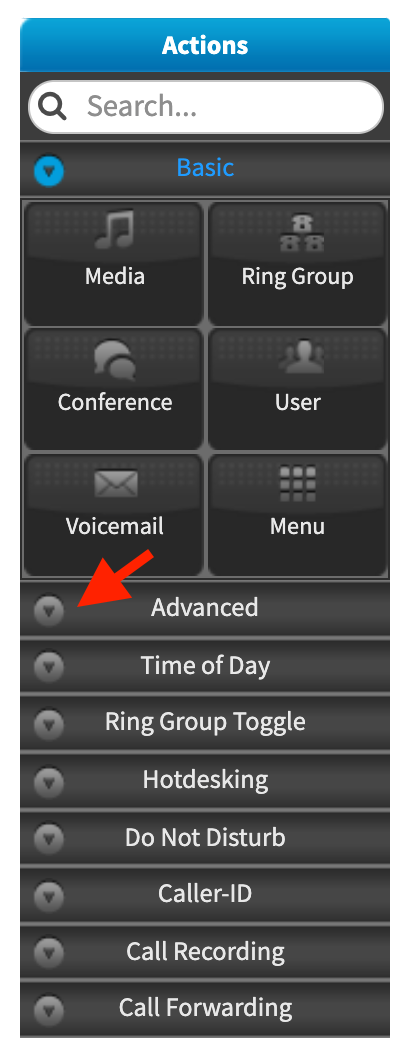
Next, review the Actions shown on the right menu bar.
NOTES:
-
The Basic Menu, with the most popular actions is displayed and open by default. To view additional actions available click on the drop down arrow of the eight additional topics.
-
For a complete listing of the Actions available in this menu and the parameters they request, see below.
Drag the actions to your “palette” in the order you want the callflow to take. “Drop” it onto the last action you have identified, and it will connect below. Depending on the action you choose, you will need to enter additional information to a dialog box that will pop up.
- Some actions trigger dual dialog boxes to display, for example the “Menu” action allows you to enter several menu items.
- Make sure to save each dialog box entry! See notes above on how to name your callflow.
- To remove a block, click on the x at the top right.
Sample Callflow
Below is a sample that uses basic actions only. It provides a submenu set of options to go to a ring group, to a generic Support Voicemail box, or to a “home” voicemail box.
Callflows Actions Available
An overview of all the possible callflow actions that are available to use is below.
NOTES:
-
Many of the Settings and Advanced settings values can be defined in SmartPBX; those values will display here. If you change the settings in callflows as part of your configuration the changes will also appear in SmartPBX. Make sure your changes will not affect what has already been defined there (such as Time of Day and Holidays).
Menu Action What it doesInitial Settings DialogAdvanced Settings Dialogs
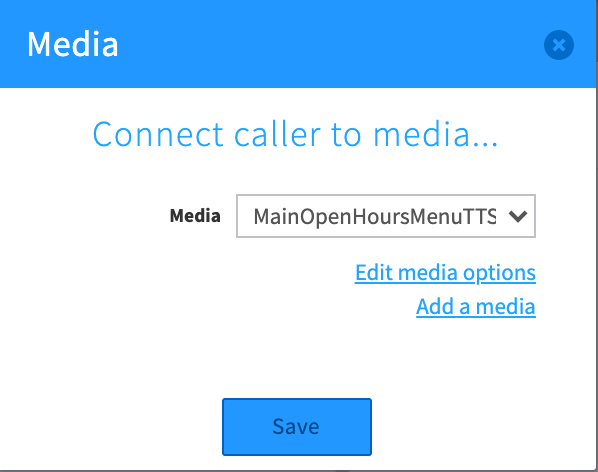
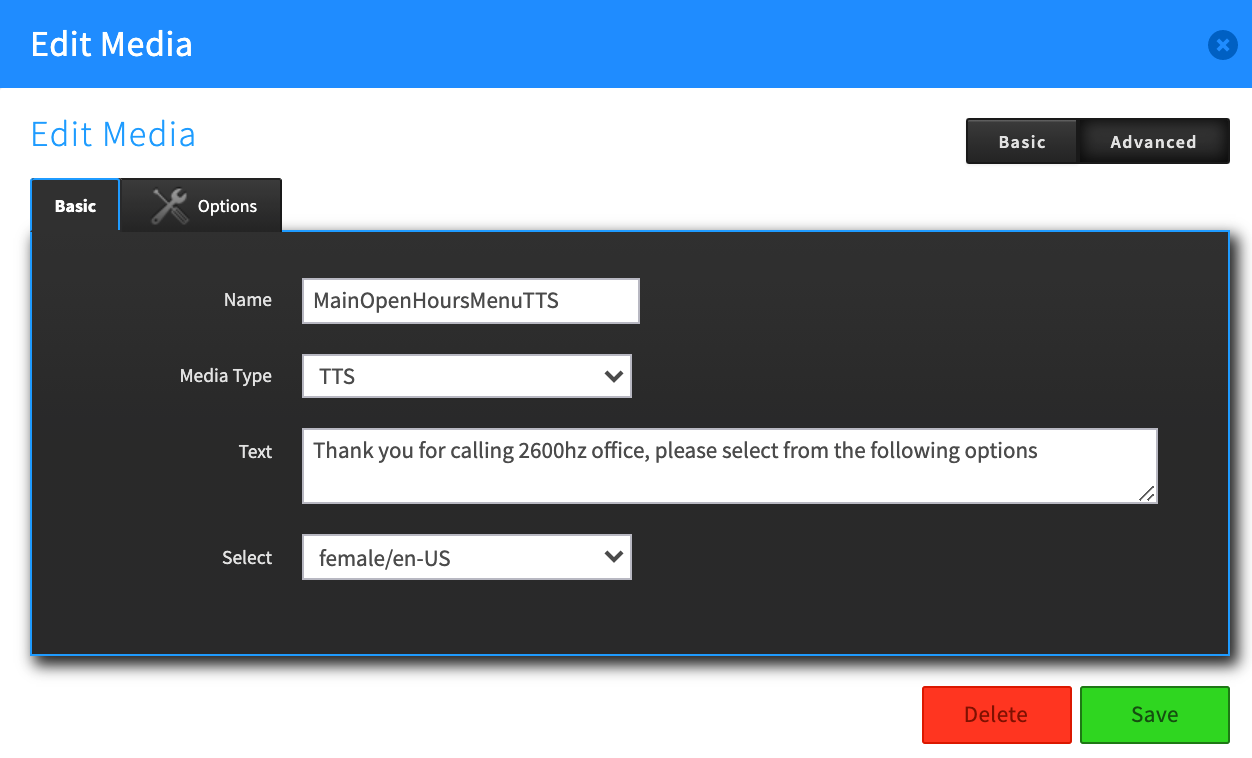
(accessible from Callflows home page)Media
Play an audio file such as a greeting
Can create, upload, or Text to Speech files
Can assign Persona for TTS voice
Can set stream option
Settings also available in SmartPBX
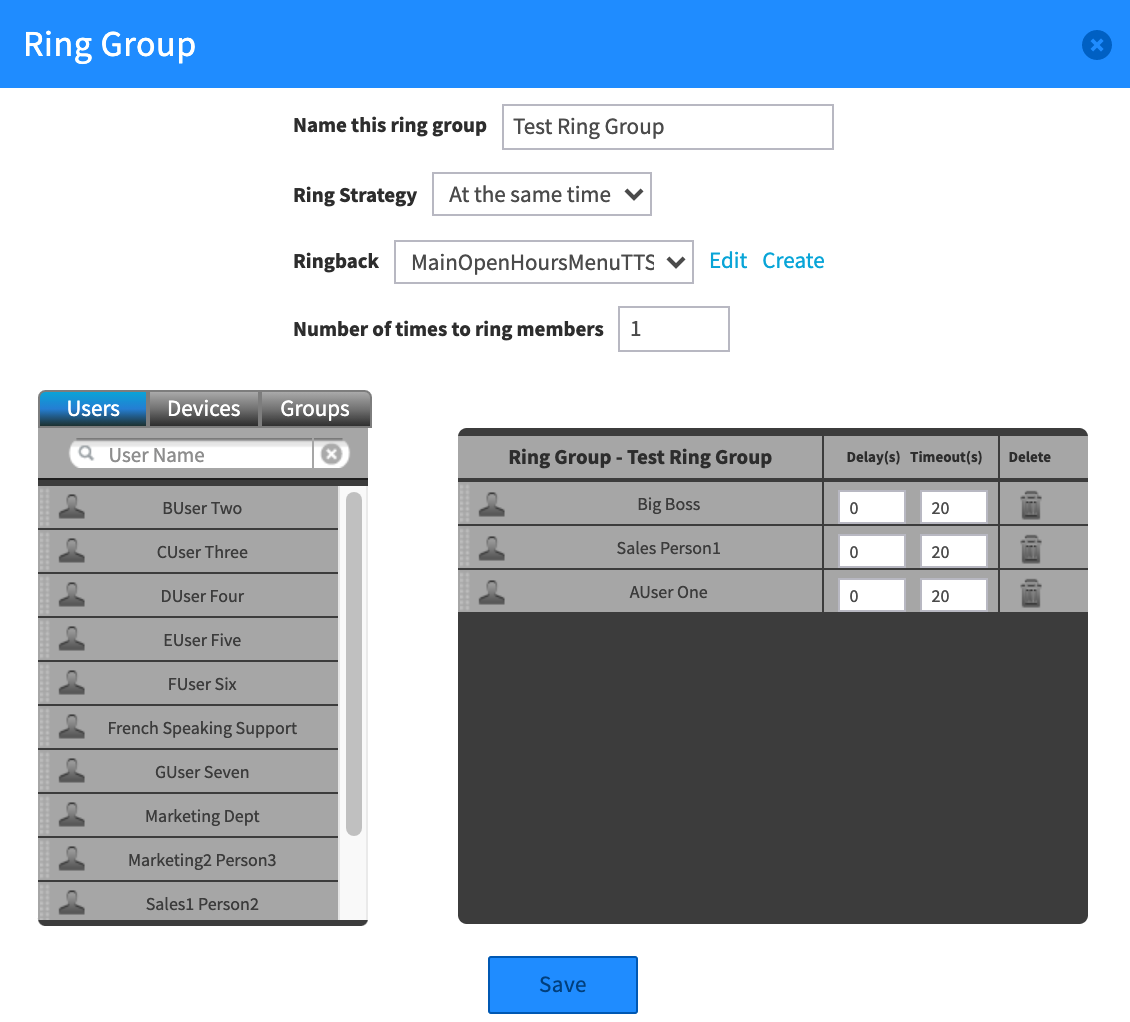
Ring
Group
Assign Users, Devices, and Groups to a Ring GroupSet ring strategy to concurrent or sequential
Set Ringback destination
Set number of times to ring members before ringback
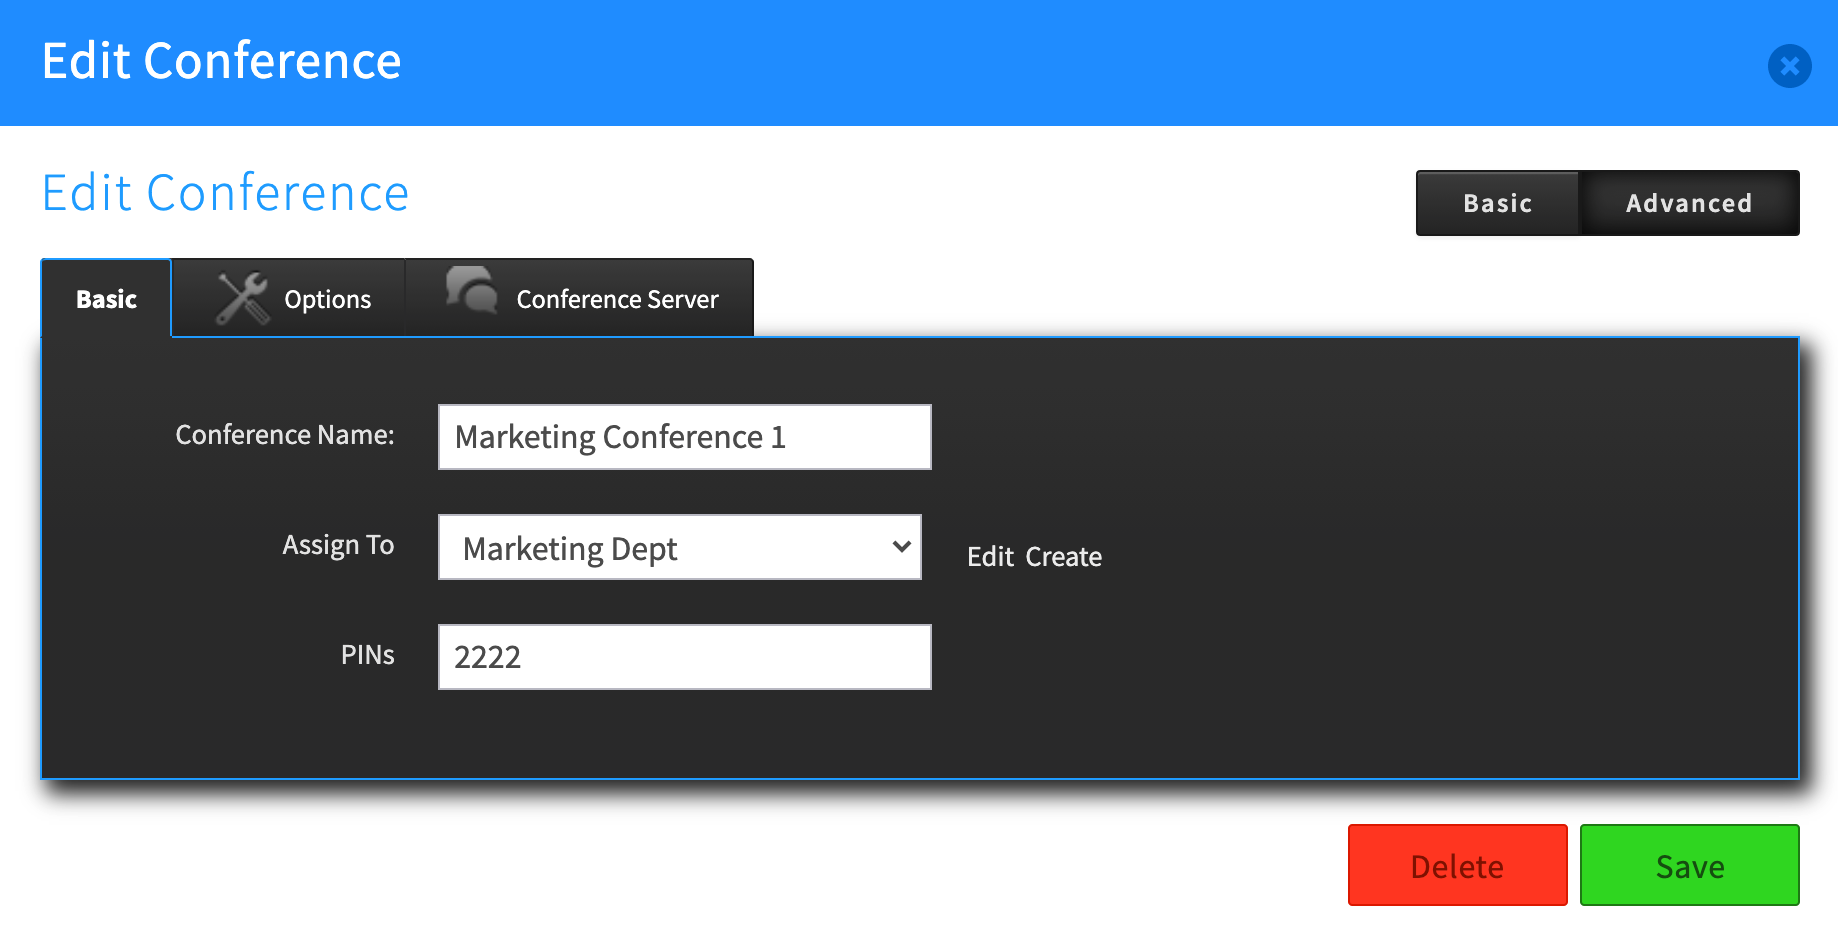
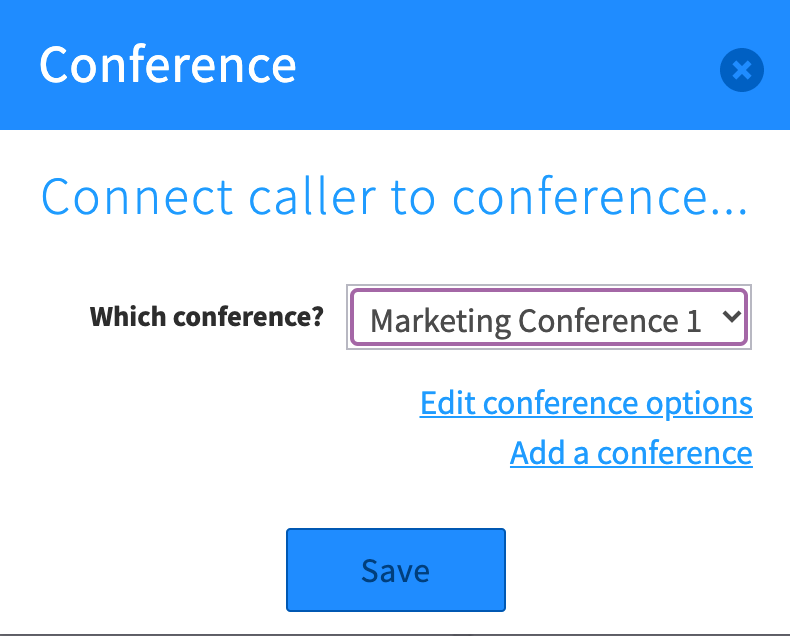
Conference
Connect caller to a conference call
Set conference name, extension, PIN #s, Join & Exit conference tones
Enable Video Conferencing (added costs)
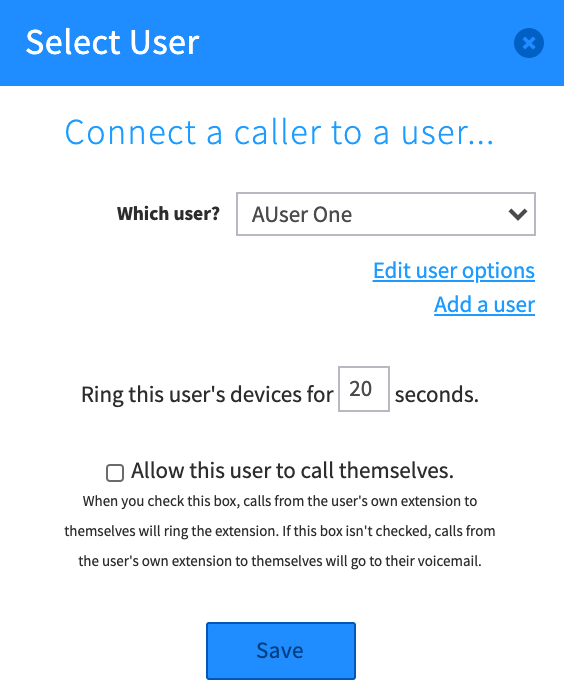
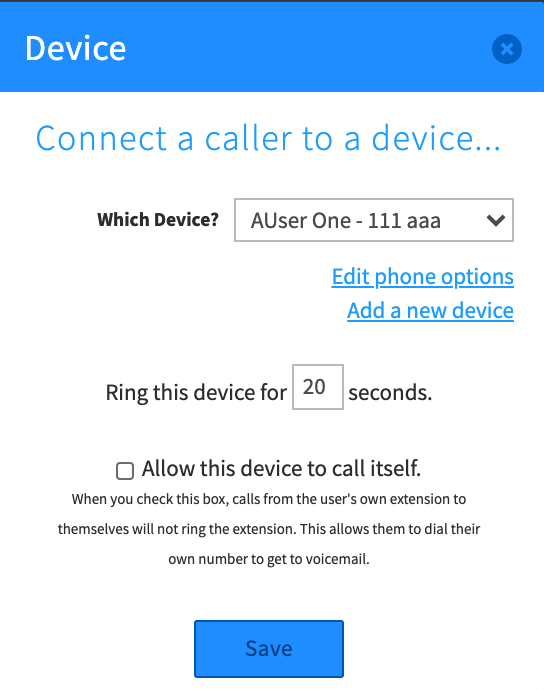
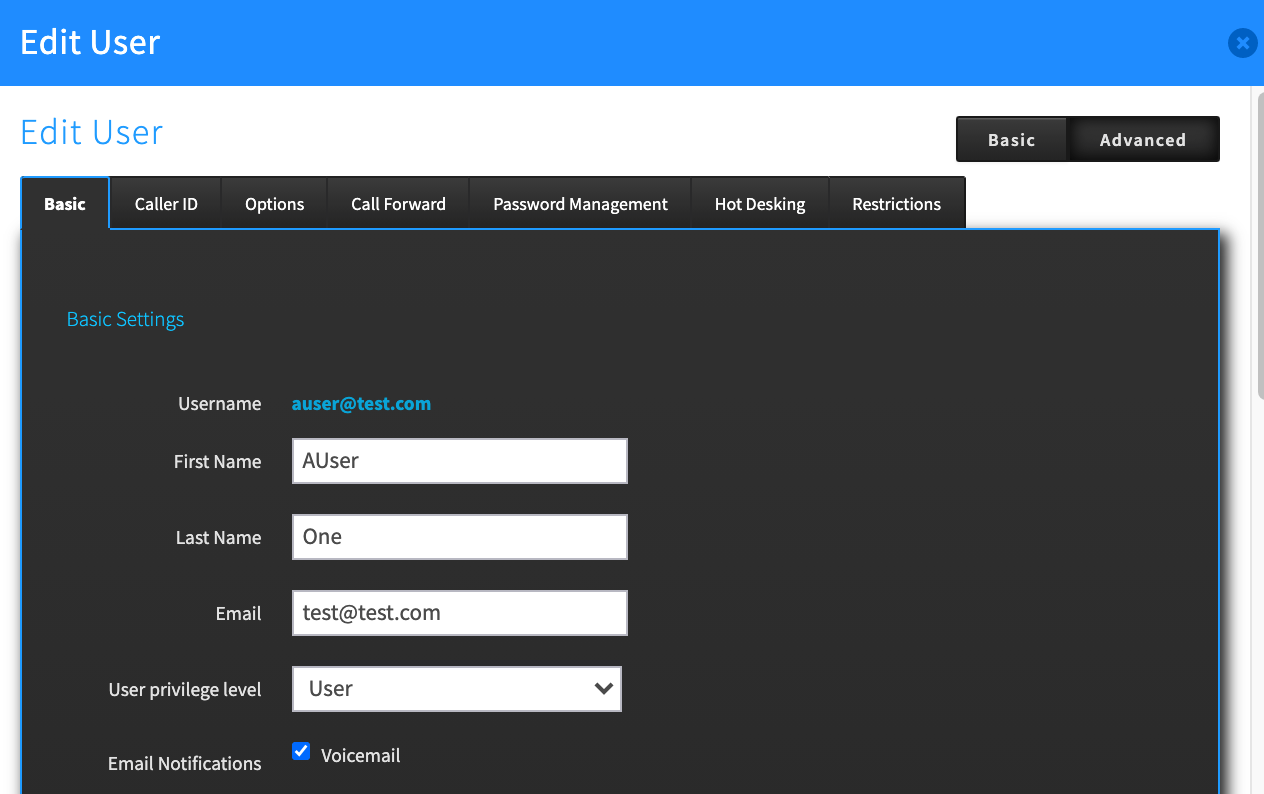
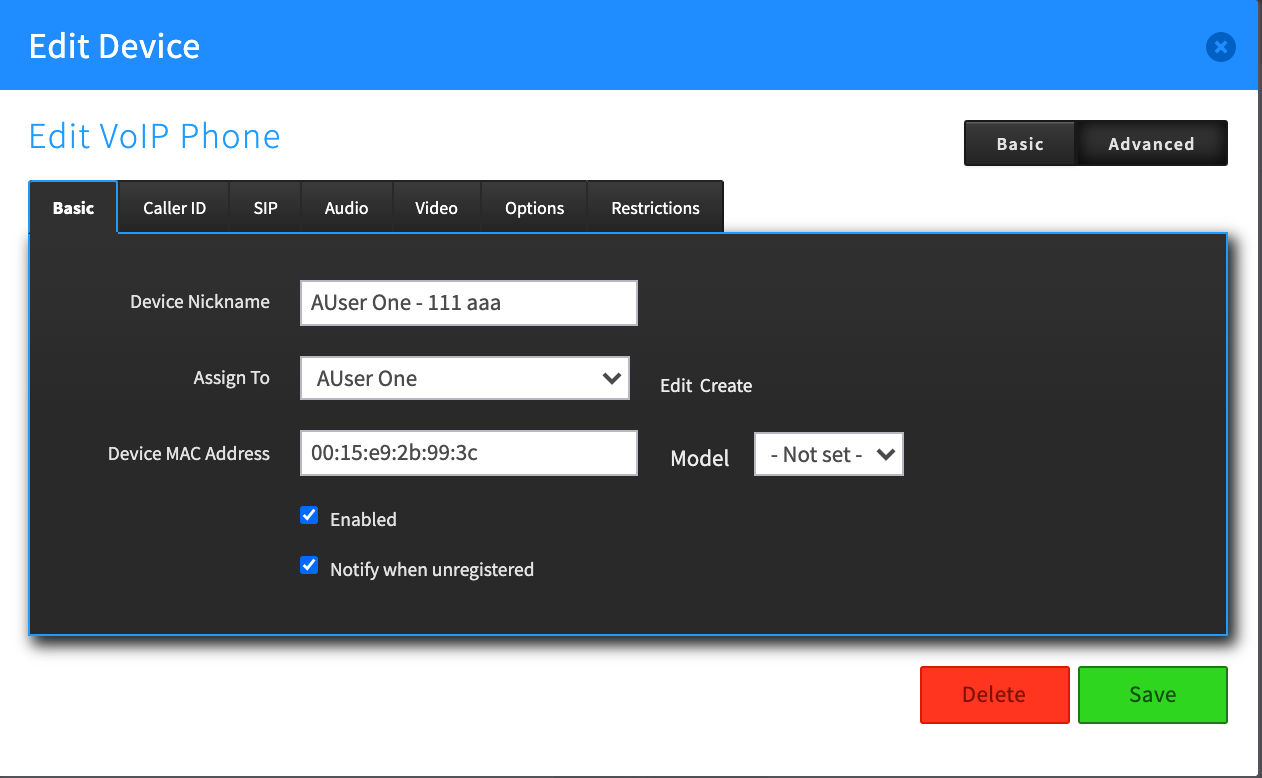
User
Connect a call to a User
Define how many rings to try before moving on.
set email notification for voicemails
Inbound/outbound Caller ID
Shows devices currently assigned
Allows assigning new devices
Full advanced menu
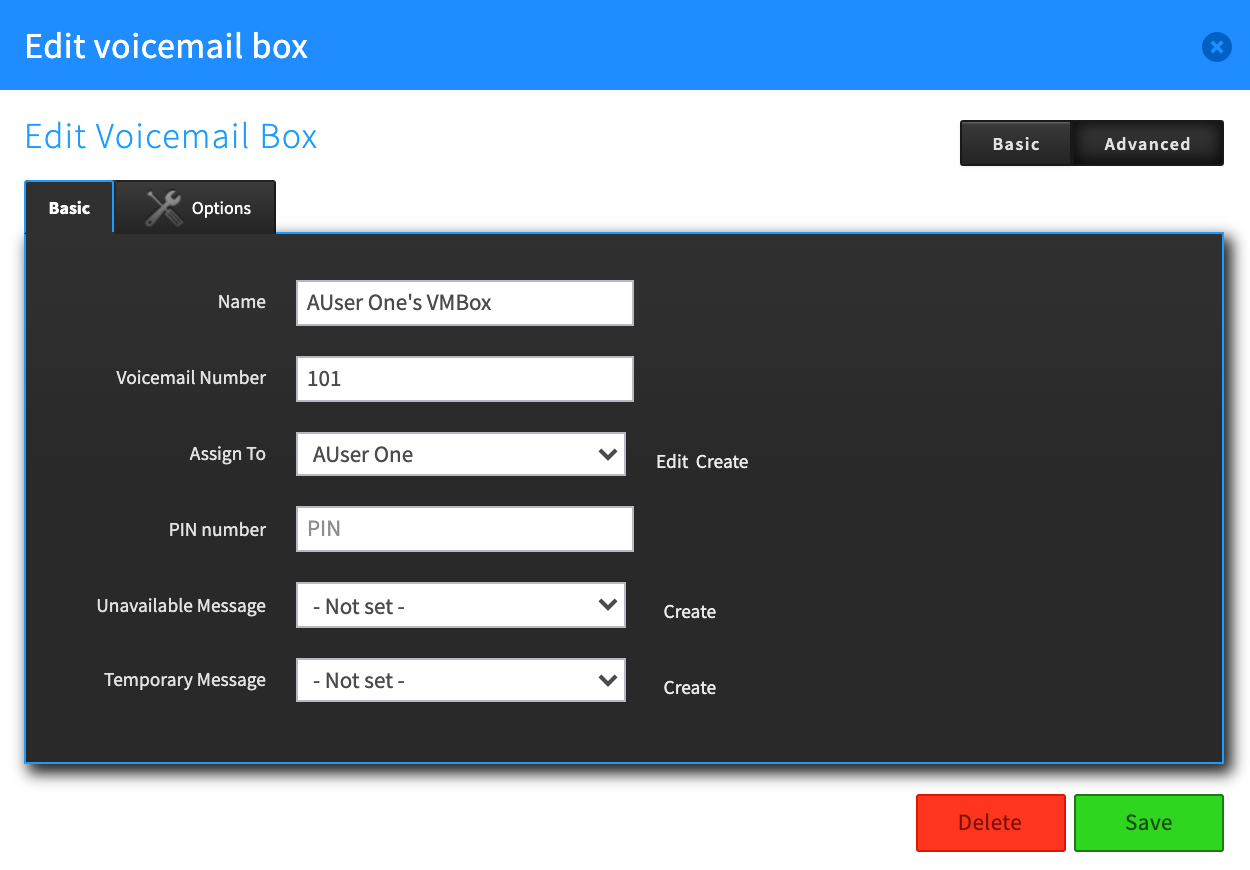
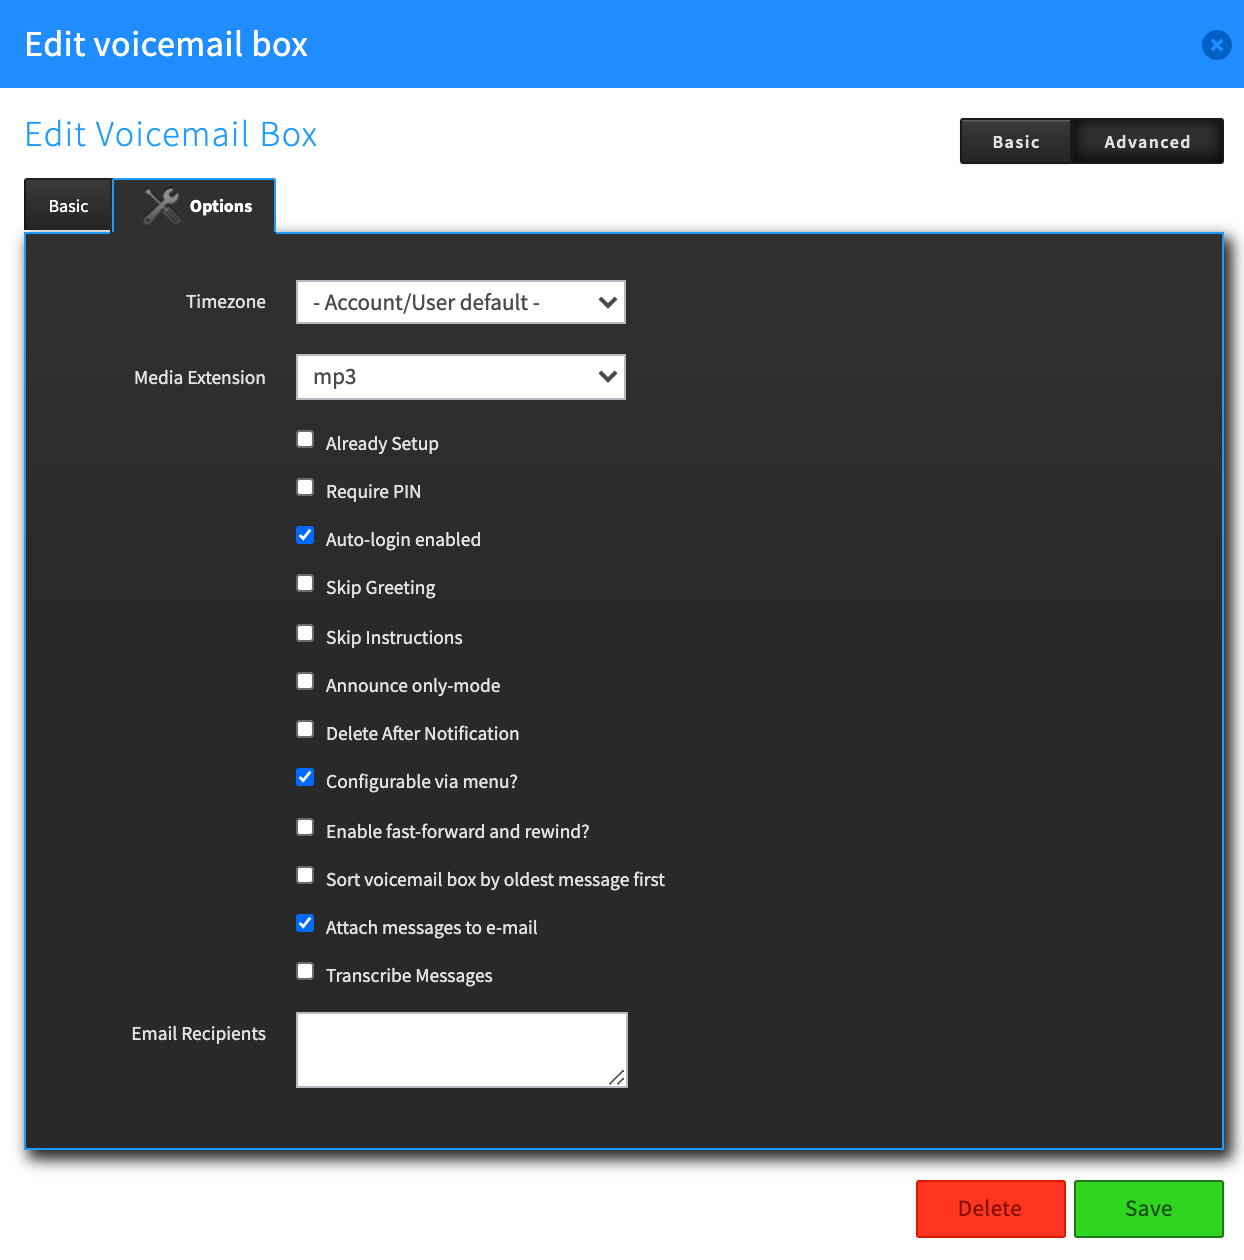
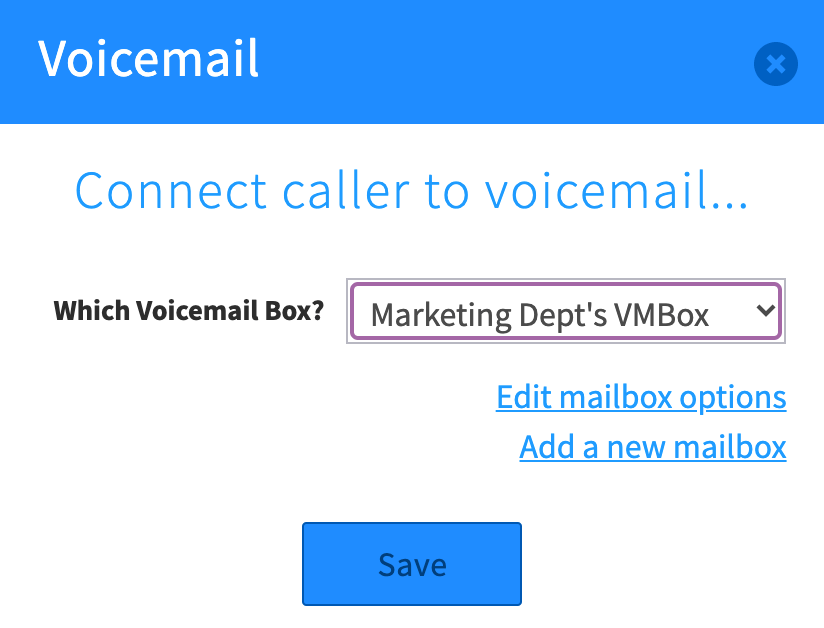
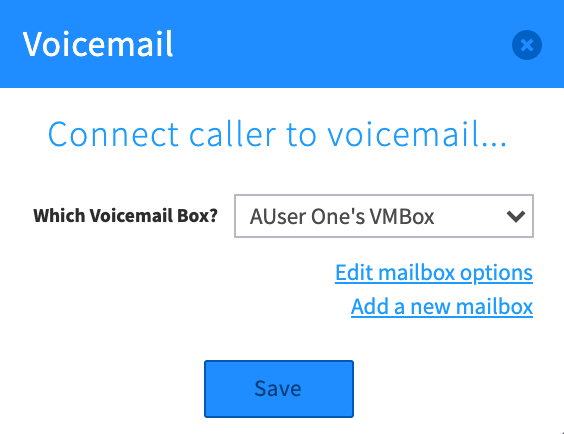
VoicemailDirect a caller to leave a voicemail message.
Assign mailbox
Advanced settings for accessing voicemail: auto-login, voicemail usage options
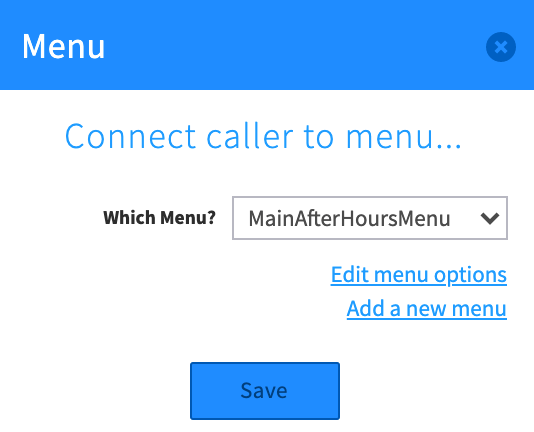
Menu Ask a caller to select a menu option or dial an extension
Device Ring a cell phone, VoIP, or other device
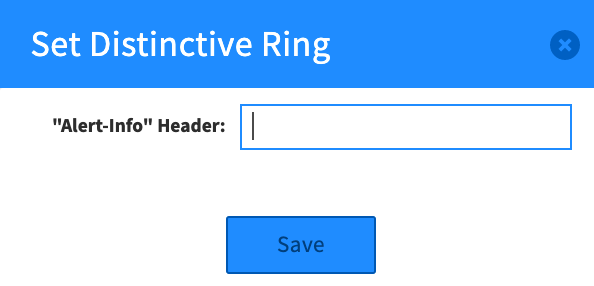
Distinctive Ring
Sets distinctive ring for incoming call
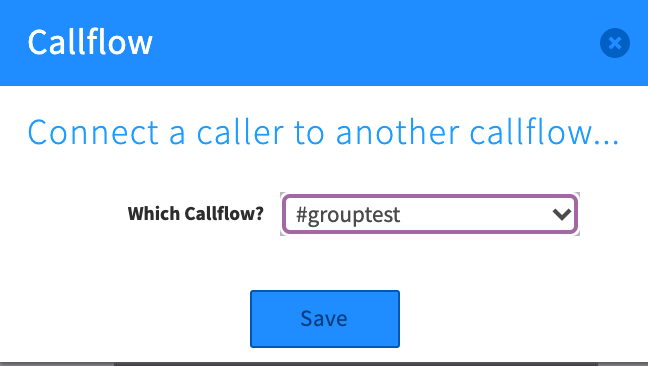
Callflow Transfers call to another saved callflow
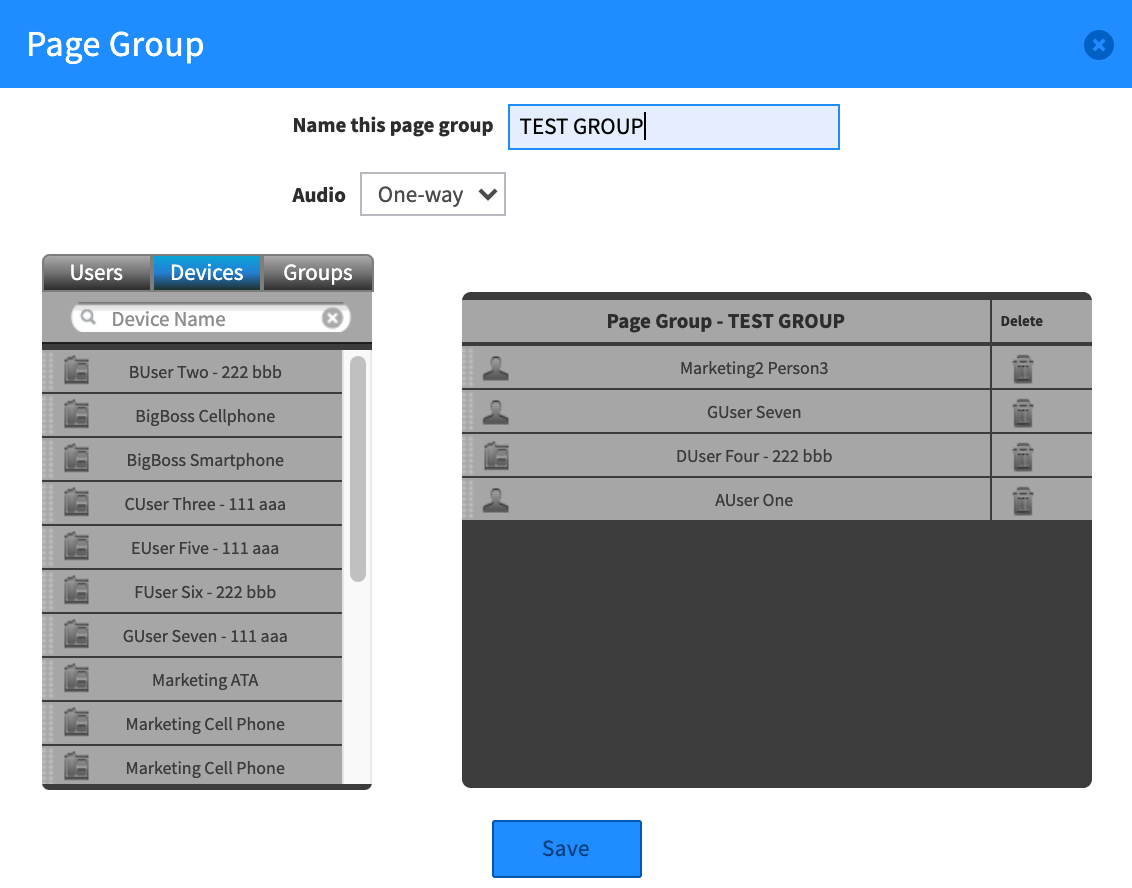
Page Group
“Page” or Ring several VoIP or cell groups
Set audio one or two-way
Add users, devices or groups to list
Set CAV
Allows you to provide key variables as custom application variables Missed Call Alert Allows you to assign users receive email notification for unanswered inbound calls that do not result in a voicemail message. Enter a list of emails separated by commas, or select users from the list below. and SAVE!
Manual Presence
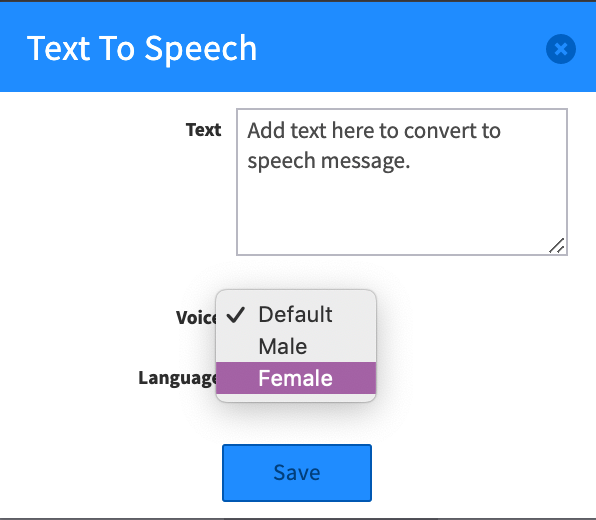
Text to Speech Allows you to enter a text that will be converted to speech.
Select voice and language
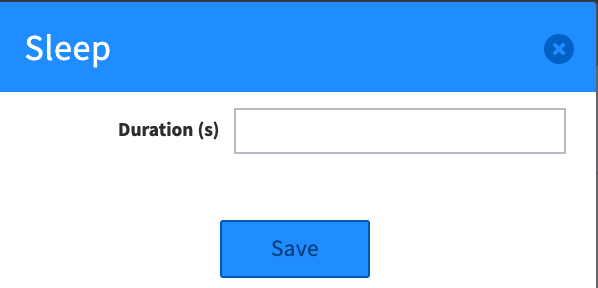
Sleep Set a pause before the next action
Define length in seconds
Language Assign a language
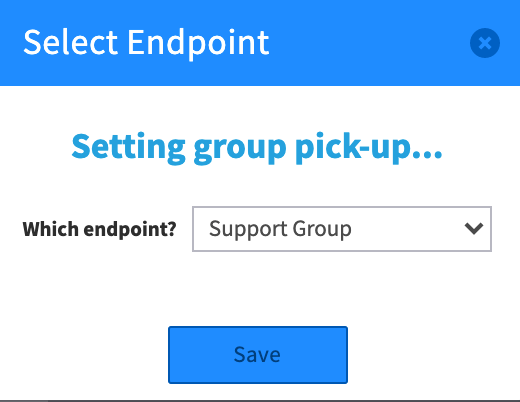
Group Pickup set Group pickup feature to a user, a group, or a device
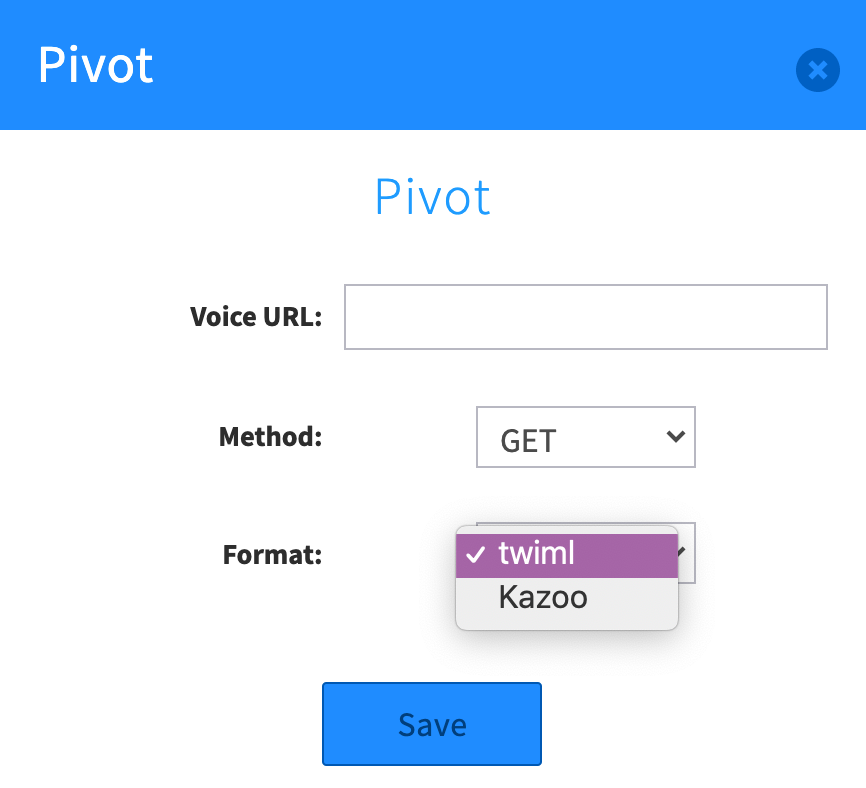
Pivot enable a pivot routine
(common uses are to access data from another source)Dynamically route calls based on external data as provided by a 3rd party server
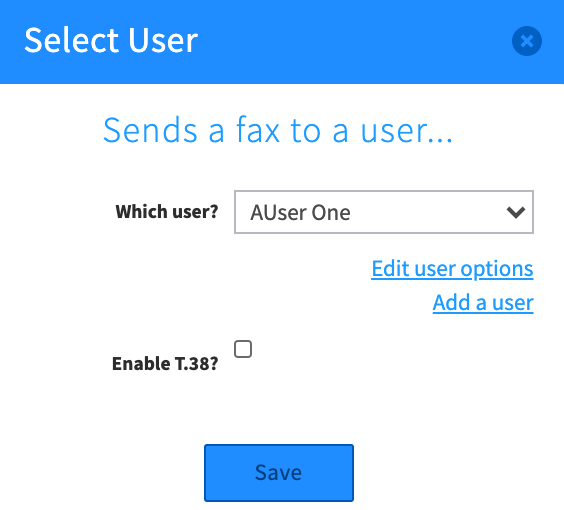
Receives Fax Sends a fax to a specific user
Enable T.387 option for faxes on devices
Accesses User Options to review fax settings
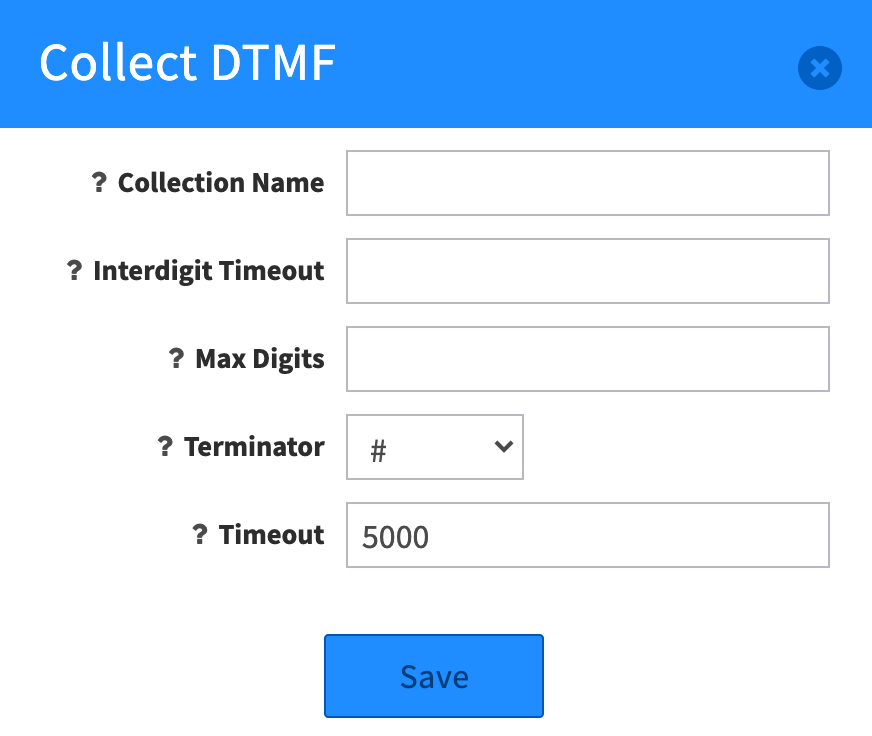
Collect DTMF Enables the collection of a DTMF for following steps.
Timeouts are measured in milliseconds
Collection name is to store as a key. If empty default back end is used.
Interdigit Timeout is how long to wait between entries
Max digits defines how many to wait for
Terminator key to enter when finished
Timeout is how long to wait for first entry
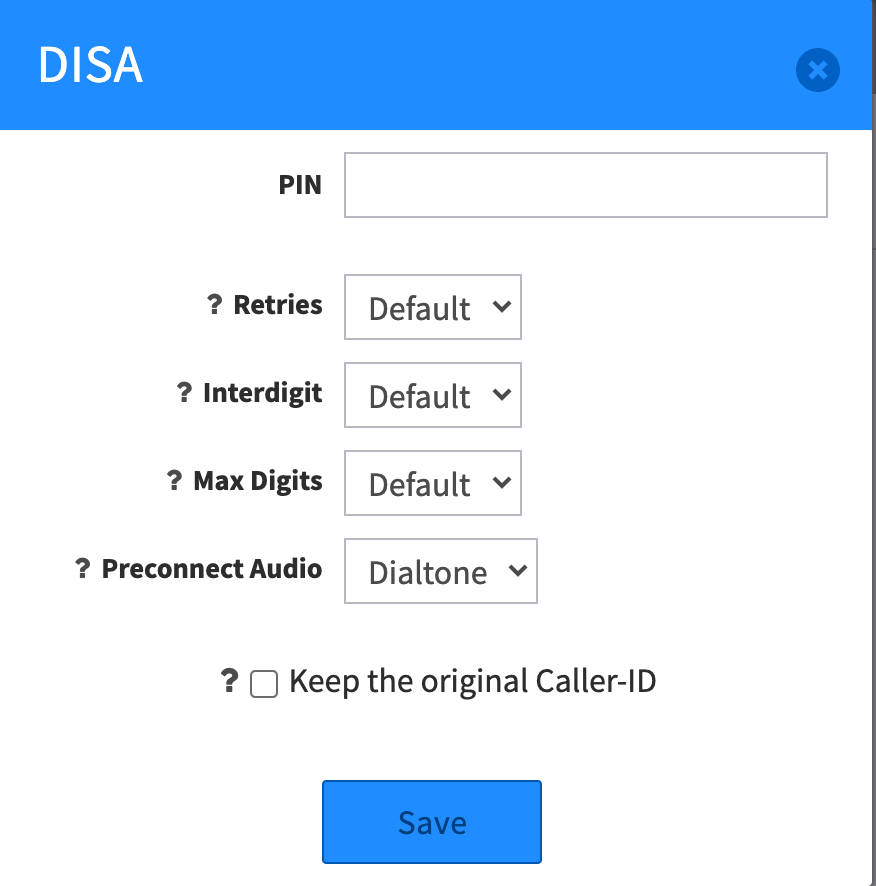
DISA Settings to allow outbound calls to be made from an external source as if it were coming from the business account.
Time settings are in seconds.
PIN enter the code for enabling DISA
Retries set how many tries to enter the correct PIN
Interdigit is the time allowed between digit entries
Max Digits is the maximum amount of digits allowed to be dialed as the external #.
Preconnect Audio is what the caller hears after entering # before connection
Keep original Caller-ID
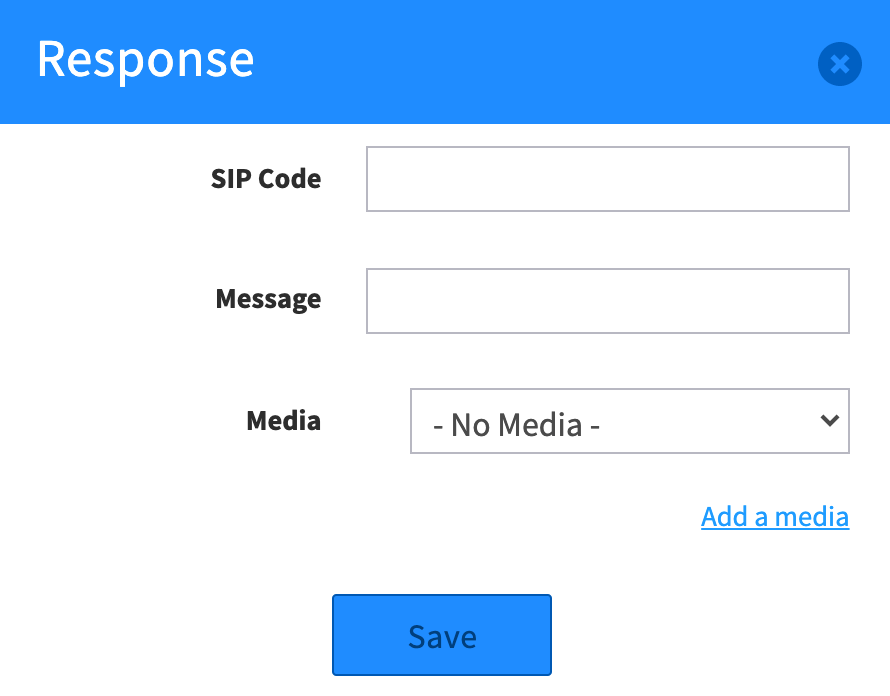
If checked, the originating Caller ID will be preserved.Response Return a custom SIP error code for troubleshooting and/or for announcing error to caller.
Any media added will be played when an error occurs. e.g. “that extension is no longer in service” Conference Service Transfer the caller to the conference call service, asks for conference # and PIN #.
Check Voicemail Sets option to check a group or personal voicemail.
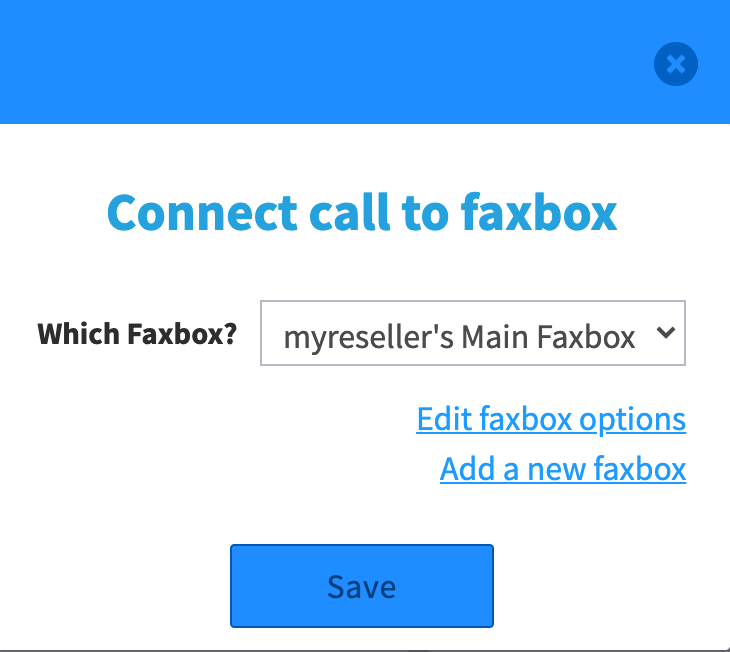
Fax Boxes connects to fax box
Global Carrier Route calls to the phone network through pre-configured service providers
Common use is for fully hosted environment where reseller doesn’t have to use their own carriers.
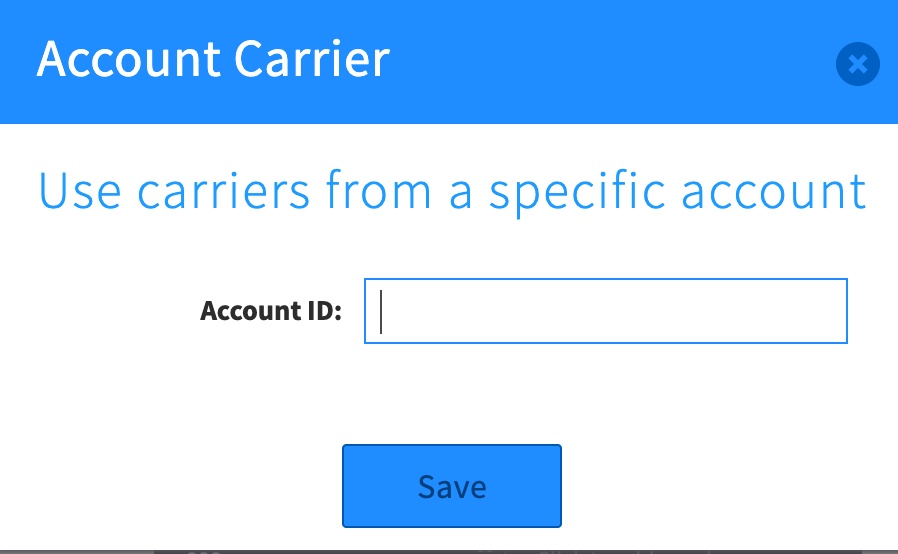
Account Carrier Route calls to the phone network through a configured SIP provider, Google Voice or a physical digital/analog line
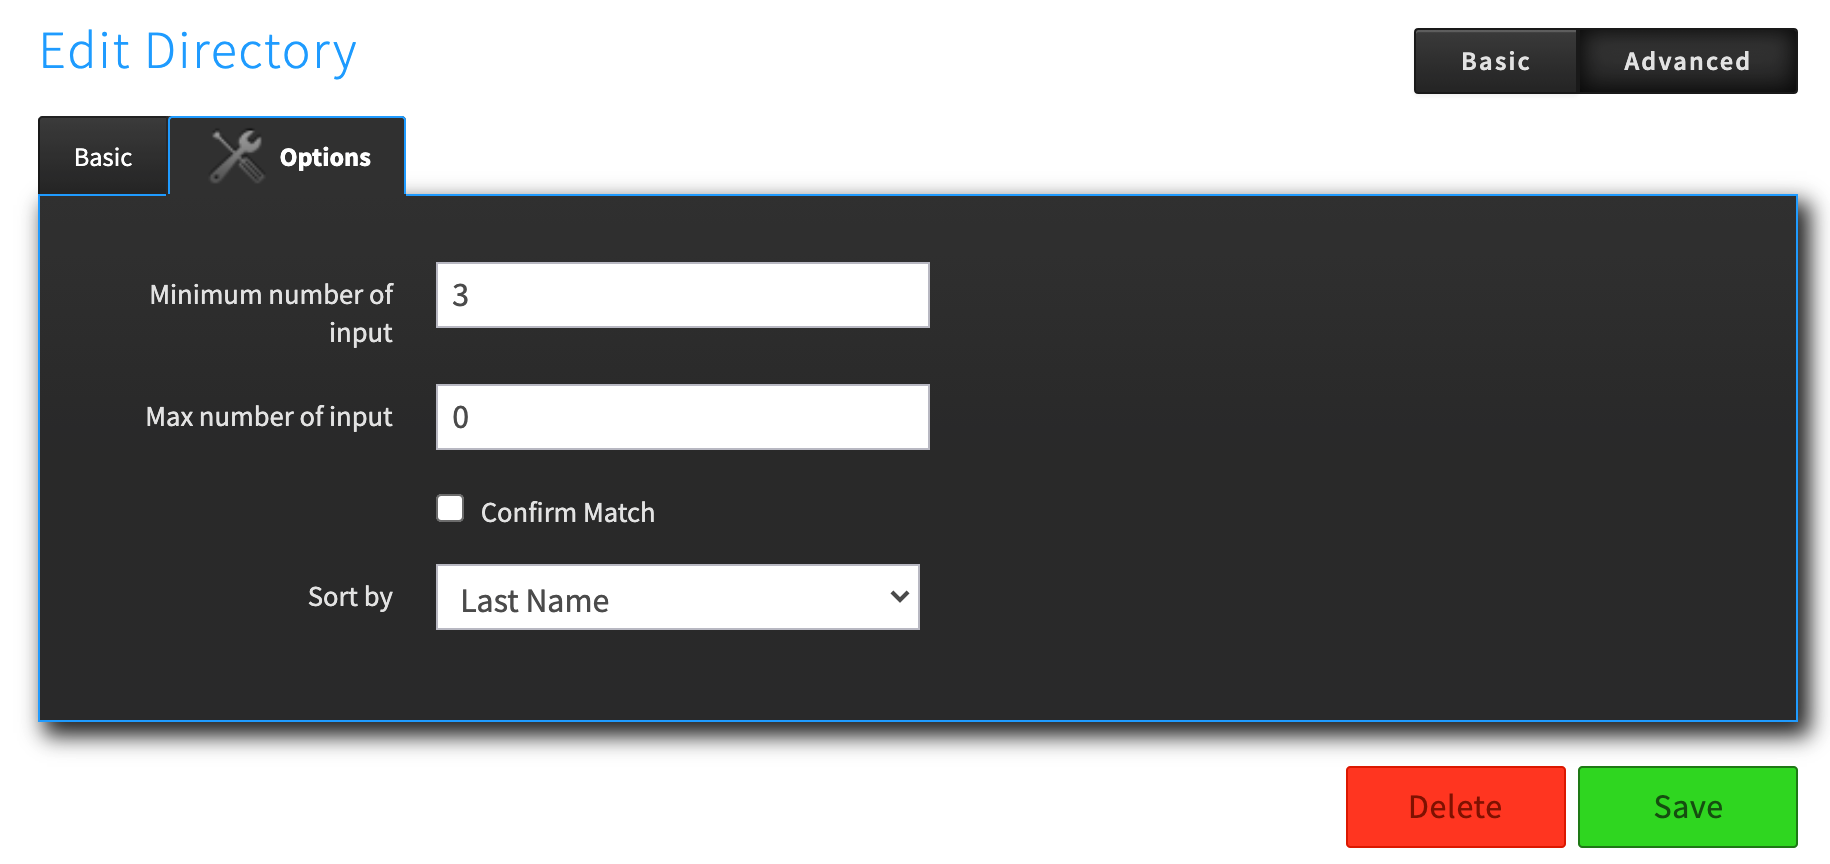
Directory Ask callers to enter the first 3 letters of the person they’re trying to reach.
Assign specific directory; rules for # input; Sort options
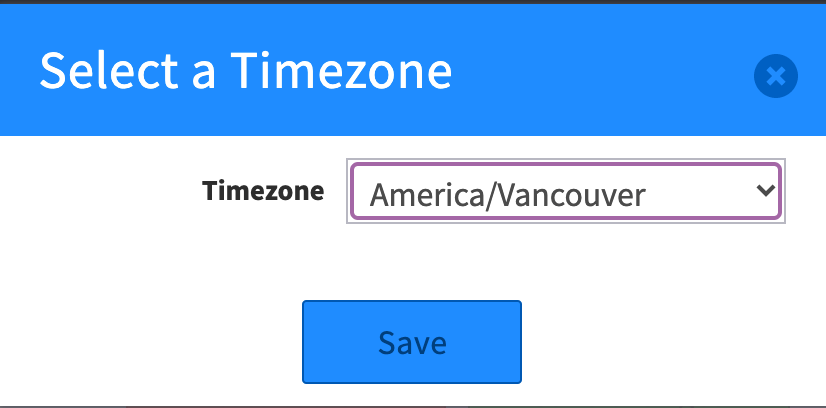
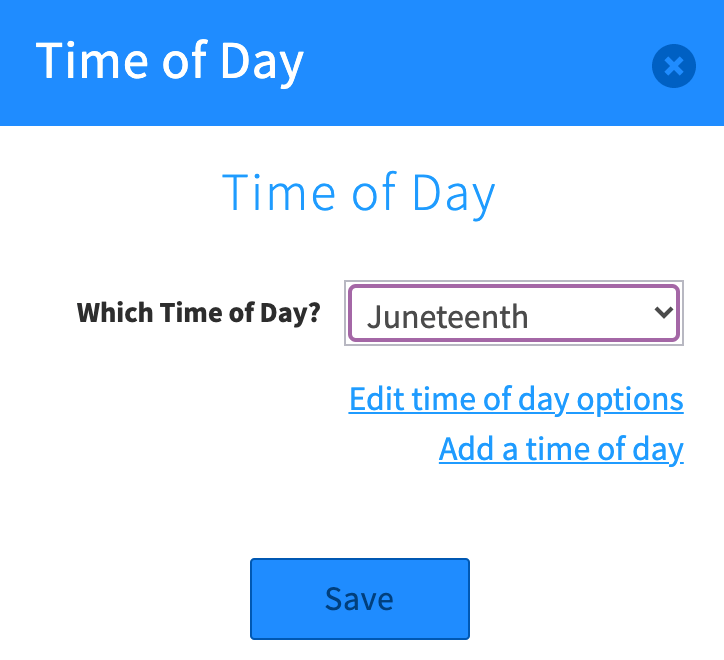
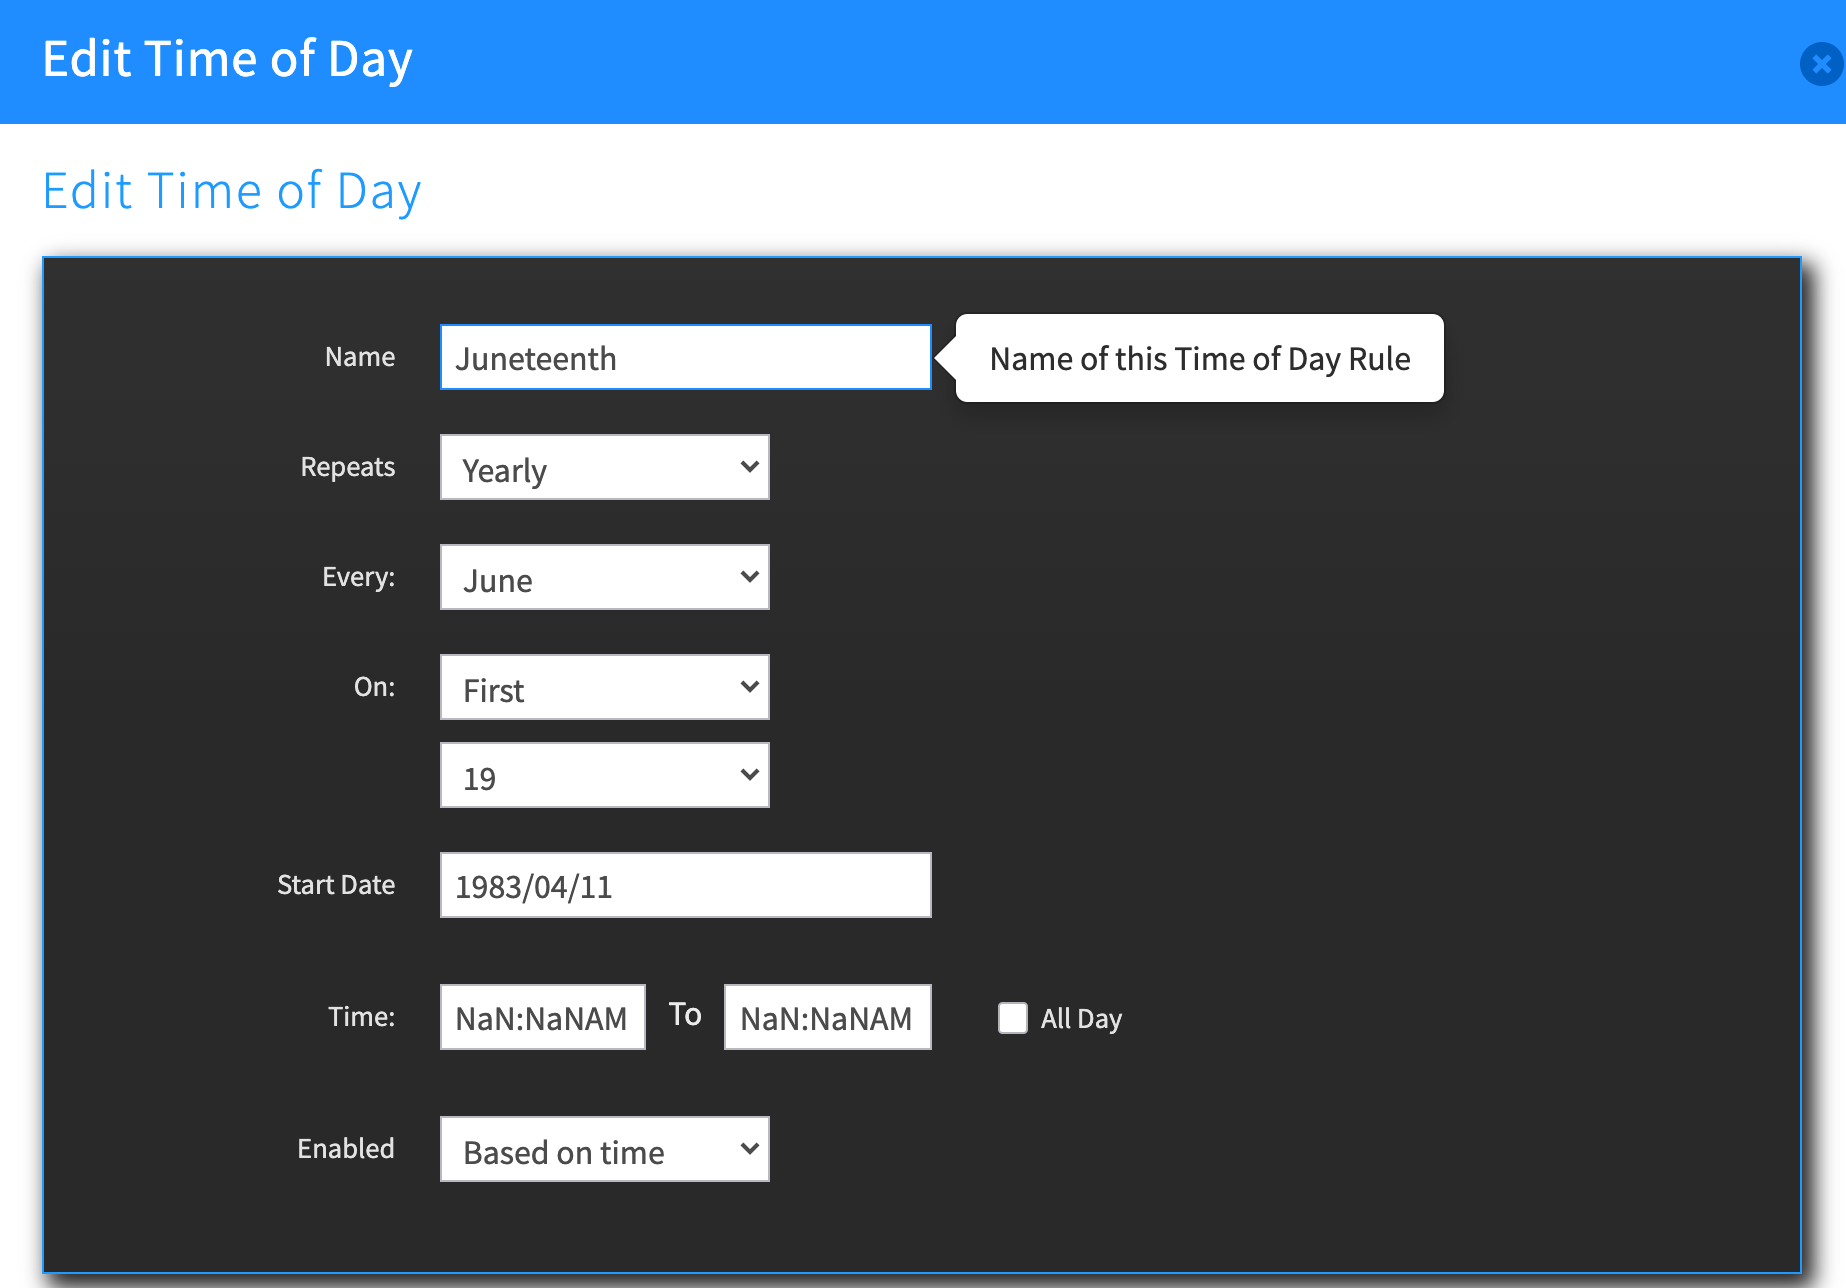
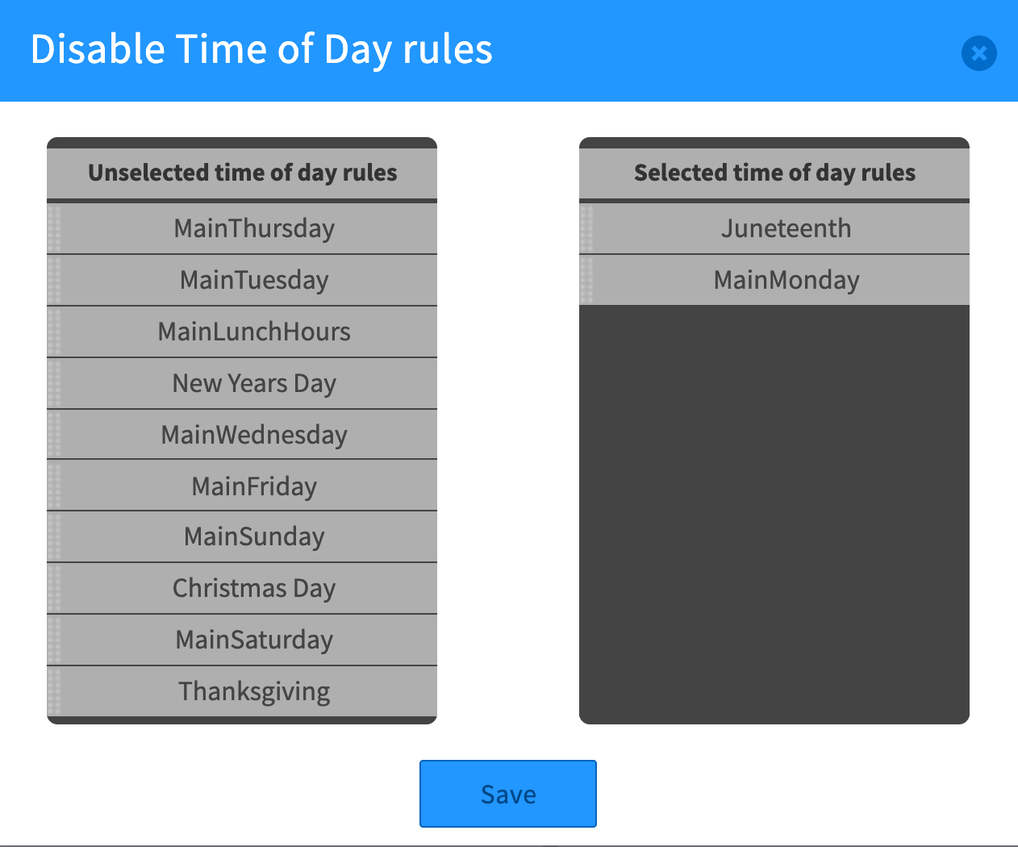
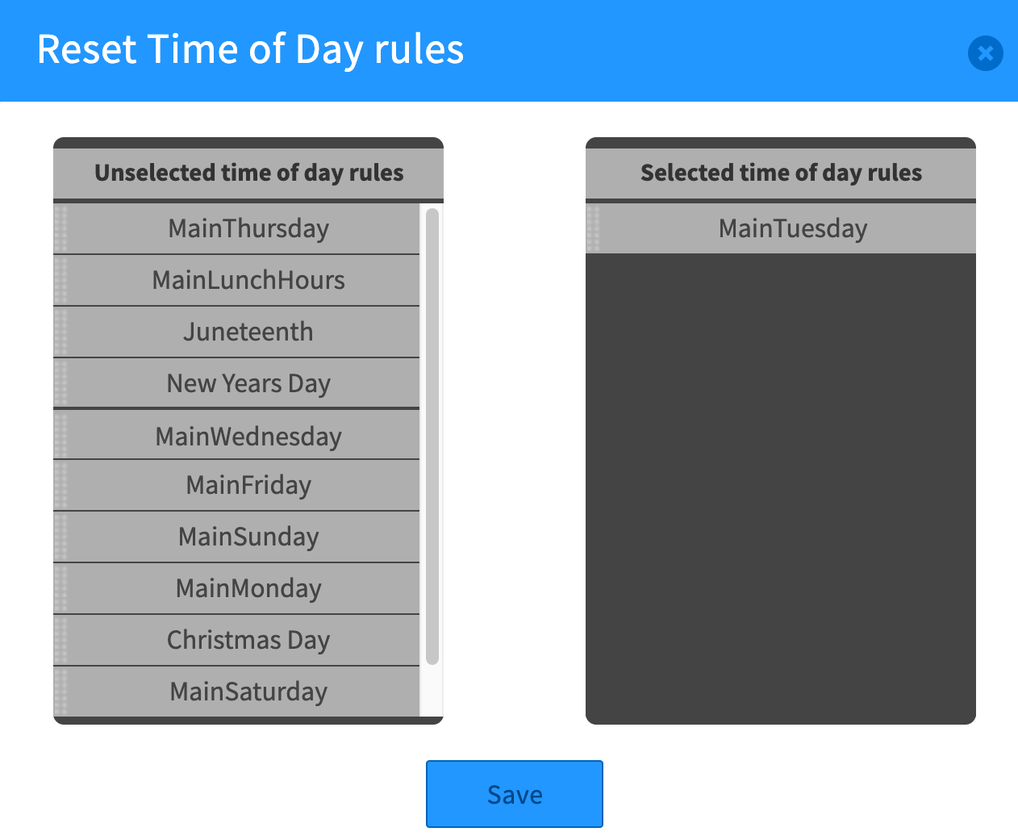
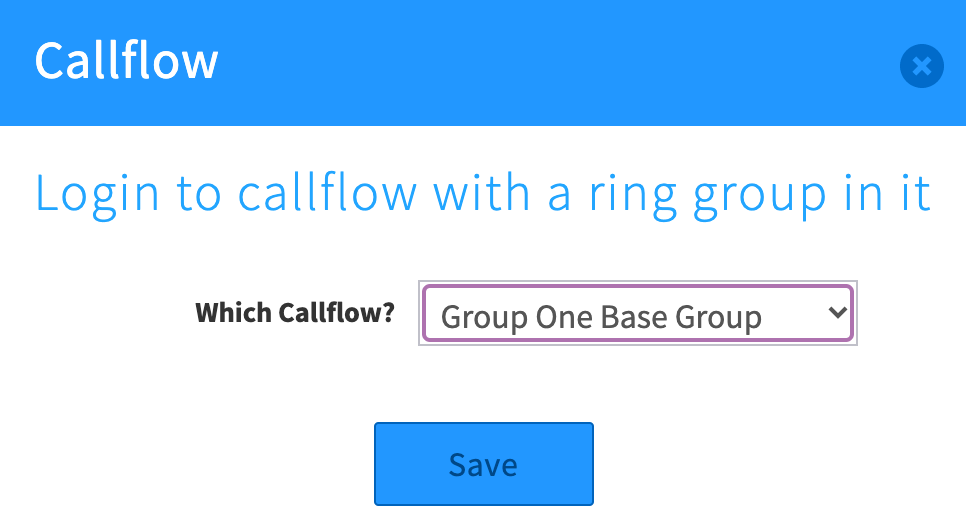
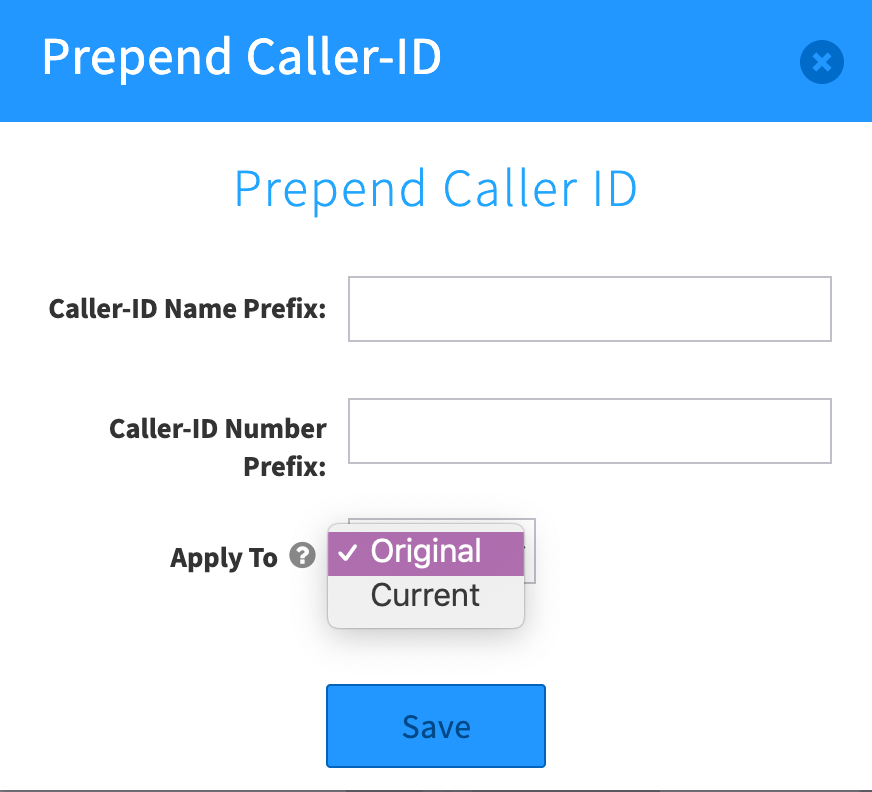
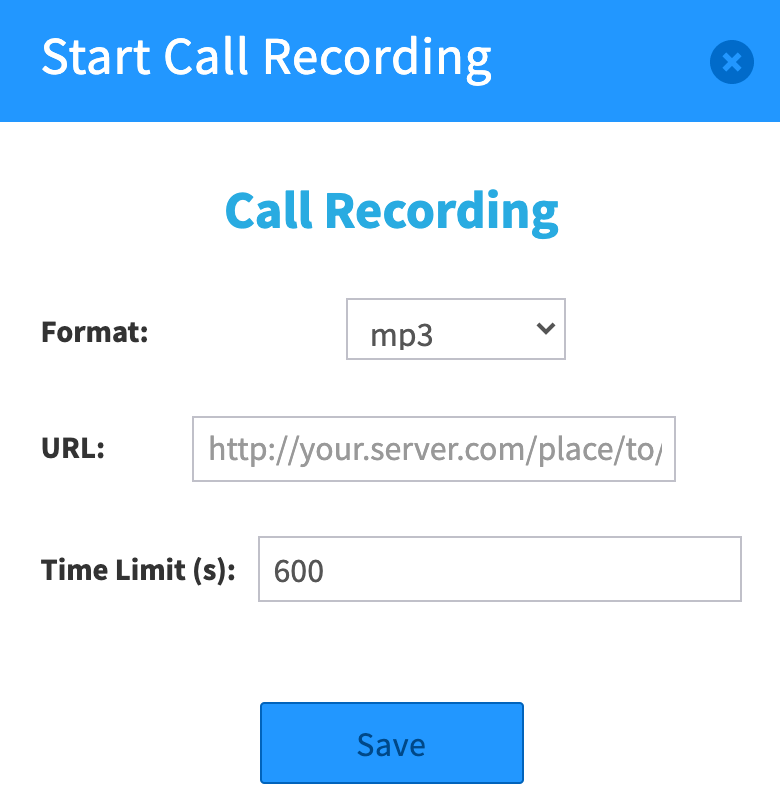
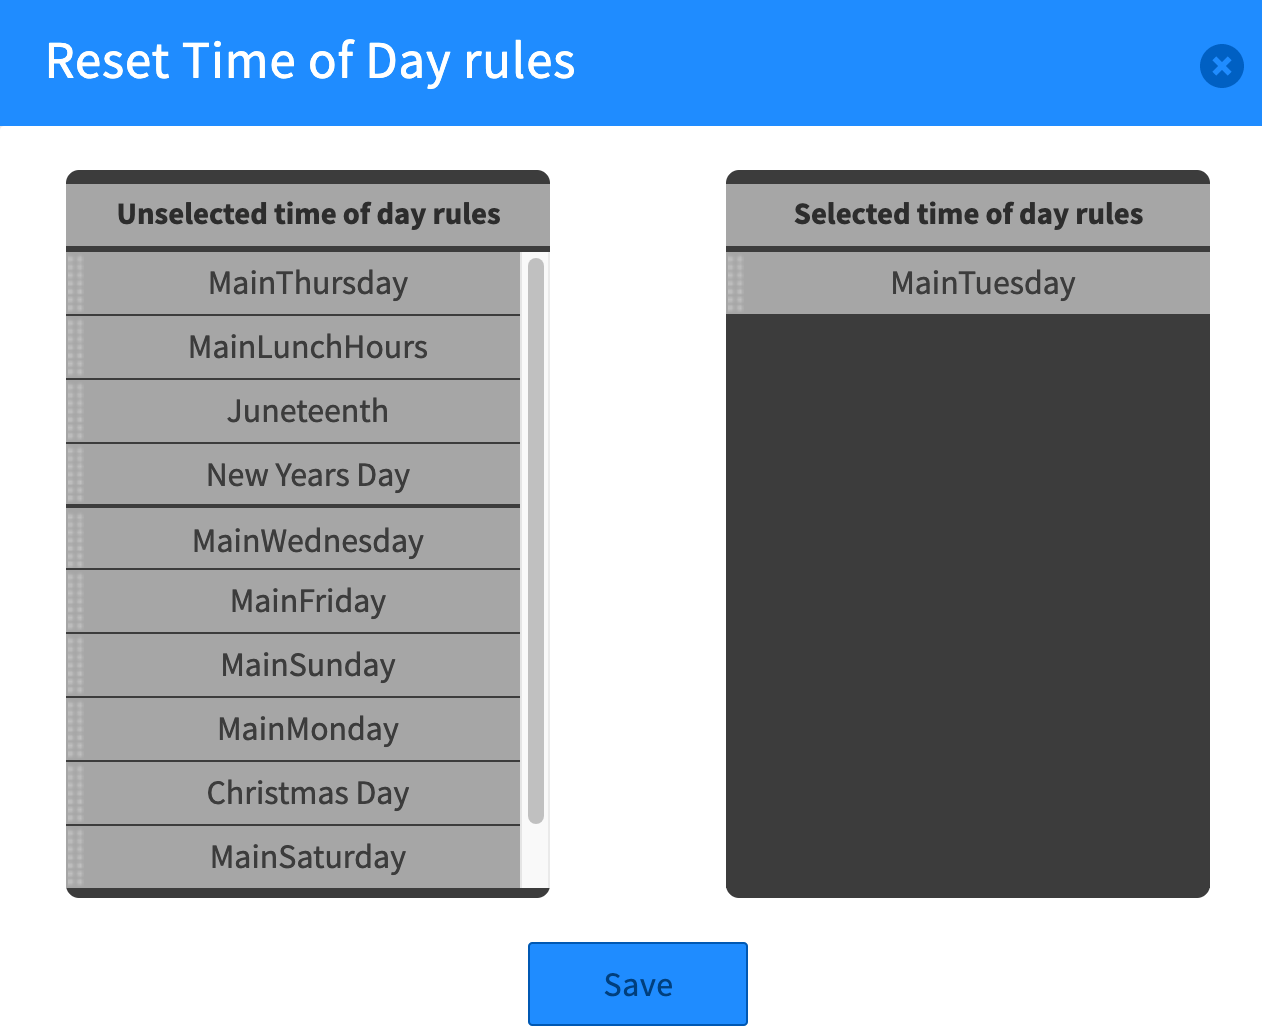
Webhook Trigger a webhook call at any level of the callflow to get “real time” info on the callflow behavior. Time of Day Actions Select a Timezone Enable Time of Day Rules Select a Time of Day “rule”, e.g. a specific holiday or holiday type. Disable Time of Day Rules Reset Time of Day Ring Group Toggle Allows caller to login and logout of ringroups dynamically Hot Desk Toggle Enable / Disable Hotdesking, and Toggle. DND Dynamic Caller ID Enables you to set your caller ID on your phone and it will read that. Prepend Caller ID Add some text in front of your caller ID Reset Prepend Resets all your prepended text before the Caller ID Call Recording Starts and stops Call Recording Frequently Asked Questions
What is the difference between these two applications?
They are the same. Advanced Callflows was introduced as a newer version of Callflows. The code has since been merged, and the name simplified. Mentions of Advanced Callflows are only due to legacy habits.Can one callflow call another callflow?
Yes! One of the action buttons in the Basic menu is “Callflow” which lets you define an existing callflow to connect to.Is there a limit to the number of steps I can add to a callflow?
No, however the more steps there are the more time will lapse as the steps progress. We recommend shorter Callflow configurations. This way each callflow can be reused as sub-flows for different instances.You will want to test the callflow once you’ve created it to make sure it isn’t too slow.
I tried to create a callflow using our main number, and it says the number is already in use. How can you make a callflow for your main phone line??
(not using the SmartPBX, but by using the Advanced Callflow app).Advanced Callflows provides added flexibility in setting where your calls go based on the incoming call number or extension. If your number is showing "Already in Use", try the following:
- Look to see if SmartPBX automatically created a callflow from your main number when it was installed.
- Look for the "Used_by" attribute next to the number for a clue to its assignments
Most people will create a new callflow with an extension to direct calls. If you do this,
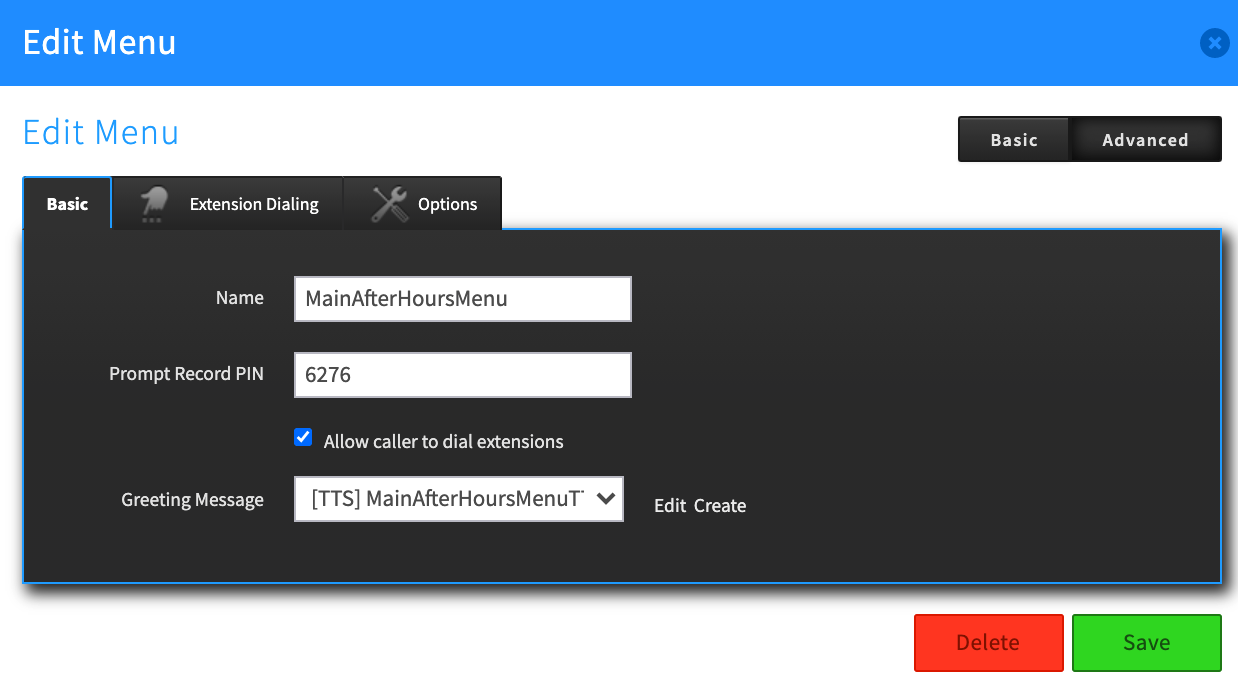
- Make sure the checkbox on the menu screen is checked for "Allow caller to dial extensions."
- When you create the callflow, click on the bar at the top of the callflow name, with the little edit button
-
Check the box that says "Make this callflow available to the Main Number"
- Return to SmartPBX and navigate tot he Main Number Incoming Call Routing option. You should see the new callflow option.
I created an IVR call flow in SmartPBX and now want to edit that using some of the more advanced Callflows features. Where can I access the SmartPBX callflow?
”Callflows” developed in SmartPBX are currently not accessible within callflows. If you want to create a more detailed callflow than SmartPBX offers, you will need to create it from scratch in the Callflows app and point your SmartPBX (holiday hours greetings for example) to the callflow you create.Is there any way to manually override a Main Number callflow if, for example we want to hold an impromptu all-hands meeting for a quick half hour during the day?
There are several suggestions for achieving this discussed in our community forum here.How can I set up a system where one option in my menu is to “repeat the menu options?”
Earlier versions of KAZOO allowed you to point to the same callflow as an option. This however caused unfriendly infinite loops and has been disabled. The current best option is to create another callflow that points back to the original callflow (call it a loopback callflow) then reference the loopback in the original.How can I create a callflow using extension 0?
The SmartPBX automatically creates the Main Callflow with extension 0; it is not configurable for other callflows.When I have a horizontal list of callflow options, what order does the callflow take?
The callflow will process the options from Left to Right. If for example you have a Time of Day process and list
Morning hours | Evening hours | Holidays
the flow will not take advance to Holidays if the other flow options apply. We recommend putting your Holiday option first. Note also in this example, these values can be set in SmartPBX, and the precedence for holidays is already set.What happens if a caller doesn’t select an option in the menu system?
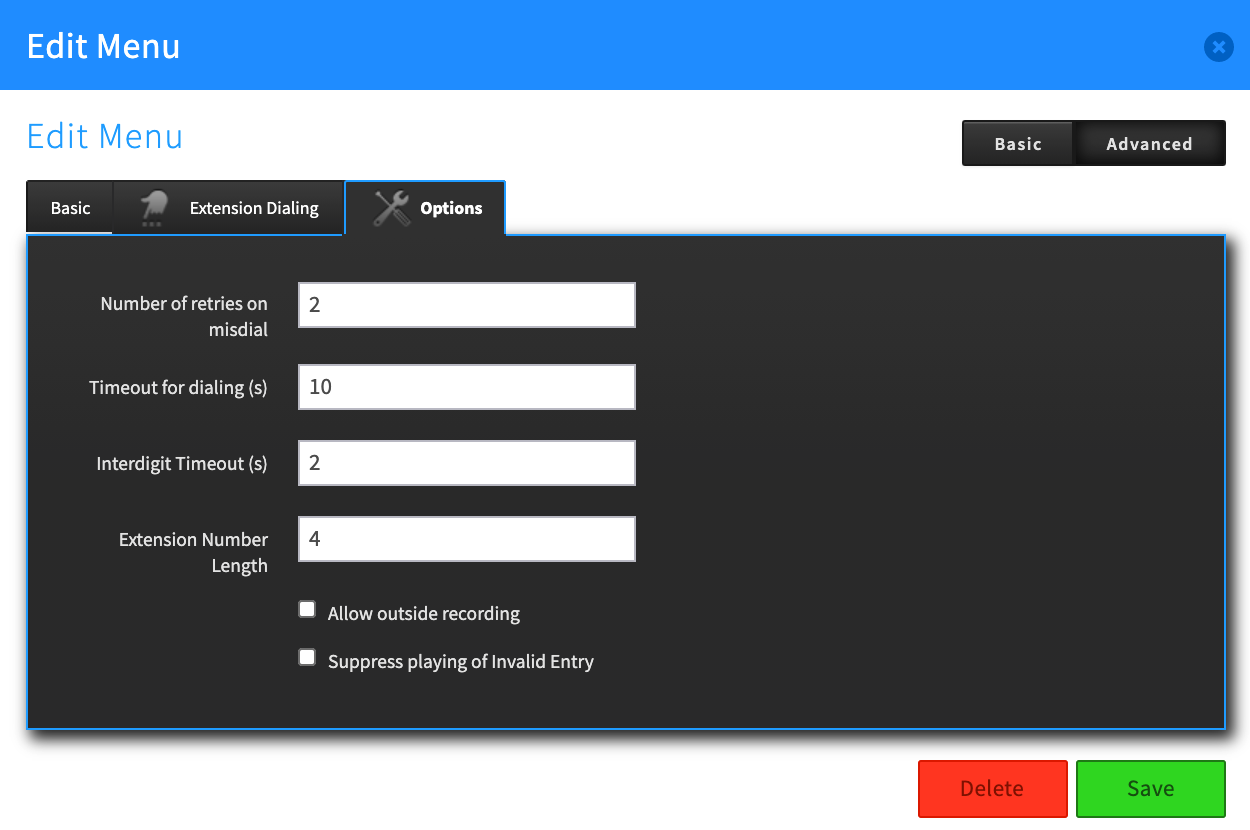
By default the menu system is set to allow 3 “misdials” (or no entry) and will replay the menu after 10 seconds. To change these settings, go to the menu action, and select Advanced Options. You can manage the threshold for the amount of retries and the length of time between tries there.What does “Require Key Press” mean in the Advanced User menu?
Requiring the key press is the mechanism that prevents the forwarded call from terminating in the forwarded number's voicemail box. It is the same trigger or setting as “Leave voicemail on forwarded numbers.” where by turning this off you enable an option for voicemail at a separate station. So, disabled “require key press” = leave voicemail on forwarded numbers”.When I set up my user profile in Callflows it does not associate a “Main Extension” to my user. How do I add one?
The association for “main extension” to a user is a new field in SmartPBX and is not captured in Callflows. This can cause an error when setting up comm.io that says “Cannot read properties “Numbers” of undefined.” If you get this error message while setting up comm.io, follow these steps:- Launch your SmartPBX application
- Click on Users tab in the left menu bar
- Find the name you want to use comm.io with. It will likely show "None" in the field.
- Add your extension and save your setting.
- Return to the comm.io setup and the error should be gone.
Related Articles
SmartPBX User Guide
Advanced Callflow configurations and setup API References
docs.2600hz.com
REST API Reference for Kazoo Crossbar API###
-
An account has multiple geographic locations and needs to create
-
Please join our community by commenting on existing posts AND by creating new ones within one of the categories listed. Below is an overview of how to add new posts, and also some tips and tricks on formatting...
-
Stage your text and open its window
While you can create your post directly in the WYSIWYG editor, some find it easier to stage your submission in a local word processor or text editor first. Once it's ready open that window and move it to the side. -
Open the Community pages and Log in to your Community Account
Make sure you are logged in to the community. Your ability to engage in forums is based on your credentials; partners can join and create additional forum posts reserved for them. -
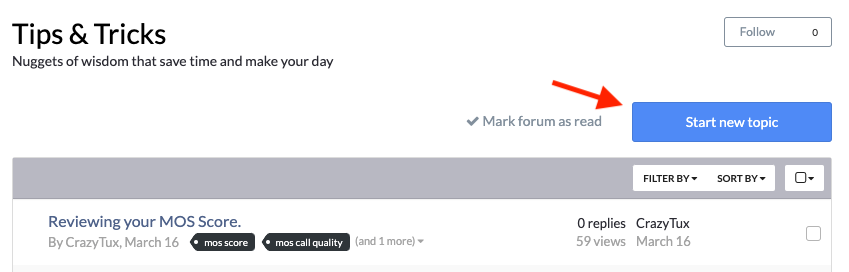
Find your Community Forum page, HERE.
Choose the Community Forum that seems to make the most sense for your topic. Look for the Post New Topic button. If you do not see it, your credentials need to be updated; you can try a different forum or ask support or your sales representative to update your account. -
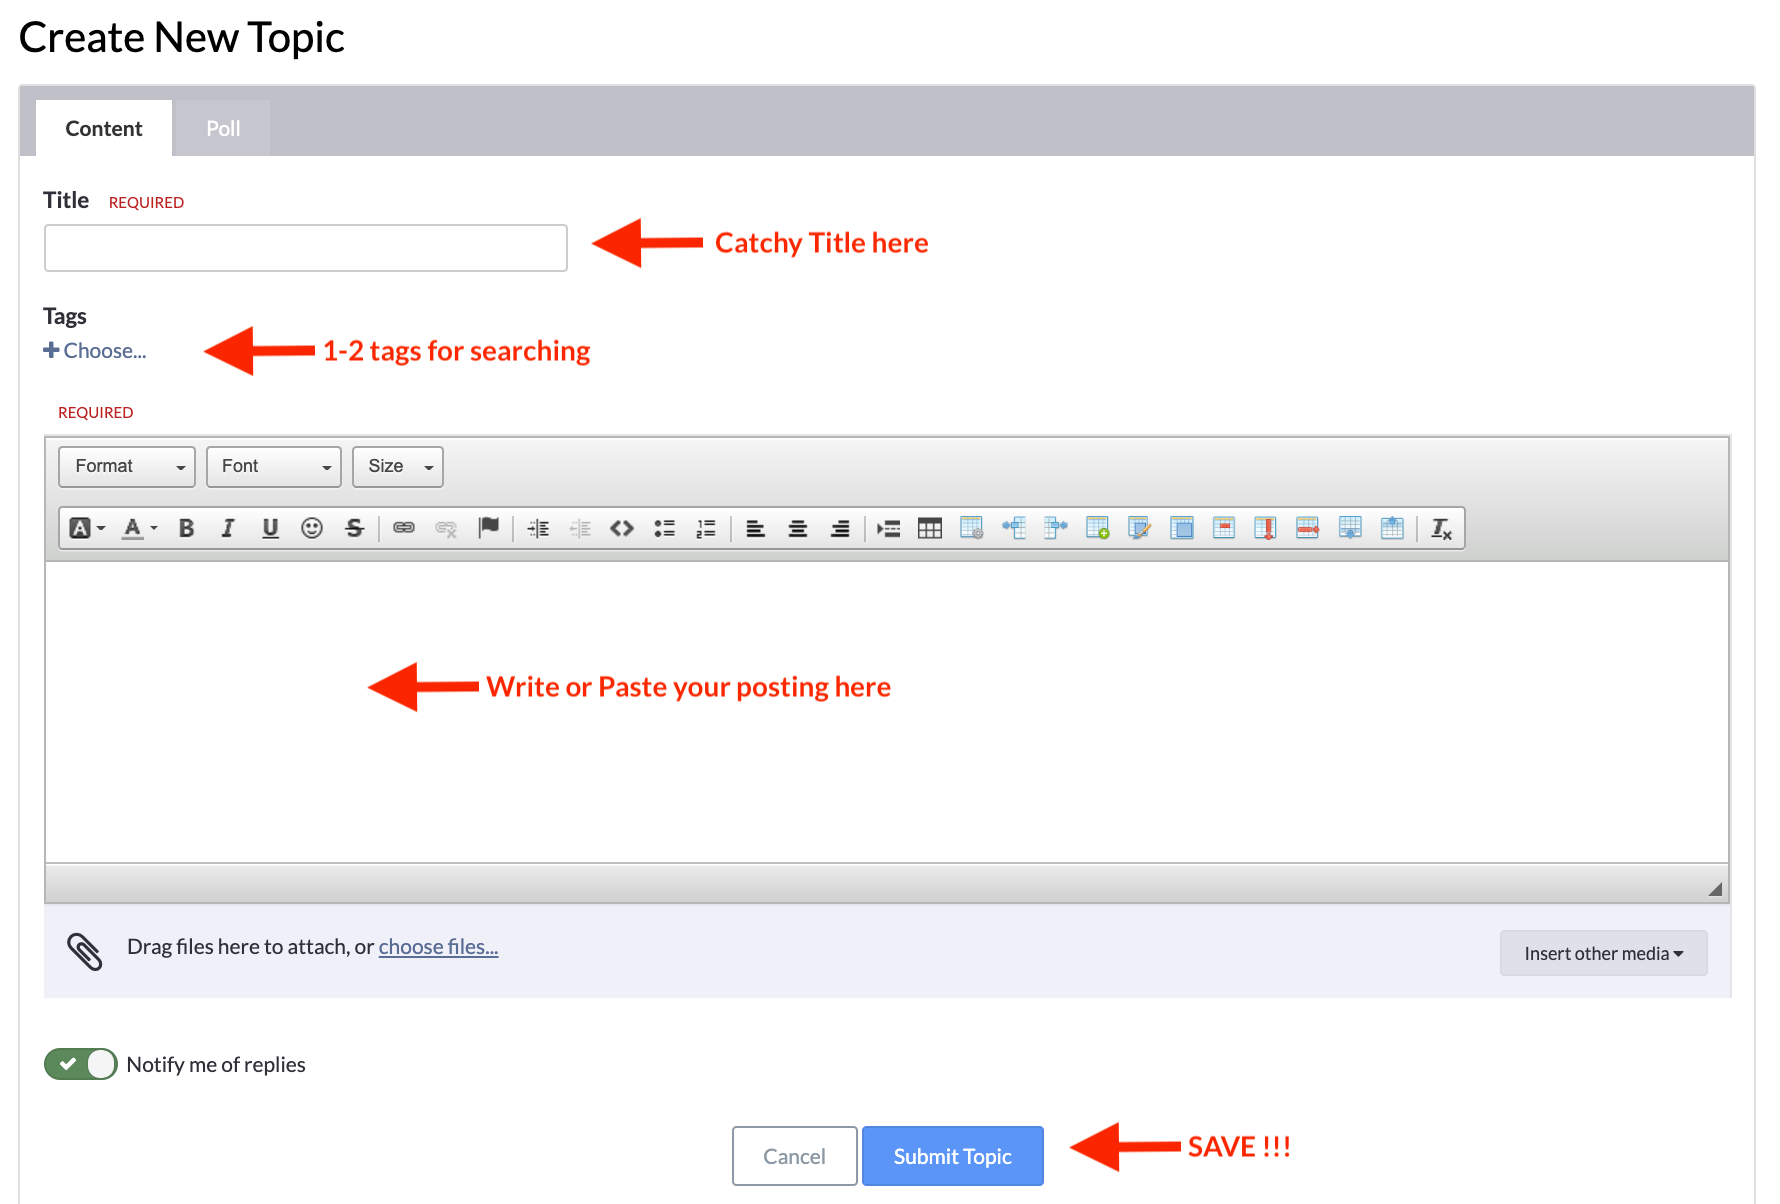
Add information in the fields shown by the arrows below. Tags are optional, but really useful for searches.
-
Write your information in directly using the WYSIWYG, or copy/paste your post.
-
Review your entry! Here are some things you may want to update/edit once the posting is saved:
-
Font size
-
The typical font size used in the forums is 16 for easy reading. You can either set the font size before you paste and/or type or select all the text and change it once you're ready to post.
-
-
Image Management:
-
If the images do not carry over, copy/paste them manually or upload by selecting choose files next to the paperclip at the bottom.
-
if the images look too big (or too small) double-click on them while in edit mode, and reset the size.
5-600 works well for main screens and 350 for popups. If you resize make sure “keep original aspect ratio” is checked. -
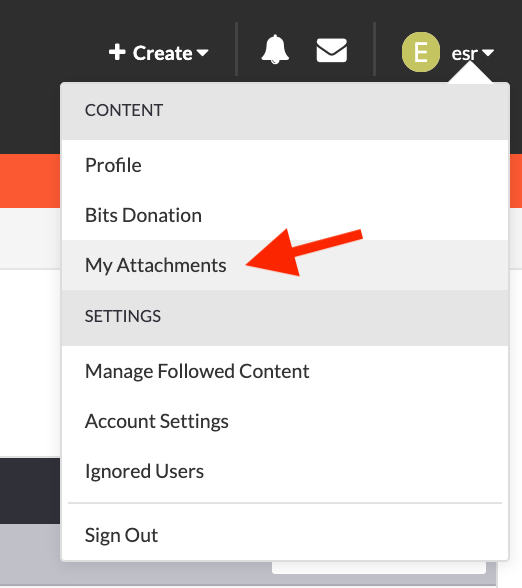
If you wish to remove an image, note that deleting may only move it to the bottom of the entry and as a very large image! To solve this, you can:
-
Simply resize the unwanted image (see above) at the bottom to a small 5 x 5 pixels.
-
Permanently delete the image from your profile menu -- select "My Attachments" and delete that image there. You will see a broken image icon in your post, you can then delete that permanently.
-
-
-
Links
-
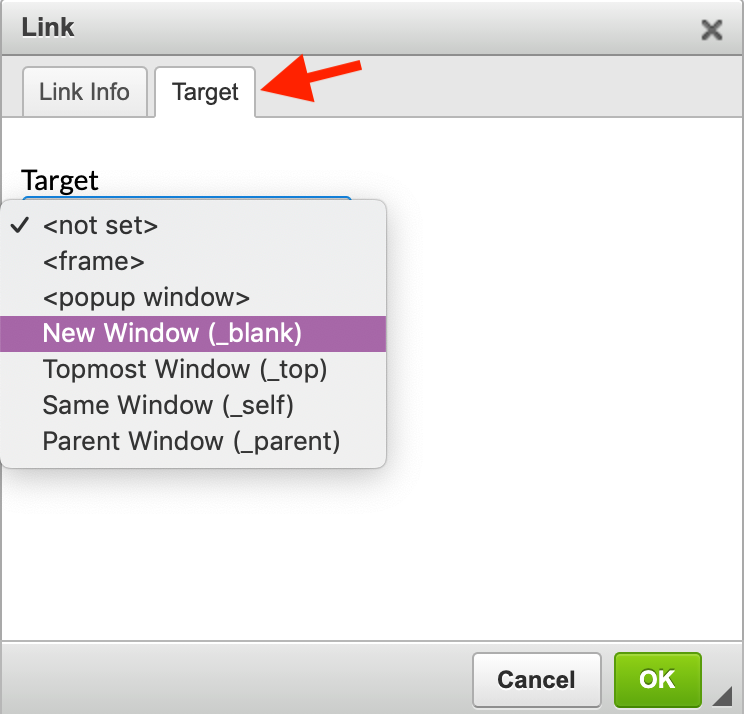
If you include links within your text, it's a best practice to set your link so it opens in a new window. To do this, highlight the link text, click on it, and select the tab that says Target. Then select "New Window" and select OK to save.
-
SAVE !!
If you want to edit your post now or later, choose the Edit command at the bottom of the posting, then select "Submit Topic," a fancy word for saving. -
-
ICYMI elsewhere:
Early today we released a new Device Unlocking feature in both the Smart PBX and Provisioner apps. This is an important feature because it enhances security during the provisioning process.
When using this feature, devices will only be unlocked and available to be newly provisioned for 24 hours. After that window expires, you would need to unlock the device again. Once a phone has been provisioned once, it will always be able to re-provision from that same IP.
For more details on this feature, including when you will need to use it during the provisioning process, go here.
-
NOTE: This feature was released on March 12, 2021
Overview: About Phone "Locking"
Attacks on VoIP phone networks have steadily increased in recent years. Hacking efforts such as scanning, brute-force hacking, or attempts to steal SIP credentials or make fraudulent calls can be disruptive at a minimum and/or -- worse -- breach your company's private data.To ensure a phone with a 2600Hz provided phone number is initially secure when first provisioned and remains secure while it is part of your account, our Provisioner application monitors IP activity to/from the phone and sets protection mechanisms to keep them safe. If Provisioner encounters one of triggers outlined below, it will automatically "lock" the phone -- meaning it will block the phone from provisioning and it will no longer be connected.
Events that can trigger a phone to lock
Provisioner will automatically lock a phone if it encounters any of the behavior outlined below:When first provisioning phones
-
When you successfully provision a phone for the first time (from a factory reset state) and you move it to a different network where its IP address will change.
- If you have created a device in KAZOO (either in SmartPBX or Callflows) more than 1 week before you provision it, the phone will be locked out. This means if you have a phone you want to send to your customer and create it as a device in KAZOO before you ship it, you will need to follow the unlock procedures when they receive it.
Once your phone is provisioned, if
-
You move a phone from your office desk to your home environment, or anywhere that the WAN IP address is not the same as your existing location.
-
Within your account, a phone has been blocked by 2600Hz security system due to suspicious activity.
-
Your phone is not a new phone but was registered in your account.
- Your internet service uses “dynamic” IP addresses; the WAN IP address may change time to time. If the phone is factory-reset right after the WAN IP is changed, the new security mechanism may lock the phone.
Updated Phone Unlocking process
Historically when Provisioner locked a phone, an account administrator would need to reach out to our support team, assure us the flagged activity is not nefarious and request it be unlocked. This process can take time to resolve.
The new unlocking feature outlined below is intended to streamline the process and give account managers and users the option to unlock a phone temporarily. This can be achieved per phone either in Provisioner or as a user in SmartPBX.
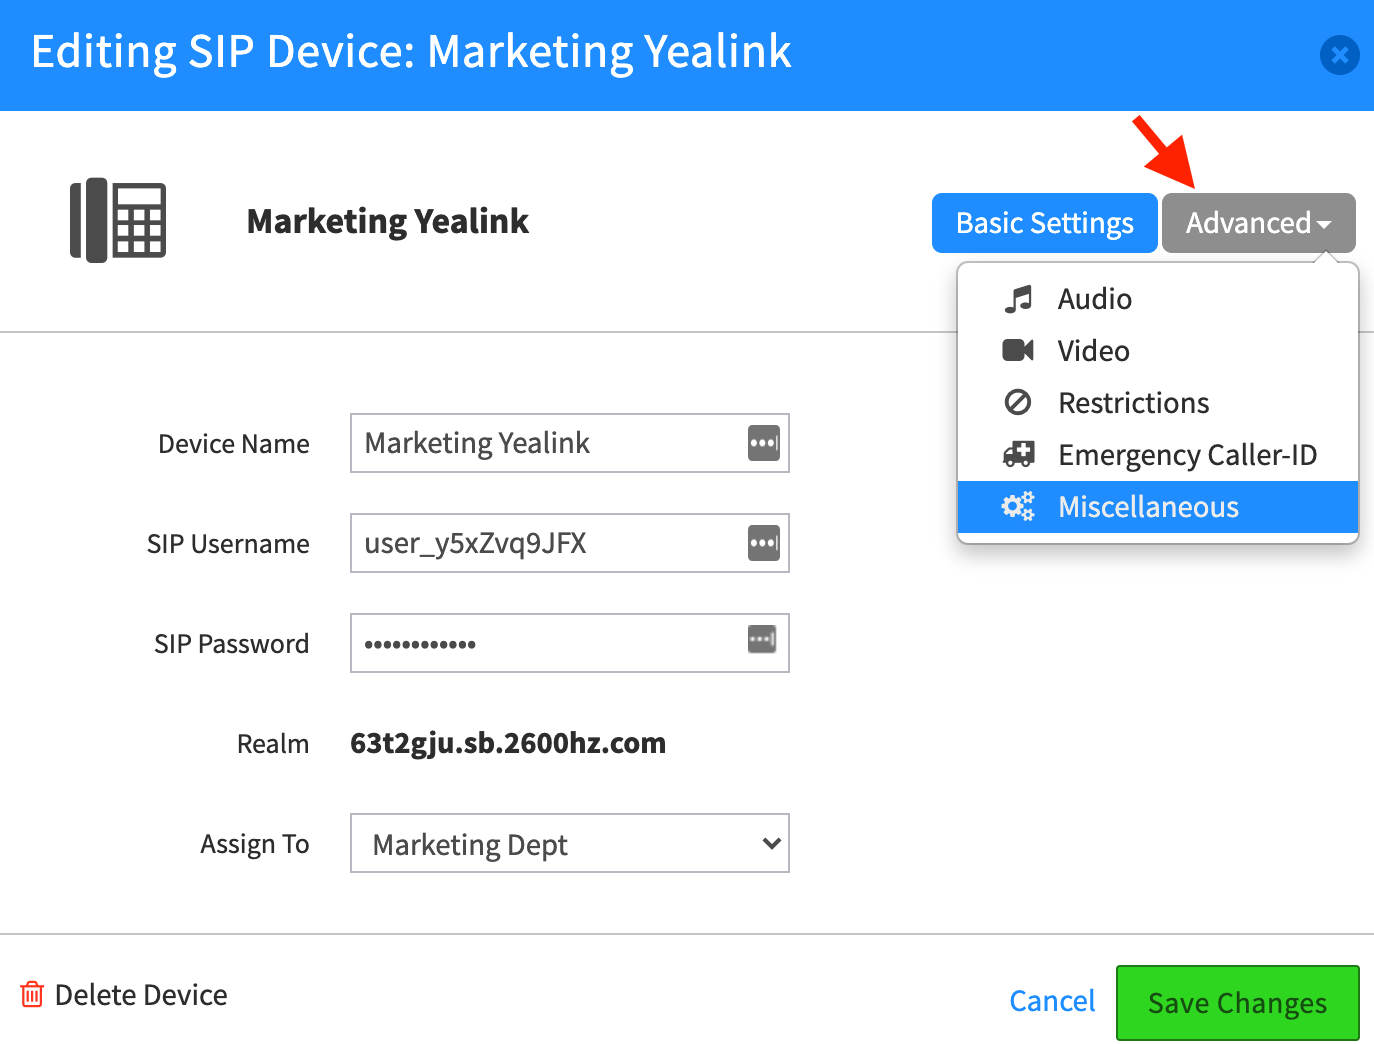
In SmartPBX
- Go to the Devices menu
- Find your phone and select the wrench tool to the right
-
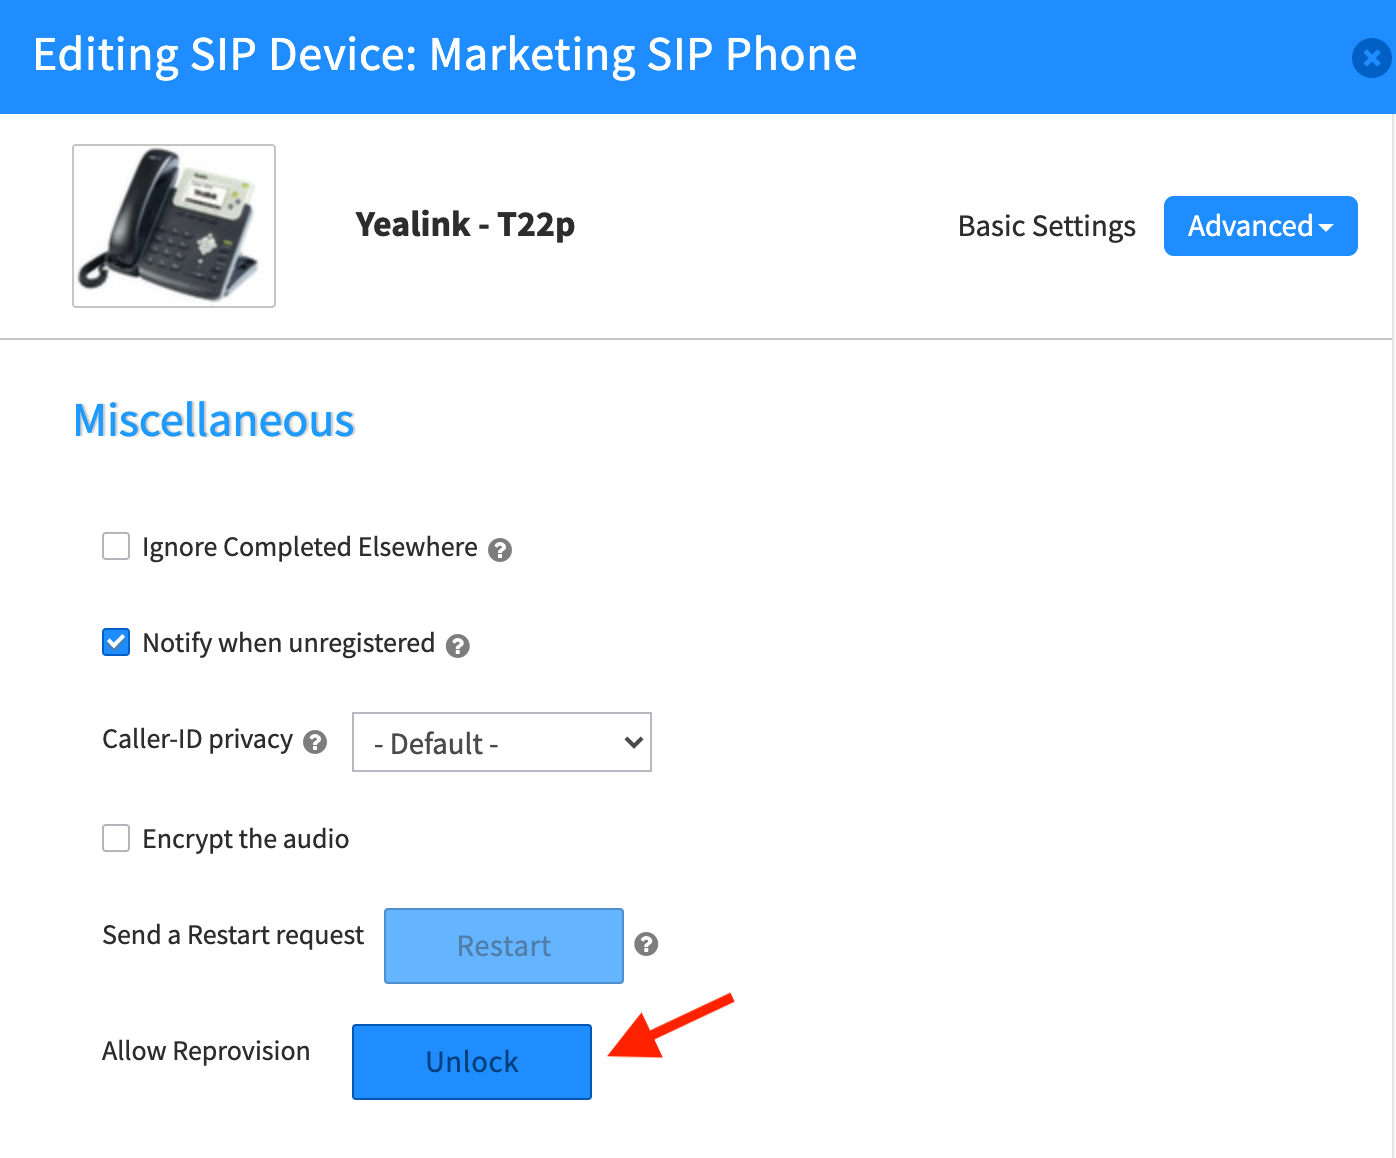
Select the Advanced Menu
-
Select Miscellaneous, and click on the "Allow Reprovision" button that says Unlock.
You will see a flag pop up stating the device will be unlocked for 24hrs.
In Provisioner
To unlock a single device
- Under devices, scroll to find your phone
- Select the Gear setting
-
Select Unlock
Once you unlock a phone
- This will enable the device with that specific MAC address to be provisioned to any IP Address for 1 week.
- If a phone is not re-provisioned in that time, the lock will turn back on.
- If suspicious activity continues, it will re-lock and you will need to contact support to troubleshoot the source of the activity.
NOTES:
- If a phone has historically been tied to the same IP address, and is just being re-provisioned (because the phone needed a factory reset for example), Provisioner will not re-lock the phone.
- If the IP address has changed and you want to reset and re-provision the phone, you will need to “unlock” the device.
- If you have overwritten the phone’s config. file with a custom configuration (this is very rare) this process will not work.
- You only need to unlock the phone after factory reset at a new location.
- The lock does not affect phones with scheduled polling for updated config files. This typically occurs every 24hrs, and/or during a phone reboot.
Frequently Asked Questions
What is the difference between banning an IP and locking a phone?
An IP Ban = exceeding provisioning attempts within a given time frame. Time is around 1 hour and can be self-removed with the UI or removed by anyone in 2600hz using the ban API. The Unlock your IP button will only unlock the local IP address as shown in the message. NOTE: For security reasons you cannot unlock a different IP address even if you are masquerading an account.
A Phone Lock = device status in Provisioner after the config file has been retrieved one time in which it will only accept new provisioning attempts from the same IP. Can be reset with the "unlock" button.
Is there a way to unlock all devices I have set up for a new office at once?
If you are setting up or moving an entire office or have shipped devices and want to enter their MAC Addresses in advance, you have 1 week to deliver the phones. If your shipment takes longer than a week the devices will likely lock before you can add them to the account with the correct data and you will need to unlock each phone separately.
As unwanted attacks have proliferated recently our priority was to enable unlocking for specific device instances. An unlock all feature is in its final development phase and will be available shortly as a follow-up release. It is designed to include the following options:
(note this is NOT available yet)
-
Unlock all devices
The unlock all button will be the same as click unlock on each device, which in turn leaves the device unlocked indefinitely until someone, from any IP, grabs the non obscured configuration file for the first time.
-
Provisioning Window
The provisioning window unlocks only a defined IP for a set period of time to re-provision any device.
There will be a field to select the number of hours to unlock these devices temporarily as you wait to provision it with your final data. The minimum is 1hr., the maximum is 40hrs.
-
When you successfully provision a phone for the first time (from a factory reset state) and you move it to a different network where its IP address will change.
-
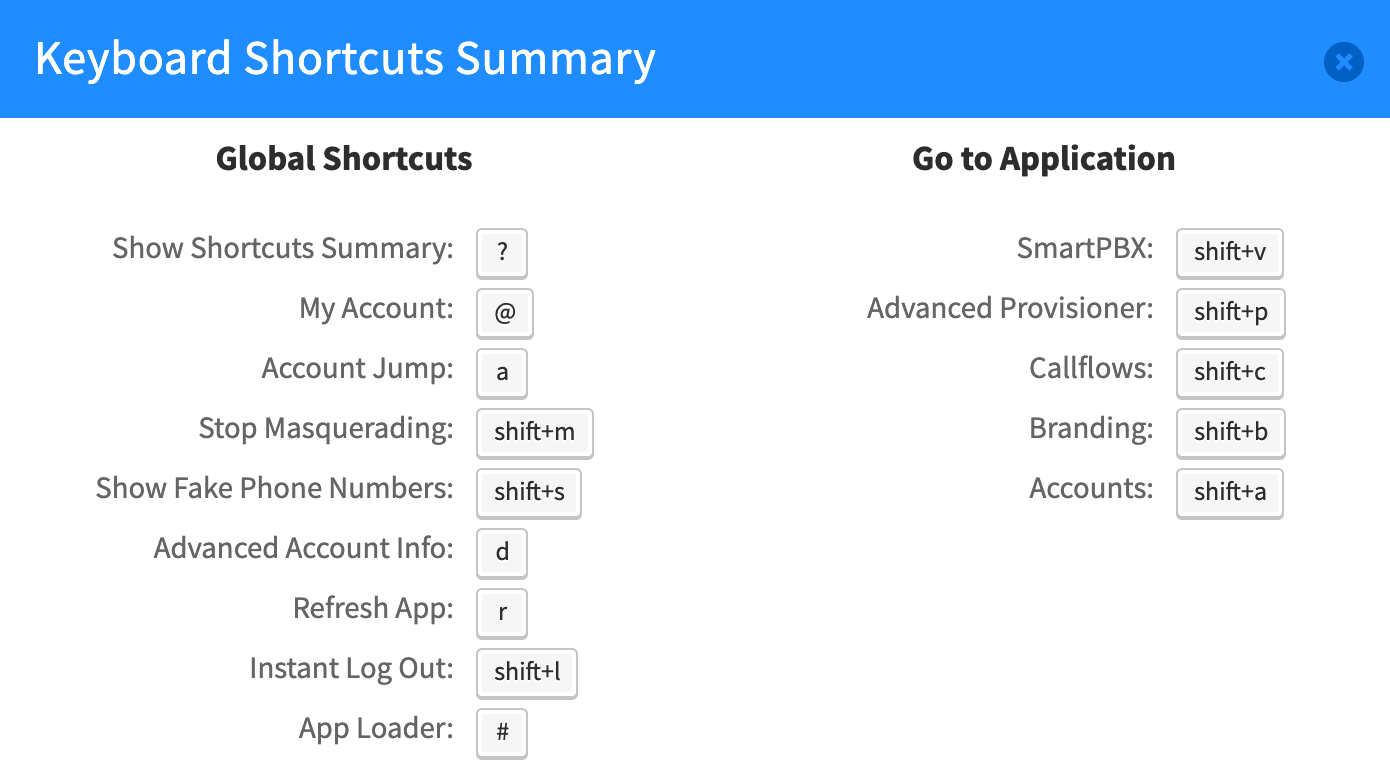
Thank you Darren for sharing... Want access to this cool pop-up that shows you shortcuts in your Monster apps?
Just press ? while in your screen and Voila! you will be graced with:I especially love the one where you can Show Fake Phone Numbers <Shift-S>
Great for sharing screen shots with Support and/or among your customers! -
Hi Jack:
If you are a manager watching incoming calls real time, then you should see the calls in queue display... you can also answer them and/or promote the call to a higher priority, join the call, and/or eavesdrop the call. After the fact, the activity log does capture the missed calls. One way to find them is to use the "All Call Activity" filter, and look for the calls entering the queue, which will include the phone number. You can then track that call to see if it was answered or rejected ("missed"). Agreed, a nice feature would be to add the phone number field on all the events to make it easier to track. You can submit this to our feature request board here.
Another way to ensure the call is captured is to provide a welcoming call queue to mitigate missed calls with a hold loop showing wait times and calls in the queue, or if a call is missed the call is either escalated or sent to a voicemail, etc.
Hope this helps. Maybe some other community members have some ideas as well?
-
Hi Jack:
Thanks for your questions!
Here's some short answers ... to get more details on the CCPro app, please check our CCPro User Guide Here.1. Manager monitoring queue. Yes, as manager to a queue you can view the queue's activity logs and follow the agent's steps.
You can also download this as a .csv file. Currently the logs are available for saving each hour.2. Managers can view missed calls in the Activity log also, by filtering for this value.
NOTE: There different access levels for Agents, Managers, and CCPro Admins. To see these check the grid at the bottom of the CCPro User Guide.
emily
-
User Story
-
A user wants to add an extension to its personal settings.
Overview
-
Users can be assigned multiple extensions. This can be helpful to track the source of calls, for example if a user is part of a sales channel as well as an internal channel. These settings are best defined and managed in SmartPBX.
Add Multiple Extensions in SmartPBX
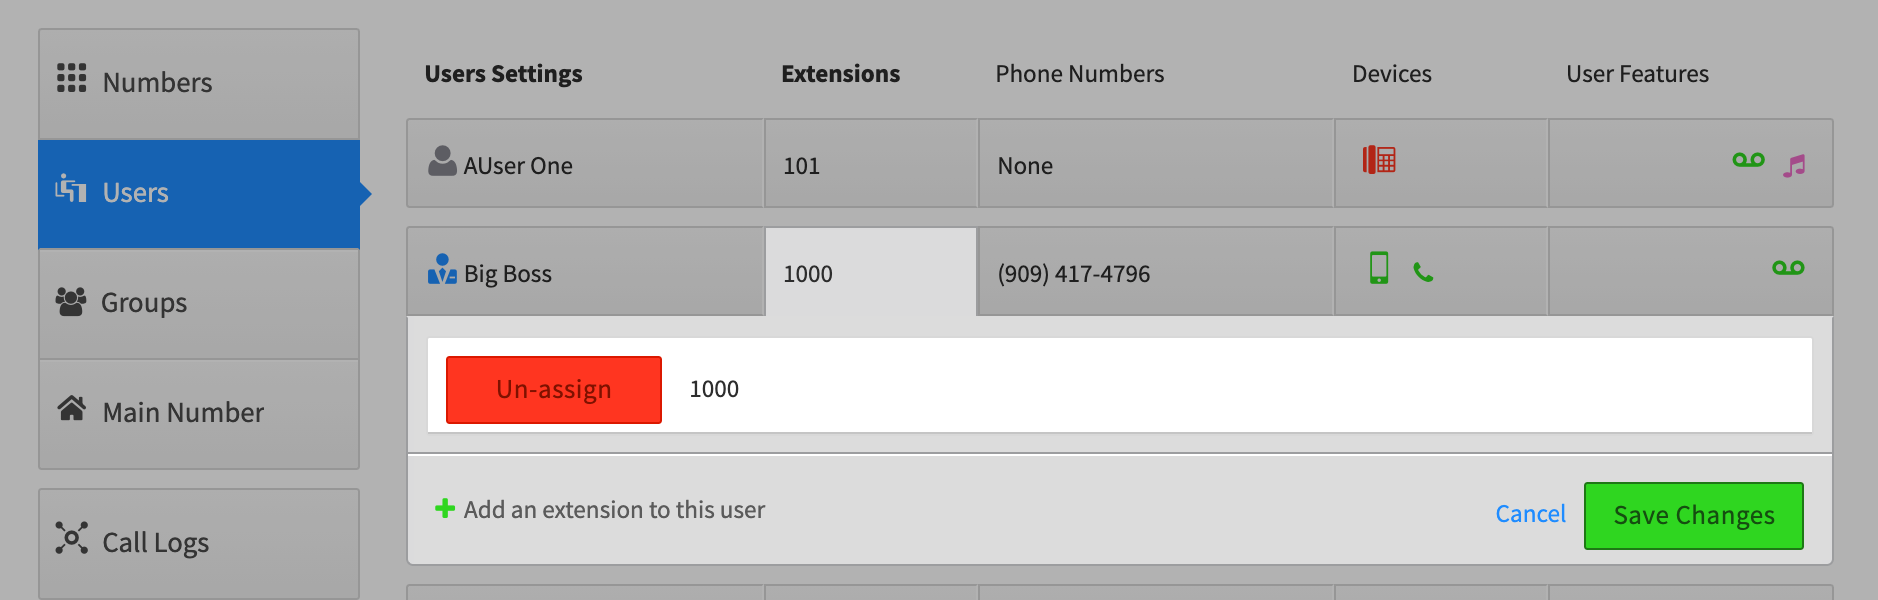
To add an extension to a User Name,
- Select Users from the side menu in the SmartPBX dashboard.
- Click in the Extension field area next to the User name.
-
Select Add an extension and enter the new number.
-
Select Save Changes. You will see a new icon display in the extension field indicating more than one extension has been assigned.
Frequently Asked Questions
Is there a maximum amount of extensions I can add to a specific user?
Technically, no – however it may be a bit of a tracking and management challenge to have more than a few.What are some use cases for multiple extensions?
At times a user may want to dedicate an extension to a specific type of incoming call, such as support, and/or have the flexibility to forward only one extension to a different device, such as a home or personal device.
-
-
User Story
- I want to assign hold music to my account.
- I want to assign a hold “announcement” to my account
- As a user I want to set a unique hold music to my phone number
Overview
You can identify what your caller hears when they call to your main number, are on hold waiting for your extension. “Hold Music” is a term that also includes any hold “announcement” created by you and saved as an MP3 or MP4 file that can be uploaded. It is also referenced in some applications as a “Media File.”
Hold music can be assigned at several levels in an account:- At the account level, to the main number (set on home page in SmartPBX)
- At the user level, when a call goes to a specific extension
- In Call Center and Call Center Pro, while a call is on hold
Notes:
- Files can be uploaded from a local device or from the internet.
- You must be sure you have a license to any copyrighted material.
- Recognized files include wav and mp3.
-
The file will auto-repeat as long as the person is on hold.
S
etting Hold Music in SmartPBX
SmartPBX provides access to settings for Hold Music that plays- When the Main Number is called
- When a User Number or extension is called
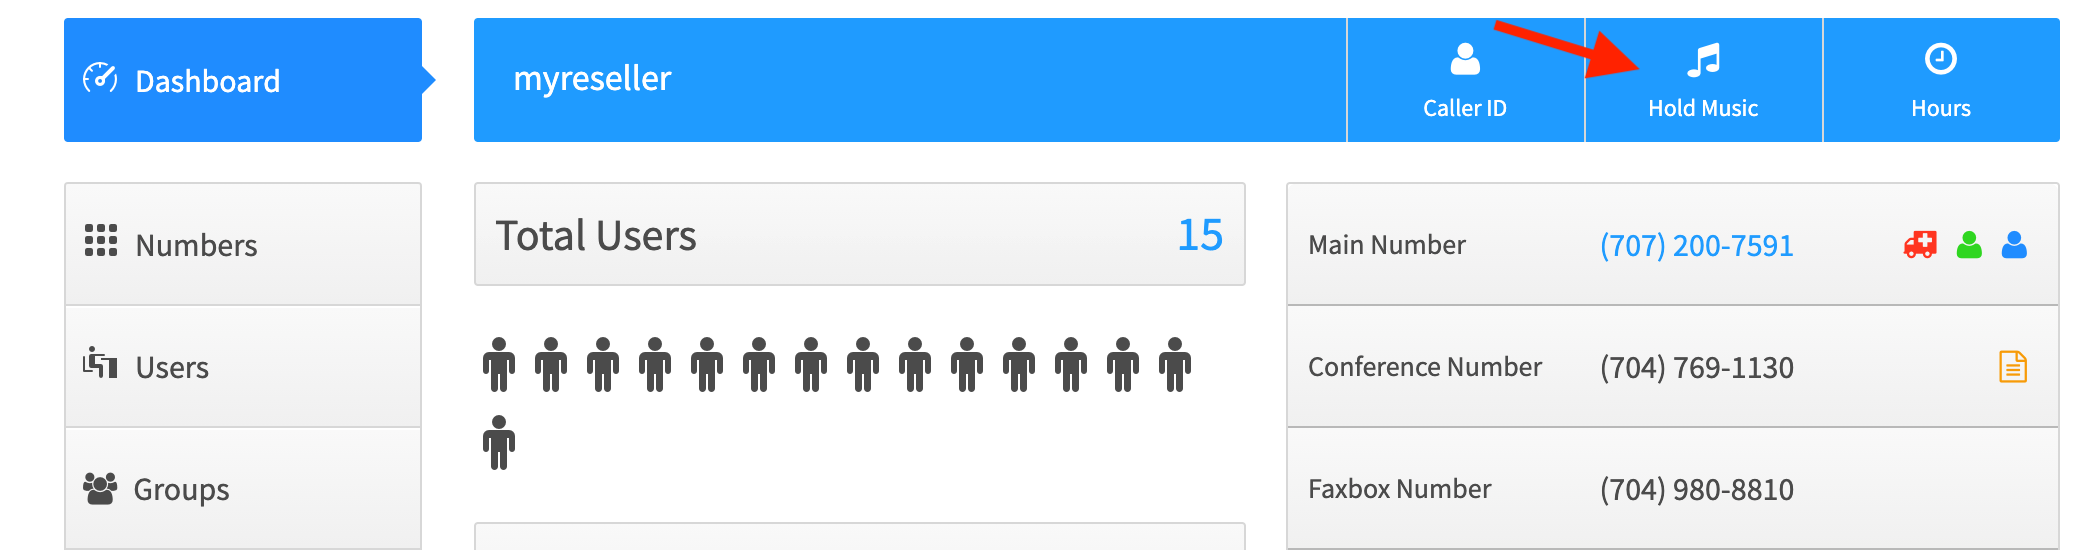
Hold Music Setting for Account Main Number
To set the Main Number Hold Music, select the Hold Music icon at the top of your SmartPBX Dashboard.You will be given the choice of selecting any existing media files on the account or to upload your own saved file.
Select SAVE CHANGES and your hold music will be used for all calls on your account unless overridden by user or qubicle settings.
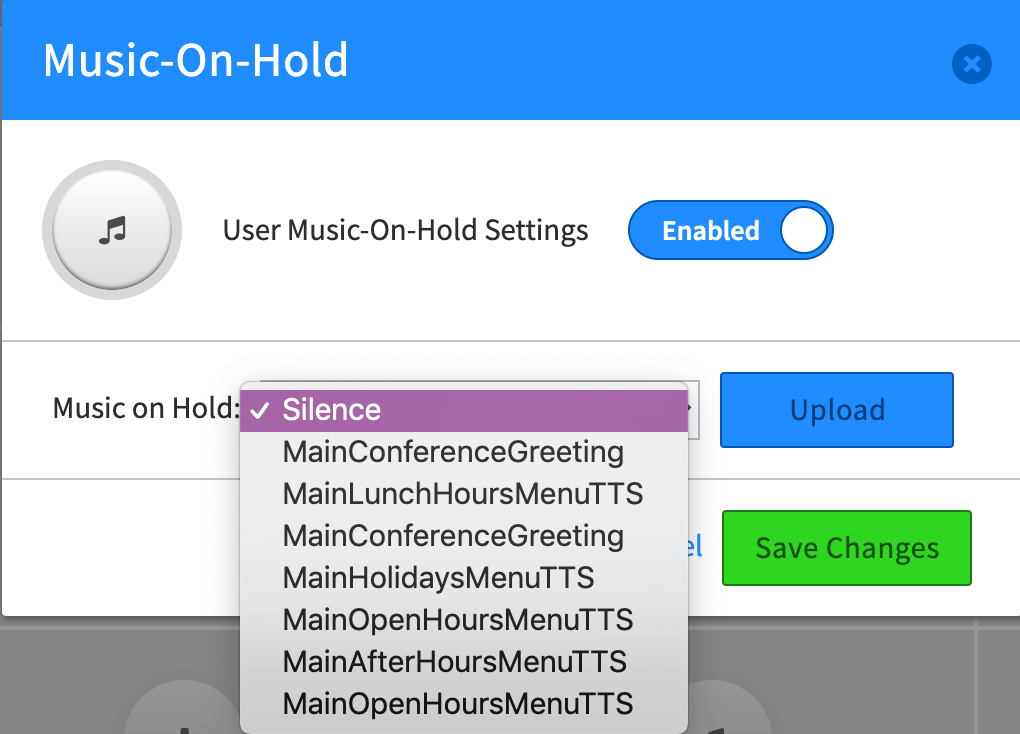
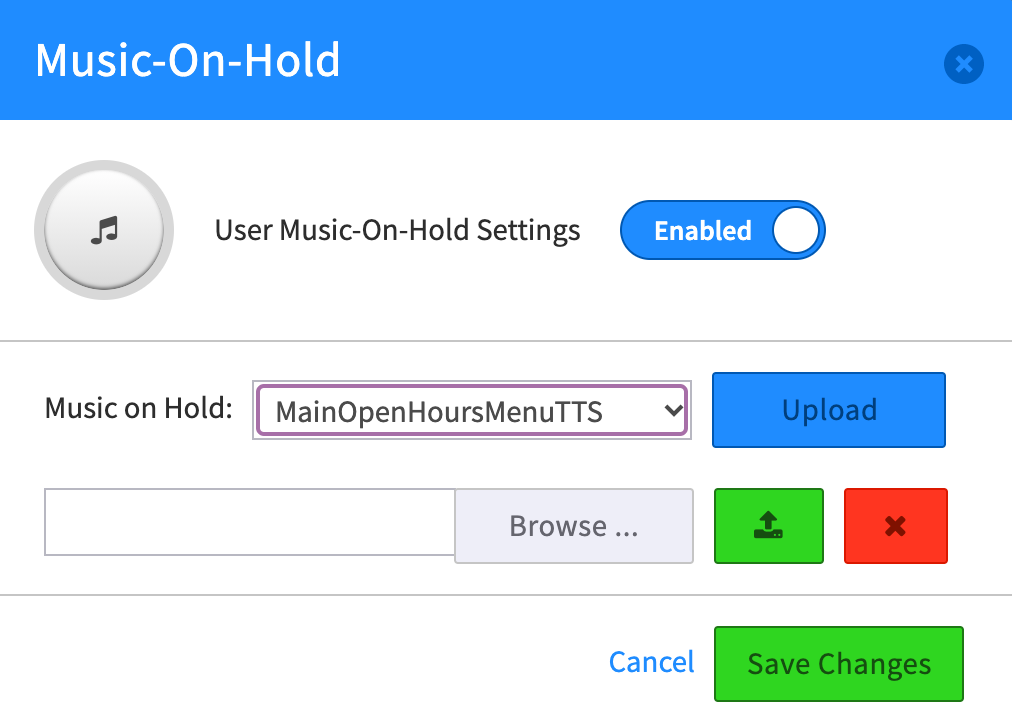
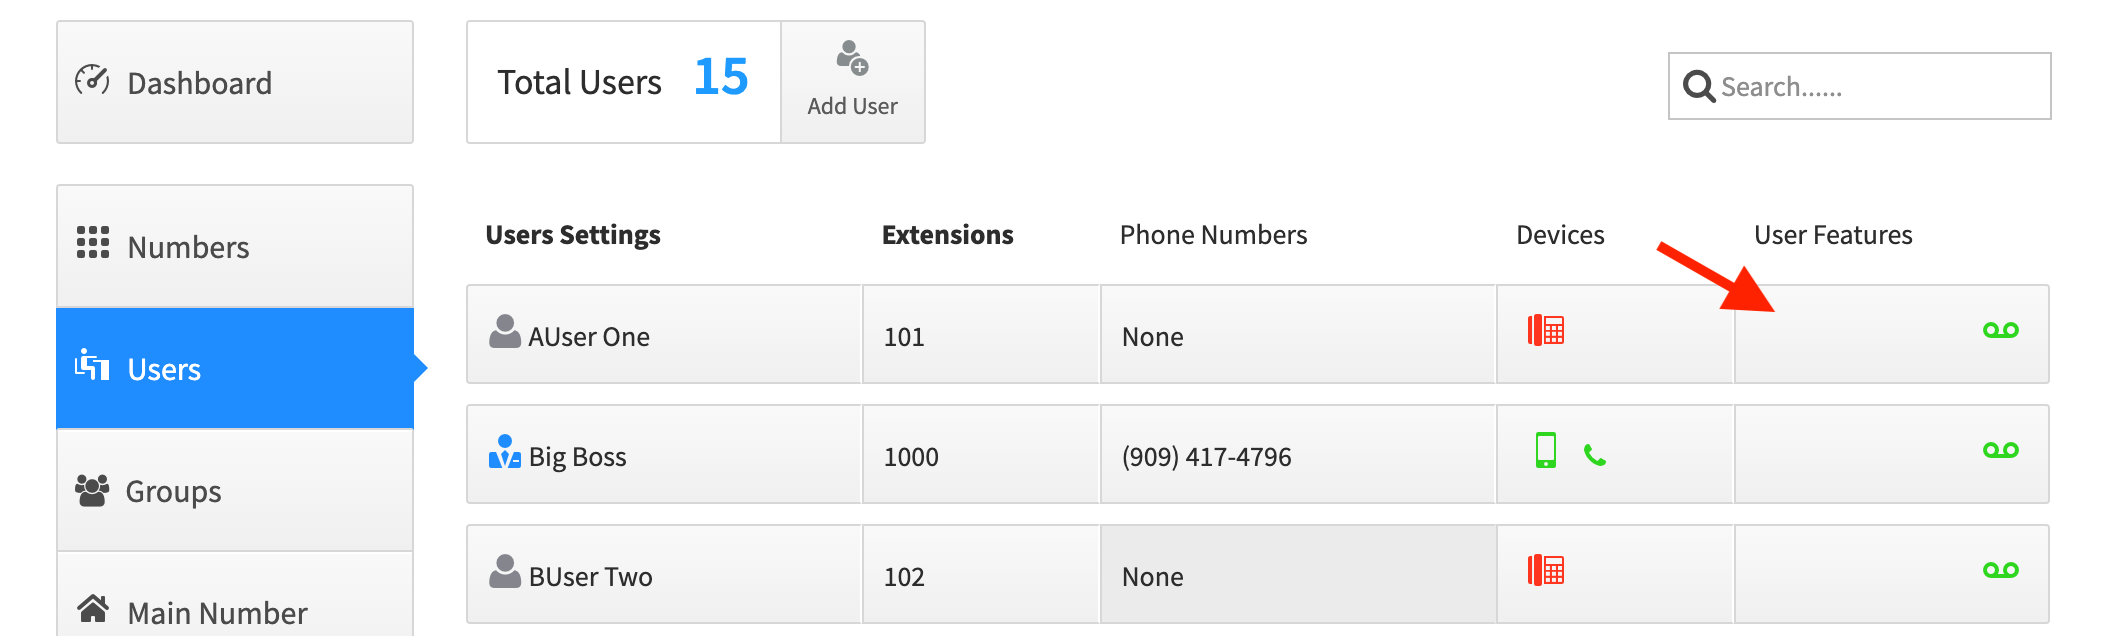
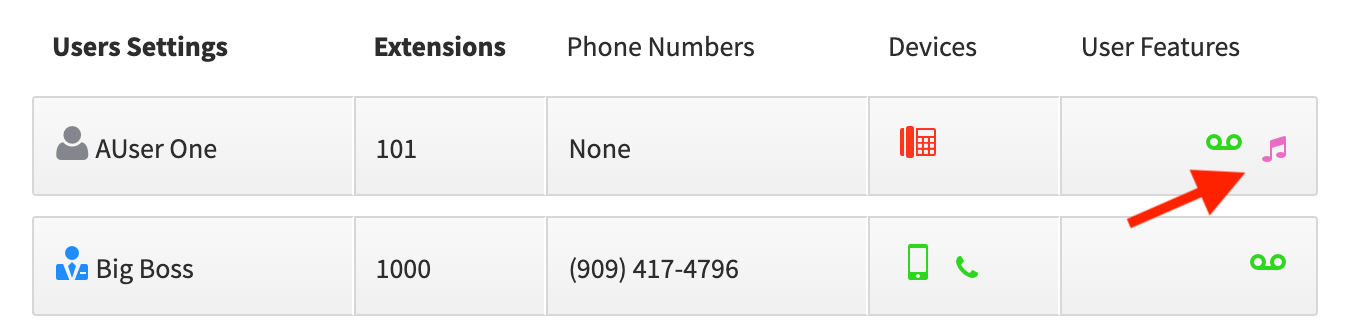
Hold Music Setting for each user
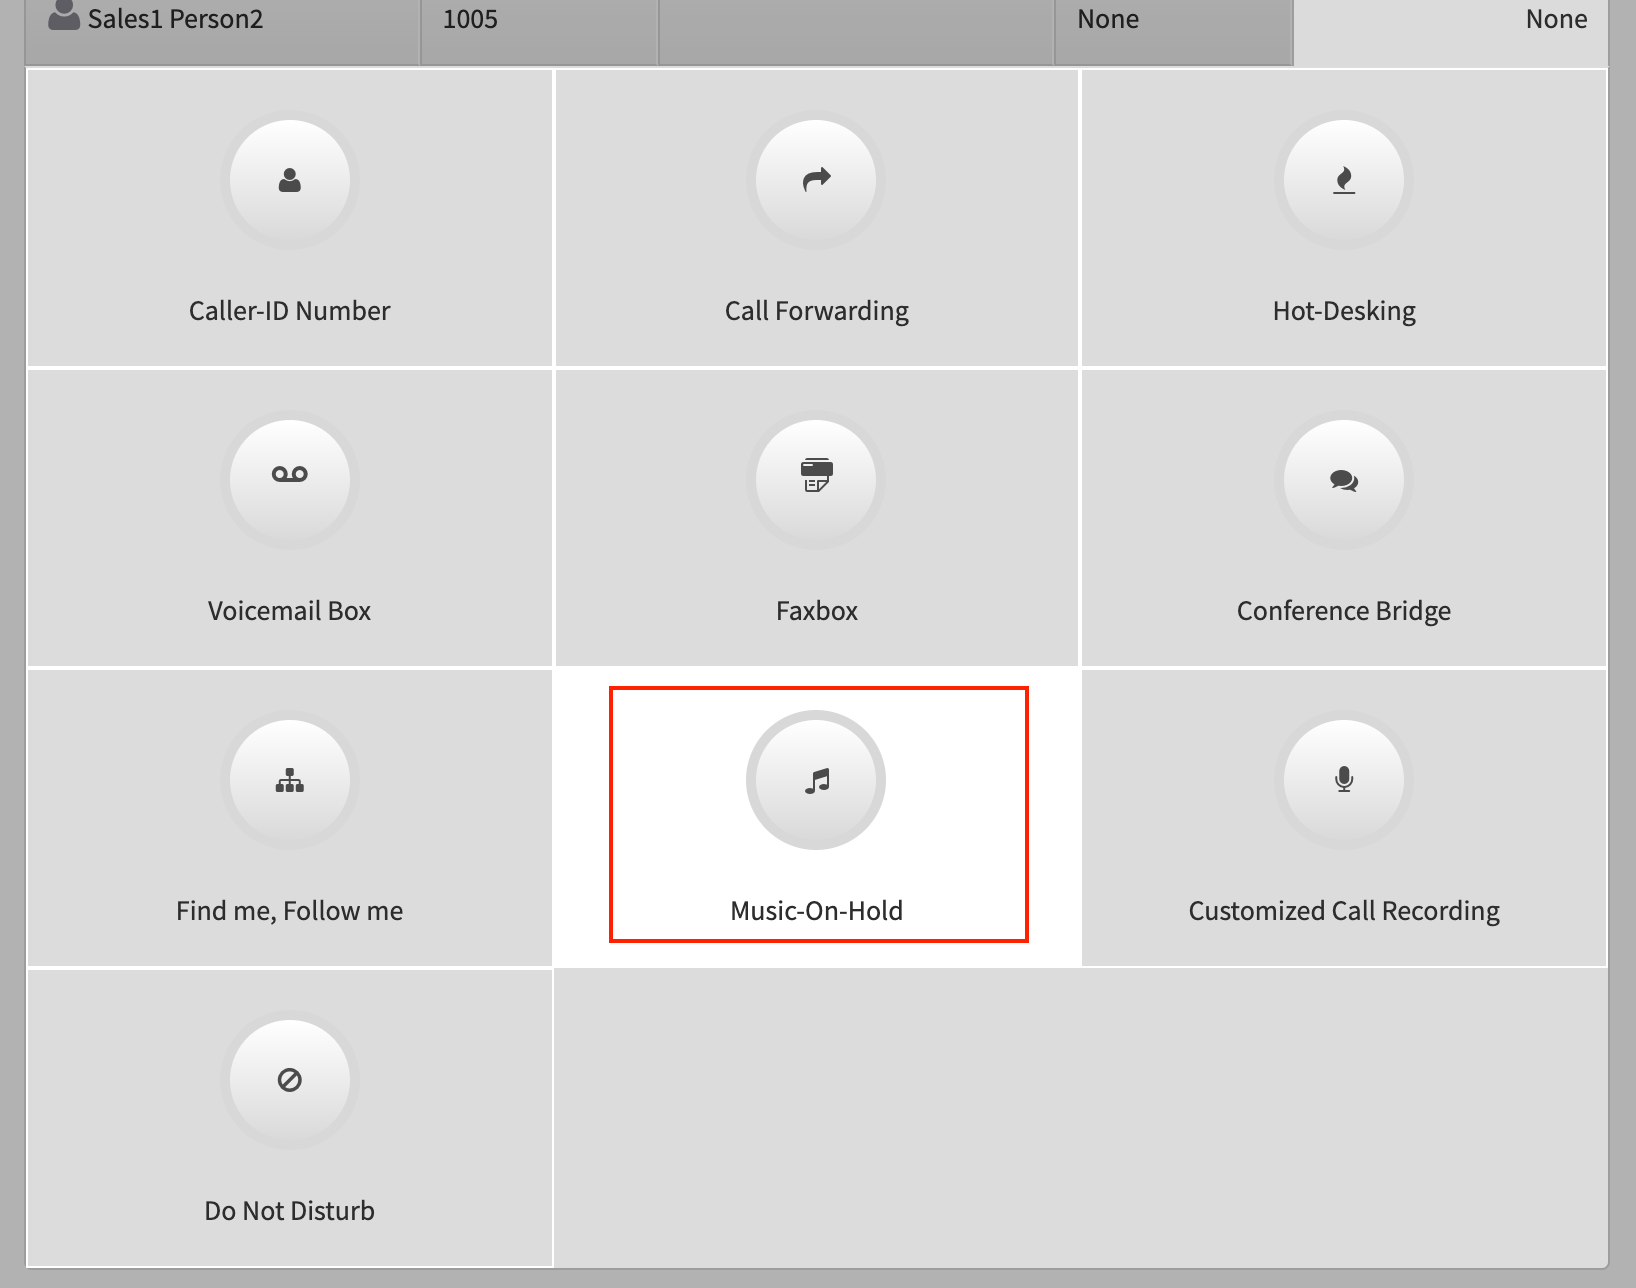
To assign a unique Hold Music file to your User setting, select the to the User menu and click on the User Features space next to your name.Then select the Music-on-Hold option.
Slide the Settings slider to Enable, and you will see the same settings options as for the Main Number.
Either select an existing file or upload a new one.
Once you have saved a Music file, you will see the Music icon displayed under the User Features field next to your name.
Setting Hold Music in CallFlows
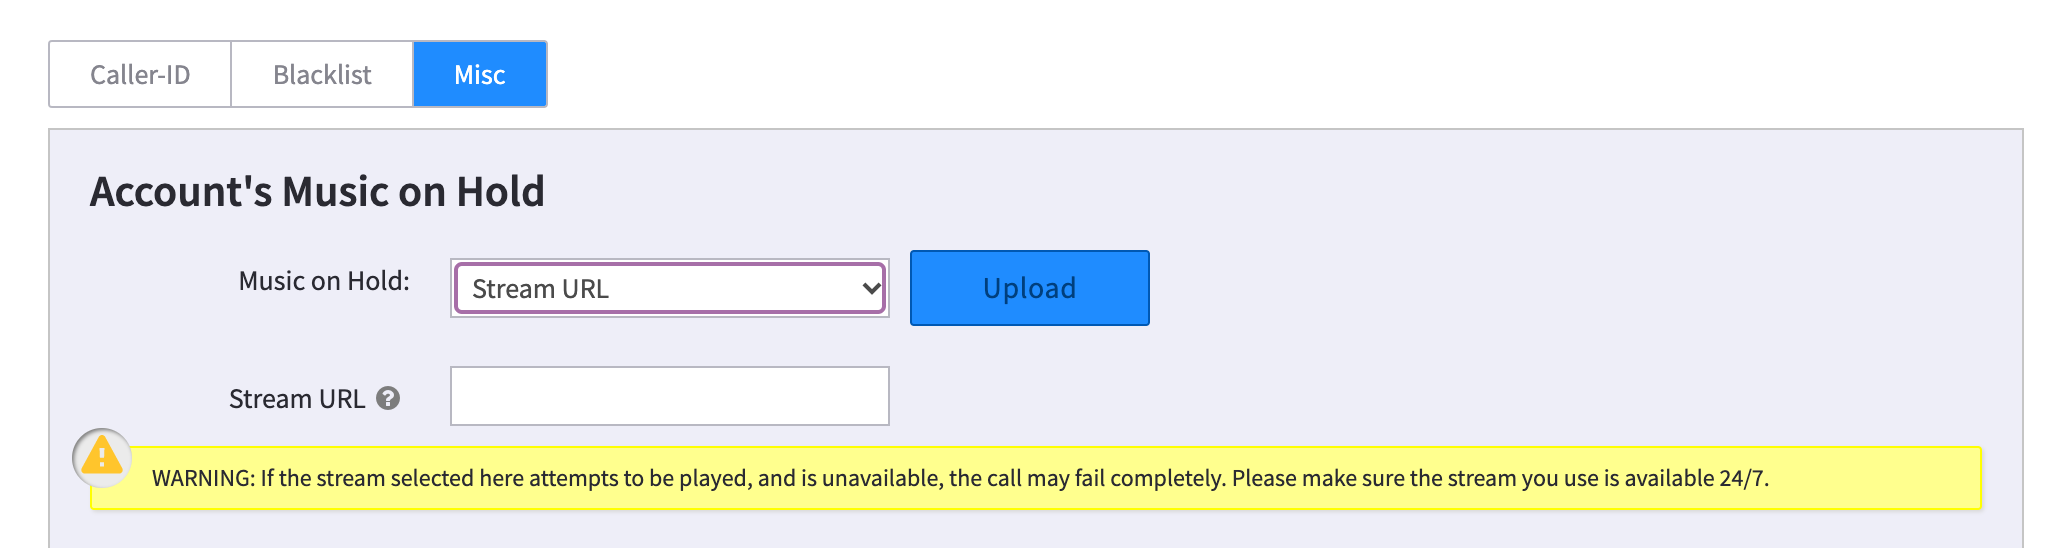
Administrators who are more familiar with advanced settings may want to manage the Music settings in Callflows. The settings are similar, and any changes here will be reflected in the SmartPBX portal also.Hold Music Setting for Account Main Number
To access these settings within Callflows, go to Account Settings and select the Misc. tab.
You can select any of the existing saved files, or upload a new one here.
NOTE: In Callflows there is an additional option to select “Stream URL” and enter an online streaming service. This service must be available 24/7, if it is not available when a call is placed, the call could fail completely.
Hold Music Setting for each user
There are a few more advanced settings a user can work with in the Callflows application. For example, a user can- Create a new greeting using Text to Speech (TTS) – and also select a “voice” to use
- Choose to stream a file.
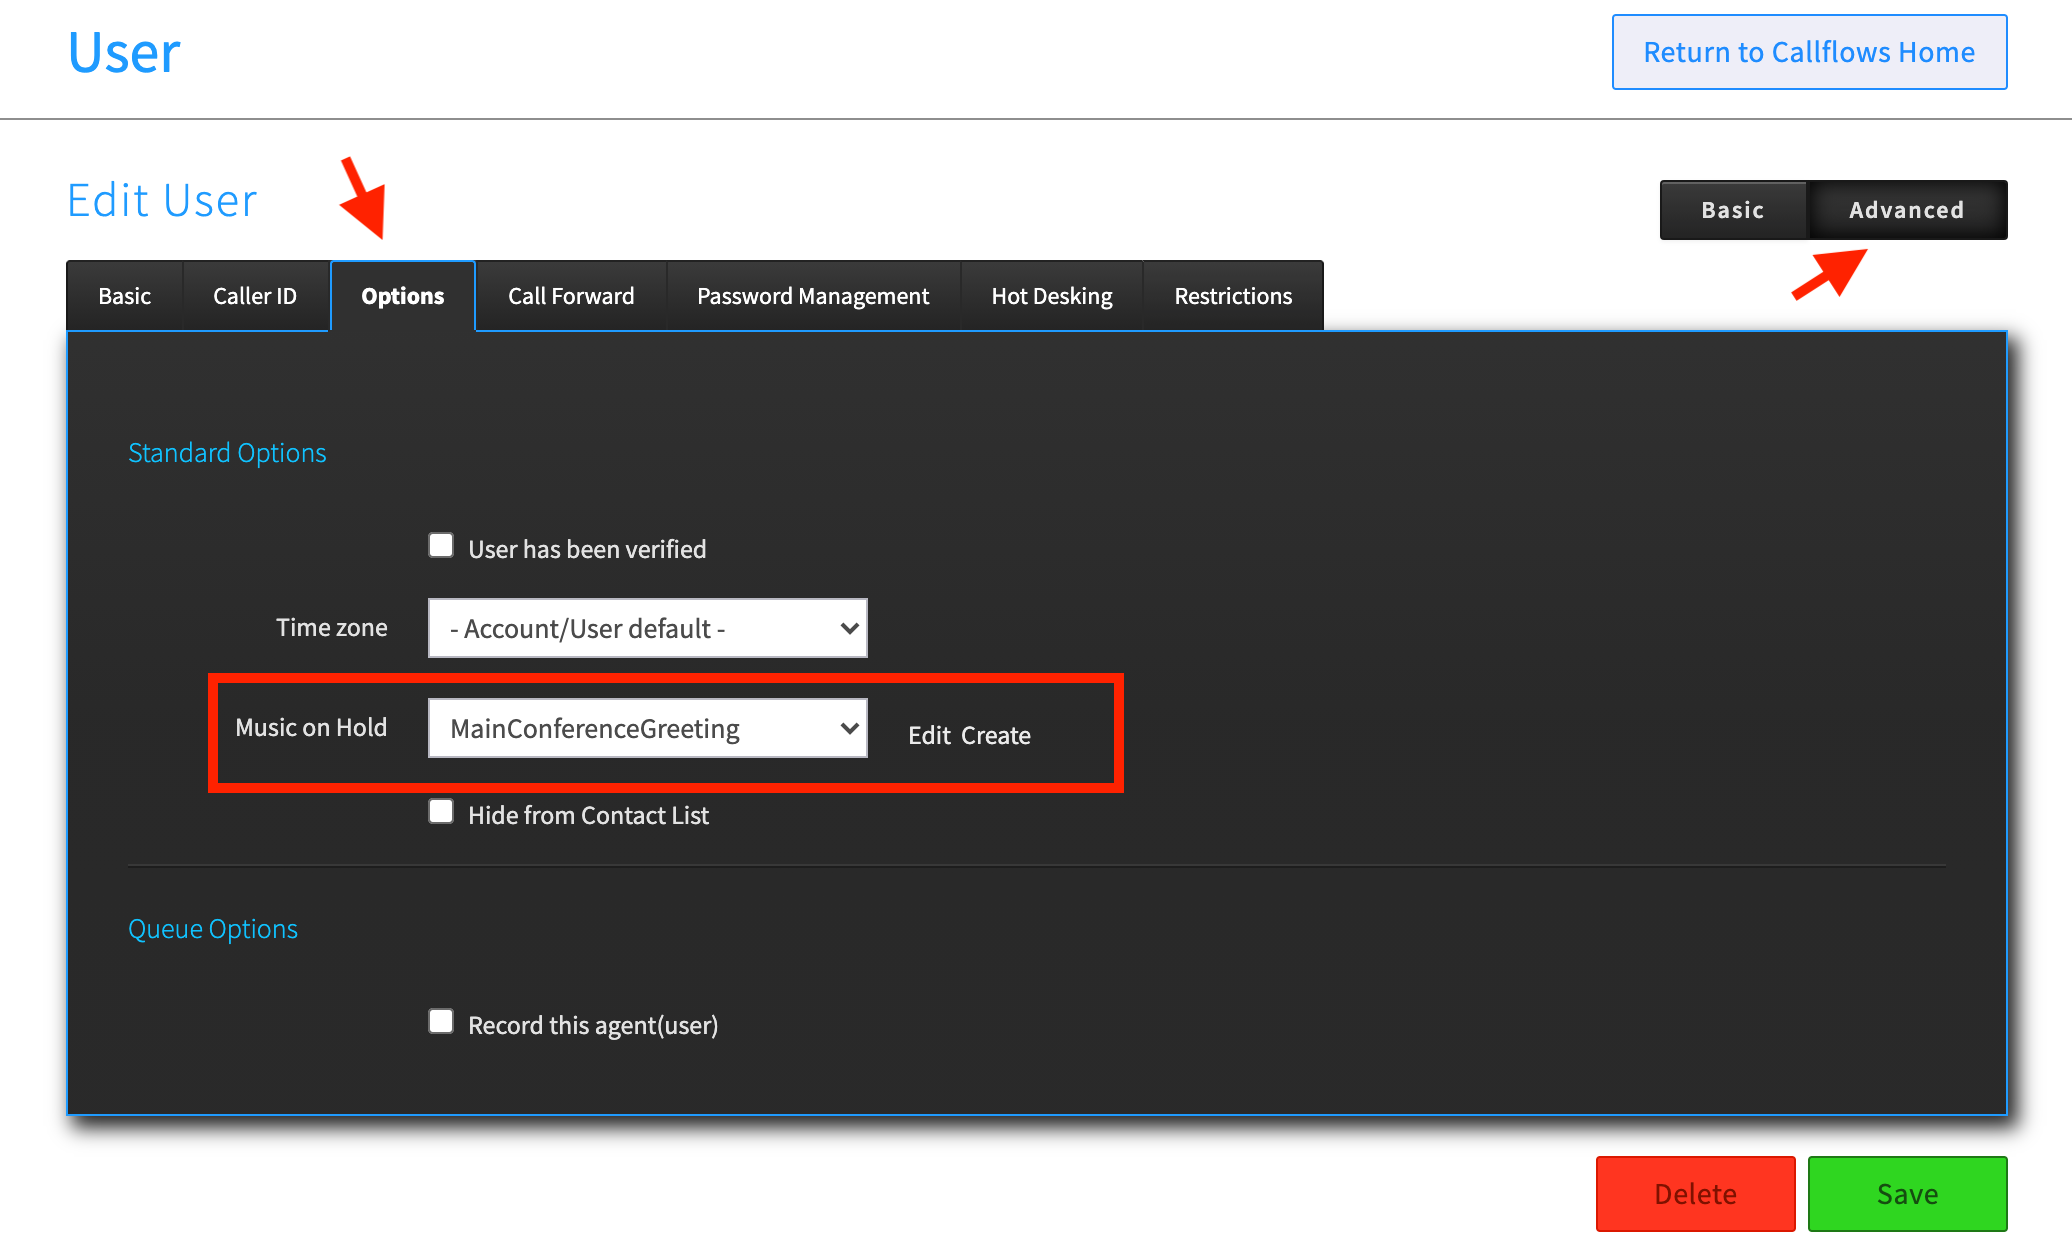
To define a unique Hold Music for a specific user,
- Select the User button from the Callflows home page
- Select the User name on the left menu
- Select Advanced tab at the top right
-
Select Options tab
Here you can select an existing file, or select Create and make a new one.
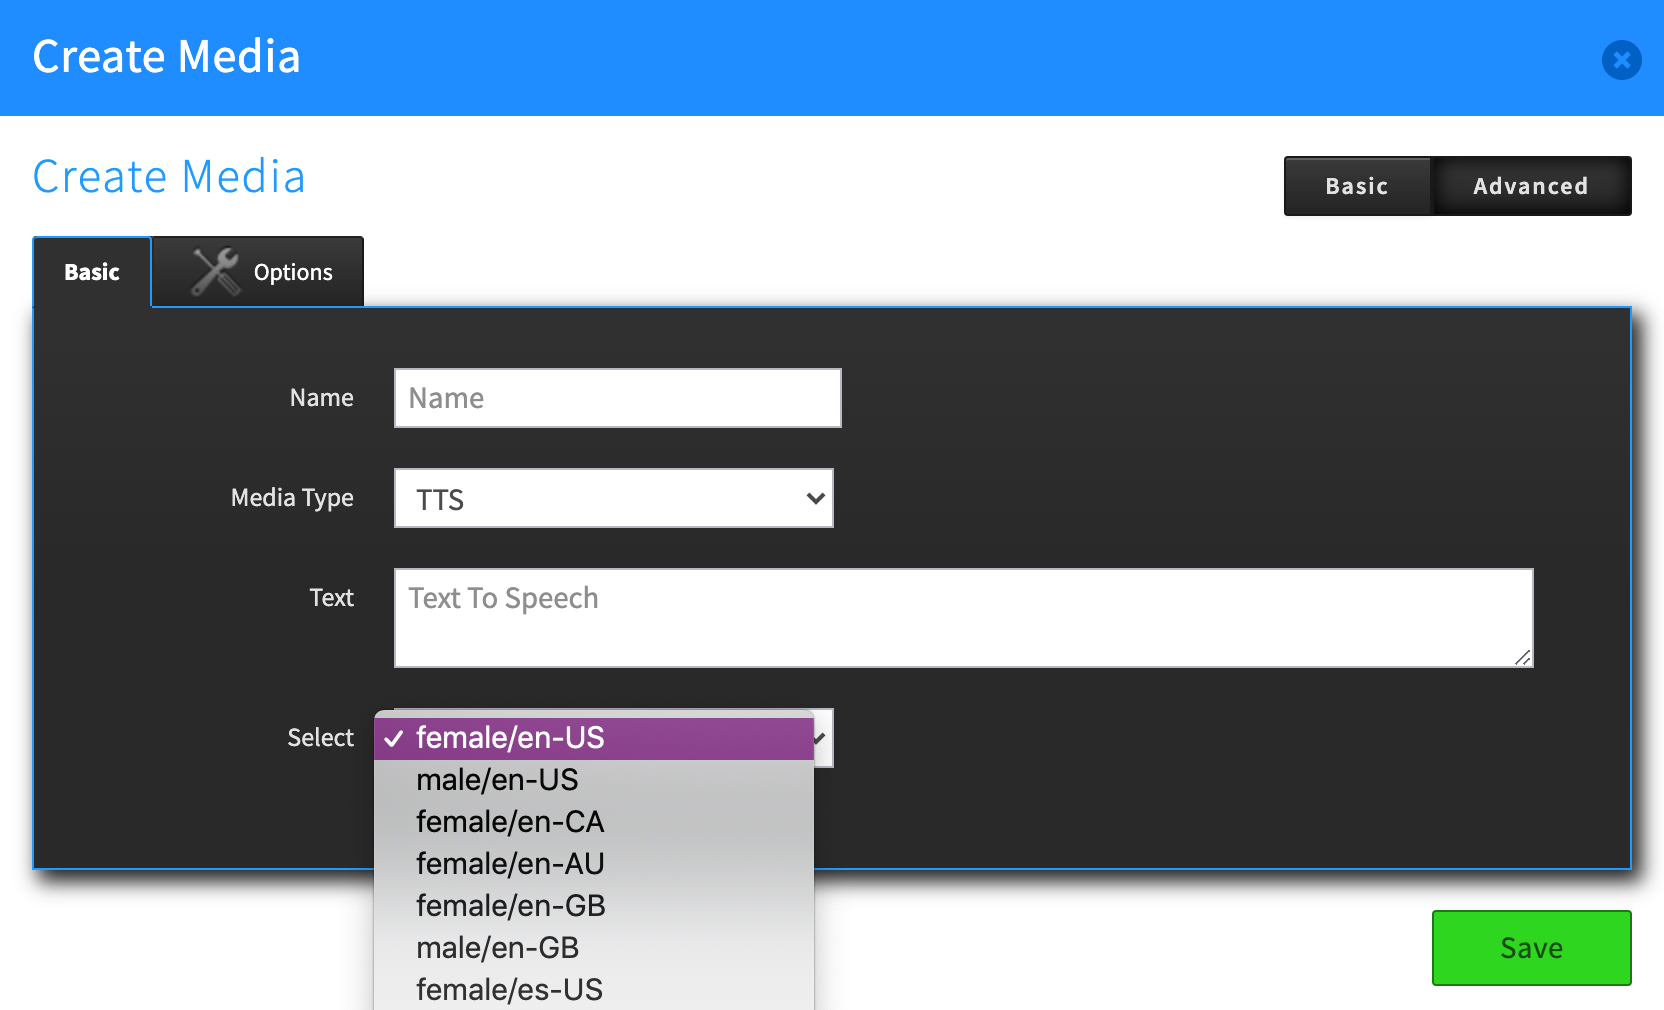
If you want to create a new file, you will see the dialog box below:
You have the option to upload a file or to type in a message and have it converted using our Text to Speech process. You can choose the voice style you want it in also.
NOTE: The Options tab allows you to enable your new file as streamable. It’s highly recommended to leave this enabled.
Setting Hold Music in Call Center and Call Center PRO
Call Center and Call Center Pro have unique hold music settings related to the queues.
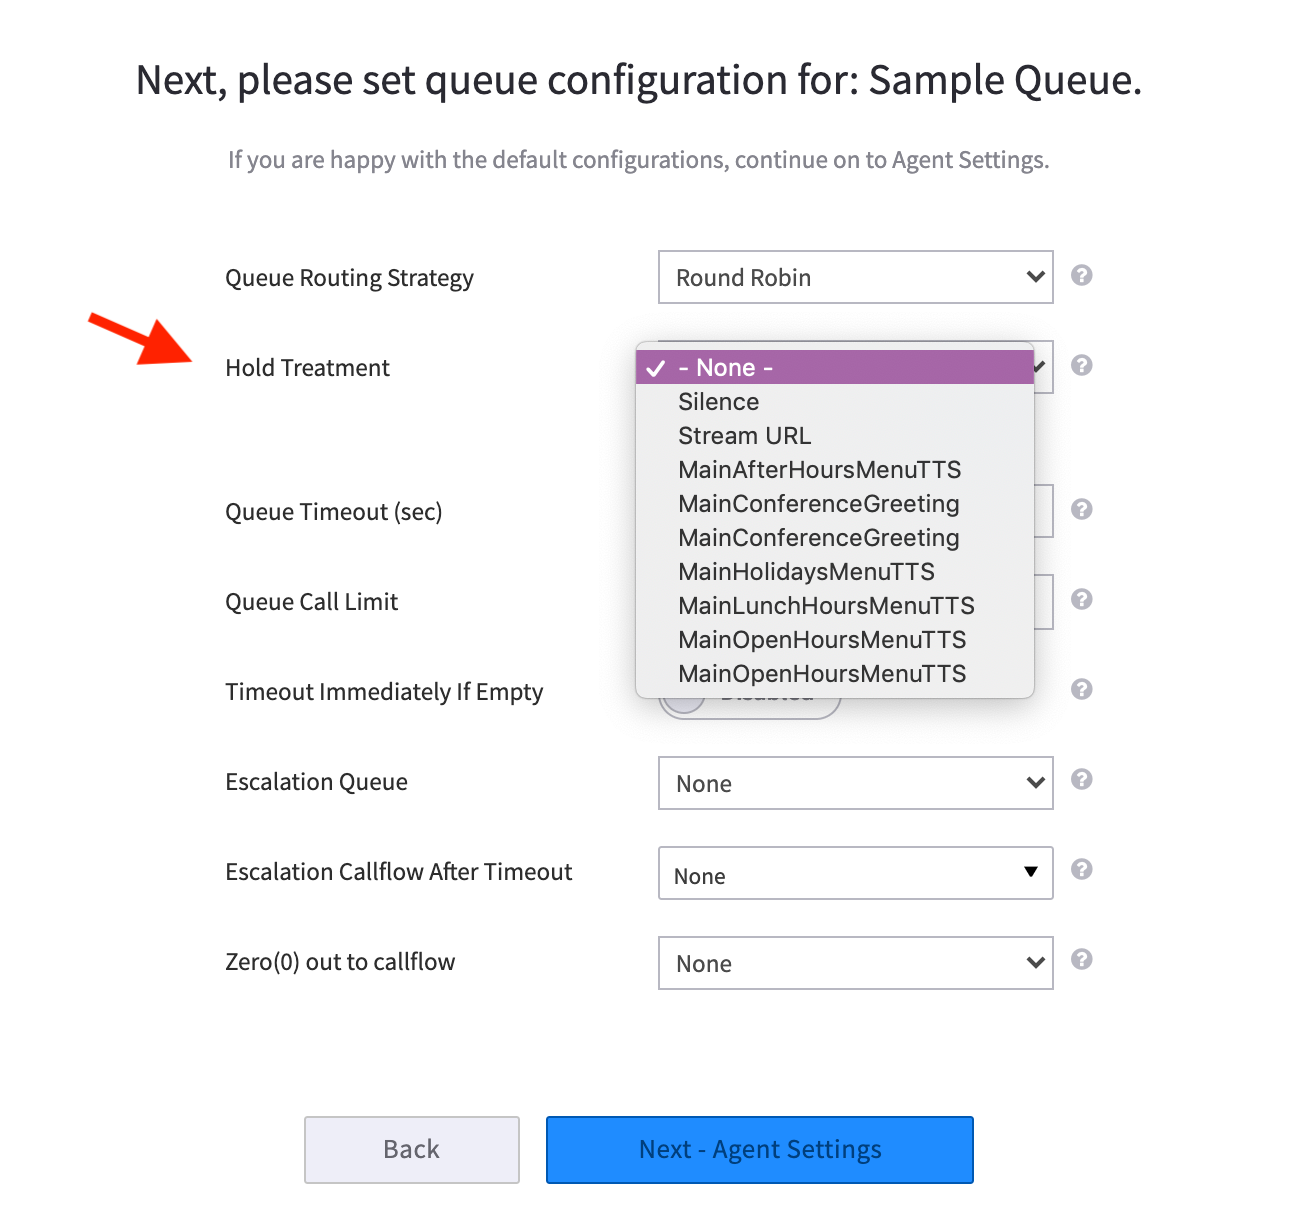
In Call Center, during your initial configuration you can define a Hold Treatment using the same options as in your SmartPBX and Callflows portals. For more information on how the Call Center settings work, refer to the Call Center User Guide, here.
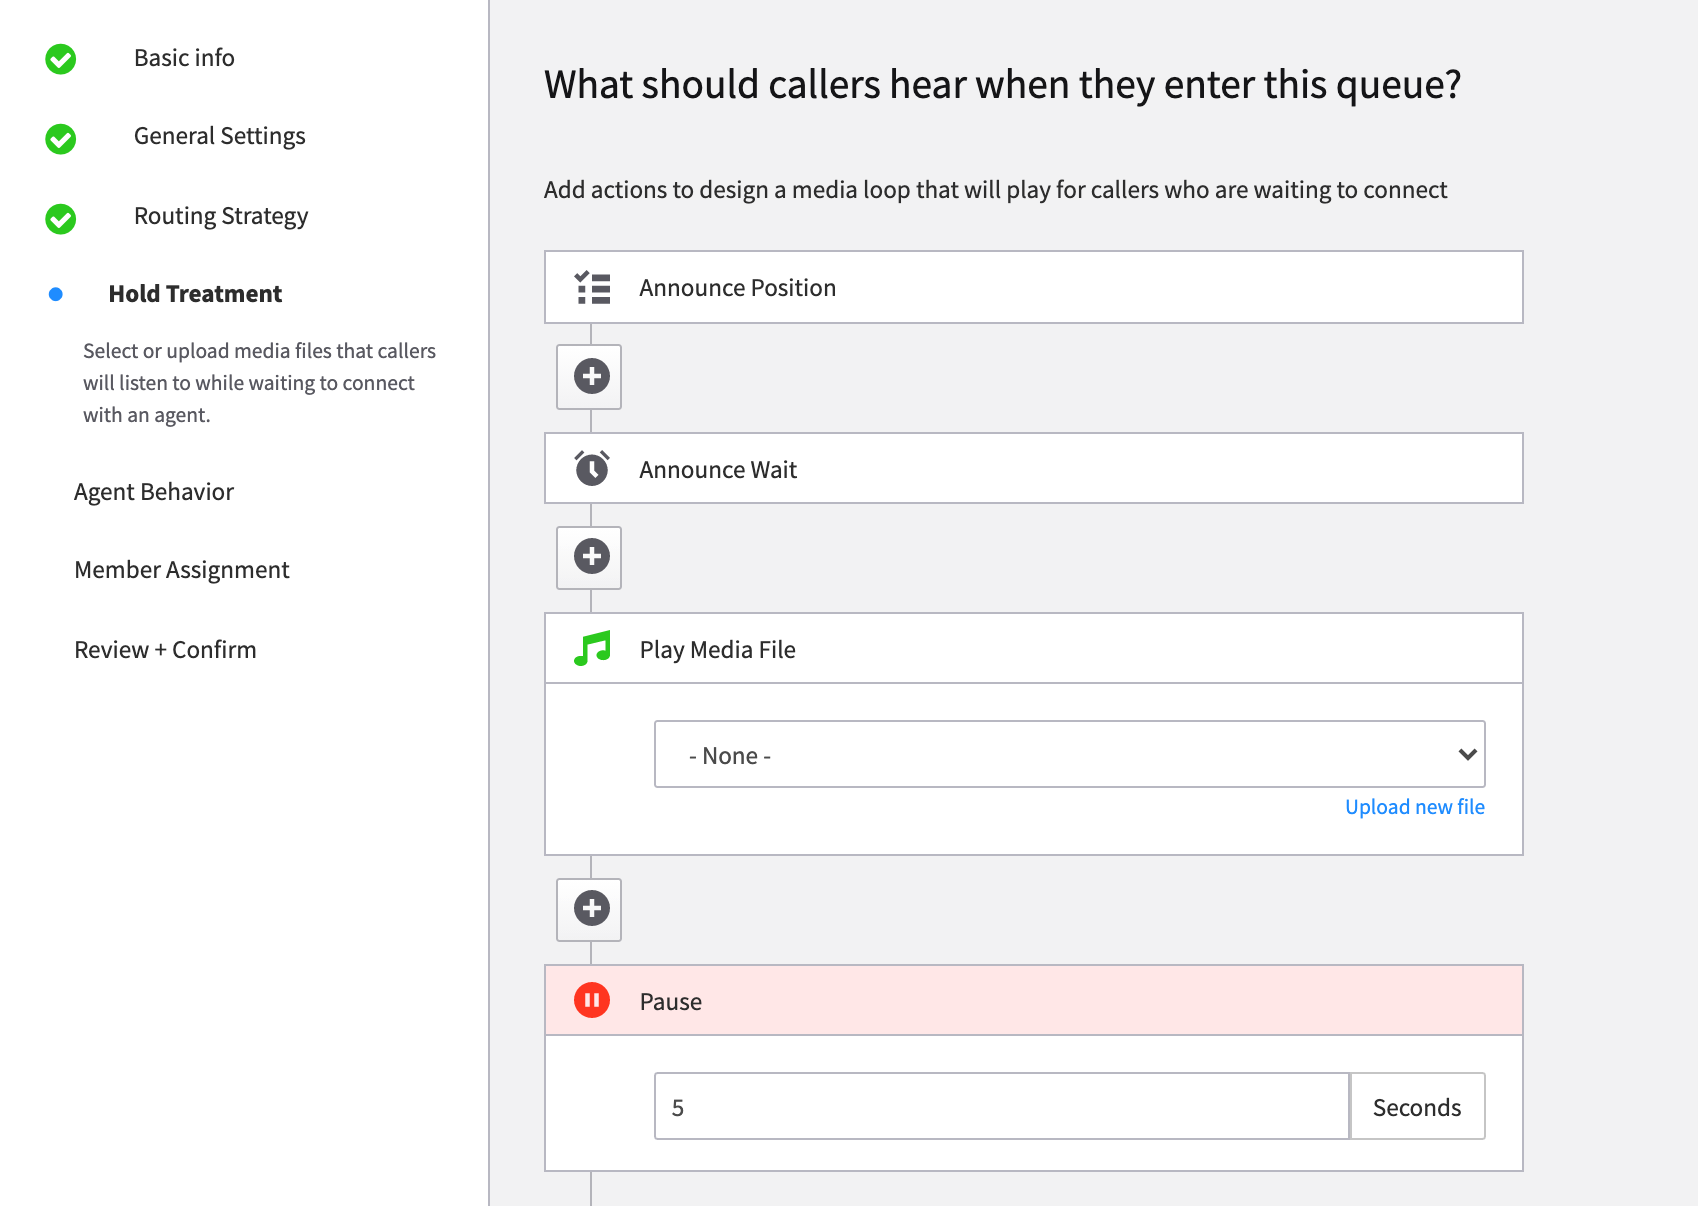
In Call Center Pro, you can define a custom media loop or “Hold Treatment” for callers with a variety of options including announcements, hold music, wait time, to number in queue. Each queue can have its own treatment. An example is shown below:
These looped responses are tied to the specific call queue number. If a user is an agent in a queue, then the Hold treatment defined here will be what is implemented when that number is called. For a detailed description on how this application works, see our Call Center Pro User guide, here.
Related Articles
SmartPBX User Guide Call Center Pro User Guide API Documentation
Accounts API - Kazoo API Reference. REST API Reference for Kazoo Crossbar APIhttps://docs.2600hz.com/supported/applications/crossbar/doc/accounts/.
music_on_holdMedia - Kazoo API Reference
https://docs.2600hz.com/supported/applications/crossbar/doc/media/#about-media#####
-
Hi all;
So sorry for those who experienced trouble joining this meeting, and thank you to those who contributed! It was a lively, constructive session and we appreciate all your feedback.For you and any. others who missed it, here's a link to the recording.
-
Hi all:
We are happy to announce the following updates to Provisioner, available Jan. 28, 2021.
This is Provisioner v. 5.11.1. Note, Provisioner release versions are not related to KAZOO release versions.Yealink:
- Increased local RTP range from 11780 to 12780
- Enhancements to Yealink's RPS system to provide more accurate logging of events
- New MAC prefix recognized for Yealink devices: 805E0C
- Custom config URL support for Yealink t3x

 SmartPBX provides settings to create fax boxes, including
 Callflows enables some advanced features for your fax setup including


Hello
in Introductions
Posted
Welcome Craig!