
.png.a3319222f564382ca8ea6cbd2d50b91e.png)
FASTDEVICE
-
Posts
438 -
Joined
-
Days Won
26
Content Type
Profiles
Forums
Resource Library: Monster UI Apps for KAZOO
Events
Downloads
Posts posted by FASTDEVICE
-
-
11 minutes ago, esoare said:Ability to look at call history for: daily, weekly, monthly, quarterly, annuallyAbility to schedule reports –1) Change your current graph, to allow for "business hours" so that would be zoomed in by the hour, while the out of business hours, would be zoomed out (Maybe before and after...i like 00:00 - 07:00 <- make this changeable by customer, and 17:00-23:59 <- make this changeable by customer)2) When a customer uses Click to call. It shows in CDR that it's an incoming call, instead of outgoing. Perhaps modify when the name shows "Click to Call" to make that "outgoing" in the metrics.
3) What about incoming calls based on numbers?a) if a customer has multiple numbers, show all the numbers and how many calls came into those numbers. daily,weekly,monthly,quarterly,annuallyb) along with "every DID" allow for individual DID statistics.4) Total, Unique, Answered, Missed, Total Time, Longest, Average5) Cost might be important, but not necessarily. Maybe make that optional? (for instance, my customers are on unlimited)6) PDF Download7) Email a PDF8) Schedule a report to email a PDF (or HTML5?)9) To be clear, these reports don't need the CDR records in them. But a link to get to them/show them, "might" be nice.10) Whole account compilation. Currently only extensions/lines@esoare Thanks for the feedback.
Anything past the date ranges 2600hz supports requires CDR data warehousing using our ETL process. The limitation is how long 2600hz stores the CDRs before they are removed. Data warehousing eliminates that issue as CDRs can be retained indefinitely.
2 - already completed and available in the next update.
6, 7, and 8 - ETL
10 - still deciding whether or not to included in our core report or ETL.
-
@esoare I'm a little surprised about all the pressure for reporting and analytics. You are using the FASTDEVICE reporting module and I believe it supports everything mentioned. Is there something additional that you need?
And, anyone else interested in a test drive of our reporting app, let me know.
-
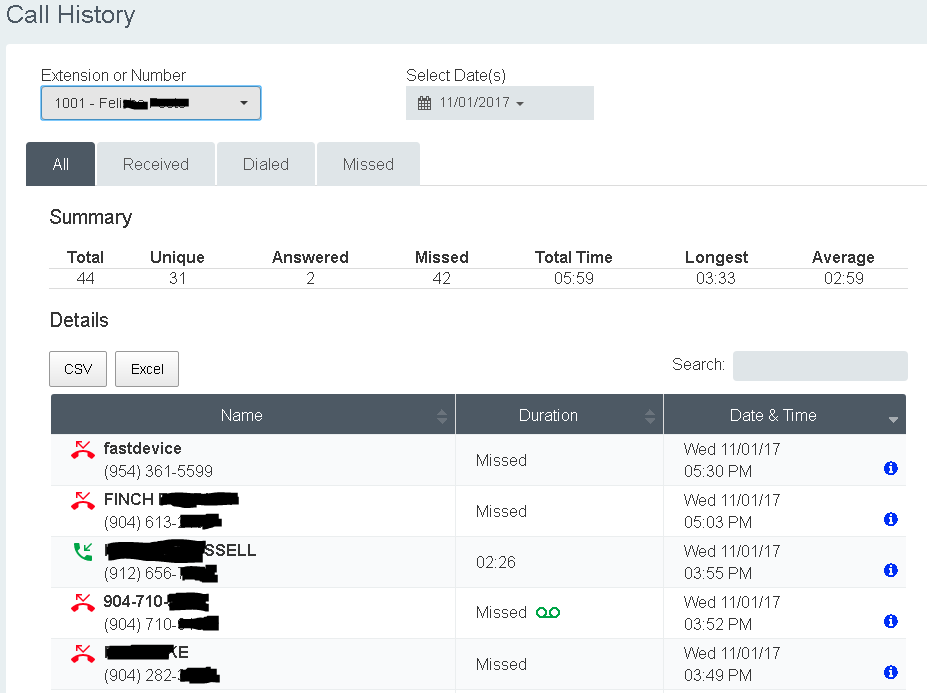
There is a clear distinction between CDRs and reporting. Here is what our reporting looks like:
-
@Karl Stallknecht I don't think you are missing anything. Once a "disable time of day" is invoked, the only way I know to resume the normal schedule is to "reset time of day" or enable selectively, but as I mentioned above, enable could be misleading so I always use reset.
Perhaps sponsor 2600hz to develop a "TEMP DISABLE TIME OF DAY" where this feature disables the time of day until the next TOD event is reached where it then follows the reset selections. However, I fear implementing this feature could be somewhat complicated.
-
@Tuly My team is working on an ETL process to load a data warehouse containing raw CDR and transformed data. When complete you can use most BI/ Reporting tools to query and build reports.
-
A system phone, while in a conference, will not play hold music when the conference call is placed on hold. Additionally, I can't place the conference call in park.
-
Thank you. How do I disable, "You are now joining the conference" and "you are the only person in the conference."
Basically, I want to transfer a client into a conference without them knowing, and use the conference bridge as a barge, eavesdrop.
-
Does anyone know where the conference welcome message media ID is located and how to change it using the API?
I see when you create a custom message in the UI (SmartPBX) it generates a media file named, "MainConferenceGreeting," but in which doc is this media id associated for the conference to play the media when a member enters the conference? I've reviewed the /conferences module, but can't seem to find it.
Also, on another related tangent, some of the conference options (i.e. play_entry_tone, and play_welcome) don't appear to work.
The root of my question here is that I want to disable the welcome message and disable the join tones.
-
@Logicwrath Precisely our predicament.
We have a GUI that provides recordings at the admin and user level. Admins are able to listen to all recordings while users are restricted to only their conversations. However, we found that users were able to listen to combined conversations when a call has been transferred. I guess we didn't test that scenario expecting users would only receive their leg of the call. Had to turn off user-level access to recordings yesterday until we can find a solution.
Additionally, now we have to find and delete these intermediate recordings as they add no value (in our case), but eat up storage space.
-
On 8/2/2017 at 2:00 PM, mc_ said:
- With the new Tasks API, store the output CSV file to S3/GoogleDrive/HTTP URL (in addition to or in lieu of the Kazoo DB) or email the CSV as a notification so you can provide reports to customers with white-labeled emails.
- Create tasks on the backend for the commonly requested reports. I think weekly/monthly usage reports make sense, Month-over-month and week-over-week as well, whatever else the business unit agrees are common requests.
@mc_ This is a great idea, can you provide some examples of using the Task API to extract CDRs?
I'm looking into an ETL process for data warehousing CDRs, so extraction examples would be much appreciated.
-
@lazedo Thanks for confirming the behavior, but what is the acceptance criteria for having incomplete intermediate recordings? These intermediate recordings seems to have no purpose, increase bandwidth, and take up storage space.
However, I have a need for:
- The total combined recording would be for the admin of the account
- and each transfer recording could be provided to the corresponding user. I only want the user to hear the part of the conversation in which they participated.
-
I'm trying to understand the behavior of what gets recorded when a call is transferred.
Based on testing, here is what I observe.
Call to ext 1001, transferred to ext 1002, then to ext 1003.
Three recordings are created:
- (combined recording) 1001 + 1002 + 1003
- (combined recording) 1002 + 1003
- 1003 Only
Is this expected behavior? I see the need for items (1) and (3), but why item 2 the intermediate combined recording and not a separate 1001 and 1002?
-
@Rick Guyton Didn't realize the routing could fail if the user hangs up before confirmation.
-
The only issue to consider with Rick's suggestion is that using "enable" will result in the persistent appearance of the office phones working, but potentially disabling your normal business hours and holiday schedule. In both Rick's and my case, the end-user has to manually use the "reset" option regardless, but in Rick's they rely on BLF for indication. My suggestion to simplify the menu and avoid BLF altogether is use a short ring duration after-hours and a normal long-ring duration normal business hours. This way if a BLF is on the fritz or not programmed, the short ring will indicate the mode and the end user never has to worry about taking a call if they stay late. Additionally, as I mentioned, the menu is simplified to just two state. All of my clients are programmed this way and we sell it as a feature; Always able to receive a call when working after hours.
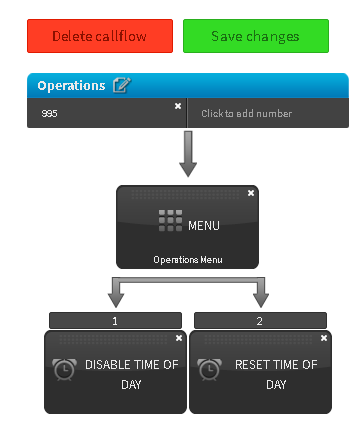
Here is our menu:
Press 1 to route calls to after hours service, Press 2 to resume normal scheduling. @Rick Guyton"Please remain on the line until the system confirms your routing is complete."
-
Travis, there are two ways that I know of to accomplish a manual override of a callflow.
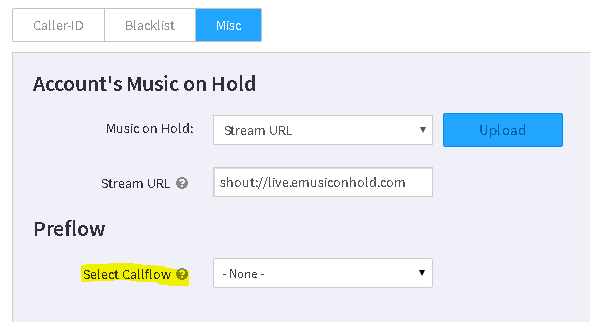
1. (This is NOT a good idea, see option 2) There is a Preflow setting in Advanced Callflows under Account Settings. You can create a callflow and then through this menu assign a Preflow. Preflow is designed to send ALL inbound calls to the assigned callflow, bypassing normal operations.

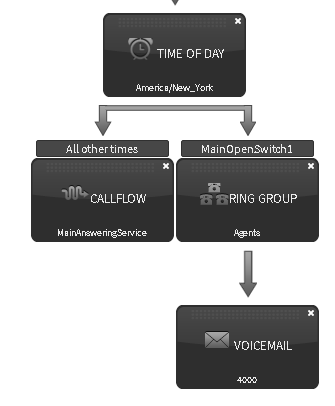
2. Another way, again, through advanced callflows, create a callflow with a menu to conditionally disable or reset time of day. In it's simplest fashion create a time of day that is always open. It will act like a logical switch. Use it in disable and reset.
Then create a callflow that uses that time of day. When active, calls flow down the MainOpenSwitch1 and when disabled, calls flow to All-other-times bypassing the main callflow.
-
You are asking for a way to trigger an alert-header by matching a regex expression from the callerID. It would be nice to have an array of them so you can program more than one.
That would be a nice feature, perhaps you can sponsor the development of it with 2600hz?
-
Correct, it would trigger the header for an internal call when the doorbell button is pressed. Why do you need it to be absolutely unique? If so, some of the phones allow for distinctive ring, but you have to program the phone to recognize the DID or extension.
-
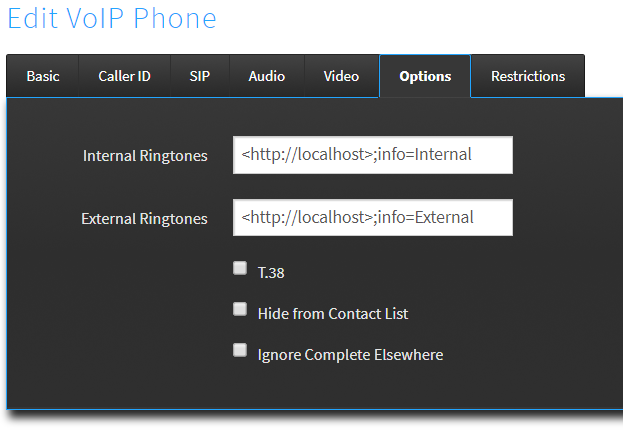
Hi Tuly,
Under the Advanced Callflows app | Device.
<http://localhost>;info=Internal or <http://localhost>;info=External, or <http://localhost>;info=anythingyouwant
Depending on the phone manufacturer, you will need to include the value of "info=" in the phone configuration.
-
deleted topic
-
deleted
-
@Karl Stallknecht Once configured as I'm showing, Postman becomes simple to use. Actually, it will be easier than the GUI and much more extensible. All that is being asked, is give it a try.
-
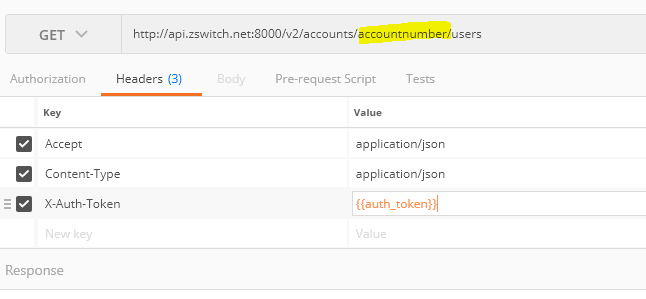
Now lets use Postman to GET users on an account. Replace the <accountnumber> with the actual Kazoo account number.
Notice the {{auth_token)) value for the X-Auth-Token key. This is the variable that was used to store the auth token when the PUT was executed.
Now save your parameters using Save As... and place the call under a folder. Remember to do the same with the PUT that retrieves and stores the auth token.
The sequence will then be, execute the PUT first to retrieve and store the auth token, and then any command after that utilizing the X-Auth-Token with a value of {{auth_token}}.
-
The first step, and hopefully the easiest, is to install the application... https://www.getpostman.com/
Once installed, you can create Collections and folders within the Collection. Click on the ellipse ... after you create a Collection to add folders.
I created a Collection called "2600hz" and under that a folder called "Auth Token"
Let's get an Auth Token.
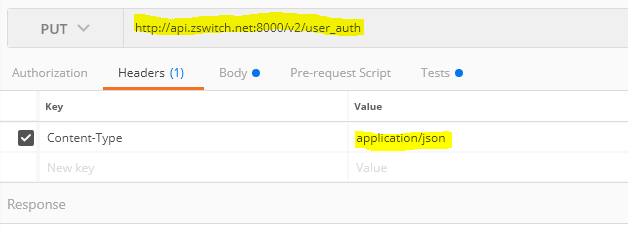
On the tabs at the top, use the pull down to select "PUT"
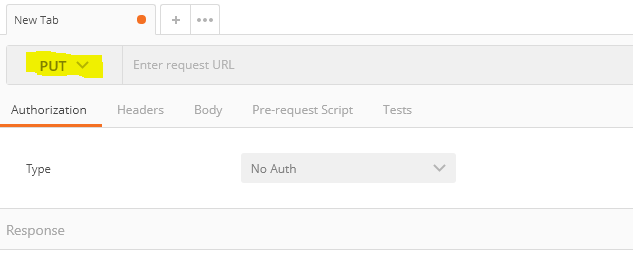
then type in the url for the API and configure your Headers as below:
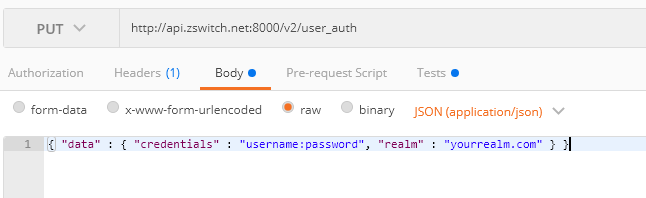
Now you need the Body of the request. However, your username:password should be an md5hash. In Linux: "echo -n username:password | md5hash"
for the MD5 hash, it has to be in "lower case" otherwise it won't work.
Lastly, you will need the Auth Token saved to a variable in Postman. Click on Tests and enter the below:
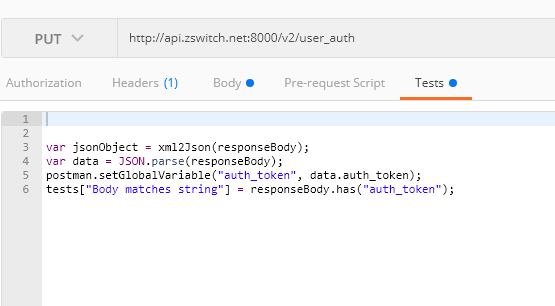
var jsonObject = xml2Json(responseBody);
var data = JSON.parse(responseBody);
postman.setGlobalVariable("auth_token", data.auth_token);
tests["Body matches string"] = responseBody.has("auth_token");If you click Send in the blue box, you should then get a response from Kazoo indicating Status "success" and a long auth_token.
-
The first step, and hopefully the easiest, is to install the application... https://www.getpostman.com/
Once installed, you can create Collections and folders within the Collection. Click on the ellipse ... after you create a Collection to add folders.
I created a Collection called "2600hz" and under that a folder called "Auth Token"
Callflow Call Forwarding
in Product Discussion
Posted
I see call forwarding at the account, user, and device level. However, what if I want to forward a call from a callflow?
e.g. Any DID that is not assigned to a user, but expected to ring an auto attendant, or a ring group. I'm fully aware that I can modify the callflow as I see fit, but I'm after a way to keep the callflow as-is and selectively override it with a forward. This way I don't have to write code to remember how the callflow was configured prior to the modification and restore the preexisting callflow.
Some PBX systems call this mainline forwarding.
Any thoughts?