Emily R
-
Posts
592 -
Joined
Content Type
Profiles
Forums
Resource Library: Monster UI Apps for KAZOO
Events
Downloads
Everything posted by Emily R
-
NOTE: This document refers to our Product Roadmap portal, which can be found HERE. User Story A user, reseller, developer or support team member has a brilliant idea for how to make our product(s) even more productive, more easy to use, and/or more accessible. A user wants to learn the most effective way to create a product idea card in our Product Board interface, HERE. Overview We at 2600Hz believe you - our community of users, resellers, platform developers and device providers - are our most valued resource in helping grow our platform and services. We have long wanted to host a transparent venue where you can submit requests, see how we prioritize these, and follow our progress. And now we’re providing exactly that! What is Product Board? We are leveraging the Product Board software to track feature requests and our roadmap. If you’ve registered on our community site, you can see our portal here. This page is a window for our community to see and contribute to our product development process. The page provides you access to: Review ongoing feature requests and submit your own See the status of planned feature updates See when the planned update is actually launched. NOTE: Help us grow this idea and make this process beneficial to all of us! As more of you join the effort we will tweak it. Send your recommendations to: product@2600Hz.com How to I submit a feature request? We hope you will! Here’s some tips to keeping this request board somewhat organized, and how best to submit your request. Check existing requests Check to see if there’s a request similar to yours already submitted. A simple way to do this is to search the page using your keyboard search function (Command-F). Use a keyword that is sure to be used in a related request. If you find a similar request, you can VOTE on it (see below) and add your personal user story to it. Select the red “Submit Idea” button at the top right of the frame. NOTE: if you do not see it, expand your window or zoom out on your screen or select the red circle with a Plus sign at the bottom left. Write out your Idea Below are some quick guidelines to help us understand your request more fully. We have also outlined a more detailed version of recommended "do's and don'ts" in our community forum, here. Create a summary title Write in a short sentence what. you want. Tell us your story Tell us when you want to use this, how, and in what user interface or applications. Tell us your urgency We want to hear all your ideas, even if they’re just “nice to have” for you. Someone else might see this and agree, or say for them it’s urgent. Votes matter. Add your email You must include an email; this will be used to verify your submission. Press Submit and Confirm by email NOTE: You will be asked to confirm your request in an email sent to you once you submit your request. Please make sure to take this step! IF you don’t see an email shortly after you submit your idea, check your junk box. The email will come from [portal <noreply@productboard.com>] In the future we will implement a single sign-on system to make this easier. What your submittal form will look like: What your confirmation email will show: Once your idea is submitted, the 2600Hz Product team will review it and publish it the next business day. I will then be ready for votes and comments from.your peers. VOTE on other ideas! Review the other idea cards already submitted and add comments to them and vote! Again, when you vote you will need to confirm your vote in an email. Frequently Asked Questions What happens next? Once you submit your request, the 2600Hz Product team will review it quickly and publish it the next business day. They meet once monthly to review, comment on and tally all requests and votes. Some of the actions they may take based on these could be: Make a comment about urgency or possible scheduling expectations (i.e. this year, low priority, etc) Make a note if it is not viable and/or a priority for our development team, and if so, why. Combine and/or refer your request to another existing request Ask followup questions NOTE as this is new for all of us we anticipate our processes will evolve. Please send any feedback to product@2600Hz.com! If I vote on an existing idea, does that display immediately? Votes on existing ideas are registered in real time. You may have to refresh your screen to see the updated data. How can I track my requests? Any updates and/or comments made to requests you have submitted or commented on will trigger a notification to your email. Are all your requests posted here now? Not yet! We have hundreds of requests from our Product Focus meetings and through our support group that have not yet been added. We hope to keep adding them throughout this year. If you submit one that we also are tracking internally we will make a comment on that and combine them. View full File
-
 NOTE: This document refers to our Product Roadmap portal, which can be found HERE. User Story A user, reseller, developer or support team member has a brilliant idea for how to make our product(s) even more productive, more easy to use, and/or more accessible. A user wants to learn the most effective way to create a product idea card in our Product Board interface, HERE. Overview We at 2600Hz believe you - our community of users, resellers, platform developers and device providers - are our most valued resource in helping grow our platform and services. We have long wanted to host a transparent venue where you can submit requests, see how we prioritize these, and follow our progress. And now we’re providing exactly that! What is Product Board? We are leveraging the Product Board software to track feature requests and our roadmap. If you’ve registered on our community site, you can see our portal here. This page is a window for our community to see and contribute to our product development process. The page provides you access to: Review ongoing feature requests and submit your own See the status of planned feature updates See when the planned update is actually launched. NOTE: Help us grow this idea and make this process beneficial to all of us! As more of you join the effort we will tweak it. Send your recommendations to: product@2600Hz.com How to I submit a feature request? We hope you will! Here’s some tips to keeping this request board somewhat organized, and how best to submit your request. Check existing requests Check to see if there’s a request similar to yours already submitted. A simple way to do this is to search the page using your keyboard search function (Command-F). Use a keyword that is sure to be used in a related request. If you find a similar request, you can VOTE on it (see below) and add your personal user story to it. Select the red “Submit Idea” button at the top right of the frame. NOTE: if you do not see it, expand your window or zoom out on your screen or select the red circle with a Plus sign at the bottom left. Write out your Idea Below are some quick guidelines to help us understand your request more fully. We have also outlined a more detailed version of recommended "do's and don'ts" in our community forum, here. Create a summary title Write in a short sentence what. you want. Tell us your story Tell us when you want to use this, how, and in what user interface or applications. Tell us your urgency We want to hear all your ideas, even if they’re just “nice to have” for you. Someone else might see this and agree, or say for them it’s urgent. Votes matter. Add your email You must include an email; this will be used to verify your submission. Press Submit and Confirm by email NOTE: You will be asked to confirm your request in an email sent to you once you submit your request. Please make sure to take this step! IF you don’t see an email shortly after you submit your idea, check your junk box. The email will come from [portal <noreply@productboard.com>] In the future we will implement a single sign-on system to make this easier. What your submittal form will look like: What your confirmation email will show: Once your idea is submitted, the 2600Hz Product team will review it and publish it the next business day. I will then be ready for votes and comments from.your peers. VOTE on other ideas! Review the other idea cards already submitted and add comments to them and vote! Again, when you vote you will need to confirm your vote in an email. Frequently Asked Questions What happens next? Once you submit your request, the 2600Hz Product team will review it quickly and publish it the next business day. They meet once monthly to review, comment on and tally all requests and votes. Some of the actions they may take based on these could be: Make a comment about urgency or possible scheduling expectations (i.e. this year, low priority, etc) Make a note if it is not viable and/or a priority for our development team, and if so, why. Combine and/or refer your request to another existing request Ask followup questions NOTE as this is new for all of us we anticipate our processes will evolve. Please send any feedback to product@2600Hz.com! If I vote on an existing idea, does that display immediately? Votes on existing ideas are registered in real time. You may have to refresh your screen to see the updated data. How can I track my requests? Any updates and/or comments made to requests you have submitted or commented on will trigger a notification to your email. Are all your requests posted here now? Not yet! We have hundreds of requests from our Product Focus meetings and through our support group that have not yet been added. We hope to keep adding them throughout this year. If you submit one that we also are tracking internally we will make a comment on that and combine them.
 -
November 27, 2020 2600Hz Staying Close – Even Through Remote Holidays JOSHUA FELDER Read it here
-
 NOTE: This initial release is available for Poly VVX 400 Series devices only. User Story An account wants generate an "office" or account-wide contact list in your devices for Poly devices. How it Works This is a new tab setting available in the Provisioner setup screen. When using this feature all the Poly phones in the account will be have their custom_contacts_dir_url automatically set to an auto generated XML file. Initial support is for Poly devices. Additional device support will be added over time. Steps for Using the Contact List Launch the Provisioner Application Select the Contact List tab Use the button “Add Contact” to add new contacts Label Must be any valid string or number, represents the value to be displayed on the function button. This field is required. Value Must be any valid string or number, it’s the number or SIP URI to be use to perform the call. This field is required. Account Must be any positive integer number. This is the reference to the line (device account / profile) number to be used. If empty it defaults to 1. Use the Cog Wheel to the right of each entry to edit or remove a contact. You can reorder the contacts by using the index column (first column) using the up/down arrows. Once the contact list is stored, the custom directory URL will be set in the configuration and the phones must be manually restarted for the contact list to be refreshed. You can search across all the contacts using the search bar, this will filter based on the label and value fields. You can override the contact list URL per device using the white labeling options inside settings. You can use the Display directory names option to use the label entries instead of the information stored in Kazoo when an incoming call is received with a matching number in the contact list. Contact list is paginated and it has been tested with upto 1000 contacts (imported via CSV) Display order Polycom Buttons/Keys on-screen Built-in extra keys Sidecar Precedence order Polycom Feature keys Sidecar Contact list Supported Brands and Models Brand Family Model(s) Poly VVX400 all How to upload a CSV Create a file with exactly three columns: CSV required column label [required] Must be any valid string or number, represents the value to be displayed on the function button value [required] Must be any valid string or number, it’s the number or SIP URI to be use to perform the call account [optional] Must be any integer number. This is the reference to the line (device account / profile) number to be used. If empty it defaults to 1. Related Articles Provisioner User Guide ######
 -
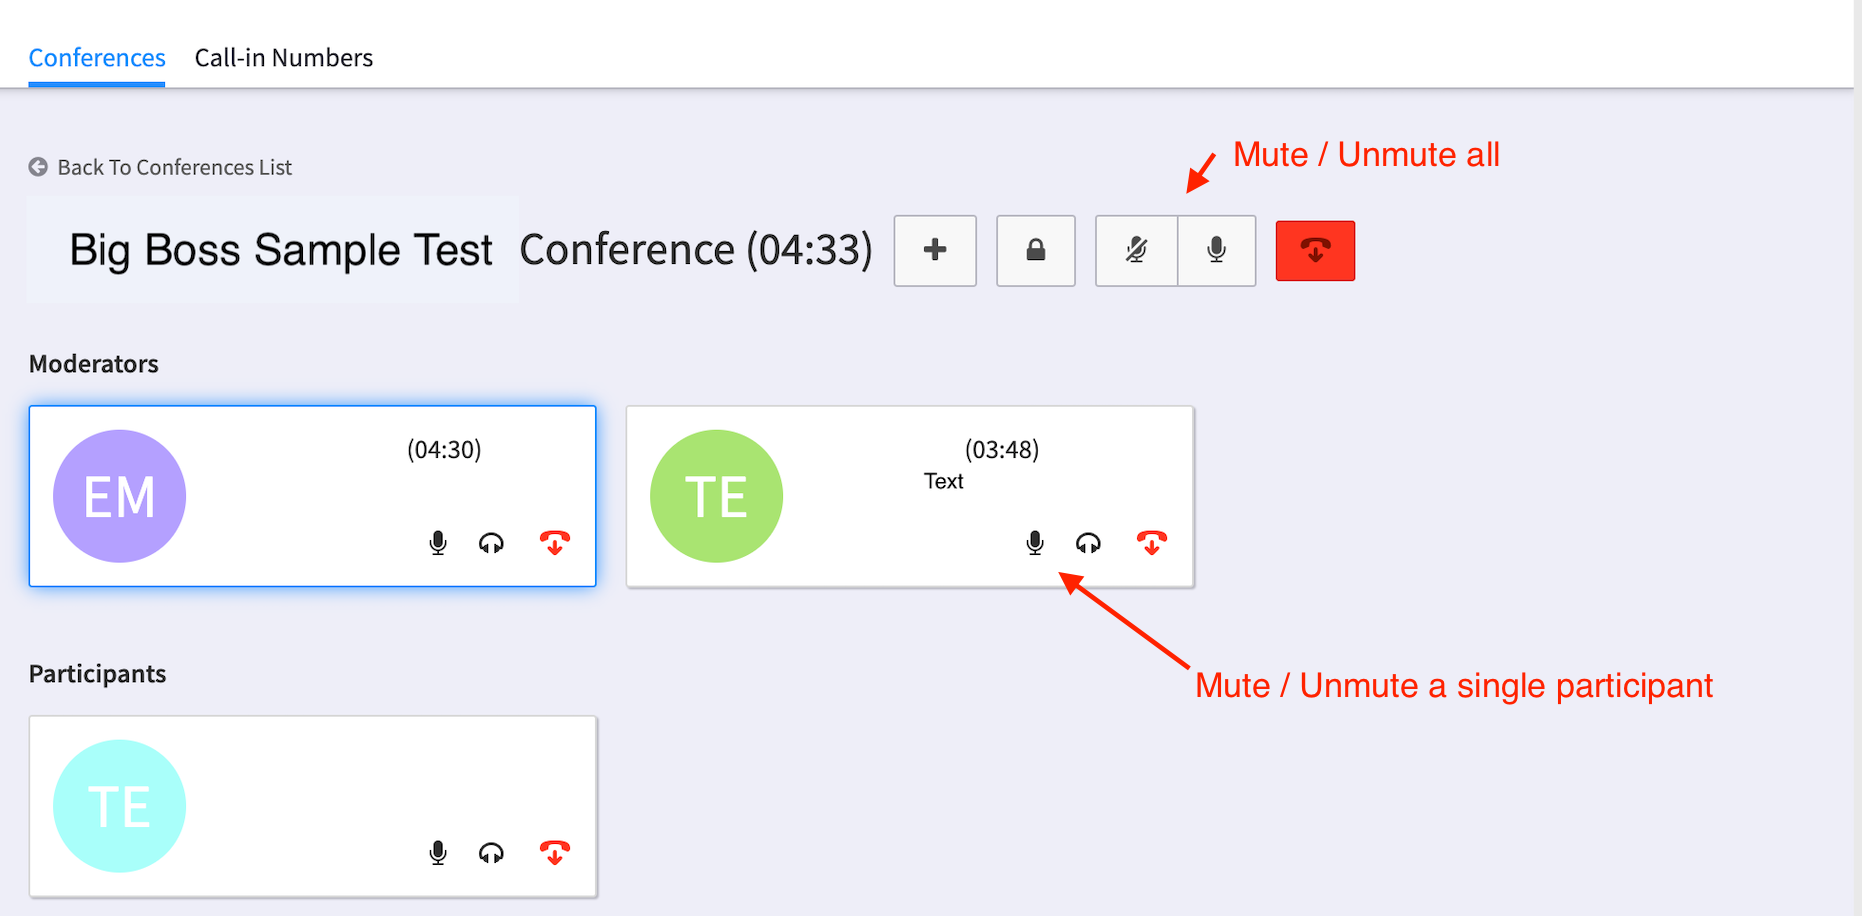
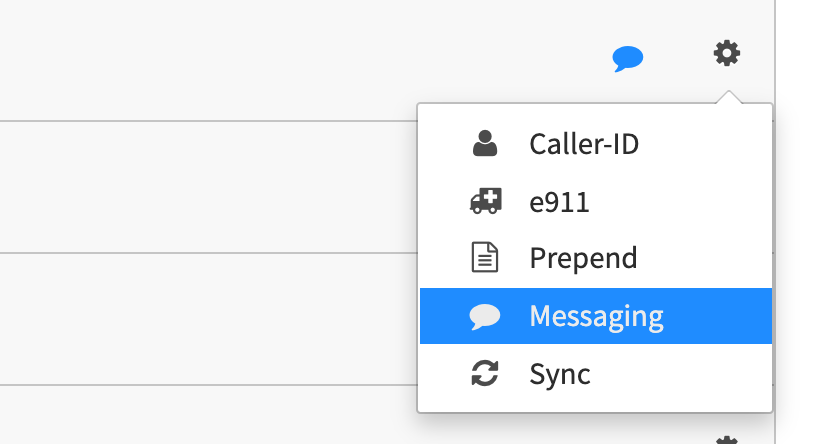
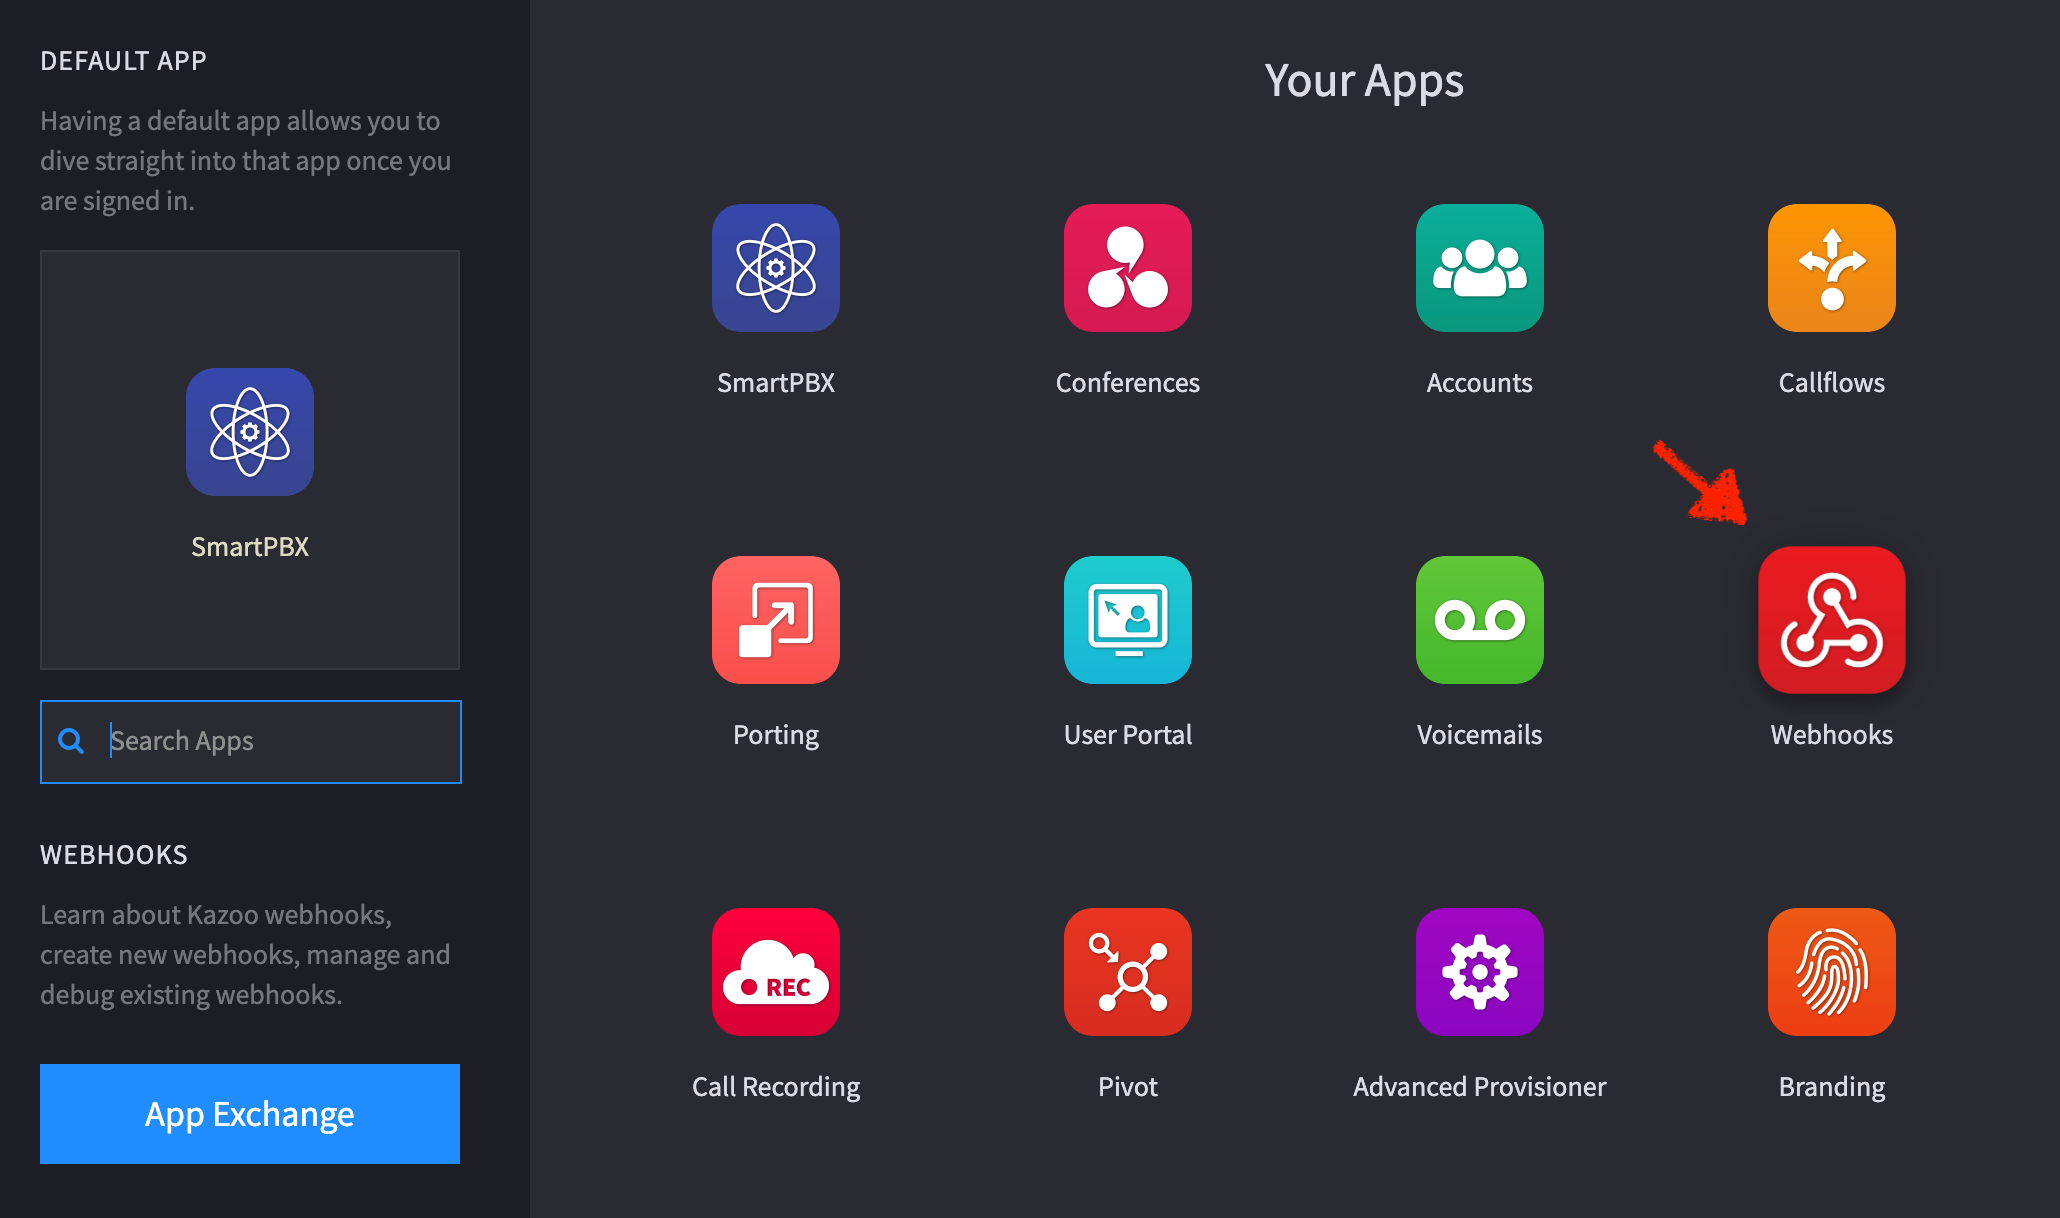
User Stories An administrator wants to customize devices added to a KAZOO account. An administrator wants to ensure security settings are compliant with company protocol. An administrator wants to make sure configuration details and files are secure from scanners and malicious users. Overview Use SmartPBX or Callflows to create a new device. This will ensure SIP credentials are generated in Kazoo. While Advanced Provisioner does have the ability to create a device, it creates one without SIP credentials. Once a device has been configured it generates a secure “config file” that is unique to that device and accessed by KAZOO during call events that include the device. Provisioner enables additional configuration options, and is used if An account or company to bootstrap hundreds of devices with minimal effort. Devices to be pre-set with KAZOO compatible settings and features. NOTE: The config file is critical to correct usage of the devices and KAZOO. If it is corrupted or hacked it can cause considerable issues with your account. Please make sure you invest the time and resources for a point person to understand how this works. Currently KAZOO supports eight brands and 200 models of devices. A full list of these devices can be found HERE. Applications that can affect Device configurations There are three applications in the Monster environment that access some or all Provisioner settings, SmartPBX This is the most accessible and user friendly access to customizing user specific devices. It is recommended all devices be initially added using SmartPBX. Provisioner Once a device is provisioned, admins and managers may provide more advanced configuration settings using the Provisioner application. Callflows Managers may use the callflows app to adjust settings for specific devices used in callflows. Access here is provided for convenience, but is not the most efficient interface for users. A diagram showing the general flow of how devices can be provisioned is below: This document focuses primarily on the Advanced Provisioner application, directed to administrators for advanced configurations. It assumes you will have already added your devices using SmartPBX. At the end of the document there is an overview of where to access provisioning tools Callflows. Initial Device Configuration using SmartPBX It is recommended you can single devices using the SmartPBX app by selecting the devices tab, then Add Device. This will launch the same user selection tools as the Provisioner Application. Additionally, you can edit user preference settings for your personal device if you select the Edit wrench icon to the right of your device name. Any changes you save will be displayed in the Provisioner app and the Callflows app. Customizing configurations using the Provisioner Application Open the Provisioner application from your desktop environment. If you do not see it in your menu ask your administrator to enable it. You will see one of the screens below with 4 tabs: Devices | Account Settings | Contact List | IP Check. Devices The account will search for devices added to the URL assigned during your setup. If you are working with a brand new account, the devices screen will show no results, as below: If any devices already added to this account, you will see the list displayed. Add Device Button – Use SmartPBX or Callflows instead NOTE: While you can add devices here, these devices will lack SIP credentials unless you manually add them from SmartPBX or Callflows. To minimize registration issues, add your devices in SmartPBX or Callflows before you work with the configuration settings below. Configure Device The configuration options provide advanced settings that are typically not accessible in SmartPBX. To further configure each device, select the gear icon at the far right. The options shown are available for each device, however the Configure option screen that will display will vary significantly as they often represent unique features. The number of configuration screens vary depending on your device. Lines, Codecs, Time & Date, Settings, Network and Preferences will always show up for every model, but the rest (Combo Keys, Feature Keys, Sidecars, Handsets) all depend on the specific model. See for example the configuration screen below for a Yealink device. In this case there are 10 tabs to step through and review values in – it is critical whoever is configuring these devices understands what settings are most important and unique, and what settings are better left as default. NOTE The circles at the top represent the number of available SIP accounts a device supports. It also appears for Feature/Combo keys and Sidecars which is for the number of keys supported per device. Unlock Device This is a provision to unlock a device that may have been locked by the system due to suspicious activity related to the device. Often this happens when a device is moved to a different WAN IP address (such as moving it from an office to a home office). The unlock setting allows provisioning to be accepted for 1 week. For more information on why and how phones can get locked, see our document HERE. Restart Device Restarting a device may help as a reset when calls are stuck in the system. It is important to note however, that if you reset your device from another IP address your configuration will be lost. Device Log Files and Config Files Administrators who are managing phones assigned with our provisioning service may access these log files to help in troubleshooting provisioning issues. To access the Device Logs or Device Config Files, click on the settings icon for a device and the dropdown will show options to view Log File of Config Files. View Log File "View Log File" opens up a screen showing activity Provisioner has logged for the device. It will show entries for when the device is created, updated or deleted through Smart PBX or Advanced Provisioner. It also shows when a phone is locked or unlocked for initial provisioning and device requests for config files. Deleting is also included, but this doesn’t show up unless you deleted and then created the device again. You obviously can’t see a deleted log entry for a deleted device. View Config File This is a tool to help troubleshoot issues and/or conflicts with your configuration. "View Config Files" opens up a screen with a list of config files for a given device. Most brands only have a single config file, but some brands, like Polycom and Yealink, have multiple config files. Once you retrieve the file you can download it and send it your administrator or to a support team. Custom Config Files Provisioner does not cover every feature available in the phones, but some vendors do support multiple config files. You can use custom config files to set features we do not cover with our Provisioner or to enable settings we don't expose. If you are using this feature, we ask that you first test the device without any custom config file settings prior to filing a support ticket with us. It will make troubleshooting issues much easier. Currently the vendors that have Custom Config File support on Provisioner: Yealink (using firmware v81+) Polycom See details on configuring specific devices HERE Delete Use this if you want to completely remove your device from the system. Note in some cases when an account is deleted, devices in that account remain listed as "orphans." To assure deletion, use this delete. Account Settings Account Settings are account defaults the admin for the account wishes to be applied on all devices in a given account. Account settings aren’t global. There is a global default (which is the Inherits from Defaults value) which are static settings on the server. Account Settings are account defaults the admin for the account wishes to be applied on all devices in a given account. Account administrators have access to Provider Settings, which is a level of defaults above Account Settings. All devices inherit settings in this order: Global → Provider/Reseller → Account → Device. Settings set lower in the order will override the settings set higher in the order. For example device Settings will always overwrite any settings inherited from above. Account Settings will replace Provider/Reseller Settings. Contact List This feature is in its final stages of development and will be released shortly. It allows an account-wide contact list in your devices. The support will initially be for Poly devices but more to come in the future. See our separate user guide that specifically addresses this feature. IP Check This tool checks to see if an IP address is blocked from provisioning due to abuse or other issues. It is available to Administrators who are managing phones hooked up to our provisioning service. Using IP Check Enter the public IP address that the phone sits on in the IP Address textbox and then click the "Check Status" button. Note: 192.168.X.X or 10.X.X.X IPs are NOT public IPs, please enter only public IP addresses. Ask your IT administrator for help if you need it. Understanding IP Status results The results of a status check should look something like this: Banned If this status is checked, then this IP is temporarily banned because someone tried to load a config file manually, or repeatedly tried to provision phones that weren’t yet in our system. This ban will automatically be removed at the start of the next hour, at which point you can try again. Failed If this status is checked, then there were failed attempts to request config files from this IP. Please check your device logs to see if any of your devices are failing to pick up their config files. Blocklisted If this status is checked, then this IP is permanently blocklisted (this has been renamed from "blacklist"). To be removed from the blocklist, please contact support. If you do not have a support contract, please use the forums to list your complaint. Whitelisted IPs are added to the whitelist on the first successful provisioning attempt from an IP. If it's not on the whitelist, then phones on the IP either hasn't reached Provisioner, or is blocklisted. Accessing Provisioner Settings in Callflows If you are an advanced administrator and are familiar with using the Callflows interface, you can also access the Provisioner settings using the Device selection. This is handy if you are in the middle of creating a callflow and need to change a device setting to support your updates. When you start Callflows, click on the Device option. You can then select “Add Device” and access the same configuration settings. Select the Advanced tab to access additional settings. NOTE: The Callflows application does not display visual versions of phone models. It also does not add/include some key fields used by Provisioner and SmartPBX. We strongly recommend you use SmartPBX for adding devices to start; if more granular settings are required, your system administrator may update these using Provisioner. Troubleshooting Provisioner Settings - Steps If your device is not registering correctly, follow these steps to troubleshoot the source of the issue. Reboot the device. Sometimes it's just a matter of updating the config file. Ensure that the base provisioning URL is correct. By default it should be p3.zswitch.net for Hosted accounts. If you are using a white label instance, ensure that your URL resolves to our provisioner server; if the phone is not reaching our provisioner server, then it's not getting any updates on settings. Reset the provisioning URL to the base provisioning URL. Sometimes phones will end up looking in the wrong directory for their config file. This is caused by deleting the device and re-adding it back into Provisioner. Factory Reset the phone and re-provision. This is to clear all settings and use only the config file generated by Provisioner. If you have custom config files attached to the device, remove it before factory resetting. After it re-provisions: If the device still isn't working, let us know as it could be an issue with our settings. If the device works, then apply the custom config file again and see if that works. If it doesn't then there's an issue with your custom settings. Frequently Asked Questions How do I know if the device I want to provision is supported by KAZOO? We update our list of supported devices frequently; you can find it on our website, HERE. Alternatively, once you launch the software you will see a comprehensive list of devices supported in the configuration process. At times a newer device is introduced; contact the manufacturer to confirm if can use an older configuration file and is backward compatible. In some cases this may mean new features are not entirely supported, but the device will be recognized. What is the difference between “registering a device" and “configuring a device”? Registering a device means the phone validates its SIP credentials with Kazoo to permit the phone to make calls and use the phone features (BLF, voicemail, call parking, etc.) Configuring a device means changing the settings on a device (editing keys, changing date/time, etc). I followed the steps in Provisioner to set up my phone but it is showing “not registered” in SmartPBX? First check the device log in Provisioner to see if “successfully provisioned” line exists. If it doesn’t, then there are issues with the phone connecting to the provisioner server (either the IP is banned or there are network settings preventing phones from reaching provisioner). If it does, then check the SIP credentials in SmartPBX to verify they match the credentials in AP. If they do, then there’s an issue with the SIP credentials in KAZOO. Once the device is configured can I change/update some of the settings for my own personal use? Many of the device settings initially configured in Provisioner can be adjusted and fine tuned using SmartPBX under the Device menu. This includes features such as call forwarding, caller ID, and call flow management. These can also be set in Callflows and even in Call Center Pro if it relates to behavior related to a call queue. When an adjustment is made from any of these other applications it is saved to a common database and reflected across all applications. The Provisioner app provides access to even more settings options for some phones. Make sure to check in with a system administrator to see if these may help a specific use case for your account. Where do I find default settings that are inherited, per notation “Inherits xxx from Defaults”? Settings “inherited from Defaults” cannot be changed at this time. These are static defaults set on the provisioning server ton ensure successful installations; only accounts with their custom installations of Provisioner can have these defaults modified. In the future there may be an option to replace the static defaults with Cluster defaults, this way different clusters can modify their defaults. Please request this on our Product Board if it is an important feature to you. What does Save and Apply Mean? Save and Apply saves the changes and then sends a check-sync for a reboot/update to the phone. It then sends a reboot to the phone. What happens if I initiate a “hard reset” on my device? Does this affect the Provisioner configuration files in KAZOO? How your device is affected depends on whether the phone is re-started using the same IP address. If the same IP address is used then the phone will reconnect with the initial config. file If a different IP address is mapped to the phone, then the initial config. file will no longer be valid. Is it possible to provision a phone not listed in Provisioner? In theory, any SIP phone can work as a very basic phone, however it is not recommended as it likely means you will have limited functionality and upgrades could cause issues. If you have a specific phone model from a manufacturer (for example Poly) that is not listed but similar models are, you may be able to get it working. If however, an entire manufacturer's phone inventory is not listed it's likely that manufacturer has a proprietary setup and does not allow alternate platforms to recognize it. Why didn't my device auto-update after changing a setting in SmartPBX (SPBX) or Advanced Provisioner (AP)? Any change you do in SPBX or AP is not automatically transferred to the phone. It can take up to 24hrs. for updates to be generated in the config file and the Provisioner database. When you make a change in SPBX or AP then a config file for the device is generated on our Provisioner servers. The phone doesn't "see" these changes until it is either rebooted, or it completes the automatic update cycle, which occurs every 24 hours. If you change something in SmartPBX or Advanced Provisioner and want it to be intermediately available in the phone, reboot the device or manually trigger a "Provision now" event from the phone web UI, otherwise wait up to 24h for the change to be picked by the phone. What is the recommended method to configure a device with multiple extensions (user)? We typically follow these steps: Add the device via SmartPBX Create more users as needed in SmartPBX -> Devices -> SoftPhone Copy the credentials of the new user(s) to the extra lines as required. During this process it's helpful to come up with some sort of naming scheme on the additional SoftPhone "devices" to help manage and keep track that those are used as extra lines on physical phones, and not actual soft phones. The BLF function isn’t working for my parked calls If BLF is working to show presence but is not working for indicating parked calls, then this is most likely a setting conflict with KAZOO. Check the device's settings in SmartPBX. We are migrating from Private Cloud to Hosted. Is there a way of migrating the devices like we do for migrations from Hosted to Private Cloud? There is currently no automated routine to migrate devices in that direction. Sometimes I remove an account and its device is still showing -- as an "orphan" it seems "Orphaned" devices can appear when an account is deleted, but not the individual devices. To avoid orphaned devices, the best practice is to delete all the devices from an account first. I added a SIP device in SmartPBX (Yealink t27p) and it appears to have gone through auto-provisioning (logs below), but I can't make any outgoing calls. The device’s screen says “no available handlers” when I try to dial out to my cell. This type of error could indicate the SIP credentials associated with the device are not correct. Click HERE for our Provisioning Guide for Supported Devices Related Articles SmartPBX User Guide Advanced Callflow configurations and setup Technical User Guides Configuring Failover Configuring GeoIP IP Status Check Tool API Reference Docs docs.2600hz.com Devices - Kazoo API Reference REST API Reference for Kazoo Crossbar API ##### View full File
-
 User Stories An administrator wants to customize devices added to a KAZOO account. An administrator wants to ensure security settings are compliant with company protocol. An administrator wants to make sure configuration details and files are secure from scanners and malicious users. Overview Use SmartPBX or Callflows to create a new device. This will ensure SIP credentials are generated in Kazoo. While Advanced Provisioner does have the ability to create a device, it creates one without SIP credentials. Once a device has been configured it generates a secure “config file” that is unique to that device and accessed by KAZOO during call events that include the device. Provisioner enables additional configuration options, and is used if An account or company to bootstrap hundreds of devices with minimal effort. Devices to be pre-set with KAZOO compatible settings and features. NOTE: The config file is critical to correct usage of the devices and KAZOO. If it is corrupted or hacked it can cause considerable issues with your account. Please make sure you invest the time and resources for a point person to understand how this works. Currently KAZOO supports eight brands and 200 models of devices. A full list of these devices can be found HERE. Applications that can affect Device configurations There are three applications in the Monster environment that access some or all Provisioner settings, SmartPBX This is the most accessible and user friendly access to customizing user specific devices. It is recommended all devices be initially added using SmartPBX. Provisioner Once a device is provisioned, admins and managers may provide more advanced configuration settings using the Provisioner application. Callflows Managers may use the callflows app to adjust settings for specific devices used in callflows. Access here is provided for convenience, but is not the most efficient interface for users. A diagram showing the general flow of how devices can be provisioned is below: This document focuses primarily on the Advanced Provisioner application, directed to administrators for advanced configurations. It assumes you will have already added your devices using SmartPBX. At the end of the document there is an overview of where to access provisioning tools Callflows. Initial Device Configuration using SmartPBX It is recommended you can single devices using the SmartPBX app by selecting the devices tab, then Add Device. This will launch the same user selection tools as the Provisioner Application. Additionally, you can edit user preference settings for your personal device if you select the Edit wrench icon to the right of your device name. Any changes you save will be displayed in the Provisioner app and the Callflows app. Customizing configurations using the Provisioner Application Open the Provisioner application from your desktop environment. If you do not see it in your menu ask your administrator to enable it. You will see one of the screens below with 4 tabs: Devices | Account Settings | Contact List | IP Check. Devices The account will search for devices added to the URL assigned during your setup. If you are working with a brand new account, the devices screen will show no results, as below: If any devices already added to this account, you will see the list displayed. Add Device Button – Use SmartPBX or Callflows instead NOTE: While you can add devices here, these devices will lack SIP credentials unless you manually add them from SmartPBX or Callflows. To minimize registration issues, add your devices in SmartPBX or Callflows before you work with the configuration settings below. Configure Device The configuration options provide advanced settings that are typically not accessible in SmartPBX. To further configure each device, select the gear icon at the far right. The options shown are available for each device, however the Configure option screen that will display will vary significantly as they often represent unique features. The number of configuration screens vary depending on your device. Lines, Codecs, Time & Date, Settings, Network and Preferences will always show up for every model, but the rest (Combo Keys, Feature Keys, Sidecars, Handsets) all depend on the specific model. See for example the configuration screen below for a Yealink device. In this case there are 10 tabs to step through and review values in – it is critical whoever is configuring these devices understands what settings are most important and unique, and what settings are better left as default. NOTE The circles at the top represent the number of available SIP accounts a device supports. It also appears for Feature/Combo keys and Sidecars which is for the number of keys supported per device. Unlock Device This is a provision to unlock a device that may have been locked by the system due to suspicious activity related to the device. Often this happens when a device is moved to a different WAN IP address (such as moving it from an office to a home office). The unlock setting allows provisioning to be accepted for 1 week. For more information on why and how phones can get locked, see our document HERE. Restart Device Restarting a device may help as a reset when calls are stuck in the system. It is important to note however, that if you reset your device from another IP address your configuration will be lost. Device Log Files and Config Files Administrators who are managing phones assigned with our provisioning service may access these log files to help in troubleshooting provisioning issues. To access the Device Logs or Device Config Files, click on the settings icon for a device and the dropdown will show options to view Log File of Config Files. View Log File "View Log File" opens up a screen showing activity Provisioner has logged for the device. It will show entries for when the device is created, updated or deleted through Smart PBX or Advanced Provisioner. It also shows when a phone is locked or unlocked for initial provisioning and device requests for config files. Deleting is also included, but this doesn’t show up unless you deleted and then created the device again. You obviously can’t see a deleted log entry for a deleted device. View Config File This is a tool to help troubleshoot issues and/or conflicts with your configuration. "View Config Files" opens up a screen with a list of config files for a given device. Most brands only have a single config file, but some brands, like Polycom and Yealink, have multiple config files. Once you retrieve the file you can download it and send it your administrator or to a support team. Custom Config Files Provisioner does not cover every feature available in the phones, but some vendors do support multiple config files. You can use custom config files to set features we do not cover with our Provisioner or to enable settings we don't expose. If you are using this feature, we ask that you first test the device without any custom config file settings prior to filing a support ticket with us. It will make troubleshooting issues much easier. Currently the vendors that have Custom Config File support on Provisioner: Yealink (using firmware v81+) Polycom See details on configuring specific devices HERE Delete Use this if you want to completely remove your device from the system. Note in some cases when an account is deleted, devices in that account remain listed as "orphans." To assure deletion, use this delete. Account Settings Account Settings are account defaults the admin for the account wishes to be applied on all devices in a given account. Account settings aren’t global. There is a global default (which is the Inherits from Defaults value) which are static settings on the server. Account Settings are account defaults the admin for the account wishes to be applied on all devices in a given account. Account administrators have access to Provider Settings, which is a level of defaults above Account Settings. All devices inherit settings in this order: Global → Provider/Reseller → Account → Device. Settings set lower in the order will override the settings set higher in the order. For example device Settings will always overwrite any settings inherited from above. Account Settings will replace Provider/Reseller Settings. Contact List This feature is in its final stages of development and will be released shortly. It allows an account-wide contact list in your devices. The support will initially be for Poly devices but more to come in the future. See our separate user guide that specifically addresses this feature. IP Check This tool checks to see if an IP address is blocked from provisioning due to abuse or other issues. It is available to Administrators who are managing phones hooked up to our provisioning service. Using IP Check Enter the public IP address that the phone sits on in the IP Address textbox and then click the "Check Status" button. Note: 192.168.X.X or 10.X.X.X IPs are NOT public IPs, please enter only public IP addresses. Ask your IT administrator for help if you need it. Understanding IP Status results The results of a status check should look something like this: Banned If this status is checked, then this IP is temporarily banned because someone tried to load a config file manually, or repeatedly tried to provision phones that weren’t yet in our system. This ban will automatically be removed at the start of the next hour, at which point you can try again. Failed If this status is checked, then there were failed attempts to request config files from this IP. Please check your device logs to see if any of your devices are failing to pick up their config files. Blocklisted If this status is checked, then this IP is permanently blocklisted (this has been renamed from "blacklist"). To be removed from the blocklist, please contact support. If you do not have a support contract, please use the forums to list your complaint. Whitelisted IPs are added to the whitelist on the first successful provisioning attempt from an IP. If it's not on the whitelist, then phones on the IP either hasn't reached Provisioner, or is blocklisted. Accessing Provisioner Settings in Callflows If you are an advanced administrator and are familiar with using the Callflows interface, you can also access the Provisioner settings using the Device selection. This is handy if you are in the middle of creating a callflow and need to change a device setting to support your updates. When you start Callflows, click on the Device option. You can then select “Add Device” and access the same configuration settings. Select the Advanced tab to access additional settings. NOTE: The Callflows application does not display visual versions of phone models. It also does not add/include some key fields used by Provisioner and SmartPBX. We strongly recommend you use SmartPBX for adding devices to start; if more granular settings are required, your system administrator may update these using Provisioner. Troubleshooting Provisioner Settings - Steps If your device is not registering correctly, follow these steps to troubleshoot the source of the issue. Reboot the device. Sometimes it's just a matter of updating the config file. Ensure that the base provisioning URL is correct. By default it should be p3.zswitch.net for Hosted accounts. If you are using a white label instance, ensure that your URL resolves to our provisioner server; if the phone is not reaching our provisioner server, then it's not getting any updates on settings. Reset the provisioning URL to the base provisioning URL. Sometimes phones will end up looking in the wrong directory for their config file. This is caused by deleting the device and re-adding it back into Provisioner. Factory Reset the phone and re-provision. This is to clear all settings and use only the config file generated by Provisioner. If you have custom config files attached to the device, remove it before factory resetting. After it re-provisions: If the device still isn't working, let us know as it could be an issue with our settings. If the device works, then apply the custom config file again and see if that works. If it doesn't then there's an issue with your custom settings. Frequently Asked Questions How do I know if the device I want to provision is supported by KAZOO? We update our list of supported devices frequently; you can find it on our website, HERE. Alternatively, once you launch the software you will see a comprehensive list of devices supported in the configuration process. At times a newer device is introduced; contact the manufacturer to confirm if can use an older configuration file and is backward compatible. In some cases this may mean new features are not entirely supported, but the device will be recognized. What is the difference between “registering a device" and “configuring a device”? Registering a device means the phone validates its SIP credentials with Kazoo to permit the phone to make calls and use the phone features (BLF, voicemail, call parking, etc.) Configuring a device means changing the settings on a device (editing keys, changing date/time, etc). I followed the steps in Provisioner to set up my phone but it is showing “not registered” in SmartPBX? First check the device log in Provisioner to see if “successfully provisioned” line exists. If it doesn’t, then there are issues with the phone connecting to the provisioner server (either the IP is banned or there are network settings preventing phones from reaching provisioner). If it does, then check the SIP credentials in SmartPBX to verify they match the credentials in AP. If they do, then there’s an issue with the SIP credentials in KAZOO. Once the device is configured can I change/update some of the settings for my own personal use? Many of the device settings initially configured in Provisioner can be adjusted and fine tuned using SmartPBX under the Device menu. This includes features such as call forwarding, caller ID, and call flow management. These can also be set in Callflows and even in Call Center Pro if it relates to behavior related to a call queue. When an adjustment is made from any of these other applications it is saved to a common database and reflected across all applications. The Provisioner app provides access to even more settings options for some phones. Make sure to check in with a system administrator to see if these may help a specific use case for your account. Where do I find default settings that are inherited, per notation “Inherits xxx from Defaults”? Settings “inherited from Defaults” cannot be changed at this time. These are static defaults set on the provisioning server ton ensure successful installations; only accounts with their custom installations of Provisioner can have these defaults modified. In the future there may be an option to replace the static defaults with Cluster defaults, this way different clusters can modify their defaults. Please request this on our Product Board if it is an important feature to you. What does Save and Apply Mean? Save and Apply saves the changes and then sends a check-sync for a reboot/update to the phone. It then sends a reboot to the phone. What happens if I initiate a “hard reset” on my device? Does this affect the Provisioner configuration files in KAZOO? How your device is affected depends on whether the phone is re-started using the same IP address. If the same IP address is used then the phone will reconnect with the initial config. file If a different IP address is mapped to the phone, then the initial config. file will no longer be valid. Is it possible to provision a phone not listed in Provisioner? In theory, any SIP phone can work as a very basic phone, however it is not recommended as it likely means you will have limited functionality and upgrades could cause issues. If you have a specific phone model from a manufacturer (for example Poly) that is not listed but similar models are, you may be able to get it working. If however, an entire manufacturer's phone inventory is not listed it's likely that manufacturer has a proprietary setup and does not allow alternate platforms to recognize it. Why didn't my device auto-update after changing a setting in SmartPBX (SPBX) or Advanced Provisioner (AP)? Any change you do in SPBX or AP is not automatically transferred to the phone. It can take up to 24hrs. for updates to be generated in the config file and the Provisioner database. When you make a change in SPBX or AP then a config file for the device is generated on our Provisioner servers. The phone doesn't "see" these changes until it is either rebooted, or it completes the automatic update cycle, which occurs every 24 hours. If you change something in SmartPBX or Advanced Provisioner and want it to be intermediately available in the phone, reboot the device or manually trigger a "Provision now" event from the phone web UI, otherwise wait up to 24h for the change to be picked by the phone. What is the recommended method to configure a device with multiple extensions (user)? We typically follow these steps: Add the device via SmartPBX Create more users as needed in SmartPBX -> Devices -> SoftPhone Copy the credentials of the new user(s) to the extra lines as required. During this process it's helpful to come up with some sort of naming scheme on the additional SoftPhone "devices" to help manage and keep track that those are used as extra lines on physical phones, and not actual soft phones. The BLF function isn’t working for my parked calls If BLF is working to show presence but is not working for indicating parked calls, then this is most likely a setting conflict with KAZOO. Check the device's settings in SmartPBX. We are migrating from Private Cloud to Hosted. Is there a way of migrating the devices like we do for migrations from Hosted to Private Cloud? There is currently no automated routine to migrate devices in that direction. Sometimes I remove an account and its device is still showing -- as an "orphan" it seems "Orphaned" devices can appear when an account is deleted, but not the individual devices. To avoid orphaned devices, the best practice is to delete all the devices from an account first. I added a SIP device in SmartPBX (Yealink t27p) and it appears to have gone through auto-provisioning (logs below), but I can't make any outgoing calls. The device’s screen says “no available handlers” when I try to dial out to my cell. This type of error could indicate the SIP credentials associated with the device are not correct. Click HERE for our Provisioning Guide for Supported Devices Related Articles SmartPBX User Guide Advanced Callflow configurations and setup Technical User Guides Configuring Failover Configuring GeoIP IP Status Check Tool API Reference Docs docs.2600hz.com Devices - Kazoo API Reference REST API Reference for Kazoo Crossbar API #####
 -
untilFrom all of us at 2600Hz to all of you, we wish you a happy holiday season and prosperous new year! To help you plan accordingly for the holidays, we wanted to let you know that 2600Hz will be closed on the following days: Thursday, Dec 24th Friday, Dec 25th Thursday, Dec 31st Friday, Jan 1st If you experience a major operational emergency and support is required, please first submit a ticket to support@2600hz.com then call our support line at (415) 886-7950 to escalate it. For all other support requests, you may submit a ticket by emailing support@2600hz.com and your ticket will be handled when we return on Monday, January 4th. Manage Event Report Event Download Event Add Similar Event
-
untilFrom all of us at 2600Hz to all of you, we wish you a happy holiday season and prosperous new year! To help you plan accordingly for the holidays, we wanted to let you know that 2600Hz will be closed on the following days: Thursday, Dec 24th Friday, Dec 25th Thursday, Dec 31st Friday, Jan 1st If you experience a major operational emergency and support is required, please first submit a ticket to support@2600hz.com then call our support line at (415) 886-7950 to escalate it. For all other support requests, you may submit a ticket by emailing support@2600hz.com and your ticket will be handled when we return on Monday, January 4th.
-
In case you missed it, Bret is looking for feedback on the Operator console Pro app. For those of you who have used it and/or might want to, please take a look here and give him your tips. Thank you all! Your voice is important to us. emily
-
User Story An account wants to manage incoming call routing based on open and closed office hours. An account wants to set different Virtual Receptionist prompts based on open and closed hours, including a “lunch hour” message, a “weekend” message and a “holiday” message. Before you Begin Confirm your office hours, including any times you may be closed due to lunch or holidays. If your office hours vary by day and include different lunch hours, consider creating a .csv file that reflects these values. You can import that file to save time; see below. Open SmartPBX SmartPBX supports a new Office Hours Strategy process. The document below is part of the SmartPBX app. Select Main Number from the side menu. Create Office Hours Strategy Select the Main Number menu, then Office Hours Strategy. You will see the following screen. If your message options stay constant 24/7, you can keep the default selection 24 hours Open Office. If you have different Incoming Call routing options based on your office hours, select the Custom Office Hours button. From this screen. you have 4 options for entering your personalized hours. Manually add hours using the “Add Hours” blue button (top left) “Select a template” from the drop down menu, which will populate a default set of hours Import CSV (top right) – where you can enter the data in a .csv file and upload it. Manually edit hours per day, by selecting each day tab. This is available as an edit option once initial hours are input. Add Hours If you want to add your hours manually, select all days that are the same, and enter your start and end times. NOTE: If you do have a separate message for lunch hours, save. your “open hours” first, then add your “Lunch Hours”. This can be any window of time your office is closed within the “open hours” window. When saved, “Lunch Hours” will use the Incoming Call Handling process as identified in the Incoming Call / Lunch Hours section below. Refer to the SmartPBX User Guide for details. Select an existing template Another way to populate your office hours is to use an existing template. NOTES: The initial template provided includes a traditional 9am to 5pm work week with a “closed” lunch hour window from 12pm to 1:00pm. You can assign this template and then make edits to it; for example if your lunch window is from 12:30-1:30 you can make these edits only. If a timeframe is not listed it is assumed the office is closed and will follow the closed path. We will be adding more templates as part of our update schedule. Once the values have been entered you will be able to scroll through each day using the tabs at the top of the window. Import a CSV fileAnother way to populate your office hours is to import a .csv file from your computer. If you have selected Custom Hours, you will see this at the top of your dialog box. Below is a sample spreadsheet file showing the format to follow. Export this as a .csv file NOTES: You will not see the “Download CSV” option until you have populated office hours values. You can then select download, edit the file, and re-upload it with changes. The .csv import system currently does not support any minute values other than :00 or :30. If you use other values the data will not be loaded. Make sure to use a 24 hour time indicator, there are no am and pm values. You will see the following dialog box prompting you to identify your file. That’s it! Assign your Incoming Call Handling Paths Now that you have defined your office hours, you will want to assign how your incoming calls will respond during the different hours – while Open, at Lunch, After Hours and during holidays. This is accessed in the menu item under Main Number below the Holiday Hours setting. It looks like this: For a detailed overview of how to manage these settings, refer to the SmartPBX guide on How to set up a Virtual Receptionist (also called IVR). Frequently Asked Questions Is there any way to add other minute values besides :30 or :00? We like to use 8:45 as our start to the day. This feature was available in earlier versions of SmartPBX and has been temporarily disabled. We will be updating the software shortly so you can manually add any minute value in the actual time field. How can I clear all the time values in the Office Hours and start over? If you want to clear all the office hours, simply select “24 hours Open Office” as your choice. This will clear all office hour variables, and you can re-select “Custom Office Hours” to start over. If I have a holiday setting defined under Holidays, are those hours respected over the standard Office Hours? Yes. If you have defined holidays, make sure to set your Incoming Call / Holidays tab to reflect how you want to your calls to be routed. Note this option will only be displayed if you have defined a holiday first. For details on that, refer to the SmartPBX User Guide here. When I try to choose lunch hours it only gives me a limited set of choices, how can I change this? The lunch hours selection is based on the close hours in the morning and the open hour in the afternoon. This forces the system to have no unassigned hours. To change your lunch hour options, change the morning and evening hours first. Related Articles SmartPBX User Guide SmartPBX: How to set up a Virtual Receptionist API Reference Docs docs.2600hz.com Temporal Rules - Kazoo API Reference REST API Reference for Kazoo Crossbar API ###### View full File
-
 User Story An account wants to manage incoming call routing based on open and closed office hours. An account wants to set different Virtual Receptionist prompts based on open and closed hours, including a “lunch hour” message, a “weekend” message and a “holiday” message. Before you Begin Confirm your office hours, including any times you may be closed due to lunch or holidays. If your office hours vary by day and include different lunch hours, consider creating a .csv file that reflects these values. You can import that file to save time; see below. Open SmartPBX SmartPBX supports a new Office Hours Strategy process. The document below is part of the SmartPBX app. Select Main Number from the side menu. Create Office Hours Strategy Select the Main Number menu, then Office Hours Strategy. You will see the following screen. If your message options stay constant 24/7, you can keep the default selection 24 hours Open Office. If you have different Incoming Call routing options based on your office hours, select the Custom Office Hours button. From this screen. you have 4 options for entering your personalized hours. Manually add hours using the “Add Hours” blue button (top left) “Select a template” from the drop down menu, which will populate a default set of hours Import CSV (top right) – where you can enter the data in a .csv file and upload it. Manually edit hours per day, by selecting each day tab. This is available as an edit option once initial hours are input. Add Hours If you want to add your hours manually, select all days that are the same, and enter your start and end times. NOTE: If you do have a separate message for lunch hours, save. your “open hours” first, then add your “Lunch Hours”. This can be any window of time your office is closed within the “open hours” window. When saved, “Lunch Hours” will use the Incoming Call Handling process as identified in the Incoming Call / Lunch Hours section below. Refer to the SmartPBX User Guide for details. Select an existing template Another way to populate your office hours is to use an existing template. NOTES: The initial template provided includes a traditional 9am to 5pm work week with a “closed” lunch hour window from 12pm to 1:00pm. You can assign this template and then make edits to it; for example if your lunch window is from 12:30-1:30 you can make these edits only. If a timeframe is not listed it is assumed the office is closed and will follow the closed path. We will be adding more templates as part of our update schedule. Once the values have been entered you will be able to scroll through each day using the tabs at the top of the window. Import a CSV fileAnother way to populate your office hours is to import a .csv file from your computer. If you have selected Custom Hours, you will see this at the top of your dialog box. Below is a sample spreadsheet file showing the format to follow. Export this as a .csv file NOTES: You will not see the “Download CSV” option until you have populated office hours values. You can then select download, edit the file, and re-upload it with changes. The .csv import system currently does not support any minute values other than :00 or :30. If you use other values the data will not be loaded. Make sure to use a 24 hour time indicator, there are no am and pm values. You will see the following dialog box prompting you to identify your file. That’s it! Assign your Incoming Call Handling Paths Now that you have defined your office hours, you will want to assign how your incoming calls will respond during the different hours – while Open, at Lunch, After Hours and during holidays. This is accessed in the menu item under Main Number below the Holiday Hours setting. It looks like this: For a detailed overview of how to manage these settings, refer to the SmartPBX guide on How to set up a Virtual Receptionist (also called IVR). Frequently Asked Questions Is there any way to add other minute values besides :30 or :00? We like to use 8:45 as our start to the day. This feature was available in earlier versions of SmartPBX and has been temporarily disabled. We will be updating the software shortly so you can manually add any minute value in the actual time field. How can I clear all the time values in the Office Hours and start over? If you want to clear all the office hours, simply select “24 hours Open Office” as your choice. This will clear all office hour variables, and you can re-select “Custom Office Hours” to start over. If I have a holiday setting defined under Holidays, are those hours respected over the standard Office Hours? Yes. If you have defined holidays, make sure to set your Incoming Call / Holidays tab to reflect how you want to your calls to be routed. Note this option will only be displayed if you have defined a holiday first. For details on that, refer to the SmartPBX User Guide here. When I try to choose lunch hours it only gives me a limited set of choices, how can I change this? The lunch hours selection is based on the close hours in the morning and the open hour in the afternoon. This forces the system to have no unassigned hours. To change your lunch hour options, change the morning and evening hours first. Related Articles SmartPBX User Guide SmartPBX: How to set up a Virtual Receptionist API Reference Docs docs.2600hz.com Temporal Rules - Kazoo API Reference REST API Reference for Kazoo Crossbar API ######
 -
Conferences Application User Guide User Stories An account wants to create a series of conference call settings that can be saved and used multiple times by different users in the company account. A user wants to create his/her own conference call with personalized settings A user who has comm.io installed wants to set a conference call “meeting room” that displays on the comm.io Conferences screen. A user wants to set personalized conferences that are available for access using the comm.io app. Overview Conference manager is a tool used within KAZOO platform that provides a simple user interface for creating, monitoring, recording, and saving conference variables. Conference moderators can initiate and end conferences on demand, see all activity for live participants, and manage microphones. In addition, you can use conferencing globally, without racking up high international fees, providing for the best business conferencing experience available. Getting Started NOTE: We have a short video showing the initial steps to setting up conferences HERE. Make sure your admin has enabled the conferencing app from the app store and select it from your Apps page. If you do not find it, ask your administrator to provide access to it. Conferences Tab The opening page for Conferences will show a list of any existing conferences already created and the general settings assigned to it. NOTE: Any conferences highlighted in blue are active (live) calls. Create a new conference Select the blue Create Conference button. Enter Details Conference Name Use a name that your owner will recognize. Often this includes the owner name. Conference Owner Select from the list of users provided. If you do not find the name you want, you will need to add it as a user in the SmartPBX app. Moderator PIN This is a number that a moderator can enter from a call-in number to gain access to moderator functions. Participant PIN This is a number that a participants can enter to gain access to the call using a call-in phone number. Max Participants This field will only show if you choose to enable video conferencing. For now the maximum video participants is 20. NOTE: If you want to use the video feature in comm.io you must select the enable video conferencing box also (see below). Enter Options Participants join the conference muted This is a great option for large conferences. You can mute/unmute all participants at once from the “View Conference” page. Participants join the conference deaf This means the participants cannot hear you or any other participants as you set up your conference. Again this is useful for larger conference settings. Play entry tone This is a verification tone that a participant has joined the conference. This can get distracting if there are a lot of late participants! Play exit tone This will play when a participant exits a conference. This can get distracting if there are a lot of participants existing early! Enable Video Conferencing This must be checked in order to use the comm.io video conference and share video features. Note there is a maximum of 20 participants to join by video and you may experience lesser quality transmission with more people. Additionally, video support will incur additional charges. Please contact your administrator to review these variables. NOTE: If you are using the comm.io app and wish to share screens, you MUST select the Use Video settings in that Conference Server Number The conference ID number is used for people who choose to join the conference by audio only. They will be asked an ID number as their entrance code. View a conference To the right of the conference name you will see an eye icon. Select this to “view” the status of a conference in session. Your screen will show the list of attendees and moderators. If you have moderator status, at the top you will see this selection of controls that can be managed during the call: The + symbol Allows you to add additional users or a known device from your account to the conference. Using the dropdown, select a user or a device. Select as many as you want, and click on the Add button. Your added selections will be sent an invitation. The lock This locks and unlocks participant’s ability to mute and unmute calls from their local access point. Mute / Unmute This is a global setting to mute or unmute all participants. Hang Up This is a master switch to end the call. NOTE: If for some reason the comm.io application does not end a conference call, this can be used to force end calls from comm.io. Call-in Numbers Tab The call-in numbers tab provides a list of numbers assigned as conference call call-in numbers. These will be used for users who wish to call in by phone, and also as the conference identifier. Add Call-In Number If you need to buy a number, you can access that process here, or add a number from your spare inventory. If you want the call in to be an extension, add it here. Editing Number Features To the right of each number the following icons will be displayed. If these options are shown in gray, the number must be edited/accessed through the Smart PBX application. If you can access these icons, they will prompt the following: The megaphone allows you to add and customize a Greeting when the conference number is accessed. You can use an existing media file you've uploaded, upload a new one, or type in a text that will be converted to speech. And you can delete your conference call setup using the Trash icon. Frequently Asked Questions How do I mute or unmute people on the call? As a moderator you launch the conference app and select the conference call when it’s in session. The you will be given the option to mute all participants or a specific participant. Can the moderator do this on the phone as well with a star code? Each caller, whether a moderator or a participant may be able to use their local mute options (on a mobile phone, a headset, or a feature code on a desk phone) to mute themselves personally. To mute participants globally it’s best to use the moderator options in either the conferences app or the comm.io app. Related Articles Video: How to Create and Manage Conferences comm.io Video Conferencing User Guide SmartPBX User Guide API Reference Docs docs.2600hz.com Configuring Conference Rooms - Kazoo API Reference REST API Reference for Kazoo Crossbar API docs.2600hz.com Routing to Conferences - Kazoo API Reference REST API Reference for Kazoo Crossbar API ####### View full File
-
 Conferences Application User Guide User Stories An account wants to create a series of conference call settings that can be saved and used multiple times by different users in the company account. A user wants to create his/her own conference call with personalized settings A user who has comm.io installed wants to set a conference call “meeting room” that displays on the comm.io Conferences screen. A user wants to set personalized conferences that are available for access using the comm.io app. Overview Conference manager is a tool used within KAZOO platform that provides a simple user interface for creating, monitoring, recording, and saving conference variables. Conference moderators can initiate and end conferences on demand, see all activity for live participants, and manage microphones. In addition, you can use conferencing globally, without racking up high international fees, providing for the best business conferencing experience available. Getting Started NOTE: We have a short video showing the initial steps to setting up conferences HERE. Make sure your admin has enabled the conferencing app from the app store and select it from your Apps page. If you do not find it, ask your administrator to provide access to it. Conferences Tab The opening page for Conferences will show a list of any existing conferences already created and the general settings assigned to it. NOTE: Any conferences highlighted in blue are active (live) calls. Create a new conference Select the blue Create Conference button. Enter Details Conference Name Use a name that your owner will recognize. Often this includes the owner name. Conference Owner Select from the list of users provided. If you do not find the name you want, you will need to add it as a user in the SmartPBX app. Moderator PIN This is a number that a moderator can enter from a call-in number to gain access to moderator functions. Participant PIN This is a number that a participants can enter to gain access to the call using a call-in phone number. Max Participants This field will only show if you choose to enable video conferencing. For now the maximum video participants is 20. NOTE: If you want to use the video feature in comm.io you must select the enable video conferencing box also (see below). Enter Options Participants join the conference muted This is a great option for large conferences. You can mute/unmute all participants at once from the “View Conference” page. Participants join the conference deaf This means the participants cannot hear you or any other participants as you set up your conference. Again this is useful for larger conference settings. Play entry tone This is a verification tone that a participant has joined the conference. This can get distracting if there are a lot of late participants! Play exit tone This will play when a participant exits a conference. This can get distracting if there are a lot of participants existing early! Enable Video Conferencing This must be checked in order to use the comm.io video conference and share video features. Note there is a maximum of 20 participants to join by video and you may experience lesser quality transmission with more people. Additionally, video support will incur additional charges. Please contact your administrator to review these variables. NOTE: If you are using the comm.io app and wish to share screens, you MUST select the Use Video settings in that Conference Server Number The conference ID number is used for people who choose to join the conference by audio only. They will be asked an ID number as their entrance code. View a conference To the right of the conference name you will see an eye icon. Select this to “view” the status of a conference in session. Your screen will show the list of attendees and moderators. If you have moderator status, at the top you will see this selection of controls that can be managed during the call: The + symbol Allows you to add additional users or a known device from your account to the conference. Using the dropdown, select a user or a device. Select as many as you want, and click on the Add button. Your added selections will be sent an invitation. The lock This locks and unlocks participant’s ability to mute and unmute calls from their local access point. Mute / Unmute This is a global setting to mute or unmute all participants. Hang Up This is a master switch to end the call. NOTE: If for some reason the comm.io application does not end a conference call, this can be used to force end calls from comm.io. Call-in Numbers Tab The call-in numbers tab provides a list of numbers assigned as conference call call-in numbers. These will be used for users who wish to call in by phone, and also as the conference identifier. Add Call-In Number If you need to buy a number, you can access that process here, or add a number from your spare inventory. If you want the call in to be an extension, add it here. Editing Number Features To the right of each number the following icons will be displayed. If these options are shown in gray, the number must be edited/accessed through the Smart PBX application. If you can access these icons, they will prompt the following: The megaphone allows you to add and customize a Greeting when the conference number is accessed. You can use an existing media file you've uploaded, upload a new one, or type in a text that will be converted to speech. And you can delete your conference call setup using the Trash icon. Frequently Asked Questions How do I mute or unmute people on the call? As a moderator you launch the conference app and select the conference call when it’s in session. The you will be given the option to mute all participants or a specific participant. Can the moderator do this on the phone as well with a star code? Each caller, whether a moderator or a participant may be able to use their local mute options (on a mobile phone, a headset, or a feature code on a desk phone) to mute themselves personally. To mute participants globally it’s best to use the moderator options in either the conferences app or the comm.io app. Related Articles Video: How to Create and Manage Conferences comm.io Video Conferencing User Guide SmartPBX User Guide API Reference Docs docs.2600hz.com Configuring Conference Rooms - Kazoo API Reference REST API Reference for Kazoo Crossbar API docs.2600hz.com Routing to Conferences - Kazoo API Reference REST API Reference for Kazoo Crossbar API #######
 -
Hi Jack: Yes, you can mute a single caller or all callers using the conference app if you have "Moderator" status in the conference. When you are logged into a conference using the conference manager app, you can "View" the live call (live conferences are shaded as active), by finding your conference call number, and then the Eye icon to it. The next screen shows the conference activity: The top mute option is to mute all participants. If you only want to mute the one hammering on a keyboard or whose dog is barking, then you can use the microphone within each participant's box As far as using your own hardware to mute yourself, I have had luck using the mute on my headset and on my cell phone. I have not used the Feature Code on a desk phone but it likely will work. I hope this helps? emily

-
User Story A caller based in France does not use any prefixes and only places calls to local phone numbers. Typically, to use KAZOO the customer would have to get used to typing prefixes in order to place calls. Overview The Dialplan app enables you to support simplified dialing for outbound phone calls. Using a RegEx syntax, Dialplan can take a number a user has dialed and transform it into a number recognized by E.164 global formatting. Users who are used to dialing phone numbers in a way that only works in their specific country can now continue to dial numbers in that way. Users can dial local numbers, just as they do with the PSTN, by providing Kazoo with DialPlan regular expressions. These regexps will be used on the dialed numbers to correct them to properly routable numbers. It is possible to set these regexps on an account, user, or device basis. Kazoo will then apply the regexes in order, preferring the calling device's, then user's (if the calling device is assigned to a user), and finally the account's dialplan. Before you start This application assumes you are familiar with using Regular Expression syntaxes, or RegEx, which is a sequence of characters that define a search pattern where the result can be then used for an additional task. It is often used for searching and replacing telephone number strings. There are several websites that provide help in creating and testing these expressions. For starters you can try the links below. For more information on how to create or edit a RegEx Expression, see this page. To test your RegEx formula, go here. Home Screen On opening Dial Plan you will see three tabs: Account | User | Device, and a listing of any Dial Plan rules if any have been assigned. Account Tab This shows any System Rules: rules that are applied to the entire account. System Rules will display if they have been pre-configured based on your system install. These are typically related to international calling rules. Custom Rules will be where you create custom rules for the entire account. Description: Enter a description that says what your RegEx will do Regex: Enter the actual regex calculation Prefix: Enter the digits before the regex Suffix: Enter the digits after the regex You can test your Regex by typing a series of digits (likely a phone number) in the empty box. You should see a result something like this: The example below shows capturing any digits and adding 502 as the areacode User Tab The user tab provides the same options to add RegEx rules, this time unique only to the user. Select the user from the dropdown, and add your RexEx. Device Tab The device tab provides the same options to add RegEx rules, this time unique only to a specific device. Select the user from the dropdown, and add your RegEx. Some Tips Be careful your rules do not interfere with extension dialing within an account It is possible that these dial_plan rules will interfere with extension dialing within an account. Please take common extension length into consideration when creating these dial_plan rules. Determine if a number is "global"# The first thing to configure is how to tell when a number is "globally rout able" versus an internal extension. This is managed in the system_config/number_manager configuration document, under the reconcile_regex key. "reconcile_regex": "^\\+?1?\\d{10}$|^\\+[2-9]\\d{7,}$|^011\\d{5,}$|^00\\d{5,}$" Here is the default, which if reading regex's isn't second nature, optionally matches a + and a 1 (the country code for the US), followed by any 10 digits, or matches 8-or-more digit numbers (prefixed by a +), or the international dialing codes for the US. This regex must be able to match number formats your carrier(s) will send you. In the US, it is normal to see the 10-digit number (NPA-NXX-XXXX), optionally with a 1 prepended (NPANXXXXXX), or the full E.164 version (+1NPANXXXXXX). The default reconcile_regex matches all of those. Internal extensions, like 100, 2504, or *97, will obviously fail to be matched with the reconcile_regex and thus be rout-able only by authorized devices within an account. Globally distributed users Users within an account may be located anywhere in the world. An account-level dial_plan may not make sense for them. Instead, place dial_plan objects on the users' documents to ensure their local dialing preferences are honored. Country samples# France +33# Calls within France are 10-digit numbers with a leading 0; from outside of France, only the last 9 digits (omitting the 0) are dialed after the +33 country code. Armed with this knowledge, a regex might look like: "reconcile_regex":"^(?:\\+33\\d{9})|(?:0\\d{9})$" Note: (?:) is a non-capturing regex group This should match calls dialed within France (using the 0 followed by a 9 digit number) as well as calls coming from outside of France (+33 followed by a 9 digit number). One locale for all devices in an account If all of the users/devices in an account are located in the same city, it would be most convenient to place a DialPlan at the account level, allowing them to dial as they are used to and converting it for Kazoo processing. For instance, we can use the following ^(\\d{7})$ regex for an account whose users are all in Louisville, KY. Then, when a user dials a 7-digit number, it is prepended with the 502 area code (as well as +1). FAQs Can I create RegEx rules for incoming calls? No. The dialplan app is only designed for outgoing call management. API References docs.2600hz.com International Numbers Dialplan Configurations REST API Reference for Kazoo Crossbar API View full File
-
 User Story A caller based in France does not use any prefixes and only places calls to local phone numbers. Typically, to use KAZOO the customer would have to get used to typing prefixes in order to place calls. Overview The Dialplan app enables you to support simplified dialing for outbound phone calls. Using a RegEx syntax, Dialplan can take a number a user has dialed and transform it into a number recognized by E.164 global formatting. Users who are used to dialing phone numbers in a way that only works in their specific country can now continue to dial numbers in that way. Users can dial local numbers, just as they do with the PSTN, by providing Kazoo with DialPlan regular expressions. These regexps will be used on the dialed numbers to correct them to properly routable numbers. It is possible to set these regexps on an account, user, or device basis. Kazoo will then apply the regexes in order, preferring the calling device's, then user's (if the calling device is assigned to a user), and finally the account's dialplan. Before you start This application assumes you are familiar with using Regular Expression syntaxes, or RegEx, which is a sequence of characters that define a search pattern where the result can be then used for an additional task. It is often used for searching and replacing telephone number strings. There are several websites that provide help in creating and testing these expressions. For starters you can try the links below. For more information on how to create or edit a RegEx Expression, see this page. To test your RegEx formula, go here. Home Screen On opening Dial Plan you will see three tabs: Account | User | Device, and a listing of any Dial Plan rules if any have been assigned. Account Tab This shows any System Rules: rules that are applied to the entire account. System Rules will display if they have been pre-configured based on your system install. These are typically related to international calling rules. Custom Rules will be where you create custom rules for the entire account. Description: Enter a description that says what your RegEx will do Regex: Enter the actual regex calculation Prefix: Enter the digits before the regex Suffix: Enter the digits after the regex You can test your Regex by typing a series of digits (likely a phone number) in the empty box. You should see a result something like this: The example below shows capturing any digits and adding 502 as the areacode User Tab The user tab provides the same options to add RegEx rules, this time unique only to the user. Select the user from the dropdown, and add your RexEx. Device Tab The device tab provides the same options to add RegEx rules, this time unique only to a specific device. Select the user from the dropdown, and add your RegEx. Some Tips Be careful your rules do not interfere with extension dialing within an account It is possible that these dial_plan rules will interfere with extension dialing within an account. Please take common extension length into consideration when creating these dial_plan rules. Determine if a number is "global"# The first thing to configure is how to tell when a number is "globally rout able" versus an internal extension. This is managed in the system_config/number_manager configuration document, under the reconcile_regex key. "reconcile_regex": "^\\+?1?\\d{10}$|^\\+[2-9]\\d{7,}$|^011\\d{5,}$|^00\\d{5,}$" Here is the default, which if reading regex's isn't second nature, optionally matches a + and a 1 (the country code for the US), followed by any 10 digits, or matches 8-or-more digit numbers (prefixed by a +), or the international dialing codes for the US. This regex must be able to match number formats your carrier(s) will send you. In the US, it is normal to see the 10-digit number (NPA-NXX-XXXX), optionally with a 1 prepended (NPANXXXXXX), or the full E.164 version (+1NPANXXXXXX). The default reconcile_regex matches all of those. Internal extensions, like 100, 2504, or *97, will obviously fail to be matched with the reconcile_regex and thus be rout-able only by authorized devices within an account. Globally distributed users Users within an account may be located anywhere in the world. An account-level dial_plan may not make sense for them. Instead, place dial_plan objects on the users' documents to ensure their local dialing preferences are honored. Country samples# France +33# Calls within France are 10-digit numbers with a leading 0; from outside of France, only the last 9 digits (omitting the 0) are dialed after the +33 country code. Armed with this knowledge, a regex might look like: "reconcile_regex":"^(?:\\+33\\d{9})|(?:0\\d{9})$" Note: (?:) is a non-capturing regex group This should match calls dialed within France (using the 0 followed by a 9 digit number) as well as calls coming from outside of France (+33 followed by a 9 digit number). One locale for all devices in an account If all of the users/devices in an account are located in the same city, it would be most convenient to place a DialPlan at the account level, allowing them to dial as they are used to and converting it for Kazoo processing. For instance, we can use the following ^(\\d{7})$ regex for an account whose users are all in Louisville, KY. Then, when a user dials a 7-digit number, it is prepended with the 502 area code (as well as +1). FAQs Can I create RegEx rules for incoming calls? No. The dialplan app is only designed for outgoing call management. API References docs.2600hz.com International Numbers Dialplan Configurations REST API Reference for Kazoo Crossbar API
 -
User Story An account manager wants to review account balances for each account and sub account. An account manager wants to review the Service Plan charges. An account manager wants to track transactions during a specific time window Overview Account information is stored within the Control Center, which is accessible by clicking on your login name and account in the header of your window. To the left, you will see the following options under the Billing section: Credit Card Usage Charges Service Plan Transactions These tabs display information for both the Master account and any sub-accounts you may have created. Credit Card Credit Card on File You MUST enter a credit card and maintain a balance for your main account. Once this is entered, it will be used to: Purchase new numbers Add credit under the Usage Charges screen for discrete charges including Monthly charges Added billing for some applications Added billing for SMS texts, depending on your service plan Manual override charges for call restrictions as defined in the Accounts setup. NOTES: Only the top level account needs to have credit card information associated to it. When an account is first created and set up. A service plan will be added. Billing starts at that date (proration). When the customer enters their card, there will be a charge then. They will also then be at the beginning of each month. The credit card is charged at billing cycles. When an account is first set up, after the service plan has been added, the account will be charged for the remainder of the month (proration). Under the Usage Charges / Subscriptions tab you can set when and how you want to set up payments for your monthly bill -- as an automatic billing via this charge card, charged against your account credit, or by manually going to check your balances. The latter, called “Self Manage” is set as the default. Billing Contact Enter contact information for billing questions. This is used if there is someone specific that we need to speak with regarding billing. Usage Charges This is where you can monitor your account usage, manage credits, enable threshold alerts, enable Auto Recharge, and if a Reseller, manage subscription payment. These will capture any charges outside the fixed monthly charges outlined in the Service Plan, and will draw off the available credit. Per minute charges This tab will display any additional charges that accrue from an account, for example if its trunk limit is exceeded or if there is a 911 call. You can sort this based on your sub-account for billing purposes. Asr Charges This tab will display any Asr (Automatic Speech Recognition, or Speech-to-text) transcriptions that your account has used. These display each event that has been transcribed and sent as an email. Recurring Charges This tab displays recurring charges similar to the Service Plan (below). Rollover Charges This tab displays rollover charges or credits that may have incurred the previous month. Payments Displays your payment history. Managing Credit for Main and Sub Accounts At the top of the Usage Charges screen is the option to add credit to your account. Below is an overview of the options.. Available Credits Make sure you check to see if you are in the Master Account or your sub-account when you add credit. The master account credit is the value that will be used to bill you. The sub-account credit is what we call “fake money.” This is a dollar value directed at the sub account, but will be billed through the main account. All charges appear on the master account. SO if they are using per minute only, it will deduct from the sub account, and from the master account. The “fake money” from the sub account is used as a way to limit and prevent fraud while it passes the actual charges onto the master account. While it appears that there are two charges only one is being deducted actually money NOTES: It is critical you maintain a positive credit balance as there are functions that require accessing this in order to work. This includes: Per-minute, inbound toll-free or international calls when using trunks or not. If no credit is available and they have no trunks, calls will fail. Only toll-free outbound would work. Depending on the amount of trunks and call volume it can be fairly quick to spot or it can take days to realize this. When using trunks, if toll-free international per-minute calls, and inbound toll-free. Add Credits When you select Add Credits you will see a new dialog box with several tabs inside. Manage Credits This provides an option to manually add credits to your Current Balance (shown as “available credit” in your master account). Threshold Alerts This sets a minimum account balance threshold. When the Current Balance falls below this, you will receive an email alert. Set this value based on how many customers you have and how many calls you anticipate will be billed per month. A common setting to start is $20-25.00. Auto Recharge Set this to ensure that your calls are not canceled due to a run-out balance. Enter the threshold amount and the amount of credit you want to add. NOTE: It is important to set the recharge amount so it will cover at least a day, as the charge event occurs once a day only and it would require a manual update Subscriptions On the first of each month, your monthly subscription will renew and you’ll be charged for the upcoming month. Enter how you want to manage these charges. Use Account Credit, with Credit Card Backup Use Credit Card, with Account Credit as Backup Self managed -- manual entry. This is the default setting. Display Filters Below your Credit Balance summary there are filters to view your charges. Per Minute This tab displays the per minute charges incurred based on your settings in SmartPBX for call charges. Mobile Data If you have enabled SMS text messaging and/or mobile phone devices to your account, this tab will display the data (in Megabytes) that you’ve used for the month. Rollovers This reflects any credits or balances carried forward from the previous month. The value is calculated after monthly charges are applied. Start and End fields If you want to filter based on a time window, enter the start and end dates. Filter When you select the filter button you can sort the list by clicking on the field you want to sort. This is how to view different accounts’ billing summaries. Download| Select the download option to save a .csv file to your desktop. This can be imported into a 3rd party billing system or simply to a spreadsheet for your own reporting process. Service Plan This displays a breakdown of the Account’s service plan and amount due at the end of each month. It will stay fixed unless you add a device or a separate service or upgrade your monthly support plan. The download button allows you to download the data into a .csv file. Transactions The transaction summary lists the charges that have been made to the card listed. This can be filtered by date. Related Articles SmartPBX User Guide Advanced Callflow configurations and setup Accounts Manager Wizard User Guide API Reference Docs docs.2600hz.com Call Detail Records - Kazoo API Reference REST API Reference for Kazoo Crossbar API docs.2600hz.com Accounts API - Kazoo API Reference REST API Reference for Kazoo Crossbar API docs.2600hz.com Ledgers - Kazoo API Reference REST API Reference for Kazoo Crossbar API docs.2600hz.com 402 Payment Required - Kazoo API Reference REST API Reference for Kazoo Crossbar API #### View full File
-
 User Story An account manager wants to review account balances for each account and sub account. An account manager wants to review the Service Plan charges. An account manager wants to track transactions during a specific time window Overview Account information is stored within the Control Center, which is accessible by clicking on your login name and account in the header of your window. To the left, you will see the following options under the Billing section: Credit Card Usage Charges Service Plan Transactions These tabs display information for both the Master account and any sub-accounts you may have created. Credit Card Credit Card on File You MUST enter a credit card and maintain a balance for your main account. Once this is entered, it will be used to: Purchase new numbers Add credit under the Usage Charges screen for discrete charges including Monthly charges Added billing for some applications Added billing for SMS texts, depending on your service plan Manual override charges for call restrictions as defined in the Accounts setup. NOTES: Only the top level account needs to have credit card information associated to it. When an account is first created and set up. A service plan will be added. Billing starts at that date (proration). When the customer enters their card, there will be a charge then. They will also then be at the beginning of each month. The credit card is charged at billing cycles. When an account is first set up, after the service plan has been added, the account will be charged for the remainder of the month (proration). Under the Usage Charges / Subscriptions tab you can set when and how you want to set up payments for your monthly bill -- as an automatic billing via this charge card, charged against your account credit, or by manually going to check your balances. The latter, called “Self Manage” is set as the default. Billing Contact Enter contact information for billing questions. This is used if there is someone specific that we need to speak with regarding billing. Usage Charges This is where you can monitor your account usage, manage credits, enable threshold alerts, enable Auto Recharge, and if a Reseller, manage subscription payment. These will capture any charges outside the fixed monthly charges outlined in the Service Plan, and will draw off the available credit. Per minute charges This tab will display any additional charges that accrue from an account, for example if its trunk limit is exceeded or if there is a 911 call. You can sort this based on your sub-account for billing purposes. Asr Charges This tab will display any Asr (Automatic Speech Recognition, or Speech-to-text) transcriptions that your account has used. These display each event that has been transcribed and sent as an email. Recurring Charges This tab displays recurring charges similar to the Service Plan (below). Rollover Charges This tab displays rollover charges or credits that may have incurred the previous month. Payments Displays your payment history. Managing Credit for Main and Sub Accounts At the top of the Usage Charges screen is the option to add credit to your account. Below is an overview of the options.. Available Credits Make sure you check to see if you are in the Master Account or your sub-account when you add credit. The master account credit is the value that will be used to bill you. The sub-account credit is what we call “fake money.” This is a dollar value directed at the sub account, but will be billed through the main account. All charges appear on the master account. SO if they are using per minute only, it will deduct from the sub account, and from the master account. The “fake money” from the sub account is used as a way to limit and prevent fraud while it passes the actual charges onto the master account. While it appears that there are two charges only one is being deducted actually money NOTES: It is critical you maintain a positive credit balance as there are functions that require accessing this in order to work. This includes: Per-minute, inbound toll-free or international calls when using trunks or not. If no credit is available and they have no trunks, calls will fail. Only toll-free outbound would work. Depending on the amount of trunks and call volume it can be fairly quick to spot or it can take days to realize this. When using trunks, if toll-free international per-minute calls, and inbound toll-free. Add Credits When you select Add Credits you will see a new dialog box with several tabs inside. Manage Credits This provides an option to manually add credits to your Current Balance (shown as “available credit” in your master account). Threshold Alerts This sets a minimum account balance threshold. When the Current Balance falls below this, you will receive an email alert. Set this value based on how many customers you have and how many calls you anticipate will be billed per month. A common setting to start is $20-25.00. Auto Recharge Set this to ensure that your calls are not canceled due to a run-out balance. Enter the threshold amount and the amount of credit you want to add. NOTE: It is important to set the recharge amount so it will cover at least a day, as the charge event occurs once a day only and it would require a manual update Subscriptions On the first of each month, your monthly subscription will renew and you’ll be charged for the upcoming month. Enter how you want to manage these charges. Use Account Credit, with Credit Card Backup Use Credit Card, with Account Credit as Backup Self managed -- manual entry. This is the default setting. Display Filters Below your Credit Balance summary there are filters to view your charges. Per Minute This tab displays the per minute charges incurred based on your settings in SmartPBX for call charges. Mobile Data If you have enabled SMS text messaging and/or mobile phone devices to your account, this tab will display the data (in Megabytes) that you’ve used for the month. Rollovers This reflects any credits or balances carried forward from the previous month. The value is calculated after monthly charges are applied. Start and End fields If you want to filter based on a time window, enter the start and end dates. Filter When you select the filter button you can sort the list by clicking on the field you want to sort. This is how to view different accounts’ billing summaries. Download| Select the download option to save a .csv file to your desktop. This can be imported into a 3rd party billing system or simply to a spreadsheet for your own reporting process. Service Plan This displays a breakdown of the Account’s service plan and amount due at the end of each month. It will stay fixed unless you add a device or a separate service or upgrade your monthly support plan. The download button allows you to download the data into a .csv file. Transactions The transaction summary lists the charges that have been made to the card listed. This can be filtered by date. Related Articles SmartPBX User Guide Advanced Callflow configurations and setup Accounts Manager Wizard User Guide API Reference Docs docs.2600hz.com Call Detail Records - Kazoo API Reference REST API Reference for Kazoo Crossbar API docs.2600hz.com Accounts API - Kazoo API Reference REST API Reference for Kazoo Crossbar API docs.2600hz.com Ledgers - Kazoo API Reference REST API Reference for Kazoo Crossbar API docs.2600hz.com 402 Payment Required - Kazoo API Reference REST API Reference for Kazoo Crossbar API ####
 -
User Story An account wants to create an extension that when activated it forwards calls to multiple people in the account, such as a sales or support department. What is a ring Group? A ring group is an extension in your account that is mapped to multiple people. These are often used to ring a specific department in an office, for example a support team or sales team. Within each ring group, you can define a succession of rings, where one extension is tried first, then the call is moved elsewhere, to another extension or to voicemail. Setting up a Ring Group in SmartPBX From your SmartPBX dashboard, Select Groups Select Add Group Give your Group a name Choose a name that helps remind you what the ring group is for. Enter an extension If you don’t know available extensions, click on “Find One”. It will list extensions already added to your account. Choose one that is not already assigned. Drag User names from "Available Users" column to the "Selected Users" column Select Create Group You should now see your newly created group in the list. Ring Group Settings There are a variety of settings you can apply to each ring group. To view them, click on the space under the column header to the right of your group. Members Click on members to further define when a member in the ring group will start to receive the call, and for how long. Change the slider after each member to define this Some considerations: Budget about 6 seconds for each Ring initially, then test. This can vary based on your account settings. The blue Distribute button will automatically sequence each member equally. In this case no ring will be set for more than one user. Big Boss may not want to be hearing the first call, and may be set as a last option. Overlapping sliders mean both extensions will ring for that call The far-right value is the longest a ring will last, past this value it will proceed as you define under the Group Features setting. To change the maximum time, select the value (defaults at 120 sec.) and enter a new value. You can Add a user to the group from this screen by selecting “Add User” at the bottom left. You can Remove a user by selecting the Remove button. SAVE! your changes Extension You can add a second extension here, and/or unassign the existing one and change it. Phone Numbers You can assign a specific phone # to this ring group instead of an extension. You will be giving the option of assigning a spare number already in the system or of purchasing a new number. Make sure you understand your pricing model before you purchase! Group FeaturesThis option provides several options for the ring group extension. Call Recording This will set a localized call recording feature to on. You will assign a path to save it and indicate its format and a time limit. NOTES: Call recording is subject to privacy and HIPAA laws. Please make sure you understand these issues before you enable this. Refer to our guidelines on HIPAA compliance HERE. The newer call recording application is a more robust solution for this, and sets up a 3rd party hosting process that is more secure. We recommend you manage all call recordings through this instead. The user guide for Call Recording is HERE. Ringback Settings Enabling this option allows you to upload a media file to play back to the caller in lieu of rings. Hold music is a common to use here. Next Action This is an important feature that sets a follow-up action for the call if no-one in the ring group can answer it, including sending the call to a voice mailbox. Allow Call-Forward When enabled, this will allow the group’s users to press their device’s “Forward” settings to forward an incoming call to a different extension outside the ring group. If this is disabled, the ring group settings will be the expected behavior. Caller ID Prepend This allows you to add a prefix to the Caller ID, either a number or a Name. An example might be "Sales - xxxx" or "Spanish - xxx" Managing a Ring Group in Callflows We recommend you create your initial Ring Groups in SmartPBX as it has a newer user interface. Administrators with a programming background who use Callflows for advanced call routing can access the same settings within Callflows as shown below, and use the Ring Group as part of a more complex Callflow. The screen below shows the same Ring Group that was created in SmartPBX. You can add and delete users from this screen, however to define the Ring Strategy, Ringback, and number of times to ring members, you will need to add the Ring Group to a callflow and then edit it. Drag the Ring Group Block to the flow area. Additional Resources SmartPBX Step Guide Advanced Callflows Set up Feature Codes HIPPA Compliance Considerations Call Recording User Guide API References docs.2600hz.com Group Object - Kazoo API Reference REST API Reference for Kazoo Crossbar API docs.2600hz.com Ring Group - Kazoo API Reference REST API Reference for Kazoo Crossbar API docs.2600hz.com Page Group - Kazoo API Reference REST API Reference for Kazoo Crossbar API View full File
-
 User Story An account wants to create an extension that when activated it forwards calls to multiple people in the account, such as a sales or support department. What is a ring Group? A ring group is an extension in your account that is mapped to multiple people. These are often used to ring a specific department in an office, for example a support team or sales team. Within each ring group, you can define a succession of rings, where one extension is tried first, then the call is moved elsewhere, to another extension or to voicemail. Setting up a Ring Group in SmartPBX From your SmartPBX dashboard, Select Groups Select Add Group Give your Group a name Choose a name that helps remind you what the ring group is for. Enter an extension If you don’t know available extensions, click on “Find One”. It will list extensions already added to your account. Choose one that is not already assigned. Drag User names from "Available Users" column to the "Selected Users" column Select Create Group You should now see your newly created group in the list. Ring Group Settings There are a variety of settings you can apply to each ring group. To view them, click on the space under the column header to the right of your group. Members Click on members to further define when a member in the ring group will start to receive the call, and for how long. Change the slider after each member to define this Some considerations: Budget about 6 seconds for each Ring initially, then test. This can vary based on your account settings. The blue Distribute button will automatically sequence each member equally. In this case no ring will be set for more than one user. Big Boss may not want to be hearing the first call, and may be set as a last option. Overlapping sliders mean both extensions will ring for that call The far-right value is the longest a ring will last, past this value it will proceed as you define under the Group Features setting. To change the maximum time, select the value (defaults at 120 sec.) and enter a new value. You can Add a user to the group from this screen by selecting “Add User” at the bottom left. You can Remove a user by selecting the Remove button. SAVE! your changes Extension You can add a second extension here, and/or unassign the existing one and change it. Phone Numbers You can assign a specific phone # to this ring group instead of an extension. You will be giving the option of assigning a spare number already in the system or of purchasing a new number. Make sure you understand your pricing model before you purchase! Group FeaturesThis option provides several options for the ring group extension. Call Recording This will set a localized call recording feature to on. You will assign a path to save it and indicate its format and a time limit. NOTES: Call recording is subject to privacy and HIPAA laws. Please make sure you understand these issues before you enable this. Refer to our guidelines on HIPAA compliance HERE. The newer call recording application is a more robust solution for this, and sets up a 3rd party hosting process that is more secure. We recommend you manage all call recordings through this instead. The user guide for Call Recording is HERE. Ringback Settings Enabling this option allows you to upload a media file to play back to the caller in lieu of rings. Hold music is a common to use here. Next Action This is an important feature that sets a follow-up action for the call if no-one in the ring group can answer it, including sending the call to a voice mailbox. Allow Call-Forward When enabled, this will allow the group’s users to press their device’s “Forward” settings to forward an incoming call to a different extension outside the ring group. If this is disabled, the ring group settings will be the expected behavior. Caller ID Prepend This allows you to add a prefix to the Caller ID, either a number or a Name. An example might be "Sales - xxxx" or "Spanish - xxx" Managing a Ring Group in Callflows We recommend you create your initial Ring Groups in SmartPBX as it has a newer user interface. Administrators with a programming background who use Callflows for advanced call routing can access the same settings within Callflows as shown below, and use the Ring Group as part of a more complex Callflow. The screen below shows the same Ring Group that was created in SmartPBX. You can add and delete users from this screen, however to define the Ring Strategy, Ringback, and number of times to ring members, you will need to add the Ring Group to a callflow and then edit it. Drag the Ring Group Block to the flow area. Additional Resources SmartPBX Step Guide Advanced Callflows Set up Feature Codes HIPPA Compliance Considerations Call Recording User Guide API References docs.2600hz.com Group Object - Kazoo API Reference REST API Reference for Kazoo Crossbar API docs.2600hz.com Ring Group - Kazoo API Reference REST API Reference for Kazoo Crossbar API docs.2600hz.com Page Group - Kazoo API Reference REST API Reference for Kazoo Crossbar API
 -
untilHappy Thanksgiving Holiday! Our offices will be closed Thursday and Friday, Nov. 26th and 27th.
-
User Story A user wants to add a device to his/her name in an existing account. Steps This can be achieved in the SmartPBX or Advanced Callflows app. It is recommended you us SmartPBX unlesss you are an administrator, as the Callflows setup may trigger additional reactions in the callflows application. Associate a device with its user in SmartPBX Open Smart PBX Select the User Tab to the left Find the user you want to assign a device to Under the devices column, select the area where devices will display - if there are no devices attached yet you will see the word None. You will be given a choice to: Add from Spare Devices. This will display a list of devices your system admin has already added to the system. Add New Device If you do not see your device listed, you can add it as a new device. Select New Device, and choose the type of device you have. NOTE: each device type also will show “Advanced” Settings, unique to that device’s characteristics.characteristics. Make sure to review those settings in addition before you select the “Create Device” button. Common settings include: Allow use of the device’s voicemail Keep (or not) Original Caller ID Hide from Contact List The screen shot below shows the Advanced settings for adding a Smartphone. SAVE your new device! Once it is added, you will see its icon in the devices area next to your name. Associate a device with its user in Callflows We recommend you assign devices in SmartPBX as it has a newer user interface. Administrators with a programming background who use Callflows for advanced call routing can access the same settings within Callflows as shown below. Select the user from your dropdown Once you assign the correct user, make sure to check the “enabled” checkbox! Review the additional settings tabs for both WiFi and Call Restrictions. Make sure an admin helps with these details. Related Articles SmartPBX -- Adding a User SmartPBX Step Guide Advanced Callflows Set up Feature Codes API Reference Docs docs.2600hz.com Devices - Kazoo API Reference REST API Reference for Kazoo Crossbar API docs.2600hz.com Users - Kazoo API Reference REST API Reference for Kazoo Crossbar API #### View full File
-
 User Story A user wants to add a device to his/her name in an existing account. Steps This can be achieved in the SmartPBX or Advanced Callflows app. It is recommended you us SmartPBX unlesss you are an administrator, as the Callflows setup may trigger additional reactions in the callflows application. Associate a device with its user in SmartPBX Open Smart PBX Select the User Tab to the left Find the user you want to assign a device to Under the devices column, select the area where devices will display - if there are no devices attached yet you will see the word None. You will be given a choice to: Add from Spare Devices. This will display a list of devices your system admin has already added to the system. Add New Device If you do not see your device listed, you can add it as a new device. Select New Device, and choose the type of device you have. NOTE: each device type also will show “Advanced” Settings, unique to that device’s characteristics.characteristics. Make sure to review those settings in addition before you select the “Create Device” button. Common settings include: Allow use of the device’s voicemail Keep (or not) Original Caller ID Hide from Contact List The screen shot below shows the Advanced settings for adding a Smartphone. SAVE your new device! Once it is added, you will see its icon in the devices area next to your name. Associate a device with its user in Callflows We recommend you assign devices in SmartPBX as it has a newer user interface. Administrators with a programming background who use Callflows for advanced call routing can access the same settings within Callflows as shown below. Select the user from your dropdown Once you assign the correct user, make sure to check the “enabled” checkbox! Review the additional settings tabs for both WiFi and Call Restrictions. Make sure an admin helps with these details. Related Articles SmartPBX -- Adding a User SmartPBX Step Guide Advanced Callflows Set up Feature Codes API Reference Docs docs.2600hz.com Devices - Kazoo API Reference REST API Reference for Kazoo Crossbar API docs.2600hz.com Users - Kazoo API Reference REST API Reference for Kazoo Crossbar API ####
 -
What is this? While KAZOO does not yet support SMS messages directly to your account, there is a solution that coverts incoming SMS messages to a user’s email. This is available using zaps, an application connection tool developed by Zapier, and KAZOO’s Webhooks application. NOTES: This process is using Zapier tools that were available in late 2020. The Zapier “zaps” and user interface steps may change without our knowledge. This outlines steps to convert incoming texts only to an email in your account. Outgoing text to email is a more involved process with multiple Zap configurations. Before you start Make sure your numbers have SMS enabled. Go to SmartPBX and select the Numbers tab Find your number and look for the SMS icon. If not displaying select settings gear, drop down SMS and enable NOTE: Enabling SMS will incur additional charges to your account. Make sure you confirm with your administrator this is approved. Set up a Zapier Account Go to www.zapier.com and create a Zapier account Keep your credentials handy! Add a Webhook for Zapier to connect with Open the Webhooks Application from your KAZOO dashboard, . If it is not displayed under your Apps, you may need to enable it from the App Exchange. Ask an adMinistrator to help with this. If this is your first Webhook, your screen will look like this. Select New Webhook. Assign a Name and a Trigger Add a Hook name you will recognize. Select SMS as your Trigger Event. Enter GET as your request type. The next step is to set up your zaplet in Zapier. Log in to your Zapier account In a new window Select “Make a Zap” Choose Webhooks by Zapier as your trigger. Select “Catch Hook” as your Trigger Event Click on ContinueThis will generate a Custom Webhook URL to paste into the KAZOO Webhooks application. Select Copy to copy the URL Return to the KAZOO Webhooks window and paste the URL into the field shown below. Select the green Create Webhook button at the bottom of the page. The Webhooks app should then display your webhook in its list, and should also show it toggled on. NOTE: The icons to the right of the toggle allow you to Edit the settings View your webhook request log - a list of attempts on the webhook. (this is useful for debugging). Delete your webhook Return to Zapier to Test your Webhook Once you have your URL saved in the KAZOO webhooks side, return to the Zapier window and select Continue Send a text message to your newly configured KAZOO SMA number Look for a confirmation in Zapier something like below Next, define an ACTION that you want Zapier to take once it has found the hook. You can choose any of the actions Zapier provides; for this email example however, choose email, and select “Send an Outbound email.” Here you can enter the email you want to send it to, and also a variety of other default fields. In each field add a data source from the drop down menu that was captured during your test. If you skipped that test, you will not see options If your test worked properly you can add any field, or more than one field if you separate them by a colon. Below is an example showing the from: , to: and subject: field applied And an example showing fields filled in: Once you have filled in all the fields you want, select Test & Continue at the bottom of the page.You should see a sample email generated based on your entries. If all looks correct, select Turn on ZAP. Make a final test from a phone to SMS phone numberNOTE: Make sure your JUNK mail filter will recognize your “From:” entry in your zaplet!If you don’t see an email in your inbox, check your Junk mail filter. View full File
-

VOTE for our next Product Group Topics and join us Nov.19th
Emily R replied to Emily R's topic in Tips and Feedback
LAST CHANCE !!! to vote for topics for TOMORROW.